Embed Size (px)
Citation preview
Disaster Planning And
Recovery
MaddenCo Inc. Revised August 2003
Copyright © 2002 by MaddenCo, Inc
All rights reserved.

Please understand that MaddenCo has expended substantial sums in developing and maintaining its software, systems and related materials, and as a result, it has and will continue to have substantial proprietary interest and valuable trade secrets therein. Also understand that MaddenCo's software, systems, related materials and the "ideas" represented by software, as well as the physical materials, are valuable trade secrets and are strictly confidential material, and important, and that its confidentiality gravely affects the successful conduct of the business of MaddenCo.
2

Table of Contents
Disaster Preparedness .................................................................................... 5 Insurance Coverage..................................................................................... 5 Disaster Recovery Site ................................................................................. 5 Hardware Requirements ............................................................................... 6 Library and Data backups ............................................................................. 6 Critical Document Storage ............................................................................ 7 Develop a Disaster Recovery Plan .................................................................. 7 Create a Disaster Recovery Kit ...................................................................... 7
Disaster Recovery Plan ................................................................................... 8 Recognize and Declare Disaster..................................................................... 8 Assess Extent of the Disaster ........................................................................ 8 Notify Critical Contacts................................................................................. 8
Employee Contact List ............................................................................... 9 Critical Contact List..................................................................................10
Establish Recovery Center ...........................................................................11 Recovery at Main Office for Extended Power Outage .....................................11 Recovery at Disaster Recovery Site Due to Loss of Building ...........................12
Maddenco Disaster Recovery Services ..............................................................18 Top Ten Tips for Business Contingency Planning ................................................19 Is Your AS/400 Secure? .................................................................................20
Store Access ...............................................................................................20 System Access.............................................................................................25 Tire Dealer Access ........................................................................................26 Accounts Payable Access................................................................................32 General Ledger Access...................................................................................34 Explicit Access Required .................................................................................35 Menu System ..............................................................................................36 Is your AS/400 secure from the Internet? ......................................................40
3

4

The potential for disaster lurks around every corner – encompassing the relatively minor inconveniences of an extended power failure to the major impact of a fire that destroys your place of business. Coping with disasters falls into two phases: preparing for a potential disaster and recovering once an actual disaster strikes.
Disaster Preparedness This document identifies sound business practices necessary to insure a timely recovery should a disaster befall your company. Every aspect of your day-to-day operations may someday require total reconstruction. To make that task possible, the following critical practices should define your disaster preparedness action plan: Maintenance of adequate insurance coverages and limits Identification of a disaster recovery site Identification of necessary hardware resources Maintenance of library and data saves from the A/S 400 and from individual PC’s Storage of critical documents Creation and maintenance of a Disaster Recovery Plan and a Disaster Recovery Kit Remember to solicit ideas from employees in all departments to gain a well-rounded picture of all your operational requirements. Several brainstorming meetings can help generate a better list of considerations. Insurance Coverage Adequate business insurance should be maintained. Additional expenses to reestablish the physical plant as well as expenses related to loss of revenue should be addressed. Now is a good time to review your coverage with your insurance agent. Be aware of any policy limitations that could affect recovery plans. Make sure contact information is up to date. Disaster Recovery Site If your main office were destroyed, where would you set up an interim site until you can again occupy your former location or obtain a new location? Perhaps you know another business with which you could establish a reciprocal agreement to provide temporary accommodations. If you quickly need to establish an office, obtaining permission from such a source in advance and being assured adequate telephone and electrical service is available can help reduce stress at a time when you least need it. This disaster site arrangement should be reconfirmed annually.
5
Hardware Requirements Take an inventory of all the computer related equipment at your business. Extend this list to include your shop equipment and office furniture. This information will aid in documenting your losses for insurance purposes and serve as a list from which to order replacement equipment. Record the source from which you obtained this equipment along with contacts and telephone numbers. Consider the purchase of an electrical generator to maintain normal office operations during extended power failures. An electrical generator with output sufficient to power an A/S 400, two workstations, the phone server and a few lights could be stored in your warehouse. Calculate the number of devices and their power requirements along with lighting needs to determine the correct generator output. Modifications must be made to your electrical supply to install a crossover switch for use with the generator. A list of power requirements for various devices follows: WATTS X QTY = Total WATTS AS/400 1420 PC + Monitor 200 + 208 408 X 2 808 Telephone Server 50 Overhead lights 40 X 10x4 1600 around 4000 Library and Data backups System saves should be performed on a regular interval. If you are applying new Maddenco releases or reloads, system saves should be done after these applies. These critical tapes should be stored offsite in a safe location. With every nightly update, your data library is saved. Again, this information should be secured in a safe offsite location. While disk protection schemes such as mirroring and RAID 5 can protect your system data in the event of a disk failure, they will do nothing for you if your AS/400 is destroyed in a fire. In addition to the system saves and nightly saves, copies of other software and data may also be needed. If your business uses PC’s, backups of critical data should also be stored offsite. An inventory of the types of PC software used in your daily activities should be made and arrangements made to store backup copies offsite. A partial list of PC software might include: Windows 95 or better Microsoft Office 2000 Netscape Virus protection Client Access
6

Critical Document Storage Your business maintains large amount of paperwork relating to customers, banking relationships, vendor agreements and much more. Take some time to determine what critical documents would be necessary to carry on post-disaster business. If you have important contracts, tax documents, etc., consider copying these and storing the originals offsite. Other critical information includes contact lists of employees and vendors. Develop a Disaster Recovery Plan Once the above information has been assembled, it’s time to create a Disaster Recovery Plan. This document will guide every step you will take if it becomes necessary to rebuild your office. Create a Disaster Recovery Kit A Disaster Recovery Kit is another critical component necessary to your recovery plan. Think of your bare bones requirements to establish a point of operation. The Disaster Recovery Kit should be maintained at an offsite, secure location. The kit should contain: Lists of contacts and phone numbers for employees, vendors, customers,
Maddenco technical support, technical support for other equipment
Copies of the latest back ups from the nightly update and from the system saves
The latest apply tapes of Maddenco software Copies of all PC software used by your employees including Client Access and any backups of data Single line phone
7

Disaster Recovery Plan The purpose of this section is to provide a blueprint for reconstructing normal business operations in the event of a catastrophic disaster in which your operations center is destroyed or seriously impaired. Several copies of the document should be maintained offsite, including a copy stored in a Disaster Recovery Kit. A Disaster Recovery Plan Administrator should be appointed, with the responsibility of maintaining and updating the Disaster Recovery Plan at regular intervals. The following sections highlight critical data and recovery steps needed to achieve your goal of operational integrity. Recognize and Declare Disaster The person discovering a potentially serious condition should assess the extent of the situation and notify Management. Determine the person who will be responsible for declaring a disaster and enacting the Recovery Plan. Identify an alternate person, should your primary person be unavailable. This person will be responsible for accessing the Disaster Recovery Kit and issuing instructions to call employees in to begin the recovery process. A list of current employee telephone numbers should be maintained in the Employee Contact section. Assess Extent of the Disaster As soon as a disaster situation is recognized, it’s scope and severity must be determined. If the problem is a general power failure, some estimate of the expected restoration of normal power supply should be obtained from your local power company. The current service interruption telephone contact number should be maintained in the Critical Contacts List. If your building is inaccessible, the Disaster Recovery Center plan should be implemented to immediately establish your base of operations.
Notify Critical Contacts The following lists should contain critical contact numbers for notifying your employees, customers, vendors and insurance carrier of your situation and for recovery related communications.
8

Employee Contact List Employee Name
Home Phone
Cell Phone
Address
9

Critical Contact List
Answering Service If you use an answering service, advise them of the problem. Record what number to call to and dictate a disaster announcement. An example: World’s Best Tires is experiencing a problem due to [insert disaster type] at their office. Temporary offices can be contacted at [answering service or disaster recovery site telephone number]. Please bear with us as we work to restore full office functions.
Phone Service Determine how to forward local incoming calls. This requires information about your local carrier. Record contact numbers and names and their hours of operation. Do you have incoming long distance and 800 calls? Determine this carrier, contact name and number. Explain the situation to all phone service providers. Ask that the phones be forwarded to another location. Telephone calls might be forwarded to an answering service immediately, then later forwarded to the Recovery Center once phone service has been established there. Someone should be monitoring answering service calls and relaying messages to cell phone numbers as needed.
Vendors MaddenCo MaddenCo supplies your AS/400 equipment. Record your sales representative’s name. Maddenco can be contacted at (812) 474-6245. After hours help is available, if needed.
Power Company Record the number to report a power outage. If you encounter a recorded message, listen for information regarding the duration of a major power outage.
Insurance Carrier As soon as practical you should contact your business insurance agent. Record your agents name, contact number and the company that underwrites your coverage. Also record your policy number and coverages.
10

Establish Recovery Center Recovery at Main Office for Extended Power Outage
Connect to Power Source If your disaster only consists of an extended power outage, you can reestablish a limited power grid through an electrical generator. You might operate the AS/400, a couple of workstations or PCs, a modem, telephones and several lights. In no event should total power consumption exceed the generator output. If the output wattage of the generator were exceeded, you would create your own local brownout. Be conservative with electricity. Turn off light switch and all devices. Connect generator to transfer switch at breaker panel. Confirm generator is in operating condition by checking fuel level and starting. Obtain additional storable fuel in spare gasoline containers.
11

Recovery at Disaster Recovery Site Due to Loss of Building List the particulars of your designated Disaster Recovery Site. If the disaster state is expected to be of short duration, with only the need for minor repairs before the building can once again be occupied, many of the following tasks will not be performed. Management will make task assignments after assessing the situation. Many of the following tasks can be performed concurrently.
Order Telephone Service If your base of operations must be permanently relocated, you will need to reestablish your communications links once a new site is secured.
Voice lines
Local Telephone Service List all particulars regarding your current local telephone service. You will need a contact person and number and hours of operation. Determine your current service: The number of voice lines and their numbers The number of voice/modem lines and their numbers The fax line number
Long Distance and 800 Telephone Service Determine your long distance and 800 number service provider. Record the name of your account representative, their contact number and hours of operation. Record your current service numbers. Data Line If you have an ISDN line, record the providers name and contact number. Record the number of your ISDN line.
Forward Phones to Interim Location After you are back in your building or are located in an interim site, phones should be forwarded to that location. See the information in the Contact List, Phone Service section above for forwarding the following lines: Voice Fax Toll Free Data line
12

Establish Business Center Determine and record the minimum requirements for a business center. This might include: 2 telephones (single line phones or multi-line phone server and two phones, if available) Manual call forms (located in the Disaster Recovery Kit) 2 workstations or 2 PC’s
Purchase PC equipment if none is available. See the Order Replacement Equipment section below for minimum system requirements.
Configure the PC’s by assigning IP addresses, mapping the network drives and loading Client Access.
See the sections below, Configure and Attach Available Devices and PC Software for details on setting up and loading these PC’s.
For a PC network, these PC’s will be connected to a telephone line with a router. Assemble Available Hardware Resources Any salvageable hardware should be used to establish a bare bones internal network. Most of these steps are dependent upon having equipment available. See the Order Replacement Equipment section below for instructions on ordering missing components.
Order Replacement Equipment The replacement AS/400 should be ordered from Maddenco as soon as it is determined a replacement is necessary. External Networking Equipment If you are using a PC network you will need a router. Contact Maddenco for this equipment. Internal Networking Equipment You will need a hub or switch to network your PCs. Hardware Determine the number of workstations or PCs you will need. Workstations can be obtained from Maddenco. Determine the minimum system requirements for your PCs. They must have a LAN card to attach to your internal network.
13

Uninterruptible Power Supply Determine the load required for an A/S 400 and a minimum of one workstation or PC and monitor. Printers Determine what printers you currently have. Record their brands and model numbers. Modems Record the number, brands and models of your modems. Telephone System Record the name and model of your current telephone system. Locate a local supplier and determine how long it would take to obtain a replacement. Count the number of phones needed. Copier Record the make and model of your copier(s). Fax Machine Record the make and model of your fax machine. Postage Machine Record the make and model of your postage machine, if you have one. Office furniture, filing cabinets Record the number of desks, chairs and filing cabinets you currently have. Record the names of several suppliers of office equipment in your area. Radio Equipment Record the brand and model of any two way radio equipment you have. Also record the vendor name and telephone number.
14
Restore backup copies of software and data
A/S 400 Software Restore to replacement AS/400
If you are replacing your AS/400 with a new processor on site, you will use the restore functions found on the IBM Save menu: type in GO RESTORE and enter. With the system save tape inserted, take option 21 - Restore System and User Data.
PC Software Determine the PC software used and which PC’s need what software. Follow the installation instructions accompanying the software. Backup copies of software should be located in the Disaster Recovery Kit. All PCs Windows 95 or better Microsoft Office 2000 Netscape or other browse Virus protection Client Access
Purchase missing PC software Obtain copies of any needed software from a local supplier, such as Best Buy.
Establish Internal Network
Run cable Cat 5 cable can be obtained locally from any electrical supply house. Record the name and number of an electrician you have used to run wiring.
Configure and attach available workstations, PC’s, router Once you have your replacement A/S 400, it’s time to attach the devices. If you are using workstations, addresses must be set and printer sessions configured.
15
PC Configuration PCs must be loaded with Client Access, and A/S 400 sessions configured for accessing the computer as well as for printers. PCs should be attached to the hub or switch with LAN cards. Any network drives should be mapped.
Establish External Network If using a PC network, configure the router and attach to the ISDN line. If ISDN is not available, use a dial up router on a regular phone line.
Obtain software and data The most recent nightly saves should be retrieved from the Disaster Recovery Kit. System saves are also stored in the Disaster Recovery Kit along with copies of PC software. Obtain supplies and forms
A/P and Payroll checks Contract your printer to determine now long it would take to obtain A/P checks and other forms. If checks would not be available, consider storing checks in the Disaster Recovery Kit.
Payroll forms Obtain W4’s, W2’s.
Office supplies Obtain pens, copier/printer paper, Post Its, calendars, etc. from a local supplier.
16

Notify contact list
Clients Store a detailed client list in the Disaster Recovery Kit.
Vendors Store a detailed vendor list in the Disaster Recovery Kit. U.S. Post Office Financial contacts, such as banks, retirement funds. Healthcare provider Life and disability insurance providers
17

Maddenco Disaster Recovery Services In addition to establishing your own recovery plan, you might consider taking advantage of the Maddenco Disaster Recovery Services. Maddenco has developed a business continuity plan for our Tire System users. When a contract is signed, we will configure workstation and printer descriptions at a remote A/S 400, to be used by your local workstations or PC’s running Tire System software. Maddenco provides user ids and adequate disk space to accommodate your data files. If a disaster strikes, you would overnight your last nightly save to be loaded on this remote system. As soon as you have operating workstations, PC’s and printers set up at your recovery site, you can be up and operating as usual, with your own data. If you are interested in more details on this plan, please contact a Marketing Representative.
18

Top Ten Tips for Business Contingency Planning by Wayne Madden
1. Confirm that your host site supports the type of tape drive needed to load
your network operating system and data. You can’t put a round tape in a square hole!
2. Publicize your “plan of action.” If your customers know you have a recovery
plan that will let you continue to provide goods or services, they will not stray too far from you.
3. Because you may not be able to get a regular purchase order (especially if
the purchasing department is computerized), determine how you will procure essential goods and services during recovery. In addition to equipment and furniture purchase or lease (insurance coverage), you will need a petty-cash supply for your alternative location(s), and the company should be prepared to cover expenses (such as airline tickets, hotels, rental cars, meals) associated with traveling to those alternative sites. Normally, employees don’t want to (or can’t) pay such expenses out of their own pockets.
4. Put your technology recovery plans in writing and make them detailed enough
for an outside consultant to understand. Key company personnel familiar with the plans may not be available after a disaster.
5. If you have an off-site storage vendor, make sure it provides 24-hour access. 6. If you’ve been given any software licensing keys (i.e., special codes to unlock
products), store them in a safe place or record them in your recovery manual in case you must reload the licensed product from the original distribution tapes. Also be ready to contact the vendor for any codes tied to the CPU serial number.
7. If your company relies on in-bound customer calls for sales and service, plan
ahead for automatic rerouting of your existing phone number(s) so you can provide uninterrupted service instead of a busy signal or a “This number is temporarily out of service” message. Do the same for your fax number if you rely on incoming fax orders and requests.
8. Write a prepared statement for the press. Waiting until after a disaster to
determine what you will say to the public could result in a disjointed or overwrought message.
9. If you rely on “demand” printing of essential business documents (especially
forms), make sure the printers at your host site can support these needs or that you can purchase such printers quickly.
10. Test your plan before disaster strikes and then test it again. Any contingency
plan you have not tested will not work – just wait and see!
19

Is Your AS/400 Secure? Are you at a risk with your internal users? Can your users get to a command line? Do they have authority to delete files or libraries? Do they have access to other stores data? Can they run purges? The following section will go through the details on setting up store and menu option access, eliminating the command line and other features that can help secure your AS/400. Store Access
All stores must exist in the store file before they can be accessed.
20

Also only ‘Active’ stores can be accessed. Reports can be printed for inactive stores if control record RPALISTR is set to Y.
21

You can only access a store if you have an entry in the store access file for that store. Entries in this file can be for a User ID or a Workstation ID. If your User ID or the terminal you are working from has an entry for a store then you can access that store. Further, if there is only one store listed for the terminal you work from and your User ID, then the store input panel will not be presented and you will automatically be set to use that one store. If more than one store is available to you or the terminal you are working from then a panel asking for which store you want to access will be presented. You or your terminal must have access to the store you input.
22

You must also have an entry in the file to access a region.
23

Typically all terminals at a store are given access to that store; then only users needing access to more that one store need entries in the Store Access file.
24

System Access Each system has access control records. These records determine what functions can be performed. These records are by user.
The System Access Control Records allow access to the following functions: System Menu – allows access to the options from the System Menu. Menu setup – allows access to User Menu Maintenance and assigning
users to menus. Auto-Report setup – allows access to Auto-Report Maintenance. Store maintenance – allows access to Store Maintenance. Store access maintenance – allows access to Store Access Maintenance. System Control File maintenance -- allows access to System Control File
Maintenance. Maintenance log – allows access to the Maintenance log. Error log – allows access to the Error Log. Special Authority – allows access to special functions. For example:
system only control records will display during System Control File Maintenance if Special Authority is set to Y.
25

Tire Dealer Access
Tire Dealer Access Control Records allow access to the following functions: Purges – allow access to execute purges in the Tire System. Updates -- allows the user to run updates. Price Generations -- allows access to Price Generations. Store Duplication – allow access to store duplication. EOM/EOY – allows access to the End of Month and End of Year function. Set Min/Max – allows access to set product minimum and maximum. Zero Inventory – allows access to the zero product inventory function.
(The Inventory Physical Count Menu has replaced this function.) Initial Payments – allows access to input Initial Payments for revolving
charge. Set Product fields – allows access to the Set Product Fields function. Employee Time Clock – allows access to the time clock function. Time Clock Edit – allows access to edit time clock entries and print the
Time Clock Edit Report. Time Clock History Rpt – allows access to Time Clock History Reports.
26

Special Authority –allows access to special functions. For example most options on the Miscellaneous Tire Options require Special Authority to access them.
Authorize credit – allows access to credit authorization. Price Authorization – allows access to price authorization.
Create P.O. in POS – allows the user the authority to create Purchase Orders while in POS. (This function is no longer available.)
Cash Receipts – allows access to Cash receipts input. Reset In Use – allows the user to reset work orders and invoices In Use
Status from ‘in use’ to ‘not in use’. Sales Reports – allows access to sales reports and invoice history reports. Inventory Reports – allows access to inventory reports. Spif maintenance – allows access to Spif Maintenance. Product maintenance – allows access to Product Maintenance. Customer maintenance – allows access to Customer Maintenance. Salesman – allows access to Salesman Maintenance. Control – allows access to Control File Maintenance. Pricing – allows access to Pricing Maintenance. Discount – allows access to Discount Maintenance. Contract – allows access to Contract Maintenance. Product class – allows access to Product Class Maintenance. Salesman’s Password – allows access to Salesman’s Password
Maintenance. Commission Plan – This field is no longer applicable. See Incentives,
below. Store Product – allows access to Store Product Maintenance. Store
Product Maintenance Sales Tax – allows access to Sales Tax Maintenance. Customer Memo – allows access to Customer Memo Maintenance. Limited Prod Mnt Setup – allows access to Limited Product Maintenance
Setup.
27

The next Tire Dealer Access Control Record allow access to the following functions: Retread System – allow access to the retread system in general. Retread Inquiries -- allows access to retread inquiries. Retread Reports -- allows access to retread reports. Retread W/O input – allow access to retread work order input.
Retread maintenance – allows access to retread maintenance functions. Retread input – allows access to retread input functions. IE shop floor
input. Retread update – allows the user to update the retread system. Due Date Change – allows the user to change the due date of A/R
invoices (via Customer Balance Inquiry). Vehicle Maintenance – allows access to vehicle maintenance option (on
the Merchandising Menu). Store Totals Inq – allows access to Store Totals Inquiry. Chng Closed Invoice – allows the user to modify closed tickets. Void Invoices – allows the user to void closed invoices. Credit Management – allows access to credit management functions. Inventory Adjustmnt – allows the user to create (input) inventory
adjustments. Salesman Memo – allows access to the Salesman Memo System.
28

Balance Cash Drawer – allows the user to balance the POS cash drawer. Set Price for SerNo – allows access to the set price function on the Serial
Number Menu (Work with Zero Price Serial No). Run Conversions – allows the user to run conversion programs. (Only
your system operator or installer usually does this.) Run Invoice Edit – allows access to the Invoice Edit Reports in POS. Create PO from OE – allows the user to create purchase orders while in
Order Entry. This function is usually used when running a virtual warehouse.
Delete Products – allows the user to deleted products (this refers to physically deleting the product, as opposed to deactivating a product).
Size Code Maint – allows access to product size code maintenance. Shipping Feedback – allows the user to perform shipping feedback in the
warehouse order entry system. A/R Adjustments – allows the user to create (input) A/R adjustments. Revolving Charge – allows access to the revolving charge system. 10 Col Report Maint – allows access to Sales Ten-Column Report Format
Maintenance. Incentives – allows access to the incentives sales report menu, including
access to Commission Plan Maintenance. Inter-Company Order – allows access to Inter-Company Order Generation
option of Order Entry. Merchandising – allows access to the Merchandising Menu. EDI Functions – allows access to the EDI menu as well as EDI functions,
for example the ‘Create a Receiver from an ASN’ functions in Receiving.
Purchase Orders – allows access to the Purchase Order Menu. Order Entry – allows access to the Order Entry System. Credit Input in POS – allows the user to input credits in POS. Reset A/R History – allows the user to reset A/R Open Invoice History
record sets from ‘History’ to ‘Current’ in the Customer Balance Inquiry option.
Upd Contract I Hist – allows the user to update the Contract Flag in Invoice History by Contract Number Inquiry.
Upd Adj Claim I Hist – allows the user to update the Adjustment Flag in Invoice Historty by Claim Number Inquiry.
29

The, presently, last Tire Dealer Access Control Record allow access to the following functions: Del ASN/Vndr Invc– allow the user to delete vendors’ invoices/ASN’s,
Advanced Shipping Notifications. Download Files -- allows the user to access the Download menu. (This
will not have any effect on a user manually downloading, or uploading, to/from the system.)
Product Change -- allows access to the Product Change options. Prod Class Change – allow access to the Product Class Change options.
NAB Update – allows access to the NAB update. Tender Type Maint – allows access to Tender Maintenance. Internet Menu Maint – allows access to the Internet User Menu
Maintenance option. FTP Control Mnt – allows access to the FTP Control Maintenance option.
(FTP is often used with the Data Exchange Module.) Limited O/E Maint – allows access to Limited Order Entry Maintenance
option. This option is used to assign user’s authority to input orders into your Order Entry System. The users are usually either customers or retail stores.
Vehicle merge – allows users to merge vehicle history in Point of Sale.
30

Set Cust Fields – allows access to the Set Customer Fields option. Edit documents – allows the user to create and edit documents. Access to documents is usually available in the operations window. If the
user does not have access to edit documents he can still display and print documents.
Store Number Change – allows access to the Store Number Change options.
Edit Memos – Allows the user to edit memos throughout the system that were not created by the user. Edit Startup Memo – Allows the user to change the Startup Memo
Reverse/Copy Invc – Allow the user to reverse or copy Invoices from Invoice History into Point of Sale or Order Entry. Edit Reject Invc – Allows the user to edit a rejected invoice from vendor in
Point of Sale Void Reject Invc – Allows the user to void a rejected invoice from a
vendor in Point of Sale. Edit P.O. Sent/Vndr – This allows you to edit a Purchase Order that has
been sent to a vendor.(We strongly recommend you set this to N for everyone)
Edit Failed ASNs – Allows the user to take the option to work with failed ASN’s from within Receiving.
Salesman Number Change - Allows the user to run Salesman Change.
31

Accounts Payable Access
The Accounts Payable Access Control Records allow access to the following functions: Update – allows access the update options of Accounts Payable. Purges – allows access to Accounts Payable purges. EOM/EOY – allows access to Accounts Payable End of Month and End of
Year. Input – allows access to Accounts Payable inputs.
Special Authority –allows access to special functions. For example most options on the Miscellaneous Accounts Payable Options require Special Authority to access them.
Change Invoices -- allows access to the change invoice number option in A/P Invoice Input.
Invc/Check Selection – allows access to invoice selection for payment. Selection Recovery – allows access to the invoice selection recovery
menu. Control – allows access to control file maintenance. Vendor – allows access to vendor maintenance. G/L – allows access to General Ledger maintenance. Terms Code – allows access to terms code maintenance.
32

1099 Codes -- allows access to 1099 code maintenance. Save – allows access to the save option on the A/P menu. (This option no
longer exists.) Restore – allows access to the restore option on the A/P menu. (This
option no longer exists.) All other Rpts – allows access to all A/P reports, but the Vendor List,
Labels, One Line Vendor List, and Monthly G/L Distribution Report. Vnd Lst/Label/One-Ln – allows access to Vendor List, Labels, and One
Line Vendor List. Monthly G/L distr – allows access to the Monthly G/L Distribution Report. Other Options Menu -- allows access to the Other Options Menus. Check Reconciliation – allows access to the Check Reconciliation Menu.
33
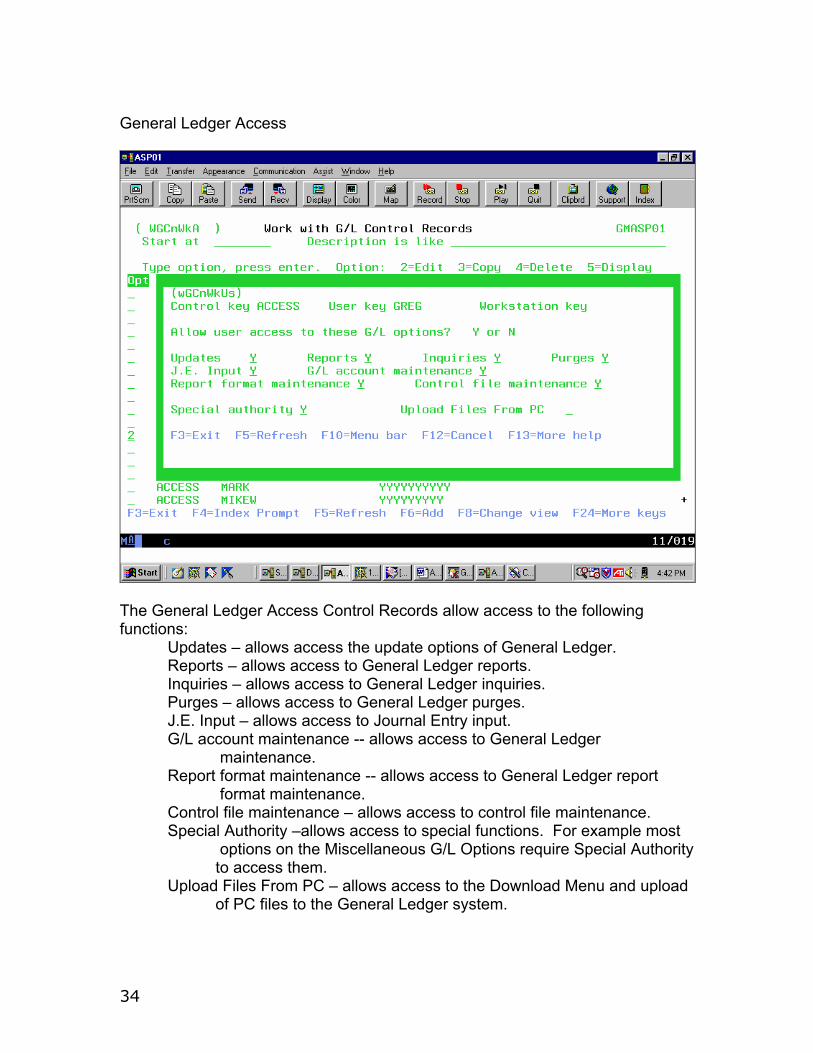
General Ledger Access
The General Ledger Access Control Records allow access to the following functions: Updates – allows access the update options of General Ledger. Reports – allows access to General Ledger reports. Inquiries – allows access to General Ledger inquiries. Purges – allows access to General Ledger purges. J.E. Input – allows access to Journal Entry input. G/L account maintenance -- allows access to General Ledger
maintenance. Report format maintenance -- allows access to General Ledger report
format maintenance. Control file maintenance – allows access to control file maintenance. Special Authority –allows access to special functions. For example most
options on the Miscellaneous G/L Options require Special Authority to access them.
Upload Files From PC – allows access to the Download Menu and upload of PC files to the General Ledger system.
34

Explicit Access Required
In each system there exists control record ACCESEXP. If this control record is set to Y, then each user must have the appropriate Access Control Record field set to Y for the user to have access to the function. If this control record is not set to Y, then each user will have access for each function denied only if the appropriate field is set to N. Note: Make certain at least one user has access to Control File Maintenance before you set this control record to Y. Else you will not be able to get back into Control File Maintenance. Also, if you do not set ACCESEXP to a Y, then a user, who does not have an ACCESS key setup, has access to everything.
35

Menu System
The System Menu has a function to create your own menus. This is an excellent tool to insure your users access only the functions you want them to.
36

Each user can be assigned to a specific menu. Note: there is a default menu for users not assigned to a menu.
37

The following System Control records should be set if you intend to use the User Menu System to its fullest. Control record STARTPGM can be set so that a user can execute a program at sign on time. Control record USEMENUS must be set to P to execute the program set in control record STARTPGM. Both control records can be set by user and/or system wide. (See above) If System Control record USEMENUS is set to Y, then the appropriate user menu will be presented at sign on time. Set this record to P to execute the program contained in control record STARTPGM instead of the user menu program. Both control records can be set by user and/or system wide. If System Control record USEMEOFF is set to Y, then the user will be signed off the system when they exit their assigned menu. This control record can be set by user and/or system wide. All user profiles should execute PSTARTUP as the initial program to call. This program will execute all appropriate programs and menus as set by the above control records. Also the Tire Dealer System sign on message will display if one exist.
38

Further if the “Limit capabilities” parameter of a user’s profile is set to *YES, then the user will not be allowed to input commands on a command line. Thus the user will only be able to perform functions assigned to him by his user menu and the operations window. You define the contents of both the user menu and operations window. If your users have a pc attached to the AS/400 then they have the capability to download any files that are located on your AS/400. You should review your IBM manuals for securing operations navigator for details on denying access to these functions. More information regarding user menus can be found in the System Menu Document. More information regarding system security can be found in the System Operator Document and specific IBM manuals. Note: Security discussions in this document and in the above mentioned documents are regarding application security. IBM ‘Redbooks’ (and/or other security manuals) should be consulted regarding securing your system from outside intrusion and programmable terminals…i.e. PCs.
39

40
Is your AS/400 secure from the Internet? Are you running client access on your PC? Can your PC access the Internet? If so, your AS/400 is at a security risk as well as your PC. You can protect your AS/400 by purchasing a firewall. CISCO Pix 506 will be adequate unless you are running multiple VPN’s. There is a vendor session available that will discuss your security needs. The company is Automated Office Solutions and they can assist with your firewall specifications. It is strongly recommended that you purchase Virus protection software for your PC. Norton and McAfee both sell software and it is relatively inexpensive. This software helps detect viruses as they come in to your system. It is also wise to never open an email if your are not familiar with the sender or the attachment and never ever execute an attachment that ends in .exe.


![Disaster Recovery Center (Disaster Assistance … Library/Disaster Recovery Center...Disaster Recovery Center (Disaster Assistance Center) Standard Operating Guide [Appendix to: ]](https://img.pdfslide.net/doc/110x75/5b0334ba7f8b9a2d518bd9d9/disaster-recovery-center-disaster-assistance-librarydisaster-recovery-centerdisaster.jpg)