Embed Size (px)
Citation preview
www.pca.state.mn.us
eDMR quick reference guide This guide takes you through creation of the Sample Values Spreadsheet and Operational Spreadsheet, use of the Discharge Monitoring Report (DMR) calculator, and submission of your DMR. To do these tasks you must have:
· An e-Services account · Active wastewater permit(s) that you are authorized for DMR submission · A web browser with high speed Internet access · Microsoft Excel or Excel compatible software
Tasks are as follows, with Appendix A and B explaining in detail how to complete the Sample Values Spreadsheet and the Operational Spreadsheet.
Table of Contents Download Sample Values Spreadsheet ......................................................................................................................2
Download Operational Spreadsheet ..........................................................................................................................2
Submit Sample Values or Operational Spreadsheets – new ......................................................................................3
Accessing previously submitted Sample Values Spreadsheets ..................................................................................4
Amending Sample Values or Operational Spreadsheet submissions .........................................................................5
Download DMR Spreadsheet – using calculator ........................................................................................................5
Submit DMR Spreadsheet ..........................................................................................................................................6
Submit DMRs online – using calculator ......................................................................................................................7
Amending DMR Spreadsheets ....................................................................................................................................8
Appendix A – Sample Values Spreadsheet guide .................................................................................................... 10
Appendix B – Operational Spreadsheet guide ........................................................................................................ 13
Minnesota Pollution Control Agency 651-296-6300 | 800-657-3864 or use your preferred relay service | [email protected]
September 2015 | wq-wwprm7-99 Available in alternative formats
Download Sample Values Spreadsheet Create a pre-populated, permit-specific Sample Values Spreadsheet. With this spreadsheet you can enter your sample values for the reporting period by date (and time, if time is called for).
Log in and Facility Selection 1. Log in to the MPCA e-Services website at:
https://rsp.pca.state.mn.us/ via the Internet using your account id and password.
2. Select “Discharge Monitoring Report” under the “Service Selection” heading.
3. Select the desired facility by clicking on the appropriate radial button under the “Facility Selection” heading and then click the continue button.
4. Select the current effective permit by clicking the appropriate radial button under the “DMR Permit Selection” heading and then click the continue button.
Download 5. In the Manage DMR Services under the “Available Sample Value Spreadsheets” click on the excel icon
for the desired monitoring period under “Download Sample Values Spreadsheet” header.
6. Select the “Save As” option and save the sample values spreadsheet with a meaningful name in the location where you store your DMRs.
7. Click the “Open” button.
8. Proceed with initial updates. You can return to the spreadsheet throughout the reporting period to review or modify it. You do not need to be logged in to e-Services to do so.
For instructions on how to complete the Sample Values Spreadsheet, please consult “Appendix A – Sample Values Spreadsheet Guide”.
Exit 9. After the download, return to the Manage DMR Services webpage to do more DMR tasks, or select “Logout”
to end your e-Services session.
Download Operational Spreadsheet Create a pre-populated, permit-specific Operational Spreadsheet. With this spreadsheet you can enter your sample values for the reporting period by date (and time, if time is called for).
Log in and Facility Selection 1. Log in to the MPCA e-Services website at:
https://rsp.pca.state.mn.us/ via the Internet using your account id and password.
2. Select “Discharge Monitoring Report” under the “Service Selection” heading.
3. Select the desired facility by clicking on the appropriate radial button under the “Facility Selection” heading and then click the continue button.
4. Select the current effective permit by clicking the appropriate radial button under the “DMR Permit Selection” heading and then click the continue button.
Page 2 of 15 September 2015 | wq-wwprm7-99
Download 5. In the Manage DMR Services under the “Available Sample Value Spreadsheets” click on the excel icon
for the desired monitoring period under “Download Operational Spreadsheet” header.
6. Select the “Save As” option and save the operational spreadsheet with a meaningful name in the location where you store your DMRs.
7. Click the “Open” button.
8. Proceed with initial updates. You can return to the spreadsheet throughout the reporting period to review or modify it. You do not need to be logged in to e-Services to do so.
For instructions on how to complete the Operational Spreadsheet, please consult “Appendix B – Operational Spreadsheet Guide”.
Exit 9. After the download, return to the Manage DMR Services webpage to do more DMR tasks, or select “Logout”
to end your e-Services session.
Submit Sample Values or Operational Spreadsheets – new Submit sample values using your Sample Values Spreadsheet or Operational Spreadsheet, for a selected permit and a particular reporting period.
Log in and Facility Selection 1. Log in to the MPCA e-Services website at:
https://rsp.pca.state.mn.us/ via the Internet using your account id and password.
2. Select “Discharge Monitoring Report” under the “Service Selection” heading.
3. Select the desired facility by clicking on the appropriate radial button under the “Facility Selection” heading and then click the continue button.
4. Select the current effective permit by clicking the appropriate radial button under the “DMR Permit Selection” heading and then click the continue button.
Specify details 5. For a Sample Values Spreadsheet, select “Submit Sample Values Spreadsheet” icon under the “Available
Sample Values Spreadsheets”; or for an Operational Spreadsheet select “Submit Operational Spreadsheet” icon for the desired monitoring period.
6. Click the “Browse” button and browse to the file that is to be submitted.
7. Double click the file name and then click the continue button.
Here is where the RSP will validate the submittal.
If no errors were found the file was successfully validated and uploaded. The RSP will go back to the Manage DMR Services screen. In the “Available DMRs” heading and under “Submitted Sample Values” a yes will appear. Further down the screen under the “Submitted Sample Values Spreadsheets” heading there will be a new row showing the monitoring period that was just submitted. If errors were found you must correct the errors in the spreadsheet and resubmit. It may be helpful to print the error messages. To do so, use your web browser “File | Print” function.
Exit 8. After the submittal, the RSP will return to the Manage DMR Services webpage where you can do more DMR
tasks, or select “Logout” to end your e-Services session. Page 3 of 15 September 2015 | wq-wwprm7-99

Sample Values submission rules You must follow these rules for successful submission of your sample values to MPCA:
· You must be authorized in MPCA e-Services for the permit number. · One permit number is allowed per sample values file. · All stations must be valid for the permit. · All parameters must be valid for the station. · Unit must be valid for the parameter. · Date of sample must fall within the reporting period.
Accessing previously submitted Sample Values Spreadsheets Access previously submitted Sample Values Spreadsheet or Operational Spreadsheet, for a selected permit and a particular reporting period.
Log in and Facility Selection 1. Log in to MPCA e-Services website at:
https://rsp.pca.state.mn.us/ via the Internet using your account id and password.
2. Select “Discharge Monitoring Report” under the “Service Selection” heading.
3. Select the desired facility by clicking on the appropriate radial button under the “Facility Selection” heading and then click the continue button.
4. Select the current effective permit by clicking the appropriate radial button under the “DMR Permit Selection” heading and then click the continue button.
Specify details 5. In the Manage DMR Service Screen, under the Submitted Sample Values Spreadsheets select the monitoring
period to be reviewed and click on the icon to “Download Submitted Spreadsheet”.
At this point the Sample Value/Operational Spreadsheet can simply be opened to review or it can be saved into your computer.
Page 4 of 15 September 2015 | wq-wwprm7-99

Amending Sample Values You can amend previously submitted sample values; however this requires resubmission of the entire set of sample values data for the reporting period being changed.
This is necessary because all sample values previously submitted are replaced by whatever you resubmit.
So you must start with the previously submitted spreadsheet; add, change, or delete what you need to within; leave the rest of the sample values intact; and then resubmit the spreadsheet.
Log in and Facility Selection 1. Log in to the MPCA e-Services website at:
https://rsp.pca.state.mn.us/ via the Internet using your account id and password.
2. Select “Discharge Monitoring Report” under the “Service Selection” heading.
3. Select the desired facility by clicking on the appropriate radial button under the “Facility Selection” heading and then click the continue button.
4. Select the current effective permit by clicking the appropriate radial button under the “DMR Permit Selection” heading and then click the continue button.
Specify details 5. In the Manage DMR Service Screen, under the Submitted Sample Values Spreadsheets select the monitoring
period that needs to be amended and click on the icon to “Resubmit Spreadsheet”.
6. Click the “Browse” button and browse to the file that is to be submitted.
7. Double click the file name and then click the continue button
8. If there are no errors the date of submittal will be updated for the row of the monitoring period that was amended.
Download DMR Spreadsheet – using calculator Create a DMR Spreadsheet that is pre-populated with monitoring results that were computed by the calculator using sample values.
Log in and Facility Selection 1. Log in to the MPCA e-Services website at:
https://rsp.pca.state.mn.us/ via the Internet using your account id and password.
2. Select “Discharge Monitoring Report” under the “Service Selection” heading.
3. Select the desired facility by clicking on the appropriate radial button under the “Facility Selection” heading and then click the continue button.
4. Select the current effective permit by clicking the appropriate radial button under the “DMR Permit Selection” heading and then click the continue button.
Download 5. In the Manage DMR Services Screen and under the “Available DMRs” heading, select “Download Calculated
DMR Spreadsheet” for the desired monitoring period.
6. Select the “Save As” function to save the spreadsheet with a meaningful name in the location where you store your DMRs.
7. Select the “Open” option to review the DMR.
Page 5 of 15 September 2015 | wq-wwprm7-99
8. Proceed with review and modification of the DMR. Be sure that you take a look at the following and ensure proper entries are made:
· No Discharge (“Yes” or “No”). You must complete this. · Each station’s worksheet (tab) is complete. · Look for blank cells. The calculator completes the majority of cells, but in cases beyond what the
calculator handles, you must provide the monitoring result. · The calculator will not calculate certain data depending on limit type, unit, or parameter. If there is a
note in the permit that has specific calculation methods directed that departs from the calculator methods, that parameter will not be provided by the calculator.
9. You can return to the spreadsheet at any time. You do not need to be logged in to e-Services to do so.
Exit 10. After the download, click on the “X” to close the excel document. The RSP will return to the Manage DMR
Services webpage where you can do more DMR tasks, or select “Logout” to end your e-Services session.
Submit DMR Spreadsheet Submit a DMR Spreadsheet and add attachments to complete your DMR.
Log in and Facility Selection 1. Log in to MPCA e-Services website at:
https://rsp.pca.state.mn.us/ via the Internet using your account id and password.
2. Select “Discharge Monitoring Report” under the “Service Selection” heading.
3. Select the desired facility by clicking on the appropriate radial button under the “Facility Selection” heading and then click the continue button.
4. Select the current effective permit by clicking the appropriate radial button under the “DMR Permit Selection” heading and then click the continue button.
Specify details 5. In the Manage DMR Services Screen and under the “Available DMRs” heading, select “Upload DMR
Spreadsheet” for the desired monitoring period.
6. Click the “Browse” button and browse to the file that is to be submitted.
7. Double click the file name and then click the continue button.
If validation was successful, the RSP will continue on to Step 8.
If errors were found, you must correct the errors in the spreadsheet and resubmit. It may be helpful to print the error messages. To do so, use your web browser “File | Print” function.
Attach files 8. Click the “Browse” button for the desired attachment type to be submitted.
9. Double click the file name. The file name then appears in the “Upload Filename.”
10. Click the continue button to attach the document.
11. If you have another file to attach repeat steps 8-10, otherwise click the “Continue” button.
Certification - Submit completed DMRs 12. Click “Blue Ribbon” to electronically sign the DMR. Page 6 of 15 September 2015 | wq-wwprm7-99
13. Enter your answer to the security challenge question and then click on the “Submit” button.
14. Enter your “Electronic Signature PIN” and click on the “Sign Electronically” button.
15. The RSP will go back to the Certification Screen. To finish the submittal process, click the “Continue” button.
The RSP will open a copy of record for review. The RSP will also email the copy of record.
Exit 16. Click the “Return” button and the RSP will go back to the Manage DMR Services where more DMR tasks can
be completed, or select “Logout” to end your e-Services session.
Submit DMRs online – using calculator Create a DMR online that is pre-populated with monitoring results that were computed by the calculator using sample values. Then submit it and add attachments to complete your DMR.
Log in and Facility Selection 1. Log in to MPCA e-Services website at:
https://rsp.pca.state.mn.us/ via the Internet using your account id and password.
2. Select “Discharge Monitoring Report” under the “Service Selection” heading.
3. Select the desired facility by clicking on the appropriate radial button under the “Facility Selection” heading and then click the continue button.
4. Select the current effective permit by clicking the appropriate radial button under the “DMR Permit Selection” heading and then click the continue button.
Specify details 5. In the Manage DMR Services Screen and under the “Available DMRs” heading, select “DMR Online Entry” for
the desired monitoring period.
Complete data entry for station 6. Proceed with review and modification of the DMR. Be sure that you take a look at the following and ensure
proper entries are made:
· No Discharge. You must check this box if this is the case. · Each station is complete. · Look for blank cells. The calculator completes the majority of cells, but in cases beyond what the
calculator handles, you must provide the monitoring result. · The calculator will not calculate certain data depending on limit type, unit, or parameter. If there is a
note in the permit that has specific calculation methods directed that departs from the calculator methods, that parameter will not be provided by the calculator.
7. Click “Next Station” or “Previous Station” and complete all stations.
8. Click the “Continue” button.
If validation was successful, continue to Step 9.
If errors were found, use the navigation buttons to return and make corrections. It may be helpful to print the results for error correction. To do so, use your web browser “File | Print” function.
Attach files
Page 7 of 15 September 2015 | wq-wwprm7-99

9. Click the “Browse” button for the desired attachment type to be submitted.
10. Double click the file name. The file name then appears in the “Upload Filename.”
11. Click the continue button to attach the document.
12. If you have another file to attach repeat steps 8-10, otherwise click the “Continue” button.
Certification - Submit completed DMRs 13. Click “Blue Ribbon” to electronically sign the DMR.
14. Enter your answer to the security challenge question and then click on the “Submit” button.
15. Enter your “Electronic Signature PIN” and click on the “Sign Electronically” button.
16. The RSP will go back to the Certification Screen. To finish the submittal process, click the “Continue” button.
The RSP will open a copy of record for review. The RSP will also email the copy of record.
Exit Click the “Return” button and the RSP will go back to the Manage DMR Services where more DMR tasks can be completed, or select “Logout” to end your e-Services session.
Amending DMR Spreadsheets You can amend previously submitted DMRs in one of two ways. The DMR can be manually amended using the “Amend DMR Online” tool or the entire DMR spreadsheet can be amended by using the “Resubmit DMR Spreadsheet” tool.
If the Resubmit DMR Spreadsheet tool is chosen you must start with the previously submitted spreadsheet; add, change, or delete what you need to within; leave the rest intact; and then resubmit the spreadsheet.
Log in and Facility Selection 1. Log in to MPCA e-Services website at:
https://rsp.pca.state.mn.us/ via the Internet using your account id and password.
2. Select “Discharge Monitoring Report” under the “Service Selection” heading.
3. Select the desired facility by clicking on the appropriate radial button under the “Facility Selection” heading and then click the continue button.
4. Select the current effective permit by clicking the appropriate radial button under the “DMR Permit Selection” heading and then click the continue button.
Specify details – Resubmittal of DMR Spreadsheet 5. In the Manage DMR Service Screen, under the Submitted DMRs select the monitoring period that needs to
be amended and click on the icon to “Resubmit DMR Spreadsheet”.
6. Click the “Browse” button and browse to the file that is to be resubmitted.
7. Double click the file name and then click the continue button
If validation was successful, continue to Step 8.
If errors were found, use the navigation buttons to return and make corrections. It may be helpful to print the results for error correction. To do so, use your web browser “File | Print” function.
Attach files If there are no files to attach click on the “Continue” button to move to Step 12. Page 8 of 15 September 2015 | wq-wwprm7-99

8. Click the “Browse” button for the desired attachment type to be submitted.
9. Double click the file name. The file name then appears in the “Upload Filename.”
10. Click the continue button to attach the document.
11. If you have another file to attach repeat steps 8-10, otherwise click the “Continue” button.
Certification - Submit completed DMR 12. Click “Blue Ribbon” to electronically sign the DMR.
13. Enter your answer to the security challenge question and then click on the “Submit” button.
14. Enter your “Electronic Signature PIN” and click on the “Sign Electronically” button.
15. The RSP will go back to the Certification Screen. To finish the submittal process, click the “Continue” button.
The RSP will open a copy of record for review. The RSP will also email the copy of record.
Exit Click the “Return” button and the RSP will go back to the Manage DMR Services where more DMR tasks can be completed, or select “Logout” to end your e-Services session.
Specify details – Amend DMR Online In the Manage DMR Service Screen, under the Submitted DMRs select the monitoring period that needs to be amended and click on the icon to “Amend DMR Online”.
Complete data entry for station 1. Proceed with review and modification of the DMR. Be sure that you take a look at the following and ensure
proper entries are made:
2. Click “Next Station” or “Previous Station” and complete all stations.
3. Click the “Continue” button.
If validation was successful, continue to Step 4.
If errors were found, use the navigation buttons to return and make corrections. It may be helpful to print the results for error correction. To do so, use your web browser “File | Print” function.
Attach files 4. Click the “Browse” button for the desired attachment type to be submitted.
5. Double click the file name. The file name then appears in the “Upload Filename.”
6. Click the continue button to attach the document.
7. If you have another file to attach repeat steps 3-5, otherwise click the “Continue” button.
Certification - Submit completed DMRs 8. Click “Blue Ribbon” to electronically sign the DMR.
9. Enter your answer to the security challenge question and then click on the “Submit” button.
10. Enter your “Electronic Signature PIN” and click on the “Sign Electronically” button.
11. The RSP will go back to the Certification Screen. To finish the submittal process, click the “Continue” button.
The RSP will open a copy of record for review. The RSP will also email the copy of record.
Page 9 of 15 September 2015 | wq-wwprm7-99

Exit Click the “Return” button and the RSP will go back to the Manage DMR Services where more DMR tasks can be completed, or select “Logout” to end your e-Services session.
Appendix A – Sample Values Spreadsheet guide The Sample Values Spreadsheet allows you to record and submit individual monitoring results in an electronic file format to MPCA as a prerequisite to DMR creation.
Spreadsheet layout
Page 10 of 15 September 2015 | wq-wwprm7-99
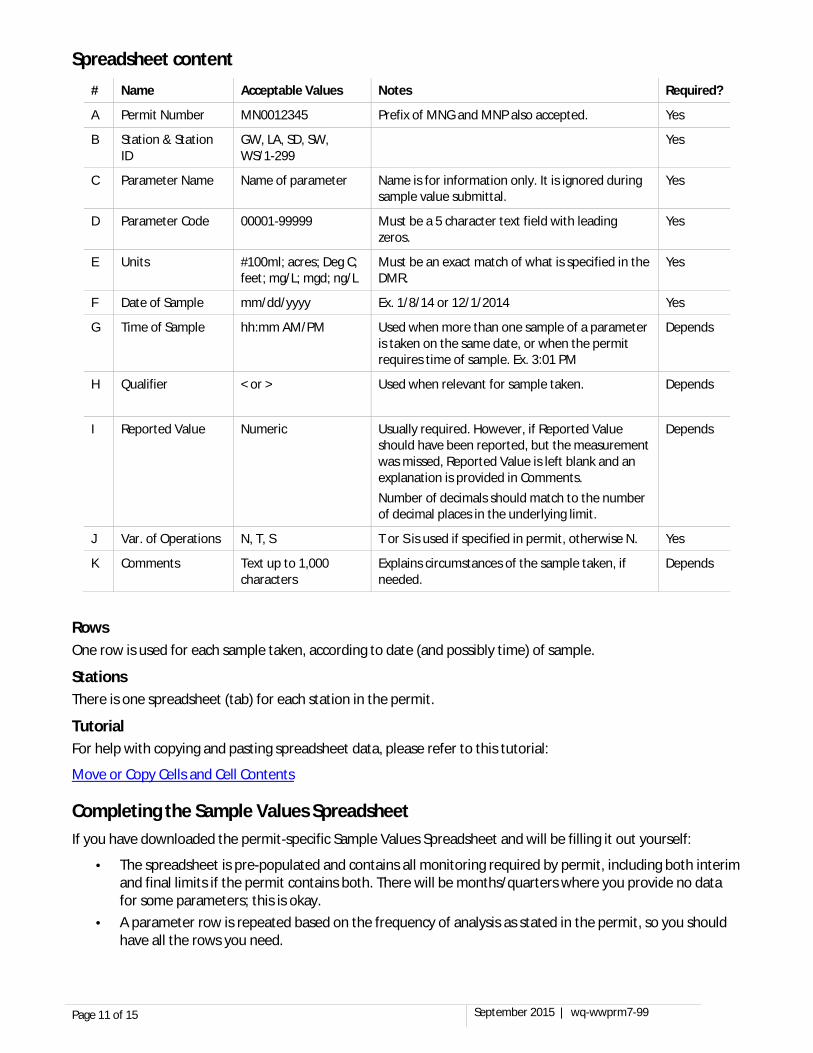
Spreadsheet content
# Name Acceptable Values Notes Required?
A Permit Number MN0012345 Prefix of MNG and MNP also accepted. Yes
B Station & Station ID
GW, LA, SD, SW, WS/1-299
Yes
C Parameter Name Name of parameter Name is for information only. It is ignored during sample value submittal.
Yes
D Parameter Code 00001-99999 Must be a 5 character text field with leading zeros.
Yes
E Units #100ml; acres; Deg C; feet; mg/L; mgd; ng/L
Must be an exact match of what is specified in the DMR.
Yes
F Date of Sample mm/dd/yyyy Ex. 1/8/14 or 12/1/2014 Yes
G Time of Sample hh:mm AM/PM Used when more than one sample of a parameter is taken on the same date, or when the permit requires time of sample. Ex. 3:01 PM
Depends
H Qualifier < or > Used when relevant for sample taken. Depends
I Reported Value Numeric Usually required. However, if Reported Value should have been reported, but the measurement was missed, Reported Value is left blank and an explanation is provided in Comments. Number of decimals should match to the number of decimal places in the underlying limit.
Depends
J Var. of Operations N, T, S T or S is used if specified in permit, otherwise N. Yes
K Comments Text up to 1,000 characters
Explains circumstances of the sample taken, if needed.
Depends
Rows One row is used for each sample taken, according to date (and possibly time) of sample.
Stations There is one spreadsheet (tab) for each station in the permit.
Tutorial For help with copying and pasting spreadsheet data, please refer to this tutorial:
Move or Copy Cells and Cell Contents
Completing the Sample Values Spreadsheet If you have downloaded the permit-specific Sample Values Spreadsheet and will be filling it out yourself:
· The spreadsheet is pre-populated and contains all monitoring required by permit, including both interim and final limits if the permit contains both. There will be months/quarters where you provide no data for some parameters; this is okay.
· A parameter row is repeated based on the frequency of analysis as stated in the permit, so you should have all the rows you need.
Page 11 of 15 September 2015 | wq-wwprm7-99
· For quarterly and annual monitoring, report the data in the month the sample is taken. If the calculator is then used in the future to create a DMR, the system should go back and use the appropriate data from the month it was reported. This will need to be verified by the users and is the responsibility of the user to ensure all DMR data is correct.
· Complete columns F – K in each parameter row for each sample taken according to the rules in the chart above.
· You can delete parameter rows that you do not need. Or rows may be left blank and they will be ignored during submission.
· Rows with date only are ignored too, so if you want to put dates in ahead of time that is fine. · Excel contains a feature that allows you to auto populate dates if you are populating a consecutive
string, such as 4/1/13 through 4/22/13. Put the starting date in the first cell, then click the lower right corner of the cell and drag it down. The date is incremented by one day as you go.
· Additional parameter rows may be added by you when the frequency of analysis exceeds the permit guidelines. Copy and paste extra rows for additional monitoring.
· Parameter rows can be sorted or arranged as you please to facilitate information entry and organization. · Columns must not be rearranged. · Data does not need to remain in station specific tabs. You can combine all stations into one worksheet,
or keep them organized into separate worksheets. · You can also subdivide a station into separate worksheets—for instance, flow on one tab, quarterly
monitoring or specialized monitoring on separate tab, etc. · Tab names can be your preference. · Calculated data is not allowed in sample values submittals. Examples are percent, kg/day, kg/month,
kg/year. If you have your own computer system that you will program to fill out the Sample Values Spreadsheet automatically for you:
· Follow the practices above. · You need only load parameter rows for which you have samples. · The first row must contain the spreadsheet headings—“Permit Number”, “Station Type”, “Station ID”,
etc. · You may put your station monitoring values in one worksheet or more, as you like. · As well as an Excel file, you can also submit a tab-delimited text file or an XML file. Contact your eDMR
specialist if you are interested in either of these options. A good practice is to save the Sample Values Spreadsheets for posterity.
· Use the folder on your computer network that you use for DMRs. · Use a meaningful file name that contains the reporting period. · Ex., “2013-03 Sample Values.xls” · This helps keep the Sample Values Spreadsheets in calendar order in the folder.
Page 12 of 15 September 2015 | wq-wwprm7-99
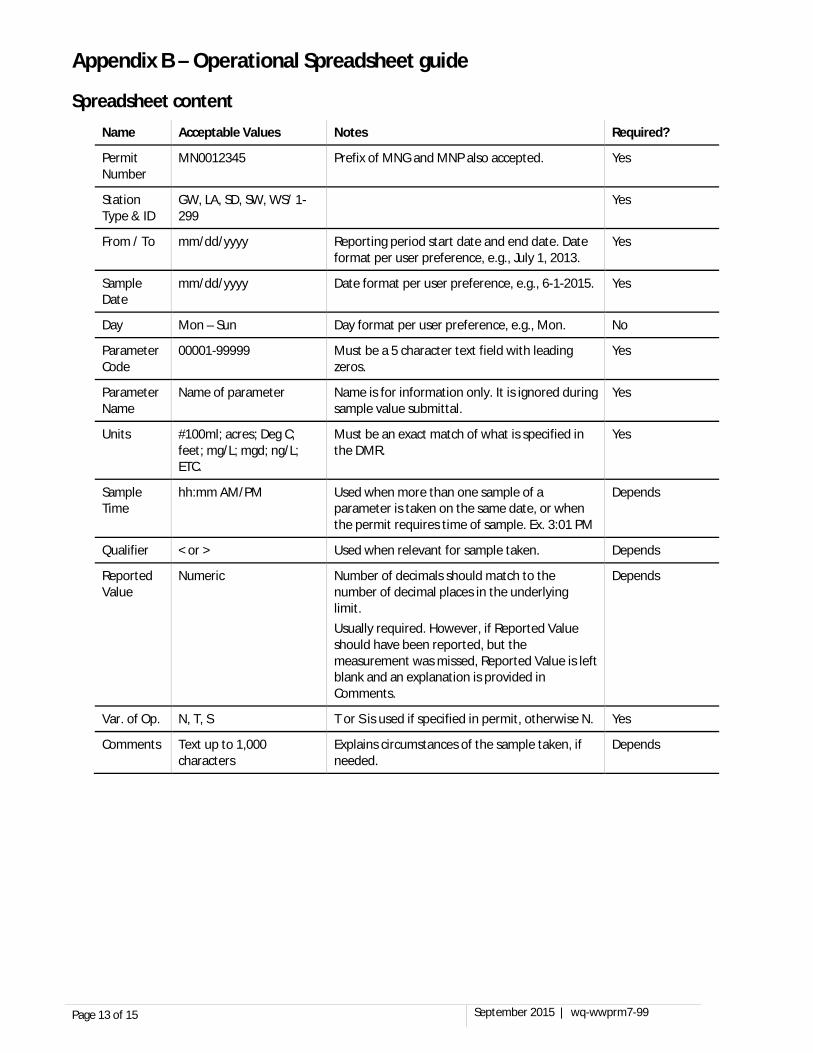
Appendix B – Operational Spreadsheet guide
Spreadsheet content
Name Acceptable Values Notes Required?
Permit Number
MN0012345 Prefix of MNG and MNP also accepted. Yes
Station Type & ID
GW, LA, SD, SW, WS/ 1-299
Yes
From / To mm/dd/yyyy Reporting period start date and end date. Date format per user preference, e.g., July 1, 2013.
Yes
Sample Date
mm/dd/yyyy Date format per user preference, e.g., 6-1-2015. Yes
Day Mon – Sun Day format per user preference, e.g., Mon. No
Parameter Code
00001-99999 Must be a 5 character text field with leading zeros.
Yes
Parameter Name
Name of parameter Name is for information only. It is ignored during sample value submittal.
Yes
Units #100ml; acres; Deg C; feet; mg/L; mgd; ng/L; ETC.
Must be an exact match of what is specified in the DMR.
Yes
Sample Time
hh:mm AM/PM Used when more than one sample of a parameter is taken on the same date, or when the permit requires time of sample. Ex. 3:01 PM
Depends
Qualifier < or > Used when relevant for sample taken. Depends
Reported Value
Numeric Number of decimals should match to the number of decimal places in the underlying limit. Usually required. However, if Reported Value should have been reported, but the measurement was missed, Reported Value is left blank and an explanation is provided in Comments.
Depends
Var. of Op. N, T, S T or S is used if specified in permit, otherwise N. Yes
Comments Text up to 1,000 characters
Explains circumstances of the sample taken, if needed.
Depends
Page 13 of 15 September 2015 | wq-wwprm7-99
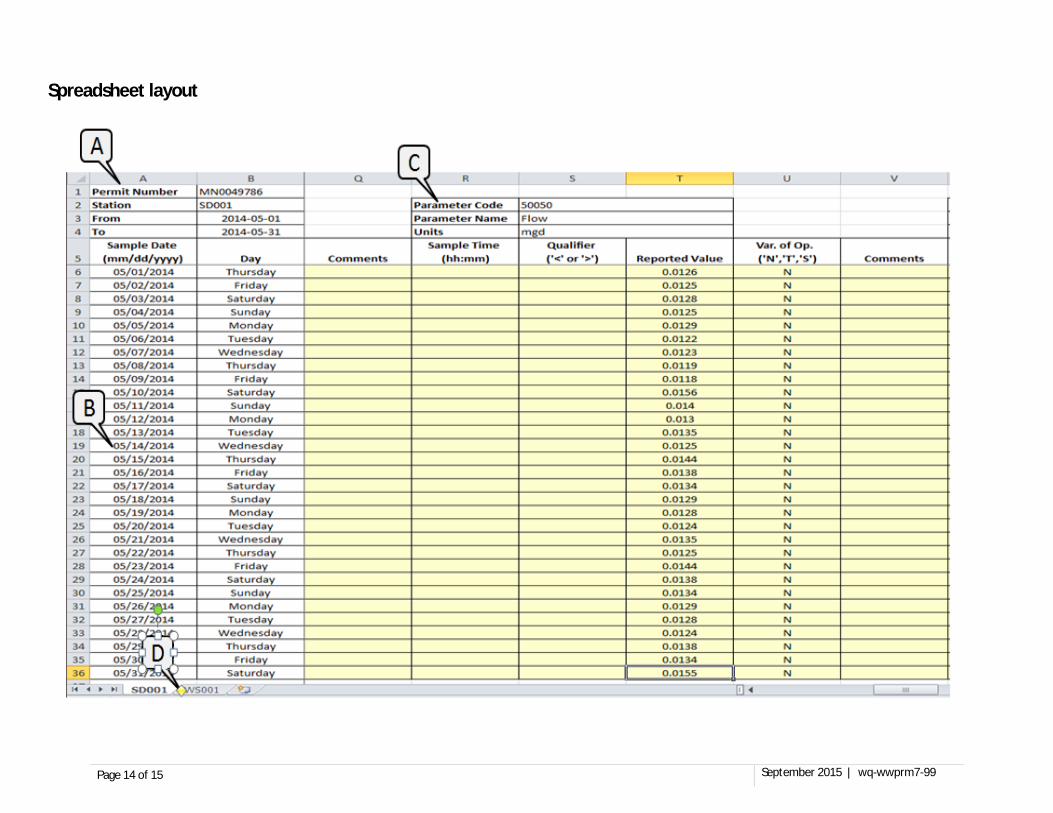
Spreadsheet layout
Page 14 of 15 September 2015 | wq-wwprm7-99

Tutorial For help with copying and pasting spreadsheet data, please refer to this tutorial:
Move or Copy Cells and Cell Contents
Completing the Operational Spreadsheet 1. The Operational Spreadsheet allows the permittee to record sample values for the reporting period, with
parameters across the top and days down the left.
2. The zones (A - D) must follow MPCA specifications exactly regarding location and use. These are the zones that MPCA depends on to programmatically retrieve sample values.
3. MPCA expects the spreadsheet zones to be positioned according to these rules:
· Zone A. Control information as shown. Starting in cell A1. · Zone B. Sample Dates. Header starting in cell A6. Dates/Days below.
The number of rows depends on the number of days in the reporting period. For example a reporting period from July 1 through September 30, 2013, would have 92 rows. Plus the rows needed for sample times within a day, if necessary.
The more common situation would be a monthly reporting period, say June 1 through
June 30, 2013. There would be 30 rows in this case. Zone C. Sample Values Block. Header information is in rows 3 through 6 as shown.
Each parameter block is identified by the string "Parameter Code" in the upper left corner of the block, on row 3.
Each parameter block is 5 columns wide.
MPCA reads across the spreadsheet (keying on “Parameter Code”) and retrieves sample values within each sample values block until the blocks run out.
MPCA reads down for sample values until the dates run out.
Note: If there is a gap in Sample Dates, for example if a date cell is blank in the series of dates on the left, MPCA stops reading down. Ensure that the series of Sample Dates has no gaps.
Blocks can be organized in any order to the right of the Sample Date columns.
However, the columns within the blocks must be in the order shown.
Columns can be hidden as long as they have appropriate default values. For example, if “Var. of Op.” is never used, it can be populated with “N” and the column hidden to make for easier reading.
· Stations are organized by worksheet tab (D). Tab names can be your preference. 4. One permit number is allowed per Excel file.
5. One reporting period is allowed per Excel file. The reporting period can be for a month, a quarter, semiannual, or annual, depending on permit requirements.
Page 15 of 15 September 2015 | wq-wwprm7-99


![CCNP BCMSN Quick Reference Sheets - Lagout Quick Reference... · CCNP BCMSN Quick Reference Sheets Exam 642-812 ... [ 4 ] CCNP BCMSN Quick Reference Sheets. ... switch would be used](https://img.pdfslide.net/doc/110x75/5a7a6ec87f8b9a05538dccf5/ccnp-bcmsn-quick-reference-sheets-lagout-quick-referenceccnp-bcmsn-quick-reference.jpg)