Embed Size (px)
Citation preview

Hardcoding subtitles in Windows
Stjepan Henc 6.1.2013
In this guide we will learn how to encode movies in the DIVX .AVI format with hardcoded
highly visible subtitles, which can be burned to a DVD and watched on almost all devices.
This guide has been tested on Windows XP 32 bit, and Windows 7 32 bit.
This guide assumes that you know how to download & install programs from the internet,
and how to unzip files. If you don’t, get some friendly help.
Step 1 - Installation
We’ll start with installing the programs that we’ll need. ffdshow and divx-codec are packages
containing codes, or programs for encoding and decoding various video formats. Avisynth is
a program that enables easy and powerful video manipulation through the use of scripts.
Virtualdub is the best free program for video editing and processing, and there are many
filters and effects it supports. Aegisub is the best free subtitling program, it is used and
developed by the anime geek community, so it supports formatting and coloring subtitles in
various ways.
ffdshow – download & install. Make sure to select the “Application plugins” >
Virtualdub and Avisynth checkboxes when the installer asks you to select which
components to install. http://www.free-
codecs.com/download_soft.php?d=6819&s=50&r=
divx-codec – download the web installer from http://www.divx.com/downloads/divx/1
It will try to install a lot of unneeded software, we need only the “Divx plus codec pack”. So you can unselect all the other options.
K-lite codec-pack – download the full 32-bit version from: http://www.free-codecs.com/download_soft.php?d=7137&s=775&r=
During the installation be careful to unselect the option to install the annoying “Yahoo toolbar” and other things, which are some kind of addware. For all other options you can just leave the defaults.
Avisynth – download & install http://sourceforge.net/projects/avisynth2/files/latest/download?source=files
VirtualDub – The link below is for my version of VirtualDub with some of the necessary filters already installed, as we need the Unicode version of the VSFilter

plugin for hardcoding the subtitles. Download from this link, and extract to 'C:\Program files'. No installation is needed. https://dl.dropbox.com/u/23328801/VirtualDub.zip
The program is started by clicking on virtualdub.exe, make yourself a shortcut on the desktop for easier access (right click on virtualdub.exe>Send To>Desktop).
VirtualDub Plugin Pack – download and install to the location where you installed VirtualDub, this is needed for opening video formats other than .avi (.flv, .mp4, .mkv...) http://www.virtualdub-fr.org/Fichiers/Plugins/VD_plugin_pack.exe
Aegisub – download & install. http://ftp.aegisub.org/pub/archives/releases/windows/Aegisub-2.1.9-setup.exe
There are newer versions available, but this one is currently the most stable one.
Step 2 – preparing subtitles in Aegisub
Now that we have successfully installed all the necessary programs, we can now start adjusting the subtitles. Subtitling with Aegisub may be covered with another guide in the future, but for now these pretty good instructions are available: http://chuuka.jetsam.org/forums/index.php?topic=14.0.
Aegisub works with .ASS subtitles encoded in utf8, but it can import all main subtitle formats. Utf8 enables us to use characters from all known alphabets of the world, if we select a font that contains the necessary characters.
Increasing readability
To start working with Aegisub we have to open the subtitles and the matching video we want to work on. If we do everything right it should look something like this:

As you can see the letters are small and almost invisible. Luckily, Aegisub comes with a „Style manager“, in which we can adjust the look of the subtitles. Opening the Style manager is done using the button marked in red. The way the subtitles look in Aegisub is how they will look after you hardcode them.

When we open the Style manager, we should see this, and we will select the “New” option with which we define a new style for our subtitles. The Style manager enables us to store styles which we define using “Copy to storage“ so that they can be used in the following subtitles.
In the “Style editor“ window which will pop up, we choose the settings we want for our subtitles. The only options we are currently interested in are highlighted on the picture above.
The most readable fonts for subtitles are simple fonts with enough spacing between letters and easily distinguished letter shapes. We will use „MS Sans Serif“ since it satisfies all the basic conditions and is by default installed on all Windows machines. If you are using a non-latin script you should find a font with similar characteristics, and to test if it works type some special characters you will need in the Style Editors preview area, and if they don’t appear as little boxes (sometimes with numbers in them), then the font works.
The option „Opaque box“ creates a black box around the subtitle text, which ensures that we always have good contrast in our subtitles, independent of which color the video in the background is. The most used color combination is white on black, which gives good visibility and is esthetically pleasing. But if we want to obtain even greater readability, I propose using some light yellow-green color since the human eye has the greatest sensitivity for light from the green part of the light spectrum.
Once you have set all the desired settings, click OK twice to close the dialogs that we opened.
To set the subtitles to use the new style, press Ctrl+A to select all the subtitles and change the active style with the highlighted option:

The result should look something like this, notice how much prettier and more readable the subtitles now are:

Now that everything is done, the last thing to do is to save. The program will save the subtitles in the .ASS format. We will need that file in the next step.
Footnote (for avoiding having subtitles go in 3 rows):
When importing subtitles from .srt files, Aegisub converts all line breaks into /N signs. Aegisub uses /n and /N signs for marking line breaks. The difference is that /N marks mandatory line breaks and /n is just a recommendation. This is important since Aegisub has an intelligent algorithm for putting text into rows and it will override the /n to use the space more efficiently, so if we use /n there will be less (or no) occurrences of subtitles going in 3 rows. /N can be substituted with /n using the tool opened with Edit>Search & Replace.
Step 3 – Hardcoding subtitles using VirtualDub
To enable our audience to handle our videos as easily as possible, and to upload videos to
youtube with subtitles that don’t look awful, we will have to hardcode the subtitles.
To do that we first have to start VirtualDub. The initial window looks like this:

We open the video by clicking in the menu File>Open Video file.
If during the opening of the file some warning shows up saying something about “VBR”, just
click OK, since for what we are doing that will not be an issue.

Once we open the video, the program looks like this:
With the thing that is highlighted in red we can seek to any point in the video.
The next step is to add a filter with which we will hardcode .ASS subtitles we have prepared.
We will do that with the option Video>Filters….
Then this window will appear, and we choose Add:
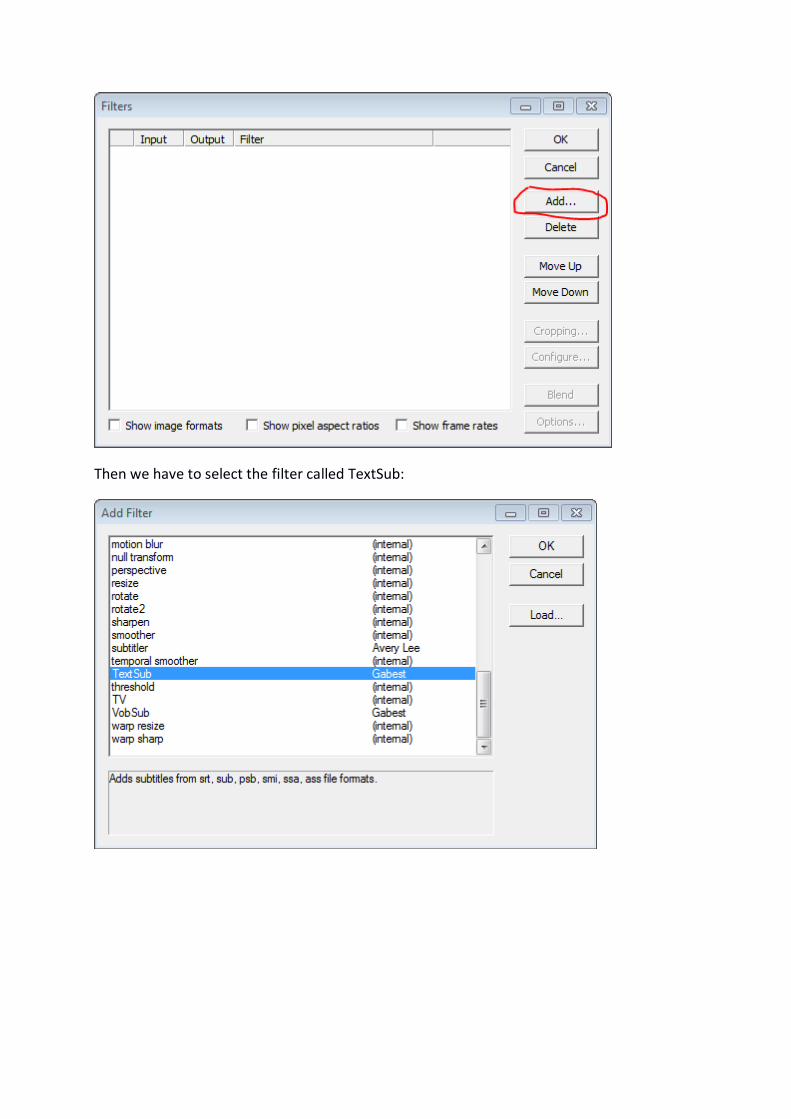
Then we have to select the filter called TextSub:

After we click OK, the program will ask us which .ASS subtitle file we want to use. Then after
we click OK a couple of times we should see something like this:
As you can see, VirtualDub is now showing our subtitles.
Now we have to adjust the settings for saving this video, because if we would now select
“File>Save to .AVI” we would get a file which would be several tenths of gigabytes big. To
avoid this we will use compression or more specifically a codec. We will do this by selecting
the option Video>Compression:

Then we choose the codec we will use (shown in blue), and click on the configure button:
Then we choose the following settings (in yellow):

To avoid the possibility of the video and audio loosing sync, we have to also configure
compression for audio. First we will set VirtualDub to reencode the audio stream instead of
just copying, by selecting Audio>Full processing mode.
Then we choose the option Audio>Compression, after which we will get this window:
I recommend these options for audio compression. If you can’t see these options, then
something is wrong with the codecs that were installed.

The codec settings shown here were chosen to make video files that can be played on all
DIVX DVD players, and all computers with the most common codecs installed. For other
uses, other codec setting are used, for example, for uploading to youtube it is best to use the
x264 codec.
Now we only need to save our video as .AVI :
Choose where to save the video.
Encoding video can take a long time, approximately as long as the duration of the video, but
this depends on how fast your computer is.
Advanced time-saving technique
Since encoding video can sometimes take a very long time, VirtualDub enables as to put multiple encoding tasks in a task queue, so the program can automatically encode the videos one-by-one while we are sleeping, taking a walk in nature or working in the garden.
Tasks or jobs can be added to the queue by instead of clicking “File>Save as AVI” in the last step of hardcoding subtitles, we instead click “File>Queue batch operation>Save as AVI”. This way the encoding and saving of the current video will be put into the job queue.
After that we can open another video, do what we need and then add it to the job queue.
Starting the jobs is done using File>Job control.
If you have a multi-core processor, you can also run multiple instances of VirtualDub at the
same time, since the DIVX codecs we use here can use only one processor at a time. To do
this, you can while a video is encoding just open another VirtualDub window and continue
working as usual.

Advanced: two-pass encoding
To obtain the maximum quality of the video while keeping the size minimal, two-pass encoding is used. This process requires one additional step, takes a bit longer, but gives a bit better quality of the image.
This is because the codec can determine for which parts of the video stream he needs to use more data and for which less to obtain the same quality of the image (the codec needs more data to encode the parts of the movie where the picture changes more rapidly). The only problem with this approach is that some older DIVX DVD players don’t support videos encoded in this fashion (it is called VBR – variable bit rate – video).
To do this, in the step where we configure the codec, in the field Rate Control Mode first choose the option “Multipass 1th pass”, and then continue as usual. After we have encoded the video with this option, we reconfigure the codec with the option “Multipass 2nd pass” and then “Save as .AVI”. We will get a video of the same size but with better quality.
This process can be accelerated by using the “Advanced time-saving technique“.
Appendix – How to ask questions on technical forums and get (useful) answers
As this guide doesn’t and can’t cover every detail of this process, you might run into problems. There are many helpful people with experience in this area on the internet, and you can easily ask them for help if you run into problems.
These are some of the forums covering this topic (among others):
http://forum.videohelp.com/forums/18-Newbie-General-discussions
http://forum.videohelp.com/forums/42-Subtitle
http://forum.videohelp.com/forums/11-Video-Conversion
http://forum.doom9.org/forumdisplay.php?f=67
But before asking a question, make sure to do everything possible to try and solve the problems yourself. Probably someone already asked the same question, so you can use the answer they got. And when asking a question make sure to post to the relevant category, and provide as much information as possible (program versions, what codecs you installed etc.), so that the people on the forum can figure out what the problem is.
This guide was made with the best intentions, but neither me nor anyone else are responsible for any damage that may happened during its use . You can do whatever you want with this document.
If you find any mistakes please contact me at my email address at [email protected].
God bless!