Embed Size (px)
DESCRIPTION
Christmas crafts and projects
Citation preview

Home-DzineIDEAS AND INSPIRATION FOR YOUR HOME
December 2012
online
Craft • DIY • Food • Green • Home Decor & Design
festiveissue

Home-Dzine Online is written and compiled by Janice Anderssen. All projects in this issue, or any other issue, remain the property of Home-Dzine and Janice Anderssen, or the respective copyright holders, and may not be copied or reproduced in any manner whatsoever without written permission.
You may have noticed that the Home-Dzine website has changed slightly. You will find the main menu at the top of the page. I am always looking for ways to improve the site and this will allow me to add even more content for readers.
This issue of Home-Dzine Online is our festive issue and I hope you enjoy the features and craft projects.
See you again in 2013
Janice
a word or two
5 TRENDY WALLSWallpaper & Anaglypta
13 ‘TIS THE SEASONDecor & Dining
20 QUICK & EASY
37 RE-USE - RECYCLE - RE-PURPOSE
43 DIY KIDSMonster bookmarks
46 FRESH IDEAS FOR THE FESTIVE SEASON

4 5
decor and designTRENDYwalls
I must confess to not being a fan of wallpaper. Blame it on my childhood spent stripping wallpaper off the walls of my home every time my mom wanted a change. But I do love how wallpaper can instantly change the look and feel of any room.
Today’s wallpaper is also a vast improvement on what was applied to walls in the 70s. It’s more durable and, if applied properly, won’t peel or come unstuck one month down the line.

6 7
TRENDYwalls TRENDYwallsChoosing the
perfect designIt’s important to select
the right design for a particular wall. Wallpaper
is not like paint, where you can paint over it if you get it wrong. Take
pics of the room setting that you can show to the
sales assistant to ask for their advice.
Although wallpaper has been slow to gain acceptance locally, there are quite a few suppliers that offer a varied selection of designs. Builders Warehouse offer a range of vinyl wallpapers that are ideal for high-traffic areas such as entrances and hallways.
For designer wallpapers you can look online at Black Fabrics, who stock Harlequin and other designer brands, and Decor Wallpaper.
Wallpaper Inn has a wonderful selection of kids wallpaper.
Those looking for more original wallpaper might consider Robin Sprong.

8 9
Anaglypta is a paintable range of wallpapers that are a stylish and practical solution for high traffic areas and imperfect walls. Although more expensive than standard wallpapers, the thicker design of this product is extremely hard-wearing and can be painted over again and again. What’s nice about this paintable range of wallpaper is the range of available designs. The product is tough and durable; covers minor cracks, lumps and bumps, and is easy to repaint.
Anaglypta dates back to the 1800s and you can purchase designs from different architectural periods.
ABOVE: Art Deco Anaglypta from Wallpaper Inn
TRENDYwalls TRENDYwalls
Lincrusta was invented in 1877 by Frederick Walton. It became an instant success because it was the first washable wallcovering and appealed to the Victorians because of its sanitary properties as well as its durability and ornate effects.
Originally made on a linen backing, it was however, quite rigid. Because of this, it was later made from wood pulp and cotton, being lighter and more flexible. This was to become Anaglypta (from the Greek words ‘Ana’ (meaning raised) and ‘Glypta’ (meaning Cameo).
Anaglypta wallpaper allows you to paint on the surface using acrylic paints
PAINTABLE WALLPAPER
Anaglypta consists of a quality range of vinyl and paper paintable textured wallcoverings, produced on traditional paper and ‘easy to hang’ paste-the-wall substrates.

10 11
1. There are reports that the paper has a tendency to shrink width-wise as the wallpaper paste dries, although there are just as many reports that this does not happen. A common solution should this occur is to apply paintable acrylic sealer along any gaps that may appear.
2. The paper has to be allowed to dry completely before being painted. If the paper is still wet it has a tendency to tear and the raised design can crush, so be patient. Once dry the paper is hard and not likely to crush.
3. Apply universal primer before painting. This helps reduce absorbency and will extend the life of the paper.
4. You can paint Anaglypta with a paint-brush or roller, although a paintbrush will be easier on a detailed pattern.
TIPS ON DECORATING WITH ANAGLYPTA
I undertook a bit of research here, as there are pros and cons for applying and painting Anaglypta wallpaper.
Anaglypta wallpaper allows older homes to be restored to almost original
detail.
RESTORATION - IT’S ALL IN THE
DETAILS
Pat Ganino renovated a historic home by applying and painting Anaglypta.
After applying the base coat the technique is very similar to that used to glaze furniture.
Using brown oxide pigment and pouring it into a bowl/plate with water, use a sponge to cover the entire surface with pigment, making sure it covers deep crevices.
Note that the amount of water to pigment is of your choice and different amounts will create a different consistency altering the look. Leave to dry.
TRENDYwalls TRENDYwalls

12 13
Once dry you can add the gold paint with a brush.
Dip the brush in gold and then dab off onto a paper plate or piece
of newspaper to provide an even distribution of the paint on the brush.
Using the brush lightly graze the raised portion of the wallpaper highlighting these sections with gold.
It is important to try and hit just the raised portions and not the relief, this can be done by the amount of pressure you have on the brush.
Once you have completed adding the gold you can let it dry and add polyurethane varnish.
This is my favourite step. I think this step really marries all the steps together completing the overall look. So using a roller you can add the satin varnish. Once this is dry you have a beautiful final product!
RESTORATION - IT’S ALL IN THE DETAILS
‘tis the season‘tis the season
Textured walls, popcorn walls and ceilings; there are more than a few homeowners reading this who hate the finish on their walls.
More often than not, and especially in large developments, this type of finish is not done properly and the end result is an uneven mess that is hard to keep clean and collects dust and dirt easily.
Although it may sound like hard work, the best way to remove bumpy walls is to use a sander and 120-grit sandpaper. If you use an older model Skil sander it’s easy to attach this to your vacuum cleaner for an almost dust-free project.
At the back of these sanders is an outlet where a vacuum nozzle can be taped in place using duct-tape. As you work, switch on the vacuum cleaner to suck away the dust.
QUICK TIP
HOW TO GET RID OF BUMPY WALLS

14 15
1. Less is moreFor the Christmas tree select your choice of ornaments and keep to the theme. The tree shown here features glass ornaments in a handful of shades: blue, green, and gold. The presents beneath it benefit from a similar restraint. “You live with the packages until you give them away,” says designer Eddie Ross. “Why not have them match?”
2. Don’t overlook the obviousBare windows offer the ultimate blank canvas; take advantage of bare windows by adding wreaths of juniper and blue spruce, mounted using double-sided tape.
3. Poinsettias aren’t the only Christmas flowersAn eye-opening alternative? White amaryllis tinged with green.
4. Create continuity with judicious pops of colourOne bowl of ornaments and another of wrapped candies, plus hardcover books and a soft throw, repeat the blues and greens of the tree decoration.
Builders Warehouse has stocked up
on some beautiful Christmas Decor!
From trees to baubles, gift wrap
to tinsel- they have Christmas covered!
18 19
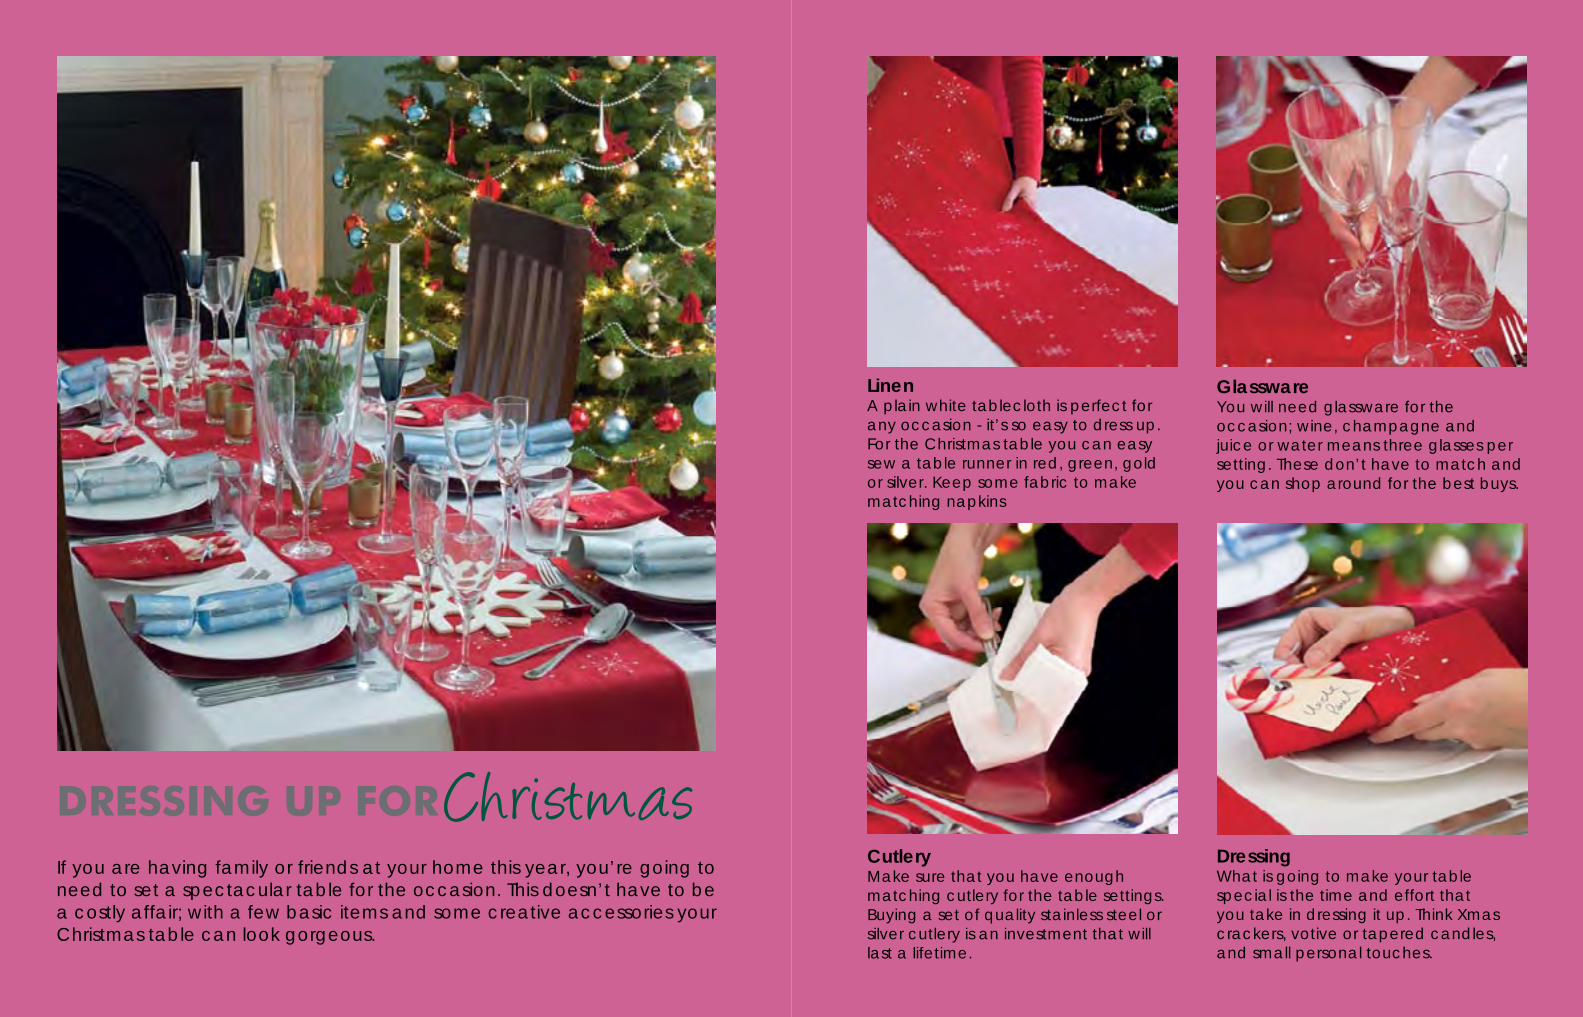
DRESSING UP FOR ChristmasIf you are having family or friends at your home this year, you’re going to need to set a spectacular table for the occasion. This doesn’t have to be a costly affair; with a few basic items and some creative accessories your Christmas table can look gorgeous.
LinenA plain white tablecloth is perfect for any occasion - it’s so easy to dress up. For the Christmas table you can easy sew a table runner in red, green, gold or silver. Keep some fabric to make matching napkins
GlasswareYou will need glassware for the occasion; wine, champagne and juice or water means three glasses per setting. These don’t have to match and you can shop around for the best buys.
CutleryMake sure that you have enough matching cutlery for the table settings. Buying a set of quality stainless steel or silver cutlery is an investment that will last a lifetime.
DressingWhat is going to make your table special is the time and effort that you take in dressing it up. Think Xmas crackers, votive or tapered candles, and small personal touches.

20 21
quick & easy
Add your personal touch
Simple details, like adding the guest’s name to a place setting or including their favourite treat with a Christmas cracker will make guests feel extra special.
Place setting available from @Home.
An elegant statement
Invest in a set of white china or porcelain crockery... so easy to dress up for any occasion.

22 23
Make your own festive tablemats using wrapping or scrapbooking card.
Use the template below to cut out the individual leaf sections - sixteen leaves for each place setting.
Fold each leaf in half and string them together using brads.
Design by seilifestyle.
Print out this leaf template and use to cut out the individual
leaf sections.
COUNTDOWNto Christmas

24 25
Print out the stocking template to make individual Christmas stockings. This template makes a stocking that is 8cm wide, so
reduce or enlarge as required.
Crafty ideas for wonderful papers, iron-on trans-fer and other craft goodies. But unfortunately they only ship to US and Canada
Tabletop Advent Calendar
Countdown the 12 days to Christmas with this tabletop display of Christmas stockings
Each stocking is filled with small goodies and sweets.
Design by seilifestyle.
After cutting and folding the template, sew around the edges. Then add your own embellishments with ribbon and trim, buttons and bows and fill with goodies!
Although this project uses fabric, you can replace this with wrapping or scrapbooking paper.

26 27
Fold a soft cloth or towel to create a cushioned surface and place the clear glass bauble down on top of it. Use a Dremel MultiTool with Flexshaft attached and insert the Diamond Wheel Engraving Point 7105; engrave a series of large and small snowflake motifs randomly around the bauble, leaving gaps in-between the designs. You need to be very delicate and not press too hard or you will shatter the glass bauble.
Fit a clear glue stick into the glue gun. Set the gun to cool heat setting and let warm up. Draw a delicate snowflake motif in-between the engraved snowflakes.
Working quickly so that the glue remains sticky, holding the bauble over the glass bowl with the white glitter, use the spoon to sprinkle glitter onto the tacky glue. Ensure the entire motif is covered in glitter before very gently tapping the excess off back onto the plate.
Allow the glue gun time to cool down then fit it with a silver glitter glue stick. Still on low setting, apply silver glitter glue to further enhance and embellish the engraved and glittered motifs.
SAFETY FIRST:Wear safety goggles when undertaking this project.
1
2
3
4
Create this amazing centrepiece for your festive table1
2
34

28 29
Sometimes creativity blossoms out of the blue; sometimes it takes a little more effort; but if you just let inspiration take you away, anything can happen, including something like this...
Lucy - craftberry bush
My original idea when making these little penguins was to have the kiddies take them outside and knock them down with snow balls, like a carnival game. But after painting their cute little faces, I fell in love with them (I say that in the humblest way possible) and decided to paint the rest of them to coordinate with the stocking advent calendar.
And I am happy to report, they have marched up the stairs and reside safely in the warmth of our upstairs hallway.
tannenboing is a beautiful, sleek, modern blank slate.
The spiral tree is so clean, it doesn’t take away from the articles or ornaments being displayed. And it isn’t just a Christmas tree, it is a modern take on a tree so it really can be used in many setting, year-round.
tannenboing is environmentally friendly, made from recycled aluminium.
The tree is flat-packed and easy to assemble. At the end of the season, the tree can be taken down and put away for next year, or it can be recycled.
trends

30 31
Hard to believe that these adorable penguins are made from nothing more than a couple of plastic cold drink bottles.
The first time I discovered these penguins was when I was posting my various plastic recycling crafts. I take my hat off to Lucy for coming up with this wonderful project.
To prepare the bottles for painting, spray with Rust-Oleum flat white and then use craft paint to decorate.

32 33
One of my favourite blogs is Crafty Sisters. Candace and Nicole design and create some amazing projects.
This wooden Christmas tree is one of my favourites. Although the project shown here uses thick SupaWood offcuts, you can substitute with PAR pine from your local Builders Warehouse.
Use PAR pine that is around 96mm wide and cut down 1 or 2 planks to varying lengths as shown right.
Use wood glue to fasten all the cut pieces together and leave this overnight to dry.
TIP: Place the boards on clingfilm or piece of plastic so that it can be easily peeled off the back once the glue has dried.
Add wording of your choice with chipboard, plywood or MDF alphabet cut-outs. You can purchase chipboard alphabets online at various craft outlets, as well as at select craft stores. These can be glued in place.
Finish off your Xmas tree with 2 or 3 coats of Rust-Oleum 2X blossom white spray paint.
craftysnippets

34 35
CottonChristmasTree
Use a polystyrene cone, cotton thread and ModPodge to make this elegant Christmas tree for your home.
Coat the cone with Vaseline before wrapping with cotton thread.
Brush on 6 to 8 4 coats of ModPodge, allowing drying time between coats.
Once dry, gently remove the cone.
Voila!
O Christmas TreeThese divine triangular boxes have so many uses as part of your Christmas decor. Make them as tree decorations, for your mantelpiece, or for your tabletop. They also make great gift containers.
Designed by Amazing Paper Grace and using JustRite templates, you can make as many boxes as you like using the template on the following page.
Each box is decorated with its own unique embellishments; from buttons and ribbons, tree decorations and silk pointsettias.

36 37
Reuse - Recycle - Repurpose

38 39
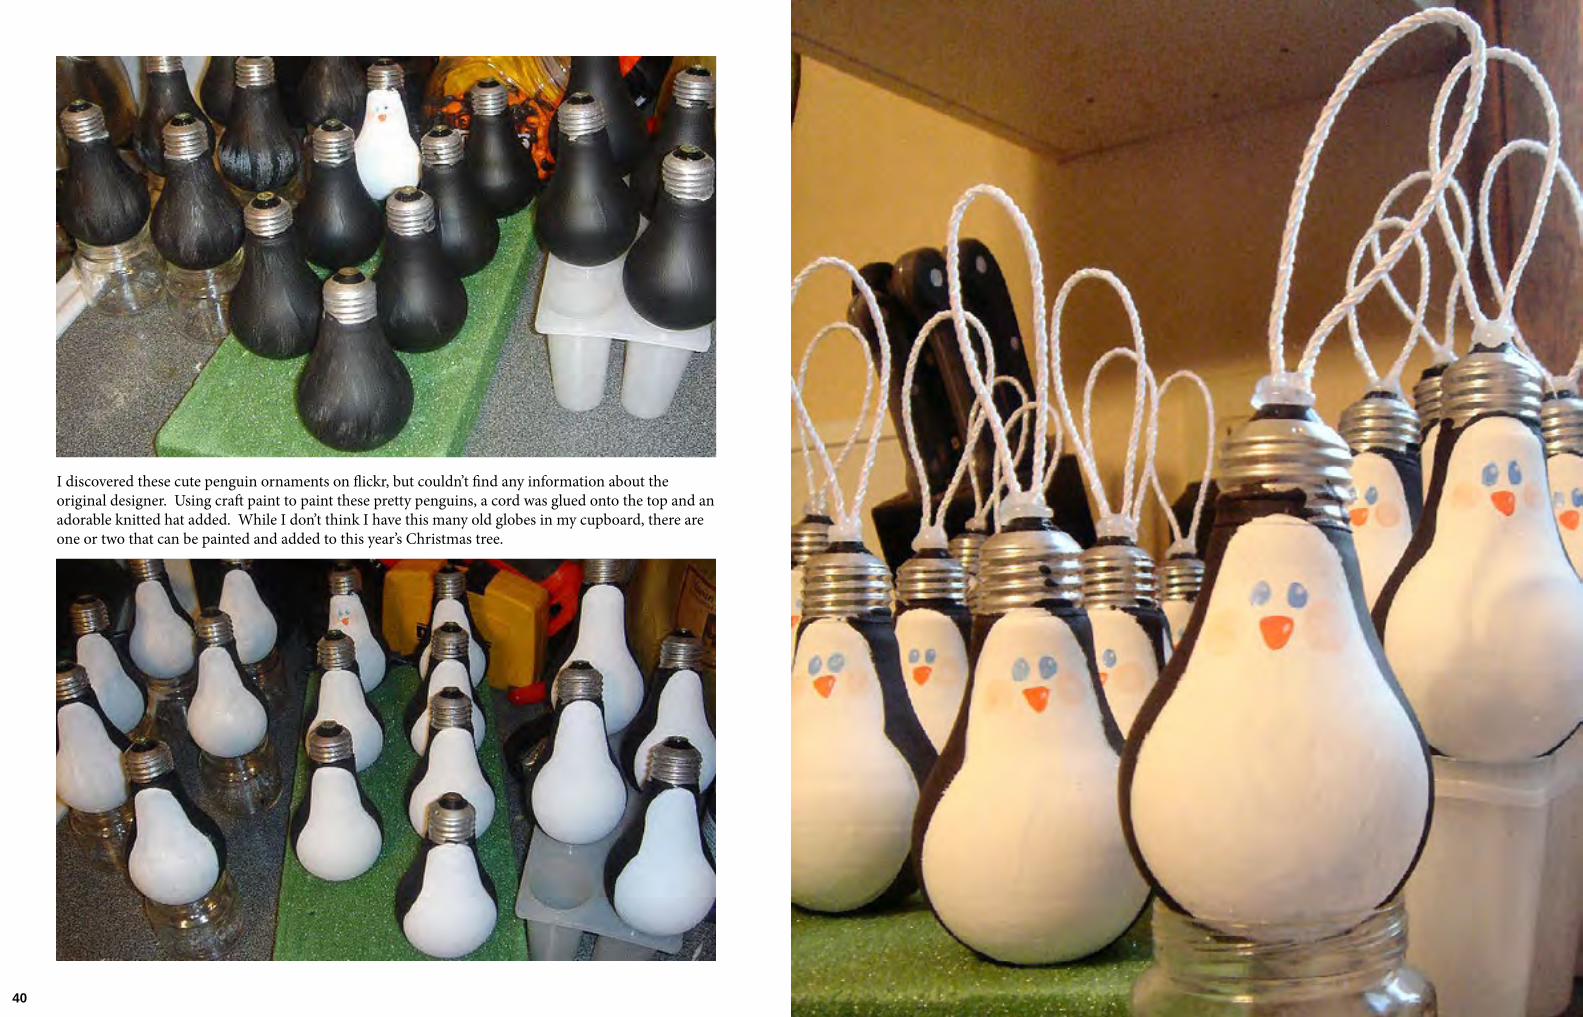
Pretty PenguinsThey might not be considered eco-friendly for lighting, but incandescent bulbs sure do make gorgeous penguin ornaments for a Christmas tree!
40 41
I discovered these cute penguin ornaments on flickr, but couldn’t find any information about the original designer. Using craft paint to paint these pretty penguins, a cord was glued onto the top and an adorable knitted hat added. While I don’t think I have this many old globes in my cupboard, there are one or two that can be painted and added to this year’s Christmas tree.

42 43
DIY kids
Ask your mom for coloured paper and a pair of craft scissors to make your own monster bookmarks. After you have made your own you will be able to make for your friends as well.
Designed by ctbakerintheacres
MAKE MONSTER
BOOKMARKS

44 45
You will need:Coloured paper 15cm x 15cmCraft scissors
Here’s how:1. Fold the paper in half to make a
triangle.
2. Fold the left corner towards the centre.
3. Fold the right corner towards the centre.
4. Put the folded corners back and a flap from the centre to the bottom.
5. Fold the left and right corner again so that it is over the top of the flap.
6. Tuck both flaps into the pocket.
1 2
3 4
5 6
Create your monsters!
Cut a contrasting square slightly smaller than the pocket.
Apply glue and press inside.
Cut teeth, eyes, nose, tongue, etc.
Apply glue and press in
place.
Slide them onto the page corner of your favourite
book.

46 47
food fun
Cheesecake SwirlsYou will need:
Foil baking cups36 vanilla wafersWhite & milk chocolate drops2 packs cream cheese, at room temperature1/2 cup granulated sugar2 tablespoons all-purpose flour2 large eggs1 teaspoon vanilla extract
Here’s how:Preheat oven to 180°C. Place foil bake cups on baking sheet. Place one vanilla wafer on bottom of each cup. Place 5 to 6 morsels on top of each wafer.
Beat cream cheese, sugar and flour in large mixer bowl until creamy. Add eggs and vanilla extract; beat well. Spoon heaped tablespoon of cream cheese mixture into each bake cup.
Bake for 15 minutes or until just set and not browned. Remove from oven to wire rack. While still warm, top cheesecakes with remaining drops. Cool completely. Cover and refrigerate.
fresh ideas for the festive season
I absolutely love fruit cake, and especially the rich variety that appears in stores during the festive season. The only problem with my love of rich fruit cake is that it doesn’t love me.
Indigestion is just one of the uncomfortable after-effects on a fruit cake binge.
This year I have decided to try out some fresh ideas for the festive season, and incorporate my other love... chocolate!
You will need:
100ml sunflower oil, plus extra to grease175g caster sugar175g self-raising flourhalf tsp bicarbonate of soda4 tbsp cocoa powder100g chocolate chips or chunks175g very ripe bananas3 medium eggs , 2 separated50ml milk
FOR THE TOPPING100g milk chocolate100ml soured creamhandful dried banana chips, roughly chopped
Here’s how:Heat oven to 160°C. Grease and line a loaf tin with wax paper (allow it to come 2cm above top of tin). Mix the sugar, flour, bicarb, cocoa and chocolate in a large bowl.
Mash the bananas in a bowl and stir in the whole egg plus 2 yolks, followed by the oil and milk. Beat the egg whites until stiff. Quickly stir the wet banana mixture into the dry ingredients, stir in a quarter of the egg whites to loosen the mixture, then gently fold in the rest.
Gently scrape into the tin and bake for 1 hr 10-15 mins, or until a skewer inserted comes out clean.
Cool in the tin on a wire rack. To make the icing, melt the chocolate and soured cream together in a heatproof bowl over a pan of barely simmering water. Chill in the fridge until spreadable.
Remove cake from tin, roughly swirl icing over and scatter with the banana chips.
http:/
/www
.bbcg
oodfo
od.co
m
http
://w
ww
.ver
ybes
tbak
ing.
com
Chocolate & Banana Cake

48 49
You will need:
140g brown sugar100g clear honey200g salted butter100g desiccated coconut140g flaked almonds300g glacé cherries , sliced4 tbsp plain flour250g dark, milk or white chocolate, or a mix
Here’s how:Heat oven to 180°C. Put sugar, honey & butter in a large pan; gently melt together. When all the sugar has dissolved stir in the coconut, flaked almonds, sliced cherries and flour.
Line a large baking tray with wax paper (about 40 x 30cm), and roughly spread the mixture out to a thin layer - don’t worry if you have small gaps, it should melt together in the oven. Bake for 10-12 mins until a rich golden colour, then set aside to cool and firm up.
Melt the chocolate in separate double-boilers. Line a second large tray with wax paper and carefully flip the cooled Florentine bake onto it. Peel off the wax paper. Spread the melted chocolate over, if you’re using a few types just leave a gap between each.
Leave aside until set, then stamp out shapes using cookie star cutters - if the cutter is digging into your hands (as the Florentine mix may be a little hard), rest a small plate or pan on top of it and push down on this instead.
Cherry & Coconut FlorentinesChocolate Truffle Star Cake
You will need:
CAKE140g dark chocolate 70%, broken into pieces140g butter , cut into pieces2 tsp coffee granules50g self-raising flour50g plain flour¼ tsp bicarbonate of soda140g light brown sugar140g golden caster sugar1.5 tbsp cocoa powder2 medium eggs3 tbsp soured cream
STARS100g white chocolate25g dark chocolate5-6 small chocolate truffles
WHITE CHOCOLATE ICING100ml double cream50g white chocolate , very finely chopped1 tbsp boiling water
DARK CHOCOLATE ICING100ml double cream2 tsp golden caster sugar50g dark chocolate , very finely chopped1.5 tbsp boiling water
http:/
/www
.bbcg
oodfo
od.co
m
http:/
/www
.bbcg
oodfo
od.co
m

50 51
Bookings are now open for our 2013DIY Divas Career Workshop
Saturday mornings from 09:00 to 12:00
www.DIY-DIVAS.co.za
Here’s how:
The cake and stars are best made a day ahead (the cake is easier to slice and fill, and the stars have time to set). Heat oven to 160°C.
Butter and base-line a deep loaf tin (22 x 11 x 6cm).
Put the chocolate and butter for the cake in a saucepan. Mix the coffee with 50ml water, then pour into the pan. Warm through over a low heat, just to melt - be careful not to overheat.
While the chocolate melts, mix both flours with the bicarbonate of soda, both sugars and the cocoa. Break down any lumps in the sugar with your fingers.
Beat the eggs, then stir in the soured cream. Pour this and the melted chocolate over the flour mixture, then stir everything together - the mix will be very soft. Pour it into the tin, then bake for about 1½ hrs, or until firm on top.
Let the cake cool in the tin (it may crack if you turn it out too soon), then loosen the sides and carefully turn it out onto a wire rack to cool completely.
To make the stars, line a baking sheet with wax paper. Melt both chocolates separately. Pour and spread the white chocolate thinly into a rectangle on the wax paper.
Drizzle the dark chocolate off the end of a teaspoon in bold squiggles over the top. Leave in a cool, dry place (not the fridge) until almost set but not hard, then lightly press down with a star cutter, about 5.5cm across, to make at least 6 star outlines. (Make a few extra in case of breakages and wipe the cutter each time you press a star shape.)
When completely set, cut through the star outlines with a small sharp knife, then carefully lift them off onto wax paper.
For the white chocolate icing, heat the cream just to boiling. Remove from the heat, tip in the chocolate and swirl so it starts to melt, then pour in the boiling water and stir to melt completely. Pour into a small bowl and chill in the fridge for about 1 hr to cool and thicken slightly. Beat with an electric hand mixer until thick and glossy.
When the cake is completely cold, place it into the fridge to chill (this makes it easier to slice). Take the cake out of the fridge and turn it over so the flat base becomes the top of the cake.
Slice the cake horizontally into three. Sandwich back together with the white chocolate icing, not quite up to the edges. (This can be done a day ahead and chilled.)
For the dark chocolate icing, heat the cream with the sugar just to boiling. Remove from the heat, tip in the chocolate, then stir in the boiling water. Leave to cool and thicken a little.
Put the cake on a wire rack with parchment paper underneath (to catch any drips). Pour and spread the icing all over the cake. Leave to set slightly, then arrange the truffles down the centre and prop 5 or 6 of your best stars against them.