Embed Size (px)
Citation preview
In-Place Upgrade HDP 3 to CDP Private Cloud Base 7.1.x
In-Place Upgrade HDP 3 to CDP Private CloudBaseDate published: 2021-03-18Date modified: 2021-08-05
https://docs.cloudera.com/

Legal Notice
© Cloudera Inc. 2021. All rights reserved.
The documentation is and contains Cloudera proprietary information protected by copyright and other intellectual propertyrights. No license under copyright or any other intellectual property right is granted herein.
Copyright information for Cloudera software may be found within the documentation accompanying each component in aparticular release.
Cloudera software includes software from various open source or other third party projects, and may be released under theApache Software License 2.0 (“ASLv2”), the Affero General Public License version 3 (AGPLv3), or other license terms.Other software included may be released under the terms of alternative open source licenses. Please review the license andnotice files accompanying the software for additional licensing information.
Please visit the Cloudera software product page for more information on Cloudera software. For more information onCloudera support services, please visit either the Support or Sales page. Feel free to contact us directly to discuss yourspecific needs.
Cloudera reserves the right to change any products at any time, and without notice. Cloudera assumes no responsibility norliability arising from the use of products, except as expressly agreed to in writing by Cloudera.
Cloudera, Cloudera Altus, HUE, Impala, Cloudera Impala, and other Cloudera marks are registered or unregisteredtrademarks in the United States and other countries. All other trademarks are the property of their respective owners.
Disclaimer: EXCEPT AS EXPRESSLY PROVIDED IN A WRITTEN AGREEMENT WITH CLOUDERA,CLOUDERA DOES NOT MAKE NOR GIVE ANY REPRESENTATION, WARRANTY, NOR COVENANT OFANY KIND, WHETHER EXPRESS OR IMPLIED, IN CONNECTION WITH CLOUDERA TECHNOLOGY ORRELATED SUPPORT PROVIDED IN CONNECTION THEREWITH. CLOUDERA DOES NOT WARRANT THATCLOUDERA PRODUCTS NOR SOFTWARE WILL OPERATE UNINTERRUPTED NOR THAT IT WILL BEFREE FROM DEFECTS NOR ERRORS, THAT IT WILL PROTECT YOUR DATA FROM LOSS, CORRUPTIONNOR UNAVAILABILITY, NOR THAT IT WILL MEET ALL OF CUSTOMER’S BUSINESS REQUIREMENTS.WITHOUT LIMITING THE FOREGOING, AND TO THE MAXIMUM EXTENT PERMITTED BY APPLICABLELAW, CLOUDERA EXPRESSLY DISCLAIMS ANY AND ALL IMPLIED WARRANTIES, INCLUDING, BUT NOTLIMITED TO IMPLIED WARRANTIES OF MERCHANTABILITY, QUALITY, NON-INFRINGEMENT, TITLE, ANDFITNESS FOR A PARTICULAR PURPOSE AND ANY REPRESENTATION, WARRANTY, OR COVENANT BASEDON COURSE OF DEALING OR USAGE IN TRADE.
In-Place Upgrade HDP 3 to CDP Private Cloud Base | Contents | iii
Contents
HDP to CDP Upgrade Overview............................................................................ 7In-place upgrade overview................................................................................................................................... 7CDP Upgrade Readiness.................................................................................................................................... 11How much time should I plan for to complete my upgrade?............................................................................11
Cluster environment readiness..............................................................................12Disk space and mountpoint considerations........................................................................................................13Downloading and Publishing the Package Repository...................................................................................... 14Downloading and Publishing the Parcel Repository......................................................................................... 15
Sample data ingestion.............................................................................................16
Merge Independent Hive and Spark Catalogs.................................................... 16
Ambari and HDP Upgrade Checklist...................................................................18Ambari upgrade checklist...................................................................................................................................18Download cluster blueprints without hosts........................................................................................................18HDP upgrade checklist....................................................................................................................................... 19Checklist for large clusters.................................................................................................................................19Before upgrading any cluster............................................................................................................................. 20Managing MPacks.............................................................................................................................................. 21Changes to Ambari services and views............................................................................................................. 21HDP Core component version changes............................................................................................................. 22Upgrading the cluster’s underlying OS..............................................................................................................23
In-Place and Restore...............................................................................................................................23Move and Decommission....................................................................................................................... 24
Upgrading Ambari..................................................................................................24Before you upgrade Ambari...............................................................................................................................24Backup Ambari................................................................................................................................................... 25Setting up a local repository.............................................................................................................................. 26
Updating Ambari repo files....................................................................................................................26Updating HDP repo files........................................................................................................................26Case study for setting up an HDP-GPL local repository.......................................................................26Setting up local repository with temporary internet access................................................................... 27Case study for setting up local repository............................................................................................. 28Update version repository base urls.......................................................................................................28Preparing Ambari Repository Configuration File to use Local Repository...........................................29
Preparing to Upgrade Ambari............................................................................................................................ 29Upgrade to Ambari 7.1.x.0.................................................................................................................................30
Upgrade to Ambari 7.1.7.0.....................................................................................................................30Upgrade to Ambari 7.1.6.0.....................................................................................................................34
Download cluster blueprints...............................................................................................................................39Mandatory Post-Upgrade Tasks......................................................................................................................... 40
In-Place Upgrade HDP 3 to CDP Private Cloud Base | Contents | iv
Upgrading Ambari Infra......................................................................................................................... 40Upgrading Ambari Log Search.............................................................................................................. 41Upgrading Ambari Metrics.....................................................................................................................42
Upgrading HDP to Cloudera Runtime 7.1.x........................................................43HDP Prerequisites...............................................................................................................................................44
Upgrade process......................................................................................................................................44Before upgrading any cluster................................................................................................................. 45
Backup HDP Cluster.......................................................................................................................................... 46Backup and Restore Databases.............................................................................................................. 46Backup Ranger........................................................................................................................................46Backup Atlas...........................................................................................................................................47Backup Ambari Infra Solr......................................................................................................................48Backup Ambari-Metrics..........................................................................................................................50Backup Hive........................................................................................................................................... 50Backup HBase.........................................................................................................................................50Backup Kafka......................................................................................................................................... 51Backup Oozie..........................................................................................................................................51Backup Knox.......................................................................................................................................... 51Backup Logsearch...................................................................................................................................51Backup Zeppelin..................................................................................................................................... 51Backup HDFS......................................................................................................................................... 51Backup ZooKeeper................................................................................................................................. 53
Backup databases................................................................................................................................................ 53Before you upgrade................................................................................................................................ 53
Pre-upgrade steps................................................................................................................................................ 54Ranger Service connection with Oracle database.................................................................................. 54Ranger admin password......................................................................................................................... 54Preparing Spark for upgrade.................................................................................................................. 55Backing up Ambari infra Solr data........................................................................................................55Preparing HBase for upgrade................................................................................................................. 58Turn off YARN GPU.............................................................................................................................59Preparing HDP Search for upgrade........................................................................................................59Preparing ZooKeeper for upgrade..........................................................................................................69Preparing Kafka for upgrade..................................................................................................................70
Register software repositories............................................................................................................................ 71HDP Intermediate bits for 7.1.x.0 Repositories.....................................................................................72Software download matrix for 3.1.5 to CDP 7.1.x................................................................................81
Install software on the hosts...............................................................................................................................81Perform the HDP upgrade..................................................................................................................................81
Perform express upgrade........................................................................................................................ 82Post-HDP-upgrade tasks..................................................................................................................................... 83
Upload HDFS entity information...........................................................................................................83Ambari infra-migrate and restore...........................................................................................................84Ambari Metrics and LogSearch............................................................................................................. 84Back up the Ranger configuration......................................................................................................... 84Backup Infra Solr collections.................................................................................................................84Search post-HDP-upgrade tasks............................................................................................................. 85
Troubleshooting the HDP upgrade.....................................................................................................................86YARN Registry DNS instance fails to start.......................................................................................... 86
Rollback Ambari 7.1.7 to Ambari 2.7.5............................................................................................................ 86Rollback HDP Services from CDP 7.1.7...........................................................................................................87
Overview................................................................................................................................................. 88ZooKeeper............................................................................................................................................... 88Ambari-Metrics....................................................................................................................................... 89
In-Place Upgrade HDP 3 to CDP Private Cloud Base | Contents | v
Ambari Infra Solr................................................................................................................................... 89Ranger..................................................................................................................................................... 90HDFS.......................................................................................................................................................93YARN......................................................................................................................................................95HBase...................................................................................................................................................... 95Kafka....................................................................................................................................................... 95Atlas.........................................................................................................................................................95Hive......................................................................................................................................................... 96Spark........................................................................................................................................................97Oozie....................................................................................................................................................... 97Knox........................................................................................................................................................ 97Zeppelin...................................................................................................................................................97Log Search.............................................................................................................................................. 97
Transitioning to Cloudera Manager.....................................................................97Pre-transition steps..............................................................................................................................................98
Databases.................................................................................................................................................99Kerberos.................................................................................................................................................. 99HDFS.....................................................................................................................................................100Spark......................................................................................................................................................100Ranger................................................................................................................................................... 101Kerberos - Optional task...................................................................................................................... 101Solr........................................................................................................................................................ 101
Cloudera Manager Installation and Setup........................................................................................................101Installing JDBC Driver.........................................................................................................................103Proxy Cloudera Manager through Apache Knox.................................................................................105
Transitioning HDP cluster to CDP Private Cloud Base cluster using the AM2CM tool.................................106Transitioning HDP 3.1.5 cluster to CDP Private Cloud Base 7.1.x cluster using the AM2CM
tool................................................................................................................................................... 106Post transition steps.......................................................................................................................................... 114
Enable Auto Start setting..................................................................................................................... 114ZooKeeper............................................................................................................................................. 115Delete ZNodes...................................................................................................................................... 115Ranger................................................................................................................................................... 115Ranger KMS......................................................................................................................................... 116Add Ranger policies for components on the CDP Cluster.................................................................. 116Set maximum retention days for Ranger audits...................................................................................120HDFS.....................................................................................................................................................120Solr........................................................................................................................................................ 122Kafka..................................................................................................................................................... 123Impala....................................................................................................................................................124YARN....................................................................................................................................................124Spark......................................................................................................................................................129Tez......................................................................................................................................................... 132Hive....................................................................................................................................................... 134HBase.................................................................................................................................................... 138Ozone.....................................................................................................................................................138Oozie..................................................................................................................................................... 138Atlas advanced configuration snippet (Safety valve)...........................................................................141Phoenix..................................................................................................................................................141Starting all services...............................................................................................................................142Knox.....................................................................................................................................................142Client Configurations............................................................................................................................143Securing ZooKeeper............................................................................................................................. 143Zeppelin Shiro configurations.............................................................................................................. 144
Apache Hive Changes in CDP.............................................................................................................144
Configuring External Authentication for Cloudera Manager......................... 164
Additional Services............................................................................................... 164Installing Data Analytics Studio on a CDP Private Cloud Base cluster using Ambari................................... 165
Check cluster configuration for Hive and Tez.....................................................................................165Add the DAS service............................................................................................................................166DAS post-installation tasks.................................................................................................................. 166
Troubleshooting DAS installation.................................................................................................................... 173Problem area: Queries page..................................................................................................................173Problem area: Compose page...............................................................................................................175Problem area: Reports page..................................................................................................................176DAS service installation fails with the “python files missing” message............................................. 176DAS does not log me out as expected, or I stay logged in longer than the time specified in the
Ambari configuration...................................................................................................................... 177Getting a 401 - Unauthorized access error message while accessing DAS......................................... 177
Installing DAS on CDP Private Cloud Base using Cloudera Manager........................................................... 178Adding Hue service with Cloudera Manager.................................................................................................. 179
Install and configure MySQL database................................................................................................179Add the Hue service using Cloudera Manager.................................................................................... 180Enable Kerberos for authentication......................................................................................................181Integrate Hue with Knox......................................................................................................................182Grant Ranger permissions to new users or groups.............................................................................. 184
Applications Upgrade........................................................................................... 186
In-Place Upgrade HDP 3 to CDP Private Cloud Base HDP to CDP Upgrade Overview
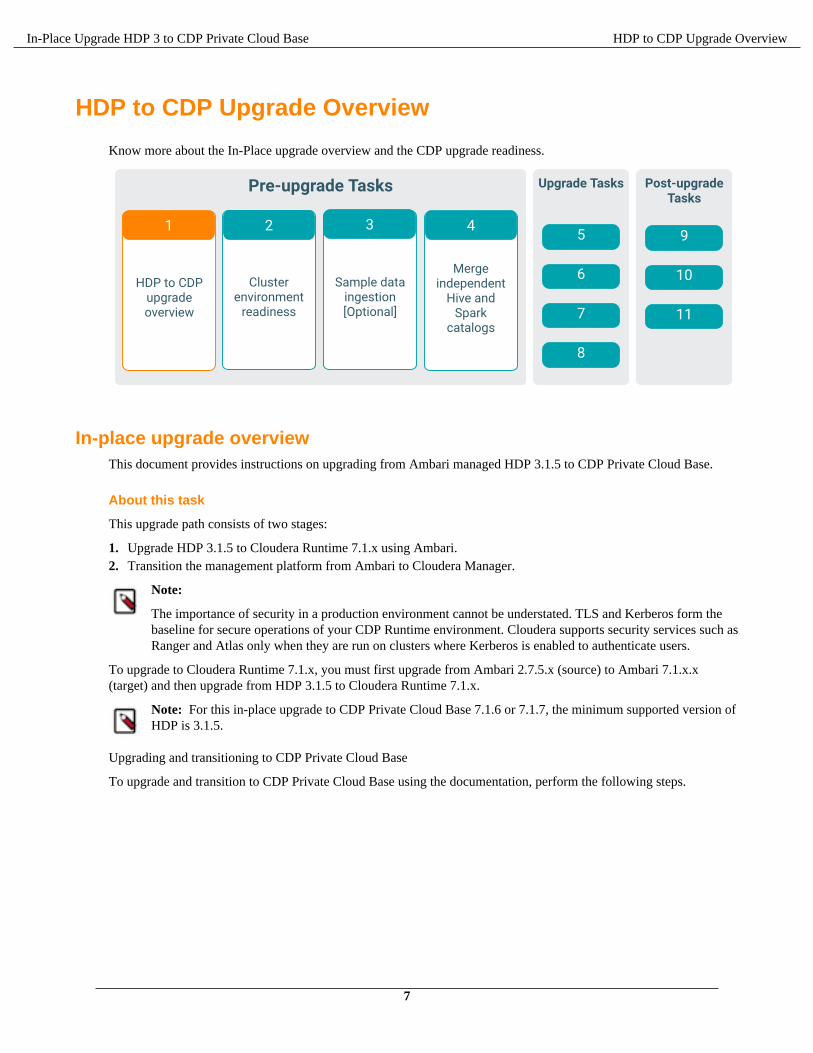
HDP to CDP Upgrade Overview
Know more about the In-Place upgrade overview and the CDP upgrade readiness.
In-place upgrade overviewThis document provides instructions on upgrading from Ambari managed HDP 3.1.5 to CDP Private Cloud Base.
About this task
This upgrade path consists of two stages:
1. Upgrade HDP 3.1.5 to Cloudera Runtime 7.1.x using Ambari.2. Transition the management platform from Ambari to Cloudera Manager.
Note:
The importance of security in a production environment cannot be understated. TLS and Kerberos form thebaseline for secure operations of your CDP Runtime environment. Cloudera supports security services such asRanger and Atlas only when they are run on clusters where Kerberos is enabled to authenticate users.
To upgrade to Cloudera Runtime 7.1.x, you must first upgrade from Ambari 2.7.5.x (source) to Ambari 7.1.x.x(target) and then upgrade from HDP 3.1.5 to Cloudera Runtime 7.1.x.
Note: For this in-place upgrade to CDP Private Cloud Base 7.1.6 or 7.1.7, the minimum supported version ofHDP is 3.1.5.
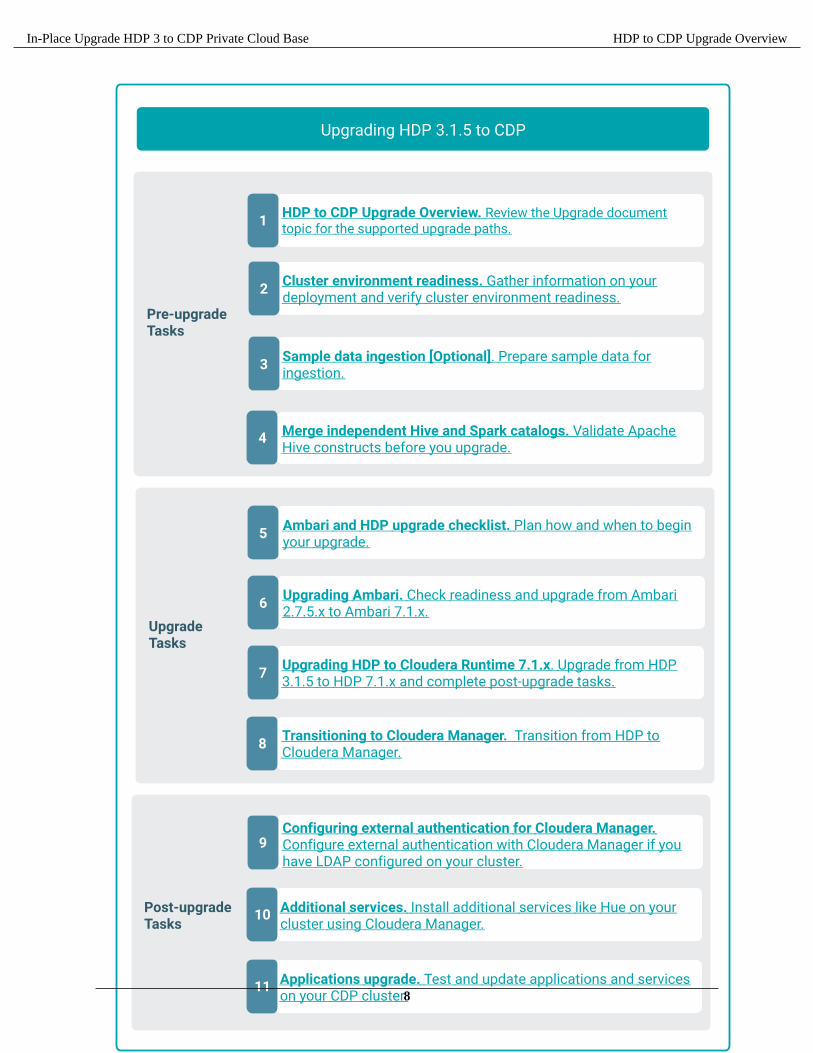
Upgrading and transitioning to CDP Private Cloud Base
To upgrade and transition to CDP Private Cloud Base using the documentation, perform the following steps.
7
In-Place Upgrade HDP 3 to CDP Private Cloud Base HDP to CDP Upgrade Overview
8
In-Place Upgrade HDP 3 to CDP Private Cloud Base HDP to CDP Upgrade Overview
Note: If you are upgrading to Cloudera Manager 7.5.1 or higher in order to install CDP Private CloudExperiences version 1.3.1, you must use Cloudera Runtime version 7.1.6 or 7.1.7. For more information, seeCDP Private Cloud Exeriences.
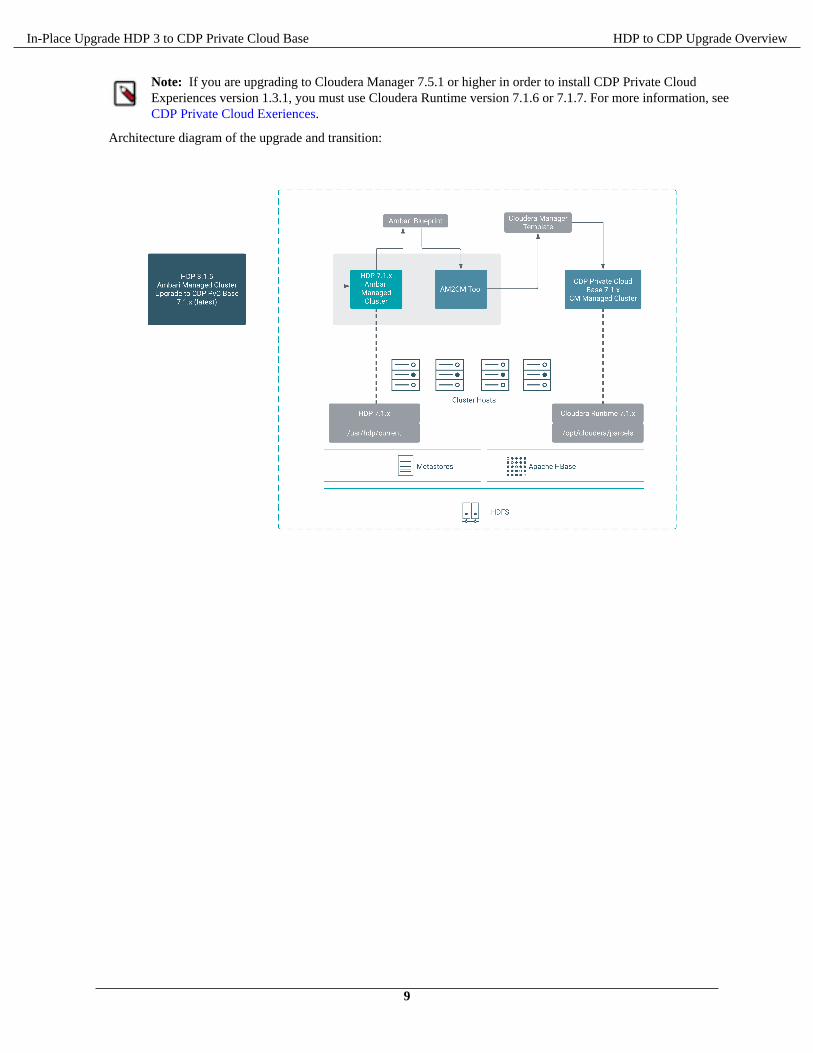
Architecture diagram of the upgrade and transition:
9
In-Place Upgrade HDP 3 to CDP Private Cloud Base HDP to CDP Upgrade Overview
Important:
• While the upgrade process will temporarily install HDP intermediate bits, the HDP intermediate bits isan interim artifact that enables you to complete the upgrade to CDP Private Cloud Base and is not a newrelease of HDP intended for production use. When the upgrade process is complete, your cluster will beusing the Cloudera Runtime 7.1.x parcel.
• If you are migrating from HDP 3.1.5 to CDP Private Cloud Base 7.1.7, then:
• The supported Runtime version is 7.1.7.• The supported Cloudera Manager version is 7.4.4.• The supported AM2CM tool version is 2.0.0.0.
• If you are migrating from HDP 3.1.5 to CDP Private Cloud Base 7.1.6, then:
• The supported Runtime version is 7.1.6.• The supported Cloudera Manager version is 7.3.1.• The supported AM2CM tool version is am2cm-1.2.0.0-45.tar.gz.
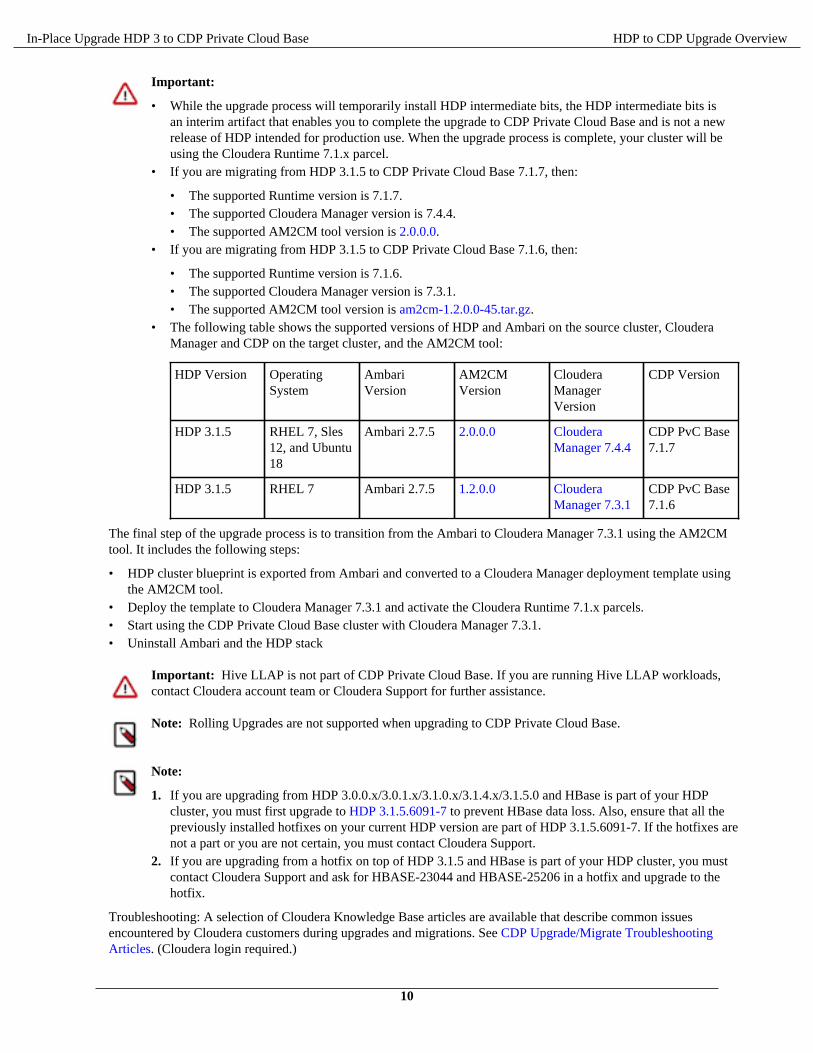
• The following table shows the supported versions of HDP and Ambari on the source cluster, ClouderaManager and CDP on the target cluster, and the AM2CM tool:
HDP Version OperatingSystem
AmbariVersion
AM2CMVersion
ClouderaManagerVersion
CDP Version
HDP 3.1.5 RHEL 7, Sles12, and Ubuntu18
Ambari 2.7.5 2.0.0.0 ClouderaManager 7.4.4
CDP PvC Base7.1.7
HDP 3.1.5 RHEL 7 Ambari 2.7.5 1.2.0.0 ClouderaManager 7.3.1
CDP PvC Base7.1.6
The final step of the upgrade process is to transition from the Ambari to Cloudera Manager 7.3.1 using the AM2CMtool. It includes the following steps:
• HDP cluster blueprint is exported from Ambari and converted to a Cloudera Manager deployment template usingthe AM2CM tool.
• Deploy the template to Cloudera Manager 7.3.1 and activate the Cloudera Runtime 7.1.x parcels.• Start using the CDP Private Cloud Base cluster with Cloudera Manager 7.3.1.• Uninstall Ambari and the HDP stack
Important: Hive LLAP is not part of CDP Private Cloud Base. If you are running Hive LLAP workloads,contact Cloudera account team or Cloudera Support for further assistance.
Note: Rolling Upgrades are not supported when upgrading to CDP Private Cloud Base.
Note:
1. If you are upgrading from HDP 3.0.0.x/3.0.1.x/3.1.0.x/3.1.4.x/3.1.5.0 and HBase is part of your HDPcluster, you must first upgrade to HDP 3.1.5.6091-7 to prevent HBase data loss. Also, ensure that all thepreviously installed hotfixes on your current HDP version are part of HDP 3.1.5.6091-7. If the hotfixes arenot a part or you are not certain, you must contact Cloudera Support.
2. If you are upgrading from a hotfix on top of HDP 3.1.5 and HBase is part of your HDP cluster, you mustcontact Cloudera Support and ask for HBASE-23044 and HBASE-25206 in a hotfix and upgrade to thehotfix.
Troubleshooting: A selection of Cloudera Knowledge Base articles are available that describe common issuesencountered by Cloudera customers during upgrades and migrations. See CDP Upgrade/Migrate TroubleshootingArticles. (Cloudera login required.)
10
In-Place Upgrade HDP 3 to CDP Private Cloud Base HDP to CDP Upgrade Overview
CDP Upgrade ReadinessThere are a number of readiness checks that need to be covered before the upgrade. You must review theconsiderations while preparing for the upgrade. The list presented below is not comprehensive and covers most areasyou need to consider.
Your Cloudera Account team can help you assess the impact of the following with respect to your upgrade. Clouderawill work with you to ensure your cluster is ready and meets all the criteria.
• Cluster environment readiness - latest supported versions
• Ensure supported Operating System, HDP stack, database, and java JDK versions are up-to-date andsupported.
• See the upgrade documentation to ensure that your environments are ready for the upgrade.• On removed components, sevices, and functionalities, see Hive unsupported interfaces and features, HDP Core
component version changes, and Changes to Ambari and HDP services.• Changes in behaviour:
• You need to do a number of migration-related tasks due to semantic changes, and a couple of syntax changesin Hive 3, for example db.table references and DROP CASCADE, might require changes to your applications.
• Spark and Hive tables interoperate using the Hive Warehouse Connector and Spark Direct Reader to accessACID managed tables. You can access external tables from Spark directly using SparkSQL.
• Downtime:
• In-place upgrades will require downtime and automation of the tasks will limit the extent of the downtime• Migrating to new cluster options may limit downtime.
• Ports - Reset the old ports to standard Cloudera Manager ports. It simplifies the Cloudera Manager managed CDPPrivate Cloud Base environment for better future support and standards.
• Bespoke configuration - Consider the impact of upgrading on any bespoke applications and customizations eitherto or integrating with the HDP platform. For example, devops integration tooling, monitoring, and so on.
• Network multihoming is not supported. If the HDP cluster is configured for multihomed networks, then you mustreconfigure to disable that. For more information, see Networking and Security Requirements
• Third-party application readiness - Ensure that the third-party software products you are integrating with arecertified to work with the HDP intermediate bits and CDP Private Cloud Base.
• Ambari mpacks are not all compatible with HDP-7.1.x and/or CDP-7.1.x (CSDs are the Cloudera Managerequivalent of mpacks)
• Not all Management Packs are compatible with the HDP intermediate bits. Cloudera Support can help you assessthe feasibility of your upgrade if you have Management Packs other than HDF installed.
How much time should I plan for to complete my upgrade?An in-place upgrade can take a variable amount of time to complete. Learn about how to plan for and shorten theamount of time required for your upgrade.
The amount of time required for an in-place upgrade depends on many factors, including:
• The number of hosts in your clusters.• The mix of services you have deployed in your clusters.• The amount of data stored in your clusters.
Generally, an upgrade can be completed in 24-48 hours. Upgrades from HDP to CDP may take somewhat longer dueto the Ambari to Cloudera Manager conversion process (AM2CM).
The following table provides some additional information to help you plan for your upgrade.
11
In-Place Upgrade HDP 3 to CDP Private Cloud Base Cluster environment readiness
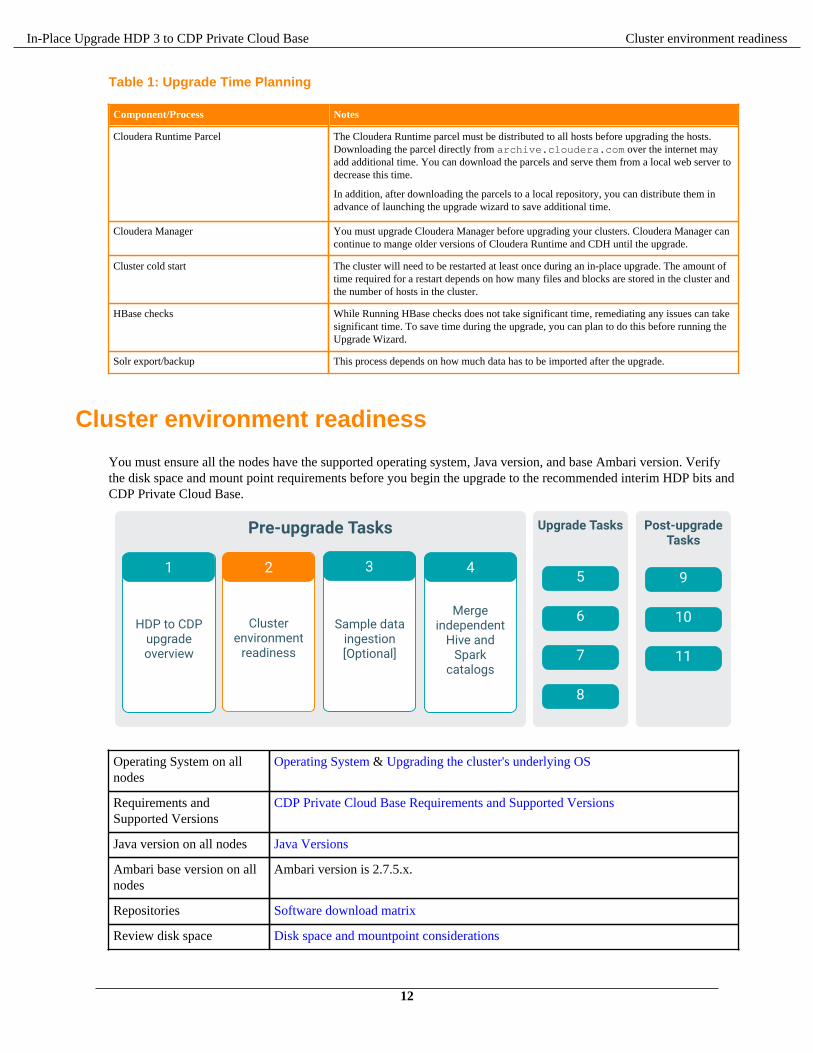
Table 1: Upgrade Time Planning
Component/Process Notes
Cloudera Runtime Parcel The Cloudera Runtime parcel must be distributed to all hosts before upgrading the hosts.Downloading the parcel directly from archive.cloudera.com over the internet mayadd additional time. You can download the parcels and serve them from a local web server todecrease this time.
In addition, after downloading the parcels to a local repository, you can distribute them inadvance of launching the upgrade wizard to save additional time.
Cloudera Manager You must upgrade Cloudera Manager before upgrading your clusters. Cloudera Manager cancontinue to mange older versions of Cloudera Runtime and CDH until the upgrade.
Cluster cold start The cluster will need to be restarted at least once during an in-place upgrade. The amount oftime required for a restart depends on how many files and blocks are stored in the cluster andthe number of hosts in the cluster.
HBase checks While Running HBase checks does not take significant time, remediating any issues can takesignificant time. To save time during the upgrade, you can plan to do this before running theUpgrade Wizard.
Solr export/backup This process depends on how much data has to be imported after the upgrade.
Cluster environment readiness
You must ensure all the nodes have the supported operating system, Java version, and base Ambari version. Verifythe disk space and mount point requirements before you begin the upgrade to the recommended interim HDP bits andCDP Private Cloud Base.
Operating System on allnodes
Operating System & Upgrading the cluster's underlying OS
Requirements andSupported Versions
CDP Private Cloud Base Requirements and Supported Versions
Java version on all nodes Java Versions
Ambari base version on allnodes
Ambari version is 2.7.5.x.
Repositories Software download matrix
Review disk space Disk space and mountpoint considerations
12
In-Place Upgrade HDP 3 to CDP Private Cloud Base Cluster environment readiness
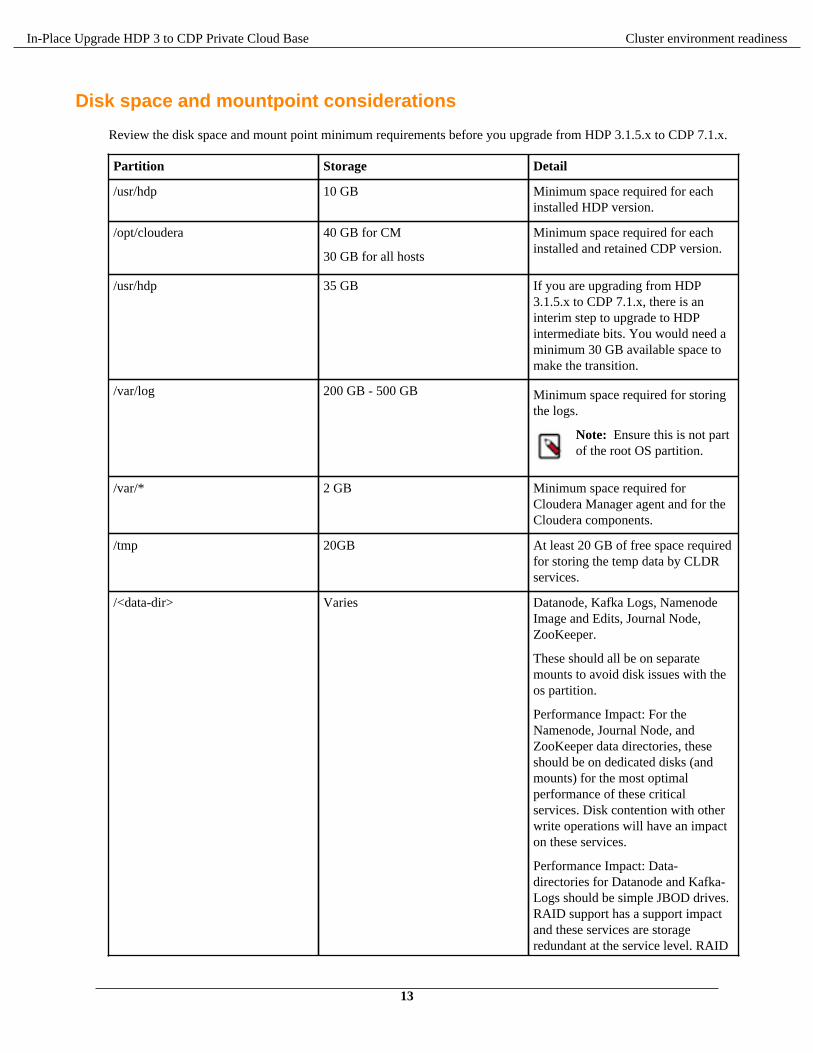
Disk space and mountpoint considerations
Review the disk space and mount point minimum requirements before you upgrade from HDP 3.1.5.x to CDP 7.1.x.
Partition Storage Detail
/usr/hdp 10 GB Minimum space required for eachinstalled HDP version.
/opt/cloudera 40 GB for CM
30 GB for all hosts
Minimum space required for eachinstalled and retained CDP version.
/usr/hdp 35 GB If you are upgrading from HDP3.1.5.x to CDP 7.1.x, there is aninterim step to upgrade to HDPintermediate bits. You would need aminimum 30 GB available space tomake the transition.
/var/log 200 GB - 500 GB Minimum space required for storingthe logs.
Note: Ensure this is not partof the root OS partition.
/var/* 2 GB Minimum space required forCloudera Manager agent and for theCloudera components.
/tmp 20GB At least 20 GB of free space requiredfor storing the temp data by CLDRservices.
/<data-dir> Varies Datanode, Kafka Logs, NamenodeImage and Edits, Journal Node,ZooKeeper.
These should all be on separatemounts to avoid disk issues with theos partition.
Performance Impact: For theNamenode, Journal Node, andZooKeeper data directories, theseshould be on dedicated disks (andmounts) for the most optimalperformance of these criticalservices. Disk contention with otherwrite operations will have an impacton these services.
Performance Impact: Data-directories for Datanode and Kafka-Logs should be simple JBOD drives.RAID support has a support impactand these services are storageredundant at the service level. RAID
13
In-Place Upgrade HDP 3 to CDP Private Cloud Base Cluster environment readiness
Partition Storage Detail
is NOT recommended for theseservice data directories.
/<yarn-local> Varies by workload“yarn.nodemanager.local-dirs`”Between 5-25% of host storagedepending on workload types.
Applications that are heavy inMR technologies will benefittremendously by using the“SSD”storage.
For more information on the hardware requirements for Runtime components, see Cloudera Runtime.
For more information on the CM server storage requirements, see Cloudera Manager Server.
For more information on the CDP Private Cloud Base requirements, see CDP Private Cloud Base Requirements andSupported Versions.
Downloading and Publishing the Package RepositoryDownload the package repository for the product you want to install.
Procedure
1. Download the package repository for the product you want to install:
Cloudera Manager 7.4.4
To download the files for a Cloudera Manager release, download the repository tarball for youroperating system. Then unpack the tarball, move the files to the web server directory, and modifyfile permissions. For example:
sudo mkdir -p /var/www/html/cloudera-repos/cm7
wget https://[username]:[password]@archive.cloudera.com/p/cm7/7.4.4/repo-as-tarball/cm7.4.4-redhat7.tar.gz
tar xvfz cm7.4.4-redhat7.tar.gz -C /var/www/html/cloudera-repos/cm7 --strip-components=1
sudo chmod -R ugo+rX /var/www/html/cloudera-repos/cm7
2. Visit the Repository URL http://<web_server>/cloudera-repos/ in your browser and verify the filesyou downloaded are present. If you do not see anything, your Web server may have been configured to not showindexes.
14
In-Place Upgrade HDP 3 to CDP Private Cloud Base Cluster environment readiness
3. Download the package repository for the product you want to install:
Cloudera Manager 7.3.1
To download the files for a Cloudera Manager release, download the repository tarball for youroperating system. Then unpack the tarball, move the files to the web server directory, and modifyfile permissions. For example:
sudo mkdir -p /var/www/html/cloudera-repos/cm7
wget https://[username]:[password]@archive.cloudera.com/p/cm7/7.3.1/repo-as-tarball/cm7.3.1-redhat7.tar.gz
tar xvfz cm7.3.1-redhat7.tar.gz -C /var/www/html/cloudera-repos/cm7 --strip-components=1
sudo chmod -R ugo+rX /var/www/html/cloudera-repos/cm7
4. Visit the Repository URL http://<web_server>/cloudera-repos/ in your browser and verify the filesyou downloaded are present. If you do not see anything, your Web server may have been configured to not showindexes.
Downloading and Publishing the Parcel RepositoryDownload the parcels that you want to install and publish the parcel directory.
Procedure
1. Download manifest.json and the parcel files for the product you want to install:
Runtime 7.1.7.0
Apache Impala, Apache Kudu, Apache Spark 2, and Cloudera Search are included in the Runtimeparcel. To download the files for the latest Runtime 7 release, run the following commands on theWeb server host:
sudo mkdir -p /var/www/html/cloudera-repossudo wget --recursive --no-parent --no-host-directories https://[username]:[password]@archive.cloudera.com/p/cdh7/7.1.7.0/parcels/ -P /var/www/html/cloudera-repos sudo chmod -R ugo+rX /var/www/html/cloudera-repos/p/cdh7
Runtime 7.1.6.0
Apache Impala, Apache Kudu, Apache Spark 2, and Cloudera Search are included in the Runtimeparcel. To download the files for the latest Runtime 7 release, run the following commands on theWeb server host:
sudo mkdir -p /var/www/html/cloudera-repossudo wget --recursive --no-parent --no-host-directories https://[username]:[password]@archive.cloudera.com/p/cdh7/7.1.6.0/parcels/ -P /var/www/html/cloudera-repossudo chmod -R ugo+rX /var/www/html/cloudera-repos/p/cdh7
Sqoop Connectors
To download the parcels for a Sqoop Connector release, run the following commands on the Webserver host. This example uses the latest available Sqoop Connectors:
sudo mkdir -p /var/www/html/cloudera-repos
15
In-Place Upgrade HDP 3 to CDP Private Cloud Base Sample data ingestion
sudo wget --recursive --no-parent --no-host-directories http://archive.cloudera.com/sqoop-connectors/parcels/latest/ -P /var/www/html/cloudera-repossudo chmod -R ugo+rX /var/www/html/cloudera-repos/sqoop-connectors
If you want to create a repository for a different Sqoop Connector release, replace latest withthe Sqoop Connector version that you want. You can see a list of versions in the parcels parentdirectory.
2. Visit the Repository URL http://<Web_server>/cloudera-repos/ in your browser and verify the filesyou downloaded are present. If you do not see anything, your Web server may have been configured to not showindexes.
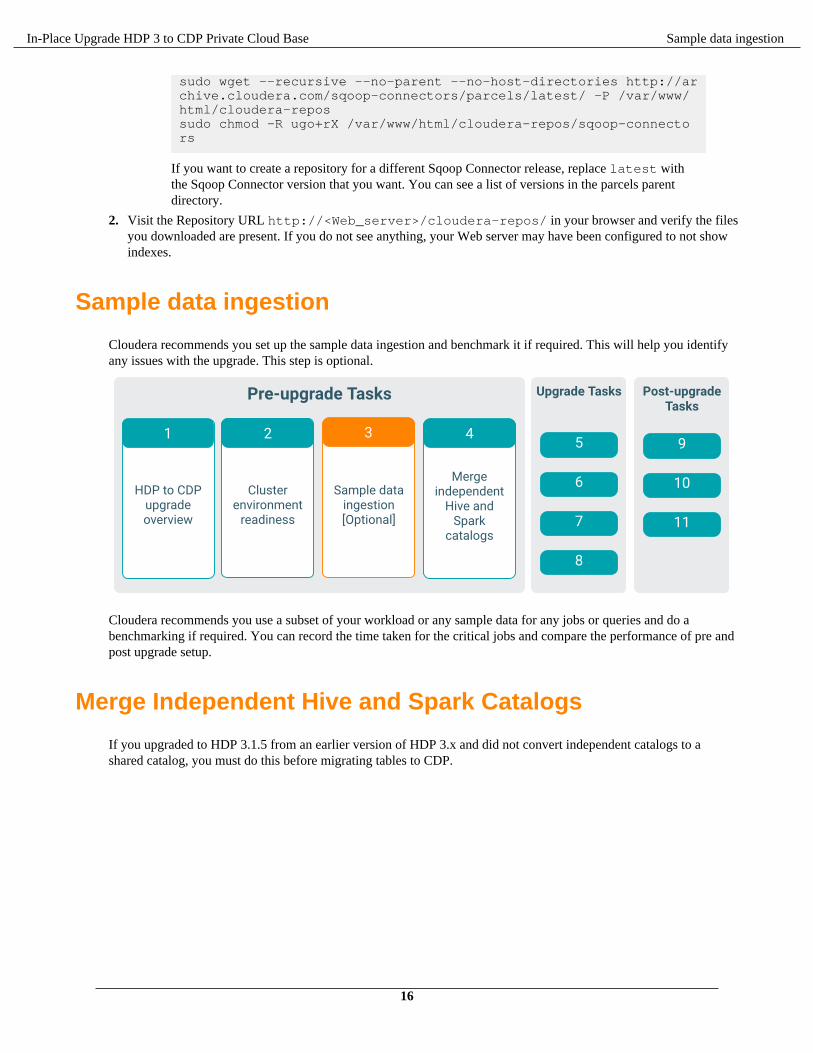
Sample data ingestion
Cloudera recommends you set up the sample data ingestion and benchmark it if required. This will help you identifyany issues with the upgrade. This step is optional.
Cloudera recommends you use a subset of your workload or any sample data for any jobs or queries and do abenchmarking if required. You can record the time taken for the critical jobs and compare the performance of pre andpost upgrade setup.
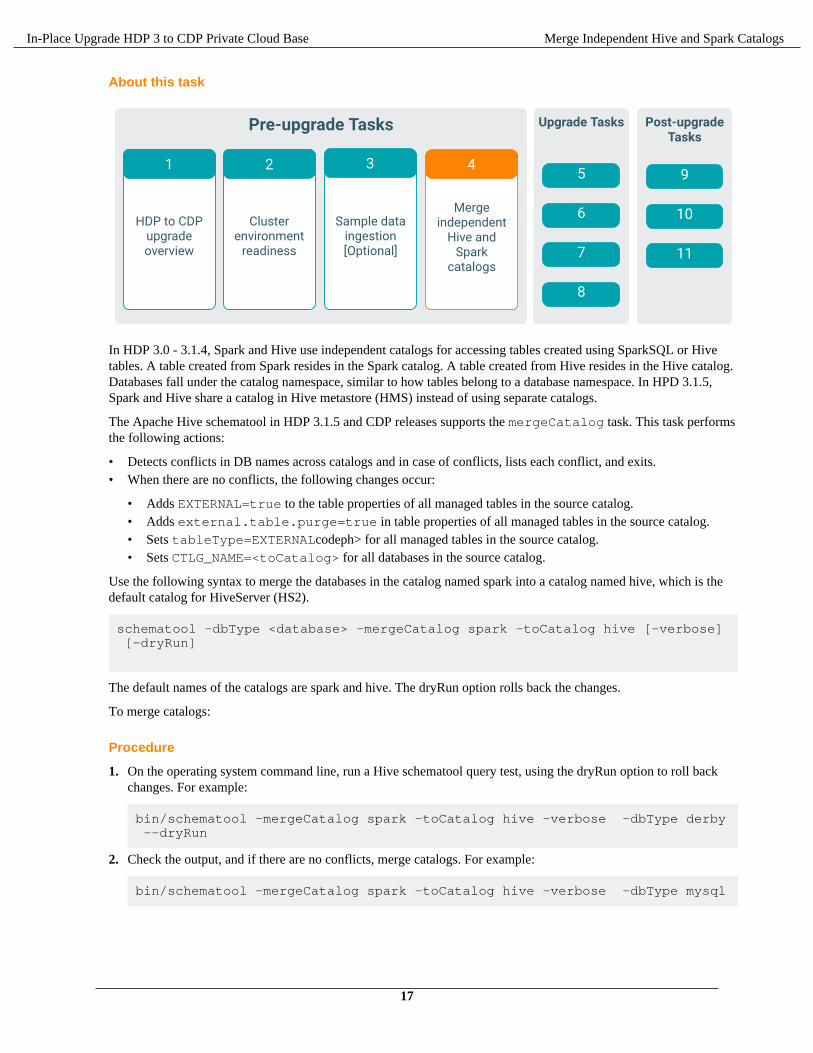
Merge Independent Hive and Spark Catalogs
If you upgraded to HDP 3.1.5 from an earlier version of HDP 3.x and did not convert independent catalogs to ashared catalog, you must do this before migrating tables to CDP.
16
In-Place Upgrade HDP 3 to CDP Private Cloud Base Merge Independent Hive and Spark Catalogs
About this task
In HDP 3.0 - 3.1.4, Spark and Hive use independent catalogs for accessing tables created using SparkSQL or Hivetables. A table created from Spark resides in the Spark catalog. A table created from Hive resides in the Hive catalog.Databases fall under the catalog namespace, similar to how tables belong to a database namespace. In HPD 3.1.5,Spark and Hive share a catalog in Hive metastore (HMS) instead of using separate catalogs.
The Apache Hive schematool in HDP 3.1.5 and CDP releases supports the mergeCatalog task. This task performsthe following actions:
• Detects conflicts in DB names across catalogs and in case of conflicts, lists each conflict, and exits.• When there are no conflicts, the following changes occur:
• Adds EXTERNAL=true to the table properties of all managed tables in the source catalog.• Adds external.table.purge=true in table properties of all managed tables in the source catalog.• Sets tableType=EXTERNALcodeph> for all managed tables in the source catalog.• Sets CTLG_NAME=<toCatalog> for all databases in the source catalog.
Use the following syntax to merge the databases in the catalog named spark into a catalog named hive, which is thedefault catalog for HiveServer (HS2).
schematool -dbType <database> -mergeCatalog spark -toCatalog hive [-verbose] [-dryRun]
The default names of the catalogs are spark and hive. The dryRun option rolls back the changes.
To merge catalogs:
Procedure
1. On the operating system command line, run a Hive schematool query test, using the dryRun option to roll backchanges. For example:
bin/schematool -mergeCatalog spark -toCatalog hive -verbose -dbType derby --dryRun
2. Check the output, and if there are no conflicts, merge catalogs. For example:
bin/schematool -mergeCatalog spark -toCatalog hive -verbose -dbType mysql
17
In-Place Upgrade HDP 3 to CDP Private Cloud Base Ambari and HDP Upgrade Checklist
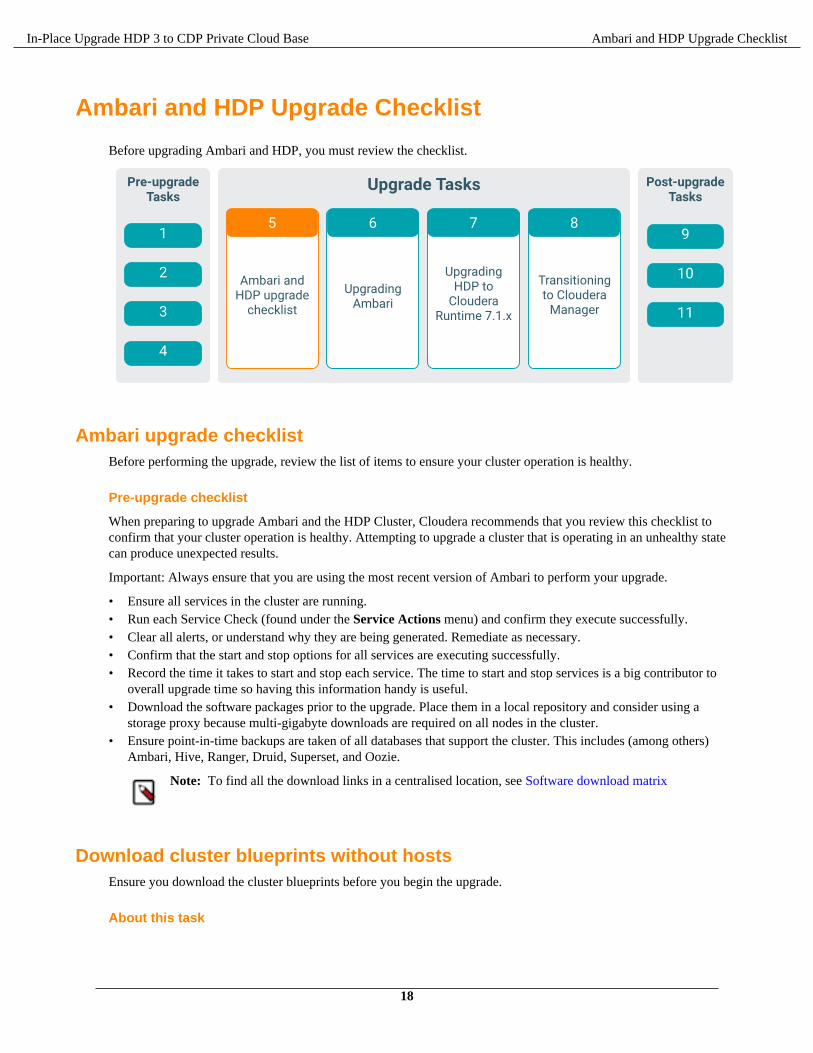
Ambari and HDP Upgrade Checklist
Before upgrading Ambari and HDP, you must review the checklist.
Ambari upgrade checklistBefore performing the upgrade, review the list of items to ensure your cluster operation is healthy.
Pre-upgrade checklist
When preparing to upgrade Ambari and the HDP Cluster, Cloudera recommends that you review this checklist toconfirm that your cluster operation is healthy. Attempting to upgrade a cluster that is operating in an unhealthy statecan produce unexpected results.
Important: Always ensure that you are using the most recent version of Ambari to perform your upgrade.
• Ensure all services in the cluster are running.• Run each Service Check (found under the Service Actions menu) and confirm they execute successfully.• Clear all alerts, or understand why they are being generated. Remediate as necessary.• Confirm that the start and stop options for all services are executing successfully.• Record the time it takes to start and stop each service. The time to start and stop services is a big contributor to
overall upgrade time so having this information handy is useful.• Download the software packages prior to the upgrade. Place them in a local repository and consider using a
storage proxy because multi-gigabyte downloads are required on all nodes in the cluster.• Ensure point-in-time backups are taken of all databases that support the cluster. This includes (among others)
Ambari, Hive, Ranger, Druid, Superset, and Oozie.
Note: To find all the download links in a centralised location, see Software download matrix
Download cluster blueprints without hostsEnsure you download the cluster blueprints before you begin the upgrade.
About this task
18
In-Place Upgrade HDP 3 to CDP Private Cloud Base Ambari and HDP Upgrade Checklist
Procedure
To download the cluster blueprints without hosts, do the following:
curl ${securecurl} -H "X-Requested-By: ambari" -X GET -u ${ambariuser}:${ambaripwd} ${ambariprotocol}://${ambariserver}:${ambariport}/api/v1/clusters/${clustername}?format=blueprint > "${backupdir}"/${clustername}_blueprint_without_hosts_"$(date +"%Y%m%d%H%M%S")".json
where,
securecurl = -k for https
ambariuser = Ambari User Name
ambaripwd = Ambari Password
ambariprotocol = http or https
ambariserver = Ambari Server Name
ambariport = Ambari Port
clustername = The Name of the cluster
backupdir = The folder to download the blueprint
HDP upgrade checklistYou must ensure that your HDP cluster satisfies specific prerequisites before initiating the upgrade process.
• You must have root, administrative, or root-equivalent authorization on the Ambari Server host and all AmbariAgent hosts in the cluster.
• You must make a safe copy of the Ambari Server configuration file found at /etc/ambari-server/conf/ambari.properties.
• If your cluster is SSO-enabled, do not stop Knox before upgrading Ambari.• You must disable the Queue Priority Support feature of YARN.
Checklist for large clustersIf you have a large cluster with a large data volume, then make sure that you configure the Ambari NameNode restarttimeout parameter.
In a large cluster, NameNode startup processes can take a long time. NameNode startup time depends not only onhost properties, but also on data volume and network parameters. To ensure that the Ambari requests for starting theNameNode do not timeout during an upgrade, you should configure the Ambari NameNode restart timeout parameter,upgrade.parameter.nn-restart.timeout in /etc/ambari-server/conf/ambari.properties on the AmbariServer host. You may need to add the restart timeout parameter and value to the Ambari server host following adefault installation. For a large cluster, you should add 10% to the usual time (in seconds) required to restart yourNameNode. Although no standard way to determine an appropriate value exists, you may use the following guidance:
For example, record the time (seconds) required to restart the active NameNode for your current Ambari serverversion. If restarting takes 10 minutes, (600 seconds), then add upgrade.parameter.nn-restart.timeout=660 to the /etc/ambari-server/conf/ambari.properties file on the Ambari Server host.
After adding or resetting the Ambari NameNode restart parameter, restart your Ambari server before starting the HDPupgrade.
ambari-server restart
For Ambari Upgrades
19
In-Place Upgrade HDP 3 to CDP Private Cloud Base Ambari and HDP Upgrade Checklist
• Review supported Ambari Server database versions using the Cloudera Support Matrix. Review the resourcesrequired for the database upgrade. You will upgrade your Ambari Server database during the Ambari upgradeprocedure.
• Ambari 7.1.x.x only supports the following operations when running against a HDP 3.1.5 cluster:• • Run Service Checks
• Start, Stop, Restart a Service• Change Configuration• Enable and Disable Maintenance Mode• Disable Auto Start• Remove Services• Remove Components• Remove and Decommission Hosts
To restore full management functionality, use Ambari 7.1.x.x to upgrade to HDP intermediate bits as soon aspossible.
For HDP Cluster Upgrades
• Ensure sufficient disk space on /usr/hdp/<version> (roughly 10GB for each additional HDP release).• Additional components are added to the cluster as part of the HDP intermediate bits upgrade including YARN
ATSv2, YARN Registry DNS, and additional Hive clients required for the Spark history server. If your clusterhas kerberos enabled, you must configure Ambari to manage the kerberos administrator credentials prior to theupgrade, so that the appropriate kerberos principals can be created during the upgrade process.
• You must take a backup of the running topology processes if your HDP cluster includes the Storm component.You must stop and remove the Storm services during the upgrade. CDP Private Cloud Base cluster does notsupport Storm. Storm can be replaced with Cloudera Streaming Analytics (CSA) powered by Apache Flink. Formore information on Component changes in CDP Private Cloud, see Updated HDP Components.
Related InformationCloudera Support Matrix
Before upgrading any clusterTo perform an HDP intermediate bits upgrade using Ambari, your cluster must meet the following prerequisites.Meeting these prerequisites is essential for Ambari to know that the cluster is in a healthy operating mode and cansuccessfully manage the upgrade process.
For any Cluster
Disk Space: Be sure to have adequate space on /usr/hdp for the target HDP version. Each complete install of anHDP version occupies about 10GB of disk space.
Ambari Agent Heartbeats: All Ambari Agents must be communicating and heartbeating to Ambari Server. Any hoststhat are not heartbeating must be in Maintenance mode.
Hive Upgrade: The upgrade process does not back up the Hive Metastore, nor does it compact ACID tables. Beforeupgrading Hive, you must:
• Manually back up your Hive metastore database after using the pre-upgrade tool, described later, and beforeupgrading.
• If you have ACID tables in your Hive metastore database, enable ACID operations using Ambari Web or set Hiveconfiguration properties to enable ACID.
Note: You must remove the components that are unsupported in CDP Private Cloud Base. For moreinformation, see HDP Core component version changes. If you are not using a component in the CDPcluster, then you must remove them. The unused component extends the time and complexity of the HDPto CDP upgrade.
Host Maintenance Mode
20
In-Place Upgrade HDP 3 to CDP Private Cloud Base Ambari and HDP Upgrade Checklist
The following two scenarios are checked:
• Any hosts in Maintenance mode must not be hosting any Service Master Components.• Any host in Maintenance Mode that is not hosting Master Components is allowed but you will receive a warning.
You can proceed with the upgrade. But these hosts will not be upgraded and before finalising the upgrade, youmust delete these hosts from the cluster.
Service Maintenance Mode: No services can be in Maintenance mode, except for Ambari Metrics System,SmartSense, and Log Search.
Services Started: All services must be started, except for Ambari Metrics System, SmartSense, and Log Search.
Service Checks: All service checks must pass. Be sure to run Service Actions > Run Service Check on all services(and remediate if necessary) prior to attempting an HDP upgrade.
Managing MPacksYou must review the information mentioned in this section before you proceed with the upgrade.
• Not all Management Packs are compatible with the HDP intermediate bits. Cloudera Support can help you assessthe feasibility of your upgrade if you have Management Packs other than HDF installed.
• If you have both HDF and HDP managed by the same Ambari instance, you must be on HDF 3.5.2. Onceyou've upgraded to HDF 3.5.2 you must have Ambari 2.7.5 with HDP 3.1.5 and HDF 3.5.2. At this point, thein-place upgrade process using AM2CM will take care of both HDP and HDF at the same time to transitionyou to CDP cluster including the CFM parcel (which contains NiFi and NiFi Registry). You must read the HDFdocumentation before proceeding with the In-place upgrade of HDF to CFM on CDP. For more information, seeHDF to CFM on CDP documentation.
• If you have doubts or concerns or questions about the migration process, you must contact the Cloudera Supportfor further assistance to help you determine the best migration plan for your business needs.
Changes to Ambari services and viewsDuring the process of upgrading to Ambari 7.1.x and HDP intermediate bits, additional components are added to yourcluster, and deprecated services and views are removed.
These services are removed automatically as part of the upgrade process. You can also remove these servicesmanually prior to the upgrade by following the steps below:
1. Log in to the Ambari UI.2. Click the service you wish to remove.3. Stop the service.4. Delete the service.
Ambari 2.7.5.x to Ambari 7.1.x.x.
The Ambari 2.7.5.x to Ambari 7.1.x.x upgrade removes the following views:
• Accumulo• Storm• Superset• Pig
The HDP 2.6.5.x to HDP intermediate bits upgrade removes the following services:
• Accumulo• Storm• Superset• Pig• SmartSense
21
In-Place Upgrade HDP 3 to CDP Private Cloud Base Ambari and HDP Upgrade Checklist
Caution:
• When you upgrade Ambari to a later version, Accumulo service is not supported as Accumulo is notcompatible with other components and cannot access the data. Hence, you must delete Accumulo servicewhen upgrading Ambari.
Note: You must remove Accumulo on the Ambari managed HDP cluster as the AM2CM tool does nottransition the Accumulo component from HDP to CDP. However, you can add Accumulo as a service on theCloudera manager managed CDP Private Cloud Base cluster.
Important:
• Upgrading from HDP 3.1.5 to HDP intermediate bits does not support HDP Search to Cloudera Searchupgrade.
• LLAP is not supported in CDP Private Cloud Base. You can move the LLAP workloads to CDW Publiccloud or Private Cloud.
• You must manually remove Storm before upgrading to the HDP Intermediate bits as it is not supported inthe HDP intermediate bits.
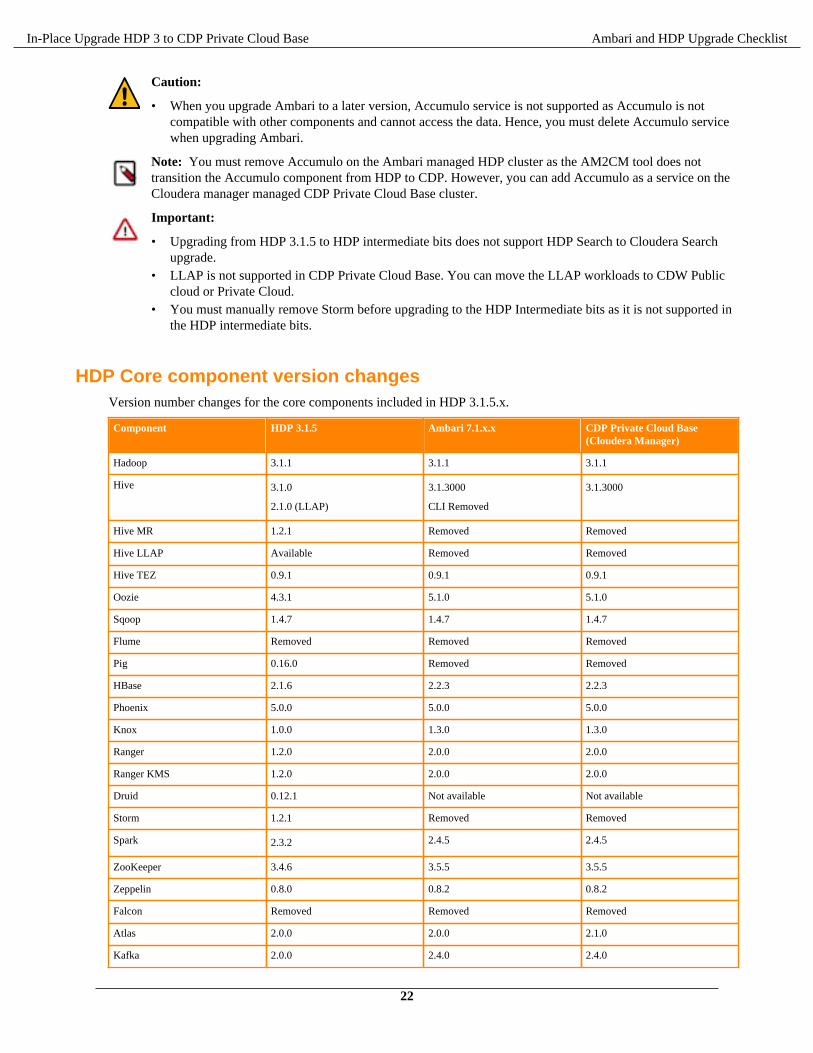
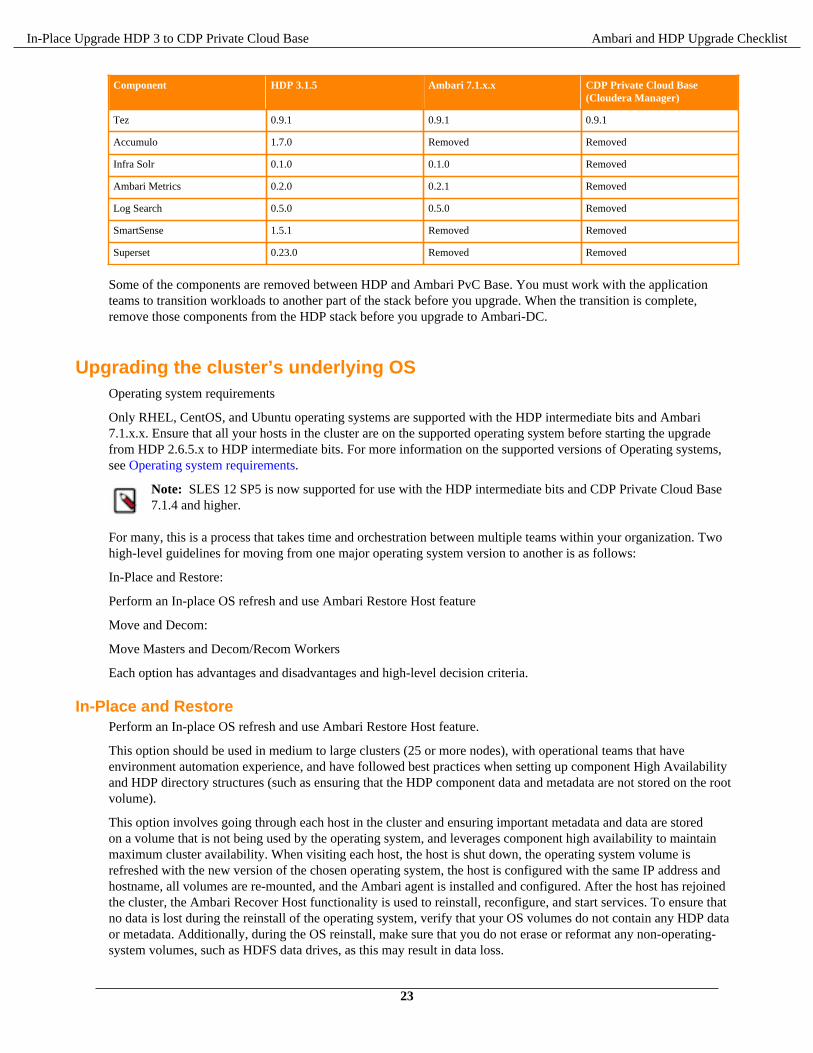
HDP Core component version changesVersion number changes for the core components included in HDP 3.1.5.x.
Component HDP 3.1.5 Ambari 7.1.x.x CDP Private Cloud Base(Cloudera Manager)
Hadoop 3.1.1 3.1.1 3.1.1
Hive 3.1.0
2.1.0 (LLAP)
3.1.3000
CLI Removed
3.1.3000
Hive MR 1.2.1 Removed Removed
Hive LLAP Available Removed Removed
Hive TEZ 0.9.1 0.9.1 0.9.1
Oozie 4.3.1 5.1.0 5.1.0
Sqoop 1.4.7 1.4.7 1.4.7
Flume Removed Removed Removed
Pig 0.16.0 Removed Removed
HBase 2.1.6 2.2.3 2.2.3
Phoenix 5.0.0 5.0.0 5.0.0
Knox 1.0.0 1.3.0 1.3.0
Ranger 1.2.0 2.0.0 2.0.0
Ranger KMS 1.2.0 2.0.0 2.0.0
Druid 0.12.1 Not available Not available
Storm 1.2.1 Removed Removed
Spark 2.3.2 2.4.5 2.4.5
ZooKeeper 3.4.6 3.5.5 3.5.5
Zeppelin 0.8.0 0.8.2 0.8.2
Falcon Removed Removed Removed
Atlas 2.0.0 2.0.0 2.1.0
Kafka 2.0.0 2.4.0 2.4.0
22
In-Place Upgrade HDP 3 to CDP Private Cloud Base Ambari and HDP Upgrade Checklist
Component HDP 3.1.5 Ambari 7.1.x.x CDP Private Cloud Base(Cloudera Manager)
Tez 0.9.1 0.9.1 0.9.1
Accumulo 1.7.0 Removed Removed
Infra Solr 0.1.0 0.1.0 Removed
Ambari Metrics 0.2.0 0.2.1 Removed
Log Search 0.5.0 0.5.0 Removed
SmartSense 1.5.1 Removed Removed
Superset 0.23.0 Removed Removed
Some of the components are removed between HDP and Ambari PvC Base. You must work with the applicationteams to transition workloads to another part of the stack before you upgrade. When the transition is complete,remove those components from the HDP stack before you upgrade to Ambari-DC.
Upgrading the cluster’s underlying OSOperating system requirements
Only RHEL, CentOS, and Ubuntu operating systems are supported with the HDP intermediate bits and Ambari7.1.x.x. Ensure that all your hosts in the cluster are on the supported operating system before starting the upgradefrom HDP 2.6.5.x to HDP intermediate bits. For more information on the supported versions of Operating systems,see Operating system requirements.
Note: SLES 12 SP5 is now supported for use with the HDP intermediate bits and CDP Private Cloud Base7.1.4 and higher.
For many, this is a process that takes time and orchestration between multiple teams within your organization. Twohigh-level guidelines for moving from one major operating system version to another is as follows:
In-Place and Restore:
Perform an In-place OS refresh and use Ambari Restore Host feature
Move and Decom:
Move Masters and Decom/Recom Workers
Each option has advantages and disadvantages and high-level decision criteria.
In-Place and RestorePerform an In-place OS refresh and use Ambari Restore Host feature.
This option should be used in medium to large clusters (25 or more nodes), with operational teams that haveenvironment automation experience, and have followed best practices when setting up component High Availabilityand HDP directory structures (such as ensuring that the HDP component data and metadata are not stored on the rootvolume).
This option involves going through each host in the cluster and ensuring important metadata and data are storedon a volume that is not being used by the operating system, and leverages component high availability to maintainmaximum cluster availability. When visiting each host, the host is shut down, the operating system volume isrefreshed with the new version of the chosen operating system, the host is configured with the same IP address andhostname, all volumes are re-mounted, and the Ambari agent is installed and configured. After the host has rejoinedthe cluster, the Ambari Recover Host functionality is used to reinstall, reconfigure, and start services. To ensure thatno data is lost during the reinstall of the operating system, verify that your OS volumes do not contain any HDP dataor metadata. Additionally, during the OS reinstall, make sure that you do not erase or reformat any non-operating-system volumes, such as HDFS data drives, as this may result in data loss.
23
In-Place Upgrade HDP 3 to CDP Private Cloud Base Upgrading Ambari
Move and DecommissionMove Masters and Decom/Recom Workers. Each option has advantages and disadvantages and high-level decisioncriteria.
This option should be used in smaller clusters (under 25 nodes), where operational teams may not have access tooperating system and configuration management automation tooling or have not yet followed best practices whensetting up the HDP directory structures (such as ensuring HDP component data and metadata are not stored on theroot volume).
This option involves decommissioning worker nodes and replacing them with worker nodes that have the newoperating system version on them. For master nodes, the move-master operation is used to move all masters off of ahost, and on to a new host with the new operating system version on them. Decommissioning worker nodes can takea great deal of time, depending on the density of the nodes, and move-master operations require many cluster servicesto be restarted, so this is a time-consuming process that requires multiple periods downtime, but it does not requireany operating system level operations to be performed.
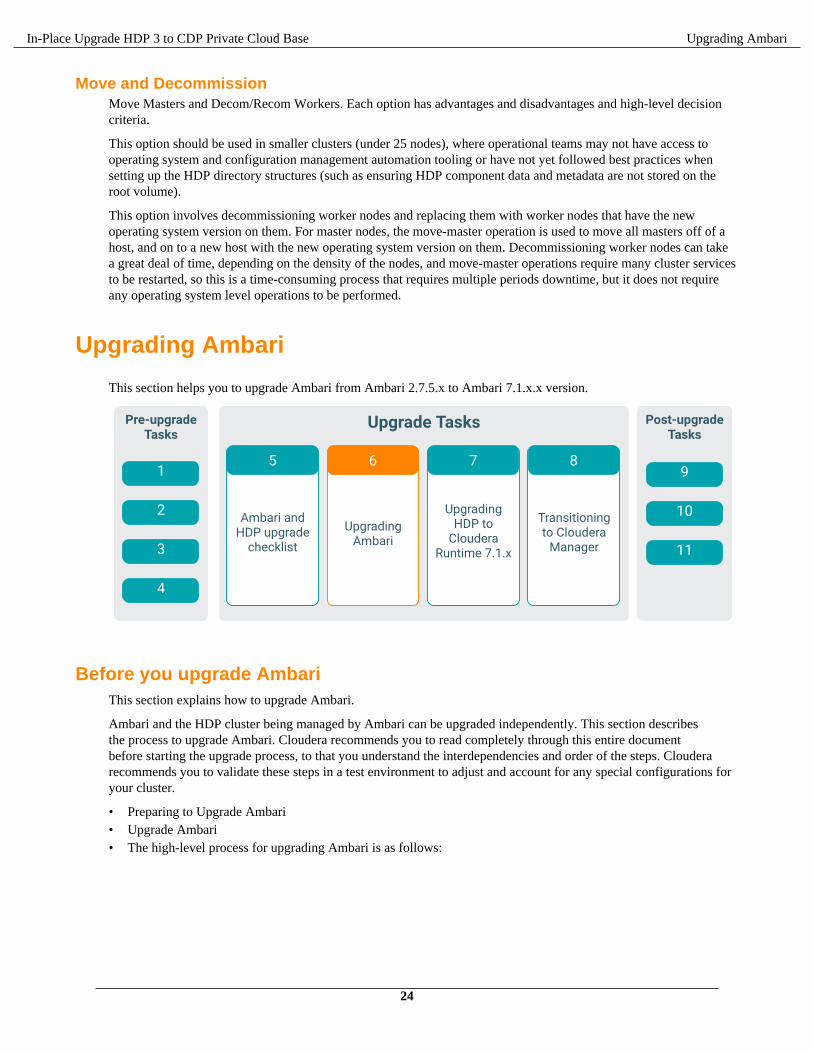
Upgrading Ambari
This section helps you to upgrade Ambari from Ambari 2.7.5.x to Ambari 7.1.x.x version.
Before you upgrade AmbariThis section explains how to upgrade Ambari.
Ambari and the HDP cluster being managed by Ambari can be upgraded independently. This section describesthe process to upgrade Ambari. Cloudera recommends you to read completely through this entire documentbefore starting the upgrade process, to that you understand the interdependencies and order of the steps. Clouderarecommends you to validate these steps in a test environment to adjust and account for any special configurations foryour cluster.
• Preparing to Upgrade Ambari• Upgrade Ambari• The high-level process for upgrading Ambari is as follows:
24
In-Place Upgrade HDP 3 to CDP Private Cloud Base Upgrading Ambari
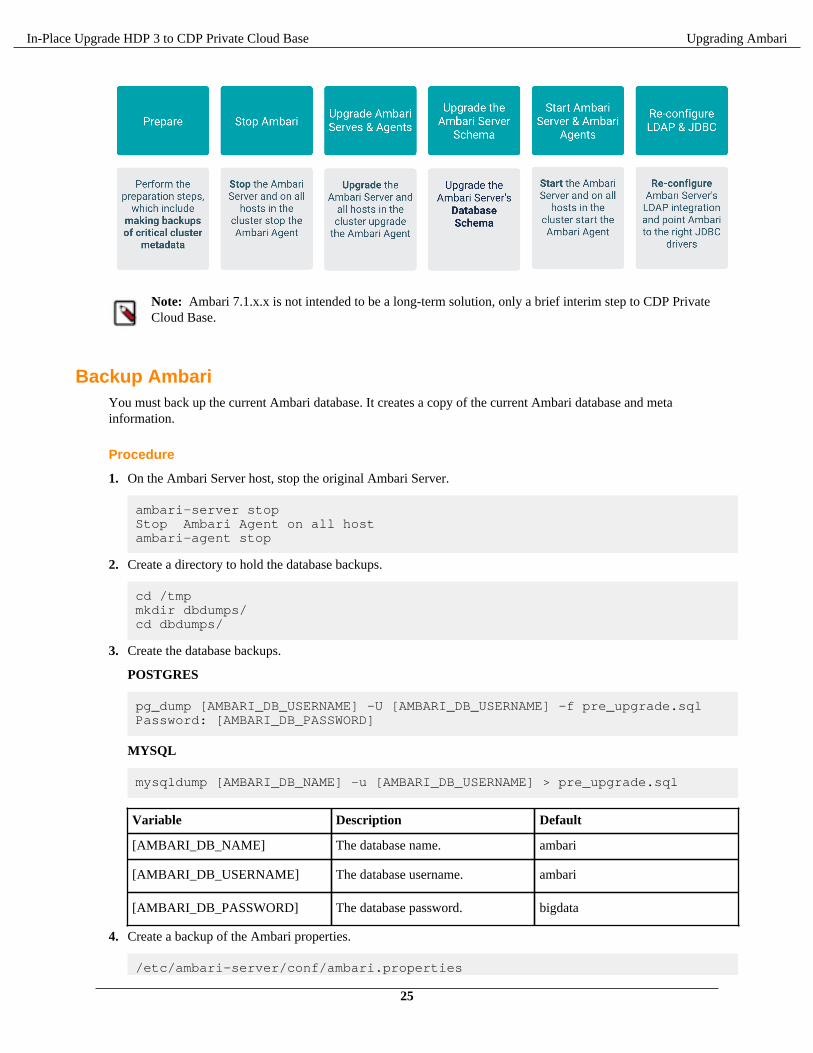
Note: Ambari 7.1.x.x is not intended to be a long-term solution, only a brief interim step to CDP PrivateCloud Base.
Backup AmbariYou must back up the current Ambari database. It creates a copy of the current Ambari database and metainformation.
Procedure
1. On the Ambari Server host, stop the original Ambari Server.
ambari-server stopStop Ambari Agent on all hostambari-agent stop
2. Create a directory to hold the database backups.
cd /tmpmkdir dbdumps/cd dbdumps/
3. Create the database backups.
POSTGRES
pg_dump [AMBARI_DB_USERNAME] -U [AMBARI_DB_USERNAME] -f pre_upgrade.sqlPassword: [AMBARI_DB_PASSWORD]
MYSQL
mysqldump [AMBARI_DB_NAME] -u [AMBARI_DB_USERNAME] > pre_upgrade.sql
Variable Description Default
[AMBARI_DB_NAME] The database name. ambari
[AMBARI_DB_USERNAME] The database username. ambari
[AMBARI_DB_PASSWORD] The database password. bigdata
4. Create a backup of the Ambari properties.
/etc/ambari-server/conf/ambari.properties
25

In-Place Upgrade HDP 3 to CDP Private Cloud Base Upgrading Ambari
/etc/ambari-agent/conf/ambari-agent.ini
Setting up a local repositoryYou need to set up a local repository, update the version repository base URLs, and edit the repository configurationfile.
As a first step, you must set up a local repository for Ambari and HDP. For more information, see set up a localrepository.
A case-study of setting up local repositories: Case study for setting up a local repo
When the local repository is created, update the version repository base urls in Ambari. For more information, seeupdate the version repository base urls.
Finally, edit the repository configuration file to use this new local repository. For more information, see edit therepository configuration file
Note: You can use the case studies to set up a local repository for all of the 7.1.x versions. For example, thecase studies in this section help you to set up a local repository for the 7.1.7 version.
Updating Ambari repo filesSome services depend on components that are installed from the Ambari repository. It is not updated automatically.Also, Package Manager displays an error about the unavailable repository URL when you update the packagelists. Cloudera recommends you to manually update the URLs located at /etc/yum.repos.d/ambari.repo on all hosts(including server host).
Updating HDP repo filesWhen the cluster settings for the HDP repository URL is updated, repository files on hosts are not immediatelyregenerated. The files are re-generated when you add a new component or service. But an inaccessible repositoryURL causes the Package Manager to display an error about the unavailable repository URL when you update thepackage lists. Cloudera recommends you to manually update the URLs in the HDP repository files (for example, /etc/yum.repos.d/ambari-hdp-1.repo) on all agent hosts.
Before you begin
Note: Ambari 7.1.x.x and HDP 7.1.x.x are version numbers. For example, Ambari 7.1.7.0 and HDP 7.1.7.0or Ambari 7.1.6.0 and HDP 7.1.6.0 and so on.
Case study for setting up an HDP-GPL local repositoryIf the cluster is using the GPL components, you must replace the HDP-GPL repository URL with a local repository.
Procedure
1. Set up a local HDP-GPL repository
wget -nv https://archive.cloudera.com/p/HDPDC/7.x/7.1.7.0/centos7/hdp.repo -O /etc/yum.repos.d/hdp.gpl.repomkdir -p /var/www/html/hdp-gpl/centos7cd /var/www/html/hdp-gpl/centos7/reposync -r HDP-GPL-7.1.x.xcreaterepo /var/www/html/hdp-gpl/centos7/HDP-GPL-7.1.x.x/
2. Edit /etc/ambari-server/conf/ambari.properties.
3. Replace gpl.license.accepted=false with gpl.license.accepted=true.
4. Restart Ambari server.
5. You must edit the HDP-GPL repository similar to the HDP repository. However, the URL and Local repositorycontents, and the UI fields are different for both the repositories. For more information on updating the version
26
In-Place Upgrade HDP 3 to CDP Private Cloud Base Upgrading Ambari
repository, see Update version repository base urls. If you do not plan use the GPL components, disable thegpl.license.accepted property.
6. Restart Ambari server
Setting up local repository with temporary internet accessYou must have completed the Getting Started Setting up a Local Repository procedure.
About this taskTo finish setting up your local repository, complete the following:
Procedure
1. Install the repository configuration files for Ambari and the Stack on the host.
2. Confirm repository availability:
• For RHEL, CentOS, Oracle or Amazon Linux: yum repolist• For SLES: zypper repos• For Debian and Ubuntu: dpkg-list
3. Synchronize the repository contents to your mirror server:
a) Browse to the web server directory:
• For RHEL, CentOS, Oracle or Amazon Linux: cd /var/www/html• For SLES: cd /srv/www/htdocs/rpms• For Debain and Ubuntu: cd /var/www/html
b) For Ambari, create the ambari directory and reposync: mkdir -p ambari/<OS>, cd ambari/<OS>,and reposync -r Updates-Ambari-7.1.x.x. In this syntax, the value of <OS> is amazonlinux2,centos7, sles12, ubuntu16, ubuntu18, or debian9.
Important: Due to a known issue in version 1.1.31-2 of the Debian 9 reposync, we advise usingreposync version 11.3.1-3 or above when working on a Debian 9 host.
c) For Hortonworks Data Platform (HDP) stack repositories, create the hdp directory and reposync: mkdir -p hdp/<OS>, cd hdp/<OS>, and reposync -r HDP-<latest.version>, and reposync -rHDP-UTILS-<version>.
d) For HDF Stack Repositories, create an hdf directory and reposync. mkdir -p hdf/<OS>, cd hdf/<OS>,and reposync -r HDF-<latest.version>.
4. Generate the repository metadata:
• For Ambari: createrepo <web.server.directory>/ambari/<OS>/Updates-Ambari-7.1.x.x
• For HDP Stack Repositories: createrepo <web.server.directory>/hdp/<OS>/HDP-<latest.version> createrepo <web.server.directory>/hdp/<OS>/HDP-UTILS-<version>
• For HDF Stack Repositories: createrepo <web.server.directory>/hdf/<OS>/HDF-<latest.version>
27
In-Place Upgrade HDP 3 to CDP Private Cloud Base Upgrading Ambari
5. Confirm that you can browse to the newly created repository:
• Ambari Base URL http://<web.server>/ambari/<OS>/Updates-Ambari-7.1.x.x• HDF Base URL http://<web.server>/hdf/<OS>/HDF-<latest.version>• HDP Base URL http://<web.server>/hdp/<OS>/HDP-<latest.version>• HDP-UTILS Base URL http://<web.server>/hdp/<OS>/HDP-UTILS-<version>
Where:
• <web.server> – The FQDN of the web server host• <version> – The Hortonworks stack version number• <OS> – centos7, sles12, ubuntu16, ubuntu 18, or debian9
Important: Be sure to record these Base URLs. You need them when you are installing Ambari and theCluster.
6. Optional. If you have multiple repositories configured in your environment, deploy the following plug-in onall the nodes in your cluster.
a) Install the plug-in. For RHEL/CentOS/Oracle 7: yum install yum-plugin-prioritiesb) Edit the /etc/yum/pluginconf.d/priorities.conf file to add the following: [main] enabl
ed=1 gpgcheck=0
Case study for setting up local repositoryReview this case study to understand - how to prepare a local repository for Ambari 7.1.x.x and HDP 7.1.x.x onCentos7:
yum install yum-utils createrepo -yyum install httpd -y//firewall configurationsudo systemctl start httpdsudo systemctl status httpdmkdir -p /var/www/html/wget -nv https://archive.cloudera.com/p/ambaridc/7.x/7.1.7.0/centos7/ambaridc.repo -O /etc/yum.repos.d/ambari.repowget -nv archive.cloudera.com/p/HDPDC/7.x/7.1.7.0/centos7/hdp.repo -O /etc/yum.repos.d/hdp.repoyum repolistcd /var/www/htmlmkdir -p ambari/centos7cd ambari/centos7/reposync -r ambari-7.1.x.xcd ../..mkdir -p hdp/centos7cd hdp/centos7/reposync -r HDP-7.1.x.xreposync -r HDP-UTILS-1.1.0.22createrepo /var/www/html/ambari/centos7/ambari-7.1.x.xcreaterepo /var/www/html/hdp/centos7/HDP-7.1.x.xcreaterepo /var/www/html/hdp/centos7/HDP-UTILS-1.1.0.22/
Result:The repositories will be available at the local web server:http://<web.server>/ambari/centos7/ambari-7.1.x.x/http://<web.server>/hdp/centos7/HDP-7.1.x.x/http://<web.server>/hdp/centos7/HDP-UTILS-1.1.0.22/
Update version repository base urlsUse Admin/Versions/Repositories to provide URLs for your source repositories.
28
In-Place Upgrade HDP 3 to CDP Private Cloud Base Upgrading Ambari
Procedure
1. Browse to Ambari Admin > Versions > Manage Versions > OK.
2. In Admin/Versions, click the version name you want to modify.
3. In Repositories, modify the base URLs for the repositories. To use the private software repositories, see the list ofavailable HDP repositories for each OS. Or, if you are using a local repository, enter the Base URLs for the localrepository you have created.
4. Click Save.
5. Click Confirm Change. You must confirm the change since you are about to change repository Base URLs thatare already in use. Please confirm that you intend to make this change and that the new Base URLs point to thesame exact stack version and build.
Preparing Ambari Repository Configuration File to use Local RepositoryYou must prepare the Ambari Repository Configuration File to use the Local Repository.
Procedure
1. Download the ambari.repo file from the private repository: https://username:[email protected]/p/ambaridc/7.x/7.1.7.0/<OS>/ambaridc.repo/
2. Edit the ambari.repo file and replace the Ambari Base URL baseurl obtained when setting up your localrepository.
#VERSION_NUMBER=7.1.7.0-96[ambari-7.1.7.0]#json.url = http://public-repo-1.hortonworks.com/HDP/hdp_urlinfo.jsonname=ambari Version - ambari-7.1.7.0baseurl=https://archive.cloudera.com/p/ambaridc/7.x/7.1.7.0/centos7/gpgcheck=1gpgkey=https://archive.cloudera.com/p/ambaridc/7.x/7.1.7.0/centos7/RPM-GPG-KEY/RPM-GPG-KEY-Jenkinsenabled=1priority=1
Note: You can disable the GPG check by setting gpgcheck =0. Alternatively, you can keep the checkenabled but replace gpgkey with the URL to GPG-KEY in your local repository.
3. Base URL for a Local Repository.
• Built with Repository Tarball (No Internet Access) http://<web.server>/Ambari-7.1.x.x/<OS>• Built with Repository File (Temporary Internet Access) http://<web.server>/ambari/<OS>/Upda
tes-Ambari-7.1.x.x where <web.server> = FQDN of the web server host, and <OS> isamazonlinux2, centos7, sles12, ubuntu16, ubuntu18, or debian9.
4. Place the ambari.repo file on the host you plan to use for the Ambari server:
• For RHEL/CentOS/Oracle/Amazon Linux: /etc/yum.repos.d/ambari.repo• For SLES: /etc/zypp/repos.d/ambari.repo• For Debain/Ubuntu: /etc/apt/sources.list.d/ambari.list
5. Edit the /etc/yum/pluginconf.d/priorities.conf file to add the following values: [main]enabled=1 gpgcheck=0
Preparing to Upgrade Ambari
• You must have root, administrative, or root-equivalent authorization on the Ambari Server host and all AmbariAgent hosts in the cluster.
• You must backup the Ambari Server database.
29
In-Place Upgrade HDP 3 to CDP Private Cloud Base Upgrading Ambari
• You must make a safe copy of the Ambari Server configuration file found at /etc/ambari-server/conf/ambari.properties.
• If your cluster is SSO-enabled, do not stop Knox before upgrading Ambari.
During the Ambari upgrade, the existing /var/lib/ambari-server/ambari-env.sh file is overwritten anda backup copy of ambari-env.sh (with extension .rpmsave) is created. If you have manually modified ambari-env.sh (for example, to change Ambari Server heap), you must re-apply your changes in the new file.
Upgrade to Ambari 7.1.x.0After reviewing the information related to Ambari UI and the Quick Links, and backing up the Ambari Serverconfiguration file, perform the recommended steps for upgrading Ambari.
Related InformationCloudera Support Matrix
Upgrade to Ambari 7.1.7.0After reviewing the information related to Ambari UI and the Quick Links, and backing up the Ambari Serverconfiguration file, perform the recommended steps for upgrading Ambari.
Procedure
1. If you are running Ambari Metrics in your cluster, stop the service and put it in Maintenance Mode. From AmbariWeb, browse to Services > Ambari Metrics and select Stop from the Service Actions menu.
2. Stop the Ambari Server. On the host running Ambari Server: ambari-server stop
3. Stop all Ambari Agents. On each host in your cluster running an Ambari Agent: ambari-agent stop.
4. Fetch the new Ambari repo and replace the old repository file with the new repository file on all hosts in yourcluster.
Important: Important: Check your current directory before you download the new repository file tomake sure that there are no previous versions of the ambaridc.repo file. If you do not, and a previousversion exists, the new download will be saved with a numeric extension, such as ambaridc.repo.1.Make sure that the version you copy is the new version.
Select the repository appropriate for your environment from the following list:
• For RHEL/CentOS/Oracle Linux 7:
wget -nv https://[***USERNAME***]:[***PASSWORD***]@archive.cloudera.com/p/ambaridc/7.x/7.1.7.0/centos7/ambaridc.repo -O /etc/yum.repos.d/ambaridc.repo
• For Ubuntu 18:
wget -nv https://[***USERNAME***]:[***PASSWORD***]@archive.cloudera.com/p/ambaridc/7.x/7.1.7.0/ubuntu18/ambaridc.list -O /etc/apt/sources.list.d/ambaridc.list
• For Sles 12:
wget -nv https://[***USERNAME***]:[***PASSWORD***]@archive.cloudera.com/p/ambaridc/7.x/7.1.7.0/sles12/ambaridc.repo -O /etc/zypp/repos.d/ambari.repo
5. Upgrade Ambari Server. On the host running Ambari Server:
For RHEL/CentOS/Oracle Linux:
yum clean all
30
In-Place Upgrade HDP 3 to CDP Private Cloud Base Upgrading Ambari
Before upgrading Ambari Server, you must update the username and password of baseurl and gpgkey in the ambaridc.repo file. Run the following command:
vi /etc/yum.repos.d/ambaridc.repo
For example, the output displays the following:
#VERSION_NUMBER=7.1.7.0-96[ambari-7.1.7.0]#json.url = https://archive.cloudera.com/p/HDP/hdp_urlinfo.jsonname=ambari Version - ambari-7.1.7.0baseurl=https://archive.cloudera.com/p/ambaridc/7.x/7.1.7.0/centos7gpgcheck=1gpgkey=https://archive.cloudera.com/p/ambaridc/7.x/7.1.7.0/centos7/RPM-GPG-KEY/RPM-GPG-KEY-Jenkinsenabled=1priority=1
yum info ambari-server
In the information output, visually validate that there is an available version containing "7.1.7.0"
yum upgrade ambari-server
For Ubuntu 18:
apt-get clean all
Before upgrading Ambari Server, you must update the username and password in the ambaridc.list file. Runthe following command:
vi /etc/apt/sources.list.d/ambaridc.list
For example, the output displays the following:
#VERSION_NUMBER=7.1.7.0-96#json.url = https://archive.cloudera.com/p/HDP/hdp_urlinfo.jsondeb https://archive.cloudera.com/p/ambaridc/7.x/7.1.7.0/ubuntu18 Ambari mainapt-get updateapt-cache show ambari-server | grep Version
In the information output, visually validate that there is an available version containing "7.1.7.0"
apt-get upgrade ambari-server
For SLES 12:
zypper clean
Before upgrading Ambari Server, you must update the username and password in the ambari.repo file. Runthe following command:
31
In-Place Upgrade HDP 3 to CDP Private Cloud Base Upgrading Ambari
vi /etc/zypp/repos.d/ambaridc.repo
For example, the output displays the following:
#VERSION_NUMBER=7.1.7.0-96[ambari-7.1.7.0]#json.url = https://archive.cloudera.com/p/HDP/hdp_urlinfo.jsonname=ambari Version - ambari-7.1.7.0baseurl=https://archive.cloudera.com/p/ambaridc/7.x/7.1.7.0/sles12gpgcheck=0gpgkey=https://archive.cloudera.com/p/ambaridc/7.x/7.1.7.0/sles12/RPM-GPG-KEY/RPM-GPG-KEY-Jenkinsenabled=1priority=1
Create the following file with your paywall credentials (replace <username> with your paywall username and<password> accordingly): /etc/zypp/credentials.d/ambari.cat
username=<username> password=<password>
In the information output, visually validate that there is an available version containing "7.1.7.0"
Zypper up ambari-server
6. After the upgrade process completes, check each host to make sure the new files have been installed:
For RHEL/CentOS/Oracle Linux 7:
rpm -qa | grep ambari-server
For SLES 12:
rpm -qa | grep ambari-server
For Ubuntu 18:
dpkg -l ambari-server
7. Check for upgrade success by noting progress during the Ambari Server installation process you started in Step 5.
• As the process runs, the console displays output similar to the following:
Setting up Upgrade Process Resolving Dependencies > Running transaction check• If the upgrade fails, the console displays output similar to the following:
Setting up Upgrade Process No Packages marked for Update• A successful upgrade displays output similar to the following:
Updated: ambari-server.noarch 0:7.1.7.0. Complete!
Important: Confirm there is only one ambari-server*.jar file in /usr/lib/ambari-server. If thereis more than one JAR file with name ambari-server*.jar, move all JARs except ambari-server-7.1.7*.jar to /tmp before proceeding with upgrade.
32
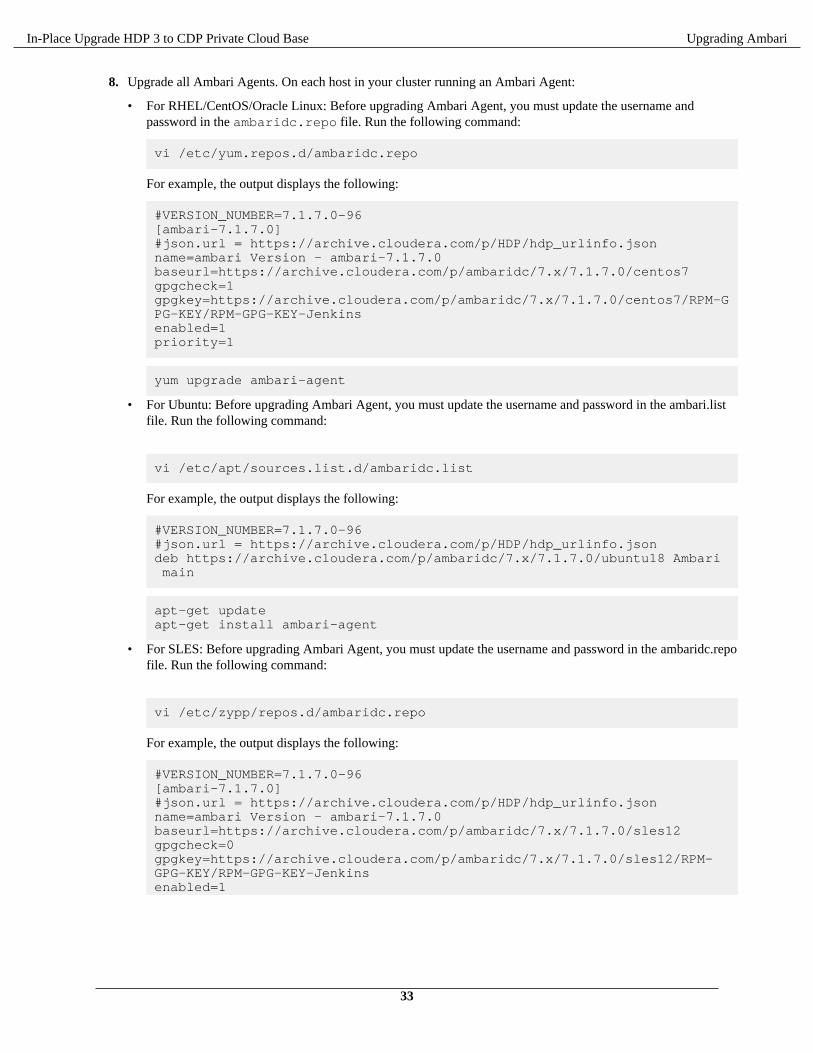
In-Place Upgrade HDP 3 to CDP Private Cloud Base Upgrading Ambari
8. Upgrade all Ambari Agents. On each host in your cluster running an Ambari Agent:
• For RHEL/CentOS/Oracle Linux: Before upgrading Ambari Agent, you must update the username andpassword in the ambaridc.repo file. Run the following command:
vi /etc/yum.repos.d/ambaridc.repo
For example, the output displays the following:
#VERSION_NUMBER=7.1.7.0-96[ambari-7.1.7.0]#json.url = https://archive.cloudera.com/p/HDP/hdp_urlinfo.jsonname=ambari Version - ambari-7.1.7.0baseurl=https://archive.cloudera.com/p/ambaridc/7.x/7.1.7.0/centos7gpgcheck=1gpgkey=https://archive.cloudera.com/p/ambaridc/7.x/7.1.7.0/centos7/RPM-GPG-KEY/RPM-GPG-KEY-Jenkinsenabled=1priority=1
yum upgrade ambari-agent
• For Ubuntu: Before upgrading Ambari Agent, you must update the username and password in the ambari.listfile. Run the following command:
vi /etc/apt/sources.list.d/ambaridc.list
For example, the output displays the following:
#VERSION_NUMBER=7.1.7.0-96#json.url = https://archive.cloudera.com/p/HDP/hdp_urlinfo.jsondeb https://archive.cloudera.com/p/ambaridc/7.x/7.1.7.0/ubuntu18 Ambari main
apt-get updateapt-get install ambari-agent
• For SLES: Before upgrading Ambari Agent, you must update the username and password in the ambaridc.repofile. Run the following command:
vi /etc/zypp/repos.d/ambaridc.repo
For example, the output displays the following:
#VERSION_NUMBER=7.1.7.0-96[ambari-7.1.7.0]#json.url = https://archive.cloudera.com/p/HDP/hdp_urlinfo.jsonname=ambari Version - ambari-7.1.7.0baseurl=https://archive.cloudera.com/p/ambaridc/7.x/7.1.7.0/sles12gpgcheck=0gpgkey=https://archive.cloudera.com/p/ambaridc/7.x/7.1.7.0/sles12/RPM-GPG-KEY/RPM-GPG-KEY-Jenkinsenabled=1
33
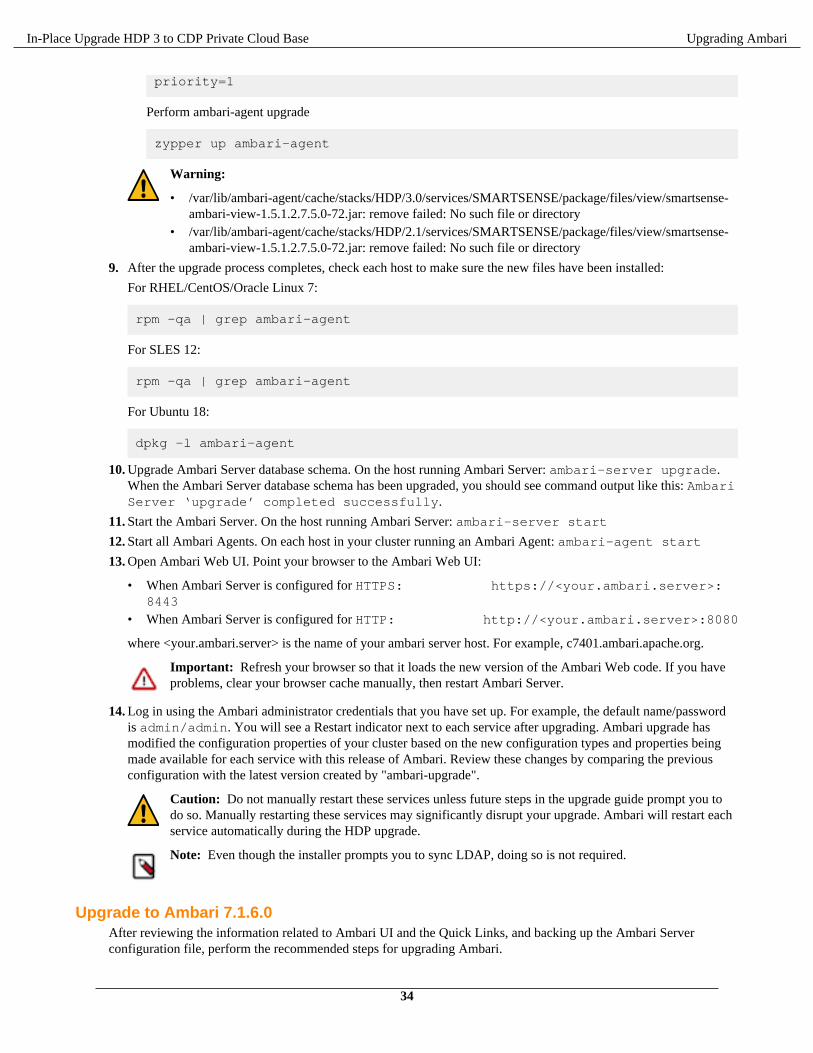
In-Place Upgrade HDP 3 to CDP Private Cloud Base Upgrading Ambari
priority=1
Perform ambari-agent upgrade
zypper up ambari-agent
Warning:
• /var/lib/ambari-agent/cache/stacks/HDP/3.0/services/SMARTSENSE/package/files/view/smartsense-ambari-view-1.5.1.2.7.5.0-72.jar: remove failed: No such file or directory
• /var/lib/ambari-agent/cache/stacks/HDP/2.1/services/SMARTSENSE/package/files/view/smartsense-ambari-view-1.5.1.2.7.5.0-72.jar: remove failed: No such file or directory
9. After the upgrade process completes, check each host to make sure the new files have been installed:
For RHEL/CentOS/Oracle Linux 7:
rpm -qa | grep ambari-agent
For SLES 12:
rpm -qa | grep ambari-agent
For Ubuntu 18:
dpkg -l ambari-agent
10. Upgrade Ambari Server database schema. On the host running Ambari Server: ambari-server upgrade.When the Ambari Server database schema has been upgraded, you should see command output like this: AmbariServer ‘upgrade’ completed successfully.
11. Start the Ambari Server. On the host running Ambari Server: ambari-server start
12. Start all Ambari Agents. On each host in your cluster running an Ambari Agent: ambari-agent start
13. Open Ambari Web UI. Point your browser to the Ambari Web UI:
• When Ambari Server is configured for HTTPS: https://<your.ambari.server>:8443
• When Ambari Server is configured for HTTP: http://<your.ambari.server>:8080
where <your.ambari.server> is the name of your ambari server host. For example, c7401.ambari.apache.org.
Important: Refresh your browser so that it loads the new version of the Ambari Web code. If you haveproblems, clear your browser cache manually, then restart Ambari Server.
14. Log in using the Ambari administrator credentials that you have set up. For example, the default name/passwordis admin/admin. You will see a Restart indicator next to each service after upgrading. Ambari upgrade hasmodified the configuration properties of your cluster based on the new configuration types and properties beingmade available for each service with this release of Ambari. Review these changes by comparing the previousconfiguration with the latest version created by "ambari-upgrade".
Caution: Do not manually restart these services unless future steps in the upgrade guide prompt you todo so. Manually restarting these services may significantly disrupt your upgrade. Ambari will restart eachservice automatically during the HDP upgrade.
Note: Even though the installer prompts you to sync LDAP, doing so is not required.
Upgrade to Ambari 7.1.6.0After reviewing the information related to Ambari UI and the Quick Links, and backing up the Ambari Serverconfiguration file, perform the recommended steps for upgrading Ambari.
34
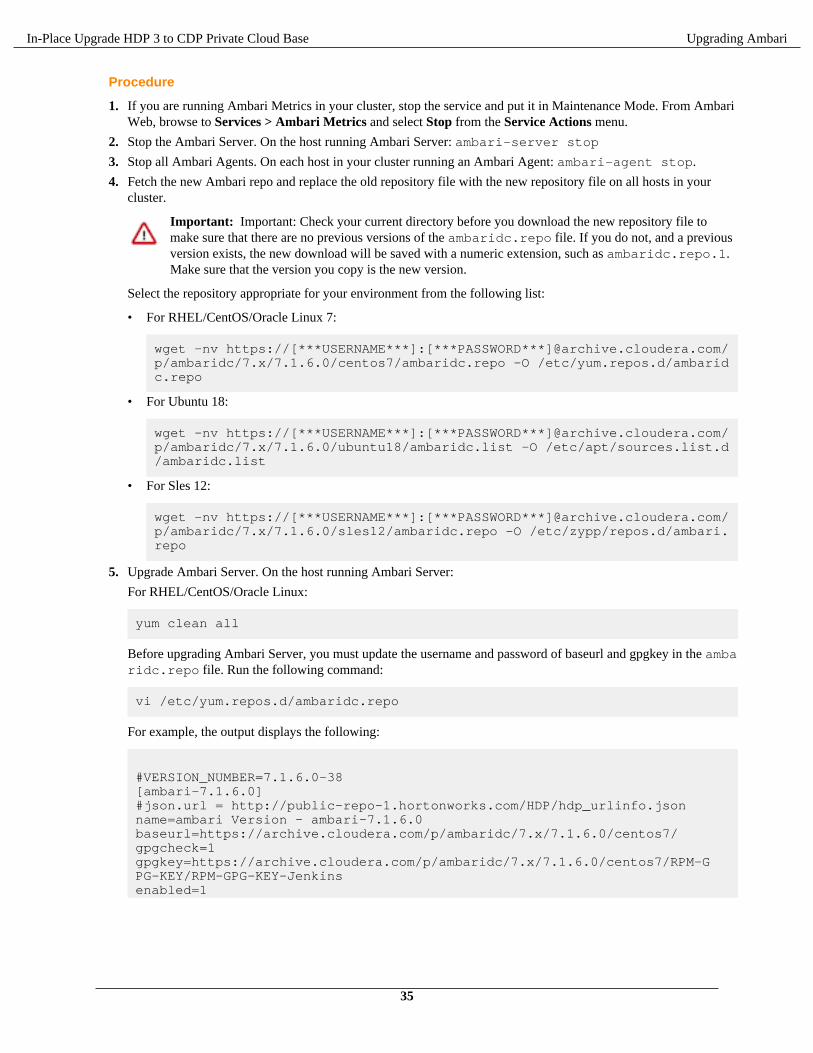
In-Place Upgrade HDP 3 to CDP Private Cloud Base Upgrading Ambari
Procedure
1. If you are running Ambari Metrics in your cluster, stop the service and put it in Maintenance Mode. From AmbariWeb, browse to Services > Ambari Metrics and select Stop from the Service Actions menu.
2. Stop the Ambari Server. On the host running Ambari Server: ambari-server stop
3. Stop all Ambari Agents. On each host in your cluster running an Ambari Agent: ambari-agent stop.
4. Fetch the new Ambari repo and replace the old repository file with the new repository file on all hosts in yourcluster.
Important: Important: Check your current directory before you download the new repository file tomake sure that there are no previous versions of the ambaridc.repo file. If you do not, and a previousversion exists, the new download will be saved with a numeric extension, such as ambaridc.repo.1.Make sure that the version you copy is the new version.
Select the repository appropriate for your environment from the following list:
• For RHEL/CentOS/Oracle Linux 7:
wget -nv https://[***USERNAME***]:[***PASSWORD***]@archive.cloudera.com/p/ambaridc/7.x/7.1.6.0/centos7/ambaridc.repo -O /etc/yum.repos.d/ambaridc.repo
• For Ubuntu 18:
wget -nv https://[***USERNAME***]:[***PASSWORD***]@archive.cloudera.com/p/ambaridc/7.x/7.1.6.0/ubuntu18/ambaridc.list -O /etc/apt/sources.list.d/ambaridc.list
• For Sles 12:
wget -nv https://[***USERNAME***]:[***PASSWORD***]@archive.cloudera.com/p/ambaridc/7.x/7.1.6.0/sles12/ambaridc.repo -O /etc/zypp/repos.d/ambari.repo
5. Upgrade Ambari Server. On the host running Ambari Server:
For RHEL/CentOS/Oracle Linux:
yum clean all
Before upgrading Ambari Server, you must update the username and password of baseurl and gpgkey in the ambaridc.repo file. Run the following command:
vi /etc/yum.repos.d/ambaridc.repo
For example, the output displays the following:
#VERSION_NUMBER=7.1.6.0-38[ambari-7.1.6.0]#json.url = http://public-repo-1.hortonworks.com/HDP/hdp_urlinfo.jsonname=ambari Version - ambari-7.1.6.0baseurl=https://archive.cloudera.com/p/ambaridc/7.x/7.1.6.0/centos7/gpgcheck=1gpgkey=https://archive.cloudera.com/p/ambaridc/7.x/7.1.6.0/centos7/RPM-GPG-KEY/RPM-GPG-KEY-Jenkinsenabled=1
35
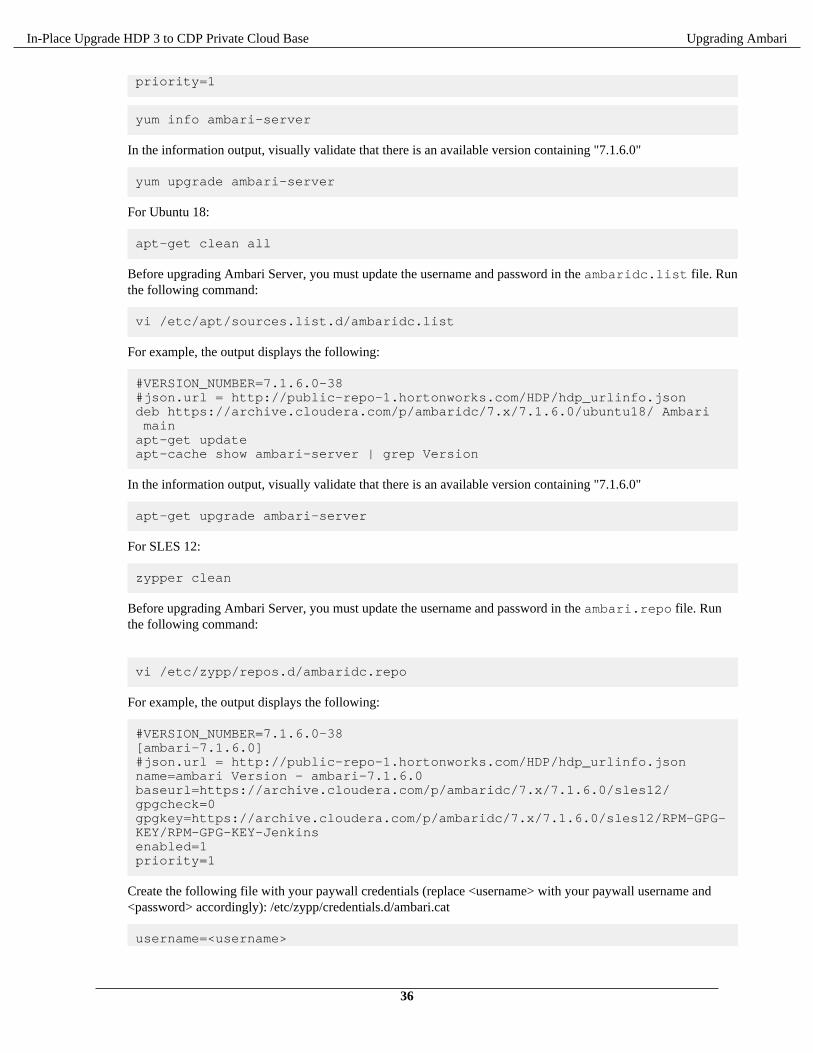
In-Place Upgrade HDP 3 to CDP Private Cloud Base Upgrading Ambari
priority=1
yum info ambari-server
In the information output, visually validate that there is an available version containing "7.1.6.0"
yum upgrade ambari-server
For Ubuntu 18:
apt-get clean all
Before upgrading Ambari Server, you must update the username and password in the ambaridc.list file. Runthe following command:
vi /etc/apt/sources.list.d/ambaridc.list
For example, the output displays the following:
#VERSION_NUMBER=7.1.6.0-38#json.url = http://public-repo-1.hortonworks.com/HDP/hdp_urlinfo.jsondeb https://archive.cloudera.com/p/ambaridc/7.x/7.1.6.0/ubuntu18/ Ambari main apt-get updateapt-cache show ambari-server | grep Version
In the information output, visually validate that there is an available version containing "7.1.6.0"
apt-get upgrade ambari-server
For SLES 12:
zypper clean
Before upgrading Ambari Server, you must update the username and password in the ambari.repo file. Runthe following command:
vi /etc/zypp/repos.d/ambaridc.repo
For example, the output displays the following:
#VERSION_NUMBER=7.1.6.0-38[ambari-7.1.6.0]#json.url = http://public-repo-1.hortonworks.com/HDP/hdp_urlinfo.jsonname=ambari Version - ambari-7.1.6.0baseurl=https://archive.cloudera.com/p/ambaridc/7.x/7.1.6.0/sles12/gpgcheck=0gpgkey=https://archive.cloudera.com/p/ambaridc/7.x/7.1.6.0/sles12/RPM-GPG-KEY/RPM-GPG-KEY-Jenkinsenabled=1priority=1
Create the following file with your paywall credentials (replace <username> with your paywall username and<password> accordingly): /etc/zypp/credentials.d/ambari.cat
username=<username>
36
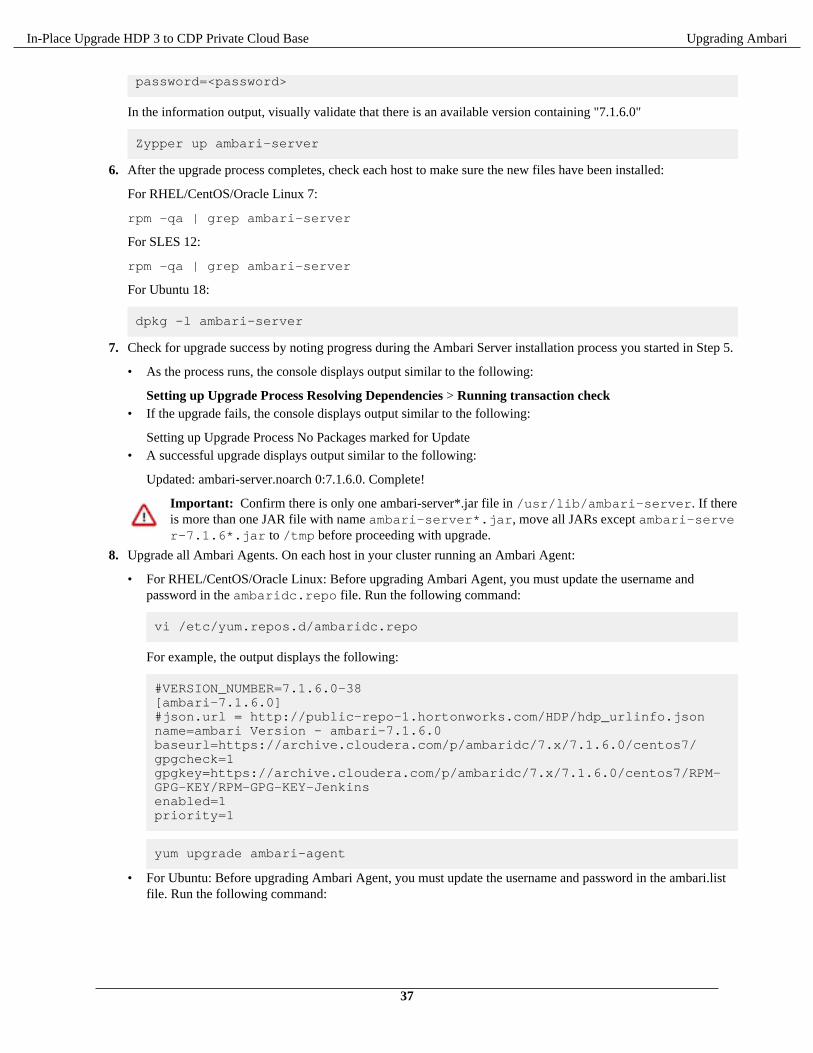
In-Place Upgrade HDP 3 to CDP Private Cloud Base Upgrading Ambari
password=<password>
In the information output, visually validate that there is an available version containing "7.1.6.0"
Zypper up ambari-server
6. After the upgrade process completes, check each host to make sure the new files have been installed:
For RHEL/CentOS/Oracle Linux 7:
rpm -qa | grep ambari-server
For SLES 12:
rpm -qa | grep ambari-server
For Ubuntu 18:
dpkg -l ambari-server
7. Check for upgrade success by noting progress during the Ambari Server installation process you started in Step 5.
• As the process runs, the console displays output similar to the following:
Setting up Upgrade Process Resolving Dependencies > Running transaction check• If the upgrade fails, the console displays output similar to the following:
Setting up Upgrade Process No Packages marked for Update• A successful upgrade displays output similar to the following:
Updated: ambari-server.noarch 0:7.1.6.0. Complete!
Important: Confirm there is only one ambari-server*.jar file in /usr/lib/ambari-server. If thereis more than one JAR file with name ambari-server*.jar, move all JARs except ambari-server-7.1.6*.jar to /tmp before proceeding with upgrade.
8. Upgrade all Ambari Agents. On each host in your cluster running an Ambari Agent:
• For RHEL/CentOS/Oracle Linux: Before upgrading Ambari Agent, you must update the username andpassword in the ambaridc.repo file. Run the following command:
vi /etc/yum.repos.d/ambaridc.repo
For example, the output displays the following:
#VERSION_NUMBER=7.1.6.0-38[ambari-7.1.6.0]#json.url = http://public-repo-1.hortonworks.com/HDP/hdp_urlinfo.jsonname=ambari Version - ambari-7.1.6.0baseurl=https://archive.cloudera.com/p/ambaridc/7.x/7.1.6.0/centos7/gpgcheck=1gpgkey=https://archive.cloudera.com/p/ambaridc/7.x/7.1.6.0/centos7/RPM-GPG-KEY/RPM-GPG-KEY-Jenkinsenabled=1priority=1
yum upgrade ambari-agent
• For Ubuntu: Before upgrading Ambari Agent, you must update the username and password in the ambari.listfile. Run the following command:
37
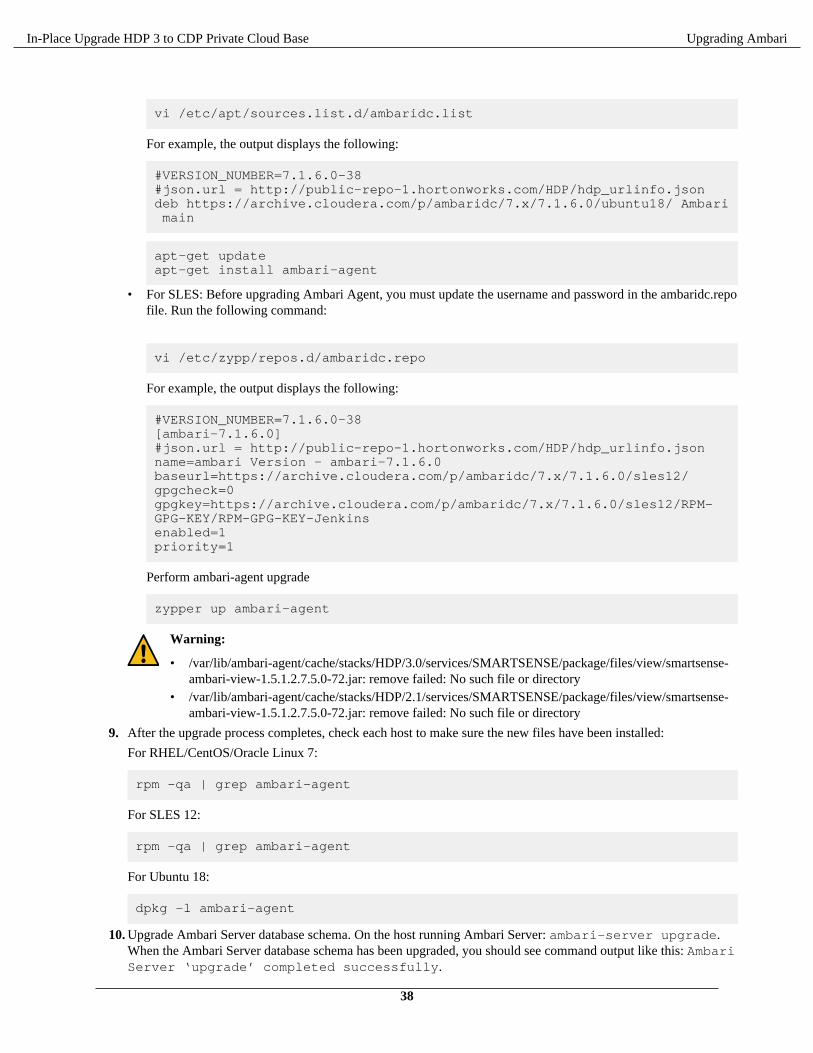
In-Place Upgrade HDP 3 to CDP Private Cloud Base Upgrading Ambari
vi /etc/apt/sources.list.d/ambaridc.list
For example, the output displays the following:
#VERSION_NUMBER=7.1.6.0-38#json.url = http://public-repo-1.hortonworks.com/HDP/hdp_urlinfo.jsondeb https://archive.cloudera.com/p/ambaridc/7.x/7.1.6.0/ubuntu18/ Ambari main
apt-get updateapt-get install ambari-agent
• For SLES: Before upgrading Ambari Agent, you must update the username and password in the ambaridc.repofile. Run the following command:
vi /etc/zypp/repos.d/ambaridc.repo
For example, the output displays the following:
#VERSION_NUMBER=7.1.6.0-38[ambari-7.1.6.0]#json.url = http://public-repo-1.hortonworks.com/HDP/hdp_urlinfo.jsonname=ambari Version - ambari-7.1.6.0baseurl=https://archive.cloudera.com/p/ambaridc/7.x/7.1.6.0/sles12/gpgcheck=0gpgkey=https://archive.cloudera.com/p/ambaridc/7.x/7.1.6.0/sles12/RPM-GPG-KEY/RPM-GPG-KEY-Jenkinsenabled=1priority=1
Perform ambari-agent upgrade
zypper up ambari-agent
Warning:
• /var/lib/ambari-agent/cache/stacks/HDP/3.0/services/SMARTSENSE/package/files/view/smartsense-ambari-view-1.5.1.2.7.5.0-72.jar: remove failed: No such file or directory
• /var/lib/ambari-agent/cache/stacks/HDP/2.1/services/SMARTSENSE/package/files/view/smartsense-ambari-view-1.5.1.2.7.5.0-72.jar: remove failed: No such file or directory
9. After the upgrade process completes, check each host to make sure the new files have been installed:
For RHEL/CentOS/Oracle Linux 7:
rpm -qa | grep ambari-agent
For SLES 12:
rpm -qa | grep ambari-agent
For Ubuntu 18:
dpkg -l ambari-agent
10. Upgrade Ambari Server database schema. On the host running Ambari Server: ambari-server upgrade.When the Ambari Server database schema has been upgraded, you should see command output like this: AmbariServer ‘upgrade’ completed successfully.
38
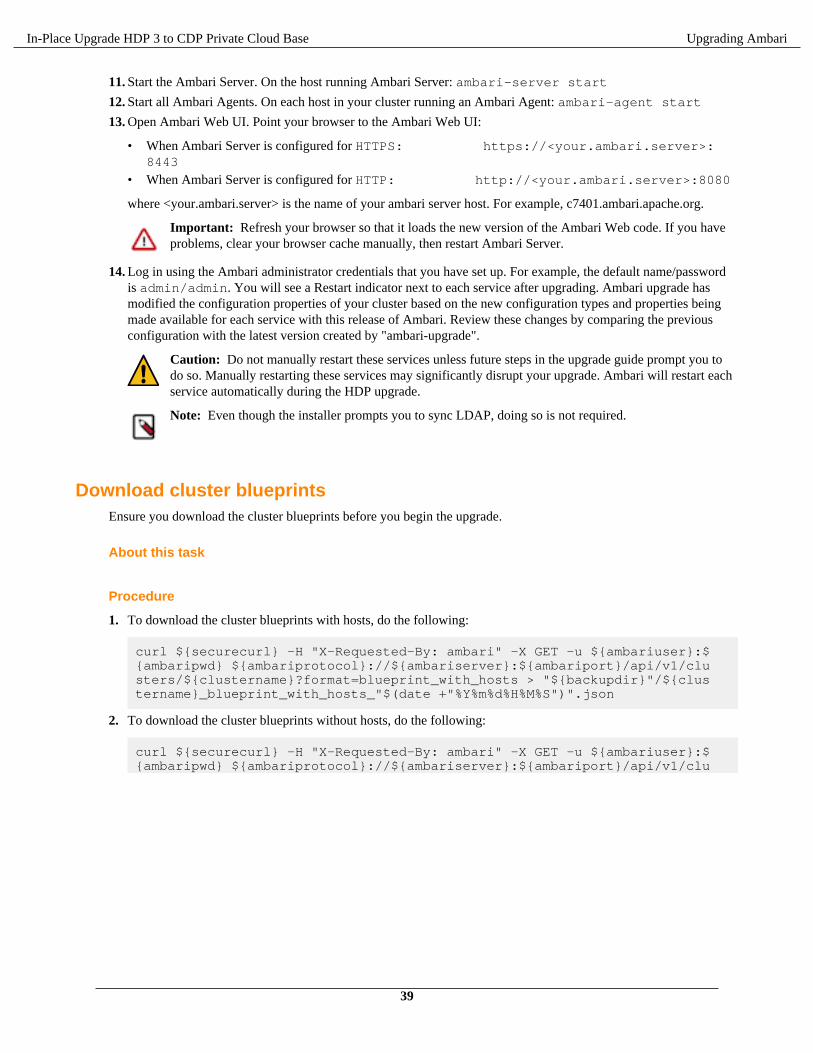
In-Place Upgrade HDP 3 to CDP Private Cloud Base Upgrading Ambari
11. Start the Ambari Server. On the host running Ambari Server: ambari-server start
12. Start all Ambari Agents. On each host in your cluster running an Ambari Agent: ambari-agent start
13. Open Ambari Web UI. Point your browser to the Ambari Web UI:
• When Ambari Server is configured for HTTPS: https://<your.ambari.server>:8443
• When Ambari Server is configured for HTTP: http://<your.ambari.server>:8080
where <your.ambari.server> is the name of your ambari server host. For example, c7401.ambari.apache.org.
Important: Refresh your browser so that it loads the new version of the Ambari Web code. If you haveproblems, clear your browser cache manually, then restart Ambari Server.
14. Log in using the Ambari administrator credentials that you have set up. For example, the default name/passwordis admin/admin. You will see a Restart indicator next to each service after upgrading. Ambari upgrade hasmodified the configuration properties of your cluster based on the new configuration types and properties beingmade available for each service with this release of Ambari. Review these changes by comparing the previousconfiguration with the latest version created by "ambari-upgrade".
Caution: Do not manually restart these services unless future steps in the upgrade guide prompt you todo so. Manually restarting these services may significantly disrupt your upgrade. Ambari will restart eachservice automatically during the HDP upgrade.
Note: Even though the installer prompts you to sync LDAP, doing so is not required.
Download cluster blueprintsEnsure you download the cluster blueprints before you begin the upgrade.
About this task
Procedure
1. To download the cluster blueprints with hosts, do the following:
curl ${securecurl} -H "X-Requested-By: ambari" -X GET -u ${ambariuser}:${ambaripwd} ${ambariprotocol}://${ambariserver}:${ambariport}/api/v1/clusters/${clustername}?format=blueprint_with_hosts > "${backupdir}"/${clustername}_blueprint_with_hosts_"$(date +"%Y%m%d%H%M%S")".json
2. To download the cluster blueprints without hosts, do the following:
curl ${securecurl} -H "X-Requested-By: ambari" -X GET -u ${ambariuser}:${ambaripwd} ${ambariprotocol}://${ambariserver}:${ambariport}/api/v1/clu
39
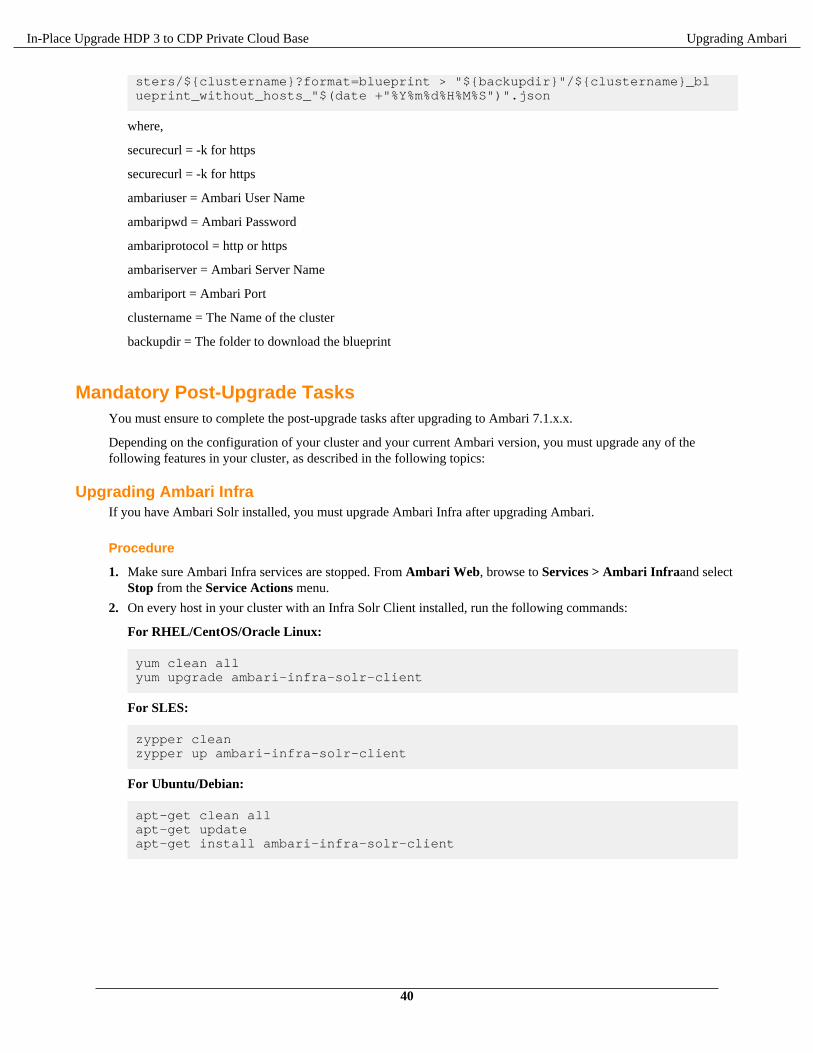
In-Place Upgrade HDP 3 to CDP Private Cloud Base Upgrading Ambari
sters/${clustername}?format=blueprint > "${backupdir}"/${clustername}_blueprint_without_hosts_"$(date +"%Y%m%d%H%M%S")".json
where,
securecurl = -k for https
securecurl = -k for https
ambariuser = Ambari User Name
ambaripwd = Ambari Password
ambariprotocol = http or https
ambariserver = Ambari Server Name
ambariport = Ambari Port
clustername = The Name of the cluster
backupdir = The folder to download the blueprint
Mandatory Post-Upgrade TasksYou must ensure to complete the post-upgrade tasks after upgrading to Ambari 7.1.x.x.
Depending on the configuration of your cluster and your current Ambari version, you must upgrade any of thefollowing features in your cluster, as described in the following topics:
Upgrading Ambari InfraIf you have Ambari Solr installed, you must upgrade Ambari Infra after upgrading Ambari.
Procedure
1. Make sure Ambari Infra services are stopped. From Ambari Web, browse to Services > Ambari Infraand selectStop from the Service Actions menu.
2. On every host in your cluster with an Infra Solr Client installed, run the following commands:
For RHEL/CentOS/Oracle Linux:
yum clean allyum upgrade ambari-infra-solr-client
For SLES:
zypper cleanzypper up ambari-infra-solr-client
For Ubuntu/Debian:
apt-get clean allapt-get updateapt-get install ambari-infra-solr-client
40
In-Place Upgrade HDP 3 to CDP Private Cloud Base Upgrading Ambari
3. Execute the following command on all hosts running an Ambari Infra Solr Instance:
For RHEL/CentOS/Oracle Linux:
yum upgrade ambari-infra-solr
For SLES:
zypper up ambari-infra-solr
For Ubuntu/Debian:
apt-get install ambari-infra-solr
4. Start the Ambari Infra services.
From Ambari Web, browse to Services > Ambari Infra select Service Actions then choose Start.
Upgrading Ambari Log SearchIf you have Ambari Log Search installed, you must upgrade Ambari Log Search after upgrading Ambari.
About this task
Prerequisites: Before starting this upgrade, ensure the Ambari Infra components have been upgraded.
Procedure
1. Make sure Ambari Log Search service is stopped. From Ambari Web, browse to Services > Log Search andselect Stop from the Service Actions menu.
2. On every host in your cluster running a Log Feeder, run the following commands:
For RHEL/CentOS/Oracle Linux:
yum clean allyum upgrade ambari-logsearch-logfeeder
For SLES:
zypper cleanzypper up ambari-logsearch-logfeeder
For Ubuntu:
apt-get clean allapt-get updateapt-get install ambari-logsearch-logfeeder
41
In-Place Upgrade HDP 3 to CDP Private Cloud Base Upgrading Ambari
3. Execute the following command on all hosts running the Log Search Server:
For RHEL/CentOS/Oracle Linux:
yum upgrade ambari-logsearch-portal
For SLES:
zypper up ambari-logsearch-portal
For Ubuntu:
apt-get install ambari-logsearch-portal
4. Start Log Search Service.
From Ambari Web, browse to Services > Log Search select Service Actions then choose Start.
Upgrading Ambari Metrics
About this taskUpgrade to Ambari 7.1.6.0 and perform necessary post-upgrade checks. Make sure all services are up and healthy.
Procedure
1. Make sure Ambari Metrics service is stopped. From Ambari Web, browse to Services > Ambari Metrics andselect Stop from the Service Actions menu.
2. On every host in your cluster running a Metrics Monitor, run the following commands:
For RHEL/CentOS/Oracle Linux:
yum clean allyum upgrade ambari-metrics-monitor yum upgrade ambari-metrics-hadoop-sink
For SLES:
zypper cleanzypper up ambari-metrics-monitor zypper up ambari-metrics-hadoop-sink
For Ubuntu:
apt-get clean allapt-get updateapt-get install ambari-metrics-assembly
42

In-Place Upgrade HDP 3 to CDP Private Cloud Base Upgrading HDP to Cloudera Runtime 7.1.x
3. Execute the following command on all hosts running the Metrics Collector:
For RHEL/CentOS/Oracle Linux:
yum upgrade ambari-metrics-collector
For SLES:
zypper up ambari-metrics-collector
For Ubuntu:
apt-get clean allapt-get updateapt-get install ambari-metrics-collector
4. Execute the following command on all hosts running the Grafana component:
For RHEL/CentOS/Oracle Linux:
yum upgrade ambari-metrics-grafana
For SLES:
zypper up ambari-metrics-grafana
For Ubuntu:
apt-get clean allapt-get updateapt-get install ambari-metrics-grafana
5. Start Ambari Metrics Service.
From Ambari Web, browse to Services > Ambari Metrics select Service Actions then choose Start.
Note:
• Do not start the Ambari Metrics System service. Do not restart other services. The HDP upgradeprocess will restart all the services.
• The updated Ambari Metrics Sink jars will be installed on all hosts. During the upgrade process, afterthe restart, each service start uses the latest sink implementations.
Upgrading HDP to Cloudera Runtime 7.1.x
This section helps you to upgrade from HDP 3.1.5.x to the Cloudera Runtime 7.1.x.
43
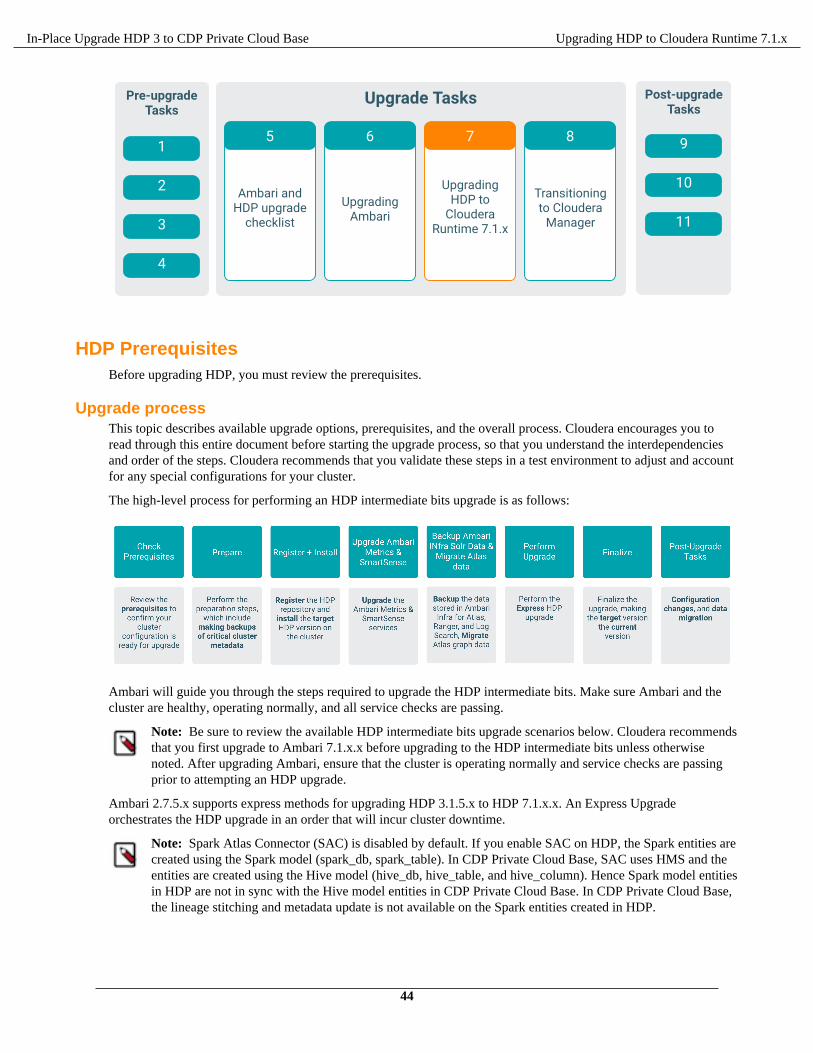
In-Place Upgrade HDP 3 to CDP Private Cloud Base Upgrading HDP to Cloudera Runtime 7.1.x
HDP PrerequisitesBefore upgrading HDP, you must review the prerequisites.
Upgrade processThis topic describes available upgrade options, prerequisites, and the overall process. Cloudera encourages you toread through this entire document before starting the upgrade process, so that you understand the interdependenciesand order of the steps. Cloudera recommends that you validate these steps in a test environment to adjust and accountfor any special configurations for your cluster.
The high-level process for performing an HDP intermediate bits upgrade is as follows:
Ambari will guide you through the steps required to upgrade the HDP intermediate bits. Make sure Ambari and thecluster are healthy, operating normally, and all service checks are passing.
Note: Be sure to review the available HDP intermediate bits upgrade scenarios below. Cloudera recommendsthat you first upgrade to Ambari 7.1.x.x before upgrading to the HDP intermediate bits unless otherwisenoted. After upgrading Ambari, ensure that the cluster is operating normally and service checks are passingprior to attempting an HDP upgrade.
Ambari 2.7.5.x supports express methods for upgrading HDP 3.1.5.x to HDP 7.1.x.x. An Express Upgradeorchestrates the HDP upgrade in an order that will incur cluster downtime.
Note: Spark Atlas Connector (SAC) is disabled by default. If you enable SAC on HDP, the Spark entities arecreated using the Spark model (spark_db, spark_table). In CDP Private Cloud Base, SAC uses HMS and theentities are created using the Hive model (hive_db, hive_table, and hive_column). Hence Spark model entitiesin HDP are not in sync with the Hive model entities in CDP Private Cloud Base. In CDP Private Cloud Base,the lineage stitching and metadata update is not available on the Spark entities created in HDP.
44
In-Place Upgrade HDP 3 to CDP Private Cloud Base Upgrading HDP to Cloudera Runtime 7.1.x
Note:
• In the HDP 3.1.5.x cluster, Hive hook and HBase hook are enabled by default.• SAC (Spark Atlas Connector or Spark Hook) is disabled by default.• Note that, in HDP, SAC is in a Technical Preview state. In CDP Private Cloud Base, Hive Hook and
HBase hook are enabled by default, In the AM2CM upgrade flow, if the Hive Hook and HBase hook areenabled in the HDP 3.1.5.x cluster, post-upgrade, it is enabled in CDP Private Cloud Base.
• HMS Hook functionality did not exist in HDP 3.1.5.x, hence it must be manually enabled in CDP PrivateCloud Base.
• Similarly SAC in CDP Private Cloud Base must also be manually enabled.
Note: Intermittently, the default owner permissions for /warehouse/tablespace/external/hivedirectory is updated to activity_analyzer user from the smartsense service in the HDP3 cluster, because ofthese permissions issues the hive external table creation fails. The workaround is to Kinit as the HDFS userand update the permissions for warehouse directory using HDFS cli.
• $ hdfs dfs -chown hdfs:hdfs /warehouse
• $ hdfs dfs -chown hdfs:hdfs /warehouse/tablespace
• $ hdfs dfs -chown hdfs:hdfs /warehouse/tablespace/external
• $ hdfs dfs -chown hdfs:hdfs /warehouse/tablespace/external/hive
Before upgrading any clusterTo perform an HDP intermediate bits upgrade using Ambari, your cluster must meet the following prerequisites.Meeting these prerequisites is essential for Ambari to know that the cluster is in a healthy operating mode and cansuccessfully manage the upgrade process.
For any Cluster
Disk Space: Be sure to have adequate space on /usr/hdp for the target HDP version. Each complete install of anHDP version occupies about 10GB of disk space.
Ambari Agent Heartbeats: All Ambari Agents must be communicating and heartbeating to Ambari Server. Any hoststhat are not heartbeating must be in Maintenance mode.
Hive Upgrade: The upgrade process does not back up the Hive Metastore, nor does it compact ACID tables. Beforeupgrading Hive, you must:
• Manually back up your Hive metastore database.• If you have ACID tables in your Hive metastore database, enable ACID operations using Ambari Web or set Hive
configuration properties to enable ACID.
Note: You must remove the components that are unsupported in CDP Private Cloud Base. For moreinformation, see HDP Core component version changes. If you are not using a component in the CDPcluster, then you must remove them. The unused component extends the time and complexity of the HDPto CDP upgrade.
Host Maintenance Mode
The following two scenarios are checked:
• Any hosts in Maintenance mode must not be hosting any Service Master Components.• Any host in Maintenance Mode that is not hosting Master Components is allowed but you will receive a warning.
You can proceed with the upgrade. But these hosts will not be upgraded and before finalising the upgrade, youmust delete these hosts from the cluster.
Service Maintenance Mode: No services can be in Maintenance mode, except for Ambari Metrics System,SmartSense, and Log Search.
Services Started: All services must be started, except for Ambari Metrics System, SmartSense, and Log Search.
Service Checks: All service checks must pass. Be sure to run Service Actions > Run Service Check on all services(and remediate if necessary) prior to attempting an HDP upgrade.
45
In-Place Upgrade HDP 3 to CDP Private Cloud Base Upgrading HDP to Cloudera Runtime 7.1.x
Backup HDP ClusterCloudera recommends that you back up the HDP 3.1.5.x services managed by Ambari 2.7.5.x.
Note: These backups are required and helps you incase in the middle of the upgrade to HDP 7.1.x you decideto downgrade the cluster back to original state.
Backup and Restore DatabasesThe steps for backing up and restoring databases differ depending on the database vendor and version that you selectfor your cluster. It is beyond the scope of this document.
Important: Restore the databases to their exact state as of when you took the backup. Do not merge anychanges that may have occurred during the subsequent upgrade.
See the following vendor resources for more information:
• For MariaDB 5.5, see MariaDB• For MySQL 5.5, see MySQL5.5• For MySQL 5.6, see MySQL 5.6• For MySQL 5.7, see MySQL 5.7• For PostgreSQL 8.4, see PostgreSQL 8.4• For PostgreSQL 9.2, see PostgreSQL 9.2• For PostgreSQL 9.3, see PostgreSQL 9.3• For Oracle 11gR2, see Oracle 11gR2
Backup RangerYou must stop the Ranger Admin and Ranger KMS Service and its dependent services.
Backup Ranger Admin DatabaseYou must run the below commands on the Ranger database host.
MySQL
1. First create directory (mkdir -p /root/backups/ranger/db/admin)
$ mysqldump -u [username] -p db_name > dump_fileName.sql
or specify destination as
/some_dir/dump_fileName.sql
2. Select the Enter key.3. Type the database password at the password prompt.
Example
mysqldump -u rangeradmin -p ranger > /root/backups/ranger/db/admin/ranger.sql
POSTGRES
46
In-Place Upgrade HDP 3 to CDP Private Cloud Base Upgrading HDP to Cloudera Runtime 7.1.x
1. Dump the contents of a database to a file by running the following command. Replace database name withthe name of the database to be backed up:
pg_dump -U username dbname > dbname.bak
Example
pg_dump -U rangeradmin ranger > /root/backups/ranger/db/admin/db/ranger.sql
2. Type the database password at the password prompt.
Backup Ranger KMS DatabaseYou must backup the MySQL, POSTEGRES, and Oracle databases.
Note: It is a good practice to note down the master key password before backing up the databases.
MySQL
1. Create directory (mkdir /etc/ranger/hdp3_backup/db/kms)2. $ mysqldump -u [username] -p db_name > dump_fileName.sql (or
specify destination as /some_dir/dump_fileName.sql)3. Select the Enter key.4. Type the database password at the password prompt.
Example
mysqldump -u rangerkms -p rangerkms > /root/backups/ranger/db/kms/rangerkms.sql
POSTGRES
1. Dump the contents of a database to a file by running the following command. Replace dbname with the name ofthe database to be backed up:
pg_dump -U [username for database] rangerkms > rangerkms.sql
Example
pg_dump -U rangerkms rangerkms > /root/backups/ranger/db/kms/rangerkms.sql
Oracle
1. Set path to Oracle home :
• export ORACLE_HOME=/opt/oracle/product/12.2.0• export PATH=${PATH}:${ORACLE_HOME}/bin• export ORACLE_SID=orcl12c (db_name)
2. Backup Ranger admin database:
exp userid=rangeradmin/rangeradmin owner=rangeradmin log=backups/ranger/db/admin/admin_db_bkp.log file=backups/ranger/db/admin/orcl12c.sql statistics=none
3. Backup Ranger KMS database:
exp userid=rangerkms/rangerkms owner=rangerkms log=backups/ranger/db/kms/kms_db_bkp.log file=backups/ranger/db/kms/orcl12c.sql statistics=none
Backup AtlasYou can back up Atlas data by backing-up HBase tables.
47
In-Place Upgrade HDP 3 to CDP Private Cloud Base Upgrading HDP to Cloudera Runtime 7.1.x
Procedure
1. Stop the Atlas service from Ambari.
2. Setup Kerberos credentials. Locate the atlas user’s keytab and use kinit to cache the kerberos ticket for atlas user.For example,
kinit -kt path/to/atlas.service.keytab atlas/hostname@domain
Backup HBase tablesFollow these steps to back up atlas_janus table.
Procedure
1. Go to HBase Shell.
2. Disable atlas_janus and ATLAS_ENTITY_AUDIT_EVENTS tables.
3. Create a snapshot of the atlas_janus and ATLAS_ENTITY_AUDIT_EVENTS HBase tables.
4. (Optional step) If the backup needs to be preserved on the local file system, then use the additional command tocopy it locally.
hbase org.apache.hadoop.hbase.snapshot.ExportSnapshot -snapshot 'atlas-janus-backup' -copy-to /path/to/backup/location
The above steps can be performed using the following commands from HBase shell.
> disable 'atlas_janus'> snapshot 'atlas_janus, 'atlas-janus-backup'> enable 'atlas_janus'> exit
> disable 'ATLAS_ENTITY_AUDIT_EVENTS'> snapshot 'ATLAS_ENTITY_AUDIT_EVENTS','ATLAS_ENTITY_AUDIT_EVENTS-backup'> enable 'ATLAS_ENTITY_AUDIT_EVENTS'> exit
Backup Ambari Infra SolrBackup all your ambari infra solr collections. Run the Solr APIs to backup the collections individually.
About this taskThe specified /path/to/backup/ directory must be created first on the host where the ambari-infra-solris installed. The specified location needs to be accessible to the user by executing the command.
mkdir -p /path/to/backup/directorychown -R infra-solr:hadoop /path/to/backup
For unsecured cluster
#Atlas infra-solr collectionscurl -v "http://$INFRA_SOLR_URL/solr/vertex_index/replication?command=BACKUP&name=vertex_index_backup&location=/path/to/backup/directory"
curl -v "http://$INFRA_SOLR_URL/solr/edge_index/replication?command=BACKUP&name=edge_index_backup&location=/path/to/backup/directory"
curl -v
48
In-Place Upgrade HDP 3 to CDP Private Cloud Base Upgrading HDP to Cloudera Runtime 7.1.x
"http://$INFRA_SOLR_URL/solr/fulltext_index/replication?command=BACKUP&name=fulltext_index_backup&location=/path/to/backup/directory"
#Ranger audit infra-solr collectionscurl -v "http://$INFRA_SOLR_URL/solr/ranger_audits/replication?command=BACKUP&name=ranger_audits_backup&location=/path/to/backup/directory"#Log Search infra-solr collectionscurl -v "http://$INFRA_SOLR_URL/solr/hadoop_logs/replication?command=BACKUP&name=hadoop_logs_backup&location=/path/to/backup/directory"
curl -v "http://$INFRA_SOLR_URL/solr/audit_logs/replication?command=BACKUP&name=audit_logs_backup&location=/path/to/backup/directory"
curl -v "http://$INFRA_SOLR_URL/solr/history/replication?command=BACKUP&name=history_backup&location=/path/to/backup/directory"
For secured cluster
If the cluster is Kerberized, then you must kinit as the service principal.
#Atlas infra-solr collectionscurl -v --negotiate -u: "http://$INFRA_SOLR_URL/solr/vertex_index/replication?command=BACKUP&name=vertex_index_backup&location=/path/to/backup/directory"
curl -v --negotiate -u: "http://$INFRA_SOLR_URL/solr/edge_index/replication?command=BACKUP&name=edge_index_backup&location=/path/to/backup/directory"
curl -v --negotiate -u: "http://$INFRA_SOLR_URL/solr/fulltext_index/replication?command=BACKUP&name=fulltext_index_backup&location=/path/to/backup/directory"
#Ranger audit infra-solr collectionscurl -v --negotiate -u: "http://$INFRA_SOLR_URL/solr/ranger_audits/replication?command=BACKUP&name=ranger_audits_backup&location=/path/to/backup/directory"#Log Search infra-solr collectionscurl -v --negotiate -u: "http://$INFRA_SOLR_URL/solr/hadoop_logs/replication?command=BACKUP&name=hadoop_logs_backup&location=/path/to/backup/directory"
curl -v --negotiate -u: "http://$INFRA_SOLR_URL/solr/audit_logs/replication?command=BACKUP&name=audit_logs_backup&location=/path/to/backup/directory"
curl -v --negotiate -u: "http://$INFRA_SOLR_URL/solr/history/replication?command=BACKUP&name=history_backup&location=/path/to/backup/directory"
It is highly recommended to save the data folder for disaster recovery.
Procedure
1. Stop Ambari-Infra service in Ambari UI.
2. Back-up services data to restore later. For Ambari-Infra on the node where the ambari-infra-solr is installed.
tar -czf ambari-infra-backup.tar.gz /var/lib/ambari-infra-solr/data
49
In-Place Upgrade HDP 3 to CDP Private Cloud Base Upgrading HDP to Cloudera Runtime 7.1.x
Backup Ambari-Metrics
Procedure
1. Stop Ambari-Metrics service in Ambari UI .
2. Back-up services data to restore later. For Ambari-Metrics on the node where the ambari-metrics-collector isinstalled.
tar czf ams-backup.tar.gz /var/lib/ambari-metrics-collector/hbase
Backup HiveTo backup the Hive service, you must backup the Hive database and create a snapshot of the Hive warehouse.
Backup Hive table data using a snapshot
In Ambari, go to Services > Hive > Configs, and check the value of hive.metastore.warehouse.dir todetermine the location of the Hive warehouse, /apps/hive/warehouse by default.
1. On any node in the cluster, as the HDFS superuser, enable snapshots. For example,
$ sudo su - hdfs$ hdfs dfsadmin -allowSnapshot /apps/hive/warehouse
Output is:
Allowing snaphot on /apps/hive/warehouse succeeded
2. Create a snapshot of the Hive warehouse. For example,
$ hdfs dfs -createSnapshot /apps/hive/warehouse
Output includes the name and location of the snapshot:
Created snapshot /apps/hive/warehouse/.snapshot/s20210308-104702.892
Back up Hive Metastore
On the node where the database you use for Hive Metastore resides, back up Hive Metastore before upgrading toHDP. For example, in MySQL, dump each database as follows:
mysqldump -u <hive_db_user> <hive_db_schema_name> > </path/to/dump_file>
If you use another database for the Hive Metastore, use the equivalent command, such as pg_dump for Postgres todump the database.
Backup HBaseThe rollback procedure rolls back HDFS and, the data in HBase is also rolled back automatically as part of thisprocedure. In addition, HBase metadata stored in ZooKeeper is recovered as part of the ZooKeeper rollbackprocedure.
About this task
If your cluster is configured to use HBase replication, Cloudera recommends that you document all replication peers.If necessary (for example, because the HBase znode has been deleted), you can roll back HBase as part of the HDFSrollback without the ZooKeeper metadata. This metadata can be reconstructed in a fresh ZooKeeper installation, withthe exception of the replication peers, which you must add back.
50
In-Place Upgrade HDP 3 to CDP Private Cloud Base Upgrading HDP to Cloudera Runtime 7.1.x
Procedure
Stop HBase before backing up HDFS.
Backup KafkaBefore you begin the upgrade process, you need to explicitly set the Kafka protocol version to match what's beingused currently among the brokers and clients. Update server.properties on all brokers as follows:
Procedure
1. Log in to Ambari.
2. Choose the Kafka service.
3. Select the Configs page.
4. Find the Custom kafka-broker section.
5. Add the following properties:
• inter.broker.protocol.version=current_Kafka_version
• log.message.format.version=current_Kafka_version
Replace current_Kafka_version with the version of Apache Kafka currently being used, in case of HDP3.1.5 it is 2.0.0.
6. Save your changes. The information is automatically copied to each broker.
Important: Once the Kafka log format and protocol version configurations (theinter.broker.protocol.version and log.message.format.version properties) are set to the new version (or leftblank, which means to use the latest version), Kafka rollback is not possible.
Backup OozieTo backup the Oozie service, you must backup the Oozie database.
For other databases, Cloudera recommends that you perform backup of your databases before beginning the upgrade.
• Ambari database• Hive Metastore database (after the pre-upgrade tool runs compaction)• Oozie Server database• Ranger database• Ranger KMS database• Druid database• Superset Database
Backup KnoxWith the backup and rollback of Ambari, Knox is also backed up and rolled back by default.
Backup LogsearchWith the backup of Ambari-Infra, Logsearch is also backed up by default.
Backup ZeppelinWith the backup and rollback of HDFS, Zeppelin is also backed up and rolled back by default.
Backup HDFSYou can roll back an upgrade from CDP Private Cloud Base 7 to HDP 3. The rollback restores your HDP cluster tothe state it was in before the upgrade. This means any change that happened after taking the backups as instructed
51
In-Place Upgrade HDP 3 to CDP Private Cloud Base Upgrading HDP to Cloudera Runtime 7.1.x
from points 4 to 7 will be reverted from the HDFS cluster. You must perform additional steps before upgrading yourHDP cluster if you have configured the NameNode HA.
Procedure
1. If you have configured the NameNode HA, then locate the Active NameNode from Ambari Web > Services >HDFS in the Summary area.
2. Check the NameNode directory to ensure that there is no snapshot of any prior HDFS upgrade. Specifically, usingAmbari Web, browse to Services > HDFS > Configs, and examine the dfs.namenode.name.dir in the NameNodeDirectories property. Make sure that only a /current directory exists and remove /previous directory on theNameNode host.
3. Create the following log and other files. The commands below back up additional state from the file system inaddition to what fsImage contains. This information can be used to validate the filesystem state after the upgradeby comparing the output before or after the upgrade. This is helpful, but it is not required for troubleshooting anyissues that arise during the upgrade.
Note: The fsck or ls command may take a significant amount of time if the number of blocks or files inHDFS is in the ten to a hundred million or more range.
Authenticate as the HDFS user su -l [HDFS_USER]
Note: If the cluster is Kerberized, then you must kinit as the service principal. If the cluster is notKerberized, then you must run as a cluster administrator user or log in as the service user.
Run the following, where [HDFS_USER] is the HDFS Service user. For example, hdfs:
a) Run fsck with the following flags and send the results to a log. The resulting file contains a complete blockmap of the file system. Use this log later to confirm the upgrade.
hdfs fsck / -files -blocks -locations > dfs-old-fsck-1.log
b) Create a list of all the DataNodes in the cluster.
hdfs dfsadmin -report > dfs-old-report-1.log
c) Capture the complete namespace of the file system. The following command does a recursive listing of theroot file system:
hdfs dfs -ls -R / > dfs-old-lsr-1.log
d) Take a backup of the HDFS data to the backup instance of your HDFS, if you have such a system.
4. Create a backup from the configuration directory under /etc/hadoop/conf into a backup directory on all ofyour hosts.
5. Save the namespace. As the HDFS user, " su -l [HDFS_USER] ", you must put the cluster in Safe Mode.
hdfs dfsadmin -safemode enterhdfs dfsadmin -saveNamespace
Note: In a highly-available NameNode configuration, the command hdfs dfsadmin -saveNamespace sets a checkpoint in the first NameNode specified in the configuration, in dfs.ha.namenodes.[nameserviceID]. You can also use the dfsadmin -fs.
6. Create a backup from the directory located in $[dfs.namenode.name.dir]/ current into a backupdirectory.
7. Create a backup from the directory located in $[dfs.journalnode.edits.dir]/current into a backupdirectory.
52
In-Place Upgrade HDP 3 to CDP Private Cloud Base Upgrading HDP to Cloudera Runtime 7.1.x
8. As the HDFS user, su -l [HDFS_USER], take the NameNode out of Safe Mode. hdfs dfsadmin -safemode leave
From this point, you have all the data that might be required to restore HDFS to the state where it was at the timewhen HDFS entered safe mode.
A few points to consider regarding the backups:
• fsck ls, and other command outputs happened before entering safe mode if you went step by step over theguide. The guide initiates safe mode before the commands that require safe mode, however you can enter safemode earlier.
• If you come out of safe mode, and leave the cluster running, then you are allowing mutations on the filesystemthat are not saved in the backup.
Backup ZooKeeper
Procedure
1. Stop the Zookeeper service in Ambari UI.
2. Back-up services data to restore later. For Zookeeper on every node.
tar -czf backup.tar.gz /hadoop/zookeeper
Backup databasesMake sure that you have reviewed and completed all prerequisites described above.
Before you upgradeMake sure that you have reviewed and completed all prerequisites described above.
Cloudera recommends that you perform backup of your databases before beginning the upgrade.
• Ambari database• Hive Metastore database (after the pre-upgrade tool runs compaction)• Oozie Server database• Ranger database• Ranger KMS database• Druid database• Superset Database
Checkpoint HDFSYou must perform additional steps before upgrading your HDP cluster if you have configured NameNode HA.
Procedure
1. If you are configured for NameNode HA, then locate the Active NameNode from Ambari Web > Services > HDFS in the Summary area.
2. Check the NameNode directory to ensure that there is no snapshot of any prior HDFS upgrade. Specifically,using Ambari Web, browse to Services > HDFS > Configs, and examine the dfs.namenode.name.dir in theNameNode Directories property. Make sure that only a /current directory exists and remove /previous directory onthe NameNode host.
53

In-Place Upgrade HDP 3 to CDP Private Cloud Base Upgrading HDP to Cloudera Runtime 7.1.x
3. Create the following log and other files. Creating these logs allows you to check the integrity of the file systemafter the Stack upgrade.
As the HDFS user, su -l [HDFS_USER], run the following (where [HDFS_USER] is the HDFS Service user,for example, hdfs):
• Run fsck with the following flags and send the results to a log. The resulting file contains a complete blockmap of the file system. You use this log later to confirm the upgrade.
hdfs fsck / -files -blocks -locations > dfs-old-fsck-1.log
• Create a list of all the DataNodes in the cluster. hdfs dfsadmin -report > dfs-old-report-1.log
• Optional: Capture the complete namespace of the file system. The following command does a recursive listingof the root file system: hdfs dfs -ls -R / > dfs-old-lsr-1.log
• Optional: Take a backup of the HDFS data to your local file system or the backup instance of your HDFS.
4. Save the namespace. As the HDFS user, " su -l [HDFS_USER] ", you must put the cluster in Safe Mode.
• hdfs dfsadmin -safemode enter
• hdfs dfsadmin -saveNamespace
Note: In a highly-available NameNode configuration, the command hdfs dfsadmin -saveNamespace sets a checkpoint in the first NameNode specified in the configuration, indfs.ha.namenodes.[nameserviceID]. You can also use the dfsadmin -fs .
5. Copy the checkpoint files located in $[dfs.namenode.name.dir]/current into a backup directory.
6. Store the layout version for the NameNode located at $[dfs.namenode.name.dir]/current/VERSION into a backup directory where $[dfs.namenode.name.dir] is the value of the config parameterNameNode directories.
7. This file will be used later to verify that the layout version is upgraded. As the HDFS user, su -l[HDFS_USER], take the NameNode out of Safe Mode. hdfs dfsadmin -safemode leave
Pre-upgrade stepsYou must complete the pre-upgrade steps for the components and services that you are going to upgrade.
Ranger Service connection with Oracle databaseIf you have configured Ranger with Oracle Database as its backend, you must add the property with Key and Value.
If you have configured Ranger with Oracle Database as its backend, you must add the property conf/ranger-admin-site.xml with the key and value provided below for the Custom ranger-admin-site section in Ambari: Key:ranger.jpa.jdbc.preferredtestquery value: select 1 from dual;
Ranger admin passwordDuring the HDP upgrade, Ranger admin fails to apply the Java patch to change all admin passwords if thehadoop.security.credstore.java-keystore-provider.password-file property is set in core-site.
About this taskBefore you upgrade from HDP 3.1.5 to HDP intermediate bits, you must manually perform the following steps:
Procedure
1. SSH to the ranger admin host
2. cd /etc/ranger/admin/conf/
3. vi ranger-admin-env-credstore.sh
54
In-Place Upgrade HDP 3 to CDP Private Cloud Base Upgrading HDP to Cloudera Runtime 7.1.x
4. add "export HADOOP_CREDSTORE_PASSWORD=none" in the "ranger-admin-env-credstore.sh" file
5. chown ranger:ranger ranger-admin-env-credstore.sh
6. chmod 755 ranger-admin-env-credstore.sh
Preparing Spark for upgradeYou must migrate catalog data from dual catalog mode to single catalog mode before you upgrade HDP 3.1.5.x toHDP intermediate bits.
About this taskDual catalog mode is not supported in CDP Private Cloud Base 7.1.6.
Procedure
• Cloudera supports only a single catalog HDP 3.1.5 upgrade to CDP Private Cloud Base 7.1.6.• If your cluster version is HDP 3.1.4 or less, then you must upgrade to HDP 3.1.5 and then migrate to the single
catalog.• You must validate that all the tables are present in the single shared catalog.
Backing up Ambari infra Solr dataIn Ambari 7.1.x.x, Ambari Infra Solr uses Solr 8.4.1. For data stored in the existing Solr 5 implementation usedby Ambari 2.6.2.x, the data stored in Ambari Infra must be backed up and the Ambari Infra Solr services must beupgraded.
The next section walks you through steps to both back up the data stored in Ambari Infra and upgrade the AmbariInfra components. The backed up data will be migrated and restored after the HDP upgrade is complete.
Back up and upgrade Ambari infra Solr and Ambari Log SearchThe Ambari Infra Solr instance is used to index data for Atlas, Ranger, and Log Search. The version of Solr usedby Ambari Infra in Ambari 2.7.5 is Solr 7. The version of Solr used by Ambari Infra in Ambari 7.1.x.x is Solr 8.4.1.When moving from Solr 7 to Solr 8.4.1 indexed data must be backed up from Solr 7, migrated, and restored into Solr8.4.1 as there are on-disk format changes, and collection-specific schema changes.
The Ambari Infra Solr components must also be upgraded. Scripts are available to do both, and are explained below.
This process will be broken up into four steps:
Generate Migration Config
The migration utility requires some basic information about your cluster and this step generates a configuration filethat captures that information.
Back up Ambari Infra Solr Data
This process backs up all indexed data either to a node-local disk, shared disk (NFS mount), or HDFS filesystem.
Remove existing collections and Upgrade Binaries
This step removes the Solr 7 collections, upgrades Ambari Infra to Solr 8.4.1, and creates the new collections with theupgraded schema required by the HDP intermediate bits services. This step also upgrades LogSearch binaries if theyare installed.
Migrate and Restore
This step migrates the backed up data to the new format required by Solr 8.4.1 and restores the data into the newcollections. This step is completed after the HDP intermediate bits upgrade has been completed in the Post-upgradeSteps section of the upgrade guide
Generate migration configurationThe utility used in this process is included in the ambari-infra-solr-client package. This package must be upgradedbefore the utility can be run. To do this:
55
In-Place Upgrade HDP 3 to CDP Private Cloud Base Upgrading HDP to Cloudera Runtime 7.1.x
Procedure
1. SSH into a host that has an Infra Solr Instance installed on it. You can locate this host by clicking Hosts on theAmbari Web UI. Click on the Filter icon and type Infra Solr Instance: All to find each host that hasan Infra Solr Instance installed on it.
2. Upgrade the ambari-infra-solr-client package.
• yum clean all
• yum upgrade ambari-infra-solr-client -y
For Ubuntu18:
• apt-get clean all
• apt-get install -y ambari-infra-solr-client
3. You can now proceed to configuring and running the migration tool from the same host. Run the followingcommands as root, or as a user with sudo access: Export the variable that will hold the full path and filename ofthe configuration file that is generated in the next step.
export CONFIG_INI_LOCATION=ambari_solr_migration.ini
4. Run the migrationConfigGenerator.py script, located in the /usr/lib/ambari-infra-solr-client/ directory, with the following parameters:
--ini-file $CONFIG_INI_LOCATION
This is the previously exported environmental variable that holds the path and filename of theconfiguration file that will be generated.
--host=ambari.hortonworks.local
This should be the hostname of the Ambari Server.
--port=8080
This is the port of the Ambari Server. If the Ambari Server is configured to use HTTPS, use theHTTPS port and add the -s parameter to configure HTTPS as the communication protocol.
--cluster=cl1
This is the name of the cluster that is being managed by Ambari. To find the name of your cluster,look in the upper right and corner of the Ambari Web UI, just to the left of the backgroundoperations and alerts.
--username=admin
This is the name of a user that is an Ambari Admin.
--password=admin
This is the password of the user.
--backup-base-path=/my/path
This is the location where the backed up data is stored. Data is backed up to this local directorypath on each host that is running an Infra Solr instance in the cluster. So, if you have 3 Infra Solrserver instances and you use --backup-base-path=/home/solr/backup, this directory iscreated on all 3 hosts and the data for that host is backed up to this path.
If you are using a shared file system that is mounted on each Infra Solr instance in the cluster, usethe --shared-drive parameter instead of --backup-base-path. The value of this parameter should bethe path to the mounted drive that is used for the backup. When this option is chosen, a directory iscreated in this path for each Ambari Infra Solr instance with the backed up data. For example, if you
56
In-Place Upgrade HDP 3 to CDP Private Cloud Base Upgrading HDP to Cloudera Runtime 7.1.x
had an NFS mount /export/solr on each host, you would use --shared-drive=/exports/solr. Only usethis option if this path exists and is shared amongst all hosts that are running the Ambari Infra Solr.
--java-home=/usr/jdk64/jdk1.8.0_112
This should point to a valid Java 1.8 JDK that is available at the same path on each host in thecluster that is running an Ambari Infra Solr instance.
If the Ranger Audit collection is being stored in HDFS, add the parameter, --ranger-hdfs-base-path.
The value of this parameter should be set to the path in HDFS where the Solr collection for theRanger Audit data has been configured to store its data.
Example:--ranger-hdfs-base-path=/user/infra-solr
Example Invocations:
If using HTTPS for the Ambari Server:
/usr/bin/python /usr/lib/ambari-infra-solr-client/migrationConfigGenerator.py \--ini-file $CONFIG_INI_LOCATION \--host=c7401.ambari.apache.org \--port=8443 -s \--cluster=cl1 \--username=admin \--password=admin \--backup-base-path=/home/solr/backup \--java-home=/usr/jdk64/jdk1.8.0_112
If using HTTP for the Ambari Server:
/usr/bin/python /usr/lib/ambari-infra-solr-client/migrationConfigGenerator.py \--ini-file $CONFIG_INI_LOCATION \--host=c7401.ambari.apache.org \--port=8080 \--cluster=cl1 \--username=admin \--password=admin \--backup-base-path=/home/solr/backup \--java-home=/usr/jdk64/jdk1.8.0_112
Ensure the script generates cleanly and there are no yellow warning texts visible. If so, review the yellowwarnings.
Back up Ambari Infra Solr dataAfter the configuration file is generated, you must review the ini file created by the process.
About this taskThere is a configuration section for each collection that was detected. If you do not want to backup a specificcollection you can set enabled = false and the collection will not be backed up. Ensure that enabled = true is set forall of the collections you do wish to back up. By default, only the Atlas and Ranger collections will be backed up andLog Search will not be backed up..
Procedure
• To execute the backup, run the following command from the same host on which you generated the configurationfile:
# /usr/lib/ambari-infra-solr-client/ambariSolrMigration.sh \--ini-file $CONFIG_INI_LOCATION \
57
In-Place Upgrade HDP 3 to CDP Private Cloud Base Upgrading HDP to Cloudera Runtime 7.1.x
--mode backup | tee backup_output.txt
During this process, the script generates Ambari tasks that are visible in the Background Operations dialog inthe Ambari Server. Once the process has completed, retain the output of the script for your records. This outputis helpful when debugging any issues that may occur during the migration process, and the output containsinformation regarding the number of documents and size of each backed up collection.
Remove Existing Collections and Upgrade BinariesOnce the data has been backed up, the old collections need to be deleted, and the Ambari Infra Solr, and Log Search(if installed) components need to be upgraded.
Procedure
• To do all of that, run the following script:
/usr/lib/ambari-infra-solr-client/ambariSolrMigration.sh \
--ini-file $CONFIG_INI_LOCATION \
--mode delete | tee delete_output.txt
During this process, the script generates Ambari tasks that are visible in the Background Operations dialog in theAmbari Server.
After the process has completed, retain the output of the script for your records. This output is helpful whendebugging any issues that may occur during the migration process.
• Starting services in Ambari
a) Enable the ignore_groupsusers_create property by running the following commands from the ambari serverhost cd /var/lib/ambari-server/resources/scripts
python configs.py -l <AMBARI_HOST> -t <AMBARI_PORT> -u <ADMIN_USERNAME> -p <ADMIN_PASSWORD> \ -n <CLUSTER_NAME> -a set -s http -c cluster-env -k ignore_groupsusers_create -v true
b) After the ignore_groupsusers_create property is enabled, start services using Ambari and proceed with theupgrade.
c) After this step is completed, you must revert the ignore_groupsusers_create property by running the followingcommands from the ambari server host cd /var/lib/ambari-server/resources/scripts
python configs.py -l <AMBARI_HOST> -t <AMBARI_PORT> -u <ADMIN_USERNAME> -p <ADMIN_PASSWORD> \ -n <CLUSTER_NAME> -a set -s http -c cluster-env -k ignore_groupsusers_create -v false
Caution: By setting the ignore_groupsusers_create property, you are stopping the ApacheSolr migration from creating a new solr user which is already created. If you do not revert theignore_groupsusers_create property, then when you get to the step in the upgrade where a newyarn_ats user must be created as it is not available in HDP 3.1.5.x, that yarn_ats user creation fails andan upgrade error is displayed. You must ensure to revert the setting immediately after this Solr upgradestep.
Preparing HBase for upgradeYou must remove the HBase backup-and-restore-utility configuration present in your HDP 3.1.5 cluster before youmigrate to CDP. CDP Private Cloud Base does not support the backup-and-restore utility present in HDP 3.1.5.
About this task
Remove the configuration properties that you added when you enabled the HBase backup-and-restore feature in HDP3.1.5. If you do not perform this pre-upgrade step, HBase service fails to start after upgrading to CDP Private CloudBase 7.1.6.
Procedure
1. Open the hbase-site.xml configuration file on your HDP 3.1.5 cluster.
58
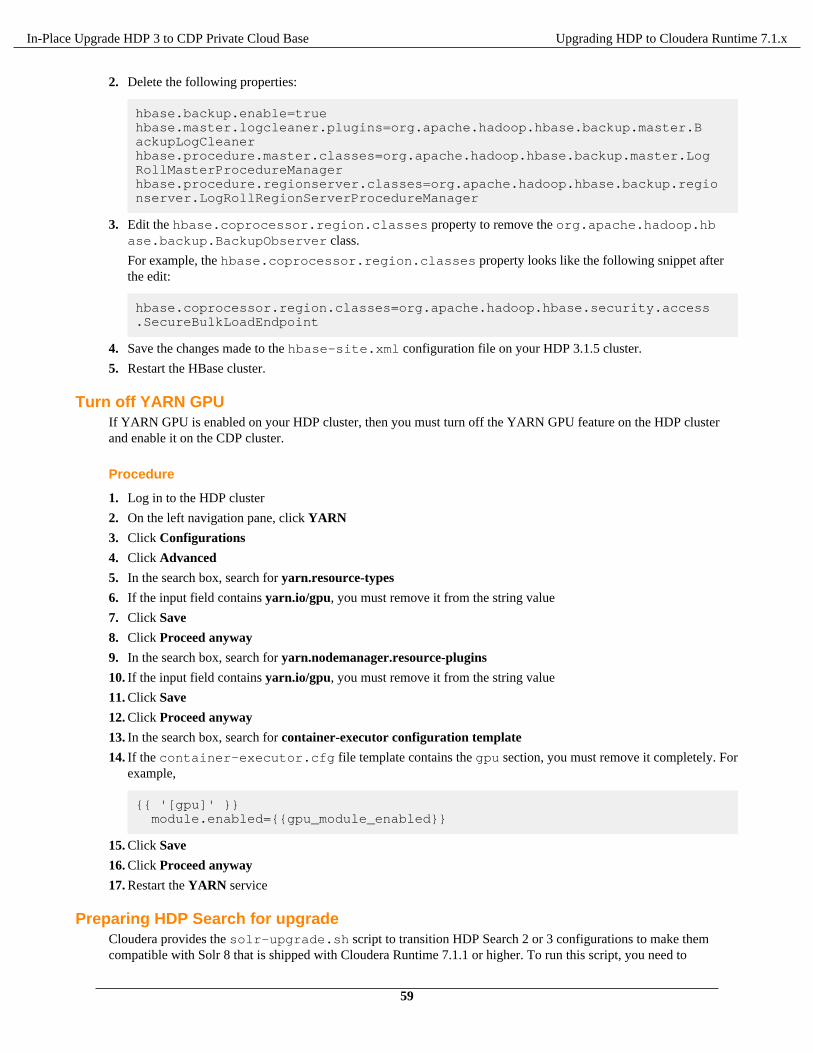
In-Place Upgrade HDP 3 to CDP Private Cloud Base Upgrading HDP to Cloudera Runtime 7.1.x
2. Delete the following properties:
hbase.backup.enable=truehbase.master.logcleaner.plugins=org.apache.hadoop.hbase.backup.master.BackupLogCleanerhbase.procedure.master.classes=org.apache.hadoop.hbase.backup.master.LogRollMasterProcedureManagerhbase.procedure.regionserver.classes=org.apache.hadoop.hbase.backup.regionserver.LogRollRegionServerProcedureManager
3. Edit the hbase.coprocessor.region.classes property to remove the org.apache.hadoop.hbase.backup.BackupObserver class.
For example, the hbase.coprocessor.region.classes property looks like the following snippet afterthe edit:
hbase.coprocessor.region.classes=org.apache.hadoop.hbase.security.access.SecureBulkLoadEndpoint
4. Save the changes made to the hbase-site.xml configuration file on your HDP 3.1.5 cluster.
5. Restart the HBase cluster.
Turn off YARN GPUIf YARN GPU is enabled on your HDP cluster, then you must turn off the YARN GPU feature on the HDP clusterand enable it on the CDP cluster.
Procedure
1. Log in to the HDP cluster
2. On the left navigation pane, click YARN
3. Click Configurations
4. Click Advanced
5. In the search box, search for yarn.resource-types
6. If the input field contains yarn.io/gpu, you must remove it from the string value
7. Click Save
8. Click Proceed anyway
9. In the search box, search for yarn.nodemanager.resource-plugins
10. If the input field contains yarn.io/gpu, you must remove it from the string value
11. Click Save
12. Click Proceed anyway
13. In the search box, search for container-executor configuration template
14. If the container-executor.cfg file template contains the gpu section, you must remove it completely. Forexample,
{{ '[gpu]' }} module.enabled={{gpu_module_enabled}}
15. Click Save
16. Click Proceed anyway
17. Restart the YARN service
Preparing HDP Search for upgradeCloudera provides the solr-upgrade.sh script to transition HDP Search 2 or 3 configurations to make themcompatible with Solr 8 that is shipped with Cloudera Runtime 7.1.1 or higher. To run this script, you need to
59
In-Place Upgrade HDP 3 to CDP Private Cloud Base Upgrading HDP to Cloudera Runtime 7.1.x
download configuration metadata from your HDP Search instance and copy it to an interim CDP cluster with Solrservice. You can then use that same cluster to validate and test the migrated configuration metadata.
Note:
Do not perform the upgrade tasks on a production cluster, during an actual HDP to CDP upgrade, because theprocess is time consuming and may require fixing incompatibilities manually.
The migration script cannot upgrade the Lucene index files. After upgrading, you must reindex your collections. Formore information, see Reindexing in Solr in the Apache Solr wiki.
HDP Search to Cloudera Search transition process
1. Deploy an interim CDP cluster with Cloudera Runtime 7.1.1 or higher. Start a Solr service.2. Download the HDP Search configuration and copy it to the interim CDP cluster.3. Transition the HDP Search configuration using the interim cluster.4. Validate the transitioned configuration, using the interim cluster.5. Test the transitioned configuration, using the interim cluster.6. Upgrade HDP to Cloudera Runtime 7.1.x.7. Perform Search post-HDP-upgrade tasks.
Warnings and prerequisitesPreparing HDP Search for a CDP Private Cloud Base upgrade is a complex task.
Warning: The procedure documented here is not applicable to transition infra-Solr deployments from HDPto CDP.
Warning: Due to changes in the underlying Apache Lucene file format between the HDP Search 2 or 3 andthe Solr shipped with Cloudera Runtime 7.1.1 or higher, it is not possible to directly upgrade your existingindexes. The following procedures update only your Solr configuration and metadata to be compatiblewith the new Solr version. After upgrading to Cloudera Runtime 7.1.1 or higher, you must reindex yourcollections.
Make sure that the source data that was used to index your collections is still available before upgrading. Plandowntime for any applications or services that use your Search deployment.
Warning:
The solr-upgrade.sh script shipped with Cloudera Manager 7.3.1 or earlier downloads aliases.json from ZooKeeper during the pre-upgrade transition, but it fails to upload the file to the upgradedcluster. You need to recreate aliases manually on the upgraded cluster. For more information on aliases, seeCollection aliasing.
If you run Cloudera Manager 7.4.2 or higher, you can disregard this warning.
Warning: Although the configuration transformation script addresses known incompatibilities, there mightbe incompatible configurations that are not detected by the script. Do not upgrade your production ClouderaSearch services to Cloudera Runtime 7.1.1 or higher until you have tested the migrated configuration withCloudera Runtime 7.1.1 or higher on a testing or development cluster.
Prerequisites
• Obtain the solr-download-metadata.sh script by creating a support ticket at the support site.• Provision an interim Cloudera Runtime 7 cluster with a Solr service before you start the upgrade process. You
need it to perform some of the upgrade transformation steps and you can also use it for upgrade testing.• Stop making changes to your HDP Search environment. Make sure that no configuration changes are made to
HDP Search for the duration of the transition and upgrade. This includes adding or removing Solr Server hosts,moving Solr Server roles between hosts, changing hostnames, and so on.
• Plan for an outage for any applications or services that use your Search deployment until you have completedreindexing after the upgrade.
60
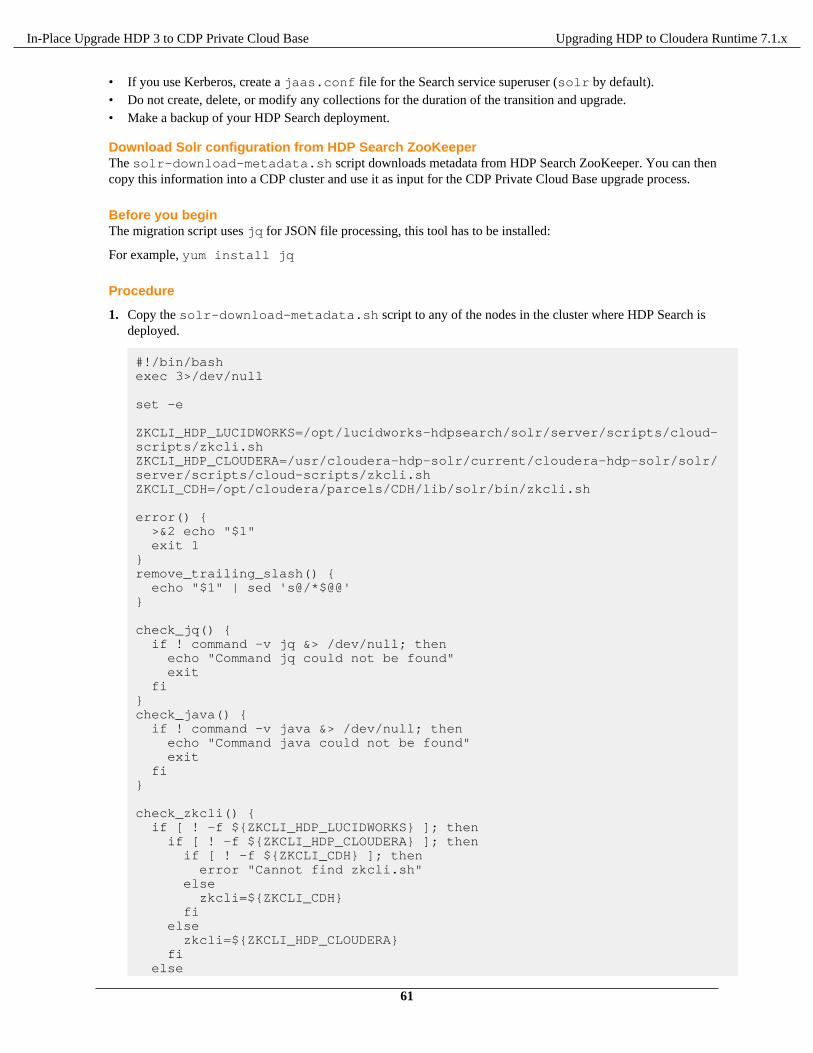
In-Place Upgrade HDP 3 to CDP Private Cloud Base Upgrading HDP to Cloudera Runtime 7.1.x
• If you use Kerberos, create a jaas.conf file for the Search service superuser (solr by default).• Do not create, delete, or modify any collections for the duration of the transition and upgrade.• Make a backup of your HDP Search deployment.
Download Solr configuration from HDP Search ZooKeeperThe solr-download-metadata.sh script downloads metadata from HDP Search ZooKeeper. You can thencopy this information into a CDP cluster and use it as input for the CDP Private Cloud Base upgrade process.
Before you beginThe migration script uses jq for JSON file processing, this tool has to be installed:
For example, yum install jq
Procedure
1. Copy the solr-download-metadata.sh script to any of the nodes in the cluster where HDP Search isdeployed.
#!/bin/bashexec 3>/dev/null
set -e
ZKCLI_HDP_LUCIDWORKS=/opt/lucidworks-hdpsearch/solr/server/scripts/cloud-scripts/zkcli.shZKCLI_HDP_CLOUDERA=/usr/cloudera-hdp-solr/current/cloudera-hdp-solr/solr/server/scripts/cloud-scripts/zkcli.shZKCLI_CDH=/opt/cloudera/parcels/CDH/lib/solr/bin/zkcli.sh
error() { >&2 echo "$1" exit 1}remove_trailing_slash() { echo "$1" | sed 's@/*$@@'}
check_jq() { if ! command -v jq &> /dev/null; then echo "Command jq could not be found" exit fi}check_java() { if ! command -v java &> /dev/null; then echo "Command java could not be found" exit fi}
check_zkcli() { if [ ! -f ${ZKCLI_HDP_LUCIDWORKS} ]; then if [ ! -f ${ZKCLI_HDP_CLOUDERA} ]; then if [ ! -f ${ZKCLI_CDH} ]; then error "Cannot find zkcli.sh" else zkcli=${ZKCLI_CDH} fi else zkcli=${ZKCLI_HDP_CLOUDERA} fi else
61
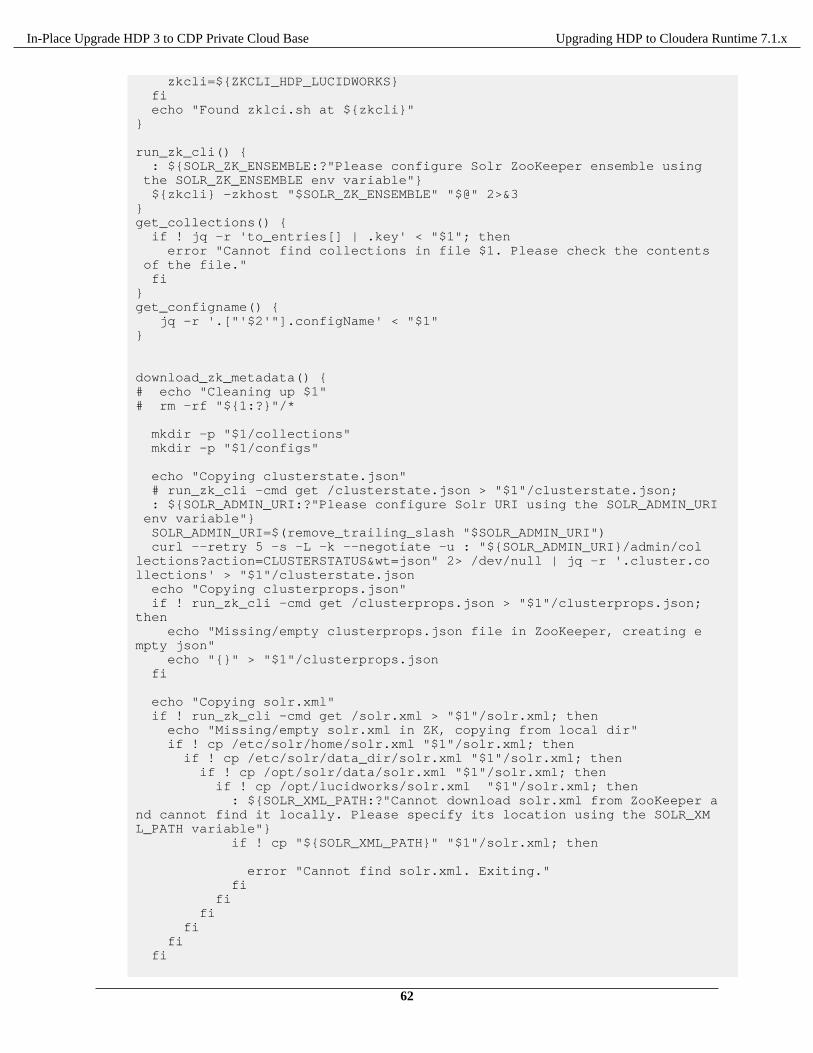
In-Place Upgrade HDP 3 to CDP Private Cloud Base Upgrading HDP to Cloudera Runtime 7.1.x
zkcli=${ZKCLI_HDP_LUCIDWORKS} fi echo "Found zklci.sh at ${zkcli}"}
run_zk_cli() { : ${SOLR_ZK_ENSEMBLE:?"Please configure Solr ZooKeeper ensemble using the SOLR_ZK_ENSEMBLE env variable"} ${zkcli} -zkhost "$SOLR_ZK_ENSEMBLE" "$@" 2>&3}get_collections() { if ! jq -r 'to_entries[] | .key' < "$1"; then error "Cannot find collections in file $1. Please check the contents of the file." fi}get_configname() { jq -r '.["'$2'"].configName' < "$1"}
download_zk_metadata() {# echo "Cleaning up $1"# rm -rf "${1:?}"/*
mkdir -p "$1/collections" mkdir -p "$1/configs"
echo "Copying clusterstate.json" # run_zk_cli -cmd get /clusterstate.json > "$1"/clusterstate.json; : ${SOLR_ADMIN_URI:?"Please configure Solr URI using the SOLR_ADMIN_URI env variable"} SOLR_ADMIN_URI=$(remove_trailing_slash "$SOLR_ADMIN_URI") curl --retry 5 -s -L -k --negotiate -u : "${SOLR_ADMIN_URI}/admin/collections?action=CLUSTERSTATUS&wt=json" 2> /dev/null | jq -r '.cluster.collections' > "$1"/clusterstate.json echo "Copying clusterprops.json" if ! run_zk_cli -cmd get /clusterprops.json > "$1"/clusterprops.json; then echo "Missing/empty clusterprops.json file in ZooKeeper, creating empty json" echo "{}" > "$1"/clusterprops.json fi
echo "Copying solr.xml" if ! run_zk_cli -cmd get /solr.xml > "$1"/solr.xml; then echo "Missing/empty solr.xml in ZK, copying from local dir" if ! cp /etc/solr/home/solr.xml "$1"/solr.xml; then if ! cp /etc/solr/data_dir/solr.xml "$1"/solr.xml; then if ! cp /opt/solr/data/solr.xml "$1"/solr.xml; then if ! cp /opt/lucidworks/solr.xml "$1"/solr.xml; then : ${SOLR_XML_PATH:?"Cannot download solr.xml from ZooKeeper and cannot find it locally. Please specify its location using the SOLR_XML_PATH variable"} if ! cp "${SOLR_XML_PATH}" "$1"/solr.xml; then error "Cannot find solr.xml. Exiting." fi fi fi fi fi fi
62
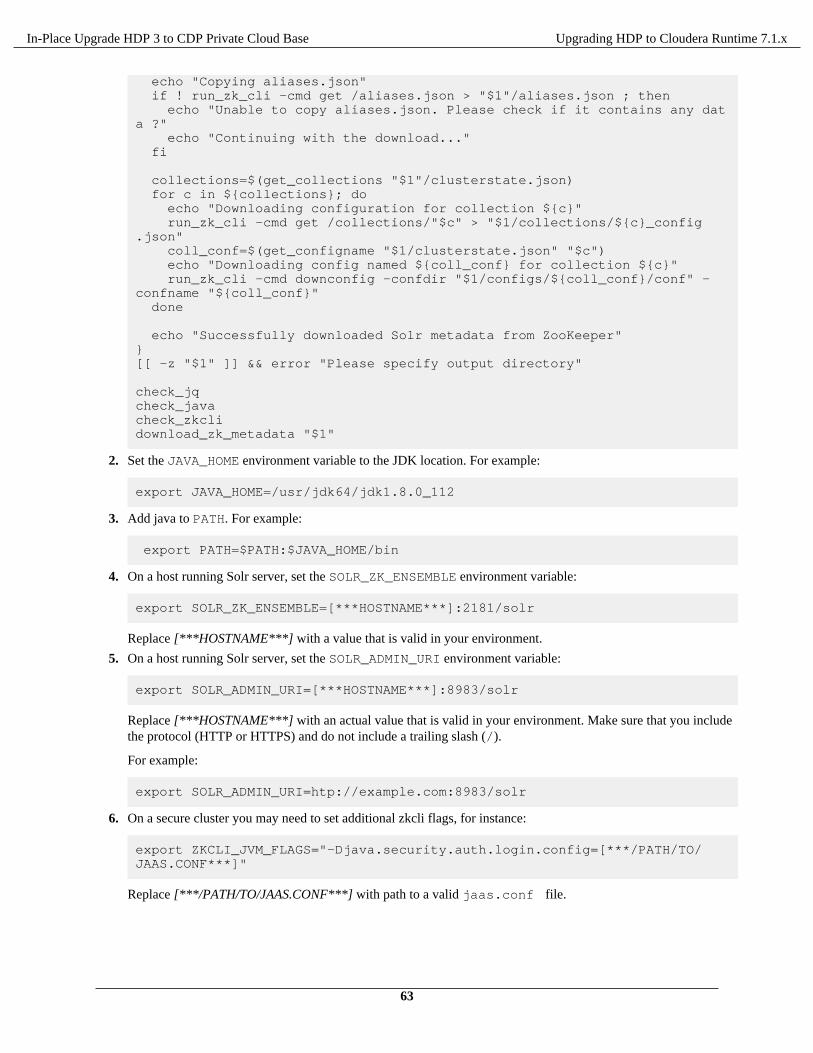
In-Place Upgrade HDP 3 to CDP Private Cloud Base Upgrading HDP to Cloudera Runtime 7.1.x
echo "Copying aliases.json" if ! run_zk_cli -cmd get /aliases.json > "$1"/aliases.json ; then echo "Unable to copy aliases.json. Please check if it contains any data ?" echo "Continuing with the download..." fi
collections=$(get_collections "$1"/clusterstate.json) for c in ${collections}; do echo "Downloading configuration for collection ${c}" run_zk_cli -cmd get /collections/"$c" > "$1/collections/${c}_config.json" coll_conf=$(get_configname "$1/clusterstate.json" "$c") echo "Downloading config named ${coll_conf} for collection ${c}" run_zk_cli -cmd downconfig -confdir "$1/configs/${coll_conf}/conf" -confname "${coll_conf}" done
echo "Successfully downloaded Solr metadata from ZooKeeper"}[[ -z "$1" ]] && error "Please specify output directory"
check_jqcheck_javacheck_zkclidownload_zk_metadata "$1"
2. Set the JAVA_HOME environment variable to the JDK location. For example:
export JAVA_HOME=/usr/jdk64/jdk1.8.0_112
3. Add java to PATH. For example:
export PATH=$PATH:$JAVA_HOME/bin
4. On a host running Solr server, set the SOLR_ZK_ENSEMBLE environment variable:
export SOLR_ZK_ENSEMBLE=[***HOSTNAME***]:2181/solr
Replace [***HOSTNAME***] with a value that is valid in your environment.
5. On a host running Solr server, set the SOLR_ADMIN_URI environment variable:
export SOLR_ADMIN_URI=[***HOSTNAME***]:8983/solr
Replace [***HOSTNAME***] with an actual value that is valid in your environment. Make sure that you includethe protocol (HTTP or HTTPS) and do not include a trailing slash (/).
For example:
export SOLR_ADMIN_URI=htp://example.com:8983/solr
6. On a secure cluster you may need to set additional zkcli flags, for instance:
export ZKCLI_JVM_FLAGS="-Djava.security.auth.login.config=[***/PATH/TO/JAAS.CONF***]"
Replace [***/PATH/TO/JAAS.CONF***] with path to a valid jaas.conf file.
63
In-Place Upgrade HDP 3 to CDP Private Cloud Base Upgrading HDP to Cloudera Runtime 7.1.x
7. If you have enabled Kerberos, run the kinit command with the Solr service superuser. For example:
kinit solr@[***EXAMPLE.COM***]
Replace [***EXAMPLE.COM***] with your Kerberos realm name.
8. Download the current (HDP Search 2 or 3) Solr configuration from ZooKeeper:
•solr-download-metadata.sh [***DIRECTORY***]
Replace [***DIRECTORY***] with the path to the directory where you want to download the Solrconfiguration.
• If you have enabled Kerberos and configured ZooKeeper Access Control Lists (ACLs), specify your JAASconfiguration file by adding the --jaas parameter to the command.
solr-download-metadata.sh --jaas [***/PATH/TO/JAAS.CONF***] [***DIRECTORY***]
Replace [***/PATH/TO/JAAS.CONF***] with the path to a valid jaas.conf file.
Replace [***DIRECTORY***] with the path to the directory where you want to download the Solrconfiguration.
In case of a successful run, the last line printed out by the script is:
Successfully downloaded SOLR metadata from Zookeeper
Note: Make a backup copy of the downloaded configuration.
9. Copy the migrated data to $HOME/cr7-solr-migration in the interim Solr instance.
10. Initialize a directory for the migrated configuration as a copy of the current configuration:
cp -r $HOME/cr7-solr-migration $HOME/cr7-migrated-solr-config
Transition Solr configurationDepending on the Cloudera Manager version, select the transition process that is applicable to your case.
Transition Solr configuration using Cloudera Manager versions 7.1.1 to 7.2.4The migration script transforms configuration metadata before the actual upgrade and checks its validity for the targetSolr version. In case it identifies incompatibilities it cannot resolve, the script stops, letting you fix the input file withthe incompatibility. Afterwards, you can rerun the script to continue with the transition process.
Warning: Although the configuration transformation script addresses known incompatibilities, there mightbe incompatible configurations that are not detected by the script. Do not upgrade your production ClouderaSearch services to Cloudera Runtime 7.1.1 or higher until you have tested the migrated configuration withCloudera Runtime 7.1.1 or higher on a testing or development cluster.
1. Run the migration script:
a./opt/cloudera/cm/solr-upgrade/solr-upgrade.sh config-upgrade -t \solrxml -c $HOME/cr7-solr-migration/solr.xml -u \/opt/cloudera/cm/solr-upgrade/validators/solr_4_to_8_processors.xml \-d /tmp
If Kerberos is enabled, specify your JAAS configuration file by appending --jaas /path/to/solr-jaas.conf to the command.
b. If the script reports any incompatibilities, fix them in the working directory ($HOME/cr7-solr-migration/solr.xml in this example) and then rerun the script. Each time you run the script, the files in the
64
In-Place Upgrade HDP 3 to CDP Private Cloud Base Upgrading HDP to Cloudera Runtime 7.1.x
output directory (/tmp in this example) are overwritten. Repeat until there are no incompatibilities and thesolr.xml migration is successful. For example:
Validating solrxml...No configuration errors found...No configuration warnings found...
Following incompatibilities will be fixed by auto-transformations (using --upgrade command): * System property used to define SOLR server port has changed from solr.port to jetty.port
Solr solrxml validation is successful. Please review /tmp/solrxml_validation.html for more details.
Applying auto transformations...
The upgraded configuration file is available at /tmp/solr.xml
2. Copy the migrated solr.xml file to the migrated configuration directory:
cp /tmp/solr.xml $HOME/cr7-migrated-solr-config
3. For each collection configuration set in $HOME/cr7-solr-migration/configs/, migrate theconfiguration and schema. Each time you run the script, the output file is overwritten. Do not proceed to the nextcollection until the migration is successful and you have copied the migrated file to its final destination.
a. Run the migration script for solrconfig.xml. For example, for a configuration set named tweets_config:
/opt/cloudera/cm/solr-upgrade/solr-upgrade.sh config-upgrade -t \solrconfig -c $HOME/cr7-solr-migration/configs/tweets_config/conf/solrconfig.xml -u \/opt/cloudera/cm/solr-upgrade/validators/solr_4_to_8_processors.xml \-d /tmp
b. If the script reports any incompatibilities, fix them in the working directory ($HOME/cr7-solr-migration/configs/tweets_config/conf/solrconfig.xml in this example) and then rerun the script.Repeat until there are no incompatibilities and the solrconfig.xml migration is successful. You shouldsee a message similar to the following:
Solr solrconfig validation is successful. Please review /tmp/solrconfig_validation.html for more details.
Applying auto transformations...
The upgraded configuration file is available at /tmp/solrconfig.xml
c. Copy the migrated solrconfig.xml file to the collection configuration directory in the migrated directory.For example:
cp /tmp/solrconfig.xml \$HOME/cr7-migrated-solr-config/configs/tweets_config/conf/
d. Run the migration script for schema.xml (or managed-schema). For example, for a configuration setnamed tweets_config:
/opt/cloudera/cm/solr-upgrade/solr-upgrade.sh config-upgrade \-t schema \-c $HOME/cr7-solr-migration/configs/tweets_config/conf/schema.xml \-u /opt/cloudera/cm/solr-upgrade/validators/solr_4_to_8_processors.xml \-d /tmp
65
In-Place Upgrade HDP 3 to CDP Private Cloud Base Upgrading HDP to Cloudera Runtime 7.1.x
e. If the script reports any incompatibilities, fix them in the working directory ($HOME/cr7-solr-migration/configs/tweets_config/conf/schema.xml in this example) and then rerun the script.Repeat until there are no incompatibilities and the solrconfig.xml migrations are all successful.
f. Copy the migrated schema.xml file to the collection configuration directory in the migrated directory. Forexample:
cp /tmp/schema.xml $HOME/cr7-migrated-solr-config/configs/tweets_config/conf/
g. Repeat for all configuration sets in $HOME/cr7-solr-migration/configs/.
Transition the configuration using Cloudera Manager versions 7.3.1 or higherThe migration script transforms configuration metadata before the actual upgrade and checks its validity for the targetSolr version. In case it identifies incompatibilities it cannot resolve, the script stops, letting you fix the input file withthe incompatibility. Afterwards, you can rerun the script to continue with the transition process.
Before you begin
When running the script, you must specify the location of the CDH 5 Solr binaries using the CDH_SOLR_HOMEenvironment variable. Solr binaries are located at /opt/cloudera/parcels/CDH/lib/solr.
For example:
export CDH_SOLR_HOME=/opt/cloudera/parcels/CDH/lib/solr
For information on solr-upgrade.sh command syntax and usage options, run the following command:
./solr-upgrade.sh help
Warning: Although the configuration transformation script addresses known incompatibilities, there mightbe incompatible configurations that are not detected by the script. Do not upgrade your production ClouderaSearch services to Cloudera Runtime 7.1.1 or higher until you have tested the migrated configuration withCloudera Runtime 7.1.1 or higher on a testing or development cluster.
About this task
In this procedure you run solr-upgrade.sh with the upgrade-metadata option. It transforms configurationmetadata to make it compatible with the target Solr version. The input of the script ([***/SOLR/METADATA/INPUT/DIRECTORY***]) is the Solr configuration that you have downloaded from the ZooKeeper service of the sourceversion.
The Solr configuration transition script, solr-upgrade.sh, is included with Cloudera Manager 7.1 agentsoftware. This enables you to run the script after upgrading to Cloudera Manager 7.1, but before upgrading toCloudera Runtime 7.1.1 or higher.
The script is located at /opt/cloudera/cm/solr-upgrade/solr-upgrade.sh.
Procedure
1. Make sure that you run the script on a host that is assigned a Solr Server or Solr service Gateway role. Confirmthat the SOLR_ZK_ENSEMBLE environment variable is set in /etc/solr/conf/solr-env.sh:
cat /etc/solr/conf/solr-env.sh
export SOLR_ZK_ENSEMBLE=[***zk01.example.com:2181,zk02.example.com:2181/solr***] \
66
In-Place Upgrade HDP 3 to CDP Private Cloud Base Upgrading HDP to Cloudera Runtime 7.1.x
export SENTRY_CONF_DIR=/etc/solr/[***conf.example.SOLR-1888]/sentry-conf
Replace [***zk01.example.com:2181,zk02.example.com:2181/solr***] and [***conf.example.SOLR-1***] withactual values valid in your environment.
2. Run the migration script:
/opt/cloudera/cm/solr-upgrade/solr-upgrade.sh upgrade-metadata \-c [***/SOLR/METADATA/INPUT/DIRECTORY***] \-d [***SOLR/METADATA/OUTPUT/DIRECTORY***]
Replace [***/SOLR/METADATA/INPUT/DIRECTORY***] and [***SOLR/METADATA/OUTPUT/DIRECTORY***] with actual values valid in your environment.
For example:
/opt/cloudera/cm/solr-upgrade/solr-upgrade.sh upgrade-metadata \-c $HOME/cr7-solr-migration -d $HOME/cr7-migrated-solr-config
If you have enabled Kerberos, specify your JAAS configuration file by adding --jaas [***PATH/TO/SOLR/JAAS.CONF***] to the command.
For example:
/opt/cloudera/cm/solr-upgrade/solr-upgrade.sh \--jaas [***PATH/TO/SOLR/JAAS.CONF***] \upgrade-metadata -c $HOME/cr7-solr-migration -d $HOME/cr7-migrated-solr-config
The output directory does not only contain the migrated configuration files but several *_validation.htmlfiles for all the steps of the migration and a new index_validation.html file linking to these files.
The output contains the following logs at the beginning and end of the steps:
---------- upgrading ...---------- upgrade successful for …
If a step reports an error, the script stops at that point and the METADATA UPGRADE SUCCESSFUL message ismissing. Check the output for the problematic step. If the script stops on error, the last step printed only has theupgrading but not the upgrade successful line.
3. Fix the erroneous file in the input directory ($HOME/cr7-solr-migration in this example) and re-run thescript.
Each time you run the script, the files in the output directory ($HOME/cr7-migrated-solr-config in thisexample) are overwritten. Repeat until the script outputs no incompatibilities.
If the script runs successfully, the last line of the output is the following:
METADATA UPGRADE SUCCESSFUL FOR METADATA IN [***/SOLR/METADATA/INPUT/DIRECTORY***] OUTPUT STORED IN [***SOLR/METADATA/OUTPUT/DIRECTORY***]
For example:
METADATA UPGRADE SUCCESSFUL FOR METADATA IN $HOME/cr7-solr-migration OUTPUT STORED IN $HOME/cr7-migrated-solr-config
Validate transitioned Solr configurationThe solr-upgrade.sh script includes a validate-metadata command that you can run against the migratedSolr configuration and metadata to make sure that they can be used to reinitialize the Solr service after the CDHcluster upgrade.
67
In-Place Upgrade HDP 3 to CDP Private Cloud Base Upgrading HDP to Cloudera Runtime 7.1.x
About this task
The script performs a series of checks to make sure that:
• Required configuration files (such as solr.xml, clusterstate.json, and collection configuration sets) arepresent.
• The configuration files are compatible with the Solr version being upgraded to (Solr 8, in this case).
Before you begin
Procedure
Validate the configuration by running the following script:
/opt/cloudera/cm/solr-upgrade/solr-upgrade.sh \validate-metadata -c [***SOLR/METADATA/OUTPUT/DIRECTORY***]
Replace [***SOLR/METADATA/OUTPUT/DIRECTORY***] with the path to the directory containing the migratedSolr configuration.
If you have enabled Kerberos, specify your JAAS configuration file by adding --jaas [***PATH/TO/SOR/JAAS.CONF***] to the command.
For example:
/opt/cloudera/cm/solr-upgrade/solr-upgrade.sh validate-metadata \-c $HOME/cr7-migrated-solr-config
Results
If the validation is successful, the script outputs a message similar to the following:
Validation successful for metadata in /home/solruser/[***SOLR/METADATA/OUTPUT/DIRECTORY***]
For example,
Validation successful for metadata in /home/solruser/cr7-migrated-solr-config
If the validation fails, you can revisit the steps in Transition the configuration.
Test transitioned Solr configuration on a Cloudera Runtime clusterCopy the upgraded Solr configuration to a test or development CDP cluster to test it for incompatibilities not detectedby the upgrade script before you initiate the upgrade on your production environment.
About this task
Warning: Although the configuration transformation script addresses known incompatibilities, there mightbe incompatible configurations that are not detected by the script. Do not upgrade your production ClouderaSearch services to Cloudera Runtime 7.1.1 or higher until you have tested the migrated configuration withCloudera Runtime 7.1.1 or higher on a testing or development cluster.
To test the migrated configuration on a Cloudera Runtime 7.1.1 or higher cluster, you can either provision a new hostin your upgraded Cloudera Manager 7 environment and add a Cloudera Runtime 7.1.1 or higher cluster using thathost, or you can upgrade a development or test cluster to Cloudera Runtime 7.1.1 or higher. You can then use theCloudera Runtime 7.1.1 or higher cluster to test the migrated configuration to make sure that it works on ClouderaRuntime 7.1.1 or higher before upgrading your production environment.
68
In-Place Upgrade HDP 3 to CDP Private Cloud Base Upgrading HDP to Cloudera Runtime 7.1.x
Procedure
1. Create a TAR file of the configuration files in the [***SOLR/METADATA/OUTPUT/DIRECTORY***] (in thisexample cr7-migrated-solr-config) directory and copy them over to a Solr host on the test CDP cluster.
tar -czvf cr7-migrated-solr-config.tar.gz \/home/solruser/cr7-migrated-solr-config
2. On the Solr host in the test CDP cluster, extract the TAR file created in the previous step.
tar -xzvf cr7-migrated-solr-config.tar.gz
3. Kinit as a solr user in the test CDP cluster:
kinit [email protected]
Replace [email protected] with your Kerberos realm name.
4. Run the following commands to create a Solr collection:
solrctl instancedir --create /[***PATH/TO/MIGRATED/CONFIG***]/cr7-migrated-solr-config/configs/testcollection_config
solrctl collection --create testcollection_config
• Replace [***CONFIG***] with the name of the configuration (NOT the name fo the collection) that you wantto test.
• Replace [***PATH/TO/MIGRATED/CONFIG***] with the path to where you extracted cr7-migrated-solr-config.tar.gz.
If Kerberos is enabled and configured ZooKeeper Access Controll Lists (ACLs), specify your JAAS configurationfile by adding the --jaas parameter to the command. For example:
solrctl --jaas $HOME/solr-jaas.conf \instancedir --create testcollection_config \/[***PATH***]/cr7-migrated-solr-config/configs/testcollection_config
solrctl collection --create testcollection_config
5. Check the Solr web UI on the host where the above collections were created, and make sure the collection iscreated.
6. Repeat the above steps for all collections you want to transition to CDP.
Preparing ZooKeeper for upgrade
About this taskZooKeeper 3.5 is trying to load an existing 3.4 data directory in which no snapshot file is created. This usuallyhappens if transaction count has not reached the limit of snapshot creation. An extra startup check is introduced in3.5.5 (ZOOKEEPER-2325) to prevent a potential data inconsistency issue which makes ZooKeeper unable to startwhen no snapshot files are present. It is a valid scenario in 3.4, but in 3.5 it will result in failure to start ZooKeeper.For CDP 7.0.2+, you must set the property before the upgrade and remove it after the upgrade is finished.
69
In-Place Upgrade HDP 3 to CDP Private Cloud Base Upgrading HDP to Cloudera Runtime 7.1.x
Note:
1. The updated ZooKeeper 3.5 in CDP 7 will not start properly, if only log files (these are write-ahead-logs)are present for ZooKeeper but there is no snapshot file available.
2. You must set the below configuration only if you identify that there is no snapshot file for ZooKeeperbefore the upgrade.
This fix allows you to specify a new configuration that will disable the sanity check and allows ZooKeeper to start.You can set this configuration in two ways, choose one of the following:
• Adding a new system property for the ZooKeeper server: -Dzookeeper.snapshot.trust.empty=true• You can also add this config to the zoo.cfg file, but in this case you need to omit the "zookeeper." prefix and you
need to add the snapshot.trust.empty=true property to the zoo.cfg file
Preparing Kafka for upgradeTo successfully upgrade Kafka, you must set the protocol version to match the protocol version used by the brokersand clients.
Procedure
1. In Ambari Configs, update the following properties:
• inter.broker.protocol.version = current_Kafka_version
• log.message.format.version = current_Kafka_version
Note: current_Kafka_version is the version of Kafka you are currently running. For example, 1.0.
Review the HDP Release Notes for the Apache Kafka version in use with your HDP installation.
2. Save your changes.
Extract Kafka broker IDYou must extract the Kafka broker IDs before you upgrade the HDP cluster from 3.1.5.x to HDP intermediate bits.
You must extract the Kafka broker IDs manually from the HDP 3.1.5.x cluster. When you migrate to ClouderaManager, you must manually enter the broker IDs to the real values in Kafka.
Procedure 1
To extract the broker IDs from the HDP 3.1.5 cluster, use the following commands: This procedure helps you only ifthe Kafka service is not stopped.
• For Unsecure environments:sh /usr/hdp/current/kafka-broker/bin/kafka-broker-api-versions.sh --bootstrap-server <host:port> | grep "id" | awk -F'[=:]''{print $1,$3}' | awk '{print $1,$2}' > /tmp/kafka-broker-ids.ini
• For Secure environments: sh /usr/hdp/current/kafka-broker/bin/kafka-broker-api-versions.sh --bootstrap-server <host:port> --command-config <client.config>| grep "id" | awk -F'[=:]' '{print $1,$3}' | awk '{print $1,$2}' > /tmp/kafka-broker-ids.ini
• For example, sh /usr/hdp/current/kafka-broker/bin/kafka-broker-api-versions.sh--bootstrap-server c6111-node2.coelab.cloudera.com:6667 --command-config
70
In-Place Upgrade HDP 3 to CDP Private Cloud Base Upgrading HDP to Cloudera Runtime 7.1.x
<client.config> | grep "id" | awk -F'[=:]' '{print $1,$3}' | awk '{print $1,$2}' > /tmp/kafka-broker-ids.ini
where <client.config> contains environment specific Kafka client security configuration for connecting the sourceKafka cluster. For more information on configuring Kafka client, see Kafka documentation and Kafka clientconfiguration.
Note: This command generates the kafka-broker-ids.ini file. The kafka-broker-ids.ini file must be manually copied to $am2cm-1.2.0.0-xx/conf/ path beforerunning the AM2CM tool.
Procedure 2
1. Create kafka-broker-ids.ini file2. Navigate to each Kafka broker host > $log.dirs/meta.properties3. Pick up the broker.id value.4. Copy the hostname broker.id to kafka-broker-ids.ini file
An example of the file format:
ctr-e153-xxxxx-xxxx71.cloudera.site 1001
ctr-e153-xxxxx-xxxx72.cloudera.site 1002
ctr-e153-xxxxx-xxxx73.cloudera.site 1003
Register software repositoriesBefore you use Ambari to perform the stack upgrade, you must register the software repositories for the new targetversion with Ambari and then install the software on all hosts in the cluster.
Procedure
1. Log into Ambari.
2. Browse to Cluster Admin > Stack and Versions.
3. Click the Versions tab. You see the version currently running, marked as Current.
Note: The full version depends on the HDP version you are actually running. For example, if you arecurrently running the HDP 3.0.1.0 release, you would see something like HDP-3.0.1.0-187 as the fullversion number.
4. Click Manage Versions.
5. Proceed to register a new version by clicking Register Version.
6. Select the software version for your cluster.Choose the HDP Version
If your Ambari host has internet access, available maintenance versions display as options in a drop-down list.
Make sure to use the Version Definition File (VDF) option for HDP 7.1.x.x.
If you see the VDF option for another version, click Add Version… and upload the VDF file for HDP 7.1.x.x.In addition, a Default Version Definition is also included in the list if you do not have Internet access or are notsure which specific version to install. If you choose the Default Version Definition, you must enter a "two-digitVersion Number" in the Name input field. If you have difficulties, contact Cloudera Support to obtain the VDFfor HDP 7.1.x.x.
7. Click Save.
71
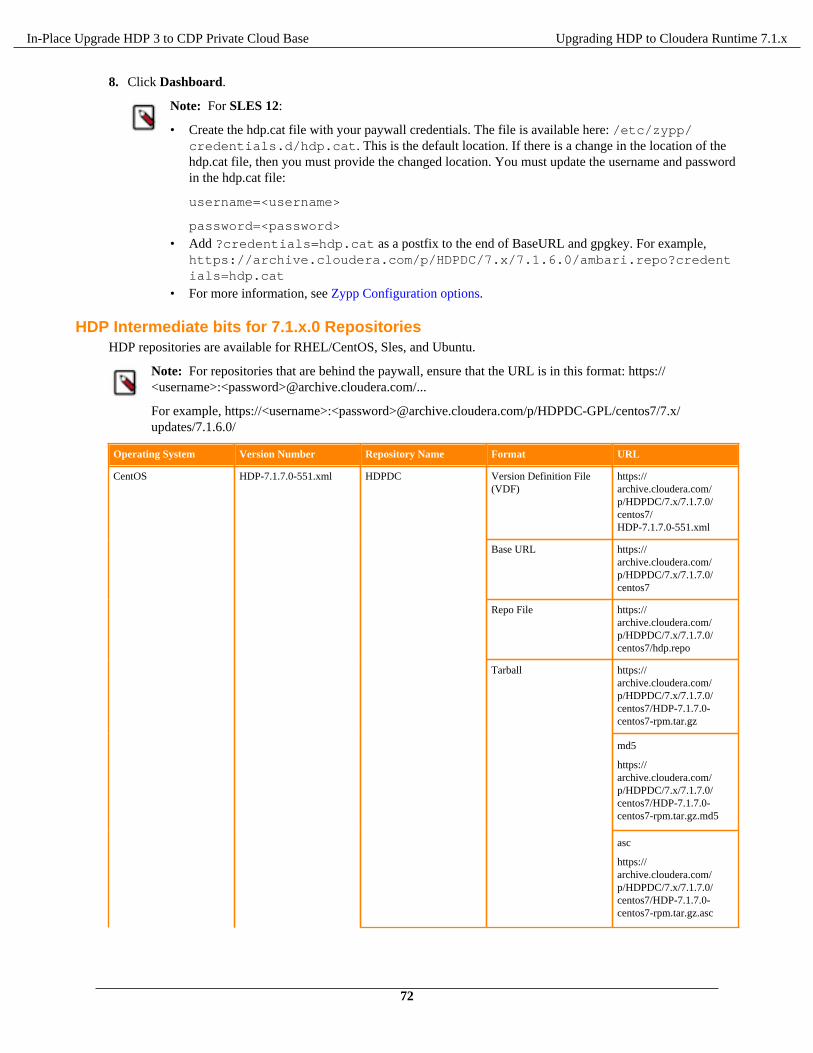
In-Place Upgrade HDP 3 to CDP Private Cloud Base Upgrading HDP to Cloudera Runtime 7.1.x
8. Click Dashboard.
Note: For SLES 12:
• Create the hdp.cat file with your paywall credentials. The file is available here: /etc/zypp/credentials.d/hdp.cat. This is the default location. If there is a change in the location of thehdp.cat file, then you must provide the changed location. You must update the username and passwordin the hdp.cat file:
username=<username>
password=<password>
• Add ?credentials=hdp.cat as a postfix to the end of BaseURL and gpgkey. For example,https://archive.cloudera.com/p/HDPDC/7.x/7.1.6.0/ambari.repo?credentials=hdp.cat
• For more information, see Zypp Configuration options.
HDP Intermediate bits for 7.1.x.0 RepositoriesHDP repositories are available for RHEL/CentOS, Sles, and Ubuntu.
Note: For repositories that are behind the paywall, ensure that the URL is in this format: https://<username>:<password>@archive.cloudera.com/...
For example, https://<username>:<password>@archive.cloudera.com/p/HDPDC-GPL/centos7/7.x/updates/7.1.6.0/
Operating System Version Number Repository Name Format URL
Version Definition File(VDF)
https://archive.cloudera.com/p/HDPDC/7.x/7.1.7.0/centos7/HDP-7.1.7.0-551.xml
Base URL https://archive.cloudera.com/p/HDPDC/7.x/7.1.7.0/centos7
Repo File https://archive.cloudera.com/p/HDPDC/7.x/7.1.7.0/centos7/hdp.repo
https://archive.cloudera.com/p/HDPDC/7.x/7.1.7.0/centos7/HDP-7.1.7.0-centos7-rpm.tar.gz
md5
https://archive.cloudera.com/p/HDPDC/7.x/7.1.7.0/centos7/HDP-7.1.7.0-centos7-rpm.tar.gz.md5
CentOS HDP-7.1.7.0-551.xml HDPDC
Tarball
asc
https://archive.cloudera.com/p/HDPDC/7.x/7.1.7.0/centos7/HDP-7.1.7.0-centos7-rpm.tar.gz.asc
72
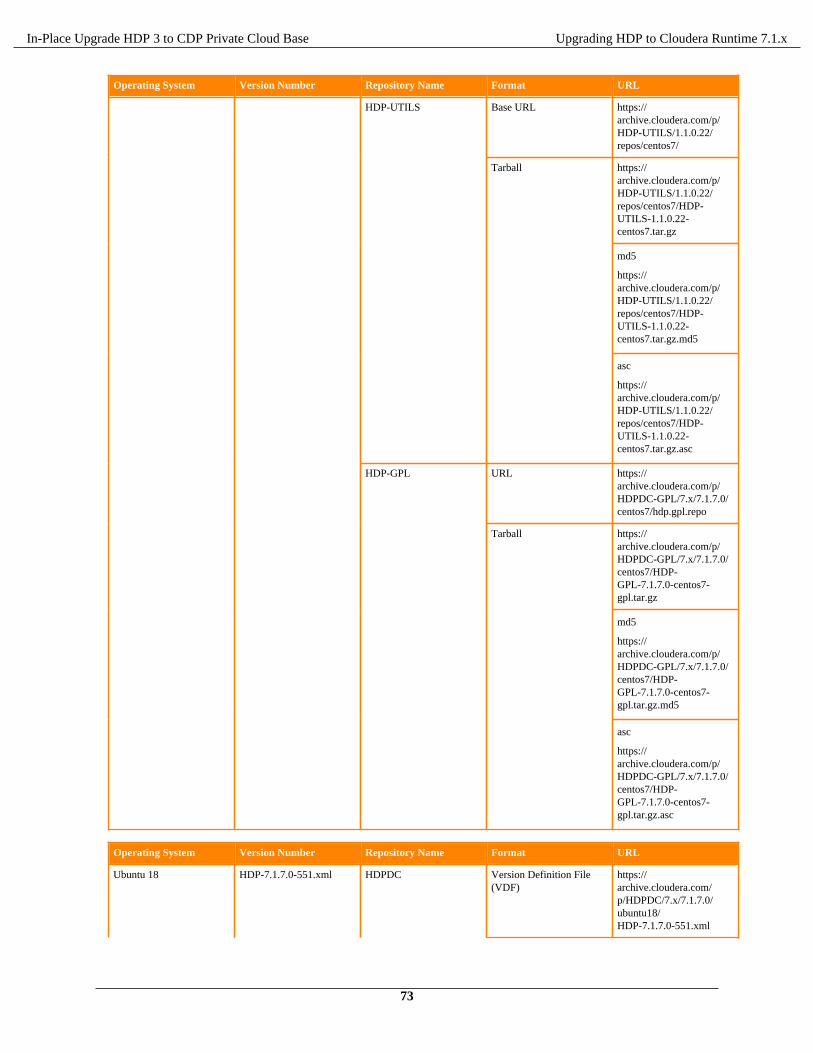
In-Place Upgrade HDP 3 to CDP Private Cloud Base Upgrading HDP to Cloudera Runtime 7.1.x
Operating System Version Number Repository Name Format URL
Base URL https://archive.cloudera.com/p/HDP-UTILS/1.1.0.22/repos/centos7/
https://archive.cloudera.com/p/HDP-UTILS/1.1.0.22/repos/centos7/HDP-UTILS-1.1.0.22-centos7.tar.gz
md5
https://archive.cloudera.com/p/HDP-UTILS/1.1.0.22/repos/centos7/HDP-UTILS-1.1.0.22-centos7.tar.gz.md5
HDP-UTILS
Tarball
asc
https://archive.cloudera.com/p/HDP-UTILS/1.1.0.22/repos/centos7/HDP-UTILS-1.1.0.22-centos7.tar.gz.asc
URL https://archive.cloudera.com/p/HDPDC-GPL/7.x/7.1.7.0/centos7/hdp.gpl.repo
https://archive.cloudera.com/p/HDPDC-GPL/7.x/7.1.7.0/centos7/HDP-GPL-7.1.7.0-centos7-gpl.tar.gz
md5
https://archive.cloudera.com/p/HDPDC-GPL/7.x/7.1.7.0/centos7/HDP-GPL-7.1.7.0-centos7-gpl.tar.gz.md5
HDP-GPL
Tarball
asc
https://archive.cloudera.com/p/HDPDC-GPL/7.x/7.1.7.0/centos7/HDP-GPL-7.1.7.0-centos7-gpl.tar.gz.asc
Operating System Version Number Repository Name Format URL
Ubuntu 18 HDP-7.1.7.0-551.xml HDPDC Version Definition File(VDF)
https://archive.cloudera.com/p/HDPDC/7.x/7.1.7.0/ubuntu18/HDP-7.1.7.0-551.xml
73
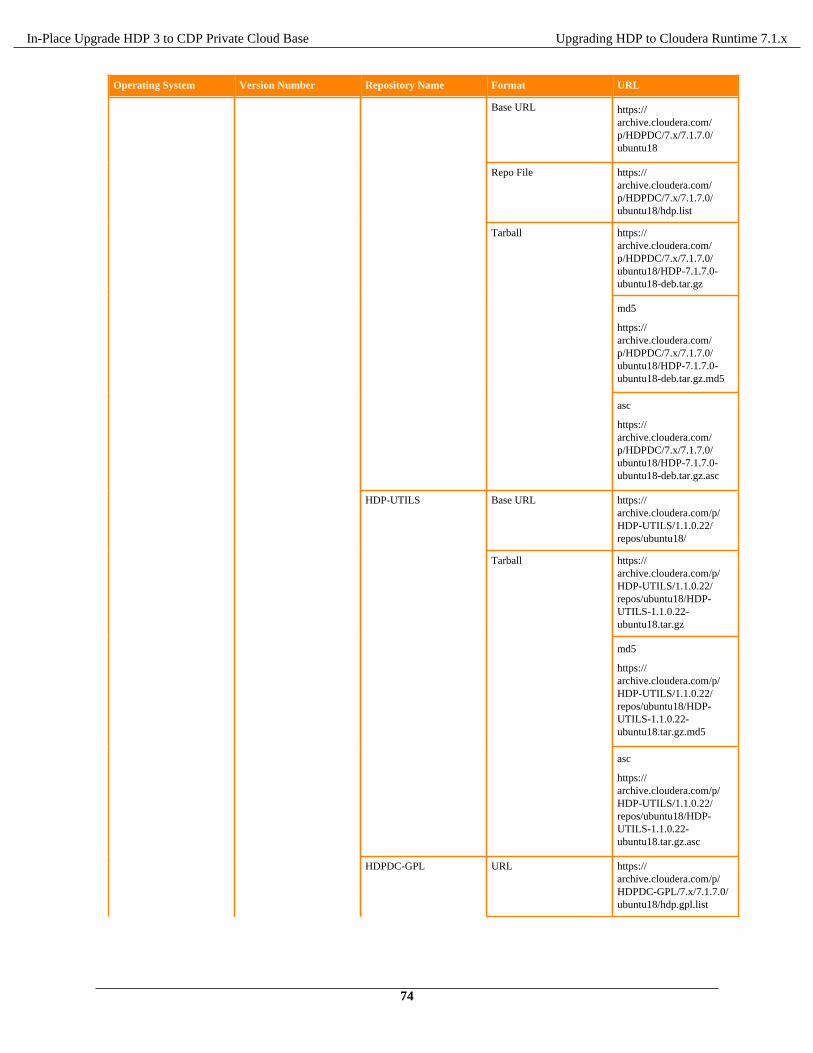
In-Place Upgrade HDP 3 to CDP Private Cloud Base Upgrading HDP to Cloudera Runtime 7.1.x
Operating System Version Number Repository Name Format URL
Base URL https://archive.cloudera.com/p/HDPDC/7.x/7.1.7.0/ubuntu18
Repo File https://archive.cloudera.com/p/HDPDC/7.x/7.1.7.0/ubuntu18/hdp.list
https://archive.cloudera.com/p/HDPDC/7.x/7.1.7.0/ubuntu18/HDP-7.1.7.0-ubuntu18-deb.tar.gz
md5
https://archive.cloudera.com/p/HDPDC/7.x/7.1.7.0/ubuntu18/HDP-7.1.7.0-ubuntu18-deb.tar.gz.md5
Tarball
asc
https://archive.cloudera.com/p/HDPDC/7.x/7.1.7.0/ubuntu18/HDP-7.1.7.0-ubuntu18-deb.tar.gz.asc
Base URL https://archive.cloudera.com/p/HDP-UTILS/1.1.0.22/repos/ubuntu18/
https://archive.cloudera.com/p/HDP-UTILS/1.1.0.22/repos/ubuntu18/HDP-UTILS-1.1.0.22-ubuntu18.tar.gz
md5
https://archive.cloudera.com/p/HDP-UTILS/1.1.0.22/repos/ubuntu18/HDP-UTILS-1.1.0.22-ubuntu18.tar.gz.md5
HDP-UTILS
Tarball
asc
https://archive.cloudera.com/p/HDP-UTILS/1.1.0.22/repos/ubuntu18/HDP-UTILS-1.1.0.22-ubuntu18.tar.gz.asc
HDPDC-GPL URL https://archive.cloudera.com/p/HDPDC-GPL/7.x/7.1.7.0/ubuntu18/hdp.gpl.list
74
In-Place Upgrade HDP 3 to CDP Private Cloud Base Upgrading HDP to Cloudera Runtime 7.1.x
Operating System Version Number Repository Name Format URL
https://archive.cloudera.com/p/HDPDC-GPL/7.x/7.1.7.0/ubuntu18/HDP-GPL-7.1.7.0-ubuntu18-gpl.tar.gz
md5
https://archive.cloudera.com/p/HDPDC-GPL/7.x/7.1.7.0/ubuntu18/HDP-GPL-7.1.7.0-ubuntu18-gpl.tar.gz.md5
Tarball
asc
https://archive.cloudera.com/p/HDPDC-GPL/7.x/7.1.7.0/ubuntu18/HDP-GPL-7.1.7.0-ubuntu18-gpl.tar.gz.asc
Operating System Version Number Repository Name Format URL
Version Definition File(VDF)
https://archive.cloudera.com/p/HDPDC/7.x/7.1.7.0/sles12/HDP-7.1.7.0-551.xml
Base URL https://archive.cloudera.com/p/HDPDC/7.x/7.1.7.0/sles12
Repo File https://archive.cloudera.com/p/HDPDC/7.x/7.1.7.0/sles12/hdp.repo
https://archive.cloudera.com/p/HDPDC/7.x/7.1.7.0/sles12/HDP-7.1.7.0-sles12-rpm.tar.gz
md5
https://archive.cloudera.com/p/HDPDC/7.x/7.1.7.0/sles12/HDP-7.1.7.0-sles12-rpm.tar.gz
HDPDC
Tarball
asc
https://archive.cloudera.com/p/HDPDC/7.x/7.1.7.0/sles12/HDP-7.1.7.0-sles12-rpm.tar.gz.asc
SLES 12 HDP-7.1.7.0-551.xml
HDP-UTILS Base URL https://archive.cloudera.com/p/HDP-UTILS/1.1.0.22/repos/sles12
75

In-Place Upgrade HDP 3 to CDP Private Cloud Base Upgrading HDP to Cloudera Runtime 7.1.x
Operating System Version Number Repository Name Format URL
https://archive.cloudera.com/p/HDP-UTILS/1.1.0.22/repos/sles12/HDP-UTILS-1.1.0.22-sles12.tar.gz
md5
https://archive.cloudera.com/p/HDP-UTILS/1.1.0.22/repos/sles12/HDP-UTILS-1.1.0.22-sles12.tar.gz.md5
Tarball
asc
https://archive.cloudera.com/p/HDP-UTILS/1.1.0.22/repos/sles12/HDP-UTILS-1.1.0.22-sles12.tar.gz.asc
URL https://archive.cloudera.com/p/HDPDC-GPL/7.x/7.1.7.0/sles12/hdp.gpl.repo
https://archive.cloudera.com/p/HDPDC-GPL/7.x/7.1.7.0/sles12/HDP-GPL-7.1.7.0-sles12-gpl.tar.gz
md5
https://archive.cloudera.com/p/HDPDC-GPL/7.x/7.1.7.0/sles12/HDP-GPL-7.1.7.0-sles12-gpl.tar.gz.md5
HDP-GPL
Tarball
asc
https://archive.cloudera.com/p/HDPDC-GPL/7.x/7.1.7.0/sles12/HDP-GPL-7.1.7.0-sles12-gpl.tar.gz.asc
Operating System Version Number Repository Name Format URL
Version Definition File(VDF)
https://archive.cloudera.com/p/HDPDC/7.x/7.1.6.0/centos7/HDP-7.1.6.0-297.xml
Base URL https://archive.cloudera.com/p/HDPDC/7.x/7.1.6.0/centos7
CentOS HDP-7.1.6.0-203.xml HDPDC
Repo File https://archive.cloudera.com/p/HDPDC/7.x/7.1.6.0/centos7/hdpdc.repo
76
In-Place Upgrade HDP 3 to CDP Private Cloud Base Upgrading HDP to Cloudera Runtime 7.1.x
Operating System Version Number Repository Name Format URL
https://archive.cloudera.com/p/HDPDC/7.x/7.1.6.0/centos7/HDPDC-7.1.6.0-centos7-rpm.tar.gz
md5
https://archive.cloudera.com/p/HDPDC/7.x/7.1.6.0/centos7/HDPDC-7.1.6.0-centos7-rpm.tar.gz.md5
Tarball
asc
https://archive.cloudera.com/p/HDPDC/7.x/7.1.6.0/centos7/HDPDC-7.1.6.0-centos7-rpm.tar.gz.asc
Base URL https://archive.cloudera.com/p/HDP-UTILS/1.1.0.22/repos/centos7/
https://archive.cloudera.com/p/HDP-UTILS/1.1.0.22/repos/centos7/HDP-UTILS-1.1.0.22-centos7.tar.gz
md5
https://archive.cloudera.com/p/HDP-UTILS/1.1.0.22/repos/centos7/HDP-UTILS-1.1.0.22-centos7.tar.gz.md5
HDP-UTILS
Tarball
asc
https://archive.cloudera.com/p/HDP-UTILS/1.1.0.22/repos/centos7/HDP-UTILS-1.1.0.22-centos7.tar.gz.asc
URL https://archive.cloudera.com/p/HDPDC-GPL/7.x/7.1.6.0/centos7/hdpdc.gpl.repo
HDP-GPL
Tarball https://archive.cloudera.com/p/HDPDC-GPL/7.x/7.1.6.0/centos7/HDPDC-GPL-7.1.6.0-centos7-tars-tarball.tar.gz
77
In-Place Upgrade HDP 3 to CDP Private Cloud Base Upgrading HDP to Cloudera Runtime 7.1.x
Operating System Version Number Repository Name Format URL
md5
https://archive.cloudera.com/p/HDPDC-GPL/7.x/7.1.6.0/centos7/HDPDC-GPL-7.1.6.0-centos7-tars-tarball.tar.gz.md5
asc
https://archive.cloudera.com/p/HDPDC-GPL/7.x/7.1.6.0/centos7/HDPDC-GPL-7.1.6.0-centos7-tars-tarball.tar.gz.asc
Operating System Version Number Repository Name Format URL
Version Definition File(VDF)
https://archive.cloudera.com/p/HDPDC/7.x/7.1.6.0/ubuntu18/HDP-7.1.6.0-297.xml
Base URL https://archive.cloudera.com/p/HDPDC/7.x/7.1.6.0/ubuntu18/7.1.6.0 HDPmain
Repo File https://archive.cloudera.com/p/HDPDC/7.x/7.1.6.0/ubuntu18/hdpdc.list
https://archive.cloudera.com/p/HDPDC/7.x/7.1.6.0/ubuntu18/HDPDC-7.1.6.0-ubuntu18-deb.tar.gz
md5
https://archive.cloudera.com/p/HDPDC/7.x/7.1.6.0/ubuntu18/HDPDC-7.1.6.0-ubuntu18-deb.tar.gz.md5
HDPDC
Tarball
asc
https://archive.cloudera.com/p/HDPDC/7.x/7.1.6.0/ubuntu18/HDPDC-7.1.6.0-ubuntu18-deb.tar.gz.asc
Base URL https://archive.cloudera.com/p/HDP-UTILS/1.1.0.22/repos/ubuntu18/
Ubuntu 18 HDP-7.1.6.0-203.xml
HDP-UTILS
Tarball https://archive.cloudera.com/p/HDP-UTILS/1.1.0.22/repos/ubuntu18/HDP-UTILS-1.1.0.22-ubuntu18.tar.gz
78
In-Place Upgrade HDP 3 to CDP Private Cloud Base Upgrading HDP to Cloudera Runtime 7.1.x
Operating System Version Number Repository Name Format URL
md5
https://archive.cloudera.com/p/HDP-UTILS/1.1.0.22/repos/ubuntu18/HDP-UTILS-1.1.0.22-ubuntu18.tar.gz.md5
asc
https://archive.cloudera.com/p/HDP-UTILS/1.1.0.22/repos/ubuntu18/HDP-UTILS-1.1.0.22-ubuntu18.tar.gz.asc
URL https://archive.cloudera.com/p/HDPDC-GPL/7.x/7.1.6.0/ubuntu18/hdpdc.gpl.list
https://archive.cloudera.com/p/HDPDC-GPL/7.x/7.1.6.0/ubuntu18/HDPDC-GPL-7.1.6.0-ubuntu18-deb.tar.gz
md5
https://archive.cloudera.com/p/HDPDC-GPL/7.x/7.1.6.0/ubuntu18/HDPDC-GPL-7.1.6.0-ubuntu18-deb.tar.gz.md5
HDPDC-GPL
Tarball
asc
https://archive.cloudera.com/p/HDPDC-GPL/7.x/7.1.6.0/ubuntu18/HDPDC-GPL-7.1.6.0-ubuntu18-deb.tar.gz.asc
Operating System Version Number Repository Name Format URL
Version Definition File(VDF)
https://archive.cloudera.com/p/HDPDC/7.x/7.1.6.0/sles12/HDP-7.1.6.0-297.xml
Base URL https://archive.cloudera.com/p/HDPDC/7.x/7.1.6.0/sles12
SLES 12 HDP-7.1.6.0-203.xml HDPDC
Repo File https://archive.cloudera.com/p/HDPDC/7.x/7.1.6.0/sles12/hdpdc.repo
79
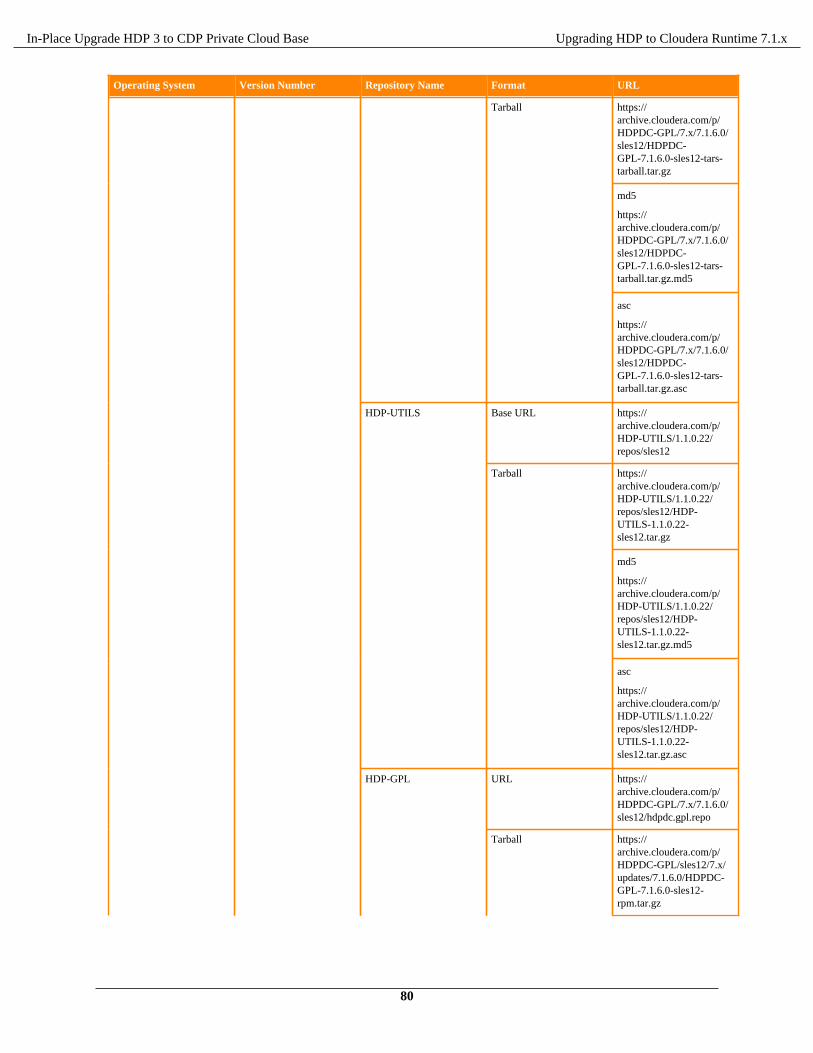
In-Place Upgrade HDP 3 to CDP Private Cloud Base Upgrading HDP to Cloudera Runtime 7.1.x
Operating System Version Number Repository Name Format URL
https://archive.cloudera.com/p/HDPDC-GPL/7.x/7.1.6.0/sles12/HDPDC-GPL-7.1.6.0-sles12-tars-tarball.tar.gz
md5
https://archive.cloudera.com/p/HDPDC-GPL/7.x/7.1.6.0/sles12/HDPDC-GPL-7.1.6.0-sles12-tars-tarball.tar.gz.md5
Tarball
asc
https://archive.cloudera.com/p/HDPDC-GPL/7.x/7.1.6.0/sles12/HDPDC-GPL-7.1.6.0-sles12-tars-tarball.tar.gz.asc
Base URL https://archive.cloudera.com/p/HDP-UTILS/1.1.0.22/repos/sles12
https://archive.cloudera.com/p/HDP-UTILS/1.1.0.22/repos/sles12/HDP-UTILS-1.1.0.22-sles12.tar.gz
md5
https://archive.cloudera.com/p/HDP-UTILS/1.1.0.22/repos/sles12/HDP-UTILS-1.1.0.22-sles12.tar.gz.md5
HDP-UTILS
Tarball
asc
https://archive.cloudera.com/p/HDP-UTILS/1.1.0.22/repos/sles12/HDP-UTILS-1.1.0.22-sles12.tar.gz.asc
URL https://archive.cloudera.com/p/HDPDC-GPL/7.x/7.1.6.0/sles12/hdpdc.gpl.repo
HDP-GPL
Tarball https://archive.cloudera.com/p/HDPDC-GPL/sles12/7.x/updates/7.1.6.0/HDPDC-GPL-7.1.6.0-sles12-rpm.tar.gz
80
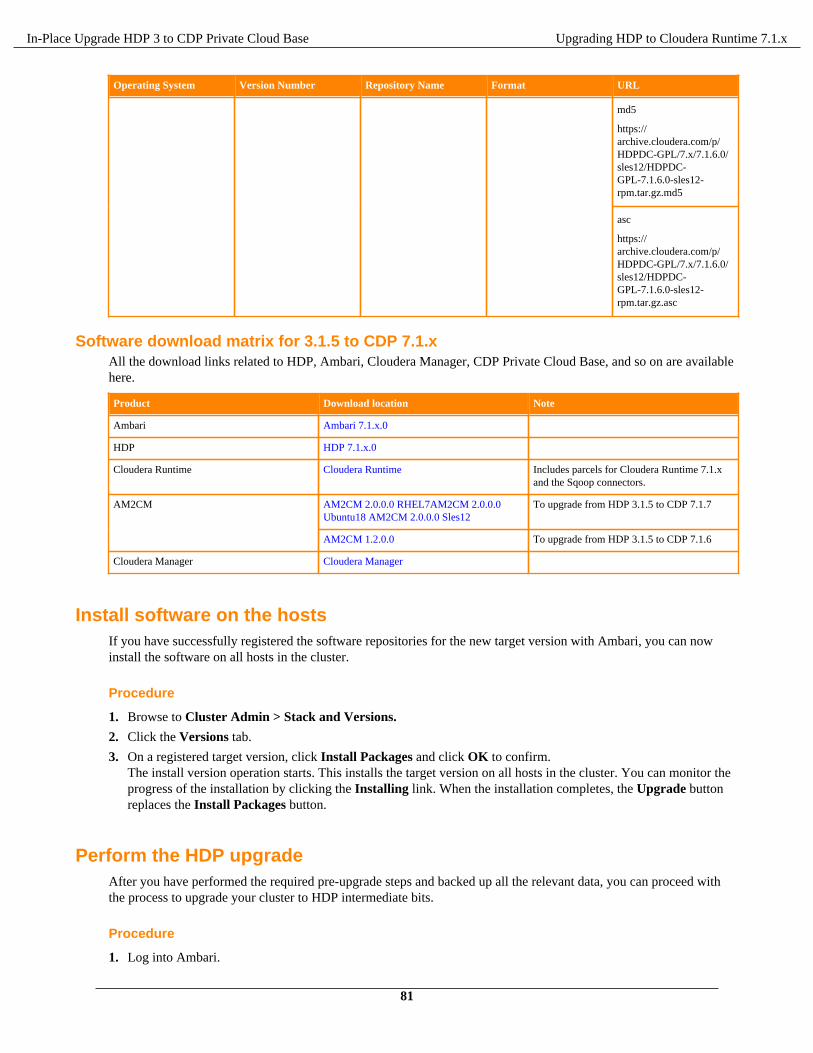
In-Place Upgrade HDP 3 to CDP Private Cloud Base Upgrading HDP to Cloudera Runtime 7.1.x
Operating System Version Number Repository Name Format URL
md5
https://archive.cloudera.com/p/HDPDC-GPL/7.x/7.1.6.0/sles12/HDPDC-GPL-7.1.6.0-sles12-rpm.tar.gz.md5
asc
https://archive.cloudera.com/p/HDPDC-GPL/7.x/7.1.6.0/sles12/HDPDC-GPL-7.1.6.0-sles12-rpm.tar.gz.asc
Software download matrix for 3.1.5 to CDP 7.1.xAll the download links related to HDP, Ambari, Cloudera Manager, CDP Private Cloud Base, and so on are availablehere.
Product Download location Note
Ambari Ambari 7.1.x.0
HDP HDP 7.1.x.0
Cloudera Runtime Cloudera Runtime Includes parcels for Cloudera Runtime 7.1.xand the Sqoop connectors.
AM2CM 2.0.0.0 RHEL7AM2CM 2.0.0.0Ubuntu18 AM2CM 2.0.0.0 Sles12
To upgrade from HDP 3.1.5 to CDP 7.1.7AM2CM
AM2CM 1.2.0.0 To upgrade from HDP 3.1.5 to CDP 7.1.6
Cloudera Manager Cloudera Manager
Install software on the hostsIf you have successfully registered the software repositories for the new target version with Ambari, you can nowinstall the software on all hosts in the cluster.
Procedure
1. Browse to Cluster Admin > Stack and Versions.
2. Click the Versions tab.
3. On a registered target version, click Install Packages and click OK to confirm.The install version operation starts. This installs the target version on all hosts in the cluster. You can monitor theprogress of the installation by clicking the Installing link. When the installation completes, the Upgrade buttonreplaces the Install Packages button.
Perform the HDP upgradeAfter you have performed the required pre-upgrade steps and backed up all the relevant data, you can proceed withthe process to upgrade your cluster to HDP intermediate bits.
Procedure
1. Log into Ambari.
81
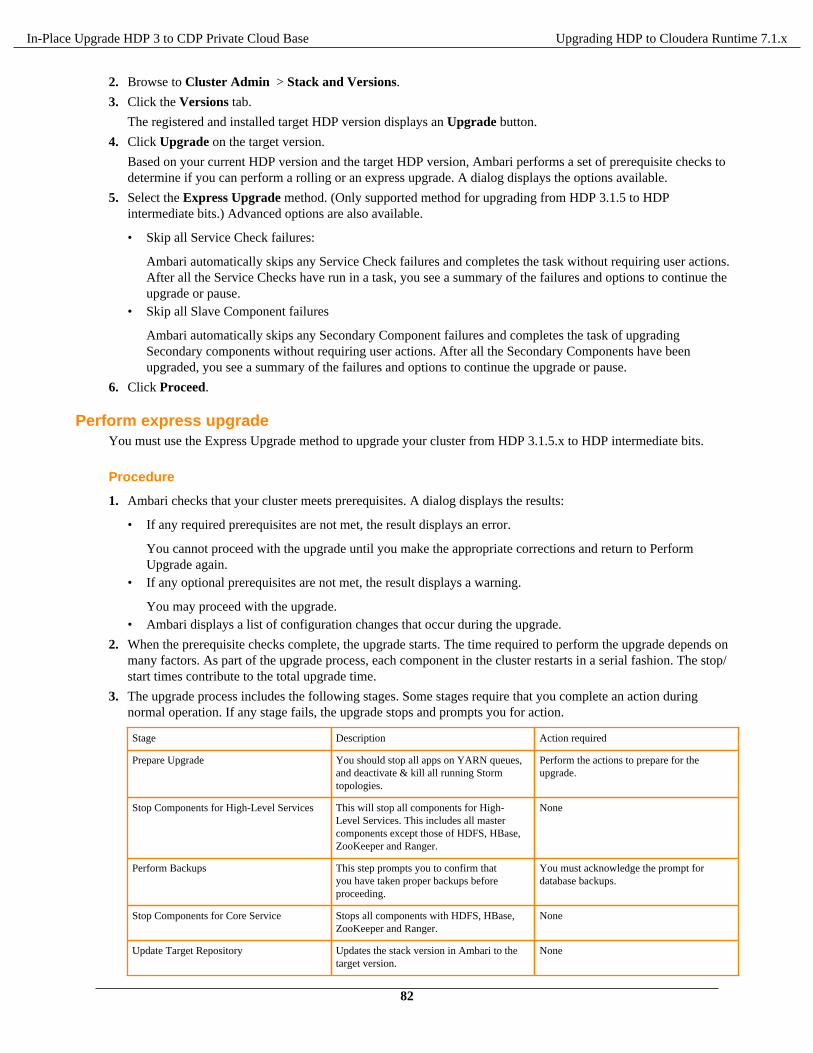
In-Place Upgrade HDP 3 to CDP Private Cloud Base Upgrading HDP to Cloudera Runtime 7.1.x
2. Browse to Cluster Admin > Stack and Versions.
3. Click the Versions tab.
The registered and installed target HDP version displays an Upgrade button.
4. Click Upgrade on the target version.
Based on your current HDP version and the target HDP version, Ambari performs a set of prerequisite checks todetermine if you can perform a rolling or an express upgrade. A dialog displays the options available.
5. Select the Express Upgrade method. (Only supported method for upgrading from HDP 3.1.5 to HDPintermediate bits.) Advanced options are also available.
• Skip all Service Check failures:
Ambari automatically skips any Service Check failures and completes the task without requiring user actions.After all the Service Checks have run in a task, you see a summary of the failures and options to continue theupgrade or pause.
• Skip all Slave Component failures
Ambari automatically skips any Secondary Component failures and completes the task of upgradingSecondary components without requiring user actions. After all the Secondary Components have beenupgraded, you see a summary of the failures and options to continue the upgrade or pause.
6. Click Proceed.
Perform express upgradeYou must use the Express Upgrade method to upgrade your cluster from HDP 3.1.5.x to HDP intermediate bits.
Procedure
1. Ambari checks that your cluster meets prerequisites. A dialog displays the results:
• If any required prerequisites are not met, the result displays an error.
You cannot proceed with the upgrade until you make the appropriate corrections and return to PerformUpgrade again.
• If any optional prerequisites are not met, the result displays a warning.
You may proceed with the upgrade.• Ambari displays a list of configuration changes that occur during the upgrade.
2. When the prerequisite checks complete, the upgrade starts. The time required to perform the upgrade depends onmany factors. As part of the upgrade process, each component in the cluster restarts in a serial fashion. The stop/start times contribute to the total upgrade time.
3. The upgrade process includes the following stages. Some stages require that you complete an action duringnormal operation. If any stage fails, the upgrade stops and prompts you for action.
Stage Description Action required
Prepare Upgrade You should stop all apps on YARN queues,and deactivate & kill all running Stormtopologies.
Perform the actions to prepare for theupgrade.
Stop Components for High-Level Services This will stop all components for High-Level Services. This includes all mastercomponents except those of HDFS, HBase,ZooKeeper and Ranger.
None
Perform Backups This step prompts you to confirm thatyou have taken proper backups beforeproceeding.
You must acknowledge the prompt fordatabase backups.
Stop Components for Core Service Stops all components with HDFS, HBase,ZooKeeper and Ranger.
None
Update Target Repository Updates the stack version in Ambari to thetarget version.
None
82
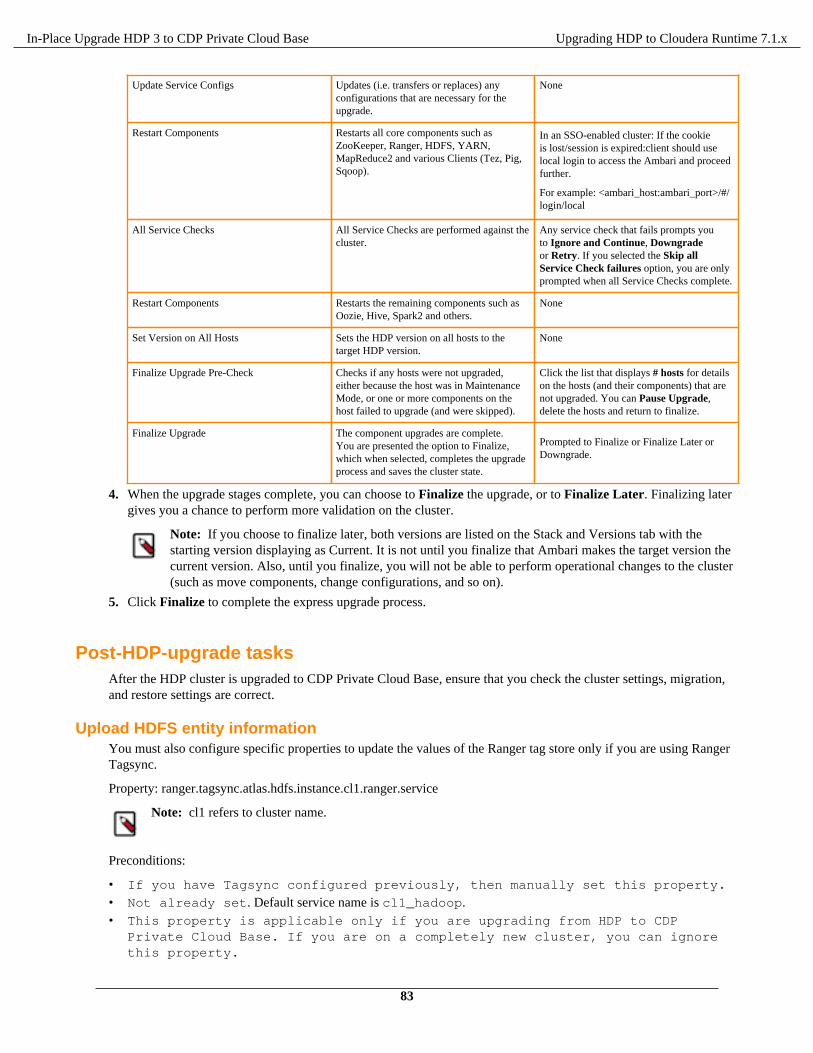
In-Place Upgrade HDP 3 to CDP Private Cloud Base Upgrading HDP to Cloudera Runtime 7.1.x
Update Service Configs Updates (i.e. transfers or replaces) anyconfigurations that are necessary for theupgrade.
None
Restart Components Restarts all core components such asZooKeeper, Ranger, HDFS, YARN,MapReduce2 and various Clients (Tez, Pig,Sqoop).
In an SSO-enabled cluster: If the cookieis lost/session is expired:client should uselocal login to access the Ambari and proceedfurther.
For example: <ambari_host:ambari_port>/#/login/local
All Service Checks All Service Checks are performed against thecluster.
Any service check that fails prompts youto Ignore and Continue, Downgradeor Retry. If you selected the Skip allService Check failures option, you are onlyprompted when all Service Checks complete.
Restart Components Restarts the remaining components such asOozie, Hive, Spark2 and others.
None
Set Version on All Hosts Sets the HDP version on all hosts to thetarget HDP version.
None
Finalize Upgrade Pre-Check Checks if any hosts were not upgraded,either because the host was in MaintenanceMode, or one or more components on thehost failed to upgrade (and were skipped).
Click the list that displays # hosts for detailson the hosts (and their components) that arenot upgraded. You can Pause Upgrade,delete the hosts and return to finalize.
Finalize Upgrade The component upgrades are complete.You are presented the option to Finalize,which when selected, completes the upgradeprocess and saves the cluster state.
Prompted to Finalize or Finalize Later orDowngrade.
4. When the upgrade stages complete, you can choose to Finalize the upgrade, or to Finalize Later. Finalizing latergives you a chance to perform more validation on the cluster.
Note: If you choose to finalize later, both versions are listed on the Stack and Versions tab with thestarting version displaying as Current. It is not until you finalize that Ambari makes the target version thecurrent version. Also, until you finalize, you will not be able to perform operational changes to the cluster(such as move components, change configurations, and so on).
5. Click Finalize to complete the express upgrade process.
Post-HDP-upgrade tasksAfter the HDP cluster is upgraded to CDP Private Cloud Base, ensure that you check the cluster settings, migration,and restore settings are correct.
Upload HDFS entity informationYou must also configure specific properties to update the values of the Ranger tag store only if you are using RangerTagsync.
Property: ranger.tagsync.atlas.hdfs.instance.cl1.ranger.service
Note: cl1 refers to cluster name.
Preconditions:
• If you have Tagsync configured previously, then manually set this property.
• Not already set. Default service name is cl1_hadoop.• This property is applicable only if you are upgrading from HDP to CDP
Private Cloud Base. If you are on a completely new cluster, you can ignorethis property.
83
In-Place Upgrade HDP 3 to CDP Private Cloud Base Upgrading HDP to Cloudera Runtime 7.1.x
Ambari infra-migrate and restoreFollow the steps below to restore the data previously backed up:
Procedure
1. SSH to the host where the migrationConfigGenerator.py was run prior to the HDP Upgrade. This willbe from one of your Ambari Infra Solr instances. Ensure you are in the current working directory containing theambari_solr_migration.ini file.
2. Export the variable used to hold the path to the ini file.
export CONFIG_INI_LOCATION=ambari_solr_migration.ini
3. Migrate the data to ensure it’s in the right format to import into Solr 7. Note that this script can take a long time torun depending on the volume of data backed up. It is recommended to run this script using the nohup command.
nohup /usr/lib/ambari-infra-solr-client/ambariSolrMigration.sh --ini-file \ $CONFIG_INI_LOCATION --mode migrate-restore
4. Re-index the migrated data into your current collections so the backed up data is visible in all of the tools usingthe Infra Solr instances. Note that this script can take a long time to run depending on the volume of data backedup. It is recommended to run this script using the nohup command.
nohup /usr/lib/ambari-infra-solr-client/ambariSolrMigration.sh --ini-file \ $CONFIG_INI_LOCATION --mode transport
Ambari Metrics and LogSearchTake the Ambari Metrics and Log Search Services out of Maintenance Mode by choosing Actions > Turn OffMaintenance Mode from each Service page.
Back up the Ranger configurationYou must backup the Ranger configuration.
After the upgrade, in case of SSL enabled environment, keystore & truststore configurations used by Ranger tagsync,usersync & plugins must be verifiied to ensure proper communication to Ranger Admin.
In case of errors, keystore must be recreated and corresponding configurations in Ambari updated. The example fortagsync and the command used to create the keystore for tagsync is: keytool -genkey -keyalg RSA -alias rangertagsync -keystore rangertagsynckeystore.jks -storepass xasecure -validity 360 -keysize 2048.
After keystore is updated, update the tagsync properties (in the Advanced ranger-tagsync-policymgr-ssl section)xasecure.policymgr.clientssl.keystore with correct value and set the password.
Backup Infra Solr collectionsBackup the Infra solr collections from the Ambari managed Infra Solr service and restore them on the Infra Solrservice managed by Cloudera Manager. When you are creating a backup of the Infra solr data, ensure that only InfraSolr and Zookeeper services are started and other services are stopped. Similarly, when you are restoring the data onInfra Solr managed by Cloudera Manager, you must start HDFS and Zookeeper only. This ensures no operations areperformed by services which can push data to Infra Solr.
About this taskTo create a backup of the Infra solr collections from Infra Solr service, perform the following steps:
84
In-Place Upgrade HDP 3 to CDP Private Cloud Base Upgrading HDP to Cloudera Runtime 7.1.x
Procedure
1. The assumption is /opt/solrdata is the work directory which must pre-exist on both local file system andHDFS.
Note: If the Solr cloud is a multi node, then /opt/solrdata should be a common mount accessiblefrom all the Solr server hosts.
mkdir -p /opt/solrdata/kinit -kt hdfs.keytab hdfs; hdfs dfs -mkdir -p /opt/solrdata
2. Set the path for the ini configuration file.
CONFIG_INI_LOCATION=/opt/solrdata/ambari_solr_migration.ini
3. For the backup of data from Infra Solr to HDFS:
a) Generate the ini configuration file which is used by the migration helper.
/usr/bin/python /usr/lib/ambari-infra-solr-client/migrationConfigGenerator.py --ini-file $CONFIG_INI_LOCATION --host <Ambari Server Host> --port <Ambari Server Port> --cluster <Cluster-Name> --username <Ambari admin username> --password <Ambari admin password> --backup-base-path=/opt/solrdata --hdfs-base-path=/opt/solrdata --java-home <JAVA JDK HOME which is also used by Ambari > -s < use -s if TLS is enabled for Ambari>
b) Backup collections:
/usr/lib/ambari-infra-solr-client/migrationHelper.py --ini-file $CONFIG_INI_LOCATION --action backup
c) Copy the backup to HDFS:
/usr/lib/ambari-infra-solr-client/migrationHelper.py --ini-file $CONFIG_INI_LOCATION --action copy-to-hdfs
You can now use the AM2CM tool to migrate from the Ambari-managed HDP cluster to the ClouderaManager-managed CDP cluster.
Search post-HDP-upgrade tasksAfter upgrading your HDP cluster to Cloudera Runtime, you need to add a Solr service to your CDP cluster whereyou can recreate the collections you transitioned from HDP Search. Once done, you can proceed with reindexing datato the transitioned collections.
Before you begin
• HDP is upgraded to Cloudera Runtime 7.1.1 or higher.• The management platform is transitioned from Ambari to Cloudera Manager.
Procedure
1. In the Cloudera Manager Admin Console, add Solr service to your CDP cluster.
For more information, see Adding a Service.
2. In the Cloudera Manager Admin Console, go to Solr service > Configuration.
3. In the Search field, type upgrade to filter the configuration parameters.
4. For the Solr Server for Upgrade property, select one of your Solr Server hosts. When you run the migrationscript, make sure to run it on this host.
85
In-Place Upgrade HDP 3 to CDP Private Cloud Base Upgrading HDP to Cloudera Runtime 7.1.x
5. For the Upgrade Backup Directory property, specify a directory in HDFS. This directory must exist and bewritable by the Solr service superuser (solr by default). Examples in these procedures use /cr7-solr-upgrade/backup for this HDFS directory.
6. For the Upgrade Metadata Directory property, specify a directory on the local filesystem of the host youselected as the Solr Server for Upgrade. When you run the migration script, make sure that you copy themigrated configuration to this directory. This directory must also be writable by the Solr service superuser.Examples in these procedures use /cr7-solr-metadata/migrated-config for this local directory.
7. Enter a Reason for change and then click Save Changes to commit the changes.
8. Copy the transitioned configuration metadata to the Solr server host designated as Solr Server for Upgrade.
9. Reinitialize Solr state for upgrade:
a) In the Cloudera Manager Admin Console, go to Solr service.b) Select Actions > Reinitialize Solr State for Upgrade and click Reinitialize Solr State for Upgrade to
confirm.
10. Bootstrap the Solr configuration:
a) In the Cloudera Manager Admin Console, go to Solr service.b) Select Actions > Bootstrap Solr Configuration and click Bootstrap Solr Configuration to confirm.
11. Start the Solr service:
a) In the Cloudera Manager Admin Console, go to Solr service.b) Select Actions > Start .
12. Bootstrap the Solr collections:
a) In the Cloudera Manager Admin Console, go to Solr service.b) Select Actions > Bootstrap Solr Collections and click Bootstrap Solr Collections to confirm.
What to do next
1. Recreate aliases, if you were using them.2. Reindex Solr collections.
Troubleshooting the HDP upgradeIn the event of a problem, contacting Cloudera Support is highly recommended. Alternatively, you can perform thesetroubleshooting procedures.
YARN Registry DNS instance fails to startThe YARN Registry DNS instance will fail to start if another process on the host is bound to port 53. Ensure no otherservices that are binding to port 53 are on the host where the YARN Registry DNS instance is deployed.
Rollback Ambari 7.1.7 to Ambari 2.7.5You must use the backup of Ambari 2.7.5 to perform the following steps.
Procedure
1. Stop all services in Ambari UI.
2. On the Ambari Server host, stop the Ambari Server.
ambari-server stopStop Ambari Agent on all hostambari-agent stop
86
In-Place Upgrade HDP 3 to CDP Private Cloud Base Upgrading HDP to Cloudera Runtime 7.1.x
3. Obtain Ambari Repositories:
wget -nv https://archive.cloudera.com/p/ambari/2.x/${your_ambari_version}/centos7/ambari.repo -O /etc/yum.repos.d/ambari.repoyum clean all
4. Downgrade ambari-server, ambari-agent packages manually using “yum downgrade <packagename>”
yum downgrade ambari-serveryum downgrade ambari-agent # on all hosts
5. Reinitialize Ambari DB - Drop the old schema and initialize blank new schema :
Example - Postgres
psql -W -d ${AMBARI_DB_NAME} --user ${AMBARI_DB_USER}DROP SCHEMA ${AMBARI_DB_NAME} CASCADE;CREATE SCHEMA ambari;GRANT ALL ON SCHEMA ambari TO ambari;
MYSQL
mysql -u ${AMBARI_DB_USER} drop database ${AMBARI_DB_NAME}; create database ${AMBARI_DB_NAME};
6. Populate the Ambari database with backup data:
POSTGRES
psql -W -d ${AMBARI_DB_NAME} --user ${AMBARI_DB_USER} < pre_upgrade.sql
MYSQL
mysql -u ${AMBARI_DB_USER} ${AMBARI_DB_NAME} < pre_upgrade.sql
7. Restore these files from the backup:
/etc/ambari-server/conf/ambari.properties/etc/ambari-agent/conf/ambari-agent.ini
8. Restore old stack symlinks on Agent nodes:
hdp-select set all 3.1.5.0-152
9. Check ambari-server user:
grep ambari-server.user /etc/ambari-server/conf/ambari.properties
If ambari-server is running as non-root user, set permissions for files by running:
ambari-server setup
10. Start Ambari
Rollback HDP Services from CDP 7.1.7You must rollback the HDP services in the following order to restore to HDP 3.1.5.
87
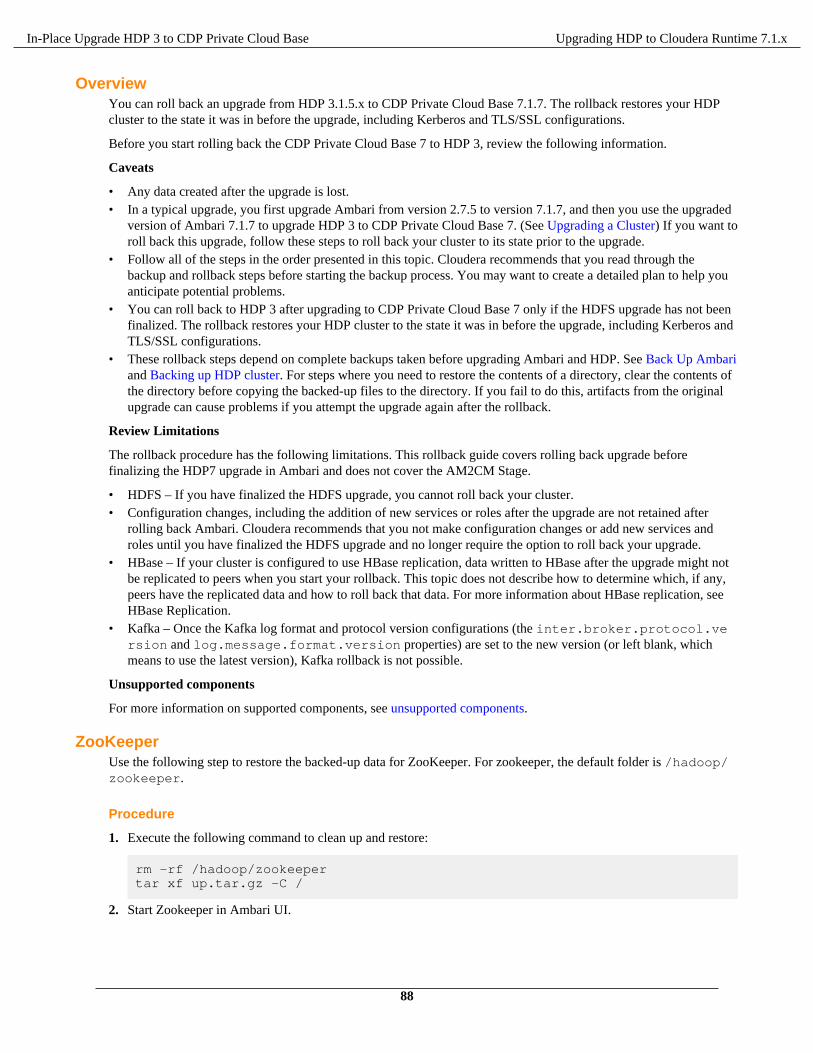
In-Place Upgrade HDP 3 to CDP Private Cloud Base Upgrading HDP to Cloudera Runtime 7.1.x
OverviewYou can roll back an upgrade from HDP 3.1.5.x to CDP Private Cloud Base 7.1.7. The rollback restores your HDPcluster to the state it was in before the upgrade, including Kerberos and TLS/SSL configurations.
Before you start rolling back the CDP Private Cloud Base 7 to HDP 3, review the following information.
Caveats
• Any data created after the upgrade is lost.• In a typical upgrade, you first upgrade Ambari from version 2.7.5 to version 7.1.7, and then you use the upgraded
version of Ambari 7.1.7 to upgrade HDP 3 to CDP Private Cloud Base 7. (See Upgrading a Cluster) If you want toroll back this upgrade, follow these steps to roll back your cluster to its state prior to the upgrade.
• Follow all of the steps in the order presented in this topic. Cloudera recommends that you read through thebackup and rollback steps before starting the backup process. You may want to create a detailed plan to help youanticipate potential problems.
• You can roll back to HDP 3 after upgrading to CDP Private Cloud Base 7 only if the HDFS upgrade has not beenfinalized. The rollback restores your HDP cluster to the state it was in before the upgrade, including Kerberos andTLS/SSL configurations.
• These rollback steps depend on complete backups taken before upgrading Ambari and HDP. See Back Up Ambariand Backing up HDP cluster. For steps where you need to restore the contents of a directory, clear the contents ofthe directory before copying the backed-up files to the directory. If you fail to do this, artifacts from the originalupgrade can cause problems if you attempt the upgrade again after the rollback.
Review Limitations
The rollback procedure has the following limitations. This rollback guide covers rolling back upgrade beforefinalizing the HDP7 upgrade in Ambari and does not cover the AM2CM Stage.
• HDFS – If you have finalized the HDFS upgrade, you cannot roll back your cluster.• Configuration changes, including the addition of new services or roles after the upgrade are not retained after
rolling back Ambari. Cloudera recommends that you not make configuration changes or add new services androles until you have finalized the HDFS upgrade and no longer require the option to roll back your upgrade.
• HBase – If your cluster is configured to use HBase replication, data written to HBase after the upgrade might notbe replicated to peers when you start your rollback. This topic does not describe how to determine which, if any,peers have the replicated data and how to roll back that data. For more information about HBase replication, seeHBase Replication.
• Kafka – Once the Kafka log format and protocol version configurations (the inter.broker.protocol.version and log.message.format.version properties) are set to the new version (or left blank, whichmeans to use the latest version), Kafka rollback is not possible.
Unsupported components
For more information on supported components, see unsupported components.
ZooKeeperUse the following step to restore the backed-up data for ZooKeeper. For zookeeper, the default folder is /hadoop/zookeeper.
Procedure
1. Execute the following command to clean up and restore:
rm -rf /hadoop/zookeepertar xf up.tar.gz -C /
2. Start Zookeeper in Ambari UI.
88
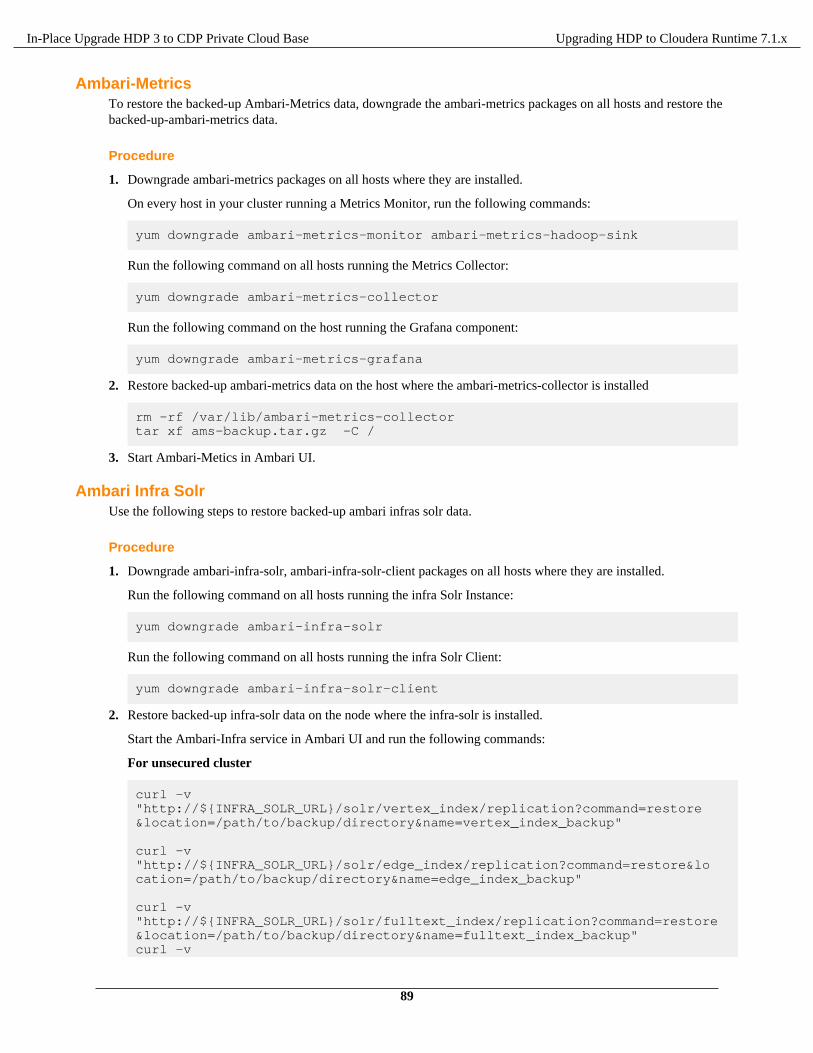
In-Place Upgrade HDP 3 to CDP Private Cloud Base Upgrading HDP to Cloudera Runtime 7.1.x
Ambari-MetricsTo restore the backed-up Ambari-Metrics data, downgrade the ambari-metrics packages on all hosts and restore thebacked-up-ambari-metrics data.
Procedure
1. Downgrade ambari-metrics packages on all hosts where they are installed.
On every host in your cluster running a Metrics Monitor, run the following commands:
yum downgrade ambari-metrics-monitor ambari-metrics-hadoop-sink
Run the following command on all hosts running the Metrics Collector:
yum downgrade ambari-metrics-collector
Run the following command on the host running the Grafana component:
yum downgrade ambari-metrics-grafana
2. Restore backed-up ambari-metrics data on the host where the ambari-metrics-collector is installed
rm -rf /var/lib/ambari-metrics-collectortar xf ams-backup.tar.gz -C /
3. Start Ambari-Metics in Ambari UI.
Ambari Infra SolrUse the following steps to restore backed-up ambari infras solr data.
Procedure
1. Downgrade ambari-infra-solr, ambari-infra-solr-client packages on all hosts where they are installed.
Run the following command on all hosts running the infra Solr Instance:
yum downgrade ambari-infra-solr
Run the following command on all hosts running the infra Solr Client:
yum downgrade ambari-infra-solr-client
2. Restore backed-up infra-solr data on the node where the infra-solr is installed.
Start the Ambari-Infra service in Ambari UI and run the following commands:
For unsecured cluster
curl -v "http://${INFRA_SOLR_URL}/solr/vertex_index/replication?command=restore&location=/path/to/backup/directory&name=vertex_index_backup"
curl -v "http://${INFRA_SOLR_URL}/solr/edge_index/replication?command=restore&location=/path/to/backup/directory&name=edge_index_backup"
curl -v "http://${INFRA_SOLR_URL}/solr/fulltext_index/replication?command=restore&location=/path/to/backup/directory&name=fulltext_index_backup"curl -v
89
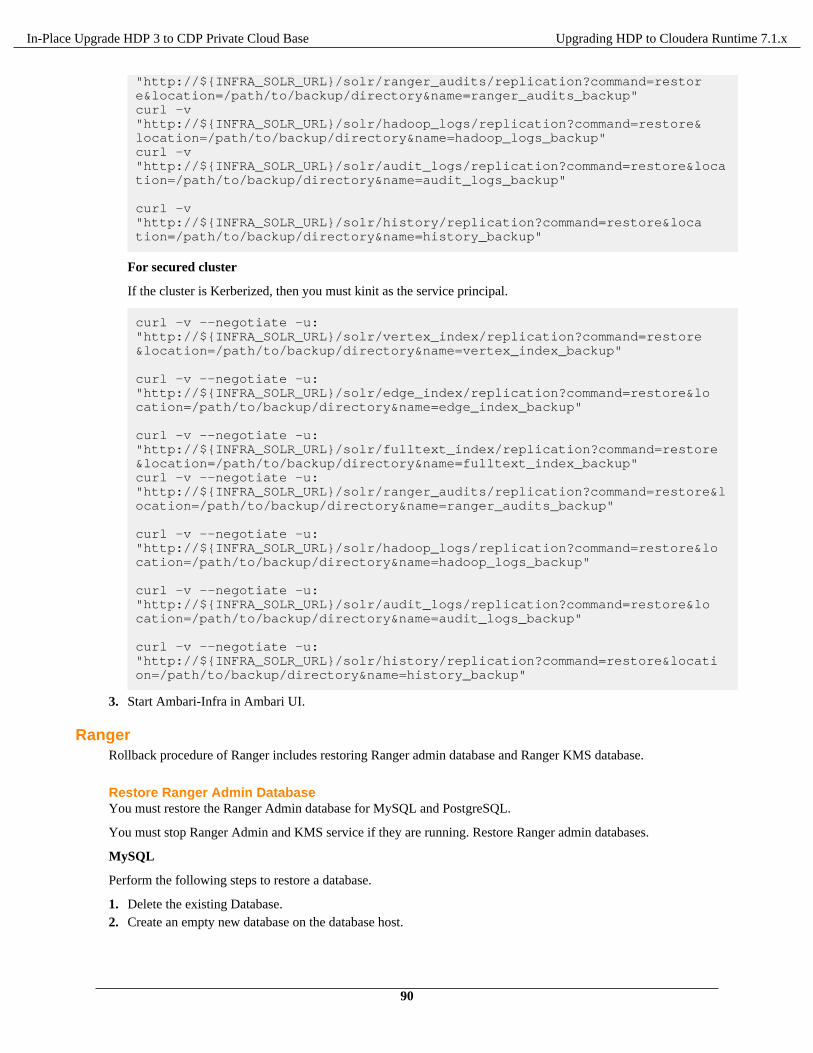
In-Place Upgrade HDP 3 to CDP Private Cloud Base Upgrading HDP to Cloudera Runtime 7.1.x
"http://${INFRA_SOLR_URL}/solr/ranger_audits/replication?command=restore&location=/path/to/backup/directory&name=ranger_audits_backup"curl -v"http://${INFRA_SOLR_URL}/solr/hadoop_logs/replication?command=restore&location=/path/to/backup/directory&name=hadoop_logs_backup"curl -v "http://${INFRA_SOLR_URL}/solr/audit_logs/replication?command=restore&location=/path/to/backup/directory&name=audit_logs_backup"
curl -v "http://${INFRA_SOLR_URL}/solr/history/replication?command=restore&location=/path/to/backup/directory&name=history_backup"
For secured cluster
If the cluster is Kerberized, then you must kinit as the service principal.
curl -v --negotiate -u: "http://${INFRA_SOLR_URL}/solr/vertex_index/replication?command=restore&location=/path/to/backup/directory&name=vertex_index_backup"
curl -v --negotiate -u: "http://${INFRA_SOLR_URL}/solr/edge_index/replication?command=restore&location=/path/to/backup/directory&name=edge_index_backup"
curl -v --negotiate -u: "http://${INFRA_SOLR_URL}/solr/fulltext_index/replication?command=restore&location=/path/to/backup/directory&name=fulltext_index_backup"curl -v --negotiate -u: "http://${INFRA_SOLR_URL}/solr/ranger_audits/replication?command=restore&location=/path/to/backup/directory&name=ranger_audits_backup"
curl -v --negotiate -u: "http://${INFRA_SOLR_URL}/solr/hadoop_logs/replication?command=restore&location=/path/to/backup/directory&name=hadoop_logs_backup"
curl -v --negotiate -u: "http://${INFRA_SOLR_URL}/solr/audit_logs/replication?command=restore&location=/path/to/backup/directory&name=audit_logs_backup"
curl -v --negotiate -u: "http://${INFRA_SOLR_URL}/solr/history/replication?command=restore&location=/path/to/backup/directory&name=history_backup"
3. Start Ambari-Infra in Ambari UI.
RangerRollback procedure of Ranger includes restoring Ranger admin database and Ranger KMS database.
Restore Ranger Admin DatabaseYou must restore the Ranger Admin database for MySQL and PostgreSQL.
You must stop Ranger Admin and KMS service if they are running. Restore Ranger admin databases.
MySQL
Perform the following steps to restore a database.
1. Delete the existing Database.2. Create an empty new database on the database host.
90
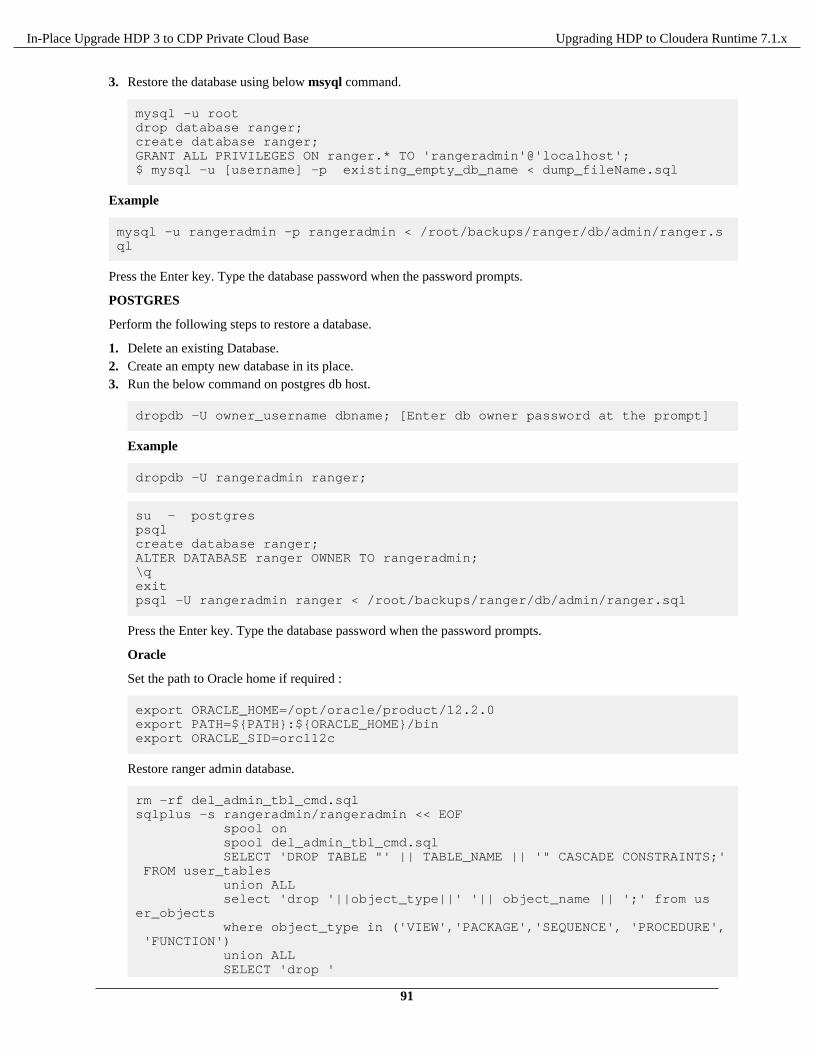
In-Place Upgrade HDP 3 to CDP Private Cloud Base Upgrading HDP to Cloudera Runtime 7.1.x
3. Restore the database using below msyql command.
mysql -u rootdrop database ranger;create database ranger;GRANT ALL PRIVILEGES ON ranger.* TO 'rangeradmin'@'localhost';$ mysql -u [username] -p existing_empty_db_name < dump_fileName.sql
Example
mysql -u rangeradmin -p rangeradmin < /root/backups/ranger/db/admin/ranger.sql
Press the Enter key. Type the database password when the password prompts.
POSTGRES
Perform the following steps to restore a database.
1. Delete an existing Database.2. Create an empty new database in its place.3. Run the below command on postgres db host.
dropdb -U owner_username dbname; [Enter db owner password at the prompt]
Example
dropdb -U rangeradmin ranger;
su - postgrespsql create database ranger;ALTER DATABASE ranger OWNER TO rangeradmin; \qexitpsql -U rangeradmin ranger < /root/backups/ranger/db/admin/ranger.sql
Press the Enter key. Type the database password when the password prompts.
Oracle
Set the path to Oracle home if required :
export ORACLE_HOME=/opt/oracle/product/12.2.0export PATH=${PATH}:${ORACLE_HOME}/binexport ORACLE_SID=orcl12c
Restore ranger admin database.
rm -rf del_admin_tbl_cmd.sqlsqlplus -s rangeradmin/rangeradmin << EOF spool on spool del_admin_tbl_cmd.sql SELECT 'DROP TABLE "' || TABLE_NAME || '" CASCADE CONSTRAINTS;' FROM user_tables union ALL select 'drop '||object_type||' '|| object_name || ';' from user_objects where object_type in ('VIEW','PACKAGE','SEQUENCE', 'PROCEDURE', 'FUNCTION') union ALL SELECT 'drop '
91
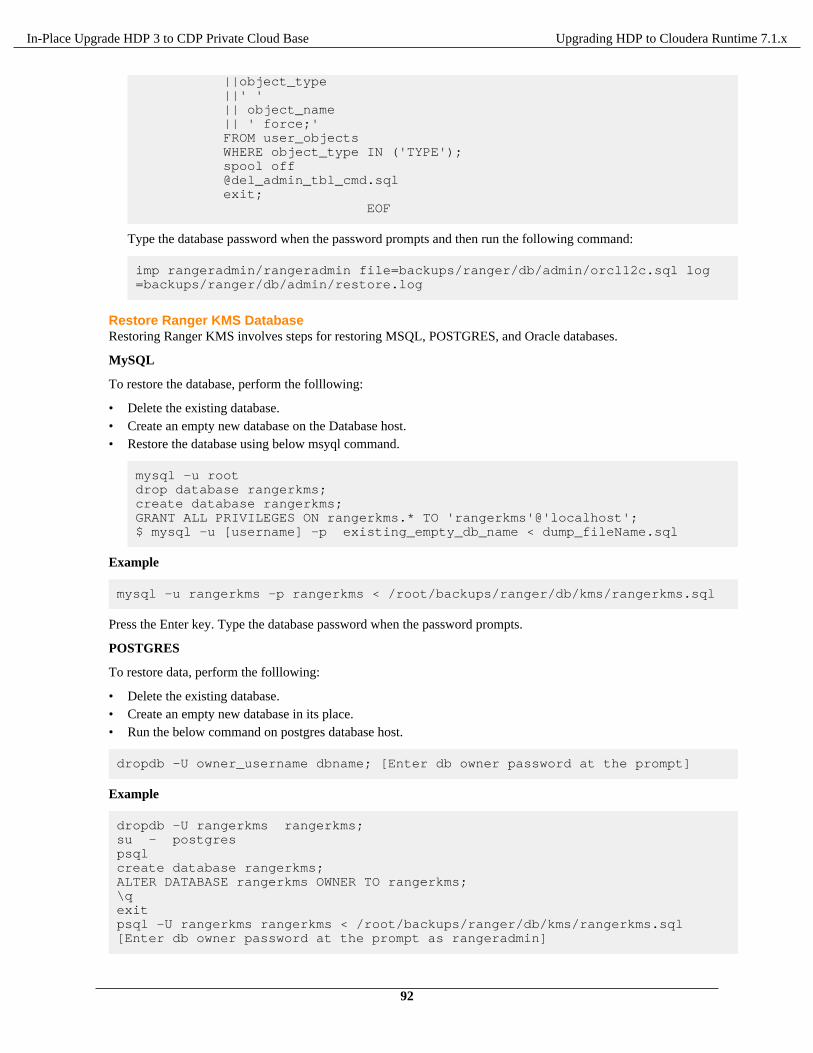
In-Place Upgrade HDP 3 to CDP Private Cloud Base Upgrading HDP to Cloudera Runtime 7.1.x
||object_type ||' ' || object_name || ' force;' FROM user_objects WHERE object_type IN ('TYPE'); spool off @del_admin_tbl_cmd.sql exit; EOF
Type the database password when the password prompts and then run the following command:
imp rangeradmin/rangeradmin file=backups/ranger/db/admin/orcl12c.sql log=backups/ranger/db/admin/restore.log
Restore Ranger KMS DatabaseRestoring Ranger KMS involves steps for restoring MSQL, POSTGRES, and Oracle databases.
MySQL
To restore the database, perform the folllowing:
• Delete the existing database.• Create an empty new database on the Database host.• Restore the database using below msyql command.
mysql -u rootdrop database rangerkms;create database rangerkms;GRANT ALL PRIVILEGES ON rangerkms.* TO 'rangerkms'@'localhost';$ mysql -u [username] -p existing_empty_db_name < dump_fileName.sql
Example
mysql -u rangerkms -p rangerkms < /root/backups/ranger/db/kms/rangerkms.sql
Press the Enter key. Type the database password when the password prompts.
POSTGRES
To restore data, perform the folllowing:
• Delete the existing database.• Create an empty new database in its place.• Run the below command on postgres database host.
dropdb -U owner_username dbname; [Enter db owner password at the prompt]
Example
dropdb -U rangerkms rangerkms;su - postgrespsql create database rangerkms; ALTER DATABASE rangerkms OWNER TO rangerkms;\qexitpsql -U rangerkms rangerkms < /root/backups/ranger/db/kms/rangerkms.sql [Enter db owner password at the prompt as rangeradmin]
92
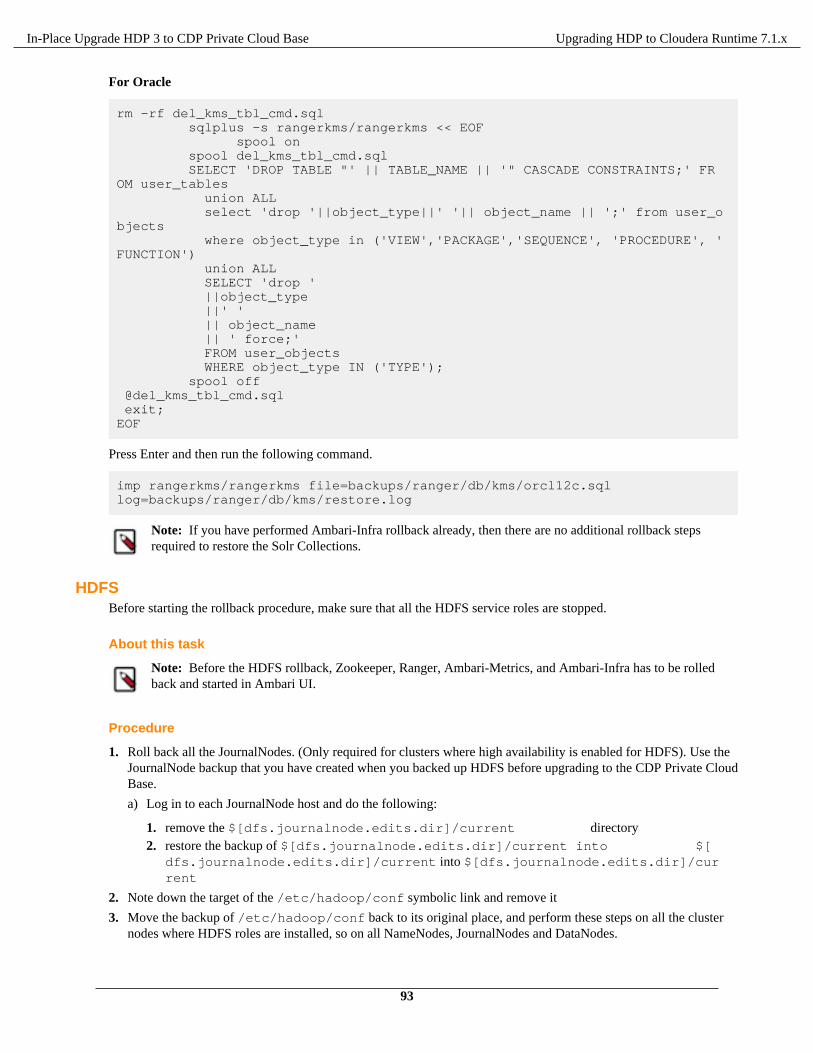
In-Place Upgrade HDP 3 to CDP Private Cloud Base Upgrading HDP to Cloudera Runtime 7.1.x
For Oracle
rm -rf del_kms_tbl_cmd.sql sqlplus -s rangerkms/rangerkms << EOF spool on spool del_kms_tbl_cmd.sql SELECT 'DROP TABLE "' || TABLE_NAME || '" CASCADE CONSTRAINTS;' FROM user_tables union ALL select 'drop '||object_type||' '|| object_name || ';' from user_objects where object_type in ('VIEW','PACKAGE','SEQUENCE', 'PROCEDURE', 'FUNCTION') union ALL SELECT 'drop ' ||object_type ||' ' || object_name || ' force;' FROM user_objects WHERE object_type IN ('TYPE'); spool off @del_kms_tbl_cmd.sql exit;EOF
Press Enter and then run the following command.
imp rangerkms/rangerkms file=backups/ranger/db/kms/orcl12c.sql log=backups/ranger/db/kms/restore.log
Note: If you have performed Ambari-Infra rollback already, then there are no additional rollback stepsrequired to restore the Solr Collections.
HDFSBefore starting the rollback procedure, make sure that all the HDFS service roles are stopped.
About this task
Note: Before the HDFS rollback, Zookeeper, Ranger, Ambari-Metrics, and Ambari-Infra has to be rolledback and started in Ambari UI.
Procedure
1. Roll back all the JournalNodes. (Only required for clusters where high availability is enabled for HDFS). Use theJournalNode backup that you have created when you backed up HDFS before upgrading to the CDP Private CloudBase.
a) Log in to each JournalNode host and do the following:
1. remove the $[dfs.journalnode.edits.dir]/current directory2. restore the backup of $[dfs.journalnode.edits.dir]/current into $[
dfs.journalnode.edits.dir]/current into $[dfs.journalnode.edits.dir]/current
2. Note down the target of the /etc/hadoop/conf symbolic link and remove it
3. Move the backup of /etc/hadoop/conf back to its original place, and perform these steps on all the clusternodes where HDFS roles are installed, so on all NameNodes, JournalNodes and DataNodes.
93
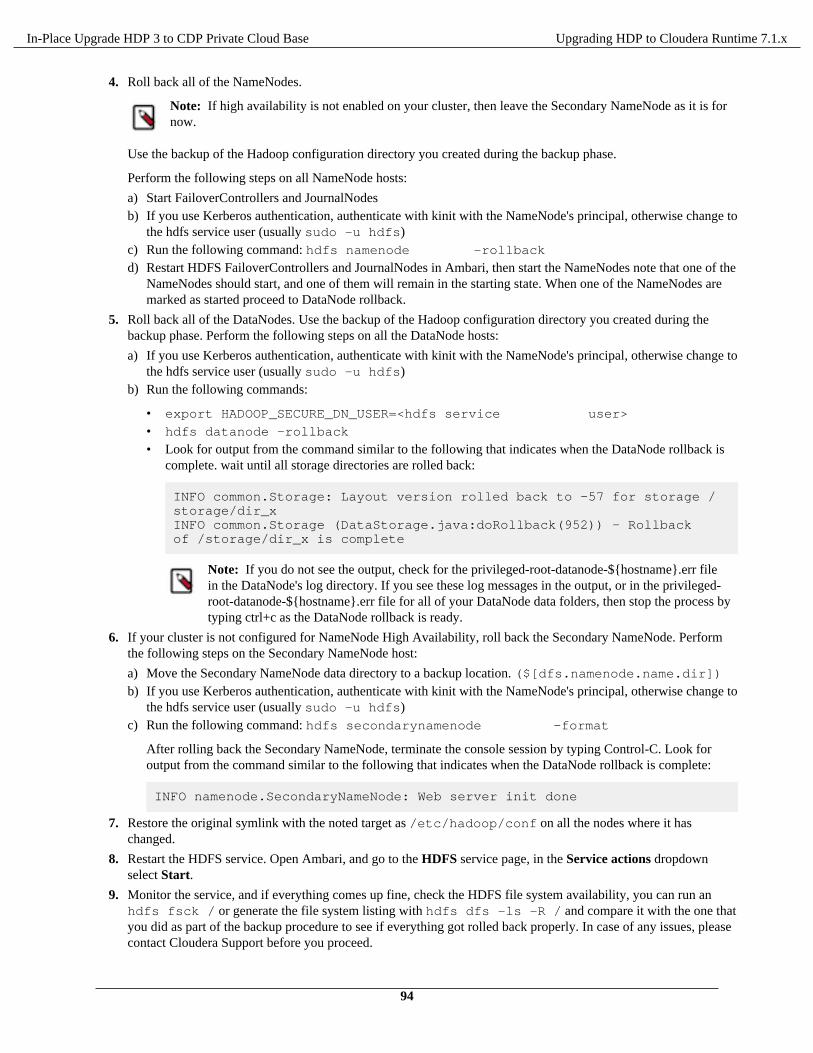
In-Place Upgrade HDP 3 to CDP Private Cloud Base Upgrading HDP to Cloudera Runtime 7.1.x
4. Roll back all of the NameNodes.
Note: If high availability is not enabled on your cluster, then leave the Secondary NameNode as it is fornow.
Use the backup of the Hadoop configuration directory you created during the backup phase.
Perform the following steps on all NameNode hosts:
a) Start FailoverControllers and JournalNodesb) If you use Kerberos authentication, authenticate with kinit with the NameNode's principal, otherwise change to
the hdfs service user (usually sudo -u hdfs)c) Run the following command: hdfs namenode -rollbackd) Restart HDFS FailoverControllers and JournalNodes in Ambari, then start the NameNodes note that one of the
NameNodes should start, and one of them will remain in the starting state. When one of the NameNodes aremarked as started proceed to DataNode rollback.
5. Roll back all of the DataNodes. Use the backup of the Hadoop configuration directory you created during thebackup phase. Perform the following steps on all the DataNode hosts:
a) If you use Kerberos authentication, authenticate with kinit with the NameNode's principal, otherwise change tothe hdfs service user (usually sudo -u hdfs)
b) Run the following commands:
• export HADOOP_SECURE_DN_USER=<hdfs service user>
• hdfs datanode -rollback
• Look for output from the command similar to the following that indicates when the DataNode rollback iscomplete. wait until all storage directories are rolled back:
INFO common.Storage: Layout version rolled back to -57 for storage /storage/dir_xINFO common.Storage (DataStorage.java:doRollback(952)) - Rollback of /storage/dir_x is complete
Note: If you do not see the output, check for the privileged-root-datanode-${hostname}.err filein the DataNode's log directory. If you see these log messages in the output, or in the privileged-root-datanode-${hostname}.err file for all of your DataNode data folders, then stop the process bytyping ctrl+c as the DataNode rollback is ready.
6. If your cluster is not configured for NameNode High Availability, roll back the Secondary NameNode. Performthe following steps on the Secondary NameNode host:
a) Move the Secondary NameNode data directory to a backup location. ($[dfs.namenode.name.dir])b) If you use Kerberos authentication, authenticate with kinit with the NameNode's principal, otherwise change to
the hdfs service user (usually sudo -u hdfs)c) Run the following command: hdfs secondarynamenode -format
After rolling back the Secondary NameNode, terminate the console session by typing Control-C. Look foroutput from the command similar to the following that indicates when the DataNode rollback is complete:
INFO namenode.SecondaryNameNode: Web server init done
7. Restore the original symlink with the noted target as /etc/hadoop/conf on all the nodes where it haschanged.
8. Restart the HDFS service. Open Ambari, and go to the HDFS service page, in the Service actions dropdownselect Start.
9. Monitor the service, and if everything comes up fine, check the HDFS file system availability, you can run anhdfs fsck / or generate the file system listing with hdfs dfs -ls -R / and compare it with the one thatyou did as part of the backup procedure to see if everything got rolled back properly. In case of any issues, pleasecontact Cloudera Support before you proceed.
94
In-Place Upgrade HDP 3 to CDP Private Cloud Base Upgrading HDP to Cloudera Runtime 7.1.x
YARNBefore starting the rollback procedure, make sure that HDFS and Zookeeper are rolled back.
1. Log in to the TIMELINE SERVICE V2.0 READER host.2. Setup Kerberos Credentials in case of secured cluster. Locate the yarn-ats-hbase’s keytab and use kinit to cache
the kerberos ticket.
• kinit -kt path/to/yarn-ats.hbase-master.keytab yarn-ats-hbase/hostname@domain.
• export JVMFLAGS="-Djava.security.auth.login.config=/etc/hadoop/conf/embedded-yarn-ats-hbase/yarn_hbase_master_jaas.conf"
3. Delete the atsv2-hbase-secure znode in the Zookeeper zookeeper-client -server${zk_server_url} rmr /atsv2-hbase-secure.
HBaseIf you have performed Zookeeper and HDFS rollback already, there are no additional rollback steps required forHBase.
1. Start HBase in Ambari UI.2. If the HBase master does not start, ZooKeeper data must be cleaned by following these steps:
a. Log in to the HBase Master host.b. Setup Kerberos Credentials in case of secured cluster.
1. kinit -kt path/to/yarn-ats.hbase-master.keytab yarn-ats-hbase/hostname@domain
2. export JVMFLAGS= "-Djava.security.auth.login.config=/usr/hdp/current/hbase-master/conf/hbase_master_jaas.conf"
c. Delete the hbase-secure znode in the Zookeeper. zookeeper-client -server ${zk_server_url}rmr /hbase-secure
KafkaTo roll back Kafka, perform the following steps.
Procedure
1. Kafka service depends on Zookeeper. Make sure Zookeeper data is restored.
2. After rollback, start the Kafka service, and check, if the producers and consumers can connect to the cluster.
3. Remove the inter broker protocol and log format version settings from the Kafka settings:
a) Log in to Ambari.b) Choose the Kafka service.c) Select the Configuration page.d) Find the Custom kafka-broker section.e) Remove following properties:
• inter.broker.protocol.version=current_Kafka_version• log.message.format.version=current_Kafka_version
f) Restart the Kafka service.g) Start Kafka in Ambari UI
AtlasPerform the following steps to restore HBase tables and ATLAS_ENTITY_AUDIT_EVENTS table.
Procedure
1. Stop Atlas from Ambari
95
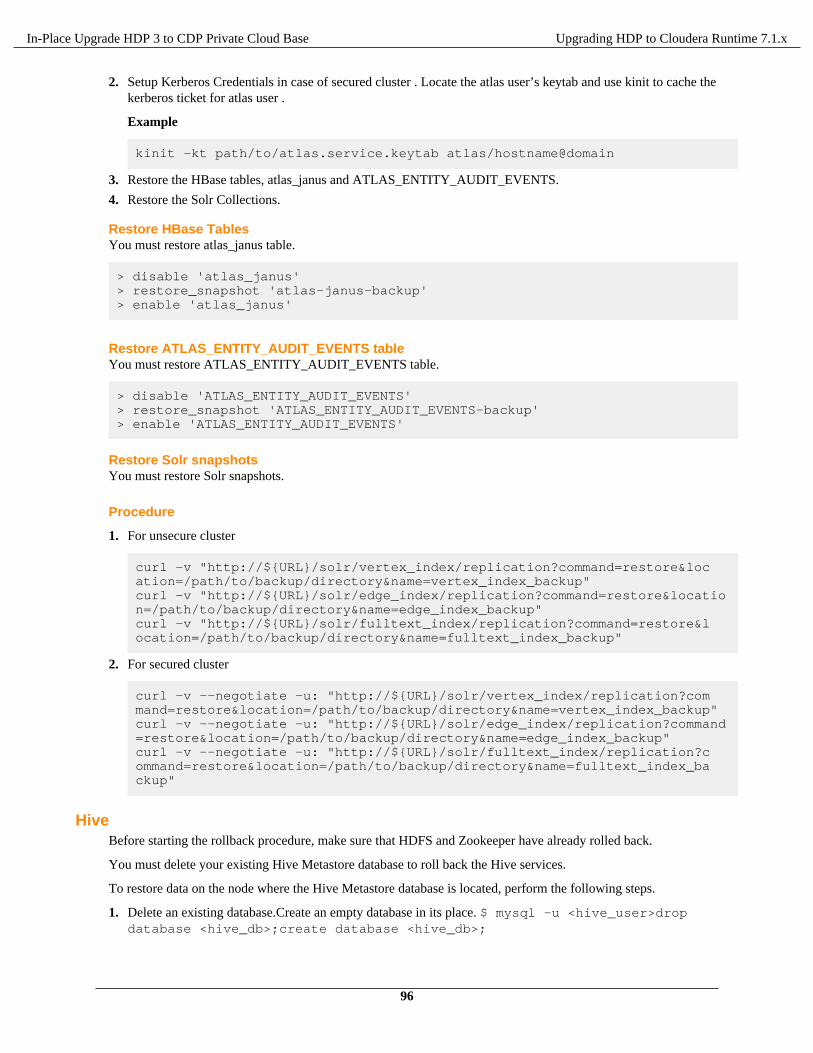
In-Place Upgrade HDP 3 to CDP Private Cloud Base Upgrading HDP to Cloudera Runtime 7.1.x
2. Setup Kerberos Credentials in case of secured cluster . Locate the atlas user’s keytab and use kinit to cache thekerberos ticket for atlas user .
Example
kinit -kt path/to/atlas.service.keytab atlas/hostname@domain
3. Restore the HBase tables, atlas_janus and ATLAS_ENTITY_AUDIT_EVENTS.
4. Restore the Solr Collections.
Restore HBase TablesYou must restore atlas_janus table.
> disable 'atlas_janus'> restore_snapshot 'atlas-janus-backup'> enable 'atlas_janus'
Restore ATLAS_ENTITY_AUDIT_EVENTS tableYou must restore ATLAS_ENTITY_AUDIT_EVENTS table.
> disable 'ATLAS_ENTITY_AUDIT_EVENTS'> restore_snapshot 'ATLAS_ENTITY_AUDIT_EVENTS-backup'> enable 'ATLAS_ENTITY_AUDIT_EVENTS'
Restore Solr snapshotsYou must restore Solr snapshots.
Procedure
1. For unsecure cluster
curl -v "http://${URL}/solr/vertex_index/replication?command=restore&location=/path/to/backup/directory&name=vertex_index_backup"curl -v "http://${URL}/solr/edge_index/replication?command=restore&location=/path/to/backup/directory&name=edge_index_backup"curl -v "http://${URL}/solr/fulltext_index/replication?command=restore&location=/path/to/backup/directory&name=fulltext_index_backup"
2. For secured cluster
curl -v --negotiate -u: "http://${URL}/solr/vertex_index/replication?command=restore&location=/path/to/backup/directory&name=vertex_index_backup"curl -v --negotiate -u: "http://${URL}/solr/edge_index/replication?command=restore&location=/path/to/backup/directory&name=edge_index_backup"curl -v --negotiate -u: "http://${URL}/solr/fulltext_index/replication?command=restore&location=/path/to/backup/directory&name=fulltext_index_backup"
HiveBefore starting the rollback procedure, make sure that HDFS and Zookeeper have already rolled back.
You must delete your existing Hive Metastore database to roll back the Hive services.
To restore data on the node where the Hive Metastore database is located, perform the following steps.
1. Delete an existing database.Create an empty database in its place. $ mysql -u <hive_user>dropdatabase <hive_db>;create database <hive_db>;
96

In-Place Upgrade HDP 3 to CDP Private Cloud Base Transitioning to Cloudera Manager
2. Restore Hive Metastore database $ mysql -u <hive_user> <hive_db> < </path/to/dump_file>. If you haveve performed HDFS rollback already, there are no additional rollback steps requiredfor Hive.
3. Start Hive service in Ambari UI.
SparkKnow more about the Spark roll back.
• The Spark application history lives in HDFS, and with the rollback of HDFS, the history at the time of the backupis restored. Any Spark applications run after the backup and rollback will not be visible.
• After the rollback, versions of Spark applications built against HDP 2 should be used instead of versions that arerebuilt against CDP.
• Start Spark in Ambari UI.
OozieTo roll back the Oozie service, you must restore the Oozie database.
• Start Oozie in Ambari UI.
It is needed to re-generate the oozie.ha.keytab file using the spnego.service.keytab files from the Oozie serverhosts and from the Oozie load balancer host and then distribute the generated oozie.ha.keytab onto the respectiveOozie hosts. In order to achieve this, follow the steps listed in this website.
• Restart Oozie.
KnoxWith the backup and rollback of Ambari, Knox is also backed up and rolled back by default.
Start Knox in Ambari UI.
ZeppelinWith the backup and rollback of HDFS, Zeppelin is also backed up and rolled back by default.
Start Zeppelin in Ambari UI.
Log Search
Procedure
1. On every host in your cluster running a Log Search Server, run the following commands:
yum downgrade ambari-logsearch-portal
2. Execute the following command on all hosts running the Logfeeder:
yum downgrade ambari-logsearch-logfeeder
Note: If you have performed Ambari-Infra already, there are no additional rollback steps required.
3. Start Log Search in Ambari UI.
Transitioning to Cloudera Manager
This section helps you to transition from HDP 3.1.5.x to Cloudera Manager and CDP Private Cloud Base
97

In-Place Upgrade HDP 3 to CDP Private Cloud Base Transitioning to Cloudera Manager
The high level of steps to transition from the HDP 3.1.5 cluster to Cloudera Manager:
Pre-transition stepsFrom Ambari configurations, collect passwords of databases, keystores, and IDM services for components that arenot part of the transition. This information will help in starting the services in Cloudera Manager after transition.
98
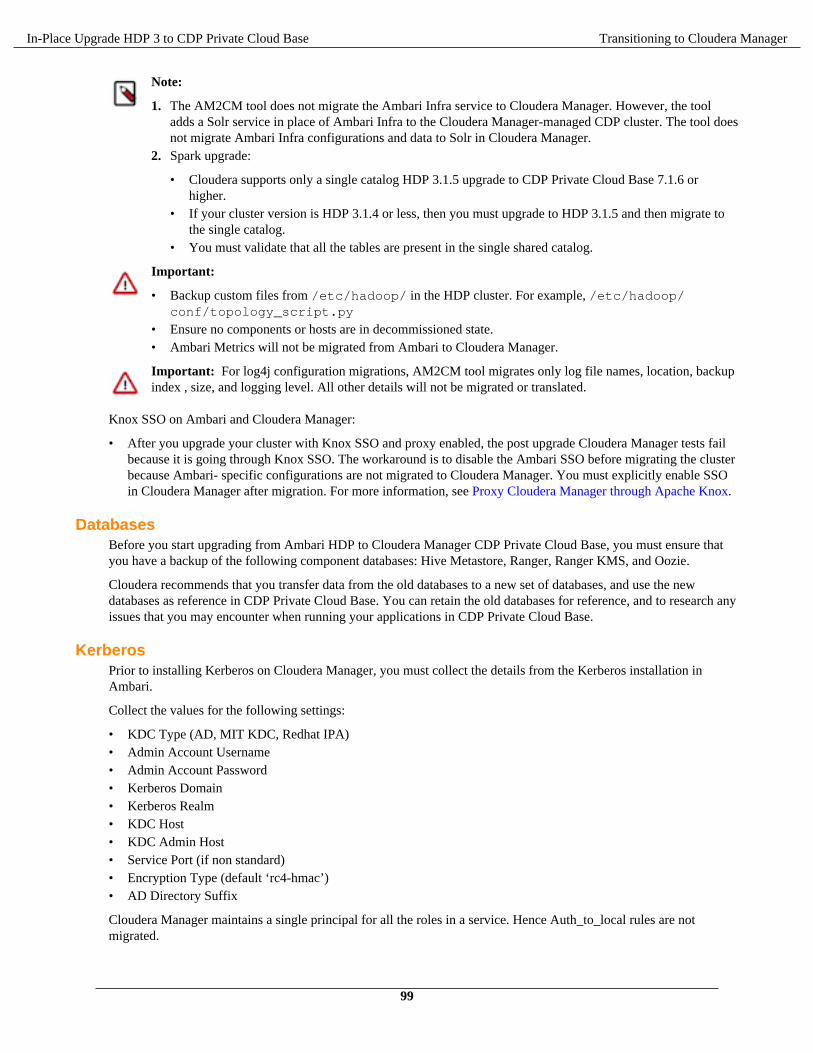
In-Place Upgrade HDP 3 to CDP Private Cloud Base Transitioning to Cloudera Manager
Note:
1. The AM2CM tool does not migrate the Ambari Infra service to Cloudera Manager. However, the tooladds a Solr service in place of Ambari Infra to the Cloudera Manager-managed CDP cluster. The tool doesnot migrate Ambari Infra configurations and data to Solr in Cloudera Manager.
2. Spark upgrade:
• Cloudera supports only a single catalog HDP 3.1.5 upgrade to CDP Private Cloud Base 7.1.6 orhigher.
• If your cluster version is HDP 3.1.4 or less, then you must upgrade to HDP 3.1.5 and then migrate tothe single catalog.
• You must validate that all the tables are present in the single shared catalog.
Important:
• Backup custom files from /etc/hadoop/ in the HDP cluster. For example, /etc/hadoop/conf/topology_script.py
• Ensure no components or hosts are in decommissioned state.• Ambari Metrics will not be migrated from Ambari to Cloudera Manager.
Important: For log4j configuration migrations, AM2CM tool migrates only log file names, location, backupindex , size, and logging level. All other details will not be migrated or translated.
Knox SSO on Ambari and Cloudera Manager:
• After you upgrade your cluster with Knox SSO and proxy enabled, the post upgrade Cloudera Manager tests failbecause it is going through Knox SSO. The workaround is to disable the Ambari SSO before migrating the clusterbecause Ambari- specific configurations are not migrated to Cloudera Manager. You must explicitly enable SSOin Cloudera Manager after migration. For more information, see Proxy Cloudera Manager through Apache Knox.
DatabasesBefore you start upgrading from Ambari HDP to Cloudera Manager CDP Private Cloud Base, you must ensure thatyou have a backup of the following component databases: Hive Metastore, Ranger, Ranger KMS, and Oozie.
Cloudera recommends that you transfer data from the old databases to a new set of databases, and use the newdatabases as reference in CDP Private Cloud Base. You can retain the old databases for reference, and to research anyissues that you may encounter when running your applications in CDP Private Cloud Base.
KerberosPrior to installing Kerberos on Cloudera Manager, you must collect the details from the Kerberos installation inAmbari.
Collect the values for the following settings:
• KDC Type (AD, MIT KDC, Redhat IPA)• Admin Account Username• Admin Account Password• Kerberos Domain• Kerberos Realm• KDC Host• KDC Admin Host• Service Port (if non standard)• Encryption Type (default ‘rc4-hmac’)• AD Directory Suffix
Cloudera Manager maintains a single principal for all the roles in a service. Hence Auth_to_local rules are notmigrated.
99
In-Place Upgrade HDP 3 to CDP Private Cloud Base Transitioning to Cloudera Manager
Service user names in Ambari will be migrated to Kerberos principal names in Cloudera manager as part of thetransition process.
Kerberos principalKafka service in Cloudera Manager does not take non-default principal names. This section is not applicable if youare upgrading to CDP Private Cloud Base 7.1.7.
Currently, the Kafka service in Cloudera Manager does not take non-default principal names. The Kafka principalname is not migrated to Cloudera Manager if you use any custom principal name in the Kafka service on Ambari.
HDFSPerform the following pre-transition steps.
Do not change the HA namespace during the upgrade. Changing HA namespace impacts Hive metadata locations andpossibly HBase (if the location reference includes the full HDFS location).
Preparing HDFSMake sure HDFS is healthy.
Before you begin
To ensure HDFS is healthy
Procedure
• Save the Namespace• Ensure that the under-replicated blocks do not exist• Ensure that the Exclude hosts list is empty. Before upgrading, remove the decommissioned datanodes from HDFS.
Backup the non-default Rack Awareness Topology scriptBackup any custom configurations of the rack awareness topology script.
In the Ambari HDFS service, if net.topology.script.file.name is configured with a non default topology script (that isnot the default /etc/hadoop/conf/topology_script.py script), then take a backup of it.
After transitioning to Cloudera Manager, you can reconfigure your script.
Note: The reason for this is that the default script has a different name in Cloudera Manager. That is thedefault script is the same in Ambari and Cloudera Manager but the two management systems have differentnames for that same script.
SparkRun the following commands on all the hosts where the spark components (Spark 2 History Server, Livy for Spark2Server, and Spark2 Client) are installed to take the backup.
Perform the following steps:
mkdir /usr/bin/sparkbackupmv /usr/bin/spark-shell /usr/bin/sparkbackup/mv /usr/bin/spark-submit /usr/bin/sparkbackup/mv /usr/bin/pyspark /usr/bin/sparkbackup/mv /usr/bin/spark-class /usr/bin/sparkbackup/mv /usr/bin/spark-script-wrapper.sh /usr/bin/sparkbackup/mv /usr/bin/spark-sql /usr/bin/sparkbackup/
Spark2/LivyCheck the Livy server component.
Cloudera Manager does not allow more than one Livy server component. Remove if Ambari has more than one Livyserver component before migration.
100
In-Place Upgrade HDP 3 to CDP Private Cloud Base Transitioning to Cloudera Manager
RangerConfigure Ranger in Cloudera Manager-managed CDP Private Cloud Base cluster.
Usually, Ranger and most HDP services are set up to synchronize and authenticate against an LDAP/AD service.In the Cloudera Manager-managed CDP Private Cloud Base cluster, additional options are available to manageintegrations using the aspects of the existing operating system's IDM integration.
The configuration for Ranger in Cloudera Manager-managed CDP Private Cloud Base cluster is through PAM(Pluggable Authentication Module). In a Kerberized environment, PAM integration is available at the Operatingsystem level.
You can use the Ranger services for authentication, user, and group synchronization using the PAM integration.
If PAM integration is not an option, then you must record the details from Ambari to install and configure Ranger inCloudera Manager.
Kerberos - Optional taskDekerberize the Ambari HDP cluster and kerberize the Cloudera Manager cluster.
You can de-kerberize the Ambari HDP cluster before migration and kerberize the Cloudera Manager cluster when theAmbari HDP migration is complete.
Note: Even without kerberos, migration works.
SolrThe AM2CM tool does not migrate Ambari Infra Solr configuration and data to Cloudera Manager. However, it addsa new Solr service. To take a backup, perform the following steps after the transition.
1. Create a local directory for backups first:
mkdir -p [backup_dir]
2. Execute the following commands on the hosts where Solr is installed.
mv /etc/alternatives/solr-conf [backup_dir]/solr-confhdpmv /etc/alternatives/hue-conf [backup_dir]/hue-confhdpmv /etc/alternatives/hbase-solr-conf [backup_dir]/hbase-solr-confhdp
For RHEL:
mv /var/lib/alternatives/solr-conf [backup_dir]/solr-confhdp
For Ubuntu:
mv /var/lib/dpkg/alternatives [backup_dir]/solr-confhdp
For Sles:
mv /var/lib/rpm/alternatives [backup_dir]/solr-confhdp
Cloudera Manager Installation and SetupInstall Cloudera Manager, install Cloudera Manager agent and daemons, add Cloudera Management service, enableTLS, and finally configure clusters to use Kerberos.
About this task
101
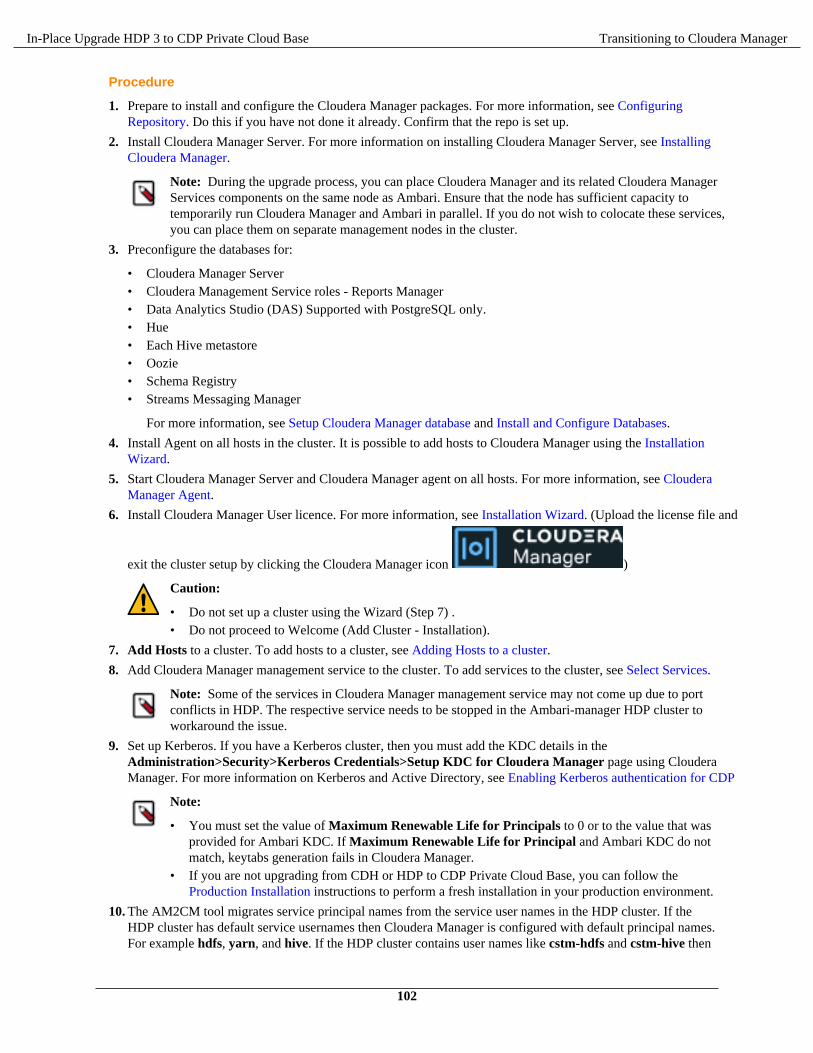
In-Place Upgrade HDP 3 to CDP Private Cloud Base Transitioning to Cloudera Manager
Procedure
1. Prepare to install and configure the Cloudera Manager packages. For more information, see ConfiguringRepository. Do this if you have not done it already. Confirm that the repo is set up.
2. Install Cloudera Manager Server. For more information on installing Cloudera Manager Server, see InstallingCloudera Manager.
Note: During the upgrade process, you can place Cloudera Manager and its related Cloudera ManagerServices components on the same node as Ambari. Ensure that the node has sufficient capacity totemporarily run Cloudera Manager and Ambari in parallel. If you do not wish to colocate these services,you can place them on separate management nodes in the cluster.
3. Preconfigure the databases for:
• Cloudera Manager Server• Cloudera Management Service roles - Reports Manager• Data Analytics Studio (DAS) Supported with PostgreSQL only.• Hue• Each Hive metastore• Oozie• Schema Registry• Streams Messaging Manager
For more information, see Setup Cloudera Manager database and Install and Configure Databases.
4. Install Agent on all hosts in the cluster. It is possible to add hosts to Cloudera Manager using the InstallationWizard.
5. Start Cloudera Manager Server and Cloudera Manager agent on all hosts. For more information, see ClouderaManager Agent.
6. Install Cloudera Manager User licence. For more information, see Installation Wizard. (Upload the license file and
exit the cluster setup by clicking the Cloudera Manager icon )
Caution:
• Do not set up a cluster using the Wizard (Step 7) .• Do not proceed to Welcome (Add Cluster - Installation).
7. Add Hosts to a cluster. To add hosts to a cluster, see Adding Hosts to a cluster.
8. Add Cloudera Manager management service to the cluster. To add services to the cluster, see Select Services.
Note: Some of the services in Cloudera Manager management service may not come up due to portconflicts in HDP. The respective service needs to be stopped in the Ambari-manager HDP cluster toworkaround the issue.
9. Set up Kerberos. If you have a Kerberos cluster, then you must add the KDC details in theAdministration>Security>Kerberos Credentials>Setup KDC for Cloudera Manager page using ClouderaManager. For more information on Kerberos and Active Directory, see Enabling Kerberos authentication for CDP
Note:
• You must set the value of Maximum Renewable Life for Principals to 0 or to the value that wasprovided for Ambari KDC. If Maximum Renewable Life for Principal and Ambari KDC do notmatch, keytabs generation fails in Cloudera Manager.
• If you are not upgrading from CDH or HDP to CDP Private Cloud Base, you can follow theProduction Installation instructions to perform a fresh installation in your production environment.
10. The AM2CM tool migrates service principal names from the service user names in the HDP cluster. If theHDP cluster has default service usernames then Cloudera Manager is configured with default principal names.For example hdfs, yarn, and hive. If the HDP cluster contains user names like cstm-hdfs and cstm-hive then
102
In-Place Upgrade HDP 3 to CDP Private Cloud Base Transitioning to Cloudera Manager
Cloudera Manager is configured the principal names with same names. For more information, see Hadoop Users(user:group) and Kerberos Principals.
Related InformationConfiguring Repository
Installing Cloudera Manager
Installation Wizard
How to Configure Clusters to Use Kerberos for Authentication
Software download matrix
Installing JDBC DriverYou must install the required JDBC driver.
Download, extract, and copy the renamed JDBC driver, to /usr/share/java/. If the target directory does not yetexist, you must create the directory.
Installing the Postgres JDBC Driver
1. Install the PostgreSQL JDBC driver. If you would like to use the PostgreSQL JDBC driver version shipped withthe OS repositories, run the following command:
yum install postgresql-jdbc*
You can also download the JDBC driver from the official PostgreSQL JDBC Driver website – https://jdbc.postgresql.org/download.html.
2. Rename the Postgres JDBC driver .jar file to postgresql-connector-java.jarand copy it to the /usr/share/java directory. The following copy command can be used if the Postgres JDBC driver .jar fileis installed from the OS repositories:
cp /usr/share/java/postgresql-jdbc.jar /usr/share/java/postgresql-connector-java.jar
3. Confirm that the .jar file is in the Java share directory:
ls /usr/share/java/postgresql-connector-java.jar
4. Change the access mode of the .jar file to 644:
chmod 644 /usr/share/java/postgresql-connector-java.jar
Installing the MySQL JDBC Driver for MariaDB
The MariaDB JDBC driver is not supported. Follow the steps in this section to install and use the MySQL JDBCdriver instead.
Install the JDBC driver on the Cloudera Manager Server host, as well as any other hosts running services that requiredatabase access.
Note: If you already have the JDBC driver installed on the hosts that need it, you can skip this section.However, MySQL 5.6 requires a 5.1 driver version 5.1.26 or higher.
Cloudera recommends that you consolidate all roles that require databases on a limited number of hosts, and installthe driver on those hosts. Locating all such roles on the same hosts is recommended but not required. Make sure toinstall the JDBC driver on each host running roles that access the database.
Note: Cloudera recommends using only version 5.1 of the JDBC driver.
103
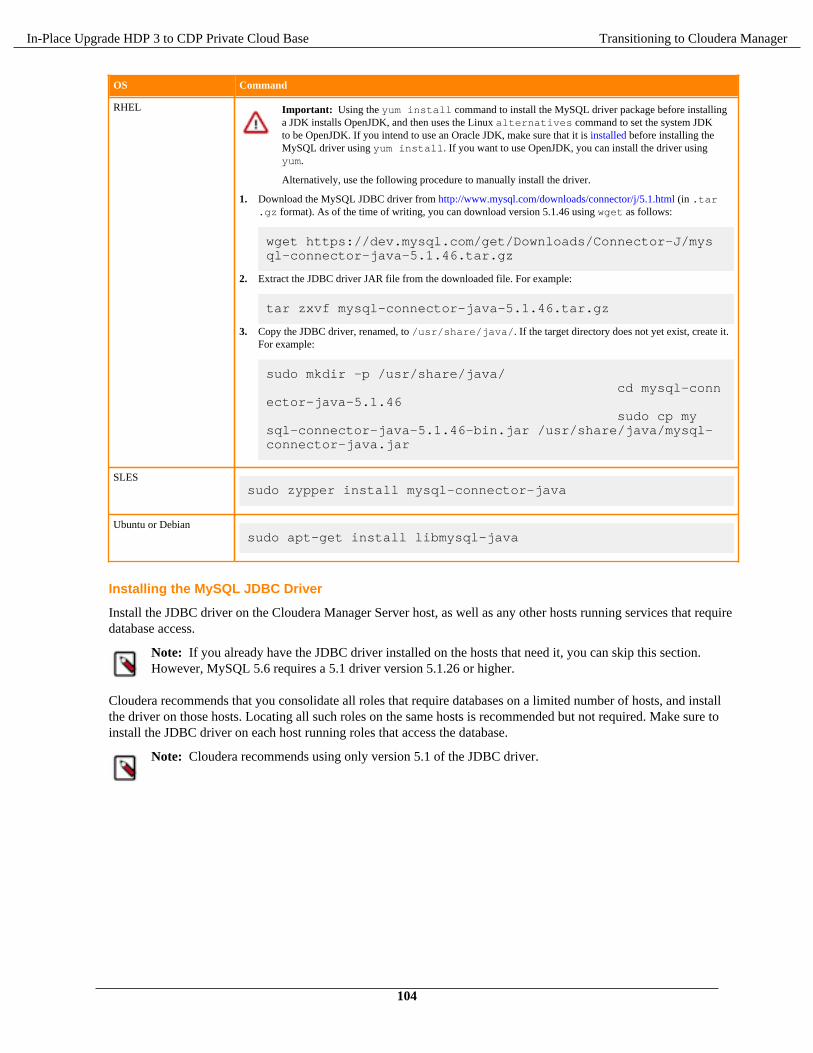
In-Place Upgrade HDP 3 to CDP Private Cloud Base Transitioning to Cloudera Manager
OS Command
RHEL Important: Using the yum install command to install the MySQL driver package before installinga JDK installs OpenJDK, and then uses the Linux alternatives command to set the system JDKto be OpenJDK. If you intend to use an Oracle JDK, make sure that it is installed before installing theMySQL driver using yum install. If you want to use OpenJDK, you can install the driver usingyum.
Alternatively, use the following procedure to manually install the driver.
1. Download the MySQL JDBC driver from http://www.mysql.com/downloads/connector/j/5.1.html (in .tar.gz format). As of the time of writing, you can download version 5.1.46 using wget as follows:
wget https://dev.mysql.com/get/Downloads/Connector-J/mysql-connector-java-5.1.46.tar.gz
2. Extract the JDBC driver JAR file from the downloaded file. For example:
tar zxvf mysql-connector-java-5.1.46.tar.gz
3. Copy the JDBC driver, renamed, to /usr/share/java/. If the target directory does not yet exist, create it.For example:
sudo mkdir -p /usr/share/java/ cd mysql-connector-java-5.1.46 sudo cp mysql-connector-java-5.1.46-bin.jar /usr/share/java/mysql-connector-java.jar
SLESsudo zypper install mysql-connector-java
Ubuntu or Debiansudo apt-get install libmysql-java
Installing the MySQL JDBC Driver
Install the JDBC driver on the Cloudera Manager Server host, as well as any other hosts running services that requiredatabase access.
Note: If you already have the JDBC driver installed on the hosts that need it, you can skip this section.However, MySQL 5.6 requires a 5.1 driver version 5.1.26 or higher.
Cloudera recommends that you consolidate all roles that require databases on a limited number of hosts, and installthe driver on those hosts. Locating all such roles on the same hosts is recommended but not required. Make sure toinstall the JDBC driver on each host running roles that access the database.
Note: Cloudera recommends using only version 5.1 of the JDBC driver.
104
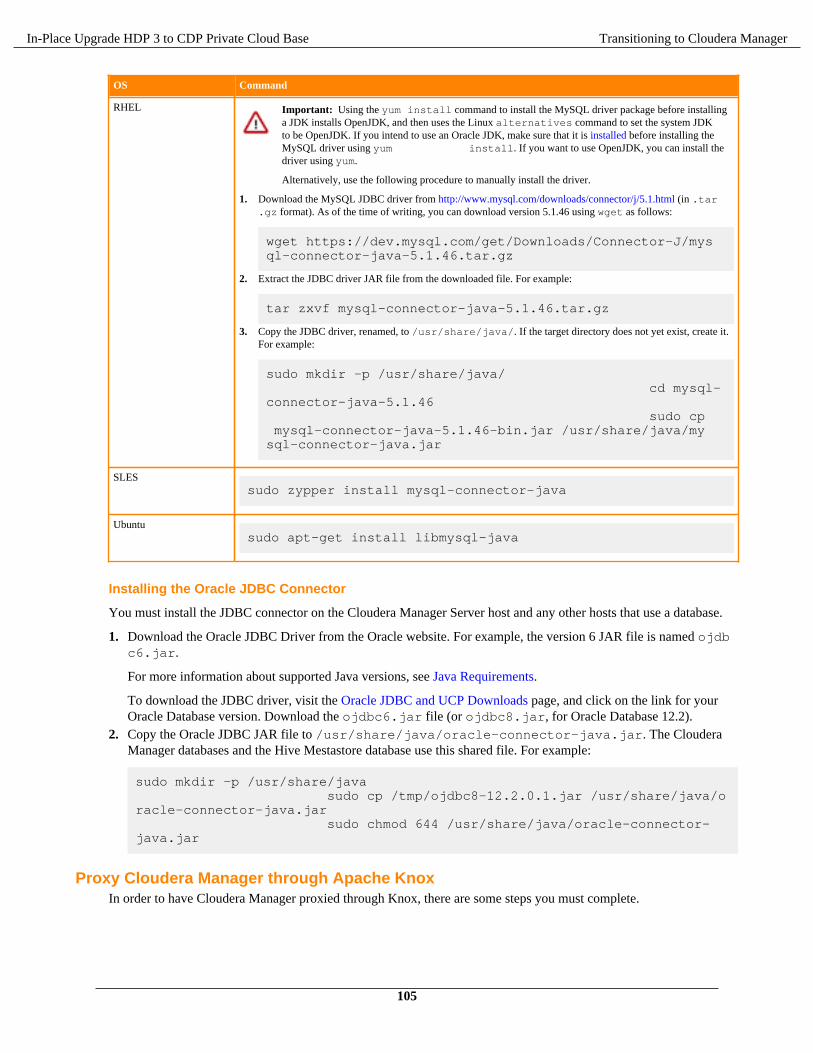
In-Place Upgrade HDP 3 to CDP Private Cloud Base Transitioning to Cloudera Manager
OS Command
RHEL Important: Using the yum install command to install the MySQL driver package before installinga JDK installs OpenJDK, and then uses the Linux alternatives command to set the system JDKto be OpenJDK. If you intend to use an Oracle JDK, make sure that it is installed before installing theMySQL driver using yum install. If you want to use OpenJDK, you can install thedriver using yum.
Alternatively, use the following procedure to manually install the driver.
1. Download the MySQL JDBC driver from http://www.mysql.com/downloads/connector/j/5.1.html (in .tar.gz format). As of the time of writing, you can download version 5.1.46 using wget as follows:
wget https://dev.mysql.com/get/Downloads/Connector-J/mysql-connector-java-5.1.46.tar.gz
2. Extract the JDBC driver JAR file from the downloaded file. For example:
tar zxvf mysql-connector-java-5.1.46.tar.gz
3. Copy the JDBC driver, renamed, to /usr/share/java/. If the target directory does not yet exist, create it.For example:
sudo mkdir -p /usr/share/java/ cd mysql-connector-java-5.1.46 sudo cp mysql-connector-java-5.1.46-bin.jar /usr/share/java/mysql-connector-java.jar
SLESsudo zypper install mysql-connector-java
Ubuntusudo apt-get install libmysql-java
Installing the Oracle JDBC Connector
You must install the JDBC connector on the Cloudera Manager Server host and any other hosts that use a database.
1. Download the Oracle JDBC Driver from the Oracle website. For example, the version 6 JAR file is named ojdbc6.jar.
For more information about supported Java versions, see Java Requirements.
To download the JDBC driver, visit the Oracle JDBC and UCP Downloads page, and click on the link for yourOracle Database version. Download the ojdbc6.jar file (or ojdbc8.jar, for Oracle Database 12.2).
2. Copy the Oracle JDBC JAR file to /usr/share/java/oracle-connector-java.jar. The ClouderaManager databases and the Hive Mestastore database use this shared file. For example:
sudo mkdir -p /usr/share/java sudo cp /tmp/ojdbc8-12.2.0.1.jar /usr/share/java/oracle-connector-java.jar sudo chmod 644 /usr/share/java/oracle-connector-java.jar
Proxy Cloudera Manager through Apache KnoxIn order to have Cloudera Manager proxied through Knox, there are some steps you must complete.
105
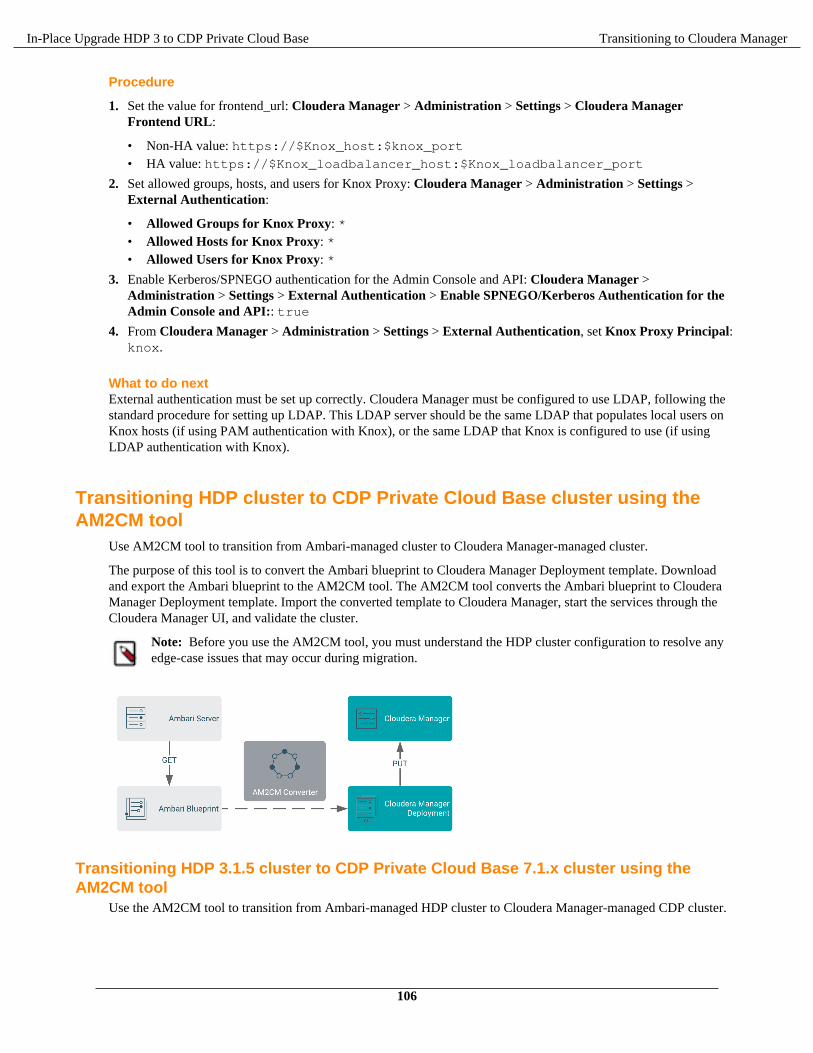
In-Place Upgrade HDP 3 to CDP Private Cloud Base Transitioning to Cloudera Manager
Procedure
1. Set the value for frontend_url: Cloudera Manager > Administration > Settings > Cloudera ManagerFrontend URL:
• Non-HA value: https://$Knox_host:$knox_port• HA value: https://$Knox_loadbalancer_host:$Knox_loadbalancer_port
2. Set allowed groups, hosts, and users for Knox Proxy: Cloudera Manager > Administration > Settings >External Authentication:
• Allowed Groups for Knox Proxy: *• Allowed Hosts for Knox Proxy: *• Allowed Users for Knox Proxy: *
3. Enable Kerberos/SPNEGO authentication for the Admin Console and API: Cloudera Manager >Administration > Settings > External Authentication > Enable SPNEGO/Kerberos Authentication for theAdmin Console and API:: true
4. From Cloudera Manager > Administration > Settings > External Authentication, set Knox Proxy Principal:knox.
What to do nextExternal authentication must be set up correctly. Cloudera Manager must be configured to use LDAP, following thestandard procedure for setting up LDAP. This LDAP server should be the same LDAP that populates local users onKnox hosts (if using PAM authentication with Knox), or the same LDAP that Knox is configured to use (if usingLDAP authentication with Knox).
Transitioning HDP cluster to CDP Private Cloud Base cluster using theAM2CM tool
Use AM2CM tool to transition from Ambari-managed cluster to Cloudera Manager-managed cluster.
The purpose of this tool is to convert the Ambari blueprint to Cloudera Manager Deployment template. Downloadand export the Ambari blueprint to the AM2CM tool. The AM2CM tool converts the Ambari blueprint to ClouderaManager Deployment template. Import the converted template to Cloudera Manager, start the services through theCloudera Manager UI, and validate the cluster.
Note: Before you use the AM2CM tool, you must understand the HDP cluster configuration to resolve anyedge-case issues that may occur during migration.
Transitioning HDP 3.1.5 cluster to CDP Private Cloud Base 7.1.x cluster using theAM2CM tool
Use the AM2CM tool to transition from Ambari-managed HDP cluster to Cloudera Manager-managed CDP cluster.
106
In-Place Upgrade HDP 3 to CDP Private Cloud Base Transitioning to Cloudera Manager
Note: Ensure that you review the supported cluster versions with the AM2CM tool for compatibilitypurposes. For example, the AM2CM 1.2.0.0-1 tool supports 7.1.6 migration and the AM2CM 2.0.0.0-x toolsupports 7.1.7 migration.
Related InformationConfigure a Repository for Cloudera Manager
Transitioning the cluster from HDP 3.1.5 to CDP Private Cloud Base 7.1.7Transition the HDP cluster managed by Ambari to CDP Private Cloud Base cluster managed by Cloudera Managerusing the AM2CM tool.
Before you beginTake a copy of your blueprint before transitioning your cluster. It helps you to understand the changes and differencesbetween HDP 3.1.5 versus HDP 7.1.x versus Cloudera Manager.
Note:
If you have more than 200 nodes, you can choose to pre-deploy the CDP parcels. You can pre-deploy theCDP parcels before Cloudera Manager starts managing the CDP Private Cloud Base cluster.
The pre-deployment of parcels can help you in reducing downtime. The downtime is the difference betweenthe shutdown of Ambari-managed HDP Intermediate bits and the start of Cloudera Manager-managed CDPPrivate Cloud Base.
For more information, see the community article on How to pre-distribute CDP 7 parcels before migrationfrom HDP 2.6.5.
About this taskPerform the following steps:
Procedure
1. Login to the Ambari server.
2. In the new tab, enter the URL: http://<ambari_ip>:<port>/api/v1/clusters/[***cluster-name***]?format=blueprint_with_hosts
Note: If there are browser issues, use this API call on the CLI:
curl -u username:password http://<ambari_ip>:<port>/api/v1/clusters/[***cluster-name***]?format=blueprint_with_hosts
3. Download the Ambari blueprint and save it in JSON format.
4. Download the AM2CM tool from AM2CM 2.0.0.0.
To find all the download links in a centralised location, see Software download matrix.
5. Extract the am2cm-2.0.0.0-32.tar file to am2cm-2.0.0.0-32 folder.
6. Set the JAVA_HOME variable. For example, $ export JAVA_HOME= [path to your installed JDK]
7. The kafka-broker-ids.ini file generated must be manually copied to $am2cm-2.0.0.0-32/conf/ path beforerunning the tool. For more information, see Extract Kafka Broker ID.
107
In-Place Upgrade HDP 3 to CDP Private Cloud Base Transitioning to Cloudera Manager
8. Navigate to the am2cm-2.0.0.0-32/conf/user-settings.ini file and update Parcels, Cluster name,passwords, and JDBC URL information.
Note:
• When you are configuring the password fields in the user-setting.ini file, you must not enclose thepassword with double-quotes. You must provide correct passwords. If you use double quotes, then thiscauses an issue when you import the template into Cloudera Manager.
• For more information on resetting the Ranger Web UI admin's password, see the Knowledge Basearticle.
# Cluster detailscluster.name=<Cluster-Name> cluster.displayname=<Cluster-Name>
# Hive JDBC settingsSERVICE_HIVE_hive_metastore_database_password=<DB-Password>SERVICE_HIVE_hive_jdbc_url_override=<JDBC_URL>
# Oozie JDBC settingsSERVICE_OOZIE_oozie_database_password=<DB-Password>SERVICE_OOZIE_oozie_service_JPAService_jdbc_url=<JDBC_URL>
# Ranger JDBC settingsSERVICE_RANGER_ranger_database_password=<Ranger-DB-Password>SERVICE_RANGER_rangeradmin_user_password=<Rangeradmin-user-Password>SERVICE_RANGER_rangerusersync_user_password=<Rangerusersync-user-Password>SERVICE_RANGER_rangertagsync_user_password=<Rangertagsync-user-Password>SERVICE_RANGER_rangerkeyadmin_user_password=<Rangerkeyadmin-user-Password>SERVICE_RANGER_KMS_ranger_kms_master_key_password=<Rangerksmmaster-key-Password>SERVICE_RANGER_KMS_ranger_kms_database_password=<Rangerkms-database-Password>
#Knox SettingsSERVICE_KNOX_gateway_master_secret=admin
Note: If you are configuring the Oracle JDBC URL in the user-settings.ini file, then @ sign must beescaped with backward slashes. For example, if you are using jdbc:oracle:thin:@//xxxx:1521/HADOOPDthen you must change it to jdbc:oracle:thin:\\@//xxxxx:1521/HADOOPD.
9. Generate the Cloudera Manager Deployment template.
# cd am2cm-2.0.0.0-32# chmod +x ./am2cm.sh# ./am2cm.sh -bp PATH/TO/Amb_blueprint.json -dt /PATH/TO/cm_deployment_template.json -sv hdp3
Note: This generates a cm_deployment_template.json file in the am2cm-2.0.0.0-32 folder.
10. Check for errors in the console or in the am2cm-2.0.0.0-32/cm_migration.log logs.
11. Stop HDP services from Ambari.
12. In Ambari UI, disable Auto Start Settings. For more information, see Disable service auto start settings fromAmbari Web
108
In-Place Upgrade HDP 3 to CDP Private Cloud Base Transitioning to Cloudera Manager
13. Import the template into Cloudera Manager using the Cloudera Manager API through browser or CLI.
• Using browser: If you are using browser, you must authenticate to the Swagger UI using the ClouderaManager full admin credentials.
a. Copy the URL in the browser and enter. http://<CM_HOST>:7180/static/apidocs/ui/index.html#!/ClouderaManagerResource/updateDeployment2
b. Navigate to Cloudera ManagerResourcec. Copy the template in body.d. Click Tryit out!
• Using CLI:
curl --user admin:admin -k -X PUT -H "Content-Type: application/json" -d @cm_deployment_template.json 'http://<CM_HOST>:7180/api/v41/cm/deployment?deleteCurrentDeployment=false'
14. In Cloudera Manager Parcel screen, download Cloudera Runtime and distribute the parcel. Cloudera Managerdeploys the parcel to the cluster hosts. The default is 10 concurrent hosts. You can adjust this to a maximum of50 by increasing the setting in the Other Parcel Configurations screen, but this must be configured before thetemplate is applied.
Note:
a. After the parcels are distributed, the Cloudera Agent unpacks them. Ensure that you have sufficientfree space on /opt/cloudera to hold both the parcel and its unpacked copy.
b. By default, the AM2CM tool migrates the Ambari configuration groups as host overrides in ClouderaManager. To migrate as Role Groups, you must enable the cm.rolegroups.enable=true parameter.This is an experimental feature and you must validate this in your lower environments before usingthis in production environment. The migrated Role groups will not have the same configuration groupnames defined in Ambari. For example, hdfs-DATANODE-host_group_2. You can rename this inClouderaManager after importing the template.
109
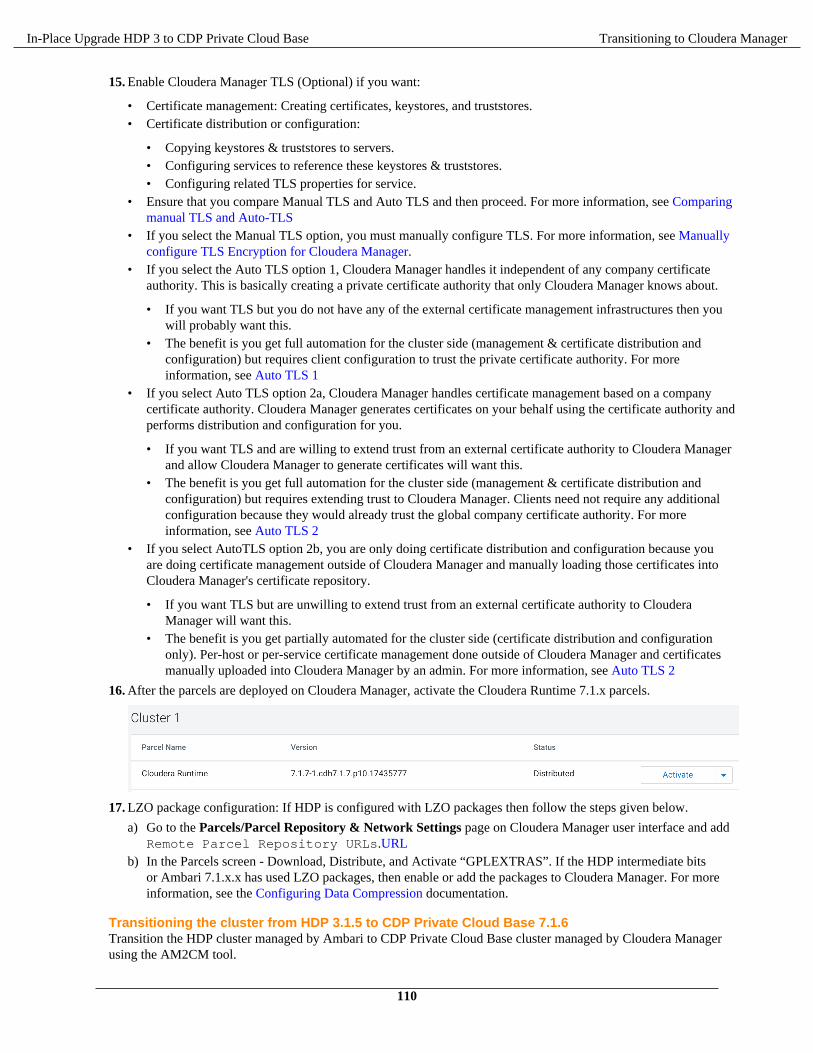
In-Place Upgrade HDP 3 to CDP Private Cloud Base Transitioning to Cloudera Manager
15. Enable Cloudera Manager TLS (Optional) if you want:
• Certificate management: Creating certificates, keystores, and truststores.• Certificate distribution or configuration:
• Copying keystores & truststores to servers.• Configuring services to reference these keystores & truststores.• Configuring related TLS properties for service.
• Ensure that you compare Manual TLS and Auto TLS and then proceed. For more information, see Comparingmanual TLS and Auto-TLS
• If you select the Manual TLS option, you must manually configure TLS. For more information, see Manuallyconfigure TLS Encryption for Cloudera Manager.
• If you select the Auto TLS option 1, Cloudera Manager handles it independent of any company certificateauthority. This is basically creating a private certificate authority that only Cloudera Manager knows about.
• If you want TLS but you do not have any of the external certificate management infrastructures then youwill probably want this.
• The benefit is you get full automation for the cluster side (management & certificate distribution andconfiguration) but requires client configuration to trust the private certificate authority. For moreinformation, see Auto TLS 1
• If you select Auto TLS option 2a, Cloudera Manager handles certificate management based on a companycertificate authority. Cloudera Manager generates certificates on your behalf using the certificate authority andperforms distribution and configuration for you.
• If you want TLS and are willing to extend trust from an external certificate authority to Cloudera Managerand allow Cloudera Manager to generate certificates will want this.
• The benefit is you get full automation for the cluster side (management & certificate distribution andconfiguration) but requires extending trust to Cloudera Manager. Clients need not require any additionalconfiguration because they would already trust the global company certificate authority. For moreinformation, see Auto TLS 2
• If you select AutoTLS option 2b, you are only doing certificate distribution and configuration because youare doing certificate management outside of Cloudera Manager and manually loading those certificates intoCloudera Manager's certificate repository.
• If you want TLS but are unwilling to extend trust from an external certificate authority to ClouderaManager will want this.
• The benefit is you get partially automated for the cluster side (certificate distribution and configurationonly). Per-host or per-service certificate management done outside of Cloudera Manager and certificatesmanually uploaded into Cloudera Manager by an admin. For more information, see Auto TLS 2
16. After the parcels are deployed on Cloudera Manager, activate the Cloudera Runtime 7.1.x parcels.
17. LZO package configuration: If HDP is configured with LZO packages then follow the steps given below.
a) Go to the Parcels/Parcel Repository & Network Settings page on Cloudera Manager user interface and addRemote Parcel Repository URLs.URL
b) In the Parcels screen - Download, Distribute, and Activate “GPLEXTRAS”. If the HDP intermediate bitsor Ambari 7.1.x.x has used LZO packages, then enable or add the packages to Cloudera Manager. For moreinformation, see the Configuring Data Compression documentation.
Transitioning the cluster from HDP 3.1.5 to CDP Private Cloud Base 7.1.6Transition the HDP cluster managed by Ambari to CDP Private Cloud Base cluster managed by Cloudera Managerusing the AM2CM tool.
110
In-Place Upgrade HDP 3 to CDP Private Cloud Base Transitioning to Cloudera Manager
Before you beginTake a copy of your blueprint before transitioning your cluster. It helps you to understand the changes and differencesbetween HDP 3.1.5 versus HDP 7.1.x versus Cloudera Manager.
Note:
If you have more than 200 nodes, you can choose to pre-deploy the CDP parcels. You can pre-deploy theCDP parcels before Cloudera Manager starts managing the CDP Private Cloud Base cluster.
The pre-deployment of parcels can help you in reducing downtime. The downtime is the difference betweenthe shutdown of Ambari-managed HDP Intermediate bits and the start of Cloudera Manager-managed CDPPrivate Cloud Base.
For more information, see the community article on How to pre-distribute CDP 7 parcels before migrationfrom HDP 2.6.5.
About this taskPerform the following steps:
Procedure
1. Login to the Ambari server.
2. In the new tab, enter the URL: http://<ambari_ip>:<port>/api/v1/clusters/[***cluster-name***]?format=blueprint_with_hosts
Note: If there are browser issues, use this API call on the CLI:
curl -u username:password http://<ambari_ip>:<port>/api/v1/clusters/[***cluster-name***]?format=blueprint_with_hosts
3. Download the Ambari blueprint and save it in JSON format.
4. Download the AM2CM tool from https://archive.cloudera.com/am2cm/1.x/am2cm-1.2.0.0-45.tar.gz.
To find all the download links in a centralised location, see Software download matrix.
5. Extract the am2cm-1.2.0.0-45.tar file to am2cm-1.2.0.0-45 folder.
6. Set the JAVA_HOME variable. For example, $ export JAVA_HOME= [path to your installed JDK]
7. The kafka-broker-ids.ini file generated must be manually copied to $am2cm-1.2.0.0-xx/conf/ path beforerunning the tool. For more information, see Extract Kafka Broker ID.
8. Navigate to the am2cm-1.2.0.0-45/conf/user-settings.ini file and update Parcels, Cluster name,passwords, and JDBC URL information.
Note:
• When you are configuring the password fields in the user-setting.ini file, you must not enclose thepassword with double-quotes. You must provide correct passwords. If you use double quotes, then thiscauses an issue when you import the template into Cloudera Manager.
• For more information on resetting the Ranger Web UI admin's password, see the Knowledge Basearticle.
# Cluster details cluster.name=<Cluster-Name> cluster.displayname=<Cluster-Name> # Hive JDBC settingsSERVICE_HIVE_hive_metastore_database_password=<DB-Password>SERVICE_HIVE_hive_jdbc_url_override=<JDBC_URL> # Oozie JDBC settingsSERVICE_OOZIE_oozie_database_password=<DB-Password>
111
In-Place Upgrade HDP 3 to CDP Private Cloud Base Transitioning to Cloudera Manager
SERVICE_OOZIE_oozie_service_JPAService_jdbc_url=<JDBC_URL> # Ranger JDBC settingsSERVICE_RANGER_ranger_database_password=<Ranger-DB-Password>SERVICE_RANGER_rangeradmin_user_password=<Rangeradmin-user-Password>SERVICE_RANGER_rangerusersync_user_password=<Rangerusersync-user-Password>SERVICE_RANGER_rangertagsync_user_password=<Rangertagsync-user-Password>SERVICE_RANGER_rangerkeyadmin_user_password=<Rangerkeyadmin-user-Password>SERVICE_RANGER_KMS_ranger_kms_master_key_password=<Rangerksmmaster-key-Password>SERVICE_RANGER_KMS_ranger_kms_database_password=<Rangerkms-database-Password> #Knox SettingsSERVICE_KNOX_gateway_master_secret=admin
Note: If you are configuring the Oracle JDBC URL in the user-settings.ini file, then @ sign must beescaped with backward slashes. For example, if you are using jdbc:oracle:thin:@//xxxx:1521/HADOOPDthen you must change it to jdbc:oracle:thin:\\@//xxxxx:1521/HADOOPD.
9. Generate the Cloudera Manager Deployment template.
# cd am2cm-1.2.0.0-45# chmod +x ./am2cm.sh# ./am2cm.sh -bp PATH/TO/Amb_blueprint.json -dt /PATH/TO/cm_deployment_template.json
Note: This generates a cm_deployment_template.json file in the am2cm-1.2.0.0-45 folder.
10. Check for errors in the console or in the am2cm-1.2.0.0-45/cm_migration.log logs.
11. Stop HDP services from Ambari.
12. In Ambari UI, disable Auto Start Settings. For more information, see Disable service auto start settings fromAmbari Web
13. Import the template into Cloudera Manager using the Cloudera Manager API through browser or CLI.
• Using browser: If you are using browser, you must authenticate to the Swagger UI using the ClouderaManager full admin credentials.
a. Copy the URL in the browser and enter. http://<CM_HOST>:7180/static/apidocs/ui/index.html#!/ClouderaManagerResource/updateDeployment2
b. Navigate to Cloudera ManagerResourcec. Copy the template in body.d. Click Tryit out!
• Using CLI:
curl --user admin:admin -k -X PUT -H "Content-Type: application/json" -d @cm_deployment_template.json 'http://<CM_HOST>:7180/api/v41/cm/deployment?deleteCurrentDeployment=false'
14. In Cloudera Manager Parcel screen, download Cloudera Runtime and distribute the parcel. Cloudera Managerdeploys the parcel to the cluster hosts. The default is 10 concurrent hosts. You can adjust this to a maximum of
112
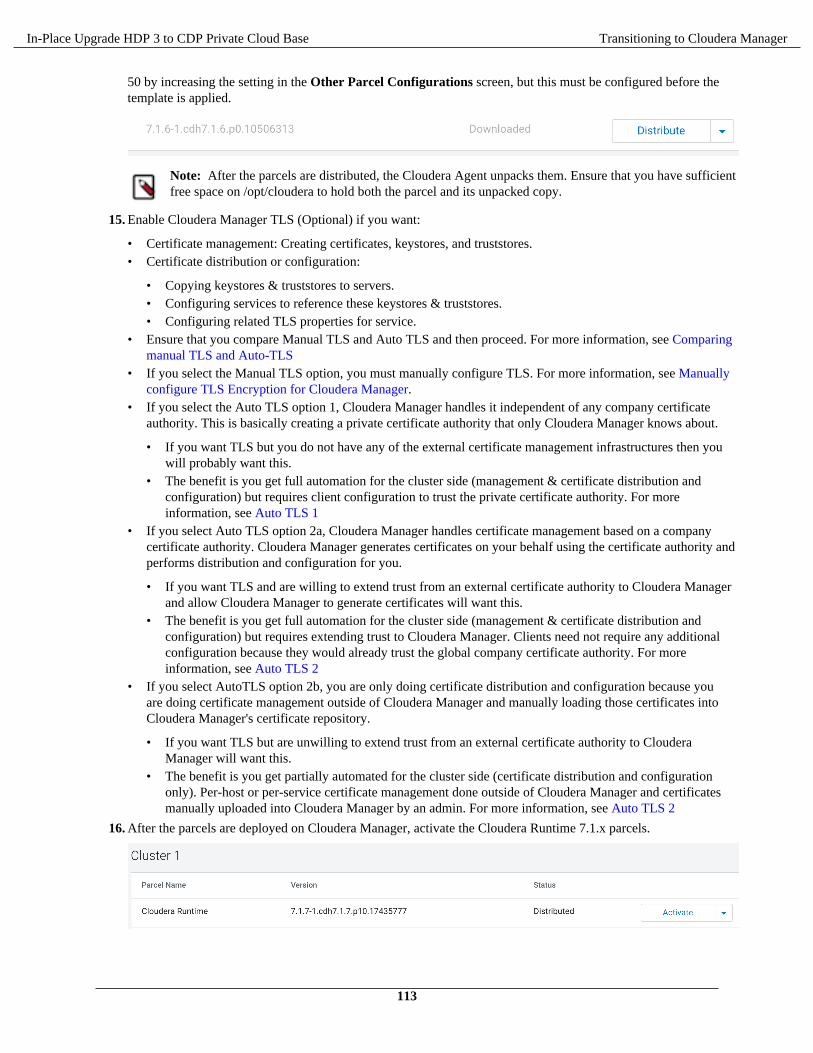
In-Place Upgrade HDP 3 to CDP Private Cloud Base Transitioning to Cloudera Manager
50 by increasing the setting in the Other Parcel Configurations screen, but this must be configured before thetemplate is applied.
Note: After the parcels are distributed, the Cloudera Agent unpacks them. Ensure that you have sufficientfree space on /opt/cloudera to hold both the parcel and its unpacked copy.
15. Enable Cloudera Manager TLS (Optional) if you want:
• Certificate management: Creating certificates, keystores, and truststores.• Certificate distribution or configuration:
• Copying keystores & truststores to servers.• Configuring services to reference these keystores & truststores.• Configuring related TLS properties for service.
• Ensure that you compare Manual TLS and Auto TLS and then proceed. For more information, see Comparingmanual TLS and Auto-TLS
• If you select the Manual TLS option, you must manually configure TLS. For more information, see Manuallyconfigure TLS Encryption for Cloudera Manager.
• If you select the Auto TLS option 1, Cloudera Manager handles it independent of any company certificateauthority. This is basically creating a private certificate authority that only Cloudera Manager knows about.
• If you want TLS but you do not have any of the external certificate management infrastructures then youwill probably want this.
• The benefit is you get full automation for the cluster side (management & certificate distribution andconfiguration) but requires client configuration to trust the private certificate authority. For moreinformation, see Auto TLS 1
• If you select Auto TLS option 2a, Cloudera Manager handles certificate management based on a companycertificate authority. Cloudera Manager generates certificates on your behalf using the certificate authority andperforms distribution and configuration for you.
• If you want TLS and are willing to extend trust from an external certificate authority to Cloudera Managerand allow Cloudera Manager to generate certificates will want this.
• The benefit is you get full automation for the cluster side (management & certificate distribution andconfiguration) but requires extending trust to Cloudera Manager. Clients need not require any additionalconfiguration because they would already trust the global company certificate authority. For moreinformation, see Auto TLS 2
• If you select AutoTLS option 2b, you are only doing certificate distribution and configuration because youare doing certificate management outside of Cloudera Manager and manually loading those certificates intoCloudera Manager's certificate repository.
• If you want TLS but are unwilling to extend trust from an external certificate authority to ClouderaManager will want this.
• The benefit is you get partially automated for the cluster side (certificate distribution and configurationonly). Per-host or per-service certificate management done outside of Cloudera Manager and certificatesmanually uploaded into Cloudera Manager by an admin. For more information, see Auto TLS 2
16. After the parcels are deployed on Cloudera Manager, activate the Cloudera Runtime 7.1.x parcels.
113
In-Place Upgrade HDP 3 to CDP Private Cloud Base Transitioning to Cloudera Manager
17. LZO package configuration: If HDP is configured with LZO packages then follow the steps given below.
a) Go to the Parcels/Parcel Repository & Network Settings page on Cloudera Manager user interface and addRemote Parcel Repository URLs.URL
b) In the Parcels screen - Download, Distribute, and Activate “GPLEXTRAS”. If the HDP intermediate bitsor Ambari 7.1.x.x has used LZO packages, then enable or add the packages to Cloudera Manager. For moreinformation, see the Configuring Data Compression documentation.
Post transition stepsYou must complete the post transition steps to start the services in CDP Private Cloud Base.
The AM2CM tool transitions the service configurations. However, you must configure and perform additional stepsto start the services in CDP Private Cloud Base.
Note:
• Review configuration warnings for all the services.• Review JVM parameters and configurations for all services as some of the JVM parameters and
configurations are not transitioned. Most of the heap configurations are transitioned.• Review the Log4j configurations. Log4j configurations such as logs dir, size, and backup index are
transitioned to Cloudera Manager.• Spark Atlas Connector (SAC) is disabled by default. If you enable SAC on HDP, the Spark entities are
created using the Spark model (spark_db, spark_table). In CDP Private Cloud Base, SAC uses HMS andthe entities are created using the Hive model (hive_db, hive_table, and hive_column). Hence Spark modelentities in HDP are not in sync with the Hive model entities in CDP Private Cloud Base. In CDP PrivateCloud Base, the lineage stitching and metadata update is not available on the Spark entities created inHDP.
• In the HDP 3.1.5.x cluster, Hive hook and HBase hook are enabled by default. SAC (Spark AtlasConnector or Spark Hook) is disabled by default. Note that, in HDP, SAC is in a Technical Preview state.In CDP Private Cloud Base, Hive Hook and HBase hook are enabled by default, In the AM2CM upgradeflow, if the Hive Hook and HBase hook are enabled in the HDP-3.1.5.x cluster, post-upgrade, it is enabledin CDP Private Cloud Base. HMS Hook functionality did not exist in HDP 3.1.5.x, hence it must bemanually enabled in CDP Private Cloud Base. Similarly SAC in CDP Private Cloud Base must also bemanually enabled.
• There are no manual steps required to enable SSO for the services on CDP. SSO is available by default onCDP.
Note: If the cluster is kerberized, you can generate keytabs in Cloudera Manager under Security section #Kerberos Credentials # Generate Missing Credentials.
Enable Auto Start settingEnsure that you enable Auto Start Settings in Cloudera Manager for all the components.
About this taskIf you enable Auto Start Settings in Ambari, the Ambari services are configured to start automatically on systemboot. However, post migration to Cloudera Manager, this Auto Start Settings field is enabled only for Zookeeper-Server. For other components, enable this setting manually in Cloudera Manager.
Procedure
1. In the Search box, search for Automatically Restart Process.Results are displayed for all the components.
2. Select the component from the results displayed.
3. Click the Automatically Restart Process checkbox.
114
In-Place Upgrade HDP 3 to CDP Private Cloud Base Transitioning to Cloudera Manager
ZooKeeperYou must complete the following steps to start the ZooKeeper service.
Procedure
1. Remove or move the myid file from the ZooKeeper server hosts. The path is ${dataDir}/myid. Forexample,
# mv /hadoop/zookeeper/myid /hadoop/zookeeper/myid.bak
2. Start ZooKeeper service from Cloudera Manager
Delete ZNodesRemove the ZNode for HDFS, YARN, Hive, HBase, and Oozie
About this taskIf the cluster is configured for Namenode HA, the Failover controllers cannot determine the Active Namenode afterthe migration. This is because the naming conventions used to identify Namenodes for the HA service are differentfor Ambari and Cloudera Manager. You must format the ZooKeeper ZNode for the Failover controller to continuefurther.
If the cluster is configured for Yarn HA, the Resource Managers cannot elect an Active Resource Manager after themigration. You must clear the previous Znode from ZooKeeper so that YARN replaces it.
You must format the ZooKeeper Znode for the failover controller to continue further.
Procedure
1. Start ZooKeeper client CLI session from a master node. (Assuming that the skipACL is set to Yes to avoidauthentication issues). zookeeper-client -server <zk_hostname>
2. Remove the HDFS HA Failover controller Znode
deleteall /hadoop-ha
3. Remove the YARN ZNode
deleteall /yarn-leader-election
4. Remove the Hive ZNode
deleteall /hive
deleteall /hiveserver2
5. Remove the HBase ZNode
deleteall /hbase-secure
6. Remove the Oozie ZNode
deleteall /oozie
RangerYou must change the port number for Ranger port numbers on Cloudera Manager.
After transitioning the cluster, the ranger.service.https.port and ranger.service.http.port configurations must havedifferent port numbers in Cloudera Manager. Otherwise, Cloudera Manager displays a warning.
Start the Ranger server.
Ranger Service connection with Oracle database
If you have configured Ranger with Oracle Database as its backend, you must add the property conf/ranger-admin-site.xml with the key and value provided below for the Ranger Admin Advanced Configuration Snippet (SafetyValve) in Cloudera Manager: Key: ranger.jpa.jdbc.preferredtestquery value: select 1 from dual;
115

In-Place Upgrade HDP 3 to CDP Private Cloud Base Transitioning to Cloudera Manager
Ranger KMSYou must add the key and value to Ranger KMS property. This procedure is not required if you are on ClouderaManager 7.4.4 and above and CDP 7.1.5 and above.
You must set RANGER_KMS_SERVER_role_env_safety_valve setting to JAVA_OPTS in Cloudera Manager. Thisis needed only for non default zookeeper principal.
1. Log in to Cloudera Manager UI2. Navigate to Clusters3. Select the Ranger KMS service4. Go to Configurations5. Search for RANGER_KMS_SERVER_role_env_safety_valve and add key JAVA_OPTS and value -Dzookee
per.sasl.client.username=<zookeeper custom principal name set on the cluster> For example, if the principal is set to custom principal value zk-test then, -Dzookeeper.sasl.client.username=zk-test
6. Start Ranger KMS service
Add Ranger policies for components on the CDP ClusterEnable the default ranger policies on the CDP Private Cloud Base cluster.
Before you beginThe default Ranger policies created on the CDP cluster under cm_<servicename> are effective after the policiesare moved under <clustername>_<servicename>. For example, in the case of knox, the default ranger policyfor Knox in CDP is CDP Proxy UI and API that is created under the service name cm_knox which can be movedunder cl1_knox. The <clustername> is the name registered under ambari.
About this taskTo migrate policies from cm_<servicename> to <clustername>_<servicename>, perform the following
Procedure
1. Log in to Cloudera Manager UI
2. Navigate to Clusters
3. Select the Ranger service
4. Click Web UI. This redirects to the Ranger service page.
5. On the Ranger Admin UI, click Service Manager
6. Add the policies available in the table
Table 2:
Service Type Policy Name ExistingGroups
Existing Users ExistingPermissions
Add newdefault usersto the existingpolicies
Add newdefault groups
Add newPermissions
Kafka
* all-topic kafka cruisecontrol,streamsmsgmgr,streamsrepmgr
N.A
rangerlookup N.A
* all - cluster kafka cruisecontrol,streamsmsgmgr,streamsrepmgr
N.A
rangerlookup N.A
116
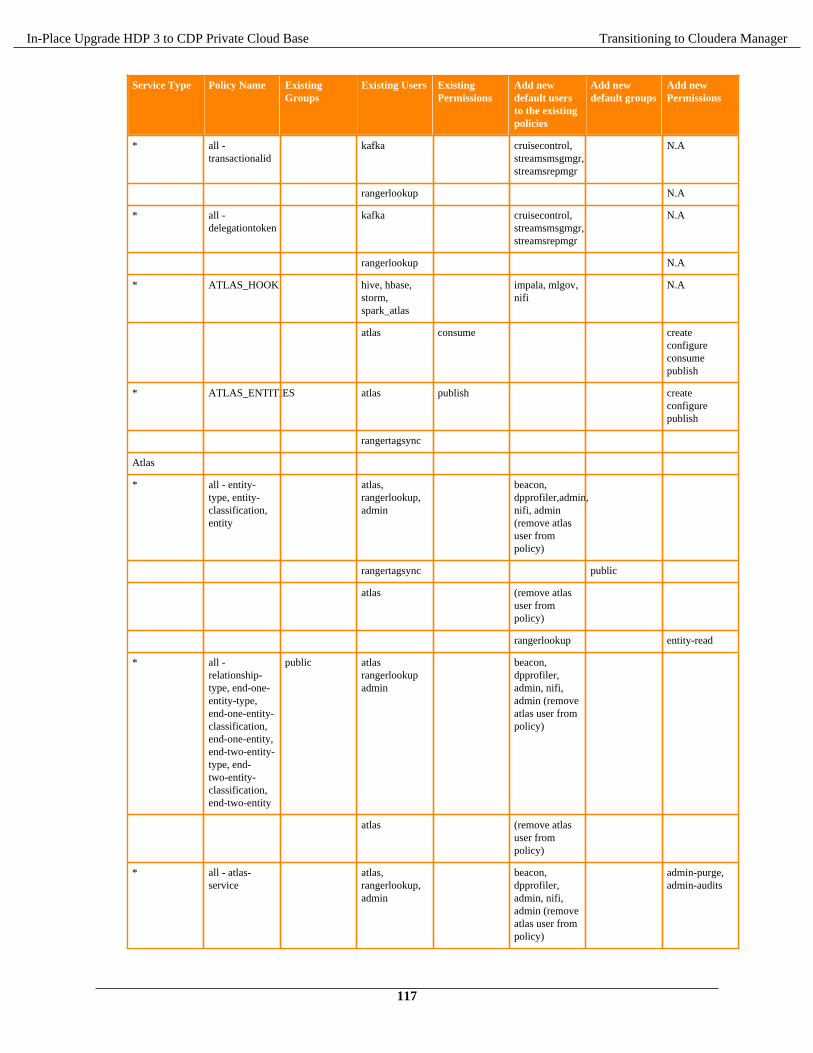
In-Place Upgrade HDP 3 to CDP Private Cloud Base Transitioning to Cloudera Manager
Service Type Policy Name ExistingGroups
Existing Users ExistingPermissions
Add newdefault usersto the existingpolicies
Add newdefault groups
Add newPermissions
* all -transactionalid
kafka cruisecontrol,streamsmsgmgr,streamsrepmgr
N.A
rangerlookup N.A
* all -delegationtoken
kafka cruisecontrol,streamsmsgmgr,streamsrepmgr
N.A
rangerlookup N.A
* ATLAS_HOOK hive, hbase,storm,spark_atlas
impala, mlgov,nifi
N.A
atlas consume createconfigureconsumepublish
* ATLAS_ENTITIES atlas publish createconfigurepublish
rangertagsync
Atlas
* all - entity-type, entity-classification,entity
atlas,rangerlookup,admin
beacon,dpprofiler,admin,nifi, admin(remove atlasuser frompolicy)
rangertagsync public
atlas (remove atlasuser frompolicy)
rangerlookup entity-read
* all -relationship-type, end-one-entity-type,end-one-entity-classification,end-one-entity,end-two-entity-type, end-two-entity-classification,end-two-entity
public atlasrangerlookupadmin
beacon,dpprofiler,admin, nifi,admin (removeatlas user frompolicy)
atlas (remove atlasuser frompolicy)
* all - atlas-service
atlas,rangerlookup,admin
beacon,dpprofiler,admin, nifi,admin (removeatlas user frompolicy)
admin-purge,admin-audits
117
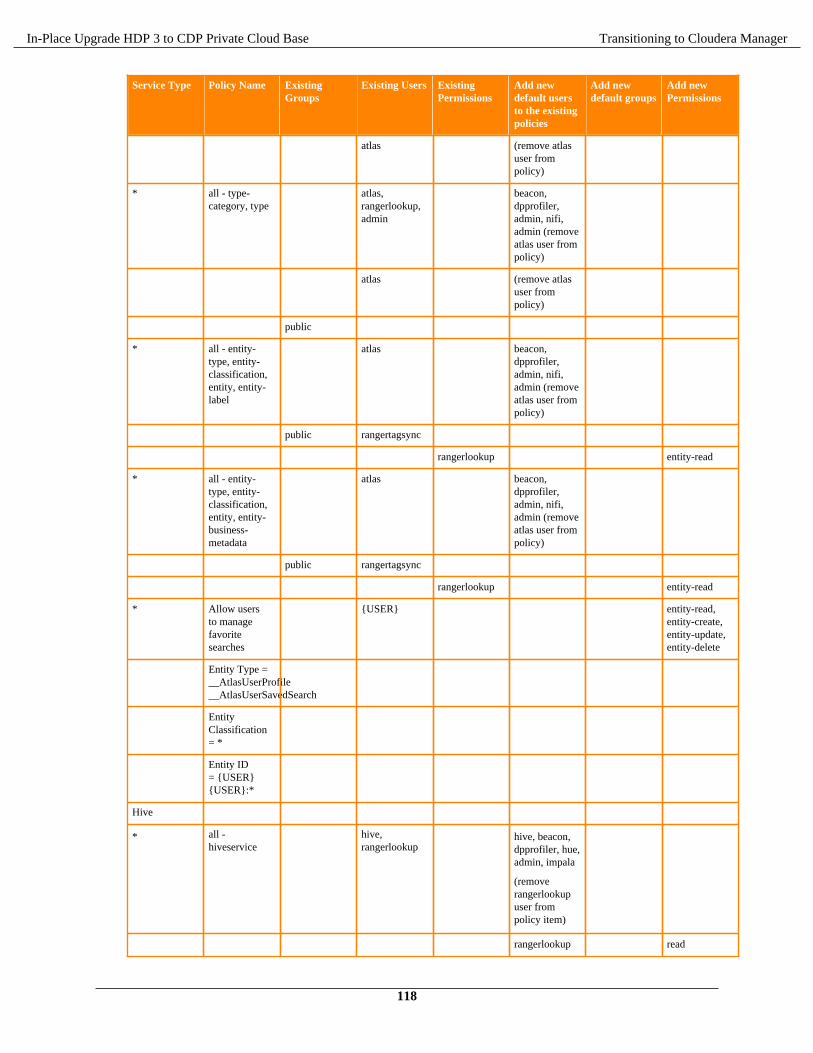
In-Place Upgrade HDP 3 to CDP Private Cloud Base Transitioning to Cloudera Manager
Service Type Policy Name ExistingGroups
Existing Users ExistingPermissions
Add newdefault usersto the existingpolicies
Add newdefault groups
Add newPermissions
atlas (remove atlasuser frompolicy)
* all - type-category, type
atlas,rangerlookup,admin
beacon,dpprofiler,admin, nifi,admin (removeatlas user frompolicy)
atlas (remove atlasuser frompolicy)
public
* all - entity-type, entity-classification,entity, entity-label
atlas beacon,dpprofiler,admin, nifi,admin (removeatlas user frompolicy)
public rangertagsync
rangerlookup entity-read
* all - entity-type, entity-classification,entity, entity-business-metadata
atlas beacon,dpprofiler,admin, nifi,admin (removeatlas user frompolicy)
public rangertagsync
rangerlookup entity-read
* Allow usersto managefavoritesearches
{USER} entity-read,entity-create,entity-update,entity-delete
Entity Type =__AtlasUserProfile__AtlasUserSavedSearch
EntityClassification= *
Entity ID= {USER}{USER}:*
Hive
* all -hiveservice
hive,rangerlookup
hive, beacon,dpprofiler, hue,admin, impala
(removerangerlookupuser frompolicy item)
rangerlookup read
118
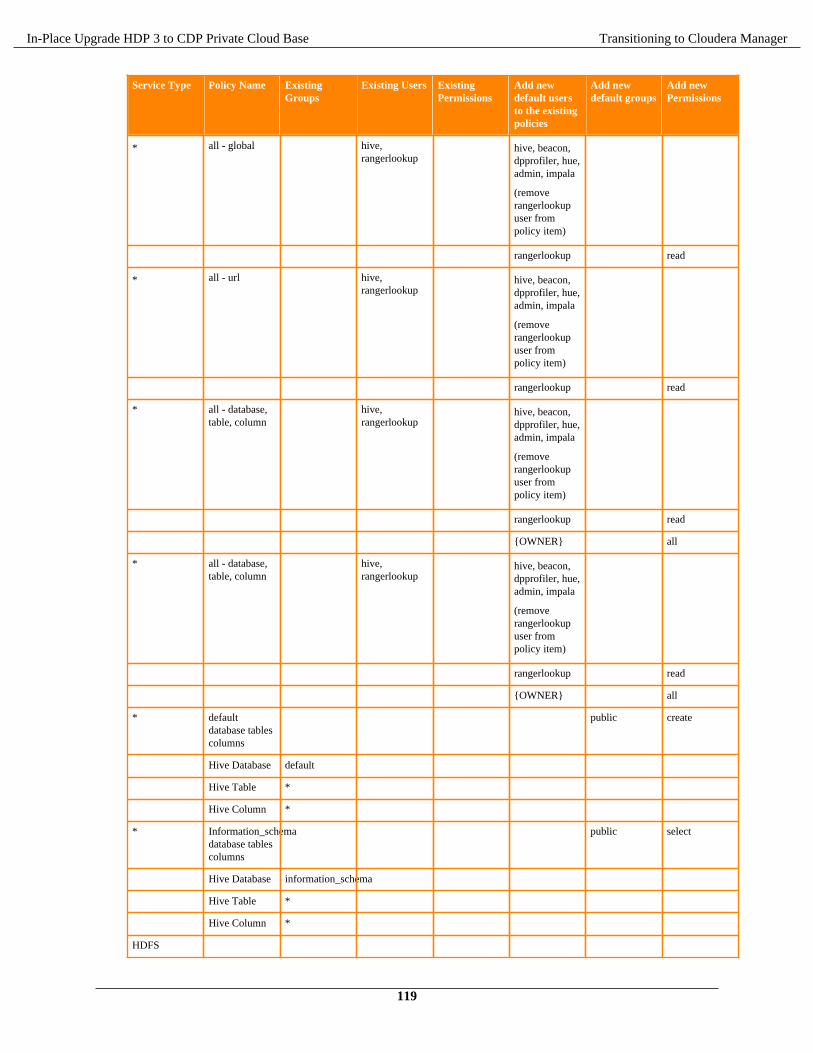
In-Place Upgrade HDP 3 to CDP Private Cloud Base Transitioning to Cloudera Manager
Service Type Policy Name ExistingGroups
Existing Users ExistingPermissions
Add newdefault usersto the existingpolicies
Add newdefault groups
Add newPermissions
* all - global hive,rangerlookup
hive, beacon,dpprofiler, hue,admin, impala
(removerangerlookupuser frompolicy item)
rangerlookup read
* all - url hive,rangerlookup
hive, beacon,dpprofiler, hue,admin, impala
(removerangerlookupuser frompolicy item)
rangerlookup read
* all - database,table, column
hive,rangerlookup
hive, beacon,dpprofiler, hue,admin, impala
(removerangerlookupuser frompolicy item)
rangerlookup read
{OWNER} all
* all - database,table, column
hive,rangerlookup
hive, beacon,dpprofiler, hue,admin, impala
(removerangerlookupuser frompolicy item)
rangerlookup read
{OWNER} all
* defaultdatabase tablescolumns
public create
Hive Database default
Hive Table *
Hive Column *
* Information_schemadatabase tablescolumns
public select
Hive Database information_schema
Hive Table *
Hive Column *
HDFS
119
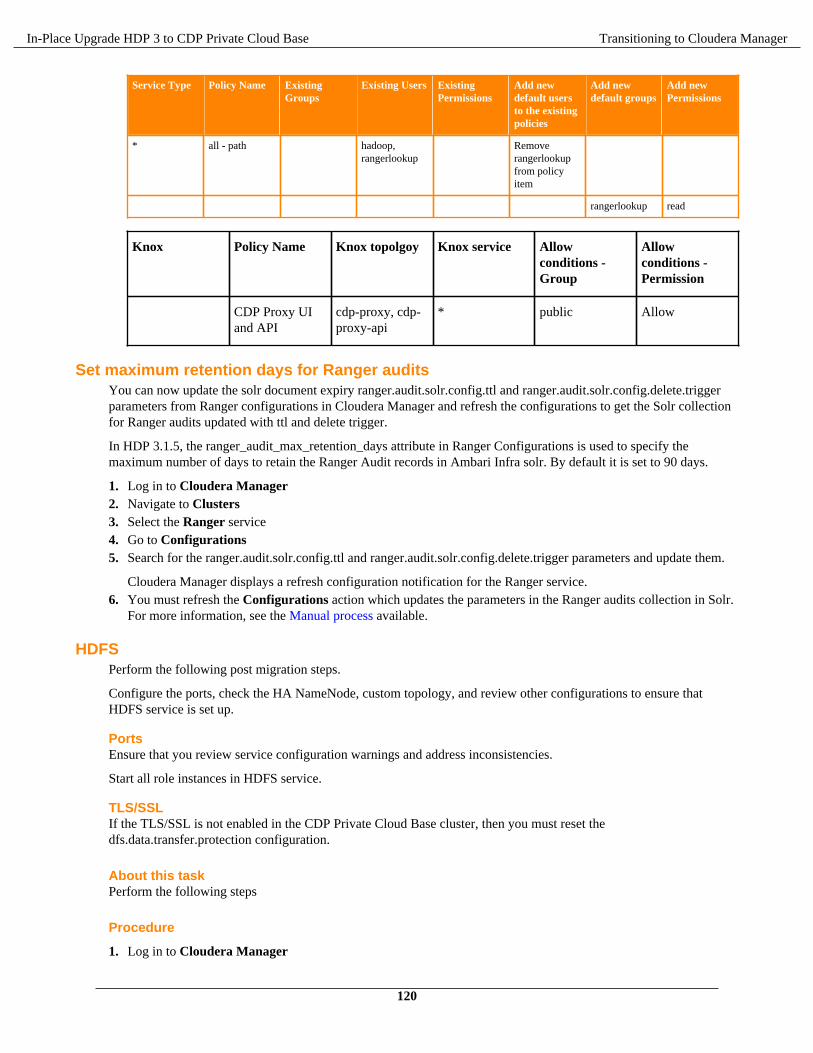
In-Place Upgrade HDP 3 to CDP Private Cloud Base Transitioning to Cloudera Manager
Service Type Policy Name ExistingGroups
Existing Users ExistingPermissions
Add newdefault usersto the existingpolicies
Add newdefault groups
Add newPermissions
* all - path hadoop,rangerlookup
Removerangerlookupfrom policyitem
rangerlookup read
Knox Policy Name Knox topolgoy Knox service Allowconditions -Group
Allowconditions -Permission
CDP Proxy UIand API
cdp-proxy, cdp-proxy-api
* public Allow
Set maximum retention days for Ranger auditsYou can now update the solr document expiry ranger.audit.solr.config.ttl and ranger.audit.solr.config.delete.triggerparameters from Ranger configurations in Cloudera Manager and refresh the configurations to get the Solr collectionfor Ranger audits updated with ttl and delete trigger.
In HDP 3.1.5, the ranger_audit_max_retention_days attribute in Ranger Configurations is used to specify themaximum number of days to retain the Ranger Audit records in Ambari Infra solr. By default it is set to 90 days.
1. Log in to Cloudera Manager2. Navigate to Clusters3. Select the Ranger service4. Go to Configurations5. Search for the ranger.audit.solr.config.ttl and ranger.audit.solr.config.delete.trigger parameters and update them.
Cloudera Manager displays a refresh configuration notification for the Ranger service.6. You must refresh the Configurations action which updates the parameters in the Ranger audits collection in Solr.
For more information, see the Manual process available.
HDFSPerform the following post migration steps.
Configure the ports, check the HA NameNode, custom topology, and review other configurations to ensure thatHDFS service is set up.
PortsEnsure that you review service configuration warnings and address inconsistencies.
Start all role instances in HDFS service.
TLS/SSLIf the TLS/SSL is not enabled in the CDP Private Cloud Base cluster, then you must reset thedfs.data.transfer.protection configuration.
About this taskPerform the following steps
Procedure
1. Log in to Cloudera Manager
120
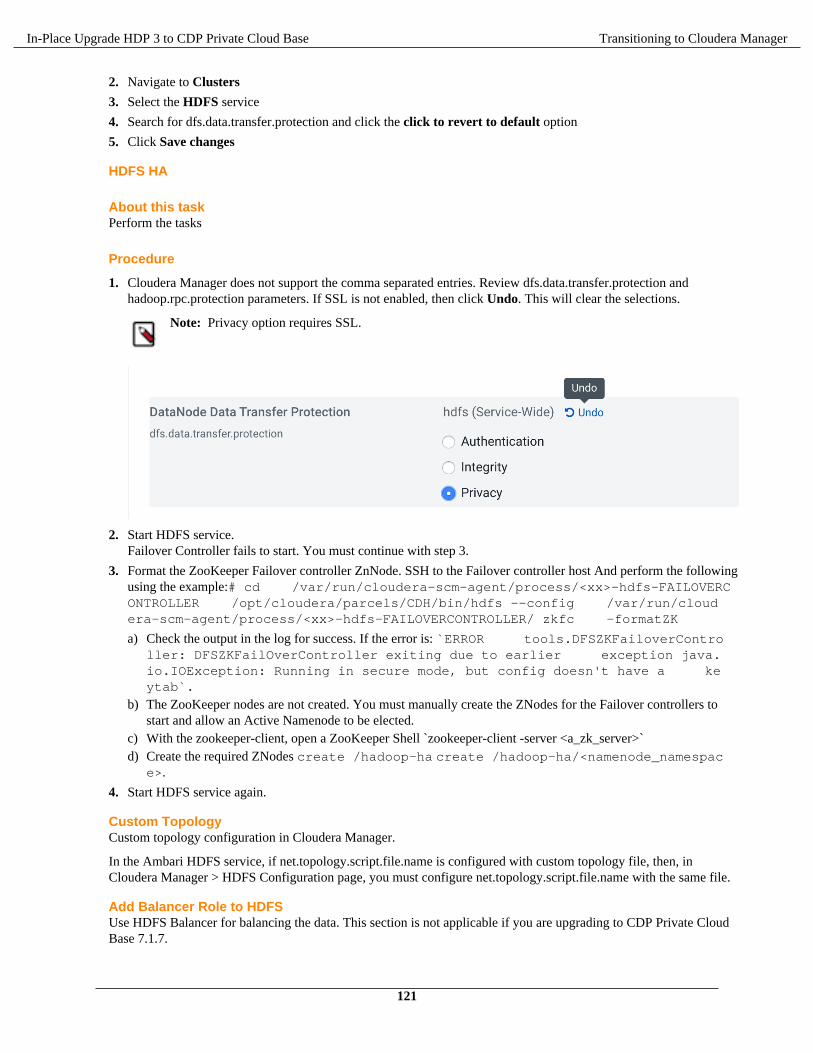
In-Place Upgrade HDP 3 to CDP Private Cloud Base Transitioning to Cloudera Manager
2. Navigate to Clusters
3. Select the HDFS service
4. Search for dfs.data.transfer.protection and click the click to revert to default option
5. Click Save changes
HDFS HA
About this taskPerform the tasks
Procedure
1. Cloudera Manager does not support the comma separated entries. Review dfs.data.transfer.protection andhadoop.rpc.protection parameters. If SSL is not enabled, then click Undo. This will clear the selections.
Note: Privacy option requires SSL.
2. Start HDFS service.Failover Controller fails to start. You must continue with step 3.
3. Format the ZooKeeper Failover controller ZnNode. SSH to the Failover controller host And perform the followingusing the example:# cd /var/run/cloudera-scm-agent/process/<xx>-hdfs-FAILOVERCONTROLLER /opt/cloudera/parcels/CDH/bin/hdfs --config /var/run/cloudera-scm-agent/process/<xx>-hdfs-FAILOVERCONTROLLER/ zkfc -formatZK
a) Check the output in the log for success. If the error is: `ERROR tools.DFSZKFailoverController: DFSZKFailOverController exiting due to earlier exception java.io.IOException: Running in secure mode, but config doesn't have a keytab`.
b) The ZooKeeper nodes are not created. You must manually create the ZNodes for the Failover controllers tostart and allow an Active Namenode to be elected.
c) With the zookeeper-client, open a ZooKeeper Shell `zookeeper-client -server <a_zk_server>`d) Create the required ZNodes create /hadoop-ha create /hadoop-ha/<namenode_namespac
e>.
4. Start HDFS service again.
Custom TopologyCustom topology configuration in Cloudera Manager.
In the Ambari HDFS service, if net.topology.script.file.name is configured with custom topology file, then, inCloudera Manager > HDFS Configuration page, you must configure net.topology.script.file.name with the same file.
Add Balancer Role to HDFSUse HDFS Balancer for balancing the data. This section is not applicable if you are upgrading to CDP Private CloudBase 7.1.7.
121
In-Place Upgrade HDP 3 to CDP Private Cloud Base Transitioning to Cloudera Manager
The HDFS Balancer is a tool for balancing the data across the storage devices of a HDFS cluster. For moreinformation on HDFS Balancer, see Balancing data across an HDFS cluster.
Related InformationBalancing data across an HDFS cluster
Other review configurations for HDFS
1. Review dfs.client.failover.proxy.provider.mycluster value. If this parameter has a non-default value, thenconfigure this parameter in Cloudera Manager. This configuration is not migrated from the Ambari managed HDPcluster to Cloudera Manager.
2. Review and add the cloud service-related configurations as those are not transitioned to Cloudera Manager.
SolrYou must create a Ranger Plug-in audit directory and HDFS Home directory and start the Solr service.
On the Cloudera Manager UI:
1. Initialize Solr2. Create Ranger Plug-in audit directory3. Create HDFS Home directory4. Start Solr service
Restore Solr collections on CDP clusterTo restore the data on Solr managed by Cloudera Manager, you must start HDFS and Zookeeper only. This ensuresno operations are performed by services which can push data to Solr.
About this taskTo restore the data on Solr managed by Cloudera Manager, perform the following steps:
Procedure
1. After migrating to CDP Private Cloud Base, you must update the infra_solr section ini file bycollecting properties from Solr on Cloudera Manager. (keep a backup of the existing file);
• • protocol: Solr protocol (http if TLS is not enabled https if TLS is enabled)• hosts: Solr server hosts• zk_connect_string: Solr Zookeeper connection string, should be available as part of process Environment
Variables• znode: Solr Znode configured, default value is /solr_ user : Solr service• user: default value is solr• port: Solr Server port, default 8983 and 8985 when TLS is enabled for Solr• keytab: Absolute path for Solr keytab• principal: Solr Service principal• zk_principal_user: Zookeeper principal
122
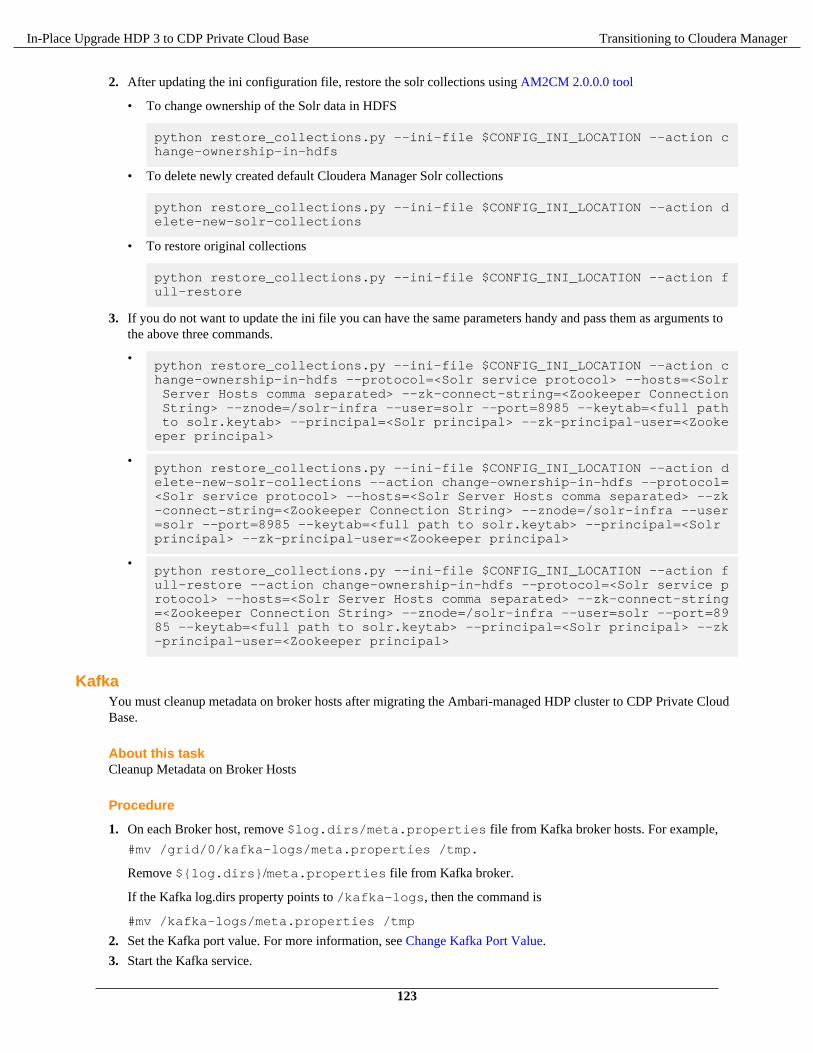
In-Place Upgrade HDP 3 to CDP Private Cloud Base Transitioning to Cloudera Manager
2. After updating the ini configuration file, restore the solr collections using AM2CM 2.0.0.0 tool
• To change ownership of the Solr data in HDFS
python restore_collections.py --ini-file $CONFIG_INI_LOCATION --action change-ownership-in-hdfs
• To delete newly created default Cloudera Manager Solr collections
python restore_collections.py --ini-file $CONFIG_INI_LOCATION --action delete-new-solr-collections
• To restore original collections
python restore_collections.py --ini-file $CONFIG_INI_LOCATION --action full-restore
3. If you do not want to update the ini file you can have the same parameters handy and pass them as arguments tothe above three commands.
•python restore_collections.py --ini-file $CONFIG_INI_LOCATION --action change-ownership-in-hdfs --protocol=<Solr service protocol> --hosts=<Solr Server Hosts comma separated> --zk-connect-string=<Zookeeper Connection String> --znode=/solr-infra --user=solr --port=8985 --keytab=<full path to solr.keytab> --principal=<Solr principal> --zk-principal-user=<Zookeeper principal>
•python restore_collections.py --ini-file $CONFIG_INI_LOCATION --action delete-new-solr-collections --action change-ownership-in-hdfs --protocol=<Solr service protocol> --hosts=<Solr Server Hosts comma separated> --zk-connect-string=<Zookeeper Connection String> --znode=/solr-infra --user=solr --port=8985 --keytab=<full path to solr.keytab> --principal=<Solr principal> --zk-principal-user=<Zookeeper principal>
•python restore_collections.py --ini-file $CONFIG_INI_LOCATION --action full-restore --action change-ownership-in-hdfs --protocol=<Solr service protocol> --hosts=<Solr Server Hosts comma separated> --zk-connect-string=<Zookeeper Connection String> --znode=/solr-infra --user=solr --port=8985 --keytab=<full path to solr.keytab> --principal=<Solr principal> --zk-principal-user=<Zookeeper principal>
KafkaYou must cleanup metadata on broker hosts after migrating the Ambari-managed HDP cluster to CDP Private CloudBase.
About this taskCleanup Metadata on Broker Hosts
Procedure
1. On each Broker host, remove $log.dirs/meta.properties file from Kafka broker hosts. For example,
#mv /grid/0/kafka-logs/meta.properties /tmp.
Remove ${log.dirs}/meta.properties file from Kafka broker.
If the Kafka log.dirs property points to /kafka-logs, then the command is
#mv /kafka-logs/meta.properties /tmp
2. Set the Kafka port value. For more information, see Change Kafka Port Value.
3. Start the Kafka service.
123
In-Place Upgrade HDP 3 to CDP Private Cloud Base Transitioning to Cloudera Manager
Change Kafka port valueChange the Kafka JMX port value if the Ranger KMS port is conflicting with Kafka JMX port.
The Ranger KMS ranger.service.https.port port value is migrated from the HDP cluster. In Cloudera Manager, if theKafka jmx_port port value is the same as the Ranger KMS port value from HDP, then you must change the value ofthe Kafka JMX port number in Cloudera Manager.
Unsetting Kafka Protocol versionYou must unset the Kafka protocol version from Cloudera Manager after the upgrade is complete. This allows you touse the updated Kafka version using Cloudera Manager.
On the HDP cluster, using Ambari, you have set the Kafka protocol versions to the older Kafka version to make surethat all the messages are stored in a manner that Kafka can handle. After upgrading to the CDP cluster, the messagesare still stored according to the older version of Kafka. This gives you the ability to roll it back if something goeswrong.
After the Kafka Protocol version properties are unset using Cloudera Manager, Kafka will use its current version (thenew and updated Kafka version) and newly stored messages will not be handled by the older Kafka version.
Note: Do not unset the older Kafka protocol version until you have completed your upgrade testing.Unsetting the version will prevent rollback to the older Kafka release.
To unset the Kafka Protocol version on Cloudera Manager, perform the following steps:
1. Remove the following properties from the Kafka Broker Advanced Configuration Snippet (Safety Valve)configuration property:
• Inter.broker.protocol.version
• log.message.format.version
2. Save your changes.3. Perform a rolling restart:
• Select the Kafka service.• Click Actions > Rolling Restart.• In the pop-up dialog box, select the options you want and click Rolling Restart.• Click Close after the command has finished.
ImpalaAfter transitioning your cluster from HDP 3.1.5.x to CDP Private Cloud Base, you can manually install the Impalaservice.
Impala is a new service that is not available in HDP. By default Impala uses the cm_hive ranger service forauthorization.
If you want to use the same Ranger service which Hive is using, you must:
On the Cloudera Manager UI:
1. Update the service name through safety valve in Cloudera Manager UI for the Impala service. In ranger-impala-security.xml, add ranger.plugin.hive.service.name = <migrated_hive_ranger_service_name> hive service name.For example, cl1_hive
On the Ranger Admin UI:
1. Add the Impala user in policy.download.auth.users and tag.download.auth.users configurations in the migratedhive ranger service. For example, cl1_hive.
2. Add the Impala user to the default policies in the migrated hive ranger service. For example, cl1_hive.
YARNPerform the following post migration steps.
124
In-Place Upgrade HDP 3 to CDP Private Cloud Base Transitioning to Cloudera Manager
Start job historyYou must start job history after migration.
About this taskTo start job history after migration
Procedure
1. Log in to Cloudera Manager
2. Navigate to Clusters
3. Click YARN
4. Under the Actions drop-down, click Create Job History Dir
5. Create Job History Dir dialog box appears, click Create Job History Dir.Successfully created HDFS directory. message appears
Yarn Mapreduce framework jars
About this taskPerform the following steps
Procedure
1. Go to Cloudera Manager UI.
2. Navigate to YARN
3. Click Install Yarn Mapreduce framework jars
GPU SchedulingYou must enable GPU on the CDP cluster if GPU was enabled on the HDP cluster.
• If you have enabled GPU in the HDP cluster and want to enable it in the CDP cluster, then you must turn on theconfigure GPU scheduling and Isolation. For more information, see Configure GPU scheduling and Isolation
YARN CGroupsIf YARN CGroups was enabled in the HDP cluster, you must manually enable the Host-level CGroups settings.
Procedure
1. Log into Cloudera Manager UI
2. Navigate to Clusters
3. Click YARN
4. Click Hosts
5. Select Hosts configuration
6. In the category filter, click Resource Management
7. Enable Enable Cgroup-based Resource Management
8. Click Save
9. Go to Cloudera Manager’s main screen and click on any of the Stale configuration: Restart needed icons.
10. Click Restart.
11. Select Deploy client configurationAll services with stale configurations will restart.
Reset ZNode ACLsYou must manually reset ZNode ACLs.
125
In-Place Upgrade HDP 3 to CDP Private Cloud Base Transitioning to Cloudera Manager
About this taskThis command requires you to have the -Dzookeeper.skipACL=yes setting for the Java Configuration Options for Zookeeper Server configuration.
Note: If the cluster is heavily used and the yarn.resourcemanager.max-completed-applications is kept high (10k-100k) Reseting ACLs on YARN ZooKeeper nodes can take a large amount of time tofinish.
Procedure
1. Log into Cloudera Manager UI.
2. Navigate to Clusters.
3. Click YARN.
4. Click Actions.
5. Click Reset ACLs on YARN Zookeeper nodes.
6. After the command is executed, navigate to ZooKeeper Configuration > search for Java Configuration Options for Zookeeper Server > remove the value -Dzookeeper.skipACL=yes > click Save >restart ZooKeeper.
Placement rules evaluation engineIf you are upgrading to Cloudera Runtime 7.1.6 or higher you need to learn about the new placement rules evaluationengine.
This list is only an overview of the most prominent changes regarding placement rules evaluation. For a more detailedguide, see Managing placement rules.
JSON-based format
From Cloudera Runtime 7.1.6 placement rules are described in a JSON-based format. The new engine has fullbackward compatibility with the old format as well but only if you use safety valves which you must not do. Clouderarecommends managing your placement rules through the YARN Queue Manager UI. The format conversion isautomatically done at the first time you use the YARN Queue Manager UI in CDP Private Cloud Base 7.1.6 orhigher. For more information about the automatic placement rules format conversion, see Converting old mappingrule format to JSON-based placement rule format.
Enabling dynamic queues
The new placement rules evaluation engines support the create flag which was also introduced in Cloudera Runtime7.1.6. Non-existing queues are only created if dynamic queue creation is enabled when the applicable placement ruleis created. That means in order to enable dynamic child queues you have to perform two steps:
1. Enable the dynamic auto child creation feature for the queue that you want to use as a parent queue for thedynamic child queues.
2. Ensure that the Create the target queue if it does not exist? property is checked when the applicable placementrule is created.
Fallback action configuration
With the new placement rules and evaluation engine you can define the action that should happen if the target queueof a placement rule does not exist or it cannot be created. This action is called the fallback action. Fallback action canbe configured for each placement rule by the user and it can have the following values:
• Skip: Ignore the current rule and proceed to the next.• PlaceDefault: Place the application to the default queue root.default (unless it is overriden to something
else). This is how Capacity Scheduler worked with the old mapping rules.• Reject: Reject the submission.
126
In-Place Upgrade HDP 3 to CDP Private Cloud Base Transitioning to Cloudera Manager
Placement rule policies
Placement rule policies were introduced as a more user friendly solution for mapping rule creation. Placement rulepolicies cover the functionality of the placement rules and provide shortcuts for the most common use cases.
All legacy Capacity Scheduler mapping rule options are now available as policy. They provide the same functionalitywithout having to manually write rules. For example, the u:%user:%primary_group.%user rule can beachieved using the primaryGroupUser policy. However, a custom policy option is available that allows you todefine the target queue manually without using any predefined placement rule policy.
Converting old mapping rule format to JSON-based placement rule formatReviewing how the old colon-separated mapping rule format is converted into the new JSON-based mapping rulesformat can help you understand the automatic placement rule conversion.
From Cloudera Runtime 7.1.6 placement rules are described in a JSON-based format. This format conversion isautomatically done at the first time you use the YARN Queue Manager UI in CDP Private Cloud Base 7.1.6 orhigher. If you use Cloudera Runtime 7.1.6 or higher you must use the new JSON-based placement rule format.
Note: You cannot manage the new JSON-based placement rules by directly editing them in the capacity-scheduler.xml configuration file. Instead, you use the YARN Queue Manager UI to manage placementrules. The table is only provided so that you can better understand how the automatic conversion happens.
127
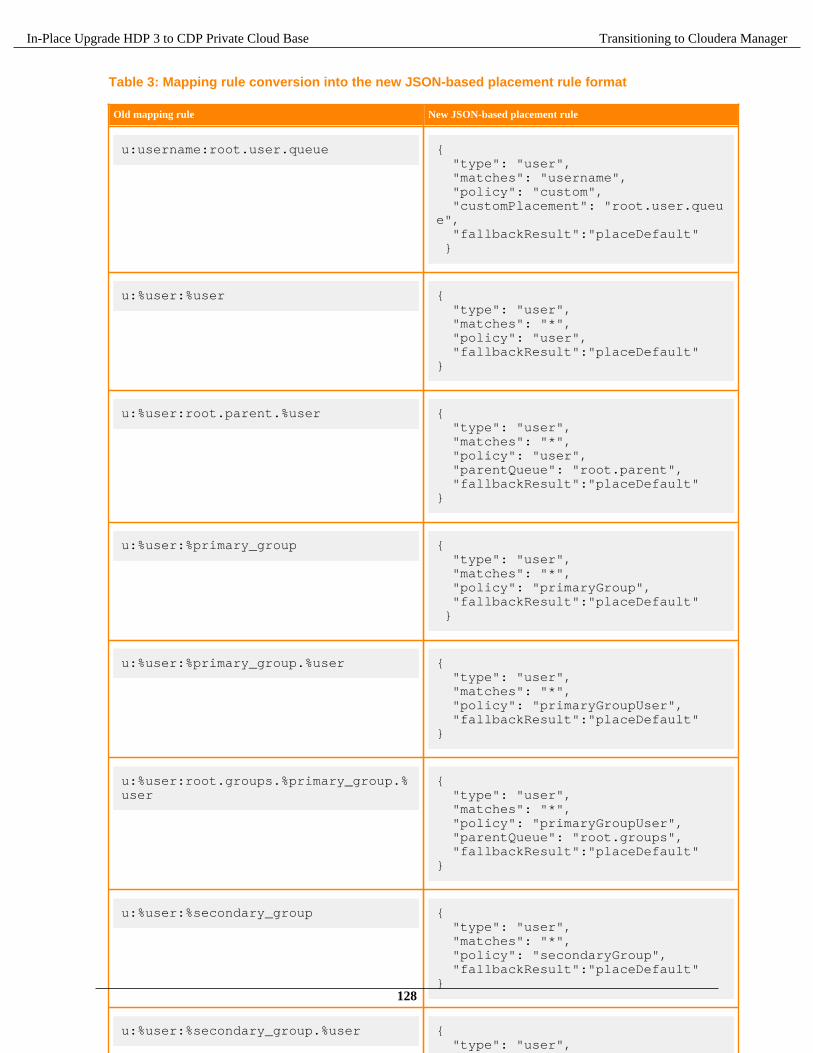
In-Place Upgrade HDP 3 to CDP Private Cloud Base Transitioning to Cloudera Manager
Table 3: Mapping rule conversion into the new JSON-based placement rule format
Old mapping rule New JSON-based placement rule
u:username:root.user.queue { "type": "user", "matches": "username", "policy": "custom", "customPlacement": "root.user.queue", "fallbackResult":"placeDefault" }
u:%user:%user { "type": "user", "matches": "*", "policy": "user", "fallbackResult":"placeDefault" }
u:%user:root.parent.%user { "type": "user", "matches": "*", "policy": "user", "parentQueue": "root.parent", "fallbackResult":"placeDefault" }
u:%user:%primary_group { "type": "user", "matches": "*", "policy": "primaryGroup", "fallbackResult":"placeDefault" }
u:%user:%primary_group.%user { "type": "user", "matches": "*", "policy": "primaryGroupUser", "fallbackResult":"placeDefault" }
u:%user:root.groups.%primary_group.%user
{ "type": "user", "matches": "*", "policy": "primaryGroupUser", "parentQueue": "root.groups", "fallbackResult":"placeDefault" }
u:%user:%secondary_group { "type": "user", "matches": "*", "policy": "secondaryGroup", "fallbackResult":"placeDefault" }
u:%user:%secondary_group.%user { "type": "user", "matches": "*", "policy": "secondaryGroupUser", "fallbackResult":"placeDefault" }
u:%user:root.groups.%secondary_group.%user
{ "type": "user", “matches": "*", "policy": "secondaryGroupUser", "parentQueue": "root.groups", "fallbackResult":"placeDefault" }
g:hadoop:root.groups.hadoop { “type": "group", "matches": "hadoop", "policy": "custom", "customPlacement": "root.groups.hadoop", "fallbackResult":"placeDefault" }
%application:%application
(application mapping)
{ "type": "user", "matches": "*", "policy": "applicationName", "fallbackResult":"placeDefault" }
hive_query:root.query.hive
(application mapping)
{ "type": "application", "matches": "hive_query", "policy": "custom", "customPlacement": "root.query.hive", "fallbackResult":"placeDefault" }
128
In-Place Upgrade HDP 3 to CDP Private Cloud Base Transitioning to Cloudera Manager
It's worth noting that %application:%application requires a user type matcher. It is because internally, the"*" is interpreted only for users. If you set the type to application, then the "*" means to match an applicationwhich is named "*".
Setting the owner and permissions of /user/yarnIf you want to add a VPC or Compute cluster after migration, ensure that the correct owner and permissions are setfor /user/yarn in HDFS.
About this task
If either the owner or the permissions of /user/yarn is set incorrectly, you can encounter errors when trying toadd a VPC or Compute cluster.
Before you begin
• You have permission to impersonate a hdfs user.• If you use Custom Service Accounts, add it to the supergroup group.
Procedure
1. SSH to a cluster node
2. Change the owner of /user/yarn:
If you do not use Custom Service Accounts, change the owner to hdfs:supergroup:
sudo -u hdfs hdfs dfs -chown hdfs:supergroup /user/yarn
If you use Custom Service Accounts, change the owner to ***HDFS CUSTOM USER***:supergroup:
sudo -u hdfs hdfs dfs -chown ***HDFS CUSTOM USER***:supergroup /user/yarn
3. Change the permissions of /user/yarn to drwxr-xr-x:
sudo -u hdfs hdfs dfs -chmod 755 /user/yarn
SparkYou must initialize a few directories for the Spark service.
Before you beginRun the following directory options:
Procedure
• Create Spark User Dir• Create Spark History Log Dir
129

In-Place Upgrade HDP 3 to CDP Private Cloud Base Transitioning to Cloudera Manager
• Create Spark Driver Log Dir
130
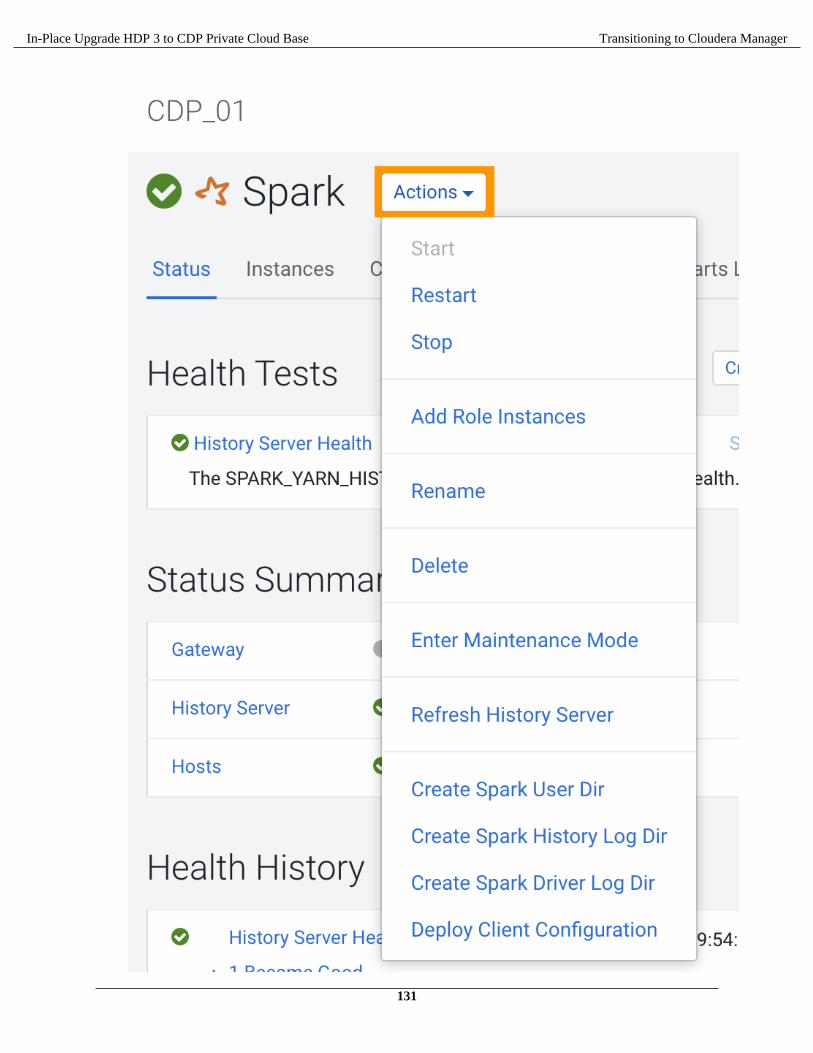
In-Place Upgrade HDP 3 to CDP Private Cloud Base Transitioning to Cloudera Manager
131
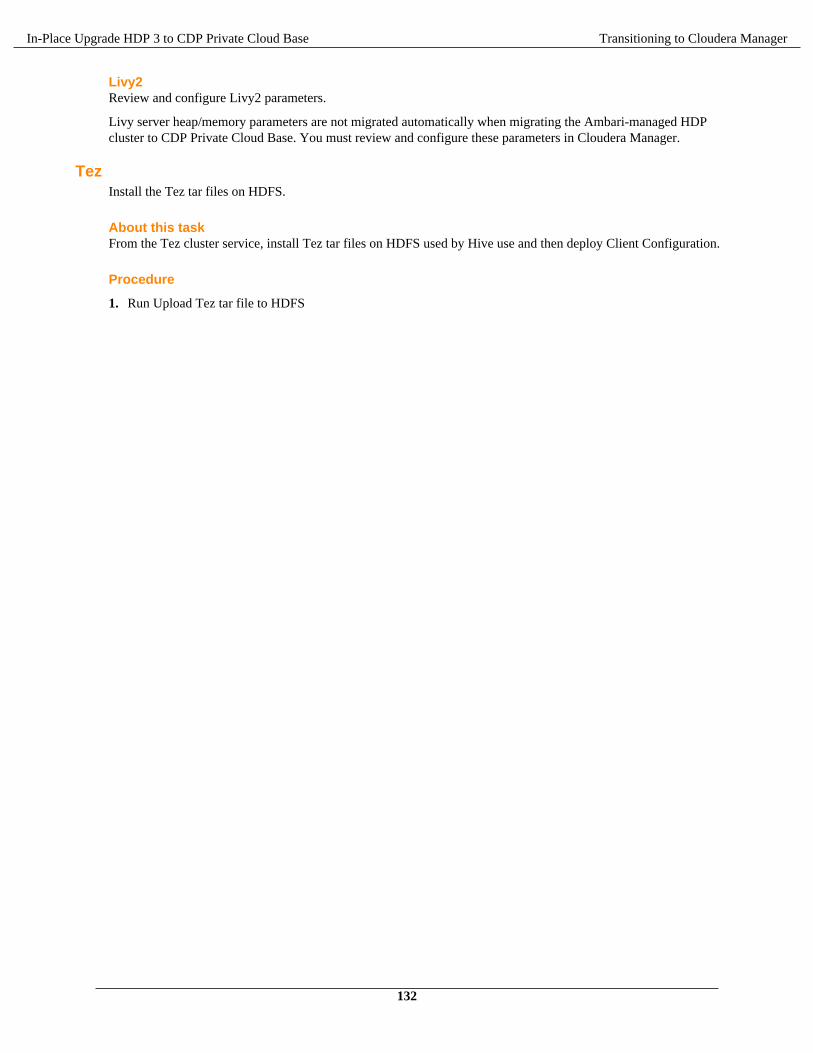
In-Place Upgrade HDP 3 to CDP Private Cloud Base Transitioning to Cloudera Manager
Livy2Review and configure Livy2 parameters.
Livy server heap/memory parameters are not migrated automatically when migrating the Ambari-managed HDPcluster to CDP Private Cloud Base. You must review and configure these parameters in Cloudera Manager.
TezInstall the Tez tar files on HDFS.
About this taskFrom the Tez cluster service, install Tez tar files on HDFS used by Hive use and then deploy Client Configuration.
Procedure
1. Run Upload Tez tar file to HDFS
132
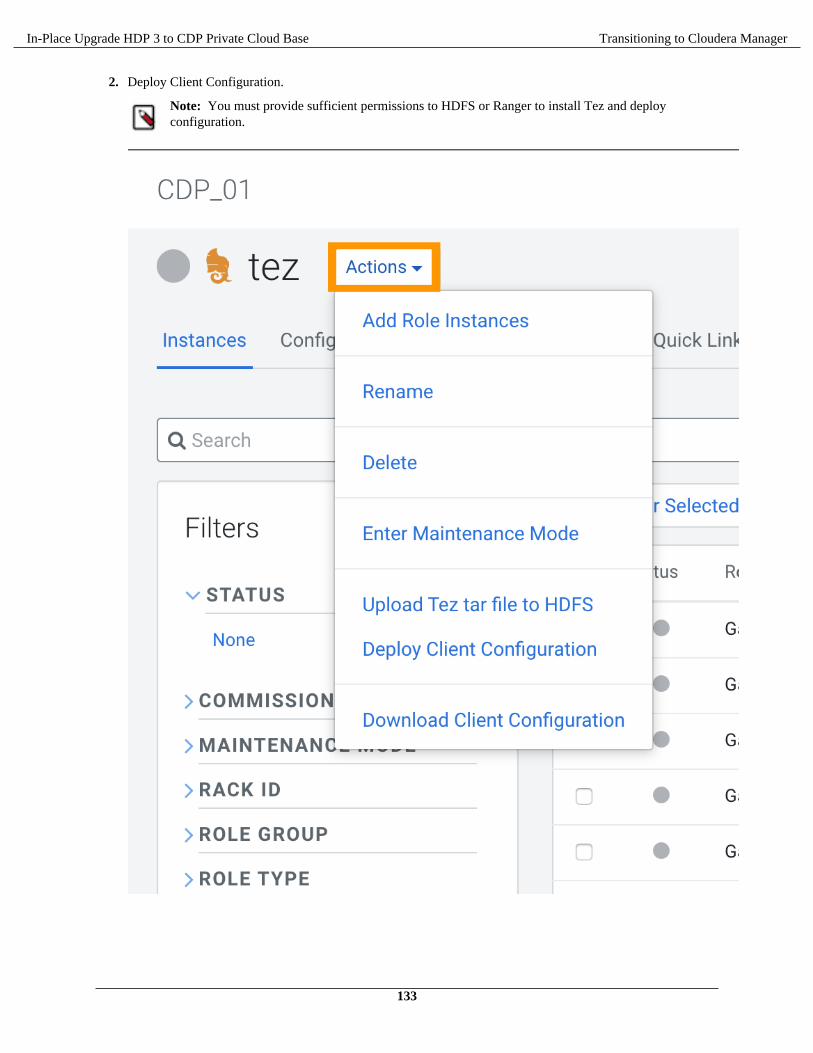
In-Place Upgrade HDP 3 to CDP Private Cloud Base Transitioning to Cloudera Manager
2. Deploy Client Configuration.
Note: You must provide sufficient permissions to HDFS or Ranger to install Tez and deployconfiguration.
133
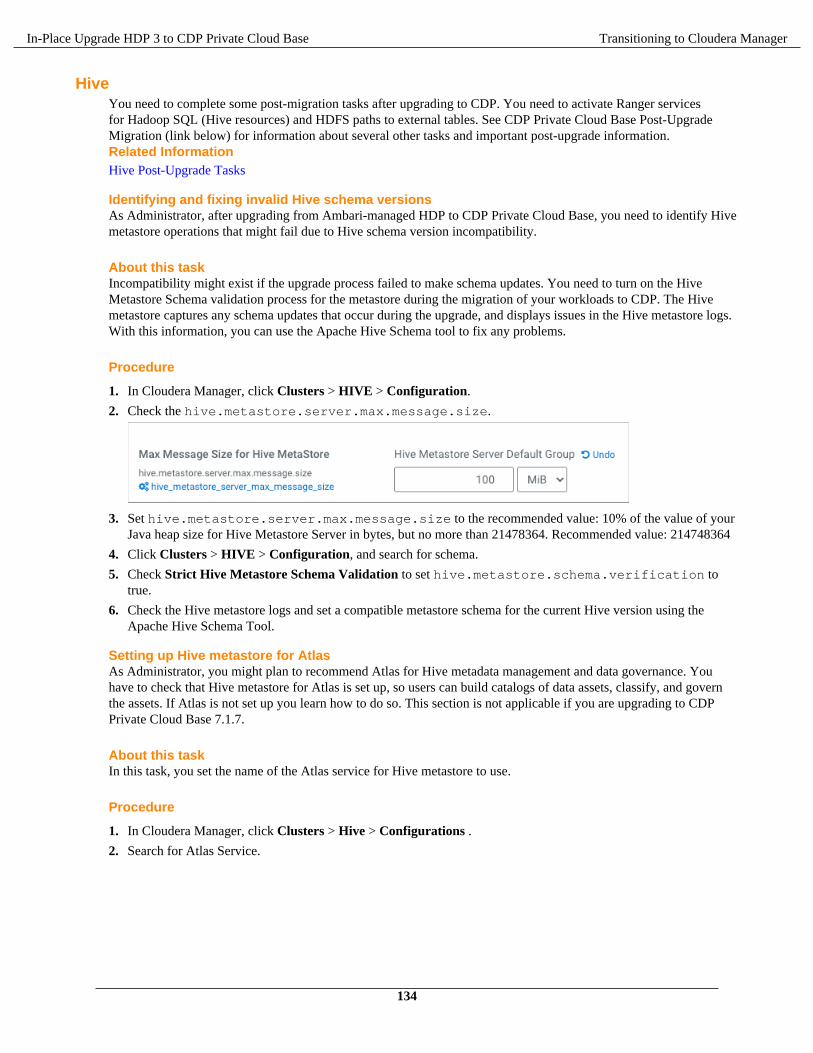
In-Place Upgrade HDP 3 to CDP Private Cloud Base Transitioning to Cloudera Manager
HiveYou need to complete some post-migration tasks after upgrading to CDP. You need to activate Ranger servicesfor Hadoop SQL (Hive resources) and HDFS paths to external tables. See CDP Private Cloud Base Post-UpgradeMigration (link below) for information about several other tasks and important post-upgrade information.Related InformationHive Post-Upgrade Tasks
Identifying and fixing invalid Hive schema versionsAs Administrator, after upgrading from Ambari-managed HDP to CDP Private Cloud Base, you need to identify Hivemetastore operations that might fail due to Hive schema version incompatibility.
About this taskIncompatibility might exist if the upgrade process failed to make schema updates. You need to turn on the HiveMetastore Schema validation process for the metastore during the migration of your workloads to CDP. The Hivemetastore captures any schema updates that occur during the upgrade, and displays issues in the Hive metastore logs.With this information, you can use the Apache Hive Schema tool to fix any problems.
Procedure
1. In Cloudera Manager, click Clusters > HIVE > Configuration.
2. Check the hive.metastore.server.max.message.size.
3. Set hive.metastore.server.max.message.size to the recommended value: 10% of the value of yourJava heap size for Hive Metastore Server in bytes, but no more than 21478364. Recommended value: 214748364
4. Click Clusters > HIVE > Configuration, and search for schema.
5. Check Strict Hive Metastore Schema Validation to set hive.metastore.schema.verification totrue.
6. Check the Hive metastore logs and set a compatible metastore schema for the current Hive version using theApache Hive Schema Tool.
Setting up Hive metastore for AtlasAs Administrator, you might plan to recommend Atlas for Hive metadata management and data governance. Youhave to check that Hive metastore for Atlas is set up, so users can build catalogs of data assets, classify, and governthe assets. If Atlas is not set up you learn how to do so. This section is not applicable if you are upgrading to CDPPrivate Cloud Base 7.1.7.
About this taskIn this task, you set the name of the Atlas service for Hive metastore to use.
Procedure
1. In Cloudera Manager, click Clusters > Hive > Configurations .
2. Search for Atlas Service.
134
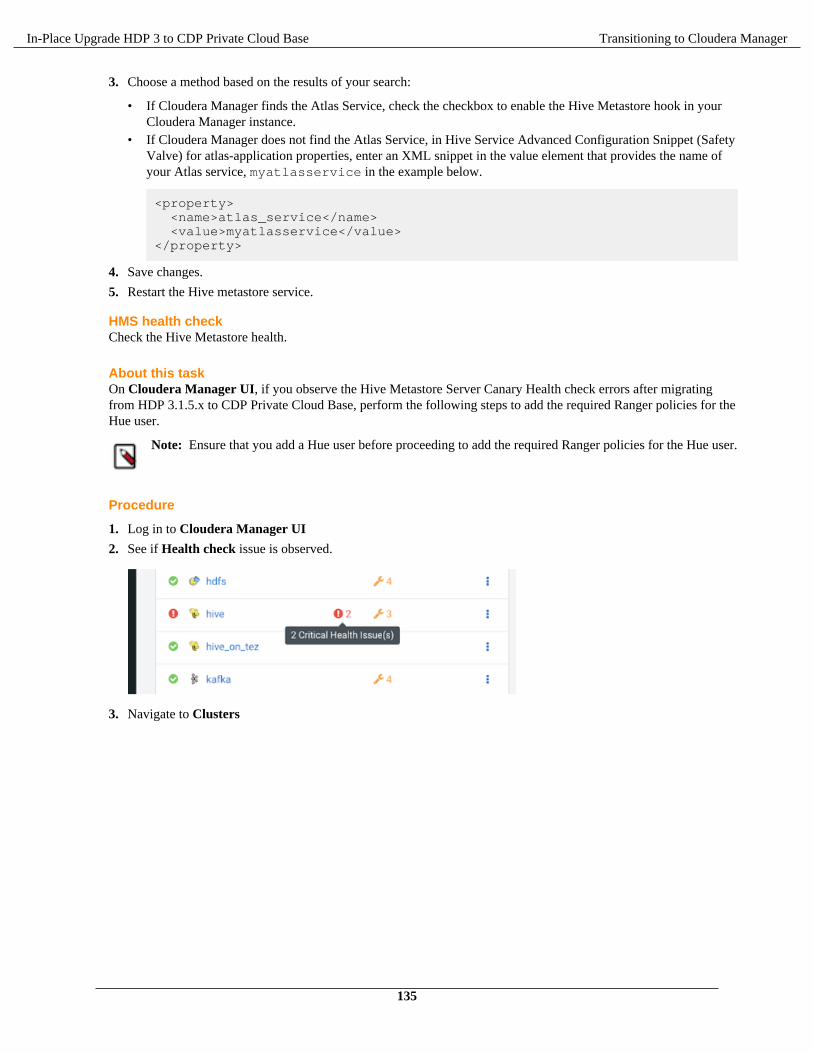
In-Place Upgrade HDP 3 to CDP Private Cloud Base Transitioning to Cloudera Manager
3. Choose a method based on the results of your search:
• If Cloudera Manager finds the Atlas Service, check the checkbox to enable the Hive Metastore hook in yourCloudera Manager instance.
• If Cloudera Manager does not find the Atlas Service, in Hive Service Advanced Configuration Snippet (SafetyValve) for atlas-application properties, enter an XML snippet in the value element that provides the name ofyour Atlas service, myatlasservice in the example below.
<property> <name>atlas_service</name> <value>myatlasservice</value></property>
4. Save changes.
5. Restart the Hive metastore service.
HMS health checkCheck the Hive Metastore health.
About this taskOn Cloudera Manager UI, if you observe the Hive Metastore Server Canary Health check errors after migratingfrom HDP 3.1.5.x to CDP Private Cloud Base, perform the following steps to add the required Ranger policies for theHue user.
Note: Ensure that you add a Hue user before proceeding to add the required Ranger policies for the Hue user.
Procedure
1. Log in to Cloudera Manager UI
2. See if Health check issue is observed.
3. Navigate to Clusters
135
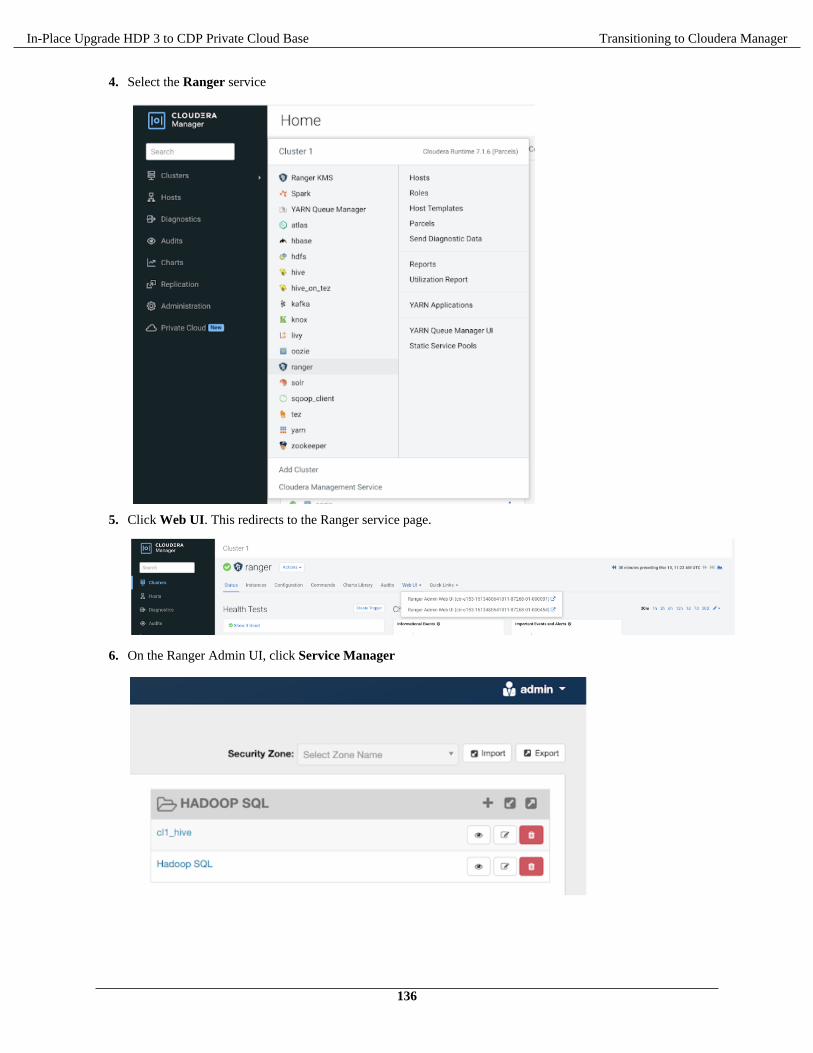
In-Place Upgrade HDP 3 to CDP Private Cloud Base Transitioning to Cloudera Manager
4. Select the Ranger service
5. Click Web UI. This redirects to the Ranger service page.
6. On the Ranger Admin UI, click Service Manager
136
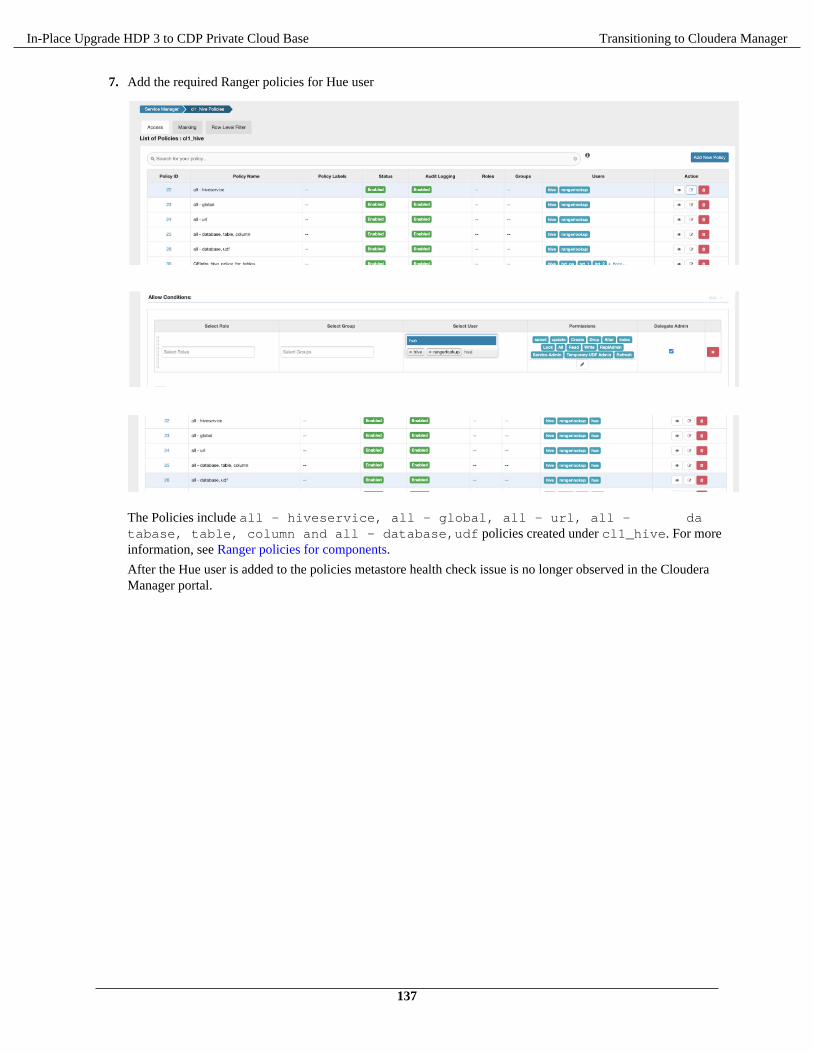
In-Place Upgrade HDP 3 to CDP Private Cloud Base Transitioning to Cloudera Manager
7. Add the required Ranger policies for Hue user
The Policies include all - hiveservice, all - global, all - url, all - database, table, column and all - database,udf policies created under cl1_hive. For moreinformation, see Ranger policies for components.
After the Hue user is added to the policies metastore health check issue is no longer observed in the ClouderaManager portal.
137
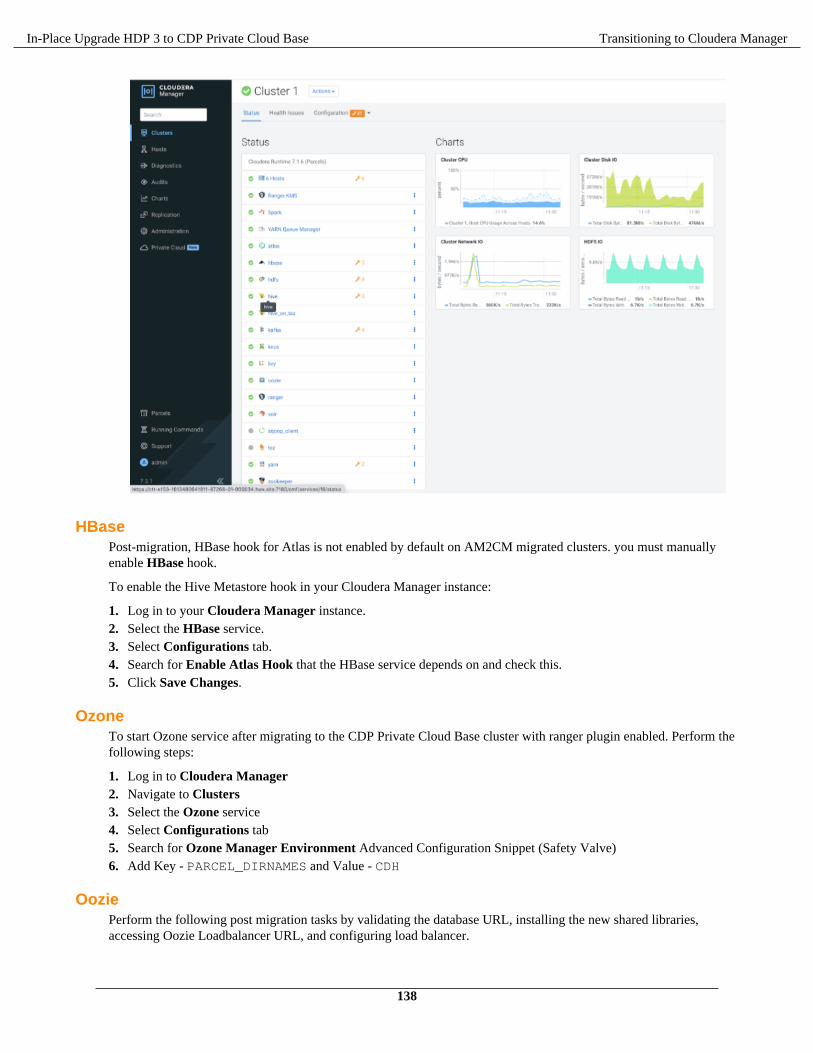
In-Place Upgrade HDP 3 to CDP Private Cloud Base Transitioning to Cloudera Manager
HBasePost-migration, HBase hook for Atlas is not enabled by default on AM2CM migrated clusters. you must manuallyenable HBase hook.
To enable the Hive Metastore hook in your Cloudera Manager instance:
1. Log in to your Cloudera Manager instance.2. Select the HBase service.3. Select Configurations tab.4. Search for Enable Atlas Hook that the HBase service depends on and check this.5. Click Save Changes.
OzoneTo start Ozone service after migrating to the CDP Private Cloud Base cluster with ranger plugin enabled. Perform thefollowing steps:
1. Log in to Cloudera Manager2. Navigate to Clusters3. Select the Ozone service4. Select Configurations tab5. Search for Ozone Manager Environment Advanced Configuration Snippet (Safety Valve)6. Add Key - PARCEL_DIRNAMES and Value - CDH
OoziePerform the following post migration tasks by validating the database URL, installing the new shared libraries,accessing Oozie Loadbalancer URL, and configuring load balancer.
138
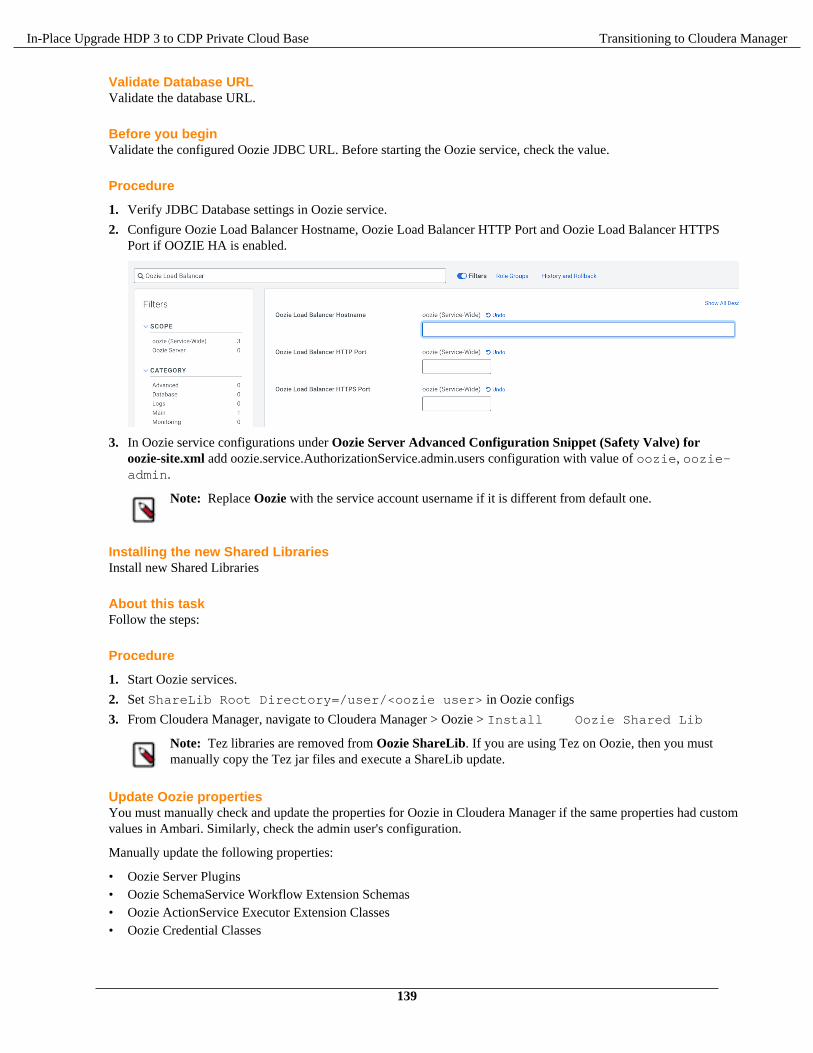
In-Place Upgrade HDP 3 to CDP Private Cloud Base Transitioning to Cloudera Manager
Validate Database URLValidate the database URL.
Before you beginValidate the configured Oozie JDBC URL. Before starting the Oozie service, check the value.
Procedure
1. Verify JDBC Database settings in Oozie service.
2. Configure Oozie Load Balancer Hostname, Oozie Load Balancer HTTP Port and Oozie Load Balancer HTTPSPort if OOZIE HA is enabled.
3. In Oozie service configurations under Oozie Server Advanced Configuration Snippet (Safety Valve) foroozie-site.xml add oozie.service.AuthorizationService.admin.users configuration with value of oozie, oozie-admin.
Note: Replace Oozie with the service account username if it is different from default one.
Installing the new Shared LibrariesInstall new Shared Libraries
About this taskFollow the steps:
Procedure
1. Start Oozie services.
2. Set ShareLib Root Directory=/user/<oozie user> in Oozie configs
3. From Cloudera Manager, navigate to Cloudera Manager > Oozie > Install Oozie Shared Lib
Note: Tez libraries are removed from Oozie ShareLib. If you are using Tez on Oozie, then you mustmanually copy the Tez jar files and execute a ShareLib update.
Update Oozie propertiesYou must manually check and update the properties for Oozie in Cloudera Manager if the same properties had customvalues in Ambari. Similarly, check the admin user's configuration.
Manually update the following properties:
• Oozie Server Plugins• Oozie SchemaService Workflow Extension Schemas• Oozie ActionService Executor Extension Classes• Oozie Credential Classes
139
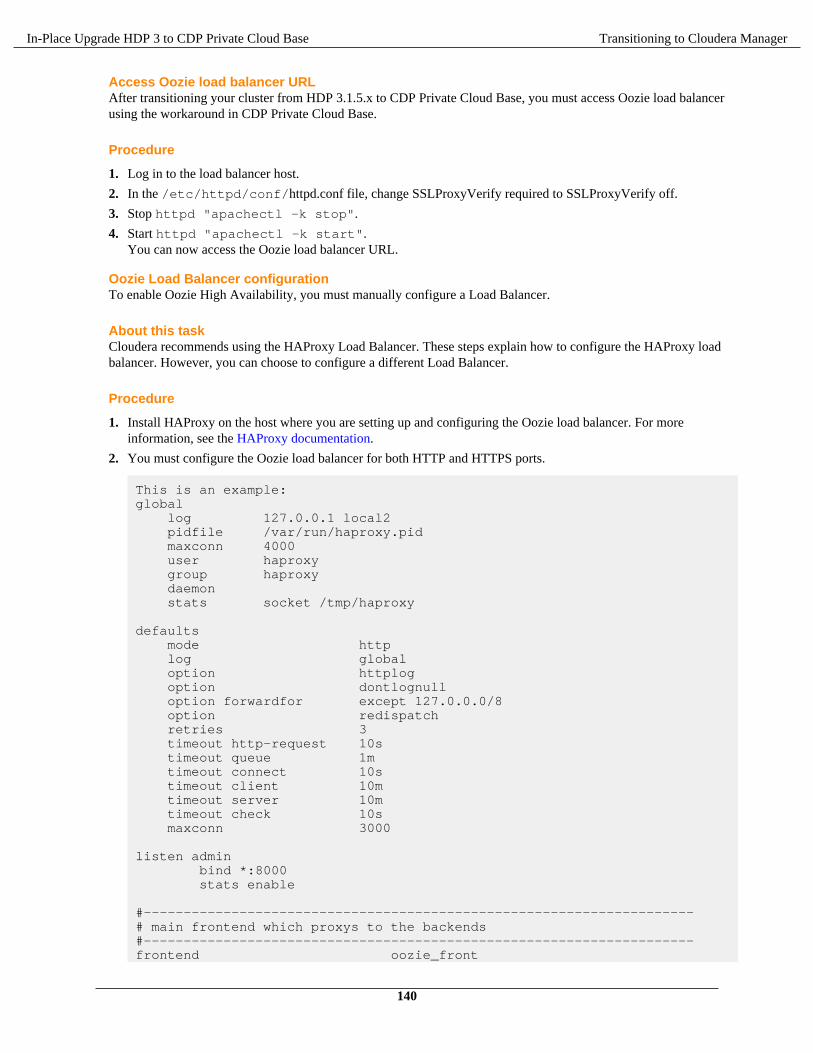
In-Place Upgrade HDP 3 to CDP Private Cloud Base Transitioning to Cloudera Manager
Access Oozie load balancer URLAfter transitioning your cluster from HDP 3.1.5.x to CDP Private Cloud Base, you must access Oozie load balancerusing the workaround in CDP Private Cloud Base.
Procedure
1. Log in to the load balancer host.
2. In the /etc/httpd/conf/httpd.conf file, change SSLProxyVerify required to SSLProxyVerify off.
3. Stop httpd "apachectl -k stop".
4. Start httpd "apachectl -k start".You can now access the Oozie load balancer URL.
Oozie Load Balancer configurationTo enable Oozie High Availability, you must manually configure a Load Balancer.
About this taskCloudera recommends using the HAProxy Load Balancer. These steps explain how to configure the HAProxy loadbalancer. However, you can choose to configure a different Load Balancer.
Procedure
1. Install HAProxy on the host where you are setting up and configuring the Oozie load balancer. For moreinformation, see the HAProxy documentation.
2. You must configure the Oozie load balancer for both HTTP and HTTPS ports.
This is an example:global log 127.0.0.1 local2 pidfile /var/run/haproxy.pid maxconn 4000 user haproxy group haproxy daemon stats socket /tmp/haproxy
defaults mode http log global option httplog option dontlognull option forwardfor except 127.0.0.0/8 option redispatch retries 3 timeout http-request 10s timeout queue 1m timeout connect 10s timeout client 10m timeout server 10m timeout check 10s maxconn 3000
listen admin bind *:8000 stats enable
#---------------------------------------------------------------------# main frontend which proxys to the backends#---------------------------------------------------------------------frontend oozie_front
140
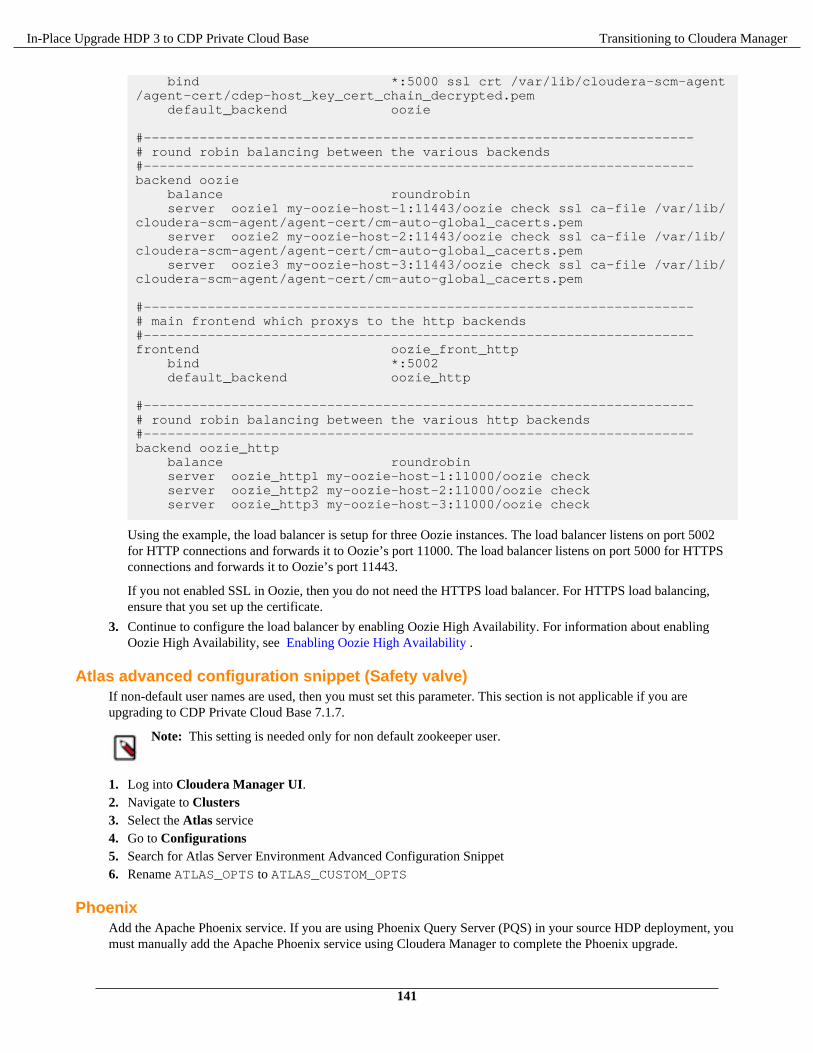
In-Place Upgrade HDP 3 to CDP Private Cloud Base Transitioning to Cloudera Manager
bind *:5000 ssl crt /var/lib/cloudera-scm-agent/agent-cert/cdep-host_key_cert_chain_decrypted.pem default_backend oozie
#---------------------------------------------------------------------# round robin balancing between the various backends#---------------------------------------------------------------------backend oozie balance roundrobin server oozie1 my-oozie-host-1:11443/oozie check ssl ca-file /var/lib/cloudera-scm-agent/agent-cert/cm-auto-global_cacerts.pem server oozie2 my-oozie-host-2:11443/oozie check ssl ca-file /var/lib/cloudera-scm-agent/agent-cert/cm-auto-global_cacerts.pem server oozie3 my-oozie-host-3:11443/oozie check ssl ca-file /var/lib/cloudera-scm-agent/agent-cert/cm-auto-global_cacerts.pem
#---------------------------------------------------------------------# main frontend which proxys to the http backends#---------------------------------------------------------------------frontend oozie_front_http bind *:5002 default_backend oozie_http
#---------------------------------------------------------------------# round robin balancing between the various http backends#---------------------------------------------------------------------backend oozie_http balance roundrobin server oozie_http1 my-oozie-host-1:11000/oozie check server oozie_http2 my-oozie-host-2:11000/oozie check server oozie_http3 my-oozie-host-3:11000/oozie check
Using the example, the load balancer is setup for three Oozie instances. The load balancer listens on port 5002for HTTP connections and forwards it to Oozie’s port 11000. The load balancer listens on port 5000 for HTTPSconnections and forwards it to Oozie’s port 11443.
If you not enabled SSL in Oozie, then you do not need the HTTPS load balancer. For HTTPS load balancing,ensure that you set up the certificate.
3. Continue to configure the load balancer by enabling Oozie High Availability. For information about enablingOozie High Availability, see Enabling Oozie High Availability .
Atlas advanced configuration snippet (Safety valve)If non-default user names are used, then you must set this parameter. This section is not applicable if you areupgrading to CDP Private Cloud Base 7.1.7.
Note: This setting is needed only for non default zookeeper user.
1. Log into Cloudera Manager UI.2. Navigate to Clusters3. Select the Atlas service4. Go to Configurations5. Search for Atlas Server Environment Advanced Configuration Snippet6. Rename ATLAS_OPTS to ATLAS_CUSTOM_OPTS
PhoenixAdd the Apache Phoenix service. If you are using Phoenix Query Server (PQS) in your source HDP deployment, youmust manually add the Apache Phoenix service using Cloudera Manager to complete the Phoenix upgrade.
141
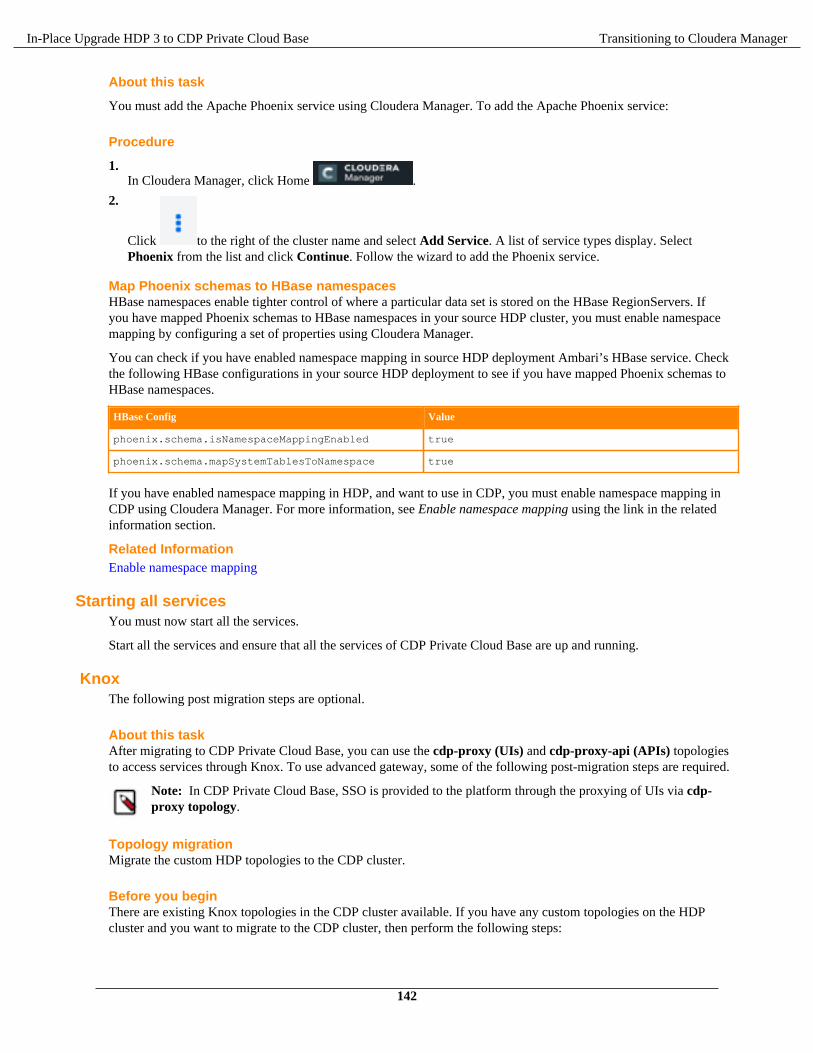
In-Place Upgrade HDP 3 to CDP Private Cloud Base Transitioning to Cloudera Manager
About this task
You must add the Apache Phoenix service using Cloudera Manager. To add the Apache Phoenix service:
Procedure
1.In Cloudera Manager, click Home .
2.
Click to the right of the cluster name and select Add Service. A list of service types display. SelectPhoenix from the list and click Continue. Follow the wizard to add the Phoenix service.
Map Phoenix schemas to HBase namespacesHBase namespaces enable tighter control of where a particular data set is stored on the HBase RegionServers. Ifyou have mapped Phoenix schemas to HBase namespaces in your source HDP cluster, you must enable namespacemapping by configuring a set of properties using Cloudera Manager.
You can check if you have enabled namespace mapping in source HDP deployment Ambari’s HBase service. Checkthe following HBase configurations in your source HDP deployment to see if you have mapped Phoenix schemas toHBase namespaces.
HBase Config Value
phoenix.schema.isNamespaceMappingEnabled true
phoenix.schema.mapSystemTablesToNamespace true
If you have enabled namespace mapping in HDP, and want to use in CDP, you must enable namespace mapping inCDP using Cloudera Manager. For more information, see Enable namespace mapping using the link in the relatedinformation section.
Related InformationEnable namespace mapping
Starting all servicesYou must now start all the services.
Start all the services and ensure that all the services of CDP Private Cloud Base are up and running.
KnoxThe following post migration steps are optional.
About this taskAfter migrating to CDP Private Cloud Base, you can use the cdp-proxy (UIs) and cdp-proxy-api (APIs) topologiesto access services through Knox. To use advanced gateway, some of the following post-migration steps are required.
Note: In CDP Private Cloud Base, SSO is provided to the platform through the proxying of UIs via cdp-proxy topology.
Topology migrationMigrate the custom HDP topologies to the CDP cluster.
Before you beginThere are existing Knox topologies in the CDP cluster available. If you have any custom topologies on the HDPcluster and you want to migrate to the CDP cluster, then perform the following steps:
142
In-Place Upgrade HDP 3 to CDP Private Cloud Base Transitioning to Cloudera Manager
Procedure
1. Add a provider configuration with the details from the providers section of the topology (or providerconfiguration) to be migrated. If the provider configuration contains any credential aliases, then you must addthem. For more information on adding a provider configuration, see Add a provider configuration and for aliases,see Saving Aliases
2. Add a descriptor with the services and corresponding parameters from the topology (or descriptor) to be migrated,referencing the newly added provider configuration. For more information on adding a descriptor, see Add adescriptor
Migrate Credential AliasesMigrate the HDP credential aliases to the CDP cluster.
Before you beginIf you want to migrate Credential Aliases, then see Saving Aliases
Migrate signing keyMigrate Knox’s signing key to the CDP cluster.
Before you beginTo add Knox signing key, you must add the credential aliases and configure the gateway properties.
Procedure
1. If you want to migrate the signing key then the following credential aliases must be added with the correspondingvalues from the HDP signing key store:
• gateway.signing.keystore.password.alias - The password for the signing keystore.• gateway.signing.key.passphrase.alias - The passphrase to sign the private key stored in the signing keystore.
2. In addition, the following gateway properties must be configured with the Cloudera Manager UI:
• gateway.signing.keystore.name• gateway.signing.key.alias• gateway.signing.keystore.type• gateway.signing.keystore.password.alias• gateway.signing.key.passphrase.alias
Configure Apache Knox authentication for AD/LDAPKnox authentication configurations for LDAP and AD in Cloudera Manager.
About this taskFor more information on configuring Knox LDAP in Cloudera Manager, see Configuring Knox LDAP
Client ConfigurationsMigrating from Ambari to Cloudera Manager can leave the Ambari-managed HDP artifacts and links that may nothave changed. After everything has been configured, deploy Client Configuration [Cloudera Manager > Clusters >Actions > Deploy Client Configurations]. This fixes any missing configuration references in the cluster.
Securing ZooKeeperBy default, the AM2CM tool adds the -Dzookeeper.skipACL=yes configuration to assist with the migration.You must remove the -Dzookeeper.skipACL=yes configuration under Java Configuration Options forZookeeper Service to secure ZooKeeper and restart the service.
143
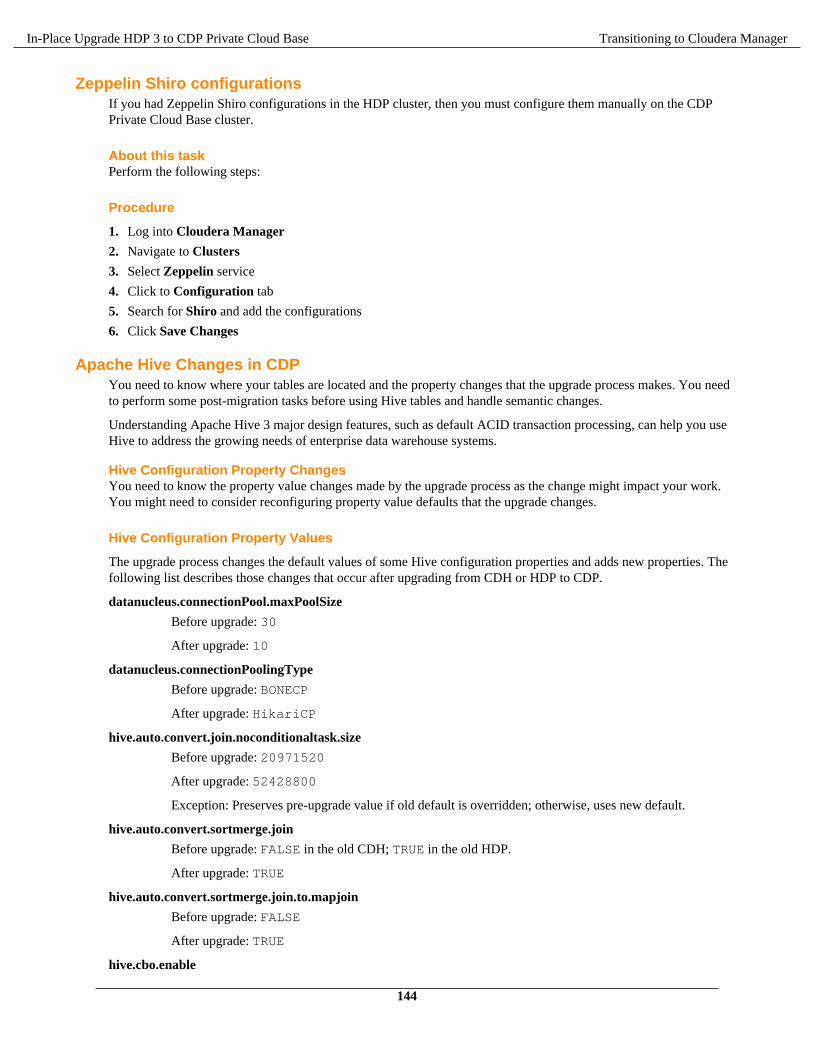
In-Place Upgrade HDP 3 to CDP Private Cloud Base Transitioning to Cloudera Manager
Zeppelin Shiro configurationsIf you had Zeppelin Shiro configurations in the HDP cluster, then you must configure them manually on the CDPPrivate Cloud Base cluster.
About this taskPerform the following steps:
Procedure
1. Log into Cloudera Manager
2. Navigate to Clusters
3. Select Zeppelin service
4. Click to Configuration tab
5. Search for Shiro and add the configurations
6. Click Save Changes
Apache Hive Changes in CDPYou need to know where your tables are located and the property changes that the upgrade process makes. You needto perform some post-migration tasks before using Hive tables and handle semantic changes.
Understanding Apache Hive 3 major design features, such as default ACID transaction processing, can help you useHive to address the growing needs of enterprise data warehouse systems.
Hive Configuration Property ChangesYou need to know the property value changes made by the upgrade process as the change might impact your work.You might need to consider reconfiguring property value defaults that the upgrade changes.
Hive Configuration Property Values
The upgrade process changes the default values of some Hive configuration properties and adds new properties. Thefollowing list describes those changes that occur after upgrading from CDH or HDP to CDP.
datanucleus.connectionPool.maxPoolSize
Before upgrade: 30
After upgrade: 10
datanucleus.connectionPoolingType
Before upgrade: BONECP
After upgrade: HikariCP
hive.auto.convert.join.noconditionaltask.size
Before upgrade: 20971520
After upgrade: 52428800
Exception: Preserves pre-upgrade value if old default is overridden; otherwise, uses new default.
hive.auto.convert.sortmerge.join
Before upgrade: FALSE in the old CDH; TRUE in the old HDP.
After upgrade: TRUE
hive.auto.convert.sortmerge.join.to.mapjoin
Before upgrade: FALSE
After upgrade: TRUE
hive.cbo.enable
144
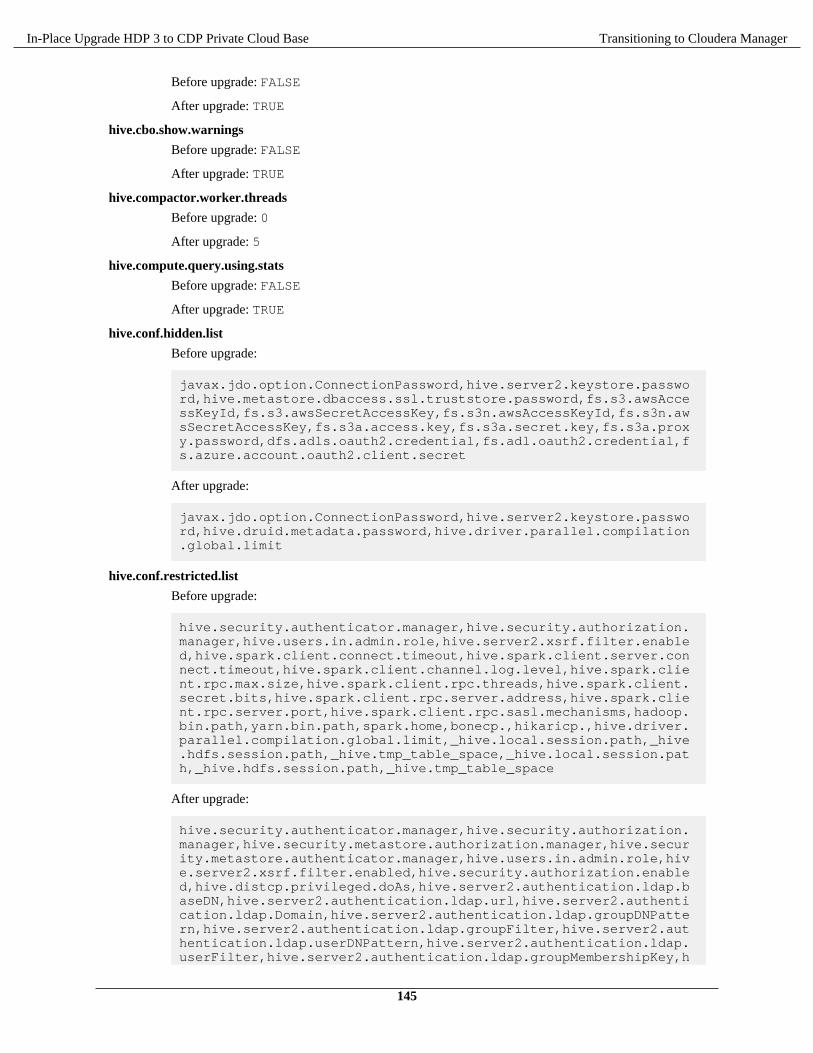
In-Place Upgrade HDP 3 to CDP Private Cloud Base Transitioning to Cloudera Manager
Before upgrade: FALSE
After upgrade: TRUE
hive.cbo.show.warnings
Before upgrade: FALSE
After upgrade: TRUE
hive.compactor.worker.threads
Before upgrade: 0
After upgrade: 5
hive.compute.query.using.stats
Before upgrade: FALSE
After upgrade: TRUE
hive.conf.hidden.list
Before upgrade:
javax.jdo.option.ConnectionPassword,hive.server2.keystore.password,hive.metastore.dbaccess.ssl.truststore.password,fs.s3.awsAccessKeyId,fs.s3.awsSecretAccessKey,fs.s3n.awsAccessKeyId,fs.s3n.awsSecretAccessKey,fs.s3a.access.key,fs.s3a.secret.key,fs.s3a.proxy.password,dfs.adls.oauth2.credential,fs.adl.oauth2.credential,fs.azure.account.oauth2.client.secret
After upgrade:
javax.jdo.option.ConnectionPassword,hive.server2.keystore.password,hive.druid.metadata.password,hive.driver.parallel.compilation.global.limit
hive.conf.restricted.list
Before upgrade:
hive.security.authenticator.manager,hive.security.authorization.manager,hive.users.in.admin.role,hive.server2.xsrf.filter.enabled,hive.spark.client.connect.timeout,hive.spark.client.server.connect.timeout,hive.spark.client.channel.log.level,hive.spark.client.rpc.max.size,hive.spark.client.rpc.threads,hive.spark.client.secret.bits,hive.spark.client.rpc.server.address,hive.spark.client.rpc.server.port,hive.spark.client.rpc.sasl.mechanisms,hadoop.bin.path,yarn.bin.path,spark.home,bonecp.,hikaricp.,hive.driver.parallel.compilation.global.limit,_hive.local.session.path,_hive.hdfs.session.path,_hive.tmp_table_space,_hive.local.session.path,_hive.hdfs.session.path,_hive.tmp_table_space
After upgrade:
hive.security.authenticator.manager,hive.security.authorization.manager,hive.security.metastore.authorization.manager,hive.security.metastore.authenticator.manager,hive.users.in.admin.role,hive.server2.xsrf.filter.enabled,hive.security.authorization.enabled,hive.distcp.privileged.doAs,hive.server2.authentication.ldap.baseDN,hive.server2.authentication.ldap.url,hive.server2.authentication.ldap.Domain,hive.server2.authentication.ldap.groupDNPattern,hive.server2.authentication.ldap.groupFilter,hive.server2.authentication.ldap.userDNPattern,hive.server2.authentication.ldap.userFilter,hive.server2.authentication.ldap.groupMembershipKey,h
145
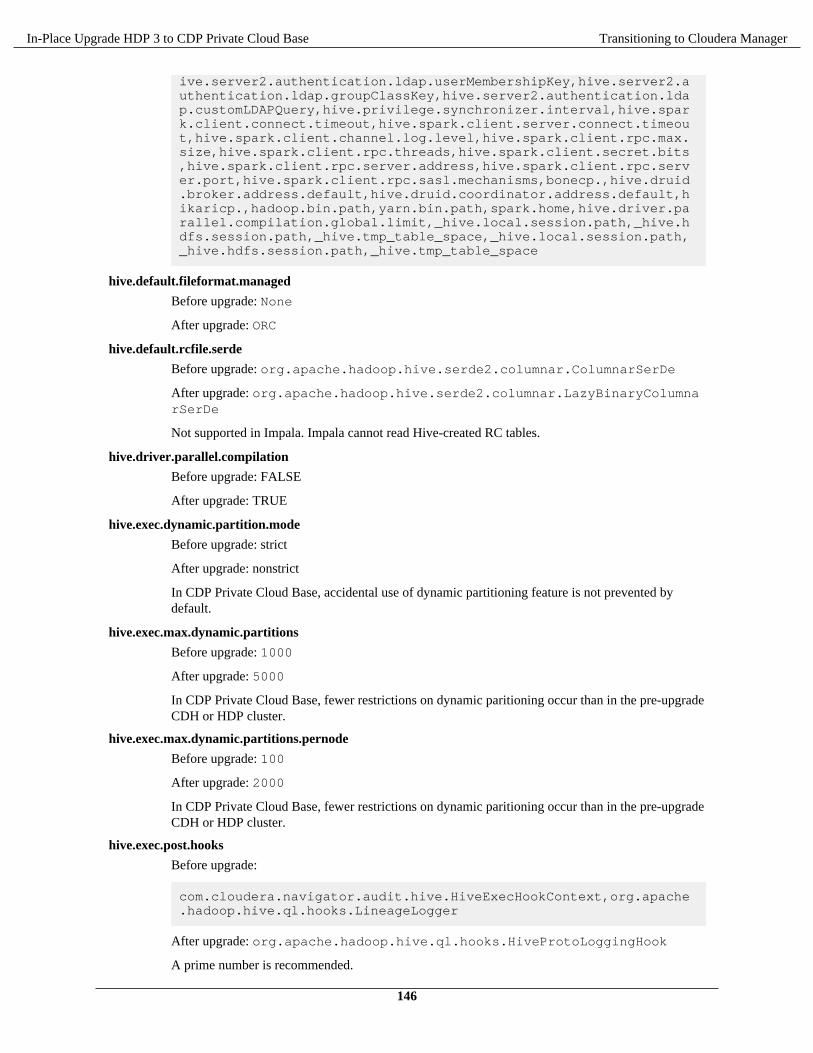
In-Place Upgrade HDP 3 to CDP Private Cloud Base Transitioning to Cloudera Manager
ive.server2.authentication.ldap.userMembershipKey,hive.server2.authentication.ldap.groupClassKey,hive.server2.authentication.ldap.customLDAPQuery,hive.privilege.synchronizer.interval,hive.spark.client.connect.timeout,hive.spark.client.server.connect.timeout,hive.spark.client.channel.log.level,hive.spark.client.rpc.max.size,hive.spark.client.rpc.threads,hive.spark.client.secret.bits,hive.spark.client.rpc.server.address,hive.spark.client.rpc.server.port,hive.spark.client.rpc.sasl.mechanisms,bonecp.,hive.druid.broker.address.default,hive.druid.coordinator.address.default,hikaricp.,hadoop.bin.path,yarn.bin.path,spark.home,hive.driver.parallel.compilation.global.limit,_hive.local.session.path,_hive.hdfs.session.path,_hive.tmp_table_space,_hive.local.session.path,_hive.hdfs.session.path,_hive.tmp_table_space
hive.default.fileformat.managed
Before upgrade: None
After upgrade: ORC
hive.default.rcfile.serde
Before upgrade: org.apache.hadoop.hive.serde2.columnar.ColumnarSerDe
After upgrade: org.apache.hadoop.hive.serde2.columnar.LazyBinaryColumnarSerDe
Not supported in Impala. Impala cannot read Hive-created RC tables.
hive.driver.parallel.compilation
Before upgrade: FALSE
After upgrade: TRUE
hive.exec.dynamic.partition.mode
Before upgrade: strict
After upgrade: nonstrict
In CDP Private Cloud Base, accidental use of dynamic partitioning feature is not prevented bydefault.
hive.exec.max.dynamic.partitions
Before upgrade: 1000
After upgrade: 5000
In CDP Private Cloud Base, fewer restrictions on dynamic paritioning occur than in the pre-upgradeCDH or HDP cluster.
hive.exec.max.dynamic.partitions.pernode
Before upgrade: 100
After upgrade: 2000
In CDP Private Cloud Base, fewer restrictions on dynamic paritioning occur than in the pre-upgradeCDH or HDP cluster.
hive.exec.post.hooks
Before upgrade:
com.cloudera.navigator.audit.hive.HiveExecHookContext,org.apache.hadoop.hive.ql.hooks.LineageLogger
After upgrade: org.apache.hadoop.hive.ql.hooks.HiveProtoLoggingHook
A prime number is recommended.
146
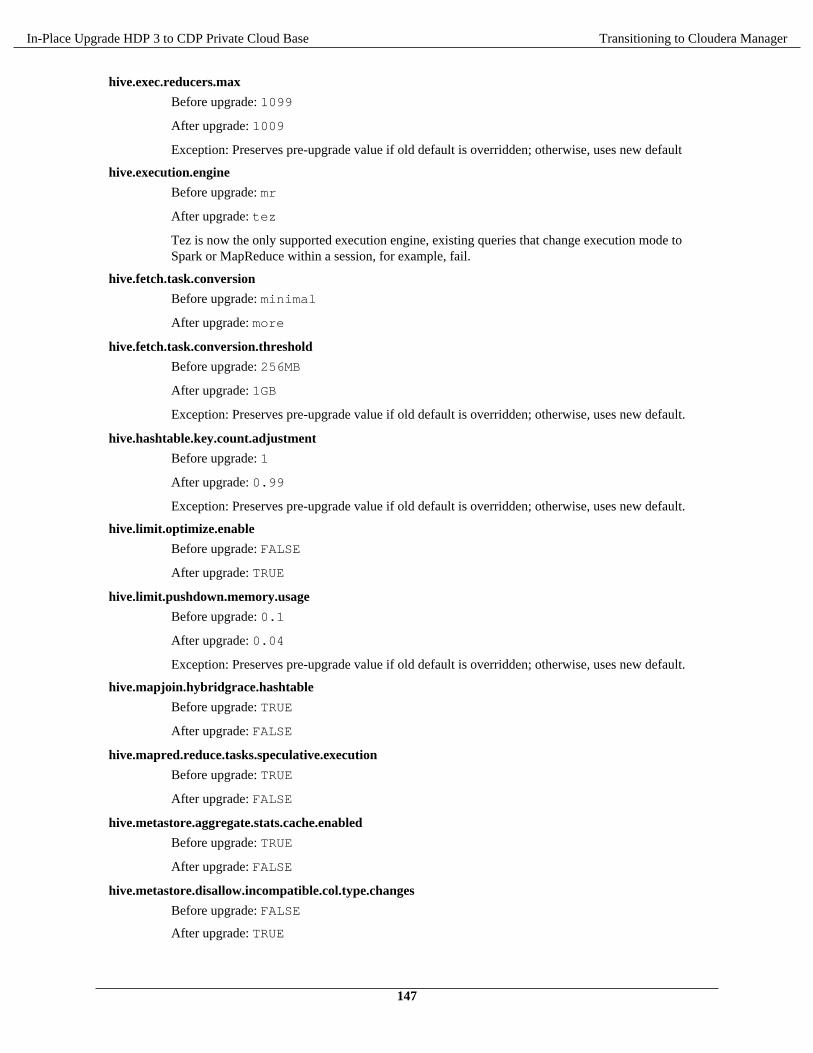
In-Place Upgrade HDP 3 to CDP Private Cloud Base Transitioning to Cloudera Manager
hive.exec.reducers.max
Before upgrade: 1099
After upgrade: 1009
Exception: Preserves pre-upgrade value if old default is overridden; otherwise, uses new default
hive.execution.engine
Before upgrade: mr
After upgrade: tez
Tez is now the only supported execution engine, existing queries that change execution mode toSpark or MapReduce within a session, for example, fail.
hive.fetch.task.conversion
Before upgrade: minimal
After upgrade: more
hive.fetch.task.conversion.threshold
Before upgrade: 256MB
After upgrade: 1GB
Exception: Preserves pre-upgrade value if old default is overridden; otherwise, uses new default.
hive.hashtable.key.count.adjustment
Before upgrade: 1
After upgrade: 0.99
Exception: Preserves pre-upgrade value if old default is overridden; otherwise, uses new default.
hive.limit.optimize.enable
Before upgrade: FALSE
After upgrade: TRUE
hive.limit.pushdown.memory.usage
Before upgrade: 0.1
After upgrade: 0.04
Exception: Preserves pre-upgrade value if old default is overridden; otherwise, uses new default.
hive.mapjoin.hybridgrace.hashtable
Before upgrade: TRUE
After upgrade: FALSE
hive.mapred.reduce.tasks.speculative.execution
Before upgrade: TRUE
After upgrade: FALSE
hive.metastore.aggregate.stats.cache.enabled
Before upgrade: TRUE
After upgrade: FALSE
hive.metastore.disallow.incompatible.col.type.changes
Before upgrade: FALSE
After upgrade: TRUE
147
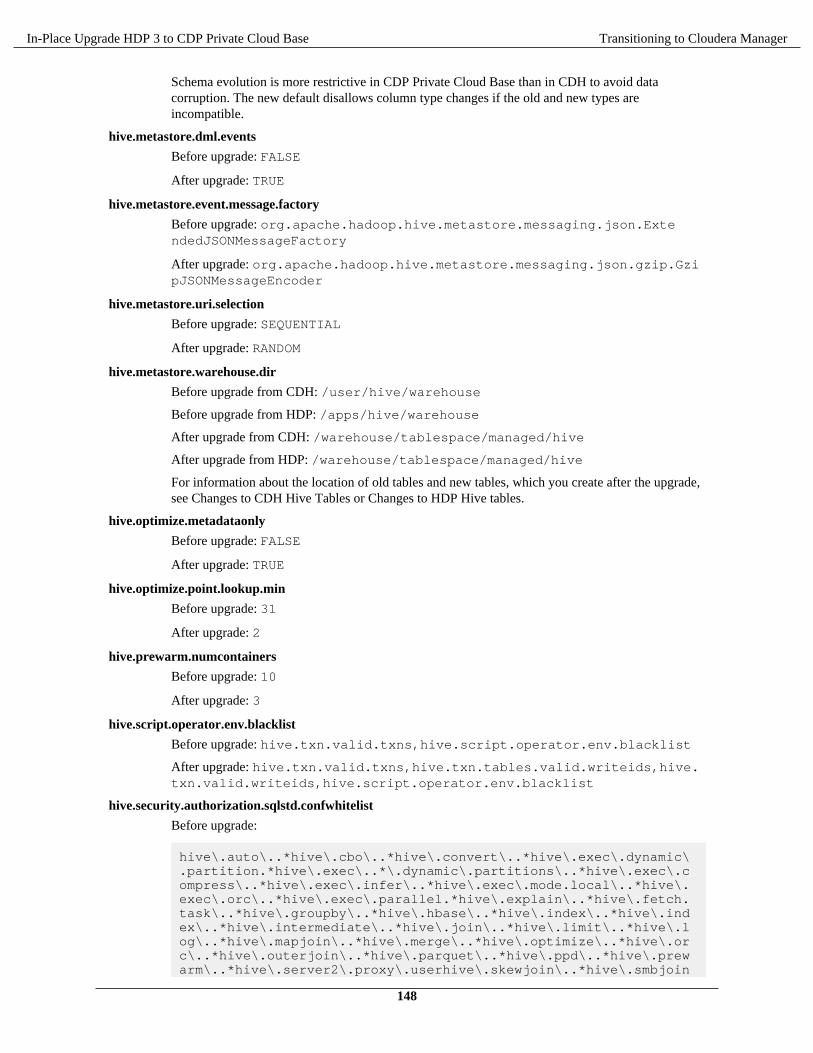
In-Place Upgrade HDP 3 to CDP Private Cloud Base Transitioning to Cloudera Manager
Schema evolution is more restrictive in CDP Private Cloud Base than in CDH to avoid datacorruption. The new default disallows column type changes if the old and new types areincompatible.
hive.metastore.dml.events
Before upgrade: FALSE
After upgrade: TRUE
hive.metastore.event.message.factory
Before upgrade: org.apache.hadoop.hive.metastore.messaging.json.ExtendedJSONMessageFactory
After upgrade: org.apache.hadoop.hive.metastore.messaging.json.gzip.GzipJSONMessageEncoder
hive.metastore.uri.selection
Before upgrade: SEQUENTIAL
After upgrade: RANDOM
hive.metastore.warehouse.dir
Before upgrade from CDH: /user/hive/warehouse
Before upgrade from HDP: /apps/hive/warehouse
After upgrade from CDH: /warehouse/tablespace/managed/hive
After upgrade from HDP: /warehouse/tablespace/managed/hive
For information about the location of old tables and new tables, which you create after the upgrade,see Changes to CDH Hive Tables or Changes to HDP Hive tables.
hive.optimize.metadataonly
Before upgrade: FALSE
After upgrade: TRUE
hive.optimize.point.lookup.min
Before upgrade: 31
After upgrade: 2
hive.prewarm.numcontainers
Before upgrade: 10
After upgrade: 3
hive.script.operator.env.blacklist
Before upgrade: hive.txn.valid.txns,hive.script.operator.env.blacklist
After upgrade: hive.txn.valid.txns,hive.txn.tables.valid.writeids,hive.txn.valid.writeids,hive.script.operator.env.blacklist
hive.security.authorization.sqlstd.confwhitelist
Before upgrade:
hive\.auto\..*hive\.cbo\..*hive\.convert\..*hive\.exec\.dynamic\.partition.*hive\.exec\..*\.dynamic\.partitions\..*hive\.exec\.compress\..*hive\.exec\.infer\..*hive\.exec\.mode.local\..*hive\.exec\.orc\..*hive\.exec\.parallel.*hive\.explain\..*hive\.fetch.task\..*hive\.groupby\..*hive\.hbase\..*hive\.index\..*hive\.index\..*hive\.intermediate\..*hive\.join\..*hive\.limit\..*hive\.log\..*hive\.mapjoin\..*hive\.merge\..*hive\.optimize\..*hive\.orc\..*hive\.outerjoin\..*hive\.parquet\..*hive\.ppd\..*hive\.prewarm\..*hive\.server2\.proxy\.userhive\.skewjoin\..*hive\.smbjoin
148
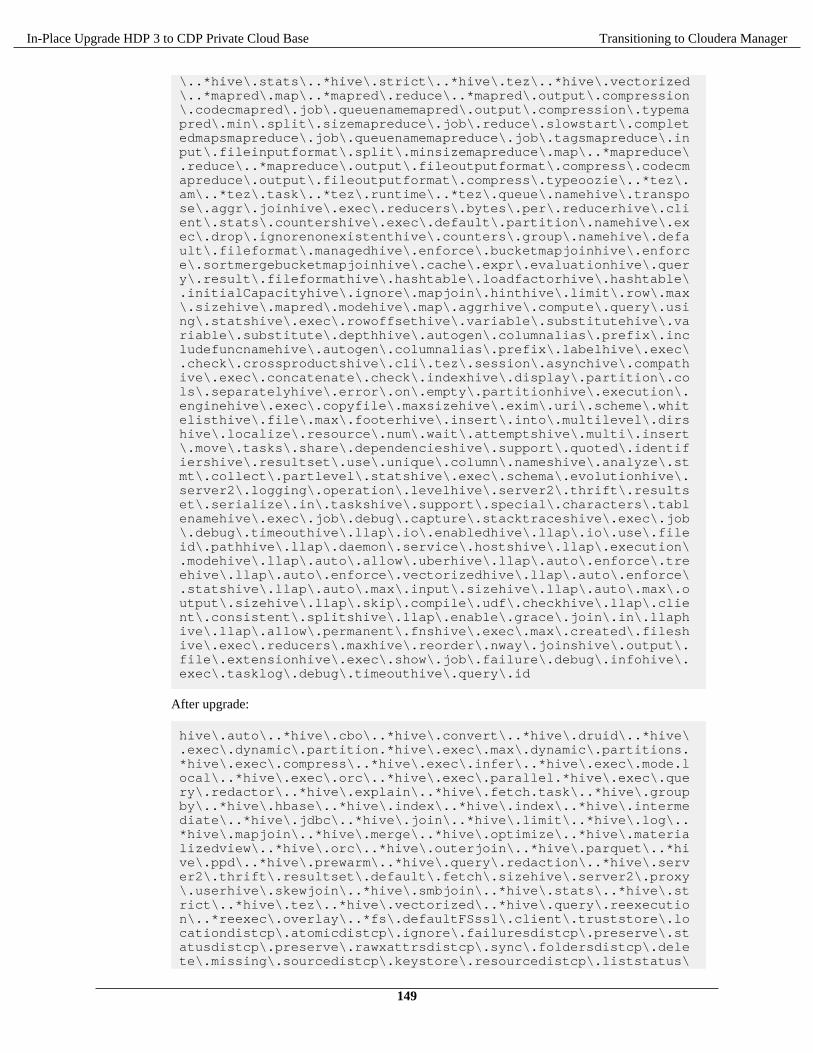
In-Place Upgrade HDP 3 to CDP Private Cloud Base Transitioning to Cloudera Manager
\..*hive\.stats\..*hive\.strict\..*hive\.tez\..*hive\.vectorized\..*mapred\.map\..*mapred\.reduce\..*mapred\.output\.compression\.codecmapred\.job\.queuenamemapred\.output\.compression\.typemapred\.min\.split\.sizemapreduce\.job\.reduce\.slowstart\.completedmapsmapreduce\.job\.queuenamemapreduce\.job\.tagsmapreduce\.input\.fileinputformat\.split\.minsizemapreduce\.map\..*mapreduce\.reduce\..*mapreduce\.output\.fileoutputformat\.compress\.codecmapreduce\.output\.fileoutputformat\.compress\.typeoozie\..*tez\.am\..*tez\.task\..*tez\.runtime\..*tez\.queue\.namehive\.transpose\.aggr\.joinhive\.exec\.reducers\.bytes\.per\.reducerhive\.client\.stats\.countershive\.exec\.default\.partition\.namehive\.exec\.drop\.ignorenonexistenthive\.counters\.group\.namehive\.default\.fileformat\.managedhive\.enforce\.bucketmapjoinhive\.enforce\.sortmergebucketmapjoinhive\.cache\.expr\.evaluationhive\.query\.result\.fileformathive\.hashtable\.loadfactorhive\.hashtable\.initialCapacityhive\.ignore\.mapjoin\.hinthive\.limit\.row\.max\.sizehive\.mapred\.modehive\.map\.aggrhive\.compute\.query\.using\.statshive\.exec\.rowoffsethive\.variable\.substitutehive\.variable\.substitute\.depthhive\.autogen\.columnalias\.prefix\.includefuncnamehive\.autogen\.columnalias\.prefix\.labelhive\.exec\.check\.crossproductshive\.cli\.tez\.session\.asynchive\.compathive\.exec\.concatenate\.check\.indexhive\.display\.partition\.cols\.separatelyhive\.error\.on\.empty\.partitionhive\.execution\.enginehive\.exec\.copyfile\.maxsizehive\.exim\.uri\.scheme\.whitelisthive\.file\.max\.footerhive\.insert\.into\.multilevel\.dirshive\.localize\.resource\.num\.wait\.attemptshive\.multi\.insert\.move\.tasks\.share\.dependencieshive\.support\.quoted\.identifiershive\.resultset\.use\.unique\.column\.nameshive\.analyze\.stmt\.collect\.partlevel\.statshive\.exec\.schema\.evolutionhive\.server2\.logging\.operation\.levelhive\.server2\.thrift\.resultset\.serialize\.in\.taskshive\.support\.special\.characters\.tablenamehive\.exec\.job\.debug\.capture\.stacktraceshive\.exec\.job\.debug\.timeouthive\.llap\.io\.enabledhive\.llap\.io\.use\.fileid\.pathhive\.llap\.daemon\.service\.hostshive\.llap\.execution\.modehive\.llap\.auto\.allow\.uberhive\.llap\.auto\.enforce\.treehive\.llap\.auto\.enforce\.vectorizedhive\.llap\.auto\.enforce\.statshive\.llap\.auto\.max\.input\.sizehive\.llap\.auto\.max\.output\.sizehive\.llap\.skip\.compile\.udf\.checkhive\.llap\.client\.consistent\.splitshive\.llap\.enable\.grace\.join\.in\.llaphive\.llap\.allow\.permanent\.fnshive\.exec\.max\.created\.fileshive\.exec\.reducers\.maxhive\.reorder\.nway\.joinshive\.output\.file\.extensionhive\.exec\.show\.job\.failure\.debug\.infohive\.exec\.tasklog\.debug\.timeouthive\.query\.id
After upgrade:
hive\.auto\..*hive\.cbo\..*hive\.convert\..*hive\.druid\..*hive\.exec\.dynamic\.partition.*hive\.exec\.max\.dynamic\.partitions.*hive\.exec\.compress\..*hive\.exec\.infer\..*hive\.exec\.mode.local\..*hive\.exec\.orc\..*hive\.exec\.parallel.*hive\.exec\.query\.redactor\..*hive\.explain\..*hive\.fetch.task\..*hive\.groupby\..*hive\.hbase\..*hive\.index\..*hive\.index\..*hive\.intermediate\..*hive\.jdbc\..*hive\.join\..*hive\.limit\..*hive\.log\..*hive\.mapjoin\..*hive\.merge\..*hive\.optimize\..*hive\.materializedview\..*hive\.orc\..*hive\.outerjoin\..*hive\.parquet\..*hive\.ppd\..*hive\.prewarm\..*hive\.query\.redaction\..*hive\.server2\.thrift\.resultset\.default\.fetch\.sizehive\.server2\.proxy\.userhive\.skewjoin\..*hive\.smbjoin\..*hive\.stats\..*hive\.strict\..*hive\.tez\..*hive\.vectorized\..*hive\.query\.reexecution\..*reexec\.overlay\..*fs\.defaultFSssl\.client\.truststore\.locationdistcp\.atomicdistcp\.ignore\.failuresdistcp\.preserve\.statusdistcp\.preserve\.rawxattrsdistcp\.sync\.foldersdistcp\.delete\.missing\.sourcedistcp\.keystore\.resourcedistcp\.liststatus\
149
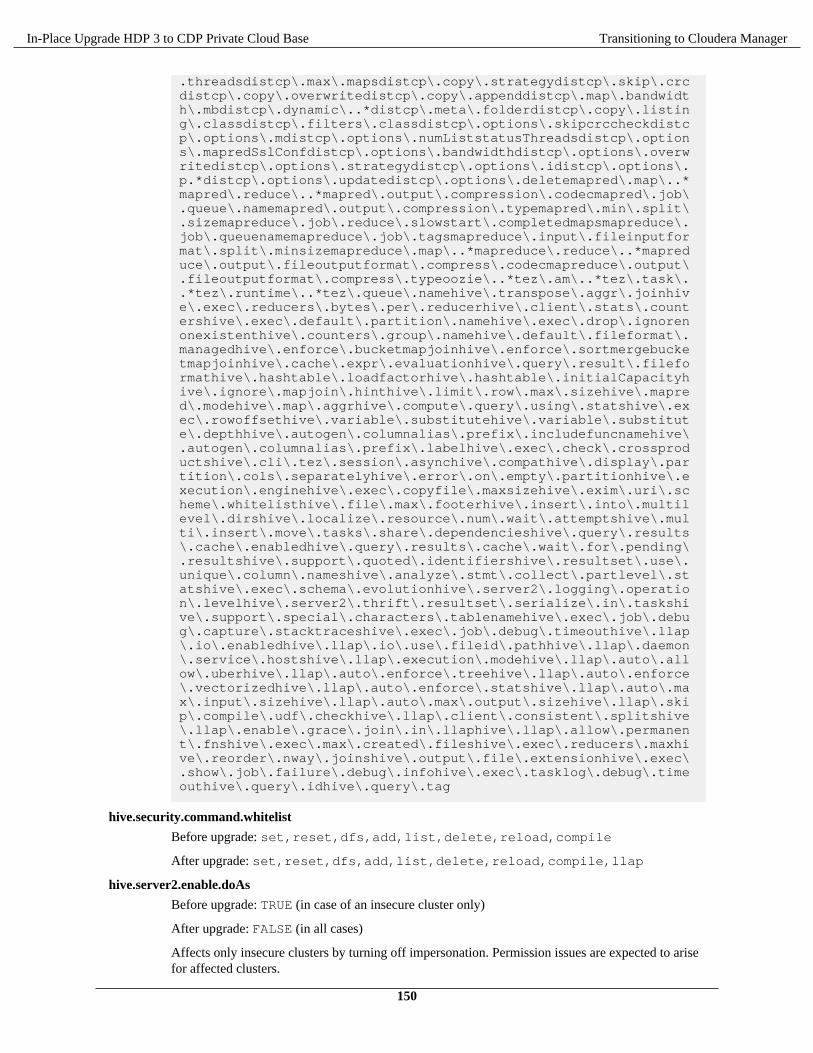
In-Place Upgrade HDP 3 to CDP Private Cloud Base Transitioning to Cloudera Manager
.threadsdistcp\.max\.mapsdistcp\.copy\.strategydistcp\.skip\.crcdistcp\.copy\.overwritedistcp\.copy\.appenddistcp\.map\.bandwidth\.mbdistcp\.dynamic\..*distcp\.meta\.folderdistcp\.copy\.listing\.classdistcp\.filters\.classdistcp\.options\.skipcrccheckdistcp\.options\.mdistcp\.options\.numListstatusThreadsdistcp\.options\.mapredSslConfdistcp\.options\.bandwidthdistcp\.options\.overwritedistcp\.options\.strategydistcp\.options\.idistcp\.options\.p.*distcp\.options\.updatedistcp\.options\.deletemapred\.map\..*mapred\.reduce\..*mapred\.output\.compression\.codecmapred\.job\.queue\.namemapred\.output\.compression\.typemapred\.min\.split\.sizemapreduce\.job\.reduce\.slowstart\.completedmapsmapreduce\.job\.queuenamemapreduce\.job\.tagsmapreduce\.input\.fileinputformat\.split\.minsizemapreduce\.map\..*mapreduce\.reduce\..*mapreduce\.output\.fileoutputformat\.compress\.codecmapreduce\.output\.fileoutputformat\.compress\.typeoozie\..*tez\.am\..*tez\.task\..*tez\.runtime\..*tez\.queue\.namehive\.transpose\.aggr\.joinhive\.exec\.reducers\.bytes\.per\.reducerhive\.client\.stats\.countershive\.exec\.default\.partition\.namehive\.exec\.drop\.ignorenonexistenthive\.counters\.group\.namehive\.default\.fileformat\.managedhive\.enforce\.bucketmapjoinhive\.enforce\.sortmergebucketmapjoinhive\.cache\.expr\.evaluationhive\.query\.result\.fileformathive\.hashtable\.loadfactorhive\.hashtable\.initialCapacityhive\.ignore\.mapjoin\.hinthive\.limit\.row\.max\.sizehive\.mapred\.modehive\.map\.aggrhive\.compute\.query\.using\.statshive\.exec\.rowoffsethive\.variable\.substitutehive\.variable\.substitute\.depthhive\.autogen\.columnalias\.prefix\.includefuncnamehive\.autogen\.columnalias\.prefix\.labelhive\.exec\.check\.crossproductshive\.cli\.tez\.session\.asynchive\.compathive\.display\.partition\.cols\.separatelyhive\.error\.on\.empty\.partitionhive\.execution\.enginehive\.exec\.copyfile\.maxsizehive\.exim\.uri\.scheme\.whitelisthive\.file\.max\.footerhive\.insert\.into\.multilevel\.dirshive\.localize\.resource\.num\.wait\.attemptshive\.multi\.insert\.move\.tasks\.share\.dependencieshive\.query\.results\.cache\.enabledhive\.query\.results\.cache\.wait\.for\.pending\.resultshive\.support\.quoted\.identifiershive\.resultset\.use\.unique\.column\.nameshive\.analyze\.stmt\.collect\.partlevel\.statshive\.exec\.schema\.evolutionhive\.server2\.logging\.operation\.levelhive\.server2\.thrift\.resultset\.serialize\.in\.taskshive\.support\.special\.characters\.tablenamehive\.exec\.job\.debug\.capture\.stacktraceshive\.exec\.job\.debug\.timeouthive\.llap\.io\.enabledhive\.llap\.io\.use\.fileid\.pathhive\.llap\.daemon\.service\.hostshive\.llap\.execution\.modehive\.llap\.auto\.allow\.uberhive\.llap\.auto\.enforce\.treehive\.llap\.auto\.enforce\.vectorizedhive\.llap\.auto\.enforce\.statshive\.llap\.auto\.max\.input\.sizehive\.llap\.auto\.max\.output\.sizehive\.llap\.skip\.compile\.udf\.checkhive\.llap\.client\.consistent\.splitshive\.llap\.enable\.grace\.join\.in\.llaphive\.llap\.allow\.permanent\.fnshive\.exec\.max\.created\.fileshive\.exec\.reducers\.maxhive\.reorder\.nway\.joinshive\.output\.file\.extensionhive\.exec\.show\.job\.failure\.debug\.infohive\.exec\.tasklog\.debug\.timeouthive\.query\.idhive\.query\.tag
hive.security.command.whitelist
Before upgrade: set,reset,dfs,add,list,delete,reload,compile
After upgrade: set,reset,dfs,add,list,delete,reload,compile,llap
hive.server2.enable.doAs
Before upgrade: TRUE (in case of an insecure cluster only)
After upgrade: FALSE (in all cases)
Affects only insecure clusters by turning off impersonation. Permission issues are expected to arisefor affected clusters.
150
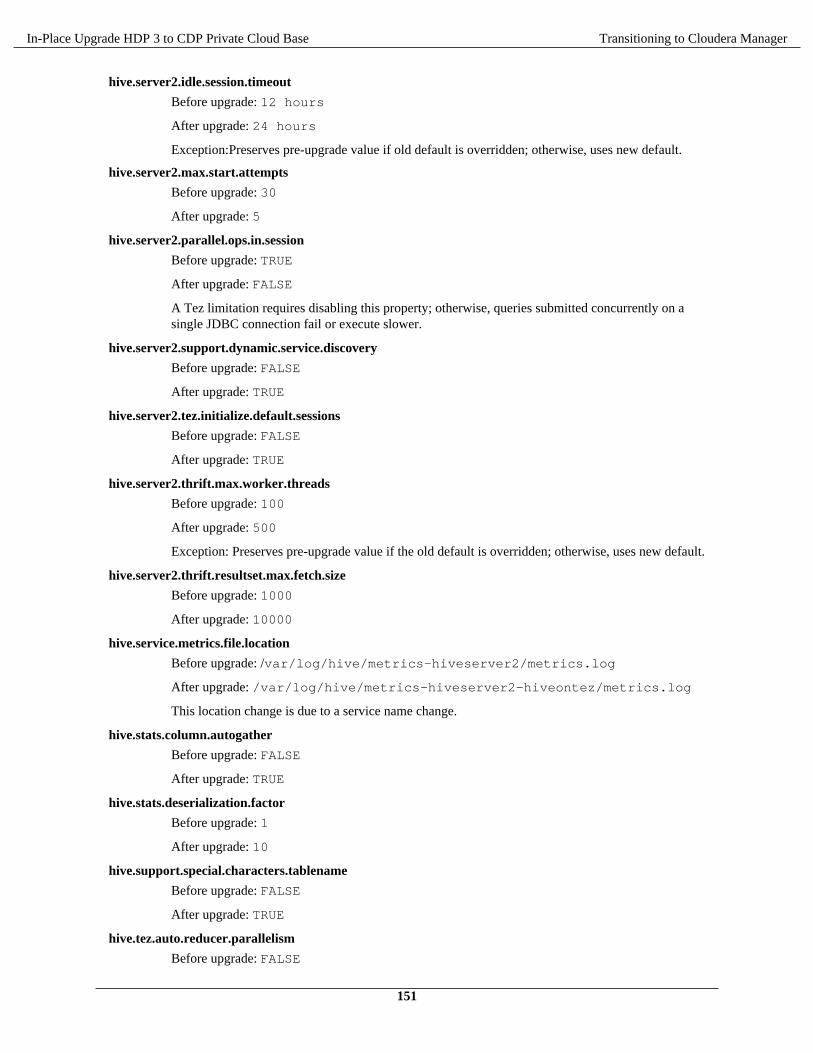
In-Place Upgrade HDP 3 to CDP Private Cloud Base Transitioning to Cloudera Manager
hive.server2.idle.session.timeout
Before upgrade: 12 hours
After upgrade: 24 hours
Exception:Preserves pre-upgrade value if old default is overridden; otherwise, uses new default.
hive.server2.max.start.attempts
Before upgrade: 30
After upgrade: 5
hive.server2.parallel.ops.in.session
Before upgrade: TRUE
After upgrade: FALSE
A Tez limitation requires disabling this property; otherwise, queries submitted concurrently on asingle JDBC connection fail or execute slower.
hive.server2.support.dynamic.service.discovery
Before upgrade: FALSE
After upgrade: TRUE
hive.server2.tez.initialize.default.sessions
Before upgrade: FALSE
After upgrade: TRUE
hive.server2.thrift.max.worker.threads
Before upgrade: 100
After upgrade: 500
Exception: Preserves pre-upgrade value if the old default is overridden; otherwise, uses new default.
hive.server2.thrift.resultset.max.fetch.size
Before upgrade: 1000
After upgrade: 10000
hive.service.metrics.file.location
Before upgrade: /var/log/hive/metrics-hiveserver2/metrics.log
After upgrade: /var/log/hive/metrics-hiveserver2-hiveontez/metrics.log
This location change is due to a service name change.
hive.stats.column.autogather
Before upgrade: FALSE
After upgrade: TRUE
hive.stats.deserialization.factor
Before upgrade: 1
After upgrade: 10
hive.support.special.characters.tablename
Before upgrade: FALSE
After upgrade: TRUE
hive.tez.auto.reducer.parallelism
Before upgrade: FALSE
151
In-Place Upgrade HDP 3 to CDP Private Cloud Base Transitioning to Cloudera Manager
After upgrade: TRUE
hive.tez.bucket.pruning
Before upgrade: FALSE
After upgrade: TRUE
hive.tez.container.size
Before upgrade: -1
After upgrade: 4096
hive.tez.exec.print.summary
Before upgrade: FALSE
After upgrade: TRUE
hive.txn.manager
Before upgrade: org.apache.hadoop.hive.ql.lockmgr.DummyTxnManager
After upgrade: org.apache.hadoop.hive.ql.lockmgr.DbTxnManager
hive.vectorized.execution.mapjoin.minmax.enabled
Before upgrade: FALSE
After upgrade: TRUE
hive.vectorized.execution.mapjoin.native.fast.hashtable.enabled
Before upgrade: FALSE
After upgrade: TRUE
hive.vectorized.use.row.serde.deserialize
Before upgrade: FALSE
After upgrade: TRUE
Related InformationChanges to HDP Hive Tables
Customizing critical Hive configurationsAs Administrator, you need property configuration guidelines. You need to know which properties you need toreconfigure after upgrading. You must understand which the upgrade process carries over from the old cluster to thenew cluster.
The CDP upgrade process tries to preserve your Hive configuration property overrides. These overrides are thecustom values you set to configure Hive in the old CDH or HDP cluster. The upgrade process does not perserve alloverrides. For example, a custom value you set for hive.exec.max.dynamic.partitions.pernode ispreserved. In the case of other properties, for example hive.cbo.enable, the upgrade ignores any override andjust sets the CDP-recommended value.
The upgrade process does not preserve overrides to the configuration values of the following properties that youlikely need to reconfigure to meet your needs:
• hive.conf.hidden.list
• hive.conf.restricted.list
• hive.exec.post.hooks
• hive.script.operator.env.blacklist
• hive.security.authorization.sqlstd.confwhitelist
• hive.security.command.whitelist
The Apache Hive Wiki describes these properties. The values of these properties are lists.
152
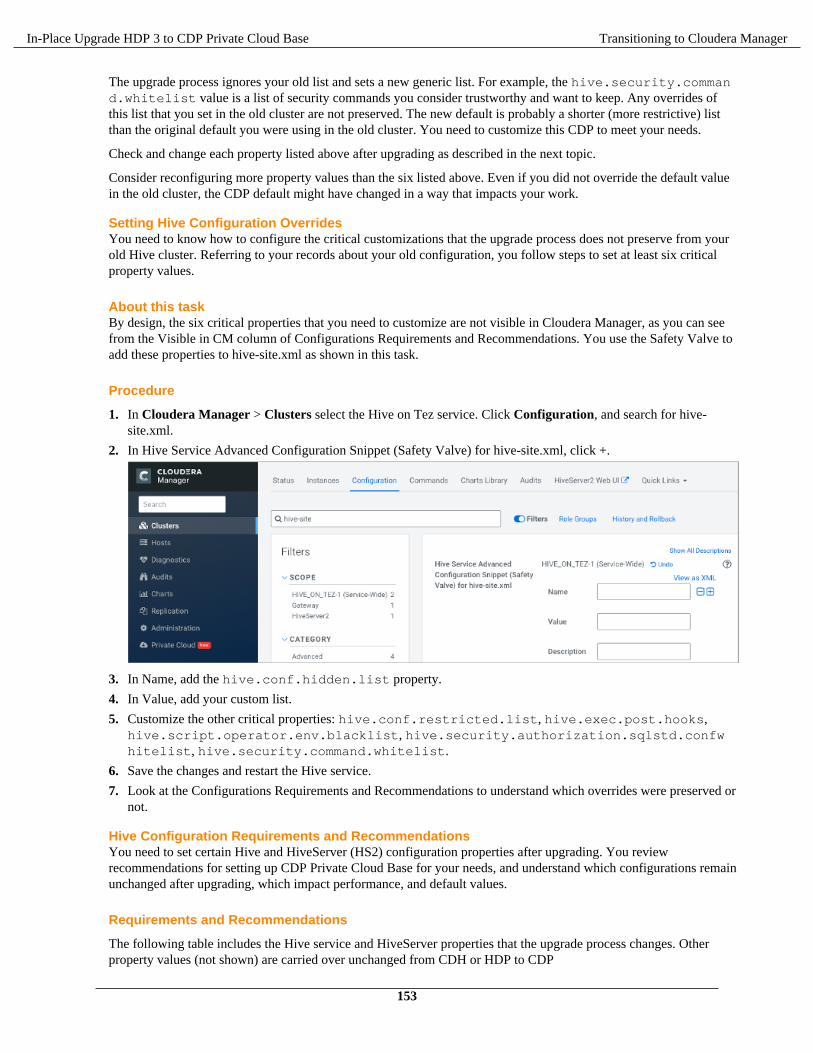
In-Place Upgrade HDP 3 to CDP Private Cloud Base Transitioning to Cloudera Manager
The upgrade process ignores your old list and sets a new generic list. For example, the hive.security.command.whitelist value is a list of security commands you consider trustworthy and want to keep. Any overrides ofthis list that you set in the old cluster are not preserved. The new default is probably a shorter (more restrictive) listthan the original default you were using in the old cluster. You need to customize this CDP to meet your needs.
Check and change each property listed above after upgrading as described in the next topic.
Consider reconfiguring more property values than the six listed above. Even if you did not override the default valuein the old cluster, the CDP default might have changed in a way that impacts your work.
Setting Hive Configuration OverridesYou need to know how to configure the critical customizations that the upgrade process does not preserve from yourold Hive cluster. Referring to your records about your old configuration, you follow steps to set at least six criticalproperty values.
About this taskBy design, the six critical properties that you need to customize are not visible in Cloudera Manager, as you can seefrom the Visible in CM column of Configurations Requirements and Recommendations. You use the Safety Valve toadd these properties to hive-site.xml as shown in this task.
Procedure
1. In Cloudera Manager > Clusters select the Hive on Tez service. Click Configuration, and search for hive-site.xml.
2. In Hive Service Advanced Configuration Snippet (Safety Valve) for hive-site.xml, click +.
3. In Name, add the hive.conf.hidden.list property.
4. In Value, add your custom list.
5. Customize the other critical properties: hive.conf.restricted.list, hive.exec.post.hooks,hive.script.operator.env.blacklist, hive.security.authorization.sqlstd.confwhitelist, hive.security.command.whitelist.
6. Save the changes and restart the Hive service.
7. Look at the Configurations Requirements and Recommendations to understand which overrides were preserved ornot.
Hive Configuration Requirements and RecommendationsYou need to set certain Hive and HiveServer (HS2) configuration properties after upgrading. You reviewrecommendations for setting up CDP Private Cloud Base for your needs, and understand which configurations remainunchanged after upgrading, which impact performance, and default values.
Requirements and Recommendations
The following table includes the Hive service and HiveServer properties that the upgrade process changes. Otherproperty values (not shown) are carried over unchanged from CDH or HDP to CDP
153

In-Place Upgrade HDP 3 to CDP Private Cloud Base Transitioning to Cloudera Manager
• Set After Upgrade column: properties you need to manually configure after the upgrade to CDP. Pre-existingcustomized values are not preserved after the upgrade.
• Default Recommended column: properties that the upgrade process changes to a new value that you are stronglyadvised to use.
• Impacts Performance column: properties changed by the upgrade process that you set to tune performance.• Safety Value Overrides column: How the upgrade process handles Safety Valve overrides.
• Disregards: the upgrade process removes any old CDH Safety Valve configuration snippets from the new CDPconfiguration.
• Preserves means the upgrade process carries over any old CDH snippets to the new CDP configuration.• Not applicable means the value of the old parameter is preserved.
• Visible in CM column: property is visible in Cloudera Manager after upgrading.
If a property is not visible, and you want to configure it, use the Cloudera Manager Safety Valve to safely add theparameter to the correct file, for example to a cluster-wide, hive-site.xml file.
Table 4:
Property Set AfterUpgrade
DefaultRecommended
ImpactsPerformance
NewFeature
Safety Valve Overrides Visible inCM
datanucleus.connectionPool.maxPoolSize # Preserve
datanucleus.connectionPoolingType # Disregard
hive.async.log.enabled Disregard #
hive.auto.convert.join.noconditionaltask.size Not applicable #
hive.auto.convert.sortmerge.join Preserve
hive.auto.convert.sortmerge.join.to.mapjoin Preserve
hive.cbo.enable Disregard #
hive.cbo.show.warnings Disregard
hive.compactor.worker.threads # Disregard #
hive.compute.query.using.stats # Disregard #
hive.conf.hidden.list # Disregard
hive.conf.restricted.list # Disregard
hive.default.fileformat.managed Disregard #
hive.default.rcfile.serde # Preserve
hive.driver.parallel.compilation Disregard #
hive.exec.dynamic.partition.mode Disregard
hive.exec.max.dynamic.partitions Preserve
hive.exec.max.dynamic.partitions.pernode Preserve
hive.exec.post.hooks # Disregard
hive.exec.reducers.max # or otherprimenumber
Not applicable #
hive.execution.engine Disregard
hive.fetch.task.conversion # Not applicable #
hive.fetch.task.conversion.threshold # Not appliable #
hive.hashtable.key.count.adjustment # Preserve
hive.limit.optimize.enable # Disregard
154
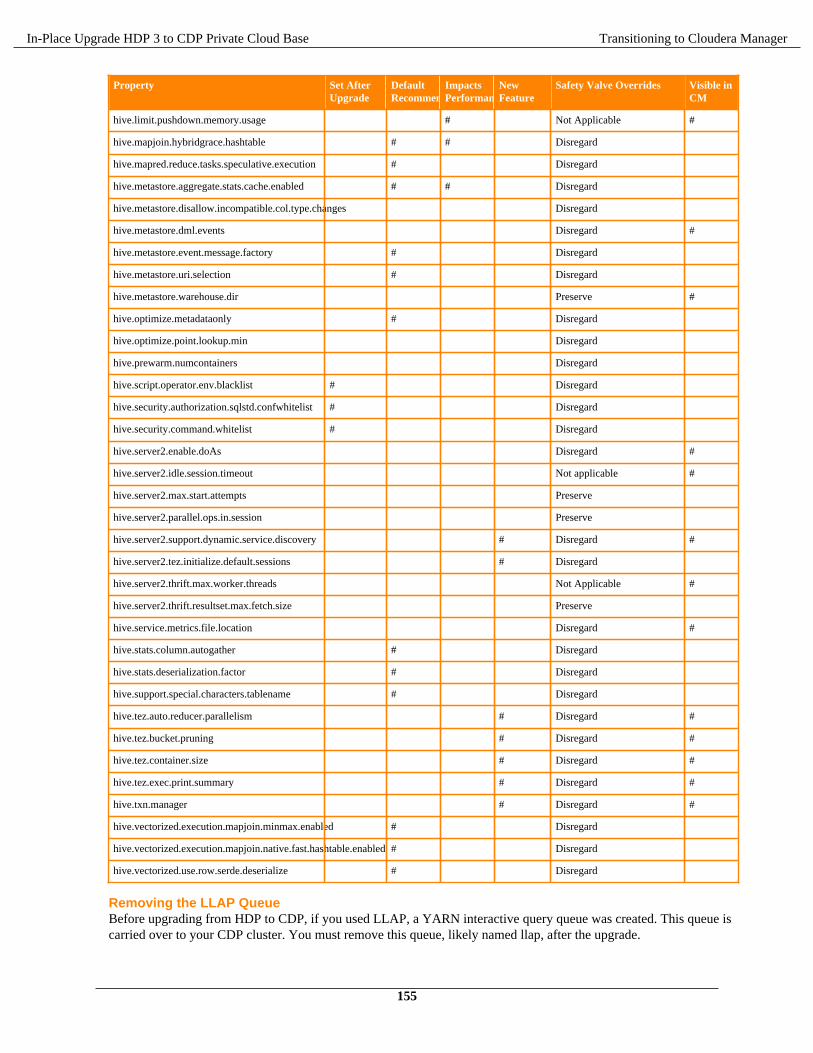
In-Place Upgrade HDP 3 to CDP Private Cloud Base Transitioning to Cloudera Manager
Property Set AfterUpgrade
DefaultRecommended
ImpactsPerformance
NewFeature
Safety Valve Overrides Visible inCM
hive.limit.pushdown.memory.usage # Not Applicable #
hive.mapjoin.hybridgrace.hashtable # # Disregard
hive.mapred.reduce.tasks.speculative.execution # Disregard
hive.metastore.aggregate.stats.cache.enabled # # Disregard
hive.metastore.disallow.incompatible.col.type.changes Disregard
hive.metastore.dml.events Disregard #
hive.metastore.event.message.factory # Disregard
hive.metastore.uri.selection # Disregard
hive.metastore.warehouse.dir Preserve #
hive.optimize.metadataonly # Disregard
hive.optimize.point.lookup.min Disregard
hive.prewarm.numcontainers Disregard
hive.script.operator.env.blacklist # Disregard
hive.security.authorization.sqlstd.confwhitelist # Disregard
hive.security.command.whitelist # Disregard
hive.server2.enable.doAs Disregard #
hive.server2.idle.session.timeout Not applicable #
hive.server2.max.start.attempts Preserve
hive.server2.parallel.ops.in.session Preserve
hive.server2.support.dynamic.service.discovery # Disregard #
hive.server2.tez.initialize.default.sessions # Disregard
hive.server2.thrift.max.worker.threads Not Applicable #
hive.server2.thrift.resultset.max.fetch.size Preserve
hive.service.metrics.file.location Disregard #
hive.stats.column.autogather # Disregard
hive.stats.deserialization.factor # Disregard
hive.support.special.characters.tablename # Disregard
hive.tez.auto.reducer.parallelism # Disregard #
hive.tez.bucket.pruning # Disregard #
hive.tez.container.size # Disregard #
hive.tez.exec.print.summary # Disregard #
hive.txn.manager # Disregard #
hive.vectorized.execution.mapjoin.minmax.enabled # Disregard
hive.vectorized.execution.mapjoin.native.fast.hashtable.enabled # Disregard
hive.vectorized.use.row.serde.deserialize # Disregard
Removing the LLAP QueueBefore upgrading from HDP to CDP, if you used LLAP, a YARN interactive query queue was created. This queue iscarried over to your CDP cluster. You must remove this queue, likely named llap, after the upgrade.
155
In-Place Upgrade HDP 3 to CDP Private Cloud Base Transitioning to Cloudera Manager
About this taskWhen you set up LLAP in an HDP cluster, Ambari creates a queue named llap by default; however, you might havecreated the LLAP queue manually and assigned a different name to the queue. Look for your LLAP and remove it asfollows:
Note: LLAP is not supported on CDP Private Cloud Base.
Procedure
1. In Cloudera Manager, select Clusters > YARN > YARN Queue Manager UI.A graphical queue hierarchy is displayed in the Overview tab.
2.
Click the options menu for the interactive query queue.
3. Click Delete Queue, and confirm deletion.
Configure HiveServer for ETL using YARN queuesAs Administrator or Data Engineer, you upgrade and want to run an ETL job. You need to check, and if not found,add several configuration properties to allow placement of the Hive workload on the Yarn queue manager.
Procedure
1. In Cloudera Manager, click Clusters > Hive > Configuration.
2. Search for the Hive Service Advanced Configuration Snippet (Safety Valve) for hive-site.xml setting.
3. In the Hive Service Advanced Configuration Snippet (Safety Valve) for hive-site.xml setting, click +.
4. In Name enter the property hive.server2.tez.initialize.default.sessions and in value enterfalse.
5. In Name enter the property hive.server2.tez.queue.access.check and in value enter true.
6. In Name enter the property hive.server2.tez.sessions.custom.queue.allowed and in valueenter true.
Related InformationManaging YARN queue users
Configuring authorization to tablesAlthough the upgrade process makes no change to the location of external tables, you need to set up access to externaltables in HDFS. If you choose the recommended Ranger security model for authorization, you need to set up policiesand configure Hive metastore (HMS).
About this task
Set up access to external tables in HDFS using one of the following methods.
• Set up a Hive HDFS policy in Ranger (recommended) to include the paths to external table data.• Put an HDFS ACL in place. Store the external text file, for example a comma-separated values (CSV) file, in
HDFS that will serve as the data source for the external table.
If you want to use Ranger to authorize access to your tables, you must configure a few HMS properties forauthorization in addition to setting up Ranger policies. If you have not configured HMS, attempting to create a tableusing Spark SQL, Beeline, or Hue results in the following error:
org.apache.hadoop.hive.ql.ddl.DDLTask. MetaException(message:No privilege 'Create' found for outputs { database:DATABASE_NAME, table:TABLE_NAME})
Related InformationAuthorizing Apache Hive Access
156
In-Place Upgrade HDP 3 to CDP Private Cloud Base Transitioning to Cloudera Manager
Configuring HMS properties for authorization
Updating Hive and Impala JDBC/ODBC driversAfter upgrading, Cloudera recommends that you update your Hive and Impala JDBC and ODBC drivers. You followa procedure to download a driver.
Before you begin
Configure authenticated users for running SQL queries through a JDBC or ODBC driver. For example, set up aRanger policy.
Getting the JDBC driverYou learn how to download the Cloudera Hive and Impala JDBC drivers to give clients outside the cluster access toyour SQL engines.
Procedure
1. Download the lastest Hive JDBC driver for CDP from the Hive JDBC driver download page.
2. Go to the Impala JDBC driver page, and download the latest Impala JDBC driver.
3. Follow JDBC driver installation instructions on the download page.
Getting the ODBC driverYou learn how to download the Cloudera ODBC drivers for Hive and Impala.
Procedure
1. Download the latest Hive ODBC driver for CDP from the Cloudera ODBC driver download page.
2. Go to the Impala ODBC driver page, and download the latest Impala ODBC driver.
3. Follow ODBC driver installation instructions on the download page.
Setting up access control listsSeveral sources of information about setting up HDFS ACLS plus a brief Ranger overview and pointer to Rangerinformation prepare you to set up Hive authorization.
In CDP Private Cloud Base, HDFS supports POSIX ACLs (Access Control Lists) to assign permissions to usersand groups. In lieu of Ranger policies, you use HDFS ACLs to check and make any necessary changes in HDFSpermission changes. For more information, see HDFS ACLs, Apache Software Foundation HDFS Permissions Guide,and HDFS ACL Permissions.
In Ranger, you give multiple groups and users specific permissions based on your use case. You apply permissions toa directory tree instead of dealing with individual files. For more information, see Authorizing Apache Hive Access.
If possible, you should use Ranger policies over HDFS ACLs to control HDFS access. Controlling HDFS accessthrough Ranger provides a single, unified interface for understanding and managing your overall governanceframework and policy design. If you need to mimic the legacy Sentry HDFS ACL Sync behavior for Hive and Impalatables, consider using Ranger RMS.
Configure encryption zone securityUnder certain conditions, you as Administrator, need to perform a security-related task to allow users to access totables stored in encryption zones. You find out how to prevent access problems to these tables.
About this taskHive on Tez cannot run some queries on tables stored in encryption zones under certain conditions. When the HadoopKey Management Server (KMS) connection is SSL-encrypted, perform the following procedure.
157
In-Place Upgrade HDP 3 to CDP Private Cloud Base Transitioning to Cloudera Manager
Procedure
1. Perform either of the following actions:
• Install self-signed SSL certificate into the cacerts file on all hosts and skip the steps below.• Recommended: Perform the steps below.
2. Copy the ssl-client.xml to a directory that is available on all hosts.
3. In Cloudera Manager, click Clusters > Hive on Tez > Configuration. Clusters > Hive on Tez > Configuration.
4. Search for the Hive Service Advanced Configuration Snippet (Safety Valve) for hive-site.xml setting.
5. In the Hive Service Advanced Configuration Snippet (Safety Valve) for hive-site.xml setting, click +.
6. InName enter the property tez.aux.uris and in value enter path-to-ssl-client.xml.
Renaming tablesTo harden the system, Hive data can be stored in HDFS encryption zones. RENAME has been changed to preventmoving a table outside the same encryption zone or into a no-encryption zone.
Before Upgrade to CDP
In CDH and HDP, renaming a managed table moves its HDFS location.
After Upgrade to CDP
Renaming a managed table moves its location only if the table is created without a LOCATION clause and is underits database directory.
Action Required
None
Configure edge nodes as gatewaysIf you use command-line clients, such as Sqoop, to access Hive, you must configure these gateways to use defaultsfor your service. You can accomplish this task in a few steps.
About this taskBy default, the HS2 instances configured in the migration already have the default beeline-site.xml file defined for theservice. Other hosts do not. Configure these hosts as a gateway for that service.
Procedure
1. Find the notes you made before the upgrade about edge nodes and default, connected endpoints.
2. In Cloudera Manager, configure hosts other than HiveServer (HS2) hosts that you want to be Hive Gateway nodesas gateways for the default beeline-site.xml file for the gateway service.
Configure HiveServer HTTP modeIf you use Knox, you might need to change the HTTP mode configuration. If you installed Knox on CDP PrivateCloud Base and want to proxy HiveServer with Knox, you need to change the default HiveServer transport mode(hive.server2.transport.mode).
Procedure
1. Click Cloudera Manager > Clusters > HIVE_ON_TEZ > Configuration
2. In Search, type transport.
158
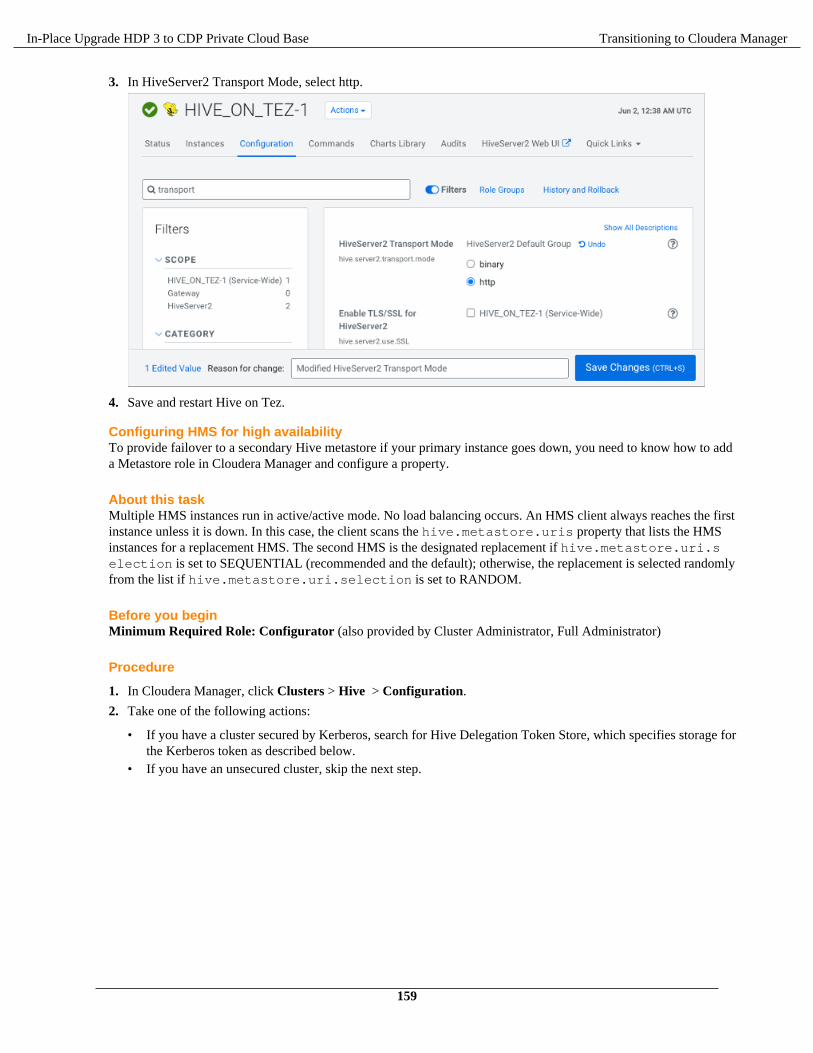
In-Place Upgrade HDP 3 to CDP Private Cloud Base Transitioning to Cloudera Manager
3. In HiveServer2 Transport Mode, select http.
4. Save and restart Hive on Tez.
Configuring HMS for high availabilityTo provide failover to a secondary Hive metastore if your primary instance goes down, you need to know how to adda Metastore role in Cloudera Manager and configure a property.
About this taskMultiple HMS instances run in active/active mode. No load balancing occurs. An HMS client always reaches the firstinstance unless it is down. In this case, the client scans the hive.metastore.uris property that lists the HMSinstances for a replacement HMS. The second HMS is the designated replacement if hive.metastore.uri.selection is set to SEQUENTIAL (recommended and the default); otherwise, the replacement is selected randomlyfrom the list if hive.metastore.uri.selection is set to RANDOM.
Before you beginMinimum Required Role: Configurator (also provided by Cluster Administrator, Full Administrator)
Procedure
1. In Cloudera Manager, click Clusters > Hive > Configuration.
2. Take one of the following actions:
• If you have a cluster secured by Kerberos, search for Hive Delegation Token Store, which specifies storage forthe Kerberos token as described below.
• If you have an unsecured cluster, skip the next step.
159
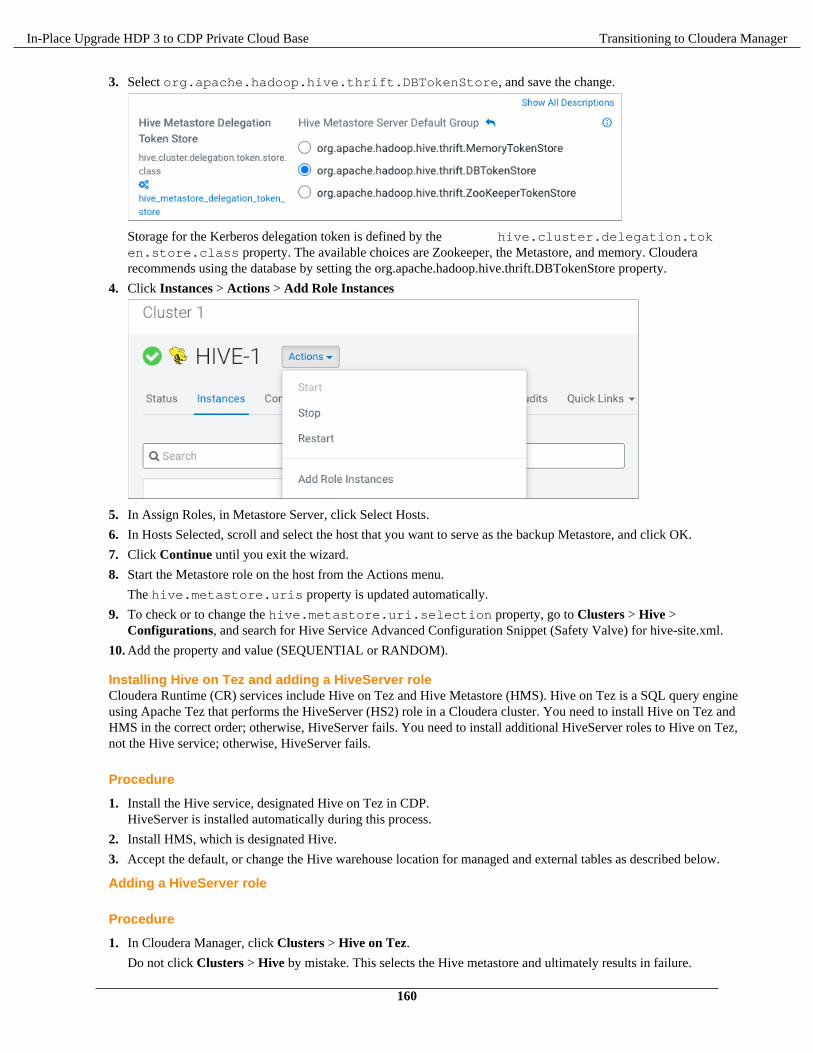
In-Place Upgrade HDP 3 to CDP Private Cloud Base Transitioning to Cloudera Manager
3. Select org.apache.hadoop.hive.thrift.DBTokenStore, and save the change.
Storage for the Kerberos delegation token is defined by the hive.cluster.delegation.token.store.class property. The available choices are Zookeeper, the Metastore, and memory. Clouderarecommends using the database by setting the org.apache.hadoop.hive.thrift.DBTokenStore property.
4. Click Instances > Actions > Add Role Instances
5. In Assign Roles, in Metastore Server, click Select Hosts.
6. In Hosts Selected, scroll and select the host that you want to serve as the backup Metastore, and click OK.
7. Click Continue until you exit the wizard.
8. Start the Metastore role on the host from the Actions menu.
The hive.metastore.uris property is updated automatically.
9. To check or to change the hive.metastore.uri.selection property, go to Clusters > Hive >Configurations, and search for Hive Service Advanced Configuration Snippet (Safety Valve) for hive-site.xml.
10. Add the property and value (SEQUENTIAL or RANDOM).
Installing Hive on Tez and adding a HiveServer roleCloudera Runtime (CR) services include Hive on Tez and Hive Metastore (HMS). Hive on Tez is a SQL query engineusing Apache Tez that performs the HiveServer (HS2) role in a Cloudera cluster. You need to install Hive on Tez andHMS in the correct order; otherwise, HiveServer fails. You need to install additional HiveServer roles to Hive on Tez,not the Hive service; otherwise, HiveServer fails.
Procedure
1. Install the Hive service, designated Hive on Tez in CDP.HiveServer is installed automatically during this process.
2. Install HMS, which is designated Hive.
3. Accept the default, or change the Hive warehouse location for managed and external tables as described below.
Adding a HiveServer role
Procedure
1. In Cloudera Manager, click Clusters > Hive on Tez.
Do not click Clusters > Hive by mistake. This selects the Hive metastore and ultimately results in failure.
160

In-Place Upgrade HDP 3 to CDP Private Cloud Base Transitioning to Cloudera Manager
2. Click Actions > Add Role Instances.
3. Click in the HiveServer2 box to select hosts.
4. In the Host name column, select a host for the HiveServer2 role, and click OK.The selected host name you assigned the HiveServer2 role appears under HiveServer2.
5. Click Continue.
The new HiveServer2 role state is stopped.
6. Select the new HiveServer2 role.
161
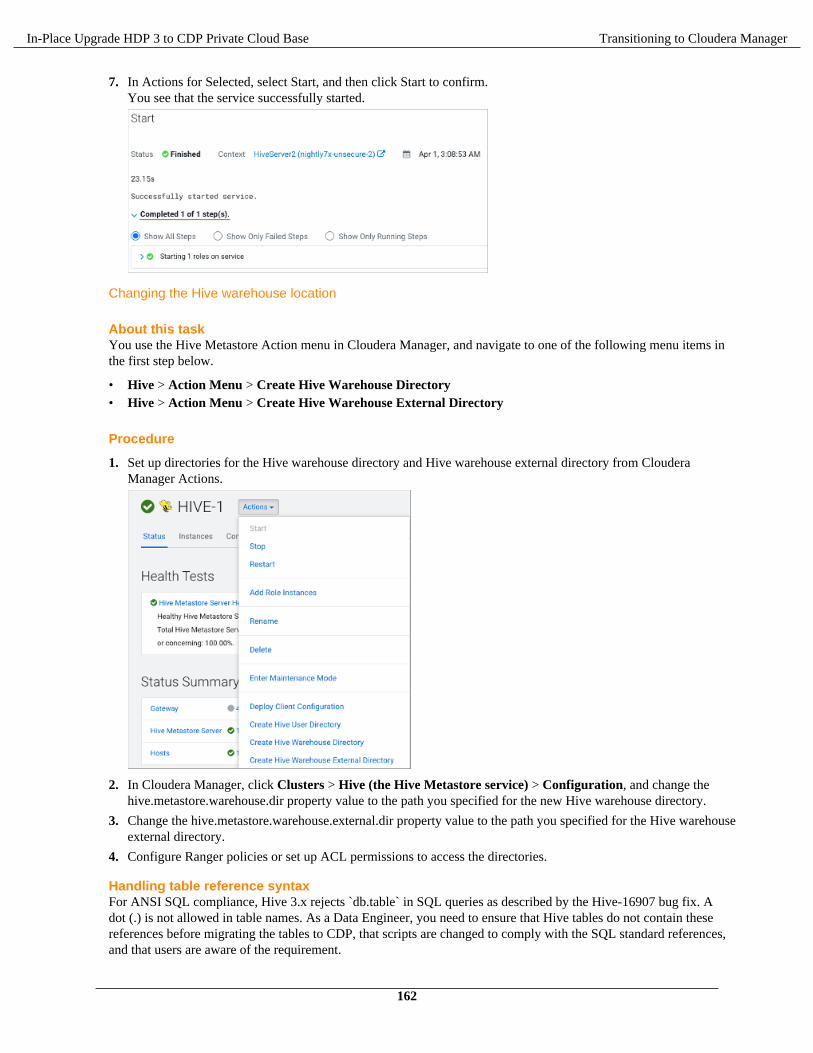
In-Place Upgrade HDP 3 to CDP Private Cloud Base Transitioning to Cloudera Manager
7. In Actions for Selected, select Start, and then click Start to confirm.You see that the service successfully started.
Changing the Hive warehouse location
About this taskYou use the Hive Metastore Action menu in Cloudera Manager, and navigate to one of the following menu items inthe first step below.
• Hive > Action Menu > Create Hive Warehouse Directory• Hive > Action Menu > Create Hive Warehouse External Directory
Procedure
1. Set up directories for the Hive warehouse directory and Hive warehouse external directory from ClouderaManager Actions.
2. In Cloudera Manager, click Clusters > Hive (the Hive Metastore service) > Configuration, and change thehive.metastore.warehouse.dir property value to the path you specified for the new Hive warehouse directory.
3. Change the hive.metastore.warehouse.external.dir property value to the path you specified for the Hive warehouseexternal directory.
4. Configure Ranger policies or set up ACL permissions to access the directories.
Handling table reference syntaxFor ANSI SQL compliance, Hive 3.x rejects `db.table` in SQL queries as described by the Hive-16907 bug fix. Adot (.) is not allowed in table names. As a Data Engineer, you need to ensure that Hive tables do not contain thesereferences before migrating the tables to CDP, that scripts are changed to comply with the SQL standard references,and that users are aware of the requirement.
162
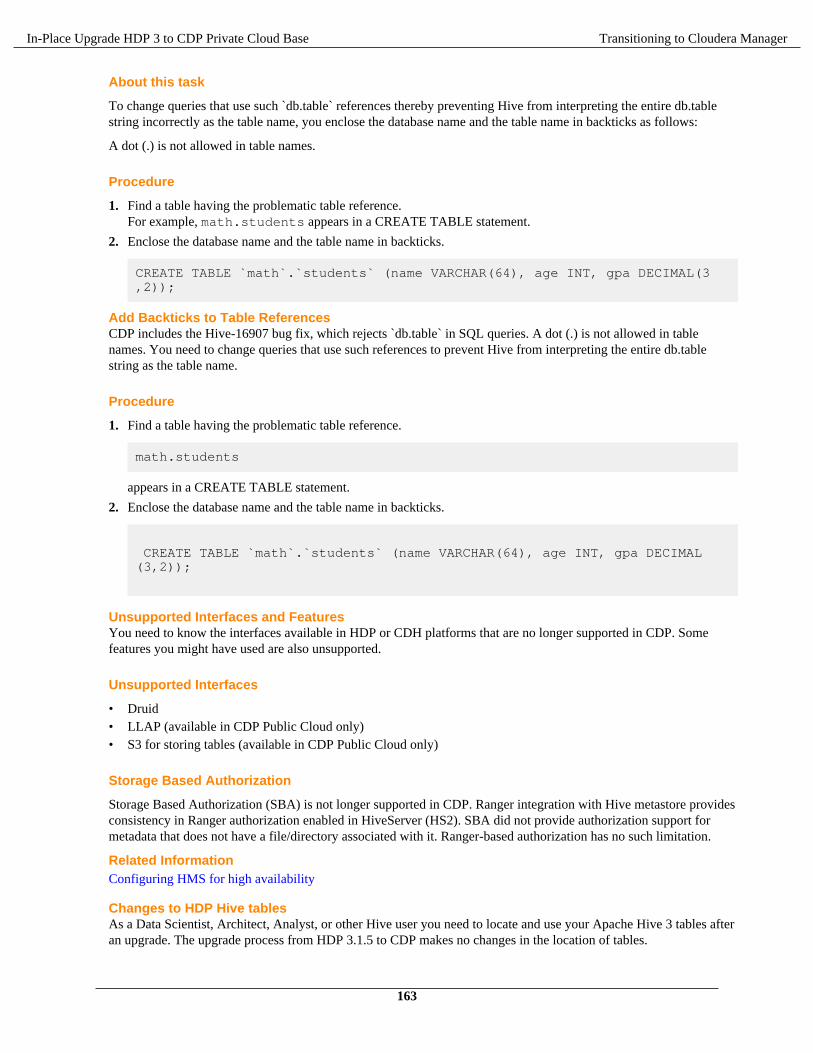
In-Place Upgrade HDP 3 to CDP Private Cloud Base Transitioning to Cloudera Manager
About this task
To change queries that use such `db.table` references thereby preventing Hive from interpreting the entire db.tablestring incorrectly as the table name, you enclose the database name and the table name in backticks as follows:
A dot (.) is not allowed in table names.
Procedure
1. Find a table having the problematic table reference.For example, math.students appears in a CREATE TABLE statement.
2. Enclose the database name and the table name in backticks.
CREATE TABLE `math`.`students` (name VARCHAR(64), age INT, gpa DECIMAL(3,2));
Add Backticks to Table ReferencesCDP includes the Hive-16907 bug fix, which rejects `db.table` in SQL queries. A dot (.) is not allowed in tablenames. You need to change queries that use such references to prevent Hive from interpreting the entire db.tablestring as the table name.
Procedure
1. Find a table having the problematic table reference.
math.students
appears in a CREATE TABLE statement.
2. Enclose the database name and the table name in backticks.
CREATE TABLE `math`.`students` (name VARCHAR(64), age INT, gpa DECIMAL(3,2));
Unsupported Interfaces and FeaturesYou need to know the interfaces available in HDP or CDH platforms that are no longer supported in CDP. Somefeatures you might have used are also unsupported.
Unsupported Interfaces
• Druid• LLAP (available in CDP Public Cloud only)• S3 for storing tables (available in CDP Public Cloud only)
Storage Based Authorization
Storage Based Authorization (SBA) is not longer supported in CDP. Ranger integration with Hive metastore providesconsistency in Ranger authorization enabled in HiveServer (HS2). SBA did not provide authorization support formetadata that does not have a file/directory associated with it. Ranger-based authorization has no such limitation.
Related InformationConfiguring HMS for high availability
Changes to HDP Hive tablesAs a Data Scientist, Architect, Analyst, or other Hive user you need to locate and use your Apache Hive 3 tables afteran upgrade. The upgrade process from HDP 3.1.5 to CDP makes no changes in the location of tables.
163

In-Place Upgrade HDP 3 to CDP Private Cloud Base Configuring External Authentication for Cloudera Manager
After the upgrade, the format of a Hive table is the same as before the upgrade. For example, native or non-nativetables remain native or non-native, respectively.
After the upgrade, the location of managed tables or partitions do not change:
Managed files reside in the Hive warehouse /warehouse/tablespace/managed/hive. The upgrade processcarries the external files over to CDP with no change in location. By default, Hive places any new external tables youcreate in /warehouse/tablespace/external/hive. The upgrade process sets the hive.metastore.warehouse.dir property to this location, designating it the Hive warehouse location.
Hive 3.x in CDP Private Cloud Base supports transactional and non-transactional tables. Transactional tables haveatomic, consistent, isolation, and durable (ACID) properties. In Hive 3.x, the mature version of ACID is ACID v2,which is the default table type in CDP Private Cloud Base.
Configuring External Authentication for ClouderaManager
If you have LDAP configured on your cluster, then continue further with this document.
Configuring External Authentication
Additional Services
The Hue and DAS services are optional.
164

In-Place Upgrade HDP 3 to CDP Private Cloud Base Additional Services
Installing Data Analytics Studio on a CDP Private Cloud Base cluster usingAmbari
This section applies only if you were on HDP 2.6.5 running Hive LLAP and Druid workloads, and using AmbariViews to manage and monitor the performance of your queries. With CDP Private Cloud Base, Data Analytics Studio(DAS) replaces Ambari Views (Hive View and Tez View) and offers additional analytical capabilities.
The tasks listed in this section assume that you have already upgraded Ambari and HDP cluster from 2.6.5 to CDPPrivate Cloud Base 7.1.x.
Note: DAS requires a backend database for storing query event information, and supports only PostgreSQLversions 9.6, 10, and 12.
Check cluster configuration for Hive and TezBefore you add the DAS service to your CDP Private Cloud Base cluster, check the configuration settings for Hiveand Tez in the Ambari UI. This can ensure that your queries appear properly when you use DAS.
Procedure
1. Go to Ambari > Services > Hive > CONFIGS > ADVANCED. Make sure that the Hive configurations are asfollows:
• hive.hook.proto.base-directory: {hive_metastore_warehouse_external_dir}/sys.db/query_data/
• hive.exec.failure.hooks: org.apache.hadoop.hive.ql.hooks.HiveProtoLoggingHook• hive.exec.post.hooks: org.apache.hadoop.hive.ql.hooks.HiveProtoLoggingHook• hive.exec.pre.hooks: org.apache.hadoop.hive.ql.hooks.HiveProtoLoggingHook• hive.metastore.transactional.event.listeners: org.apache.hive.hcatalog.listener.DbNoti
ficationListener
Note: If you have upgraded your cluster from HDP 2.6.x to CDP Private Cloud Base 7.1.x, thenspecify org.apache.hive.hcatalog.listener.DbNotificationListener in thehive.metastore.transactional.event.listeners property under Advanced hivemetastore-site.
165
In-Place Upgrade HDP 3 to CDP Private Cloud Base Additional Services
2. Go to Ambari > Services > Tez > CONFIGS > Custom tez-site. Make sure that the Tez configuration is asfollows:
• tez.history.logging.service.class: org.apache.tez.dag.history.logging.proto.ProtoHistoryLoggingService
• tez.history.logging.proto-base-dir: {hive_metastore_warehouse_external_dir}/sys.db/
Add the DAS serviceAdding the DAS service from the Ambari UI makes DAS available on your cluster.
Procedure
1. On the Ambari UI, click Actions > Add Service.
The Add Service Wizard is displayed.
2. On the Choose Services page of the Wizard, select Data Analytics Studio.
Other required services are automatically selected.
3. When prompted to confirm the addition of dependent services, give a positive confirmation to all.
This adds the other required services.
4. On the Customize Services page, expand Advance_data_analytics_studio-database and fill in the databasedetails and other required fields that are highlighted.
Note:
• Enter a password in the password field. Do not leave this field empty.• Uncheck the Create Data Analytics Studio database checkbox, and specify the same database
hostname in the Data Analytics Studio database hostname field on which your database is running.
5. In the user_authentication field, specify the authentication method that you want to use. You can specify one ofthe following:
• NONE: Specify NONE if you do not want to enable user authentication. In this case, all the queries will beexecuted as the hive service user.
• KNOX_SSO: Specify KNOX_SSO to enable single sign-on experience to authenticate users as configured inthe Knox SSO topology.
• KNOX_PROXY: Specify KNOX_PROXY to use DAS behind a Knox proxy. The user is authenticated asconfigured in the Knox proxy topology. It also enables SPNEGO authentication.
• SPNEGO: Specify SPNEGO to authenticate users using a token-based authentication.
You can configure the user authentication separately, after you have added the DAS service as part of the post-installation tasks.
6. You can add additional configuration information in rest of the fields as appropriate.
7. Complete the remaining installation wizard steps and exit the wizard.
8. Ensure that all components required for the DAS service start successfully.
9. Make sure to restart all the affected services in Ambari.
DAS post-installation tasksAfter adding the DAS service on the CDP Private Cloud Base 7.1.x cluster, complete the tasks in this section to startusing DAS.
Additional configuration tasksYou can increase or decrease the time for which the audit and event logs are retained in the system, after which theyare auto-purged. You can also make DAS work with HiveServer2 in case your Hive deployment is not LLAP-enabledand does not have Hive Server Interactive.
166
In-Place Upgrade HDP 3 to CDP Private Cloud Base Additional Services
Making DAS work with HiveServer2
If your Hive deployment is not LLAP-enabled and does not have Hive Server Interactive, you need to update theconfiguration for DAS to work with HiveServer2 as follows:
Go to Ambari > Data Analytics Studio > Configs and change use.hive.interactive.mode=true to use.hive.interactive.mode=false
Customizing the retention period of audit and event logs
Audit and event logs are written by Hive/Tez to HDFS for DAS to consume to generate DAG information. Once DASconsumes them, this information on HDFS is no longer required. They are cleaned automatically via a thread in HMS(Hive metastore).
The time to live count of the audit logs is defined in the hive.hook.proto.events.ttl parameter. By default,the logs are retained for seven days. To configure a custom value:
1. From the Ambari UI, go to Hive > HiveMetaStore > Configs and specify the time to live in the hive.hook.proto.events.ttl parameter.
For example, to retain the logs for 30 days, specify 30d.
Typically, a 30-day duration is useful if you want to download older DAG data.2. Restart the Hive service.
Setting up the tmp directoryDAS allows you to download logs for secure clusters. To download logs, make sure that the DAS service user haswrite permission to the /tmp directory. Also make sure that the /tmp directory has sufficient storage space to holdlogs from a query for the download logs feature to work.
Configuring DAS for SSL/TLSIf your HDP cluster is SSL enabled, then you can configure SSL. This is an optional configuration.
You can use one of the two options to set up SSL certificates:
• Set up trusted CA certificates• Set up self-signed certificates
Set up trusted CA certificateYou can enable SSL for the DAS Engine using a certificate from a trusted Certificate Authority (CA). Certificatesfrom a trusted CA are primarily used in production environments. For a test environment, you can use a self-signedcertificate.
Before you begin
• You must have root user access to the clusters on which DAS Engine is installed.• You must have obtained a certificate from your CA, following their instructions.
Procedure
1. Log in as root user on the cluster with DAS Engine installed.
167
In-Place Upgrade HDP 3 to CDP Private Cloud Base Additional Services
2. Import the Certificate Chain Certificate and the certificate you obtained from your CA.
keytool -import -alias root -keystore <path_to_keystore_file> -trustcacerts -file <certificate_chain_certificate>
keytool -import -alias jetty -keystore <path_to_keystore_file> -file <certificate_from_CA>
Note: Ignore the following warning:
The JKS keystore uses a proprietary format. It is recommended to migrate to PKCS12 which is an industry standard format using "keytool -importkeystore -srckeystore <keystore_file_path> -destkeystore <keystore_file_path> -deststoretype pkcs12".
Set up self-signed certificatesYou can enable SSL for the DAS Engine using a self-signed certificate. Self-signed certificates are primarily used intest environments. For a production environment, you should use a certificate from a trusted CA.
Before you beginYou must have root user access to the clusters on which DAS Engine is installed.
Procedure
1. Log in as root user on the cluster with DAS Engine installed.
2. Generate a key pair and keystore for use with DAS Engine.
keytool -genkey -alias jetty -keystore <certificate_file_path> -storepass <keystore_password> -dname 'CN=das.host.com, OU=Eng, O=ABC Corp, L=Santa Clara, ST=CA, C=US' -keypass <key_password> -keyalg RSA
Note: Ignore the following warning:
The JKS keystore uses a proprietary format. It is recommended to migrate to PKCS12 which is an industry standard format using "keytool -importkeystore -srckeystore <keystore_file_path> -destkeystore <keystore_file_path> -deststoretype pkcs12".
Follow the prompts and enter the required information.
• CN must be the FQDN of the DAS Engine host.• Default value for the key password is password.
If you change the password, then you have to update the DAS configuration.
Following is a sample command output:
keytool -genkey -alias jetty -keystore ~/tmp/ks -storepass passwordWhat is your first and last name? [Unknown]: das.host.comWhat is the name of your organizational unit? [Unknown]: EngWhat is the name of your organization? [Unknown]: ABC CorpWhat is the name of your City or Locality? [Unknown]: Santa ClaraWhat is the name of your State or Province? [Unknown]: CAWhat is the two-letter country code for this unit? [Unknown]: US
168
In-Place Upgrade HDP 3 to CDP Private Cloud Base Additional Services
Is CN=das.host.com, OU=Eng, O=ABC Corp, L=Santa Clara, ST=CA, C=US correct? [no]: yes
Enter key password for <jetty> (RETURN if same as keystore password):
Note: You will have to use this keystore file while configuring the DAS Engine for TLS in Ambari.
Configure SSL/TLS in AmbariIn the Ambari UI, you enable TLS for DAS Engine and update the DAS Engine configuration if settings change.
Procedure
1. Copy the keystore files generated in the earlier procedures to webapp and event processor hosts. Make sure theyare owned by configured user for DAS. The default user is hive.
For example:
/etc/security/certs/das-cert.jks
2. Navigate to Data Analytics Studio > Configs.
3. Set the following properties in Advanced data_analytics_studio-security-site section.
Field Value
ssl_enabled Make sure it is checked.
webapp_keystore_file Enter the keystore path on the webapp host.
das_webapp_keystore_password Enter the password used in the previous procedure.
event_processor_keystore_file Enter the keystore path on the event processor.
das_event_processor_keystore_password Enter the password used in the previous procedure.
4. In the Advanced data_analytics_studio-webapp-properties section, set Data Analytics Studio Webapp serverprotocol property to https.
5. In the Advanced data_analytics_studio-event_processor-properties section, set Data Analytics Studio EventProcessor server protocol property to https.
Configuring user authentication in AmbariYou can authenticate the users by using either Knox SSO, Knox proxy, or SPNEGO. You can also choose not to setup user authentication. In this case, all the queries are executed as a Hive service user.Configuring user authentication using Knox SSOIn a CDP Private Cloud Base deployment, to enable DAS to work with the CDP cluster SSO, configure the Knoxsettings as described in this topic.
About this task
Note: Follow these instructions only if you choose to configure secure clusters.
Before you begin
You need to export the Knox certificate from the Knox gateway host. To find the Knox gateway host, go toAmbari > Services > Knox > CONFIGS > Knox Gateway hosts.
Procedure
1. SSH in to the Knox gateway host with a root or a knoxuser user.
169
In-Place Upgrade HDP 3 to CDP Private Cloud Base Additional Services
2. Export the Knox certificate by running the following command:
/usr/hdp/current/knox-server/bin/knoxcli.sh export-cert --type PEM
Note: If you have already integrated Knox SSO earlier, then the gateway-identity.pem file wouldexist. Check whether the gateway-identity.pem file exists or not before running this command.
/usr/hdp/current/knox-server/data/security/keystores/gateway-identity.pem
If the export is successfully, the following message is displayed:
Certificate gateway-identity has been successfully exported to: /usr/hdp/current/knox-server/data/security/keystores/gateway-identity.pem
Note the location where you save the gateway-identity.pem file.
3. If not done already, specify KNOX_SSO in the user_authentication field under Ambari > Data AnalyticsStudio > Config.
4. Enable the Knox SSO topology settings. From the Ambari UI, go to Data Analytics Studio > Config >Advanced data_analytics_studio-security-site and make the following configuration changes:
a) Specify KNOX_SSO in the user_authentication field.b) Specify the Knox SSO URL in the knox_sso_url field in the following format:
https:knox-host>:8443/gateway/knoxsso/api/v1/websso
c) Copy the contents of the PEM file that you exported earlier in the knox_publickey field without the headerand the footer.
d) Add the list of users in the admin_users field who need admin access to DAS.
You can specify * (asterisk) in the admin_users field to make all users the admin users.
You can also specify an admin group in the admin_groups field.
Note: Only admin users have access to all the queries. Non-admin users can access only their queries.
e) Click Save and click through the confirmation pop-ups.f) Restart DAS and any services that require restart by clicking Actions > Restart All Required.
Configuring user authentication using Knox proxyIn the CDP Private Cloud Base 7.1.x release, Knox Proxy is configured via the Knox Admin UI. To set up proxy, youfirst define the provider configurations and descriptors, and the topologies are automatically generated based on thosesettings.
Procedure
1. SSH in to the machine on which you have installed the Knox gateway.
2. Change directory to the following:
/usr/hdp/current/knox-server/data/services/das/1.4.5/
3. Create the following two configuration files with the given content:
rewrite.xml
<!-- Licensed to the Apache Software Foundation (ASF) under one or more contributor license agreements. See the NOTICE file distributed with this work for additional information regarding copyright ownership. The ASF licenses this file to You under the Apache License, Version 2.0 (the "License"); you may not use this file except in compliance with the License. You may obtain a copy of the License at
170
In-Place Upgrade HDP 3 to CDP Private Cloud Base Additional Services
http://www.apache.org/licenses/LICENSE-2.0 Unless required by applicable law or agreed to in writing, software distributed under the License is distributed on an "AS IS" BASIS, WITHOUT WARRANTIES OR CONDITIONS OF ANY KIND, either express or implied. See the License for the specific language governing permissions and limitations under the License.--><rules> <rule dir="IN" name="DAS/das/inbound/root" pattern="*://*:*/**/das/"> <rewrite template="{$serviceUrl[DAS]}/"/> </rule> <rule dir="IN" name="DAS/das/inbound/path" pattern="*://*:*/**/das/{**}"> <rewrite template="{$serviceUrl[DAS]}/{**}"/> </rule> <rule dir="IN" name="DAS/das/inbound/pathqp" pattern="*://*:*/**/das/{**}?{**}"> <rewrite template="{$serviceUrl[DAS]}/{**}?{**}"/> </rule> <rule dir="OUT" name="DAS/das/outbound/assets" pattern="assets/{**}"> <rewrite template="{$frontend[path]}/das/assets/{**}"/> </rule> <rule dir="OUT" name="DAS/das/outbound/rooturl"> <rewrite template="{$frontend[path]}/das/"/> </rule> <filter name="DAS/das/outbound/dasrooturl"> <content type="application/javascript"> <apply path="/dasroot/.." rule="DAS/das/outbound/rooturl"/> </content> </filter></rules>
service.xml
<!-- Licensed to the Apache Software Foundation (ASF) under one or more contributor license agreements. See the NOTICE file distributed with this work for additional information regarding copyright ownership. The ASF licenses this file to You under the Apache License, Version 2.0 (the "License"); you may not use this file except in compliance with the License. You may obtain a copy of the License at
http://www.apache.org/licenses/LICENSE-2.0 Unless required by applicable law or agreed to in writing, software distributed under the License is distributed on an "AS IS" BASIS, WITHOUT WARRANTIES OR CONDITIONS OF ANY KIND, either express or implied. See the License for the specific language governing permissions and limitations under the License.--><service role="DAS" name="das" version="1.4.5"> <routes> <route path="/das" /> <route path="/das/**" /> <route path="/das/**/hivestudio*.js"> <rewrite apply="DAS/das/outbound/dasrooturl" to="response.body"/> </route> </routes></service>
If you have more than one Knox servers in a high availability configuration, then you need to create these files onevery machine.
171
In-Place Upgrade HDP 3 to CDP Private Cloud Base Additional Services
4. Restart the Knox server.
5. Sign in to the Knox Admin UI. From Ambari, go to Knox > Quick Links and click Knox Admin UI.
6. Create or use an existing Provider Configuration with the following configuration:
a) (Required) Authentication provider: It provides authentication mechanism for Knox. For example,ShiroProvider. ShiroProvider integrates with LDAP.
b) (Required) Identity Assertion provider: It authenticates the user name requesting access to DAS throughSPNEGO.
c) (Optional) Add any other provider as per your organization’s requirements, such as Acls or WebAppSec.
7. Create a new descriptor for the DAS service with the Provider Configuration that you created earlier. If adescriptor is already present with the required Provider Configuration, then you can edit it.
a) Add a new service named DAS.b) Under Descriptor Detail > Services > DAS, add the DAS Webapp URL in the URLs field and save the
changes.
8. If not done already, specify KNOX_PROXY in the user_authentication field under Ambari > Data AnalyticsStudio > Config.
9. Next, go to Ambari > Data Analytics Studio > CONFIGS > Advanced data_analytics_studio-security-siteand configure the following fields:
a) das_knox_user: It specifies the Knox service user, and is picked up automatically.b) das_knox_doas_param_name: Specify the parameter name that you specified under the Params field
in the Knox Admin UI. However, if you have selected the default Identity Assertion provider, then thedas_knox_doas_param_name name is doAs, and is configured automatically.
c) knox_ssout_url: Specify the KnoxSSOUT URL in the following format:
https://{host}:{port}/{cluster-name}/{knox-sso-out-topo}/api/v1/webssout
This step requires you to have a KnoxSSO out topology present in your Knox server. To create the Knox SSOout topology, see Enabling logout option for secure clusters.
d) Add the list of users in the admin_users field who need admin access to DAS.
You can specify * (asterisk) in the admin_users field to make all users the admin users.
You can also specify an admin group in the admin_groups field.
Note: Only admin users have access to all the queries. Non-admin users can access only their queries.
10. Restart the DAS service.
Configuring user authentication using SPNEGOSPNEGO uses a Kerberized environment for user authentication. To use SPNEGO to authenticate users, specifySPNEGO in the user_authentication field.
Procedure
1. From the Ambari UI, go to Data Analytics Studio > CONFIGS > Advanced data_analytics_studio-security-site.
2. Specify SPNEGO in the user_authentication field.
3. Configure the das_spnego_name_rules field if you have specific name mapping rules for your cluster.
4. Save the changes and restart DAS.
Enabling logout option for secure clustersTo sign out from the application (DAS Webapp) and the identity provider on secure clusters, you need to create aKnoxSSO out topology in the Ambari console and configure the knox_ssout_url through the Ambari UI.
About this task
This section can be used to configure the Knox SSO logout URL for both HA and non-HA clusters.
172
In-Place Upgrade HDP 3 to CDP Private Cloud Base Additional Services
Procedure
1. SSH in to the Ambari console on which you have configured Knox as a root user.
2. If you are configuring KnoxSSOUT for the first time, then you need to create a KnoxSSO out topology calledknoxssout.xml in the /etc/knox/x.x.x.x-xx/0/topologies directory.
If you have already configured KnoxSSOUT, then you can skip this step.
Add the following lines in the knoxssout.xml file:
<?xml version="1.0"?><topology> <gateway> <provider> <role>hostmap</role> <name>static</name> <enabled>true</enabled> </provider> </gateway> <service> <role>KNOXSSOUT</role> </service></topology>
Note: If you have configured Knox SSO for HA clusters, then you must create the KnoxSSO outtopology on all the Knox hosts.
3. On the Ambari UI, go to Data Analytics Studio > Config > Advanced data_analytics_studio-security-site andspecify the Knox SSO logout URL in the knox_ssout_url field in the following format:
https://{host}:{port}/{cluster-name}/{knox-sso-out-topo}/api/v1/webssout
Where, knox-sso-out-topo is the name of the KnoxSSO out topology xml file that you created earlier. Inthis case, it is knoxssout.
The host and the port that you specify here should be the same as those specified in the knox_sso_url field.
To obtain the cluster_name, on the Ambari UI, click admin > Manage Ambari > Cluster Information and notethe value from the Cluster Name field.
If you have HA clusters, then specify the host and the port of the load balancer pointing to the Knox instance.
4. Click Save and click through the confirmation pop-ups.
5. Restart DAS and any services that require restart by clicking Actions > Restart All Required.
Troubleshooting DAS installationThis section provides you a list of possible causes and solutions to debug and resolve issues that you might face whileusing DAS on a CDP Private Cloud Base cluster managed through Ambari.
Problem area: Queries pageIssues related to queries can arise mostly because of misconfigured Hive or Tez hooks. You may also experiencetrouble viewing your queries if you are a non-admin user. Non-admin users can view only their queries.
Your queries are not appearing on the Queries page
Check the role that you have been assigned. If you are not an administrator, then you can only view the queries thatyou have run. Only administrators can view queries and data of other users.
173
In-Place Upgrade HDP 3 to CDP Private Cloud Base Additional Services
• To enlist yourself as the admin user, go to Ambari > Data Analytics Studio > Config > Advanceddata_analytics_studio-security-site, and add your user name in the admin_users field. For example, hive,admin1,admin2.
You can also specify * (asterisk) in the admin_users field to make all users administrators.
You can also specify an admin group in the admin_groups field.• Check the configuration settings for Hive and Tez in the Ambari UI. See Check cluster configuration for Hive and
Tez on page 165.• Verify whether the logs are added to the paths specified in the hive.hook.proto.base-directory and
the tez.history.logging.proto-base-dir directory configurations.
Use the following commands to get the paths to the logs for Hive and Tez. If you have not run any queries, thenthe log directories may be empty.
For Hive:
hdfs dfs -ls /warehouse/tablespace/external/hive/sys.db/query_data
For Tez:
hdfs dfs -ls /warehouse/tablespace/external/hive/sys.db/dag_data
hdfs dfs -ls /warehouse/tablespace/external/hive/sys.db/dag_meta
hdfs dfs -ls /warehouse/tablespace/external/hive/sys.db/app_data
• Verify whether the following proto directory configurations are present in the /etc/das/conf/das-event-processor.json file: hive.hook.proto.base-directory and tez.history.logging.proto-base-dir. If these configurations are not present in the /etc/das/conf/das-event-processor.json file, then do not edit the das-event-processor.json file - because they will beoverwritten by the configurations specified in Ambari.
At this stage, restart the DAS service and recheck. If this doesn't fix the problem, then you might be using multipleconfiguration groups in Hive and Tez.
If you are using different or multiple configuration groups in Hive or Tez, then make sure that you specify thesame paths in all the configuration groups. Presently, DAS does not support multiple configuration groups.
• Verify whether you have the required access and permission to directories specified in the hive.hook.proto.base-directory and tez.history.logging.proto-base-dir directory configurations by checkingerrors from EventProcessorPipeline in the /var/log/das/event-processor.log file.
• Make sure that the DAS services are running as the hive service user.• If you have a large number of users running Hive queries simultaneously using DAS, the connections from Hive
can get exhausted. This sends the query to a queue in Hive which takes a long time to start running. This can resultin the following:
• If query is fired from DAS, it does not return any log or indicate that the query has been queued.• The query does not appear on the UI, because no event is received by DAS.
Evaluate your cluster usage. You may need to add more machines to the clusters to resolve this issue.
Query column is empty, yet you can see the DAG ID and Application ID
• Check the configuration settings for Hive and Tez in the Ambari UI. See Check cluster configuration for Hive andTez on page 165.
• Check whether Hive has access to write in to the directory specified by the following proto directoryconfiguration: hive.hook.proto.base-directory.
• Check whether Hive can write in to the directory specified by the following proto directory configuration: hive.hook.proto.base-directory.
• Check whether Hive has access to read from the directory specified by the following proto directoryconfiguration: hive.hook.proto.base-directory.
Query column is not empty, but you cannot see the DAG ID and Application ID
174
In-Place Upgrade HDP 3 to CDP Private Cloud Base Additional Services
• Check the configuration settings for Hive and Tez in the Ambari UI. See Check cluster configuration for Hive andTez on page 165.
• Check whether the Tez job has access to write in to the directory specified by the following proto directoryconfiguration: tez.history.logging.proto-base-dir.
• Check whether the data is being written in to the following subdirectories of the directory specified in the tez.history.logging.proto-base-dir directory configuration: app_data, dag_data, and dag_meta.
• Check whether das has access to read from the following subdirectories of the directory specified in the tez.history.logging.proto-base-dir directory configuration: app_data, dag_data, and dag_meta.
You cannot view queries from other users
If you need to view queries and data of other users, then assign admin role to the user by going to Ambari > DataAnalytics Studio > Config > Advanced data_analytics_studio-security-site, and specifying the user in theadmin_users field. For example, hive,admin1,admin2.
You can also specify * (asterisk) in the admin_users field to make all users administrators.
You can also specify an admin group in the admin_groups field.
Problem area: Compose pageMisconfigured repl in Hive can affect the query compose page on the DAS UI. Issues can also occur if HSI or HS2 isnot running.
You cannot see your databases or the query editor is missing
• Verify whether HSI or HS2 services are running by going to Ambari > Hive > Summary.• If you are not running llap, then go to Ambari > Data Analytics Studio > Config > Advanced
data_analytics_studio-properties > Data Analytics Studio config file template and set the use.hive.interactive.mode parameter to false.
• Verify whether the Hive configuration parameter hive.metastore.transactional.event.listeners is set to org.apache.hive.hcatalog.listener.DbNotificationListener by going toAmbari > Hive > Configs > Advanced > Advanced hive-site.
• DAS event processor runs the repl dump command as a hive service user. The hive service user can run therepl dump command if the user has repl admin privileges.
• Verify whether DAS can read the repl root directory permissions - if das and hive are running as different serviceusers.
There may be exceptions in the /var/log/das/event-processor.log file with repl dump failuresbecause of read errors.
Note: If the das services cannot read the repl root directory permissions, then it can cause a number ofrepl directories to be created, but not deleted.
You cannot view new databases and tables, or cannot see changes to existing databases or tables
• Verify whether the hive configuration parameter hive.metastore.transactional.event.listeners is set to org.apache.hive.hcatalog.listener.DbNotificationListener by going toAmbari > Hive > Configs > Advanced > Advanced hive-site.
• Verify whether HSI or HS2 services are running by going to Ambari > Hive > Summary.• This can also happen if the Hive metadata replication fails. To troubleshoot replication-related failures, see
Replication failure in the DAS Event Processor on page 175.
Replication failure in the DAS Event ProcessorDAS uses replication as a way to copy database and table metadata information from Hive to DAS Postgres database.If the replication fails, then you may not be able to see database or table information in DAS.
The Hive metadata replication process occours in the following two phases:
• Bootstrap dump
175
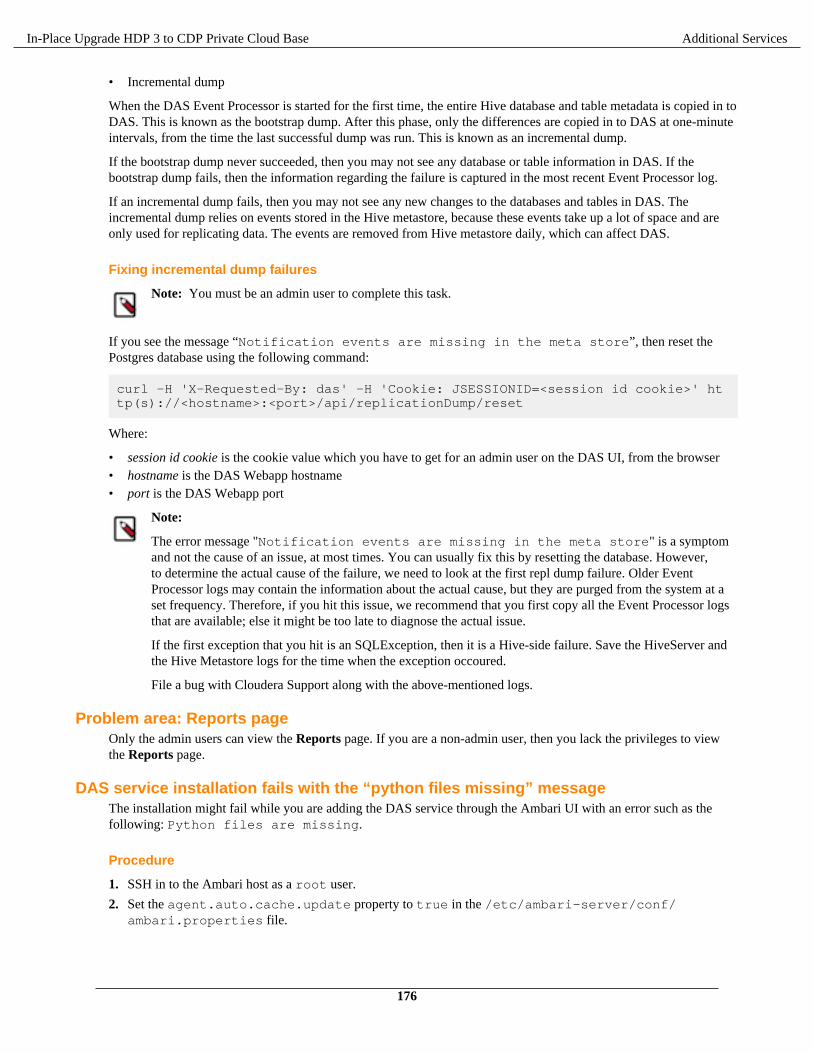
In-Place Upgrade HDP 3 to CDP Private Cloud Base Additional Services
• Incremental dump
When the DAS Event Processor is started for the first time, the entire Hive database and table metadata is copied in toDAS. This is known as the bootstrap dump. After this phase, only the differences are copied in to DAS at one-minuteintervals, from the time the last successful dump was run. This is known as an incremental dump.
If the bootstrap dump never succeeded, then you may not see any database or table information in DAS. If thebootstrap dump fails, then the information regarding the failure is captured in the most recent Event Processor log.
If an incremental dump fails, then you may not see any new changes to the databases and tables in DAS. Theincremental dump relies on events stored in the Hive metastore, because these events take up a lot of space and areonly used for replicating data. The events are removed from Hive metastore daily, which can affect DAS.
Fixing incremental dump failures
Note: You must be an admin user to complete this task.
If you see the message “Notification events are missing in the meta store”, then reset thePostgres database using the following command:
curl -H 'X-Requested-By: das' -H 'Cookie: JSESSIONID=<session id cookie>' http(s)://<hostname>:<port>/api/replicationDump/reset
Where:
• session id cookie is the cookie value which you have to get for an admin user on the DAS UI, from the browser• hostname is the DAS Webapp hostname• port is the DAS Webapp port
Note:
The error message "Notification events are missing in the meta store" is a symptomand not the cause of an issue, at most times. You can usually fix this by resetting the database. However,to determine the actual cause of the failure, we need to look at the first repl dump failure. Older EventProcessor logs may contain the information about the actual cause, but they are purged from the system at aset frequency. Therefore, if you hit this issue, we recommend that you first copy all the Event Processor logsthat are available; else it might be too late to diagnose the actual issue.
If the first exception that you hit is an SQLException, then it is a Hive-side failure. Save the HiveServer andthe Hive Metastore logs for the time when the exception occoured.
File a bug with Cloudera Support along with the above-mentioned logs.
Problem area: Reports pageOnly the admin users can view the Reports page. If you are a non-admin user, then you lack the privileges to viewthe Reports page.
DAS service installation fails with the “python files missing” messageThe installation might fail while you are adding the DAS service through the Ambari UI with an error such as thefollowing: Python files are missing.
Procedure
1. SSH in to the Ambari host as a root user.
2. Set the agent.auto.cache.update property to true in the /etc/ambari-server/conf/ambari.properties file.
176
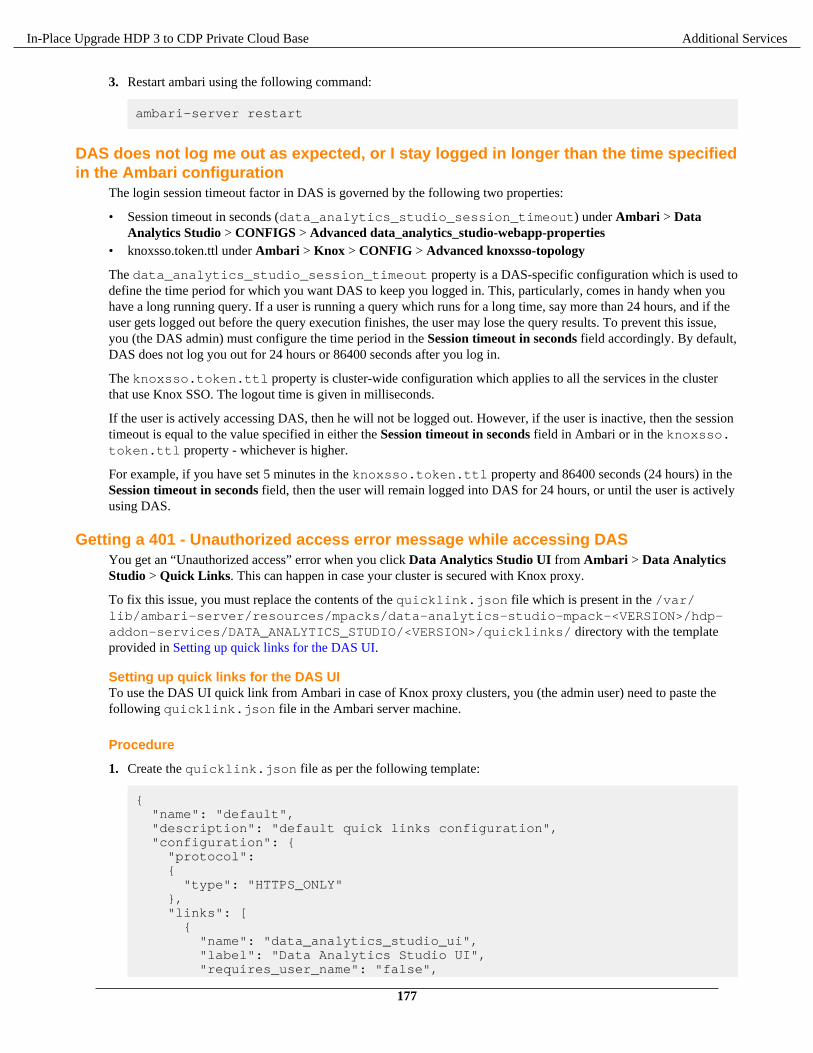
In-Place Upgrade HDP 3 to CDP Private Cloud Base Additional Services
3. Restart ambari using the following command:
ambari-server restart
DAS does not log me out as expected, or I stay logged in longer than the time specifiedin the Ambari configuration
The login session timeout factor in DAS is governed by the following two properties:
• Session timeout in seconds (data_analytics_studio_session_timeout) under Ambari > DataAnalytics Studio > CONFIGS > Advanced data_analytics_studio-webapp-properties
• knoxsso.token.ttl under Ambari > Knox > CONFIG > Advanced knoxsso-topology
The data_analytics_studio_session_timeout property is a DAS-specific configuration which is used todefine the time period for which you want DAS to keep you logged in. This, particularly, comes in handy when youhave a long running query. If a user is running a query which runs for a long time, say more than 24 hours, and if theuser gets logged out before the query execution finishes, the user may lose the query results. To prevent this issue,you (the DAS admin) must configure the time period in the Session timeout in seconds field accordingly. By default,DAS does not log you out for 24 hours or 86400 seconds after you log in.
The knoxsso.token.ttl property is cluster-wide configuration which applies to all the services in the clusterthat use Knox SSO. The logout time is given in milliseconds.
If the user is actively accessing DAS, then he will not be logged out. However, if the user is inactive, then the sessiontimeout is equal to the value specified in either the Session timeout in seconds field in Ambari or in the knoxsso.token.ttl property - whichever is higher.
For example, if you have set 5 minutes in the knoxsso.token.ttl property and 86400 seconds (24 hours) in theSession timeout in seconds field, then the user will remain logged into DAS for 24 hours, or until the user is activelyusing DAS.
Getting a 401 - Unauthorized access error message while accessing DASYou get an “Unauthorized access” error when you click Data Analytics Studio UI from Ambari > Data AnalyticsStudio > Quick Links. This can happen in case your cluster is secured with Knox proxy.
To fix this issue, you must replace the contents of the quicklink.json file which is present in the /var/lib/ambari-server/resources/mpacks/data-analytics-studio-mpack-<VERSION>/hdp-addon-services/DATA_ANALYTICS_STUDIO/<VERSION>/quicklinks/ directory with the templateprovided in Setting up quick links for the DAS UI.
Setting up quick links for the DAS UITo use the DAS UI quick link from Ambari in case of Knox proxy clusters, you (the admin user) need to paste thefollowing quicklink.json file in the Ambari server machine.
Procedure
1. Create the quicklink.json file as per the following template:
{ "name": "default", "description": "default quick links configuration", "configuration": { "protocol": { "type": "HTTPS_ONLY" }, "links": [ { "name": "data_analytics_studio_ui", "label": "Data Analytics Studio UI", "requires_user_name": "false",
177
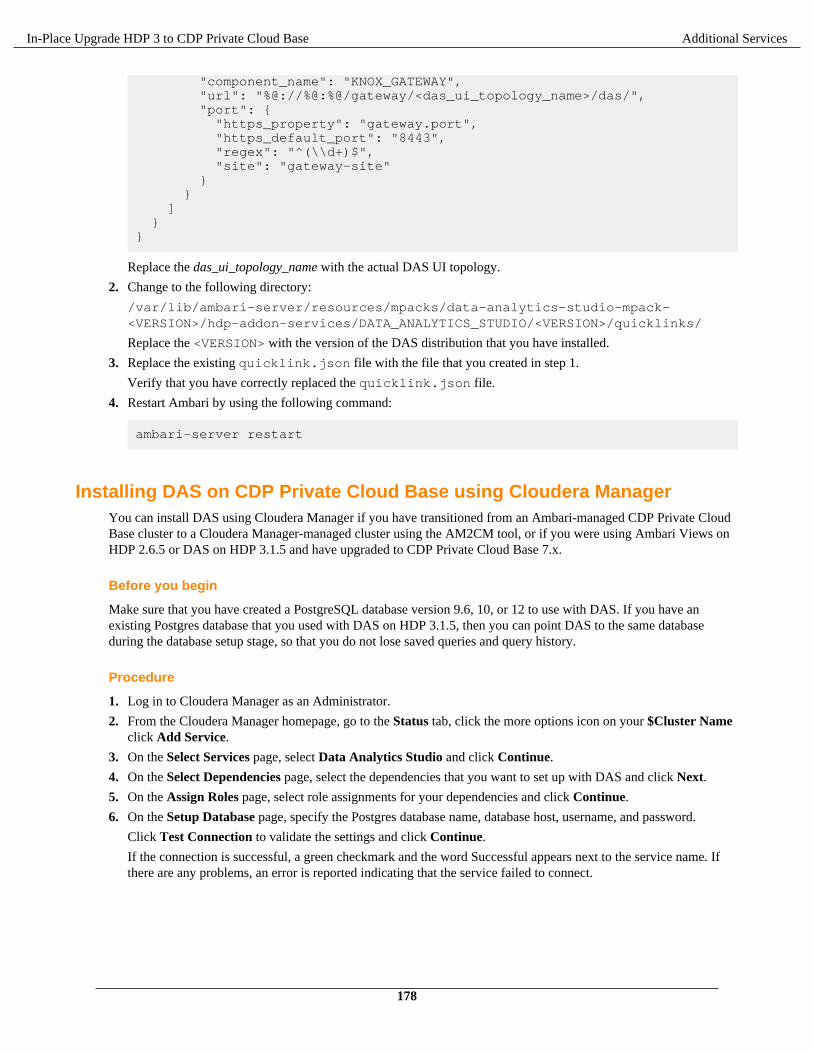
In-Place Upgrade HDP 3 to CDP Private Cloud Base Additional Services
"component_name": "KNOX_GATEWAY", "url": "%@://%@:%@/gateway/<das_ui_topology_name>/das/", "port": { "https_property": "gateway.port", "https_default_port": "8443", "regex": "^(\\d+)$", "site": "gateway-site" } } ] }}
Replace the das_ui_topology_name with the actual DAS UI topology.
2. Change to the following directory:
/var/lib/ambari-server/resources/mpacks/data-analytics-studio-mpack-<VERSION>/hdp-addon-services/DATA_ANALYTICS_STUDIO/<VERSION>/quicklinks/
Replace the <VERSION> with the version of the DAS distribution that you have installed.
3. Replace the existing quicklink.json file with the file that you created in step 1.
Verify that you have correctly replaced the quicklink.json file.
4. Restart Ambari by using the following command:
ambari-server restart
Installing DAS on CDP Private Cloud Base using Cloudera ManagerYou can install DAS using Cloudera Manager if you have transitioned from an Ambari-managed CDP Private CloudBase cluster to a Cloudera Manager-managed cluster using the AM2CM tool, or if you were using Ambari Views onHDP 2.6.5 or DAS on HDP 3.1.5 and have upgraded to CDP Private Cloud Base 7.x.
Before you begin
Make sure that you have created a PostgreSQL database version 9.6, 10, or 12 to use with DAS. If you have anexisting Postgres database that you used with DAS on HDP 3.1.5, then you can point DAS to the same databaseduring the database setup stage, so that you do not lose saved queries and query history.
Procedure
1. Log in to Cloudera Manager as an Administrator.
2. From the Cloudera Manager homepage, go to the Status tab, click the more options icon on your $Cluster Nameclick Add Service.
3. On the Select Services page, select Data Analytics Studio and click Continue.
4. On the Select Dependencies page, select the dependencies that you want to set up with DAS and click Next.
5. On the Assign Roles page, select role assignments for your dependencies and click Continue.
6. On the Setup Database page, specify the Postgres database name, database host, username, and password.
Click Test Connection to validate the settings and click Continue.
If the connection is successful, a green checkmark and the word Successful appears next to the service name. Ifthere are any problems, an error is reported indicating that the service failed to connect.
178
In-Place Upgrade HDP 3 to CDP Private Cloud Base Additional Services
7. The Review Changes page lists default and suggested settings for several configuration parameters, includingdata directories.
Select user authentication mode as None.
Note: SPNEGO as the default mode of authentication. If you do not want to use SPNEGO, then selectNone as the user authentication mode.
Review and make any necessary changes, and then click Continue. The Command Details page is displayed.
8. The Command Details page shows the status of your operation. After completion, you can view the installationlogs under the standard output (stdout).
After the First Run command completes, click Continue to go to the Summary page.
9. The Summary page reports the success or failure of the setup wizard. Click Finish to complete the wizard. Theinstallation is complete.
If the DAS WebApp fails to start with the following error message, then specify the latest activated CDH 7.1.xparcel directory in the DAS WebApp Advanced Configuration Snippet:
Error: Could not find or load main class org.apache.ranger.credentialapi.buildks.
For more information, see Unable to start DAS after installing the GPL Extras parcel.
What to do nextCloudera recommends that you change the default password as soon as possible by clicking the logged-in username atthe top right of the home screen and clicking Change Password.
Adding Hue service with Cloudera ManagerHue is a web-based interactive query editor that enables you to interact with databases and data warehouses. Dataarchitects, SQL developers, and data engineers can use Hue to create data models, clean data to prepare it for analysis,and to build and test SQL scripts for applications.
To add the Hue service with Cloudera Manager, complete the following steps:
1. Install and configure MySQL database on page 1792. Add the Hue service using Cloudera Manager on page 1803. Enable Kerberos for authentication on page 1814. Integrate Hue with Knox on page 1825. Grant Ranger permissions to new users or groups on page 184
Install and configure MySQL databaseHue requires a SQL database such as MySQL, PostgreSQL, or Oracle to store small amounts of data, including useraccount information, query history, and permissions. The instructions in this topic are for installing the MySQLdatabase.
Before you beginInstall MySQL on a host within your cluster. For instructions, refer to the MySQL Installation Guide.
About this taskTo configure Hue to store data in the MySQL database:
Procedure
1. SSH into the host on which you have installed MySQL.
179
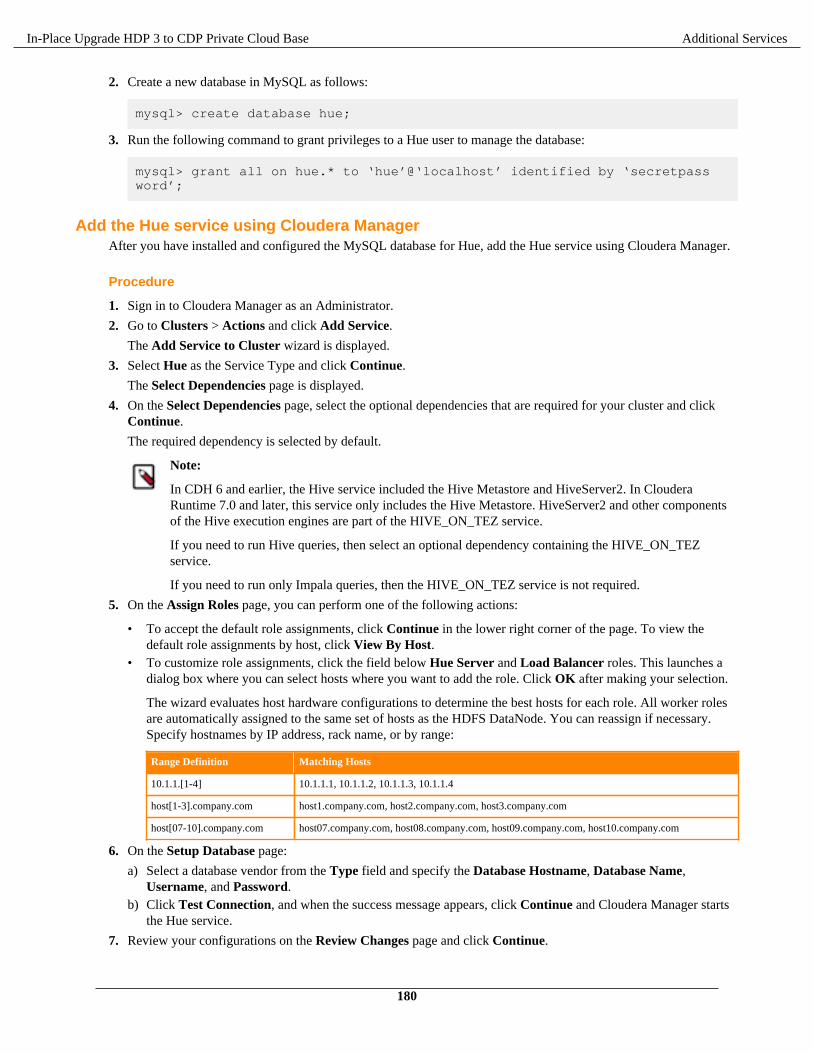
In-Place Upgrade HDP 3 to CDP Private Cloud Base Additional Services
2. Create a new database in MySQL as follows:
mysql> create database hue;
3. Run the following command to grant privileges to a Hue user to manage the database:
mysql> grant all on hue.* to ‘hue’@‘localhost’ identified by ‘secretpassword’;
Add the Hue service using Cloudera ManagerAfter you have installed and configured the MySQL database for Hue, add the Hue service using Cloudera Manager.
Procedure
1. Sign in to Cloudera Manager as an Administrator.
2. Go to Clusters > Actions and click Add Service.
The Add Service to Cluster wizard is displayed.
3. Select Hue as the Service Type and click Continue.
The Select Dependencies page is displayed.
4. On the Select Dependencies page, select the optional dependencies that are required for your cluster and clickContinue.
The required dependency is selected by default.
Note:
In CDH 6 and earlier, the Hive service included the Hive Metastore and HiveServer2. In ClouderaRuntime 7.0 and later, this service only includes the Hive Metastore. HiveServer2 and other componentsof the Hive execution engines are part of the HIVE_ON_TEZ service.
If you need to run Hive queries, then select an optional dependency containing the HIVE_ON_TEZservice.
If you need to run only Impala queries, then the HIVE_ON_TEZ service is not required.
5. On the Assign Roles page, you can perform one of the following actions:
• To accept the default role assignments, click Continue in the lower right corner of the page. To view thedefault role assignments by host, click View By Host.
• To customize role assignments, click the field below Hue Server and Load Balancer roles. This launches adialog box where you can select hosts where you want to add the role. Click OK after making your selection.
The wizard evaluates host hardware configurations to determine the best hosts for each role. All worker rolesare automatically assigned to the same set of hosts as the HDFS DataNode. You can reassign if necessary.Specify hostnames by IP address, rack name, or by range:
Range Definition Matching Hosts
10.1.1.[1-4] 10.1.1.1, 10.1.1.2, 10.1.1.3, 10.1.1.4
host[1-3].company.com host1.company.com, host2.company.com, host3.company.com
host[07-10].company.com host07.company.com, host08.company.com, host09.company.com, host10.company.com
6. On the Setup Database page:
a) Select a database vendor from the Type field and specify the Database Hostname, Database Name,Username, and Password.
b) Click Test Connection, and when the success message appears, click Continue and Cloudera Manager startsthe Hue service.
7. Review your configurations on the Review Changes page and click Continue.
180
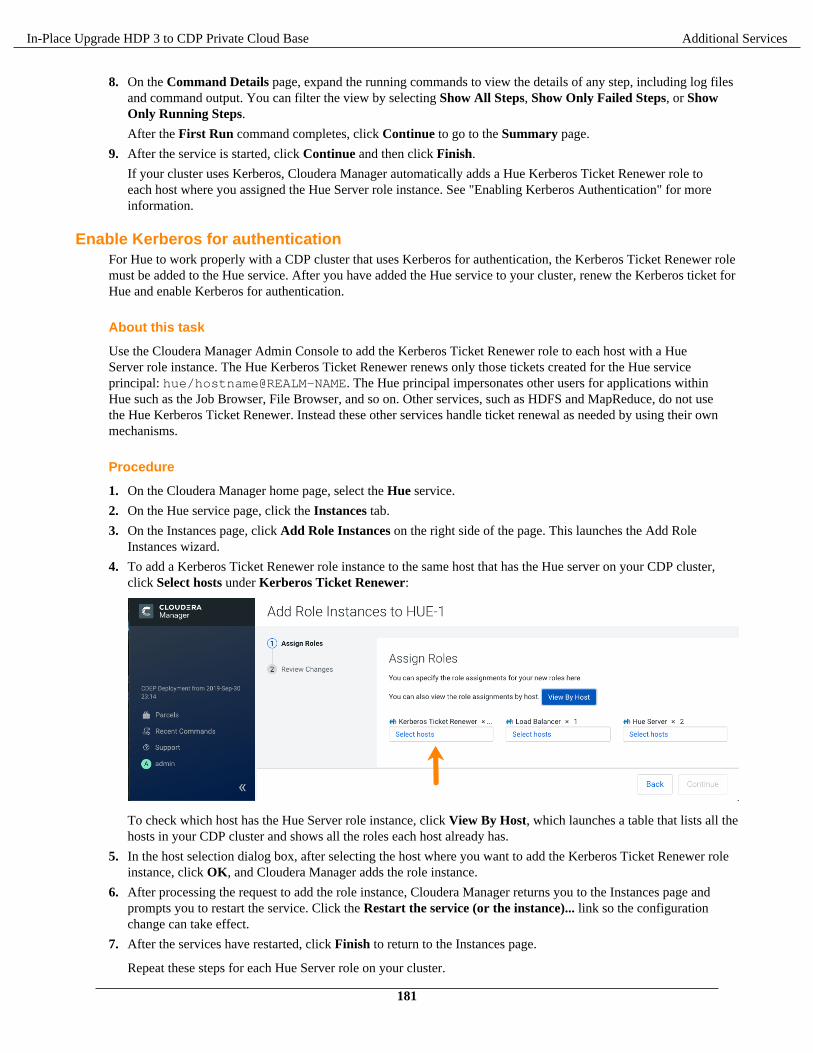
In-Place Upgrade HDP 3 to CDP Private Cloud Base Additional Services
8. On the Command Details page, expand the running commands to view the details of any step, including log filesand command output. You can filter the view by selecting Show All Steps, Show Only Failed Steps, or ShowOnly Running Steps.
After the First Run command completes, click Continue to go to the Summary page.
9. After the service is started, click Continue and then click Finish.
If your cluster uses Kerberos, Cloudera Manager automatically adds a Hue Kerberos Ticket Renewer role toeach host where you assigned the Hue Server role instance. See "Enabling Kerberos Authentication" for moreinformation.
Enable Kerberos for authenticationFor Hue to work properly with a CDP cluster that uses Kerberos for authentication, the Kerberos Ticket Renewer rolemust be added to the Hue service. After you have added the Hue service to your cluster, renew the Kerberos ticket forHue and enable Kerberos for authentication.
About this task
Use the Cloudera Manager Admin Console to add the Kerberos Ticket Renewer role to each host with a HueServer role instance. The Hue Kerberos Ticket Renewer renews only those tickets created for the Hue serviceprincipal: hue/hostname@REALM-NAME. The Hue principal impersonates other users for applications withinHue such as the Job Browser, File Browser, and so on. Other services, such as HDFS and MapReduce, do not usethe Hue Kerberos Ticket Renewer. Instead these other services handle ticket renewal as needed by using their ownmechanisms.
Procedure
1. On the Cloudera Manager home page, select the Hue service.
2. On the Hue service page, click the Instances tab.
3. On the Instances page, click Add Role Instances on the right side of the page. This launches the Add RoleInstances wizard.
4. To add a Kerberos Ticket Renewer role instance to the same host that has the Hue server on your CDP cluster,click Select hosts under Kerberos Ticket Renewer:
To check which host has the Hue Server role instance, click View By Host, which launches a table that lists all thehosts in your CDP cluster and shows all the roles each host already has.
5. In the host selection dialog box, after selecting the host where you want to add the Kerberos Ticket Renewer roleinstance, click OK, and Cloudera Manager adds the role instance.
6. After processing the request to add the role instance, Cloudera Manager returns you to the Instances page andprompts you to restart the service. Click the Restart the service (or the instance)... link so the configurationchange can take effect.
7. After the services have restarted, click Finish to return to the Instances page.
Repeat these steps for each Hue Server role on your cluster.
181
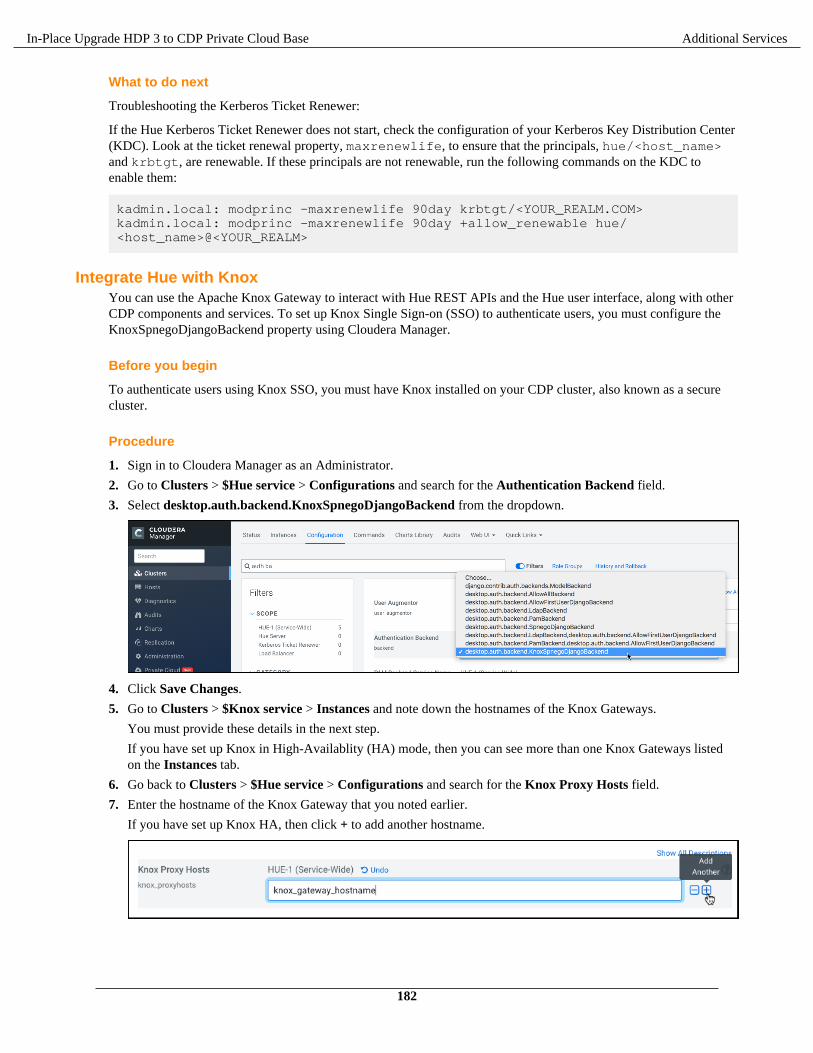
In-Place Upgrade HDP 3 to CDP Private Cloud Base Additional Services
What to do next
Troubleshooting the Kerberos Ticket Renewer:
If the Hue Kerberos Ticket Renewer does not start, check the configuration of your Kerberos Key Distribution Center(KDC). Look at the ticket renewal property, maxrenewlife, to ensure that the principals, hue/<host_name>and krbtgt, are renewable. If these principals are not renewable, run the following commands on the KDC toenable them:
kadmin.local: modprinc -maxrenewlife 90day krbtgt/<YOUR_REALM.COM>kadmin.local: modprinc -maxrenewlife 90day +allow_renewable hue/<host_name>@<YOUR_REALM>
Integrate Hue with KnoxYou can use the Apache Knox Gateway to interact with Hue REST APIs and the Hue user interface, along with otherCDP components and services. To set up Knox Single Sign-on (SSO) to authenticate users, you must configure theKnoxSpnegoDjangoBackend property using Cloudera Manager.
Before you begin
To authenticate users using Knox SSO, you must have Knox installed on your CDP cluster, also known as a securecluster.
Procedure
1. Sign in to Cloudera Manager as an Administrator.
2. Go to Clusters > $Hue service > Configurations and search for the Authentication Backend field.
3. Select desktop.auth.backend.KnoxSpnegoDjangoBackend from the dropdown.
4. Click Save Changes.
5. Go to Clusters > $Knox service > Instances and note down the hostnames of the Knox Gateways.
You must provide these details in the next step.
If you have set up Knox in High-Availablity (HA) mode, then you can see more than one Knox Gateways listedon the Instances tab.
6. Go back to Clusters > $Hue service > Configurations and search for the Knox Proxy Hosts field.
7. Enter the hostname of the Knox Gateway that you noted earlier.
If you have set up Knox HA, then click + to add another hostname.
182
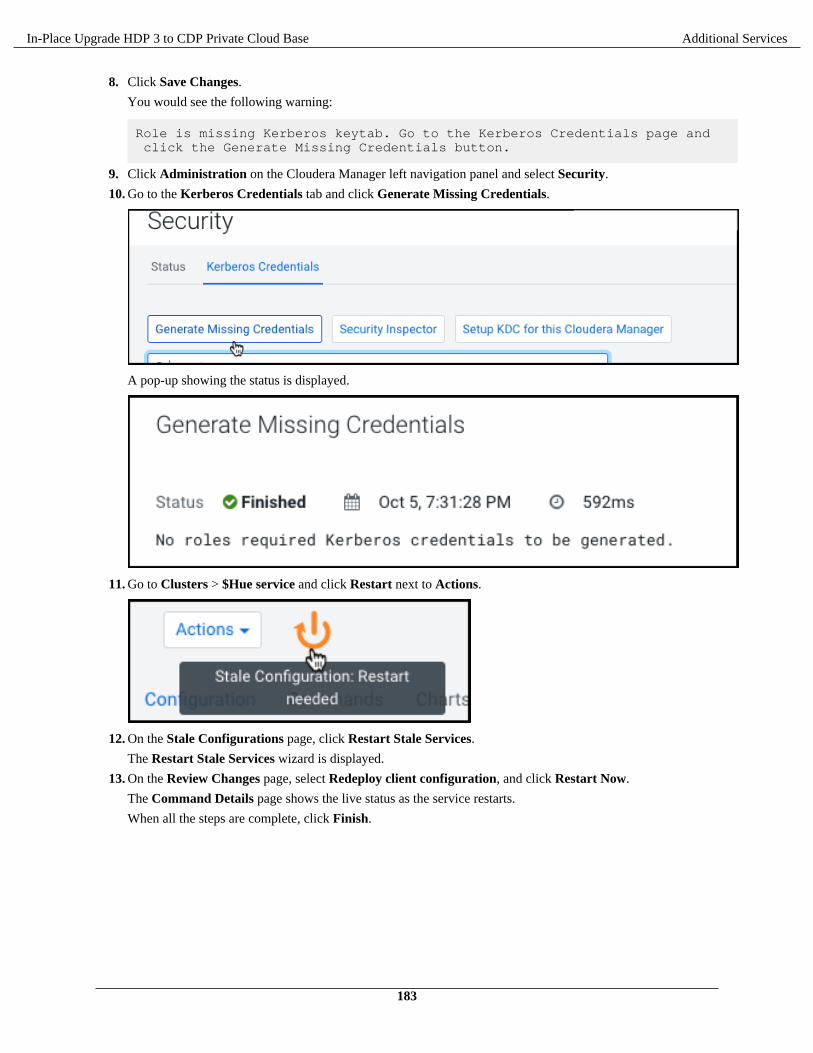
In-Place Upgrade HDP 3 to CDP Private Cloud Base Additional Services
8. Click Save Changes.
You would see the following warning:
Role is missing Kerberos keytab. Go to the Kerberos Credentials page and click the Generate Missing Credentials button.
9. Click Administration on the Cloudera Manager left navigation panel and select Security.
10. Go to the Kerberos Credentials tab and click Generate Missing Credentials.
A pop-up showing the status is displayed.
11. Go to Clusters > $Hue service and click Restart next to Actions.
12. On the Stale Configurations page, click Restart Stale Services.
The Restart Stale Services wizard is displayed.
13. On the Review Changes page, select Redeploy client configuration, and click Restart Now.
The Command Details page shows the live status as the service restarts.
When all the steps are complete, click Finish.
183
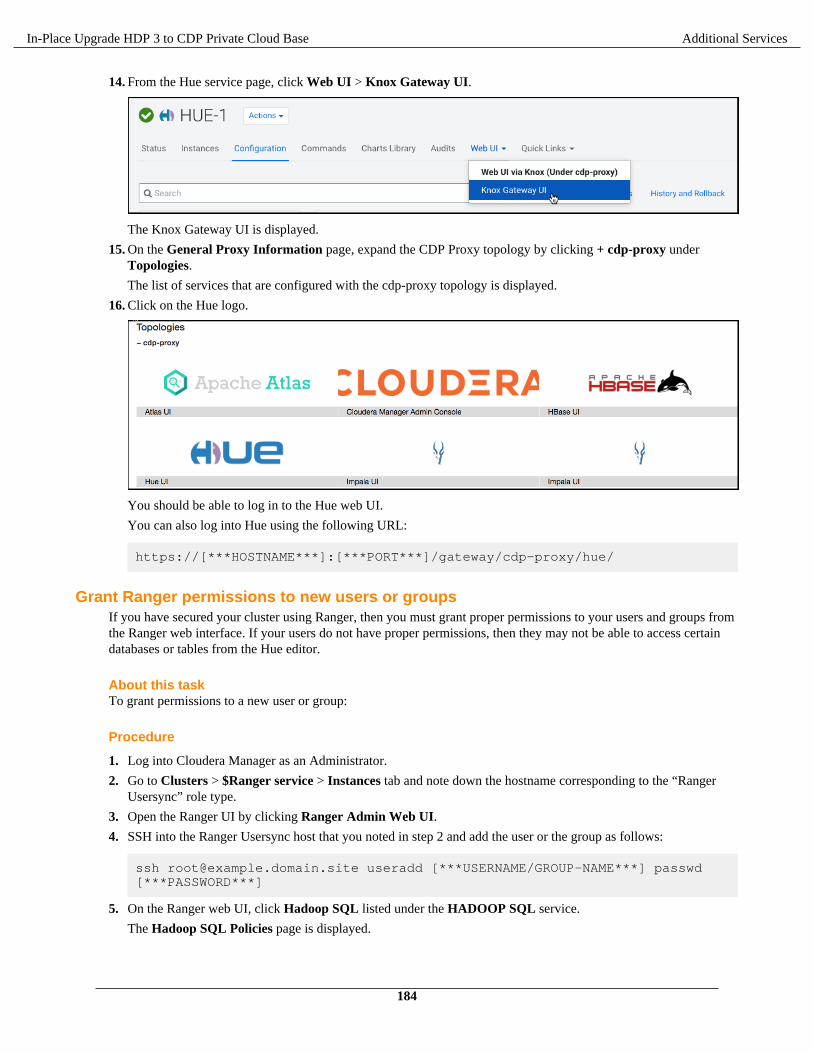
In-Place Upgrade HDP 3 to CDP Private Cloud Base Additional Services
14. From the Hue service page, click Web UI > Knox Gateway UI.
The Knox Gateway UI is displayed.
15. On the General Proxy Information page, expand the CDP Proxy topology by clicking + cdp-proxy underTopologies.
The list of services that are configured with the cdp-proxy topology is displayed.
16. Click on the Hue logo.
You should be able to log in to the Hue web UI.
You can also log into Hue using the following URL:
https://[***HOSTNAME***]:[***PORT***]/gateway/cdp-proxy/hue/
Grant Ranger permissions to new users or groupsIf you have secured your cluster using Ranger, then you must grant proper permissions to your users and groups fromthe Ranger web interface. If your users do not have proper permissions, then they may not be able to access certaindatabases or tables from the Hue editor.
About this taskTo grant permissions to a new user or group:
Procedure
1. Log into Cloudera Manager as an Administrator.
2. Go to Clusters > $Ranger service > Instances tab and note down the hostname corresponding to the “RangerUsersync” role type.
3. Open the Ranger UI by clicking Ranger Admin Web UI.
4. SSH into the Ranger Usersync host that you noted in step 2 and add the user or the group as follows:
ssh [email protected] useradd [***USERNAME/GROUP-NAME***] passwd [***PASSWORD***]
5. On the Ranger web UI, click Hadoop SQL listed under the HADOOP SQL service.
The Hadoop SQL Policies page is displayed.
184

In-Place Upgrade HDP 3 to CDP Private Cloud Base Additional Services
6. On the Hadoop SQL Policies page, you can grant the new user access to all the databases or to specific databasesby adding a new policy.
To grant the permission on all databases:
a. Click the policy ID corresponding to "all - database, table, column".
b. On the Edit Policy page, add the user whom you want to grant the permission in the Select User field underthe Allow Conditions section as shown in the following image:
To grant permissions to a group, enter the group name in the Select Group field.c. Click Save.
To grant permission on specific database:
a. Click Add New Policy.
The Create Policy page is displayed.b. Under the Policy Details section, specify the policy name and select the database, table, and column that you
want your user to access as shown in the following image:
185
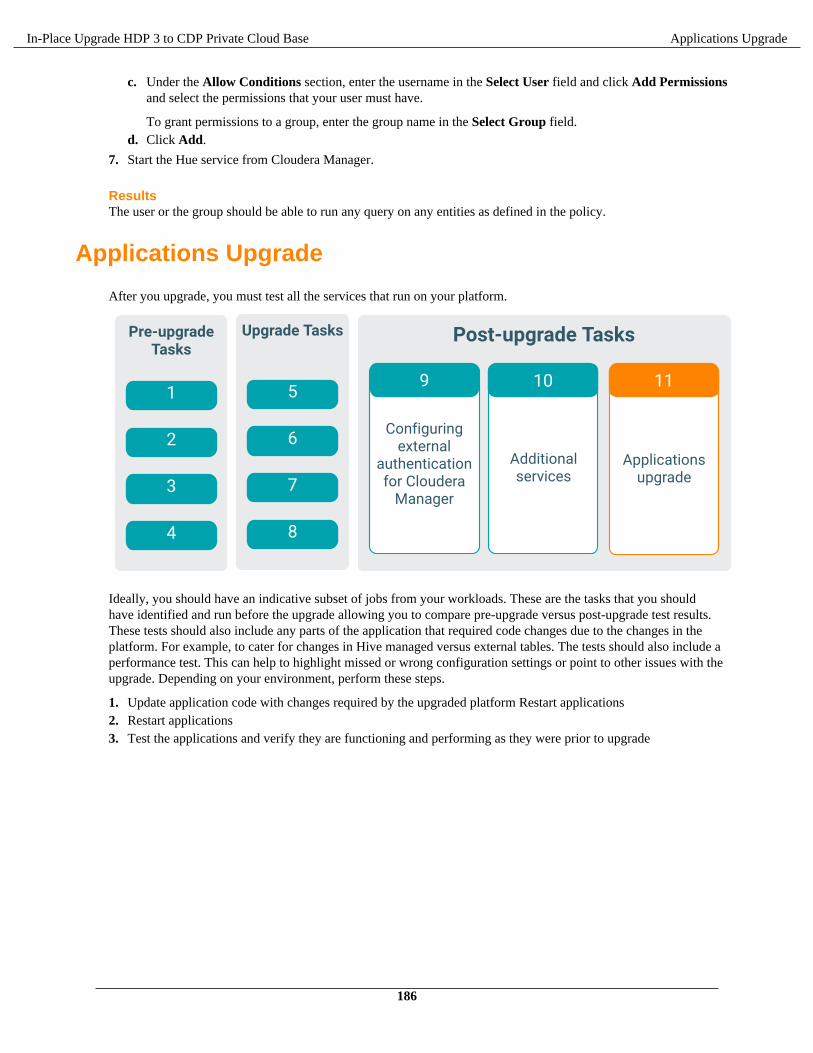
In-Place Upgrade HDP 3 to CDP Private Cloud Base Applications Upgrade
c. Under the Allow Conditions section, enter the username in the Select User field and click Add Permissionsand select the permissions that your user must have.
To grant permissions to a group, enter the group name in the Select Group field.d. Click Add.
7. Start the Hue service from Cloudera Manager.
ResultsThe user or the group should be able to run any query on any entities as defined in the policy.
Applications Upgrade
After you upgrade, you must test all the services that run on your platform.
Ideally, you should have an indicative subset of jobs from your workloads. These are the tasks that you shouldhave identified and run before the upgrade allowing you to compare pre-upgrade versus post-upgrade test results.These tests should also include any parts of the application that required code changes due to the changes in theplatform. For example, to cater for changes in Hive managed versus external tables. The tests should also include aperformance test. This can help to highlight missed or wrong configuration settings or point to other issues with theupgrade. Depending on your environment, perform these steps.
1. Update application code with changes required by the upgraded platform Restart applications2. Restart applications3. Test the applications and verify they are functioning and performing as they were prior to upgrade
186