Embed Size (px)
Citation preview

Rev: 1/23/07
MacTheRipper
Manual and General Guide to Mac DVD Ripping
Website: www.mactheripper.org Email: [email protected]
Foreword:
It is our belief that the media we purchase is ours to do with what we will, as long as it is for personal, private use.
Recent techniques have allowed content distributors to dictate very intrusive restrictions on our use of the media we
buy, to the detriment of the fair use rights granted us by US copyright law, as well as that of most civilized nations.
The MacTheRipper project was created to remove the restrictions imposed on the DVD Video standard format for
movie distribution, so that DVD owners may exercise their right to make backup copies or convert to different
media formats. MacTheRipper is intended for legal use by DVD purchasers, and we in no way endorse copyright
infringement or intellectual property theft. Due to the ever-evolving restrictions imposed by DVD distributors onto
their customers, as well as the sums of money being spent on content protection, it is a constant battle against both
their new technical developments, as well as their lawyers shutting down our web hosts and chasing us around. Yet
we are convinced that this is a noble fight, and we will persist for as long as possible, in order to preserve our rights
through technical means, since our supposedly representative governments have so severely failed us.
MacTheRipper (MTR) is a free DVD ripper (extractor) for Mac OS X. It is capable of copying your DVD movies
to your Mac’s hard drive without all the copy and region restrictions, with all quality intact. This is ideal for saving
your kids‘ favorite movies from rough handling, or making copies for the car, or for a trip. It can also be used to
make the content accessible to programs that will convert the movie to another format, like for a video iPod or a
variety of other media players. With a few caveats, MacTheRipper is also useful in removing region control,
allowing you to watch movies from other parts of the World. These features, combined with an easy-to-use
interface, make MTR an indispensible part of your media tool chest. Join our millions of users in discovering the
best way to backup your DVDs on the Mac. If you enjoy MTR, and would like to help support continuing
development, we are glad to accept donations; info available via email or on our forum.
Table of Contents:
Section 1: Using MacTheRipper to get the DVD content onto your hard drive
1.1: Installing MacTheRipper / System Requirements
1.2: Feature overview
1.2.1: Extraction modes
1.2.2: Disc options
1.2.3: MTR‘s Preferences
1.2.4: “LCD” portion of the interface
1.2.5: Miscellaneous
1.3: Extracting the Full Disc, making an exact copy (ready to burn)
1.4: Extracting the Main Feature, making a copy of just the movie, no menus (ready to burn)
1.5: Extracting a Title Set (ready to burn, may have playback issues – verify playback before burning)
1.6: Extracting a DVD as a single VOB, or as demuxed streams (ready to convert or use in DVD Studio Pro)
1.7: Extracting Chapters and Cells (makes VOBs or demuxed streams – ready to convert or use in DVD Studio Pro,
with caveats)
Section 2: What to do once you have the content extracted
2.1: How to play the MTR output with Apple DVD Player
2.2: How to burn the MTR output to DVD-/+R
2.3: How to convert the MTR output for the iPod or PSP
2.4: How to edit MTR output with NLEs like iMovie, Final Cut, etc.
2.5: How to convert the DVD audio to Audio CD, MP3, AAC, etc.
Section 3: General information
3.1: DVD regions, color formats (PAL vs. NTSC), and region coding
3.2: DVD drives, firmware, rip speed, etc.
3.3: DVD-/+R media (often overlooked, but a crucial part of your success)
Section 4: Troubleshooting / Frequently-Asked Questions / Resources

Section 5: Uninstalling MacTheRipper
Section 6: Acknowledgments
Section 7: Version history
Section 1: Using MacTheRipper to get the DVD content onto your hard drive
1.1: Installing MacTheRipper
Note: MacTheRipper 3.0 requires Mac OS X 10.3.9 or higher, and a G3, G4, G5 or Intel processor. The speed
at which it runs, however, is based completely on the speed of your DVD drive, so CPU power will not affect
its performance.
To install MacTheRipper, simply mount the .dmg (disk image) archive by double-clicking it, and copy the
MacTheRipper application from the mounted disk image to your Applications folder (or wherever you want it),
along with this MacTheRipper Manual if you need it. The disk image can then be ejected, and the .dmg file can be
deleted or archived for backup.
1.2: Feature Overview
1.2.1: Extraction modes
MacTheRipper has five different extraction modes:
• Full Disc Extraction mode makes a perfect copy of the whole DVD, minus the restrictions and encryption. This
is the most common use for MTR, and should work with the most discs. DVDs extracted in this mode are ready to
be played from the hard drive with DVD Player, burned to DVD-R to use on DVD players, or converted to other
formats with other applications.
• Main Feature Extraction mode makes a copy of just the main feature, without any special features or DVD
menu (the movie just starts playing right away), with the audio and subtitle streams you want present. DVDs
extracted in this mode are also ready to be played from the hard drive with DVD Player, burned to DVD-R to use on
DVD players, or converted to other formats.
• Title Set Extraction mode makes a copy of a selected Title Set (title/feature grouping on DVDs). DVDs
extracted in this mode should play through the movie automatically, but you may experience playback issues
depending on the disc. This is a legacy mode that is left in for people who have found it useful.
• Title Only Extraction mode extracts the selected title (typically the individual features on DVDs) to a single
file, either as a muxed (multiplexed) VOB file, where all the different streams (.m2v video, .ac3, .dts and .pcm
audio, and .srt subtitles) are combined, or as the desired demuxed streams. VOB files can be played using VLC
(http://www.videolan.org/vlc) or converted to other formats with apps like ffmpegX
(http://homepage.mac.com/major4/), Handbrake (http://handbrake.m0k.org/), or MPEG Streamclip
(http://www.alfanet.it/squared5/mpegstreamclip.html). Demuxed streams can be converted with ffmpegX or
imported into DVD mastering tools like Apple DVD Studio Pro.
• Title – Chapter Extraction mode extracts the selected chapter(s) to a single file (or optionally one file for each
chapter), either as a muxed (multiplexed) VOB file, where all the different streams (video, audio, subtitles) are
combined, or as the desired demuxed streams. Note that the streams from Chapter mode might not be able to be
imported into DVD Studio Pro, as they may lack the proper file headers for that. This is because chapter breaks
often do not come at the start of the file header. The streams can still be used in other programs, and converted to
other formats.
• Title – Cell Extraction mode extracts the selected cell(s) to a single file (or optionally one file for each cell),
either as a muxed (multiplexed) VOB file, where all the different streams (video, audio, subtitles) are combined, or
as the desired demuxed streams. Cells are the smallest division on DVDs, useful for when you want to get a small
portion of the DVD’s content. The same limitation with stream compatibility exists with Cell mode as with Chapter
mode - the streams from Cell mode might not be able to be imported into DVD Studio Pro.
1.2.2: Disc options
There are several options presented in the main Disc tab of MTR’s interface that apply when you make a backup
using Full Disc, Main Feature or Title Set modes:
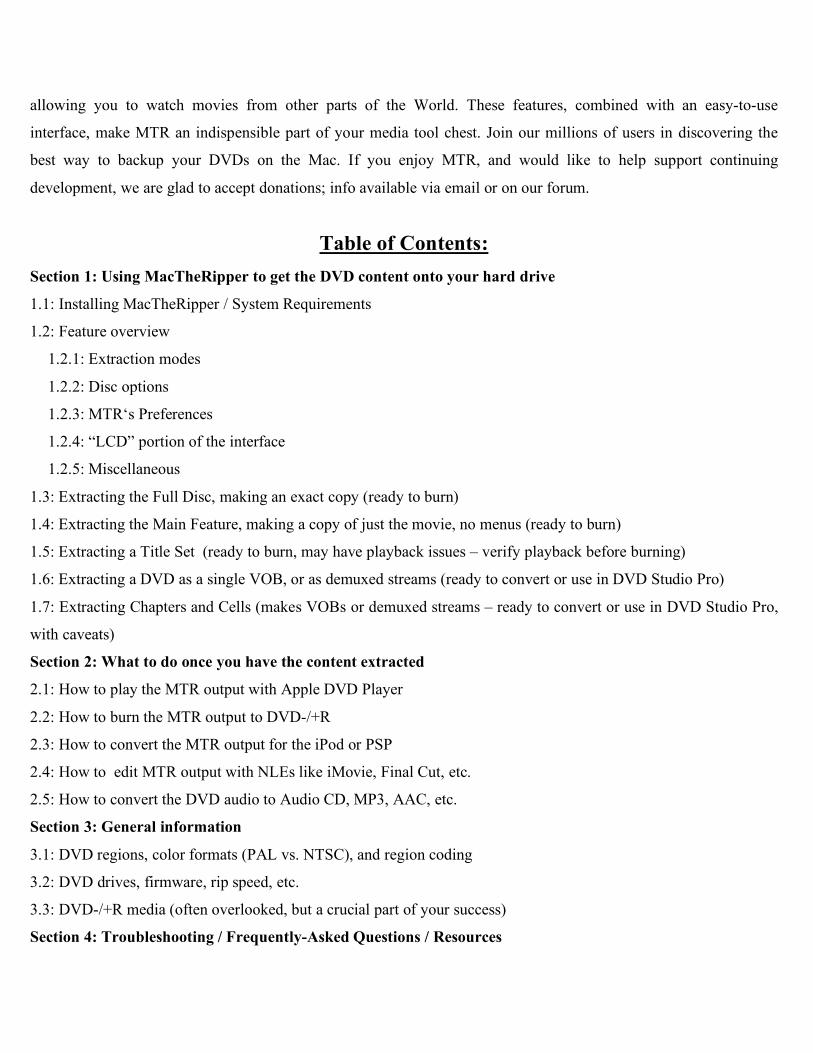
• New Region - This is the setting for the disc region(s) you wish to have your backed up DVD able to play in.
‘New Region’ should usually be left on its default of all regions selected (region 0), unless you wish to restrict the
playback of the DVD to certain regions.
If you wish to select certain regions to limit the output DVD to (for some reason), click on the ‘New Region’ button,
and select the regions you want the output to work with, and hit ‘Close’.
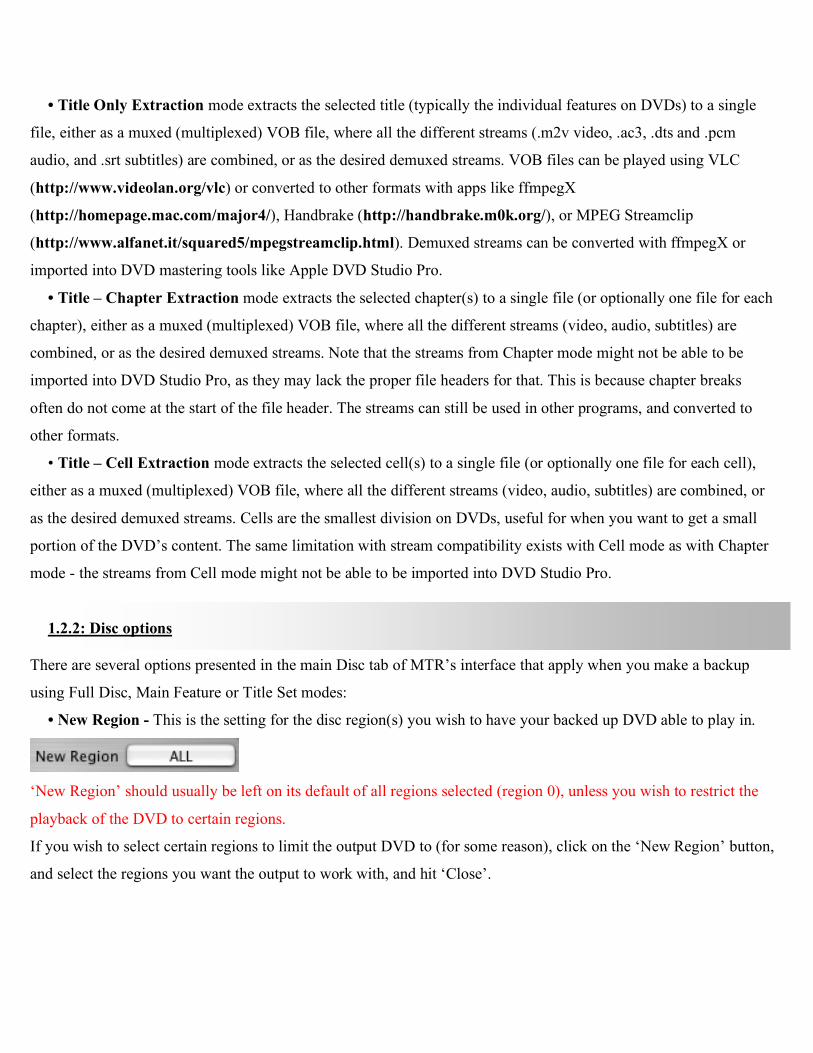
In the above example, the DVD would play in regions 1-6, but not in 7 or 8.
Disc RPC displays which regions the original DVD is set to work in.
• RCE Region – This option is used to remove RCE region control when MTR detects it. If MacTheRipper
displays ‘DISC RCE: -CLEAR-’ after scanning the DVD in the drive, you can leave the ‘RCE Region’ popup menu
on ‘OFF’, as it is by default. Leave ‘RCE Region’ set to “OFF” when it says that RCE is ‘-CLEAR-’.
’.
If MacTheRipper displays ‘DISC RCE: -DETECTED-’, you must set the ‘RCE Region’ popup menu option to the
region in which the DVD was purchased. For example, if you have a DVD that was purchased in N. America
(Region 1), and MacTheRipper says that RCE is detected, you must set the ‘RCE Region’ popup menu to ‘RCE 1’.
So, if RCE is ‘-DETECTED-’, always set the ‘RCE Region’ to the region the DVD comes from, regardless of the
numbers that show up in the ‘Region’ field.
• UOPs (User Operation Prohibitions) are the settings that prevent users from performing certain operations at
certain times. A common example of this is on some DVDs, where you are unable to skip to the next screen or go to
the menu during the logo, warning and/or preview presentations.
This button opens a sheet where you can choose to ‘Disable DVD UOPs’, by checking this box:
If you do this, be sure to verify the output of MTR with DVD Player before you burn to DVD±R, as it can break the
menu system on certain DVDs.
If you want to access the advanced UOPs options, you can check the ‘Enable Advanced Features’ box:
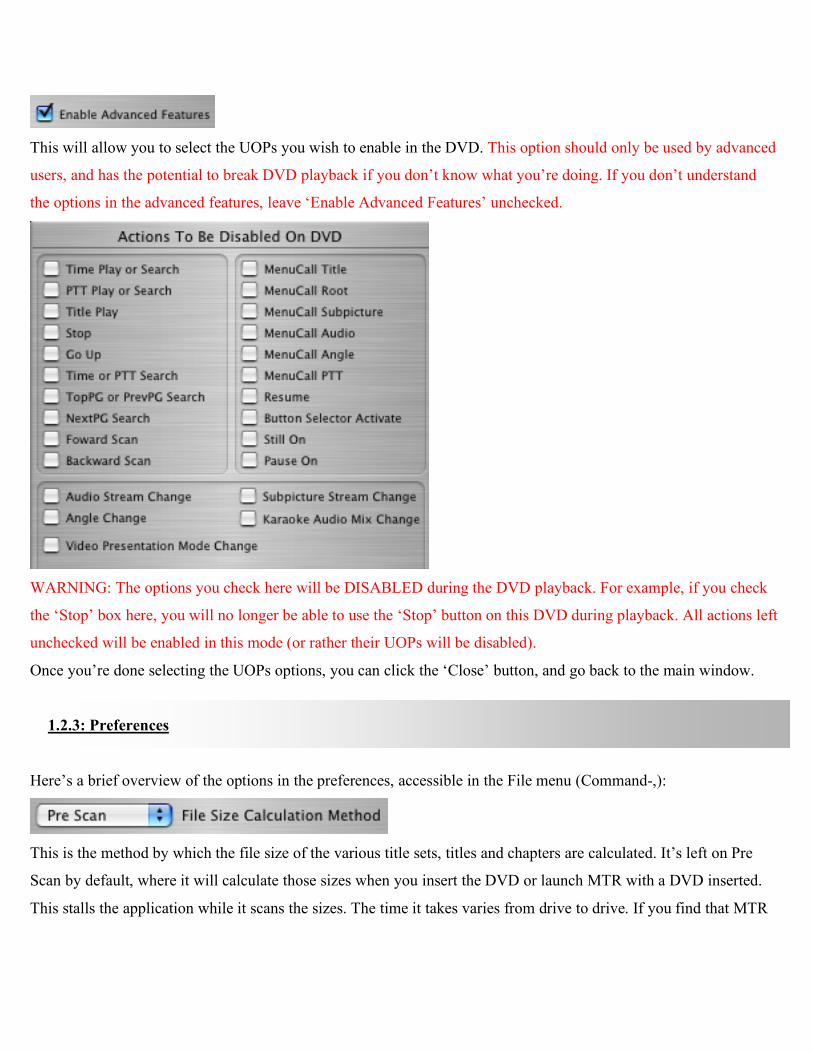
This will allow you to select the UOPs you wish to enable in the DVD. This option should only be used by advanced
users, and has the potential to break DVD playback if you don’t know what you’re doing. If you don’t understand
the options in the advanced features, leave ‘Enable Advanced Features’ unchecked.
WARNING: The options you check here will be DISABLED during the DVD playback. For example, if you check
the ‘Stop’ box here, you will no longer be able to use the ‘Stop’ button on this DVD during playback. All actions left
unchecked will be enabled in this mode (or rather their UOPs will be disabled).
Once you’re done selecting the UOPs options, you can click the ‘Close’ button, and go back to the main window.
1.2.3: Preferences
Here’s a brief overview of the options in the preferences, accessible in the File menu (Command-,):
This is the method by which the file size of the various title sets, titles and chapters are calculated. It’s left on Pre
Scan by default, where it will calculate those sizes when you insert the DVD or launch MTR with a DVD inserted.
This stalls the application while it scans the sizes. The time it takes varies from drive to drive. If you find that MTR
crashes when scanning the DVD, you can set this option to ‘Disabled’, and see if this fixes the issue. If this happens
to you, we always want to hear about it so we can fix any incompatibilities.
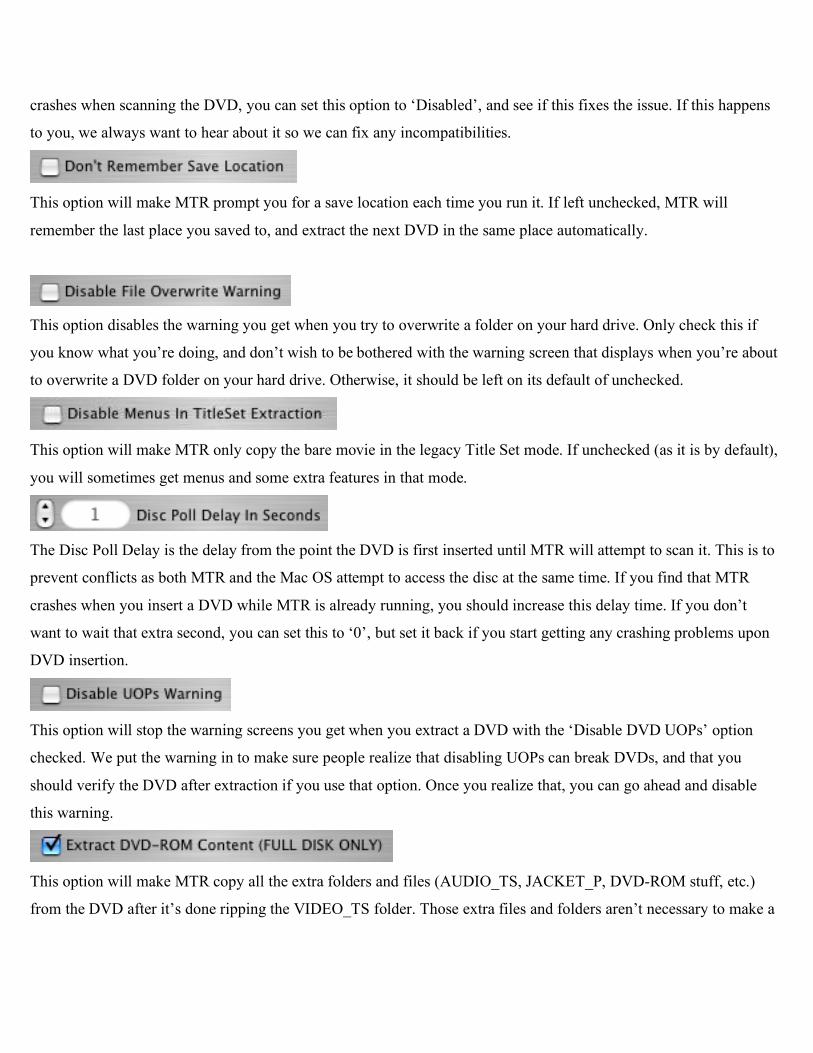
This option will make MTR prompt you for a save location each time you run it. If left unchecked, MTR will
remember the last place you saved to, and extract the next DVD in the same place automatically.
This option disables the warning you get when you try to overwrite a folder on your hard drive. Only check this if
you know what you’re doing, and don’t wish to be bothered with the warning screen that displays when you’re about
to overwrite a DVD folder on your hard drive. Otherwise, it should be left on its default of unchecked.
This option will make MTR only copy the bare movie in the legacy Title Set mode. If unchecked (as it is by default),
you will sometimes get menus and some extra features in that mode.
The Disc Poll Delay is the delay from the point the DVD is first inserted until MTR will attempt to scan it. This is to
prevent conflicts as both MTR and the Mac OS attempt to access the disc at the same time. If you find that MTR
crashes when you insert a DVD while MTR is already running, you should increase this delay time. If you don’t
want to wait that extra second, you can set this to ‘0’, but set it back if you start getting any crashing problems upon
DVD insertion.
This option will stop the warning screens you get when you extract a DVD with the ‘Disable DVD UOPs’ option
checked. We put the warning in to make sure people realize that disabling UOPs can break DVDs, and that you
should verify the DVD after extraction if you use that option. Once you realize that, you can go ahead and disable
this warning.
This option will make MTR copy all the extra folders and files (AUDIO_TS, JACKET_P, DVD-ROM stuff, etc.)
from the DVD after it’s done ripping the VIDEO_TS folder. Those extra files and folders aren’t necessary to make a
working DVD video, but it doesn’t hurt. You can uncheck this option if you only want the VIDEO_TS folder, or
wish to copy the rest manually.
This will delete the .dvdcss hidden directory where MTR (as well as VLC and mplayer) stores the DVD decryption
keys for the DVDs it has processed. These keys are stored in order to make playing and ripping DVDs faster the
second time you use them. It can be useful to delete this directory if you’re having problems with MTR output still
containing CSS encryption. Once the .dvdcss folder is deleted (after you’ve enabled this option and quit the MTR
application), you can try playing the original DVD with Apple DVD Player and then trying to rip again.
This option will enable logging MTR’s progress to your computer’s Console.log file, useful in troubleshooting
problems. You should probably only enable this option if we request that you do while trying to figure out any
problems you’re having. Note that when this option is enabled, it will significantly increase the amount of info (and
therefore the file size) in the console.log if you use MTR often.
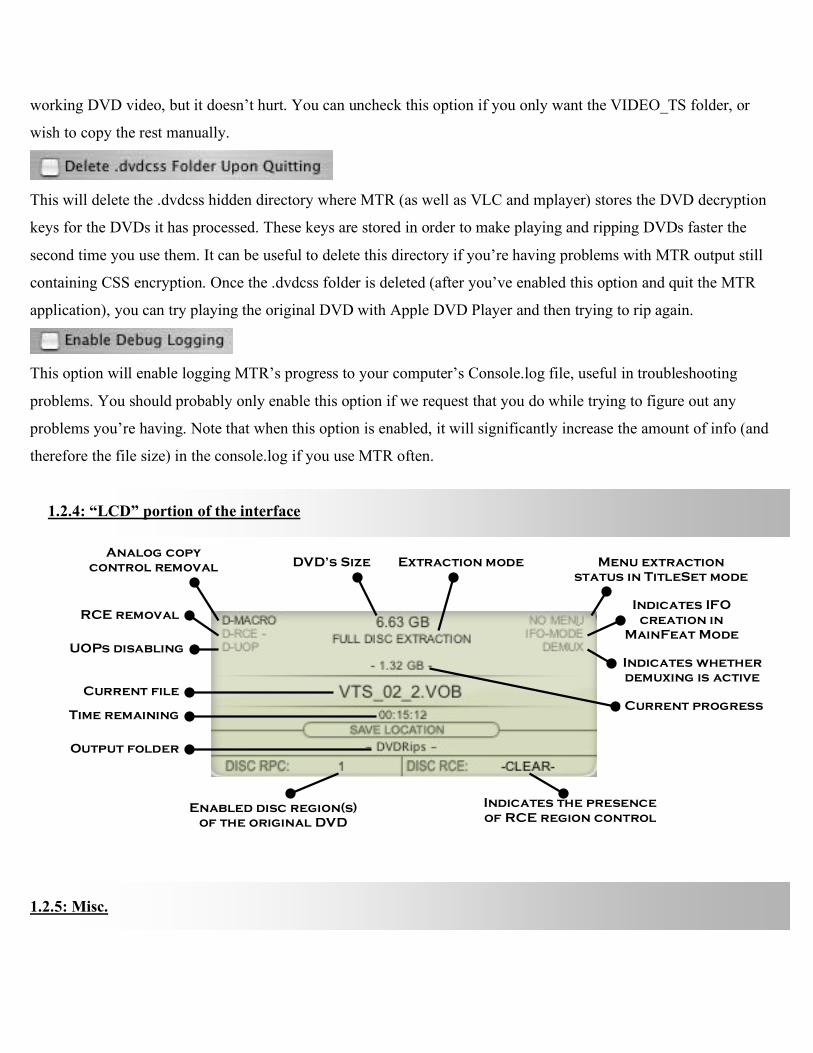
1.2.4: “LCD” portion of the interface
1.2.5: Misc.
Menu extraction status in TitleSet mode
Indicates IFO creation in
MainFeat Mode Indicates whether demuxing is active
Analog copy control removal
RCE removal
UOPs disabling
DVD’s Size
Extraction mode
Current progress
Current file Time remaining
Output folder
Enabled disc region(s) of the original DVD
Indicates the presence of RCE region control
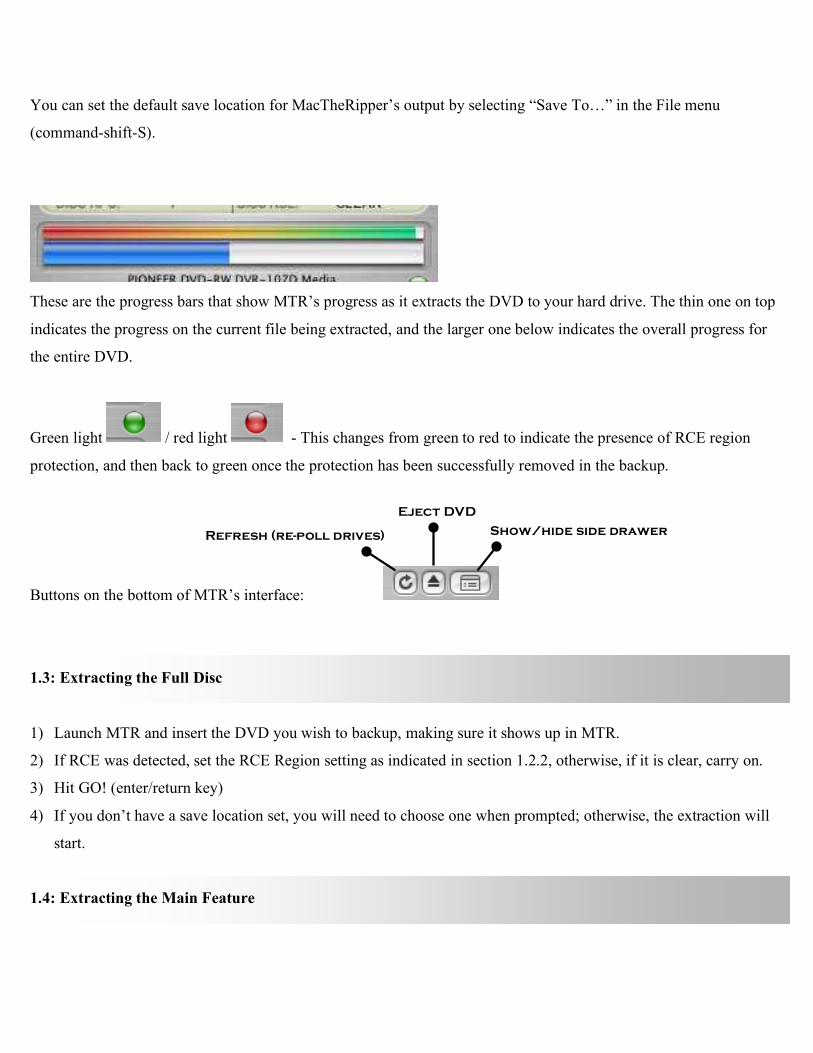
You can set the default save location for MacTheRipper’s output by selecting “Save To…” in the File menu
(command-shift-S).
These are the progress bars that show MTR’s progress as it extracts the DVD to your hard drive. The thin one on top
indicates the progress on the current file being extracted, and the larger one below indicates the overall progress for
the entire DVD.
Green light / red light - This changes from green to red to indicate the presence of RCE region
protection, and then back to green once the protection has been successfully removed in the backup.
Buttons on the bottom of MTR’s interface:
1.3: Extracting the Full Disc
1) Launch MTR and insert the DVD you wish to backup, making sure it shows up in MTR.
2) If RCE was detected, set the RCE Region setting as indicated in section 1.2.2, otherwise, if it is clear, carry on.
3) Hit GO! (enter/return key)
4) If you don’t have a save location set, you will need to choose one when prompted; otherwise, the extraction will
start.
1.4: Extracting the Main Feature
Refresh (re-poll drives)
Eject DVD
Show/hide side drawer
1) Launch MTR and insert the DVD you wish to backup, making sure it shows up in MTR.
2) If RCE was detected, set the RCE Region setting as indicated in section 1.2.2, otherwise, if it is clear, carry on.
3) Click on the “Mode” tab, and switch from Full Disc Extraction to Main Feature Extraction mode.
4) Select the title (feature) you want on the right side drawer. You can choose to omit audio and subtitle tracks that
you don’t want.
5) Hit GO! (enter/return key)
6) If you don’t have a save location set, you will need to choose one when prompted; otherwise, the extraction will
start.
1.5: Extracting a Title Set
Note that Title Set mode is a legacy mode left in for those with workflows based around it. It may produce output
with playback issues on certain DVDs, and you should play the output with DVD Player before burning to DVD-R.
1) Launch MTR and insert the DVD you wish to backup, making sure it shows up in MTR.
2) If RCE was detected, set the RCE Region setting as indicated in section 1.2.2, otherwise, if it is clear, carry on.
3) Click on the “Mode” tab, and switch from Full Disc Extraction to Title Set Extraction mode.
4) Select the title set you wish to backup in the popup menu (main feature title set is indicated as “MF”).
5) Hit GO! (enter/return key)
6) If you don’t have a save location set, you will need to choose one when prompted; otherwise, the extraction will
start.
1.6: Extracting a movie as a single VOB file
Note that Title – Chapter mode produces output that will not play on DVD players. It is meant for those that wish to
obtain muxed (multiplexed – combined video, audio and subtitle streams) VOB files, or demuxed streams (.m2v
video, .ac3, .dts, .pcm audio) for use in DVD mastering tools or video format converters. Do not burn this to DVD-
R and expect it to play on a DVD player.
1) Launch MTR and insert the DVD you wish to backup, making sure it shows up in MTR.
2) Click on the “Mode” tab, and switch from Full Disc Extraction to Title - Chapter Extraction mode.
3) Select the title(s) you wish to backup in the left side pulldown menu (main feature title is indicated as “MF”).
4) All of the chapters in the right side drawer should be selected to get the entire movie.
5) If you wish to obtain split streams, with separate audio and video streams, you can check the “Demux” option.
6) Hit GO! (enter/return key)
7) If you don’t have a save location set, you will need to choose one when prompted; otherwise, the extraction will
start.
1.7: Extracting Chapters and Cells
Note that Title - Chapter and Title - Cell modes produce output that will not play on DVD players. They are meant
for those that wish to obtain muxed (multiplexed – combined video, audio and subtitle streams) VOB files, or
demuxed streams (.m2v video, .ac3, .dts, .pcm audio) from selected ranges of chapters or cells for use in DVD
mastering tools or video format converters. Do not burn this to DVD-R and expect it to play on a DVD player.
1) Launch MTR and insert the DVD you wish to backup, making sure it shows up in MTR.
2) Click on the “Mode” tab, and switch from Full Disc Extraction to Title – Chapter or Title - Cell Extraction
mode.
3) Select the title you wish to backup chapters from in popup menu below the mode selection menu (main feature
title is indicated as “MF”).
4) Select the chapter(s) or cell(s) you wish to backup in the right side drawer. You can choose to leave the chapters
merged, or uncheck that option if you would like one file for each chapter or cell.
5) If you wish to obtain split streams, with separate audio and video streams, you can check the “Demux” option.
Then, you can click the “Open Streams” button and choose which streams you wish to extract.
6) Hit GO! (enter/return key)
7) If you don’t have a save location set, you will need to choose one when prompted; otherwise, the extraction will
start.
Section 2: What to do once you have the content extracted
2.1: Playing the MTR output with DVD Player
You can use DVD Player to play the MTR output from Full Disc, Main Feature and Title Set modes directly from
your hard drive.
1) Launch DVD Player.
2) Go to the 'File' menu, select 'Open VIDEO_TS Folder', navigate to the VIDEO_TS folder (the VIDEO_TS folder
itself, not the contents or the DVD folder) MTR saved to your HD, and hit the 'choose' button (alternatively, you
can just drag and drop a VIDEO_TS folder onto DVD Player's dock icon or application icon in the Finder).
3) Then, you can hit 'play' (space bar) and the DVD will play from your HD.
Alternatively, there is a program called Matinee (http://matinee.dizandat.com/), which can easily play back
VIDEO_TS folders from your hard drive for you.
2.2: How to burn the MTR output to DVD-/+R
Once you have your DVD backed up to your hard drive, you need to get it burned to DVD-R media in the proper
format (UDF, or Universal Disc Format), with the proper file structure (at least a VIDEO_TS folder in the root/base
directory of the DVD). There is one main issue that you will need to contend with, and that is compression. A
majority of commercial DVD movies on the market today are dual-layered (DVD-9), and can hold up to about
8.5GB worth of data. The most common DVD-R media and burners are single-layered (DVD-5), and can only hold
4.37GB worth of data.
Single-layered media is the most compatible with DVD players, so stick to this if you want to ensure good
playback on all DVD players. You can get dual-layered DVD-R drives and media, but the discs are more expensive,
and many DVD players will have problems playing them, or won’t play them at all, so be sure to check
compatibility with your DVD player of choice. Be sure to read section 3.3 for information on the DVD-R media that
will give you the best compatibility with DVD players. If you are burning to Dual-Layered (DL) media, or if the
DVD you’re copying is already less than 4.37GB, you can skip the compression section that follows, and go directly
to “How to burn”.
To compress a DVD to under 4.37GB:
If you want to use the most common and compatible single-layered DVD-R media, you will need to "compress"
(technically called requantizing in this case, a fast process that discards less crucial data from the video stream,
typically with acceptable picture quality degradation) the DVD to less than 4.37 GB to fit on single-layered DVD-R
media. Tools to use for requantizing are DVD2OneX, DVDRemaster, Roxio Popcorn and Roxio Toast Titanium
(versions 7 and higher), in order of reputed value, quality and usability. Requantizing only compresses the video
stream, leaving the audio and subtitles unchanged; this means that the process only affects the picture quality.
There are two compression modes you can choose from, either Full Disc Copy mode, which compresses the entire
DVD, keeping menus and extras, or Movie-Only mode, where you select a feature, or set of features you want from
the DVD, and it will discard the rest, including the menu (the feature will just start playing when you insert the
DVD). If you want the best quality possible, Movie-Only mode is the way to go. If you want to keep the menus and
special features, and don’t mind the image quality degradation, then Disc Copy is the mode for you. For the purpose
of this guide, I will tell you how to do this with DVD2OneX 2.x as that is the solution that gives the best results, but
the same principles should apply to the other programs, and their interfaces shouldn't be too hard to figure out.
• Full Disc Copy compression:
If you want to make a compressed clone of the entire DVD, the process is fairly straightforward. First, launch
DVD2OneX. Select “Make a full disc copy…”. Navigate to the DVD folder saved by MTR, select the VIDEO_TS
folder within it, and click the “Choose” button. In the “Settings” section, I typically leave the “Output” setting on
“Custom”, and set the size to 4472 MB. This usually makes output that just barely fits onto a DVD-R disc, but it
may be necessary to lower this value if the output is greater than 4.38GB. For the “Compression Mode” setting, I
leave this on “Best Quality” and “Automatic”.
Next, in the “Audio” section, you can remove audio tracks you don’t need to save space. I typically discard DTS
format surround sound audio tracks (as opposed to the most common AC3), especially if surround sound AC3 is
present, as they take up a huge amount of space, requiring you to degrade the picture quality significantly to recover
the space. I also discard audio tracks for languages I don't need, especially if subtitles are present for that language.
Now, click the green button at the lower right to start the process. If you want DVD2OneX to burn the movie
directly to DVD-R, set the “Output type” to “Burn”. If you would like to verify the quality before burning to DVD-
R, you must either make a disk image, or a file set. If you would like to make a disk image that you can burn with
Disk Utility or Roxio Toast, set it to “Image”. You can also mount the disc image to verify the playback before
burning to disc.
If you want it to make another DVD folder in the Finder, like the MTR output, set the output type to “File set”.
For the DVD name, I typically enter the same name as the original DVD. Select “Ok” when you’re ready to start the
processing. Once you have your compressed DVD folder, (if you used “File set” output) you can copy any extra
content present in the DVD folder that MTR saved to the compressed DVD folder (optional), such as JACKET_P
(contains the images you see when you stop playback of the DVD on certain movies), or any DVD-ROM content
(random files and folders). Those aren't necessary for a working DVD (only a VIDEO_TS folder is required), but
you might want to have them.
• Movie-Only compression:
One issue I will note here is that on some of the latest DVD releases, publishers have been putting some junk data
on the DVDs, in the form of zero-duration cells (DVD features are broken up into cells of varying lengths), which
can interfere with normal playback. If you use Main Feature mode, it may be necessary for you to manually remove
any zero-duration cells present in the feature(s) you want. First, launch DVD2OneX. Next, select “Make a movie-
only copy…”. Navigate to the DVD folder saved by MTR, select the VIDEO_TS folder within it, and click the
“Choose” button.
In the “Settings” section, I typically leave the “Output” setting on “Custom”, and set the size to 4472 MB. This
usually makes output that just barely fits onto a DVD-R disc, but it may be necessary to lower this value if the
output is greater than 4.38GB. For the “Compression Mode” setting, I leave this on “Best Quality” and “Automatic”.
In the “Title” setting, (in Title 1) select the feature you want. Typically, the main feature is the longest title, and is
selected by default.
Next, in the “Audio” section, you can remove audio tracks you don’t need to save space. I typically discard DTS
format surround sound audio tracks (as opposed to the most common AC3), especially if surround sound AC3 is
present, as they take up a huge amount of space, requiring you to degrade the picture quality significantly to recover
the space. I also discard audio tracks for languages I don't need, especially if subtitles are present for that language.
For the “Subtitles”, you can always enable all subtitle tracks, as they will not add any significant size to the DVD,
and it’s basically useless to remove them.
Next, you must remove any zero-duration cells to ensure proper playback. In the “Cells” section, scroll through
the list of cells, and uncheck any cell that has a duration of 0:00. Now, click the green button at the lower right to
start the process. If you want DVD2OneX to burn the movie directly to DVD-R, set the “Output type” to “Burn”. If
you would like to verify the quality before burning to DVD-R, you must either make a disk image, or a file set. If
you would like to make a disk image that you can burn with Disk Utility or Roxio Toast, set it to “Image”. You can
also mount the disc image to verify the playback before burning to disc.
If you want it to make another DVD folder in the Finder, like the MTR output, set the output type to “File set”.
For the DVD name, I typically enter the same name as the original DVD. Select “Ok” when you’re ready to start the
processing. Once you have your compressed DVD folder, (if you used “File set” output) you can copy any extra
content present in the DVD folder that MTR saved to the compressed DVD folder (optional), such as JACKET_P
(contains the images you see when you stop playback of the DVD on certain movies), or any DVD-ROM content
(random files and folders). Those aren't necessary for a working DVD (only a VIDEO_TS folder is required), but
you might want to have them.
How to burn the content to DVD-R:
If you are using Roxio Toast (recommended), in the Data tab, choose "DVD-ROM (UDF)" in the left side drawer
as the format. Now, drag the compressed DVD folder with the name of the DVD to the main Toast window, and it
should make a DVD with the same name as the original DVD containing at least a VIDEO_TS and AUDIO_TS
folder (always empty), and maybe some other stuff you copied over. Now insert a blank DVD-R, and hit the big red
button in the lower right and start the burn. If the DVD is too big, remove some of the extra DVD-ROM content you
added to the compressed DVD folder, or try reducing the output size from 4472 MB.
I will note here that if you skipped the compression step, and you get an error from Toast saying that “The source
folder is damaged”, or something to that effect, you might try running the DVD through DVD2OneX, even if it
doesn’t need compression. If you are burning a dual-layered disc, and you would like to keep all the quality intact,
use DVD2OneX in Disc Copy mode, and set the size from 4472 up to 9000 MB.
Additional Tutorials:
http://macweaver.com/dvdinfo/mtr.htm
http://forums.afterdawn.com/thread_view.cfm/125996
http://howto.diveintomark.org/dvd-backup/
http://forum.videohelp.com/viewtopic.php?t=156359
2.3: Converting the MTR output for the iPod or PSP
For the iPod:
1) Use MTR in Full Disc or Main Feature mode to extract the movie to your hard drive.
2) Use Handbrake (http://handbrake.m0k.org/) to convert the selected sections and audio to mp4 format.
Tutorial: http://howto.diveintomark.org/ipod-dvd-ripping-guide/
For the PSP (primary method):
1) Use MTR in Full Disc or Main Feature mode to extract the movie to your hard drive.
2) Use iPSP (http://www.kaisakura.com/ipsp.php) to convert the VIDEO_TS folder to PSP-compatible video
formats.
For the PSP (alternate method):
1) Use MTR in Title - Chapter mode to extract the selected title as a VOB file (or demux into individual streams if
you want to select the audio stream you want).
2) Use ffmpegX (http://homepage.mac.com/major4/index.html) to convert the .VOB (or the demuxed .m2v
video and the desired .ac3 audio streams) into PSP MP4 format.
Tutorial: http://homepage.mac.com/major4/psp.html
2.4: How to edit MTR output with NLEs like iMovie, Final Cut, etc.
1) Extract the content you want in Title – Chapter Extraction mode.
2) Use MPEG Stream Clip to convert the MTR output to DV format. Available here:
http://www.squared5.com/
3) The DV files can be edited in iMovie or Final Cut, and then you can use iDVD or DVD Studio Pro to convert
back to DVD format.
2.5: How to convert the DVD movie’s audio to Audio CD, MP3, AAC, etc.
1) Extract the content you want in Title – Chapter Extraction mode, with 'demux streams' enabled, only audio
tracks enabled (ac3, dts, and pcm, not m2v or subtitles), and 'merge chapters' disabled. This will output the audio
from the selected chapters of the DVD, typically as AC3 files.
2) You can then use mAC3dec to convert the AC3 files to a compressed format for the iPod, such as MP3 or AAC,
or export to uncompressed AIFF and use something like iTunes to convert to the format of your choice. For
PCM, get PCM2AIFF, or AIFF from PCM and convert them to AIFF format, which you can import into iTunes
and convert to MP3. Unfortunately, there are no easy methods for extracting DTS audio to usable formats.
mAC3dec: http://sourceforge.net/projects/mac3dec/
AIFF from PCM: http://www.verek.com/products/aiff_from_pcm/beta/
Section 3: General information
3.1: DVD regions, color formats (PAL vs. NTSC), and region coding
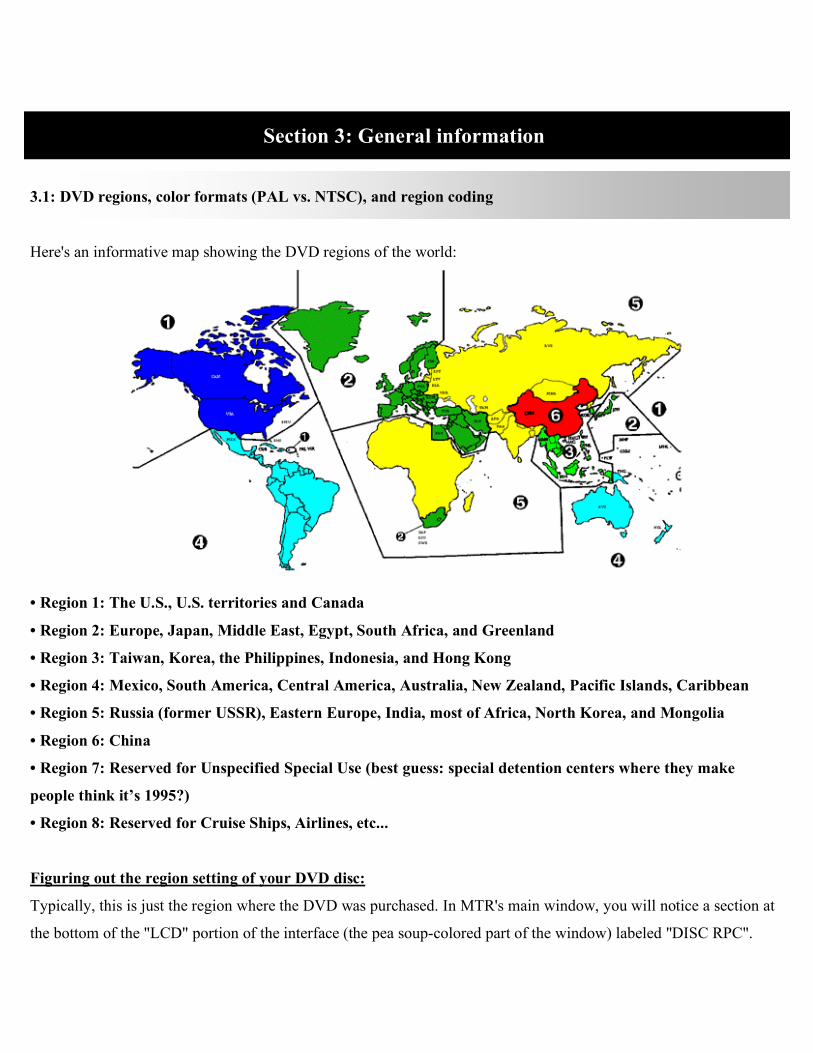
Here's an informative map showing the DVD regions of the world:
• Region 1: The U.S., U.S. territories and Canada
• Region 2: Europe, Japan, Middle East, Egypt, South Africa, and Greenland
• Region 3: Taiwan, Korea, the Philippines, Indonesia, and Hong Kong
• Region 4: Mexico, South America, Central America, Australia, New Zealand, Pacific Islands, Caribbean
• Region 5: Russia (former USSR), Eastern Europe, India, most of Africa, North Korea, and Mongolia
• Region 6: China
• Region 7: Reserved for Unspecified Special Use (best guess: special detention centers where they make
people think it’s 1995?)
• Region 8: Reserved for Cruise Ships, Airlines, etc...
Figuring out the region setting of your DVD disc:
Typically, this is just the region where the DVD was purchased. In MTR's main window, you will notice a section at
the bottom of the "LCD" portion of the interface (the pea soup-colored part of the window) labeled "DISC RPC".
When you insert a DVD, and MTR is done scanning it, it will display some number(s) for DISC RPC. The
number(s) listed in the RPC section indicate which region(s) the DVD you inserted will play in. If there is only a
single number, then that DVD came from that region (0 doesn't count, that just means it's region-free). Otherwise, if
several numbers are listed, it's not always obvious which region the DVD came from; but often, US releases are only
region 1, so if you see two numbers present, regions 1 and X, then your DVD is most likely from region X, unless
you know it was purchased in region 1. Also, you can look on the DVD case to figure out the DVD's region,
typically indicated with a globe icon with a number at the center.
Color Formats – PAL vs. NTSC:
There's also the issue of PAL vs. NTSC color formats. PAL is used in Europe and European ex-colonies, and NTSC
is used in the N. America and most Asian countries. Some DVD players and TV sets are incompatible with the other
color format (especially Sony ones), and others work fine, or need to be switched over to the other color mode in the
DVD player or TV's system menu. MTR does not convert color formats, and it's generally a huge pain in the ass to
convert them; you're much better off getting yourself a cheap set-top DVD player for $30 that can handle both color
formats. Also note that computers should be able to play both formats without any problems.
3.2: DVD drives, firmware, rip speed, etc.
I will note here that when you have a new DVD drive, or a new computer, you must set the DVD drive’s region
setting for MTR to be able to function. To do this, simply play a commercial DVD movie with DVD Player (if it
doesn’t launch automatically when you insert a DVD, you can find it in your Applications folder), and when
prompted (before the movie starts playing), select your DVD region. Once this is done, MTR will function as
normal. Read on to find out about region-free (RPC1) firmware for certain drives.
The speed at which your DVDs rip is based completely on the read speed of your DVD drive. Also, certain drives,
especially those from certain manufacturers such as Matshita (Panasonic), Sony, and HL-DT-ST (LG), are
known to have weaker compatibility and performance, and are incapable of playing or ripping DVDs from other
regions than the one they’re set to (meaning you can’t play or rip DVDs from other parts of the World).
For best results, and widest compatibility, we recommend using Pioneer DVD drives. These drives have region-free
unlocked firmware available that will let you rip and play DVDs from anywhere in the World. We have links to
specific drive models and special deals in our forum, and firmware is available at rpc1.org. If you plan on doing a lot
of ripping, and especially if you plan on ripping or playing DVDs from different regions, it will make your life
easier to get a nice internal IDE (for Mac Pro owners) or external FireWire/USB2 Pioneer drive for all your DVD
needs. We have no ties to Pioneer, but have found that they are the most widely-supported and reliable drives on the
market.
RPC1.org Mac forums (for region-free firmware): http://forum.rpc1.org/viewforum.php?f=30
3.3: DVD-/+R media
The DVD+/-R media blanks you use are crucial to the playback of burned copies on various DVD players. If you get
cheap DVD-R media, you will have playback problems on some DVD players. Over the course of extensive
experimentation and collaboration, we have come to the conclusion that Taiyo Yuden DVD-R media (available from
online retailers) have the best compatibility with DVD players. If you can’t find that, Verbatim and
Ritek/RiData/Arita are pretty good as well. For Dual-Layered (DL) media, Verbatim is the manufacturer of choice.
We have no affiliation with any of these companies, but have found through trial and error that they make the
highest quality DVD-R media. If you experience playback issues such as stuttering and pixelation, the DVD-R
media is the first thing to look at.
Section 4: Troubleshooting / Frequently-Asked Questions / Resources
We can help you on our message boards (forum) if you’re having any further problems not explained in this manual.
We have several knowledgeable moderators, and an active community of friendly and helpful members ready to
answer any remaining questions you may have. Our forum can be found at the following web address:
http://www.ripdifferent.com/phpbb2/viewforum.php?f=26
Try browsing our Frequently-Asked Questions thread on the forum, or searching for the particular issue or movie
you’re having problems with before you post a new topic. You might also check out the posting rules. Otherwise, we
welcome your participation on our forums, and encourage you to share any problems or suggestions you may have.
Note that you must register a forum account with ripDifferent.com to see our forum. We do have a separate
section devoted to answering a few frequently-asked questions (FAQ), available to the public without having
to sign up at this address:
http://www.ripdifferent.com/phpbb2/viewforum.php?f=34
Section 5: Uninstalling MacTheRipper
To uninstall MacTheRipper, there are four elements that can be deleted from your computer.
• The first step is to remove the .dvdcss folder. This is a hidden folder that MTR creates in your home directory,
which contains the decryption keys to unlock any DVD it encounters. This makes future processing of the same
discs faster. To remove this folder, you can launch MacTheRipper, go to the preferences and ensure that the “Delete
.dvdcss Folder Upon Quitting” option is checked. Then Quit the MTR application. The .dvdcss folder will then be
removed.
• The next step is to remove the MacTheRipper application. Just drag it to the trash and empty it.
• Then, you can trash the MTR preferences. The preferences file is located in your home/library/preferences folder
(the folder called “Preferences”, located in the “Library” folder in your “Home” directory), and is called
com.MTR3.plist. Just drag this file to the trash and empty it.
• The last remnant of MTR is this manual. Simply close out of this document, and drag me to the trash. Dear reader,
I thank you for bearing with me until now, and hope that your experience with MacTheRipper has been pleasurable
and rewarding.
Section 6: Acknowledgments
MacTheRipper is made possible thanks to hard work by Geezerbuttz, who coded the application. Also, thanks to the
creators of libdvdcss and libdvdread, which are essential to MTR. Here are some relevant links:
libdvdcss: http://developers.videolan.org/libdvdcss/
libdvdread: http://www.dtek.chalmers.se/groups/dvd/downloads.shtml
Section 7: Version history
3.0b
• New interface with more efficient workflow for all extraction modes
• Improves compatibility with new forms of copy protection
• Main Feature Extraction that really works
• Chapter extraction that doesn’t suck
• Cell extraction
• Progress bar in the Dock icon to show MTR’s progress in the Dock during extraction
2.6.6
• Improves prescanning to fix crashing problems on certain DVDs
• Faster prescanning by consolidating code into fewer passes to reduce seeking
2.6.5
• Improves prescanning code to fix crashing problems on certain DVDs
2.6.4
• Improves IFO scanning code to fix some crashing problems on certain DVDs
2.6.3
• This time it really fixes the bug in the new UOPs disabling code
• Fixes an obscure bug where a file called Glass.snd in the home/Library/Sounds folder on some users' systems
could cause MTR to crash
2.6.2
• Fixes a big bug in the new UOPs disabling code introduced in 2.6.1
2.6.1
• Greatly improved UOPs disabling code, now much less of a chance of making an unplayable DVD, and more
effective
• Improved prescanning code for speed and compatibility, should now work with more titles
2.6
• Added the ability to extract DVDs with ARccOS copy protection, along with new Full Disc and Main Feature
modes for those discs
• Added the ability to handle VOBs with bad sectors, which get padded with dummy data, and notify the user at the
end of extraction that read errors were encountered
• Added bad cell detection in Title Only and Title - Chapter modes, so they automatically get skipped; useful for
ARccOS DVDs
• Added the ability to demux elementary streams in Title Only and Title - Chapter modes, along with the ability to
choose which streams will get extracted
• Removed deprecated preferences
• Fixed large crashing bug that occurs if the user chooses Title Only extraction, and then immediately chooses
another mode
• Fixed a bug in Non-PGC Title Only and Title - Chapter modes where the output would be incorrect
• Fixed a crashing bug on certain DVDs with particular IFO issues
• Reduced the amount of UI updates during extraction to hopefully reduce the amount of crashes on certain
computers, namely dual-processor Macs
• Improved progress bar accuracy
• Removed 'Real Time' prescan option in the preferences, as Pre Scan is required for certain functions to work
properly now, including ARccOS detection and chapter extraction
2.0.2
• Fixed a bug where MTR would become unstable if chapters were selected in reverse order
• Other miscellaneous bug fixes
2.0.1
• Minor bug fixes
• Compiled with Xcode 1.5 for improved performance and stability
• Changed the progress bar code to decrease the tax on CPU when MTR is in focus
2.0
• Completely rewritten in Objective-C Cocoa to behave more like a Mac application
• New PGC mode for improved title and chapter extractions
• UOP disabling
• ForceRead mode for extracting damaged discs
• File size calculation in the various extraction modes
• DVD-ROM content extraction
• Compiled with GCC 3.3 for improved performance
• Countless bug fixes and performance enhancements
• Improved compatibility with a wider range of DVDs
• New and improved interface with innumerable enhancements
1.5.6
• Added analog copy protection removal
• Added CSS key recovery method selection
• Added an 'Eject' button
• Updated interface
1.5.5a
• Improved RCE removal code
1.5.5
• Allows you to select exactly which regions you want to enable, allowing for any combination of regions
• No longer remembers the last RCE region you set, so that it will always go back to the default of 'OFF', to avoid
corrupting DVDs by having RCE removal enabled when it shouldn't be
• Minor interface enhancements
1.5.4
• Fixes a bug with DVDs that have certain characters (namely the apostrophe) in their title
• Fixes a bug with the disc size calculation code
• Minor interface enhancements
1.5.3
• Fixes a bug where MTR would forget the last save location if you open the 'Save To' panel and hit 'Cancel'
• Redesigned interface in standard Aqua widgets to improve compatibility and functionality
1.5.2
• New application preferences remember the last options you set last time you used MTR, including save location,
extraction type, disc region and RCE options
• 'GO!' is now the default option, so if you have a save location set, you can just hit 'Enter' and start the extraction, as
long as there is no RCE option to set
• Minor interface enhancements
1.5.1
• Fixes a bug where mounted volumes other than the DVD were being scanned for region and RCE
• Fixes a bug if you insert a second DVD while the first one is ripping
• Added a refresh button for the list of DVDs, in case it doesn't get automatically updated (disabled during
extraction)
• Remembers window placement
• Minor interface enhancements
1.5
• RCE and disc region detection and removal
• New interface with progress bar
• Now makes playable output in 'Main Feature' and 'Title Set' modes, thanks to the addition of tocgen
• Consolidated different releases to have a single version for Mac OS X 10.2.x, 10.3.x and for G5s
• Additional minor bug fixes
1.0
• New interface
• Many bug fixes, resolved crashing issues
0.5
• Fixes bug for DVDs with spaces and punctuation marks in their title
0.4
• Several bug fixes, including some of the quit-on-launch problems
0.3
• Minor bug fixes
• Separate version for G5s
0.2
• Several bug fixes
• Separate version for Mac OS 10.2.x and 10.3.x
0.1
• Initial public beta
![Grupo motor MTR-DCI...Manual MTR-DCI-...IO Manual 539 617 es 1201c [761 421] Grupo motor MTR-DCI](https://img.pdfslide.net/doc/110x75/5f50b60cf149462795018d10/grupo-motor-mtr-manual-mtr-dci-io-manual-539-617-es-1201c-761-421-grupo.jpg)


![Grupo motor MTR-DCI · 2020. 3. 30. · Manual MTR-DCI-...IO Manual 539 617 es 1201c [761 421] Grupo motor MTR-DCI](https://img.pdfslide.net/doc/110x75/5fdf6ed6d5c9aa6d13088c40/grupo-motor-mtr-dci-2020-3-30-manual-mtr-dci-io-manual-539-617-es-1201c.jpg)
![Motoreinheit MTR-DCI€¦ · Beschreibung MTR-DCI-...IO Beschreibung 539 615 de 1201c [761 419] Motoreinheit MTR-DCI](https://img.pdfslide.net/doc/110x75/5fef4889bbcb5b6e3e4d4bbb/motoreinheit-mtr-dci-beschreibung-mtr-dci-io-beschreibung-539-615-de-1201c-761.jpg)

![Motor MTR-DCI - Festo · Descripción MTR-DCI-...-CO Descripción 539631 es 1209a [763214] Motor MTR-DCI](https://img.pdfslide.net/doc/110x75/5f777c2db26ccf0a2d169545/motor-mtr-dci-festo-descripcin-mtr-dci-co-descripcin-539631-es-1209a-763214.jpg)