Embed Size (px)
Citation preview
INSTALL AND CONFIGURATION GUIDE Atlas 5.1 for Microsoft Dynamics AX
COPYRIGHT NOTICE
Copyright © 2012, Globe Software Pty Ltd, All rights reserved.
Trademarks
Dynamics AX, IntelliMorph, and X++ have been registered as or are under registration as
trademarks of Microsoft Corporation.
Microsoft Office System 2007, Windows 2003 and Windows 2008 are registered trademarks of
Microsoft Corporation.
Software release
This documentation accompanies Atlas version 5.1.3402 or higher and which is suitable for
Dynamics AX 2009 SP1, Microsoft Dynamics AX 2012 or higher and Microsoft Excel 2007 or
higher.
Publication date
31/05/2012
Reader comments
Any comments or suggestions regarding this publication are welcomed and should be
addressed to the attention of:
i
Table of Contents 1 Getting started ................................................................................................. 4
1.1 Outline ................................................................................................................................ 4
1.2 Outline of steps in the installation process ....................................................................... 4
1.3 Pre-requisites and system requirements ........................................................................... 5
1.3.1 Outline................................................................................................................................................................................................ 5
1.3.2 General pre-requisites .................................................................................................................................................................. 6
1.3.3 Software ............................................................................................................................................................................................. 6
1.3.4 Hardware ........................................................................................................................................................................................... 6
1.3.5 Network ............................................................................................................................................................................................. 7
1.4 Additional Atlas client settings for remote users .............................................................. 7
1.4.1 Outline................................................................................................................................................................................................ 7
1.4.2 Terminal services and remote desktop .................................................................................................................................. 7
1.4.3 Citrix .................................................................................................................................................................................................... 8
1.4.4 Post installation steps ................................................................................................................................................................... 9
2 Server installation .......................................................................................... 10
2.1 Outline .............................................................................................................................. 10
2.2 Opening the installation program ................................................................................... 10
2.3 Welcome ............................................................................................................................ 10
2.4 License agreement ............................................................................................................. 11
2.5 Readme information .......................................................................................................... 11
2.6 Installation type ................................................................................................................ 12
2.7 Destination folders ........................................................................................................... 12
2.8 Ready to install .................................................................................................................. 13
2.9 Finish! ................................................................................................................................ 14
3 Server configuration ....................................................................................... 15
3.1 Outline ............................................................................................................................... 15
3.2 Creating a server service .................................................................................................... 15
3.2.1 Outline............................................................................................................................................................................................. 15
3.2.2 Identify the Atlas server ............................................................................................................................................................ 15
3.2.3 Identify Microsoft Dynamics AX object servers ................................................................................................................ 16
3.2.4 Identify label and log file locations ...................................................................................................................................... 16
3.2.5 Identify the license server ......................................................................................................................................................... 16
3.2.6 Adding the server service ......................................................................................................................................................... 17
3.2.7 Adding additional service configurations .......................................................................................................................... 17
3.3 License server configuration ............................................................................................ 18
3.4 Review the local services window ..................................................................................... 19
3.5 Installing additional Atlas server services ....................................................................... 19
3.5.1 Outline............................................................................................................................................................................................. 19
3.5.2 More services on the same computer .................................................................................................................................. 20
Getting started
ii
3.5.3 Installing Atlas server services on a different computer ............................................................................................... 20
4 Client installation ........................................................................................... 22
4.1 Outline .............................................................................................................................. 22
4.2 Opening the installation program ................................................................................... 22
4.3 Welcome ............................................................................................................................ 22
4.4 License agreement ............................................................................................................ 23
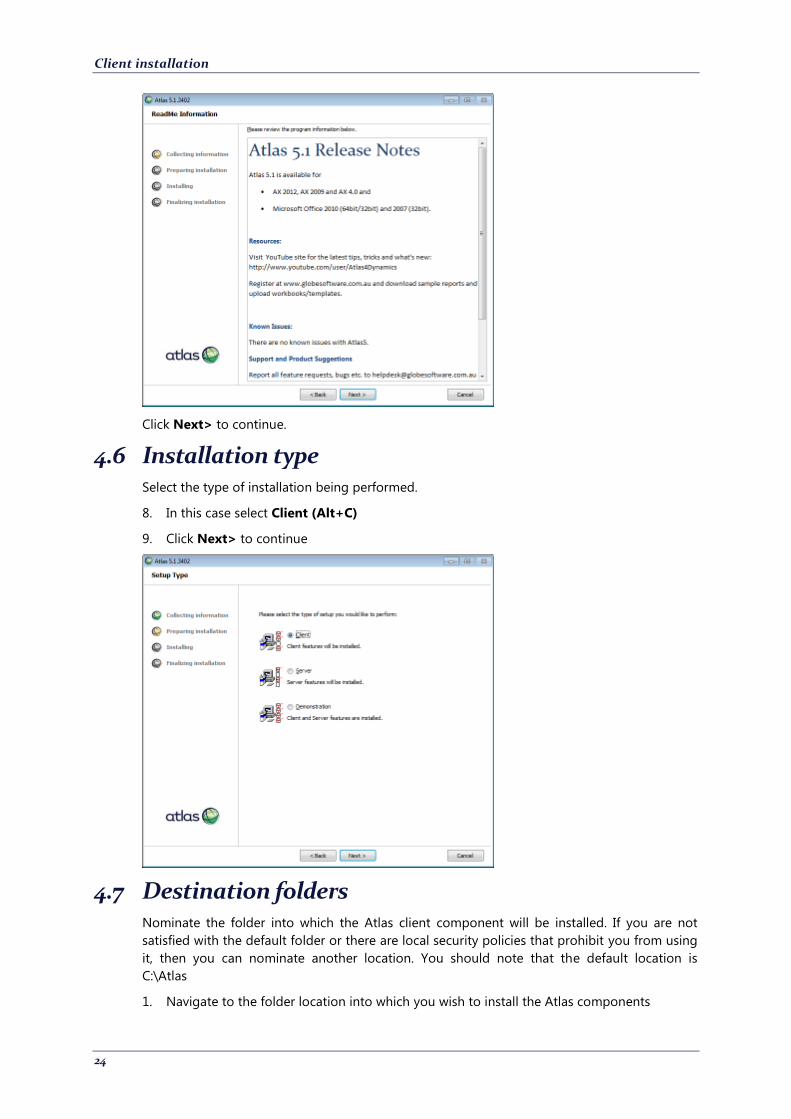
4.5 Readme information ......................................................................................................... 23
4.6 Installation type ................................................................................................................ 24
4.7 Destination folders ........................................................................................................... 24
4.8 Ready to install ................................................................................................................. 25
4.9 Finish! ................................................................................................................................ 26
4.10 What is included with the client installation ................................................................... 26
5 Client configuration ....................................................................................... 27
5.1 Outline .............................................................................................................................. 27
5.2 Creating a client configuration ........................................................................................ 27
5.2.1 Outline............................................................................................................................................................................................. 27
5.2.2 Starting the Atlas client ............................................................................................................................................................ 27
5.2.3 Creating a new configuration ................................................................................................................................................ 28
5.2.4 Describe the server connection .............................................................................................................................................. 28
5.2.5 Saving the configuration .......................................................................................................................................................... 30
5.2.6 Other connection related activities ...................................................................................................................................... 30
5.3 Adding additional client configurations .......................................................................... 30
5.4 Sharing configurations ..................................................................................................... 30
5.4.1 Outline............................................................................................................................................................................................. 30
5.4.2 Saving a configuration to a shared folder ......................................................................................................................... 30
5.4.3 Selecting the shared configuration in the Atlas client .................................................................................................. 32
5.5 Shared client settings........................................................................................................ 32
5.5.1 Outline............................................................................................................................................................................................. 32
5.5.2 Sharing the Atlas client settings file ..................................................................................................................................... 33
5.5.3 Adjusting time-out parameters.............................................................................................................................................. 34
5.5.4 Adjusting maximum message size ....................................................................................................................................... 37
6 Demonstration installation ........................................................................... 39
7 Logging in and license activation .................................................................. 40
7.1 Outline .............................................................................................................................. 40
7.2 Configuring Concurrent User License keys ...................................................................... 40
7.3 Standard license pool ....................................................................................................... 41
7.4 First time login .................................................................................................................. 42
7.5 License key activation ....................................................................................................... 43
7.6 Microsoft Office start up after install ............................................................................... 44
8 Re-installation ................................................................................................ 45
Getting started
iii
8.1 Outline .............................................................................................................................. 45
8.2 Removing the existing software ....................................................................................... 45
8.3 Re-installing a new server component ............................................................................. 45
8.4 Re-installing the client software ...................................................................................... 46
8.5 How Atlas re-applies settings from a prior install ........................................................... 46
8.5.1 Installation settings file ............................................................................................................................................................. 46
8.5.2 Applying an alternative settings file .................................................................................................................................... 46
9 Un-installing the software .............................................................................. 47
9.1 Outline .............................................................................................................................. 47
9.2 Using Control Panel to start the un-install ...................................................................... 47
9.3 Modify, Repair or Remove ................................................................................................ 47
9.4 Settings file creation ......................................................................................................... 48
10 Troubleshooting guide ............................................................................... 49
10.1 Outline .............................................................................................................................. 49
10.2 Server service startup ........................................................................................................ 49
10.3 Client startup and logging in ............................................................................................ 49
10.4 Microsoft Office ................................................................................................................. 51
10.5 Activation messages ........................................................................................................... 51
10.6 Additional Resources (online) ........................................................................................... 51
4
1 Getting started
1.1 Outline Before you can use Atlas with your enterprise software system, you must successfully complete
the installation procedure. This involves the installation of both a server component (You’ll
need one Atlas server for every Microsoft Dynamics AX object server that you wish to use) and
a client installation (to be performed for all people that intend to use Atlas). Normally, the
server and client installations will be performed separately, but where the Atlas Server and
Atlas Client software is located on the same, standalone computer, then the two steps will be
done at the same time. This is known as a Demonstration installation.
This guide describes the steps needed to complete the installation procedure and describes
how to configure your software subsequently. This document is intended to supplement the
installation wizard used to do the installation itself.
When completed successfully, appropriate services will be started, and you will be ready to
login and use Atlas.
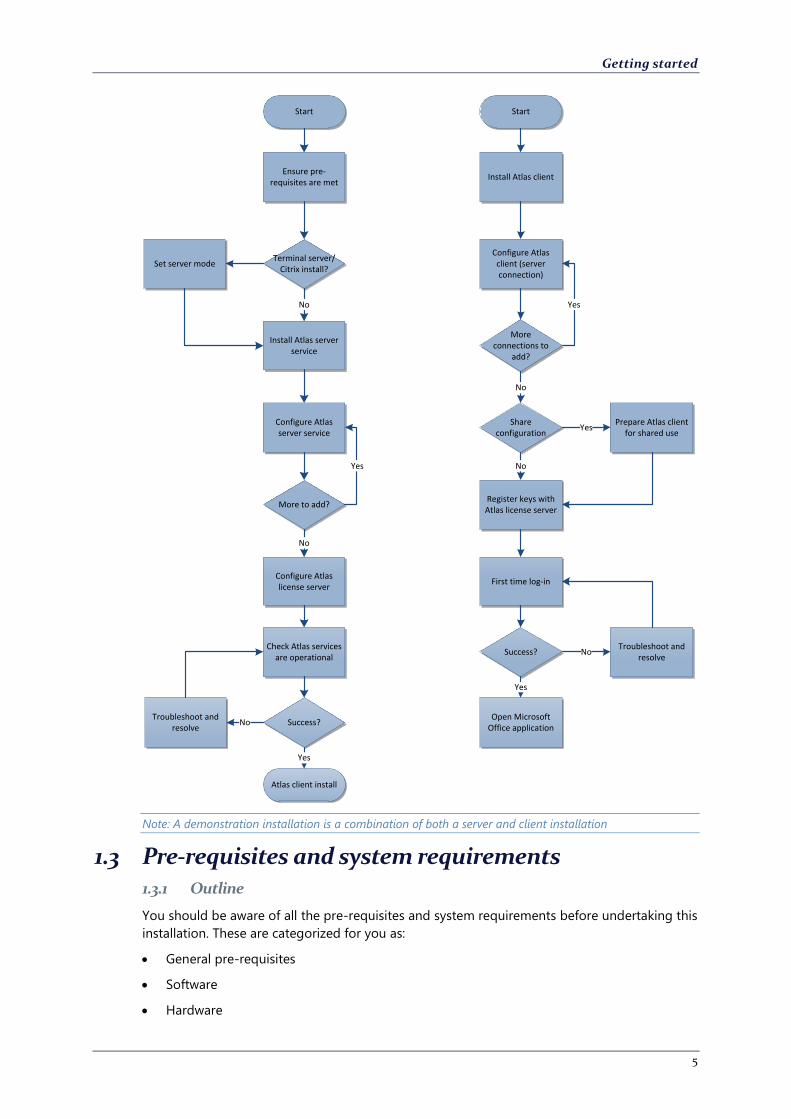
1.2 Outline of steps in the installation process The following diagram illustrates the steps you will need to perform in order to install the Atlas
software:
Getting started
5
Start
Ensure pre-requisites are met
Terminal server/Citrix install?
Install Atlas server service
Install Atlas client
Configure Atlas client (server connection)
No
Set server mode
Configure Atlas server service
More to add?
Yes
Configure Atlas license server
No
More connections to
add?
Yes
Share configuration
No
Register keys with Atlas license server
First time log-in
No
Success?Troubleshoot and
resolve
Open Microsoft Office application
Yes
No
Prepare Atlas client for shared use
Yes
Start
Check Atlas services are operational
Success?
Atlas client install
Yes
Troubleshoot and resolve
No
Note: A demonstration installation is a combination of both a server and client installation
1.3 Pre-requisites and system requirements 1.3.1 Outline
You should be aware of all the pre-requisites and system requirements before undertaking this
installation. These are categorized for you as:
General pre-requisites
Software
Hardware
Getting started
6
Network
In general, the system requirements are based upon those identified by Microsoft and outlined
in the following document: Microsoft Dynamics AX 2009 System Requirements
1.3.2 General pre-requisites
The following table lists the general pre-requisites for a successful installation:
General pre-requisites Requirement Notes
Installation package Atlas 5.1 distribution media and
installation guide
Microsoft Dynamics AX
AOS
Server name and port number of the
Microsoft Dynamics AX AOS
E.g. Server name = AXSERVER, Port =
2713
Access rights and server
permissions
All installations must be carried out by a
user with elevated user privileges. It is
recommended this be the administrator
user account
E.g. Administrator
1.3.3 Software
The following list describes the software components that need to be installed before the Atlas
will install correctly:
Software component Requirement Notes
Operating system Microsoft Windows Server 2008 R2,
Microsoft Windows Server 2003 SP2 or
Windows Server 2008 or Windows 7,
Windows Vista SP1 or Windows XP
Professional Edition, SP2 or SP3
.NET Microsoft .NET framework 4.0
Visual studio tools Microsoft Visual Studio Tools for the
Microsoft Office system (version 3.0
Runtime) (x86)1
Business connector Microsoft Dynamics AX .NET business
connector. This needs to be installed on
the computer that will host the Atlas server
service.
Installed as part of the Microsoft
Dynamics AX client components. Both
32 bit and 64 bit supported for
AX2009 and AX2012. For AX4 only the
32 bit version is supported
Microsoft Office System Microsoft Office System 2007 or Microsoft
Office System 2010
Atlas works as an add-in to these
systems
1.3.4 Hardware
These are minimum hardware requirements for the Atlas server and client:
Element Requirement Notes
Processor Intel Pentium/Celeron family or compatible
Pentium III Xeon or higher processor
minimum; 1.1 GHz or higher
recommended
RAM 1024 MB RAM or more recommended
Monitor Super VGA (1024x768) or higher resolution
monitor
1 If the installation of this component fails, you can download from Microsoft and then install manually
Getting started
7
1.3.5 Network
The following table lists the minimum network requirements for the connection between the
server and the Microsoft Dynamics AX Application Object Server (AOS) if not on the same
computer.
Element Requirement Notes
Bandwidth 100 Mbps
Latency Less the 5 milliseconds
1.4 Additional Atlas client settings for remote users 1.4.1 Outline
In some situations, you will be required to install the Atlas software in an environment that
supports access by remote users. To do this successfully you will need to complete some
preliminary as well as some additional, post installation steps.
1.4.2 Terminal services and remote desktop
1.4.2.1 Outline
Generally, the remote desktop server or terminal server will need to be placed into an
installation mode before running any part of the Atlas software installation. This section
describes doing this on two Microsoft platforms:
Terminal services 2003
Remote Desktop 2008
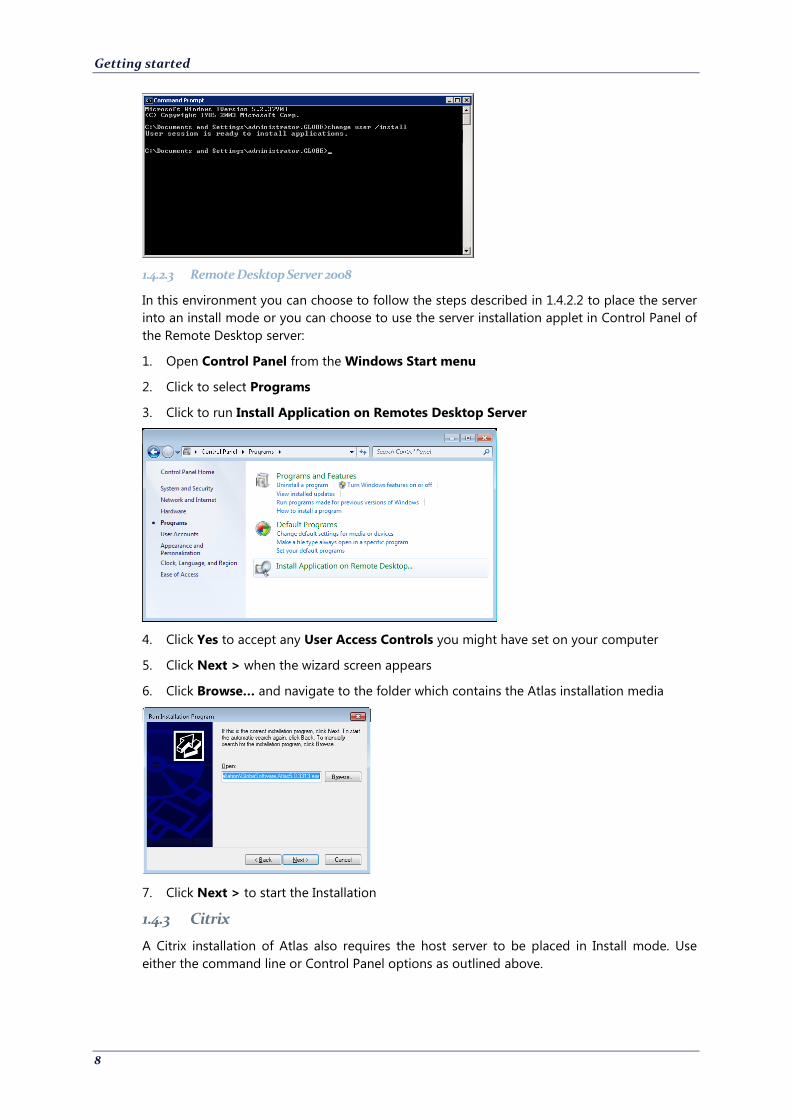
1.4.2.2 Terminal Services 2003
You must place the Terminal Server into a mode which will allow the installation of new
software. To do this, follow these steps:
1. Click the Windows Start button from the desktop of the Terminal Server
2. Locate the Command Prompt icon in the Start menu2
3. Right-click the Command Prompt and select Run as…
4. Un-tick Run this Program with restricted access
5. Click OK
6. Type change user /install and press Enter from the command line
The following message User session is ready to install applications is displayed and you can
now proceed with the Atlas software installation.
2 Normally this can be found on the Start menu itself, if not, then navigate to the Accessories menu (All Programs -> Accessories)
Getting started
8
1.4.2.3 Remote Desktop Server 2008
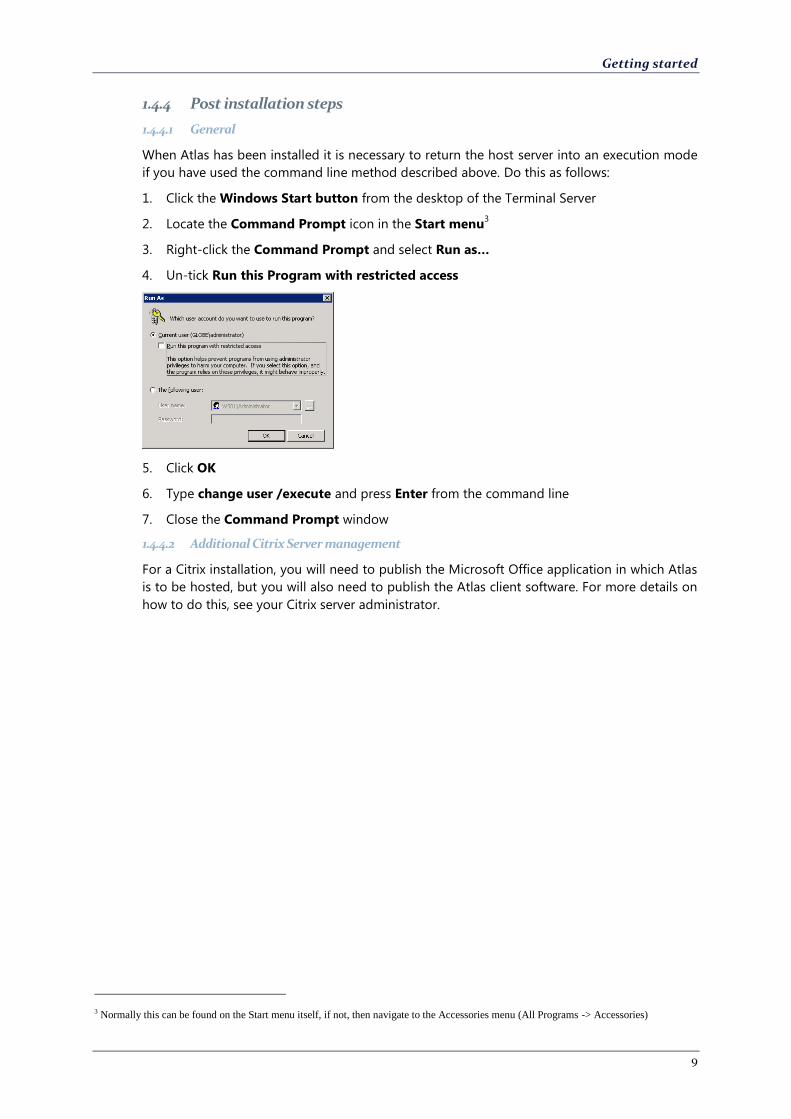
In this environment you can choose to follow the steps described in 1.4.2.2 to place the server
into an install mode or you can choose to use the server installation applet in Control Panel of
the Remote Desktop server:
1. Open Control Panel from the Windows Start menu
2. Click to select Programs
3. Click to run Install Application on Remotes Desktop Server
4. Click Yes to accept any User Access Controls you might have set on your computer
5. Click Next > when the wizard screen appears
6. Click Browse… and navigate to the folder which contains the Atlas installation media
7. Click Next > to start the Installation
1.4.3 Citrix
A Citrix installation of Atlas also requires the host server to be placed in Install mode. Use
either the command line or Control Panel options as outlined above.
Getting started
9
1.4.4 Post installation steps
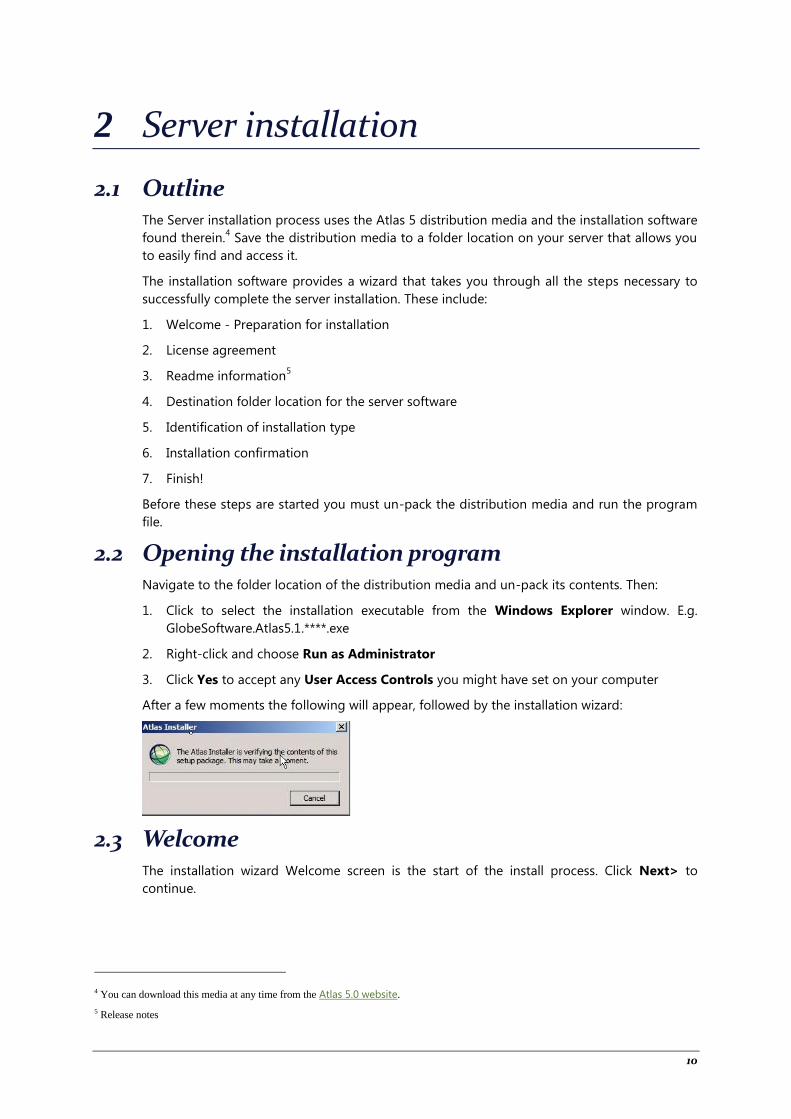
1.4.4.1 General
When Atlas has been installed it is necessary to return the host server into an execution mode
if you have used the command line method described above. Do this as follows:
1. Click the Windows Start button from the desktop of the Terminal Server
2. Locate the Command Prompt icon in the Start menu3
3. Right-click the Command Prompt and select Run as…
4. Un-tick Run this Program with restricted access
5. Click OK
6. Type change user /execute and press Enter from the command line
7. Close the Command Prompt window
1.4.4.2 Additional Citrix Server management
For a Citrix installation, you will need to publish the Microsoft Office application in which Atlas
is to be hosted, but you will also need to publish the Atlas client software. For more details on
how to do this, see your Citrix server administrator.
3 Normally this can be found on the Start menu itself, if not, then navigate to the Accessories menu (All Programs -> Accessories)
10
2 Server installation
2.1 Outline The Server installation process uses the Atlas 5 distribution media and the installation software
found therein.4 Save the distribution media to a folder location on your server that allows you
to easily find and access it.
The installation software provides a wizard that takes you through all the steps necessary to
successfully complete the server installation. These include:
1. Welcome - Preparation for installation
2. License agreement
3. Readme information5
4. Destination folder location for the server software
5. Identification of installation type
6. Installation confirmation
7. Finish!
Before these steps are started you must un-pack the distribution media and run the program
file.
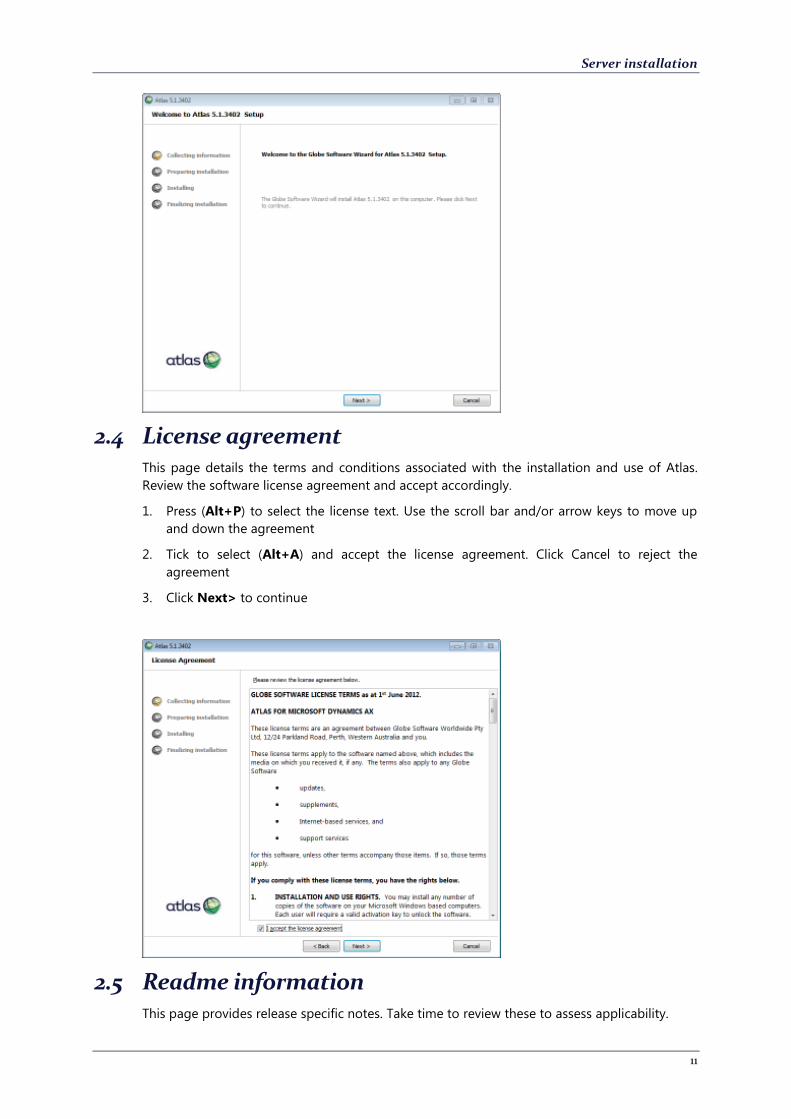
2.2 Opening the installation program Navigate to the folder location of the distribution media and un-pack its contents. Then:
1. Click to select the installation executable from the Windows Explorer window. E.g.
GlobeSoftware.Atlas5.1.****.exe
2. Right-click and choose Run as Administrator
3. Click Yes to accept any User Access Controls you might have set on your computer
After a few moments the following will appear, followed by the installation wizard:
2.3 Welcome The installation wizard Welcome screen is the start of the install process. Click Next> to
continue.
4 You can download this media at any time from the Atlas 5.0 website.
5 Release notes
Server installation
11
2.4 License agreement This page details the terms and conditions associated with the installation and use of Atlas.
Review the software license agreement and accept accordingly.
1. Press (Alt+P) to select the license text. Use the scroll bar and/or arrow keys to move up
and down the agreement
2. Tick to select (Alt+A) and accept the license agreement. Click Cancel to reject the
agreement
3. Click Next> to continue
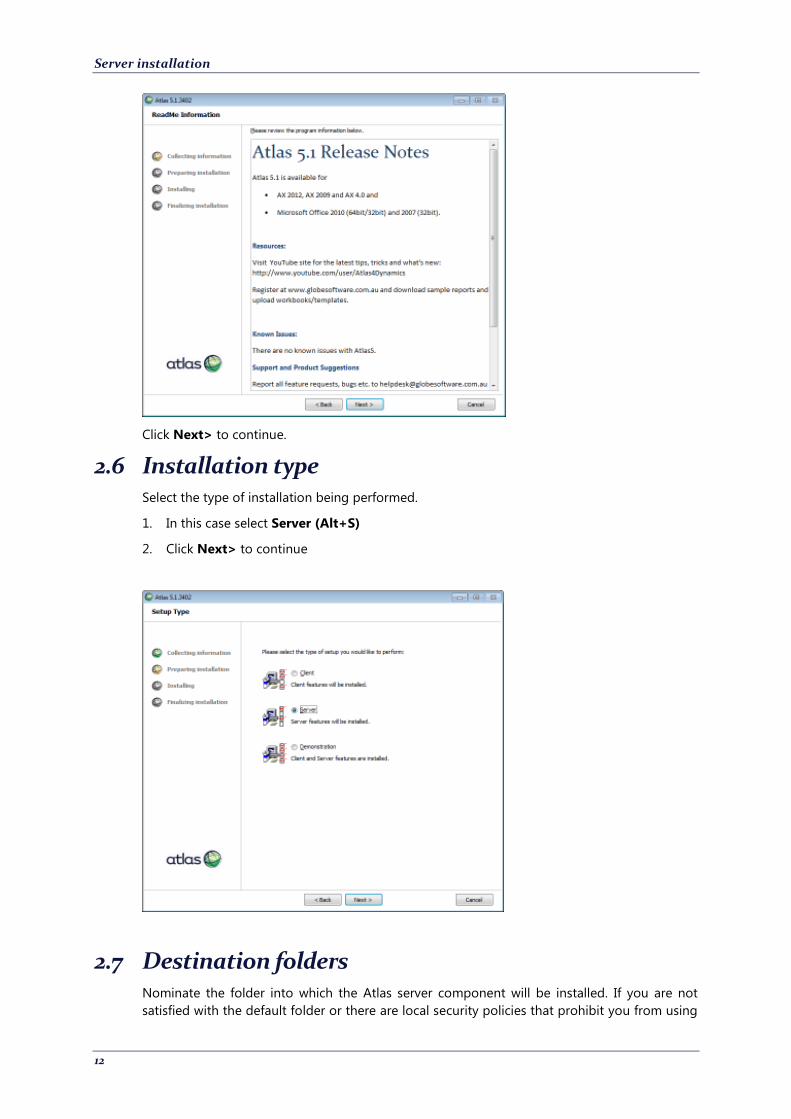
2.5 Readme information This page provides release specific notes. Take time to review these to assess applicability.
Server installation
12
Click Next> to continue.
2.6 Installation type Select the type of installation being performed.
1. In this case select Server (Alt+S)
2. Click Next> to continue
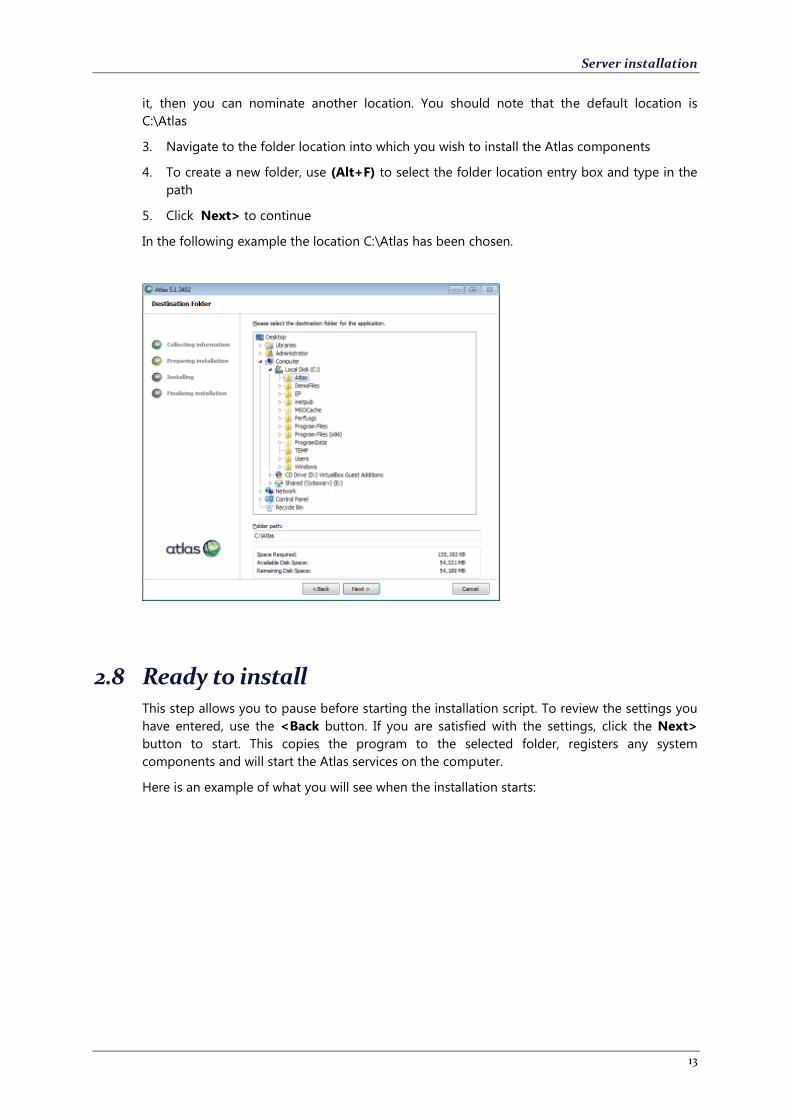
2.7 Destination folders Nominate the folder into which the Atlas server component will be installed. If you are not
satisfied with the default folder or there are local security policies that prohibit you from using
Server installation
13
it, then you can nominate another location. You should note that the default location is
C:\Atlas
3. Navigate to the folder location into which you wish to install the Atlas components
4. To create a new folder, use (Alt+F) to select the folder location entry box and type in the
path
5. Click Next> to continue
In the following example the location C:\Atlas has been chosen.
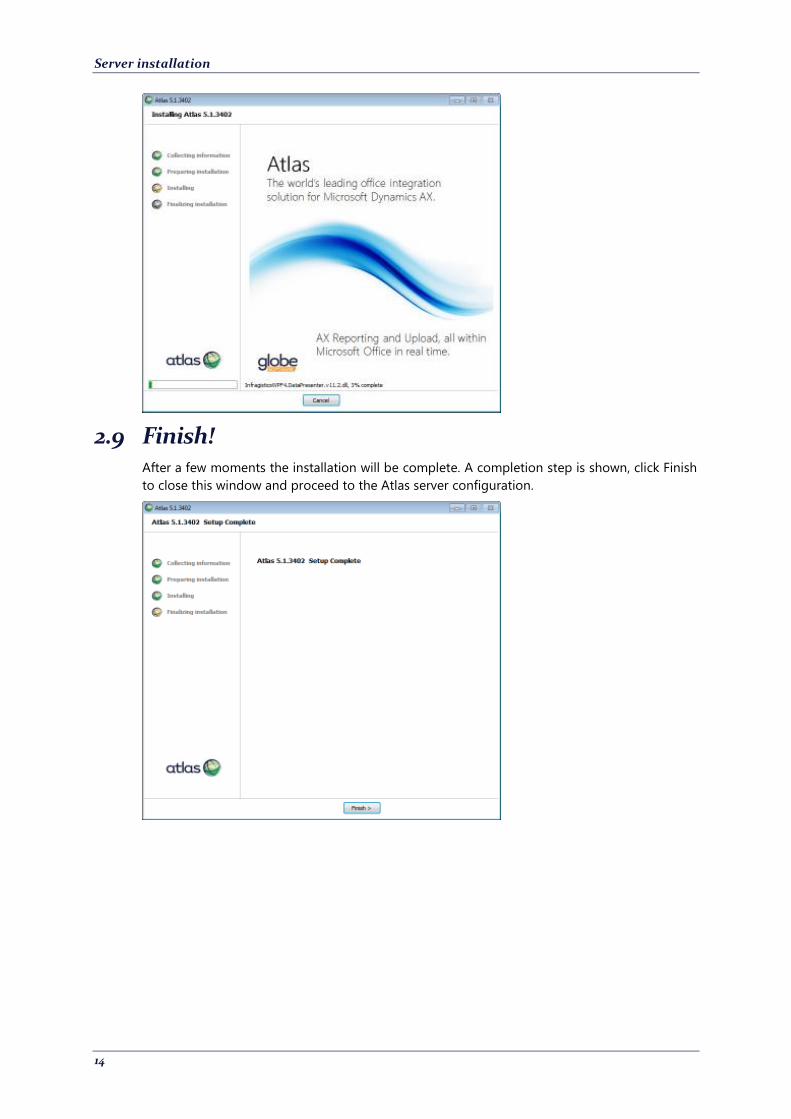
2.8 Ready to install This step allows you to pause before starting the installation script. To review the settings you
have entered, use the <Back button. If you are satisfied with the settings, click the Next>
button to start. This copies the program to the selected folder, registers any system
components and will start the Atlas services on the computer.
Here is an example of what you will see when the installation starts:
Server installation
14
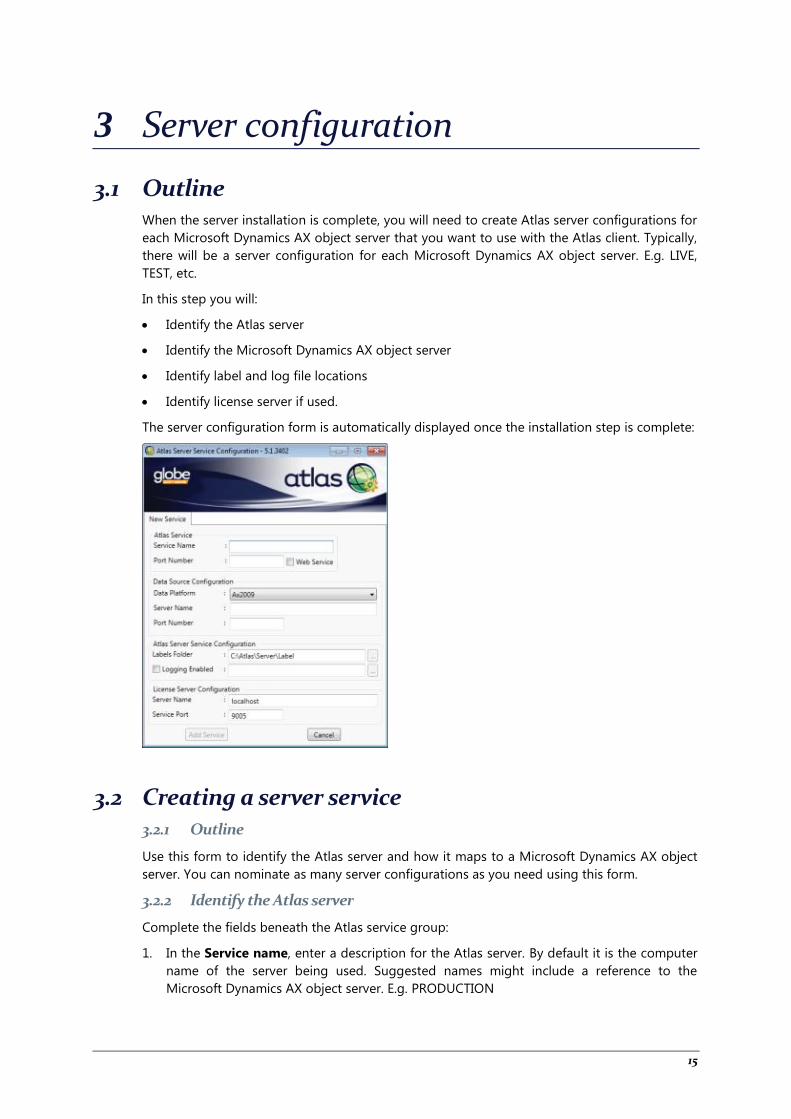
2.9 Finish! After a few moments the installation will be complete. A completion step is shown, click Finish
to close this window and proceed to the Atlas server configuration.
15
3 Server configuration
3.1 Outline When the server installation is complete, you will need to create Atlas server configurations for
each Microsoft Dynamics AX object server that you want to use with the Atlas client. Typically,
there will be a server configuration for each Microsoft Dynamics AX object server. E.g. LIVE,
TEST, etc.
In this step you will:
Identify the Atlas server
Identify the Microsoft Dynamics AX object server
Identify label and log file locations
Identify license server if used.
The server configuration form is automatically displayed once the installation step is complete:
3.2 Creating a server service 3.2.1 Outline
Use this form to identify the Atlas server and how it maps to a Microsoft Dynamics AX object
server. You can nominate as many server configurations as you need using this form.
3.2.2 Identify the Atlas server
Complete the fields beneath the Atlas service group:
1. In the Service name, enter a description for the Atlas server. By default it is the computer
name of the server being used. Suggested names might include a reference to the
Microsoft Dynamics AX object server. E.g. PRODUCTION
Server configuration
16
2. Enter a Port number to be used by the Atlas server. In a typical installation, use 9006 for
the production system and increments of 1 for all other object servers.6
3. Tick the Web Service box if this server installation is to be used as a web server. In such
cases, the Service name will be a URL to a web server.
3.2.3 Identify Microsoft Dynamics AX object servers
This section describes the link to the Microsoft Dynamics AX server:
1. Select from the drop-down list the Data platform this service will be connected to. For
Microsoft Dynamics AX, choose AX2009, AX2012 or AX4 (32bit Operating System only)
2. Enter a Server name. This is the name of the server upon which Microsoft Dynamics AX is
installed. By default the installation wizard chooses the computer name of the installation
computer. E.g. AX2012-A
3. Enter an AOS Port number. This is the port upon which the Microsoft Dynamics AX object
server is running. By default, these start above 2700. You should contact your Microsoft
Dynamics AX system administrator to determine the correct port number to use. A typical
port number would be 2712.
3.2.4 Identify label and log file locations
Here you can identify a location into which default label files can be stored. The Atlas server
service uses the label files found in this folder instead of the labels found in the Microsoft
Dynamics AX system folder. These settings are optional parameters and can be left blank.
1. Enter the file path to locate the default label files used by the Atlas server. This is normally
defaulted to include the name of the Atlas service entered in 3.2.2.
2. Optionally tick to Enable Logging
3. Enter the file path to where the Atlas log file will be written
Why do this? In most end user systems the number of language files installed is limited and the impact of
these on the memory usage of the Atlas server is not significant. However, if the system is a demonstration
system or a system where all the language files are installed, then Atlas will attempt to cache all labels for
all languages meaning the amount of memory given to the Atlas server service is inflated. By copying only
those label files for only those languages you need minimizes the server memory usage.
What is recorded when logging is enabled? This log file is used in conjunction with the Atlas event viewer. It
contains any communication related messages encountered during the operation of the server.
3.2.5 Identify the license server
This step is optional and is used whenever the license server is used as the basis of client
authentication. All concurrent licenses use the License server and it is mandatory for Citrix
installations where the license pool is used.
1. Enter the Server name used to host the license server. Normally, the computer name
which hosts the Atlas server service, eg AX2012-A.
2. Enter a Port number. This is the port upon which the Atlas license server listens for
authentication requests. Normally, this is defaulted to 9005.
6 All ports nominated must be open on the host machine’s firewall
Server configuration
17
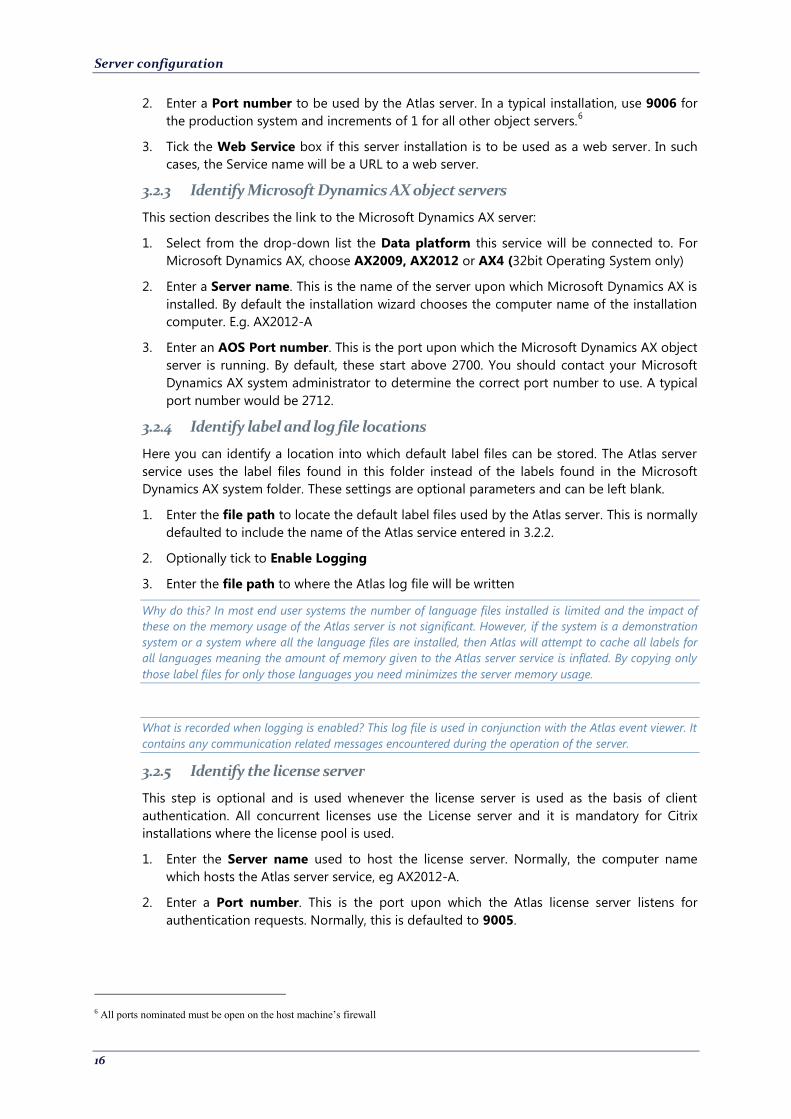
3.2.6 Adding the server service
At this stage the server configuration form appears as follows:
Click Add Service to add and start the service. Once started, it will appear in the list of services
running on this computer. Furthermore, the configuration form changes to reflect the current
status of the service:
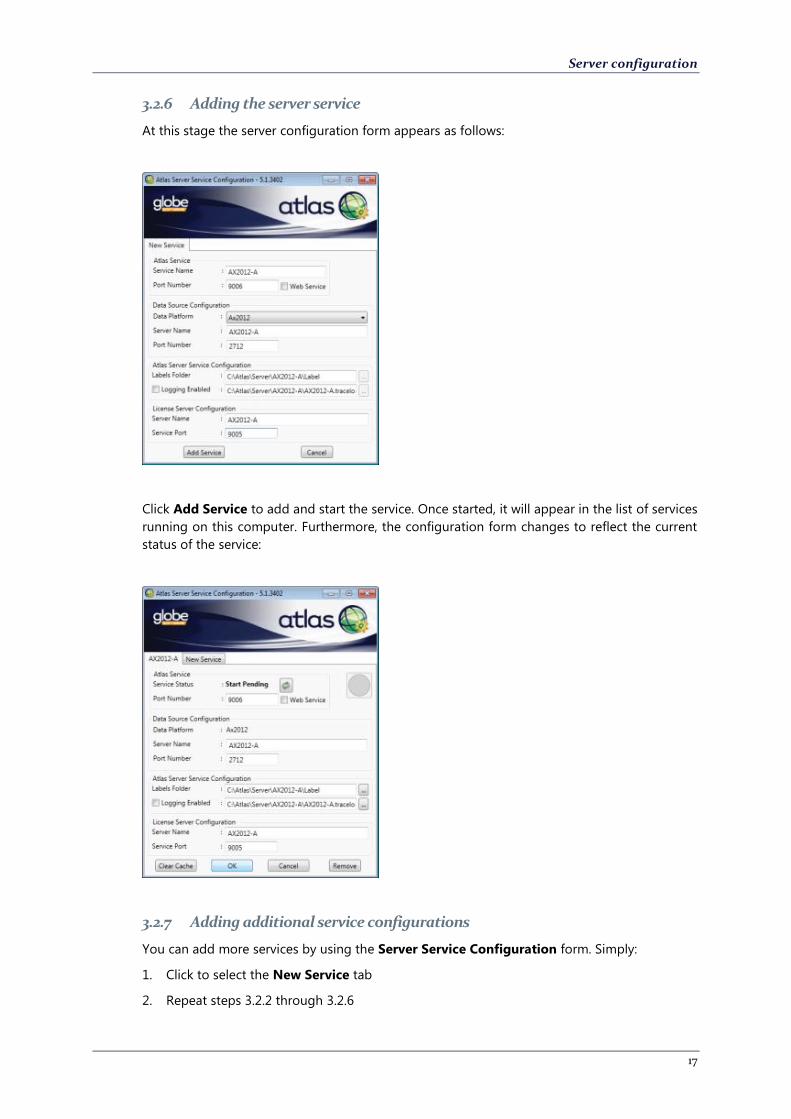
3.2.7 Adding additional service configurations
You can add more services by using the Server Service Configuration form. Simply:
1. Click to select the New Service tab
2. Repeat steps 3.2.2 through 3.2.6
Server configuration
18
Here is an example of the Server Service Configuration form when New Service is selected:
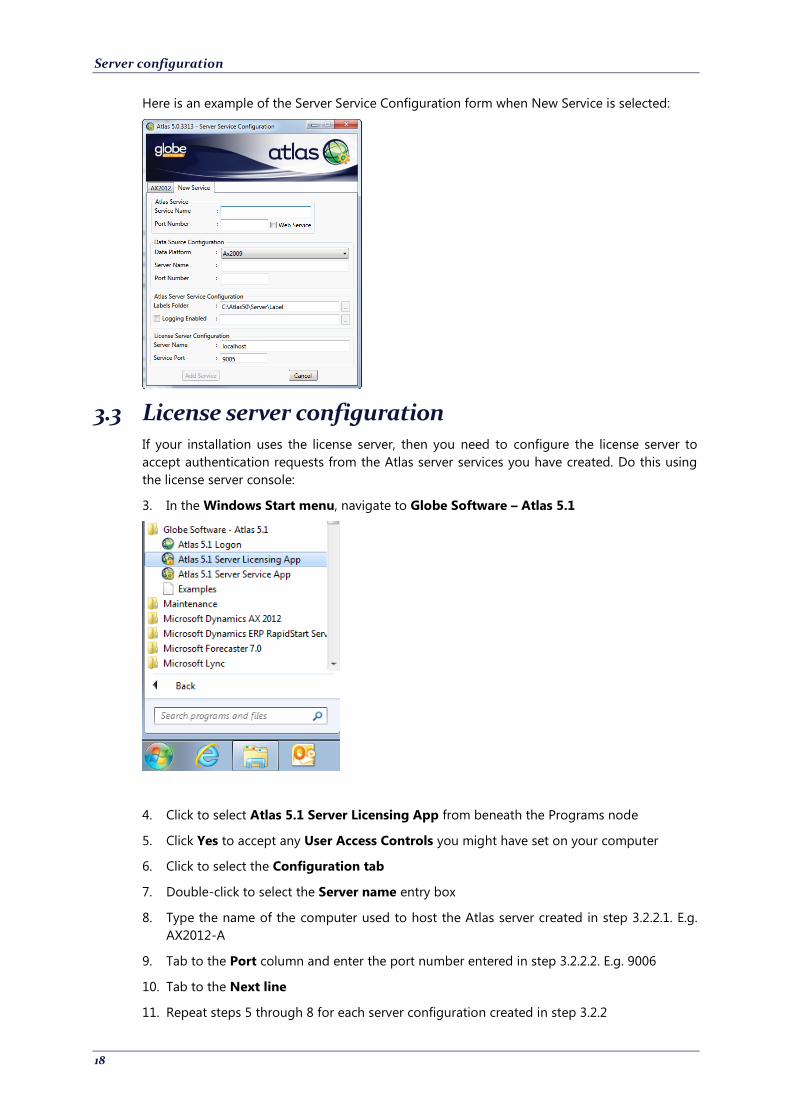
3.3 License server configuration If your installation uses the license server, then you need to configure the license server to
accept authentication requests from the Atlas server services you have created. Do this using
the license server console:
3. In the Windows Start menu, navigate to Globe Software – Atlas 5.1
4. Click to select Atlas 5.1 Server Licensing App from beneath the Programs node
5. Click Yes to accept any User Access Controls you might have set on your computer
6. Click to select the Configuration tab
7. Double-click to select the Server name entry box
8. Type the name of the computer used to host the Atlas server created in step 3.2.2.1. E.g.
AX2012-A
9. Tab to the Port column and enter the port number entered in step 3.2.2.2. E.g. 9006
10. Tab to the Next line
11. Repeat steps 5 through 8 for each server configuration created in step 3.2.2
Server configuration
19
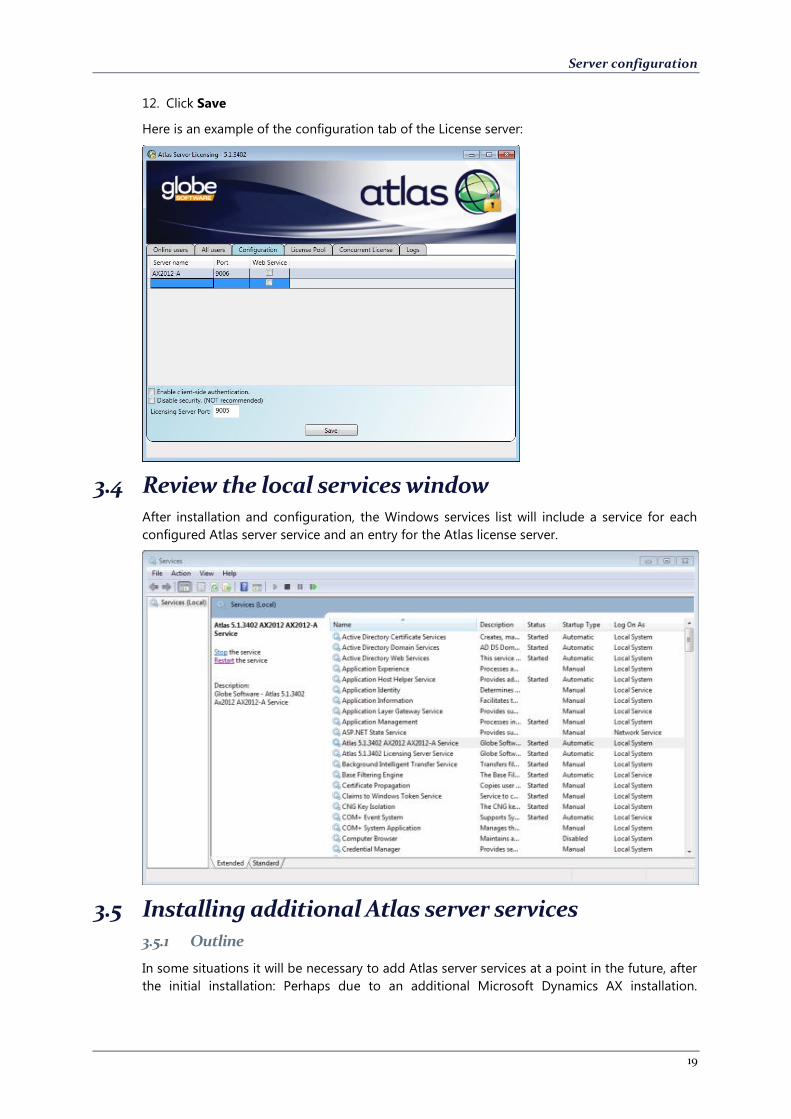
12. Click Save
Here is an example of the configuration tab of the License server:
3.4 Review the local services window After installation and configuration, the Windows services list will include a service for each
configured Atlas server service and an entry for the Atlas license server.
3.5 Installing additional Atlas server services 3.5.1 Outline
In some situations it will be necessary to add Atlas server services at a point in the future, after
the initial installation: Perhaps due to an additional Microsoft Dynamics AX installation.
Server configuration
20
Depending on where the additional server service is to be installed, will determine what action
you need to take.
Additional service(s) on the same computer
Additional service(s) on a different computer
Note: This is subject to the conditions of your license agreement and purchased product
3.5.2 More services on the same computer
In this case, you do not need to use the installation package, and will use the Atlas Server
Service App in conjunction with the Atlas Server Licensing App. Then follow the instructions in
3.2.2 and 3.3 respectively:
Start each program from the Windows Start Menu and search for each using the entry box.
3.5.3 Installing Atlas server services on a different computer
To install an additional server service onto a computer other than the one used for the initial
installation, means that you are performing a new installation for that computer. In this case
you will need to use the installation package and follow the steps outlined in sections 2 and 3.
By default, the Atlas server service installation includes an installation of the Atlas license
server, since there should only be one instances of this in your organization, it is necessary to
stop the extra license service on the computer in which the Atlas server service was started. Do
this as follows:
1. In the Windows Start menu, type services in the Search programs and files entry box
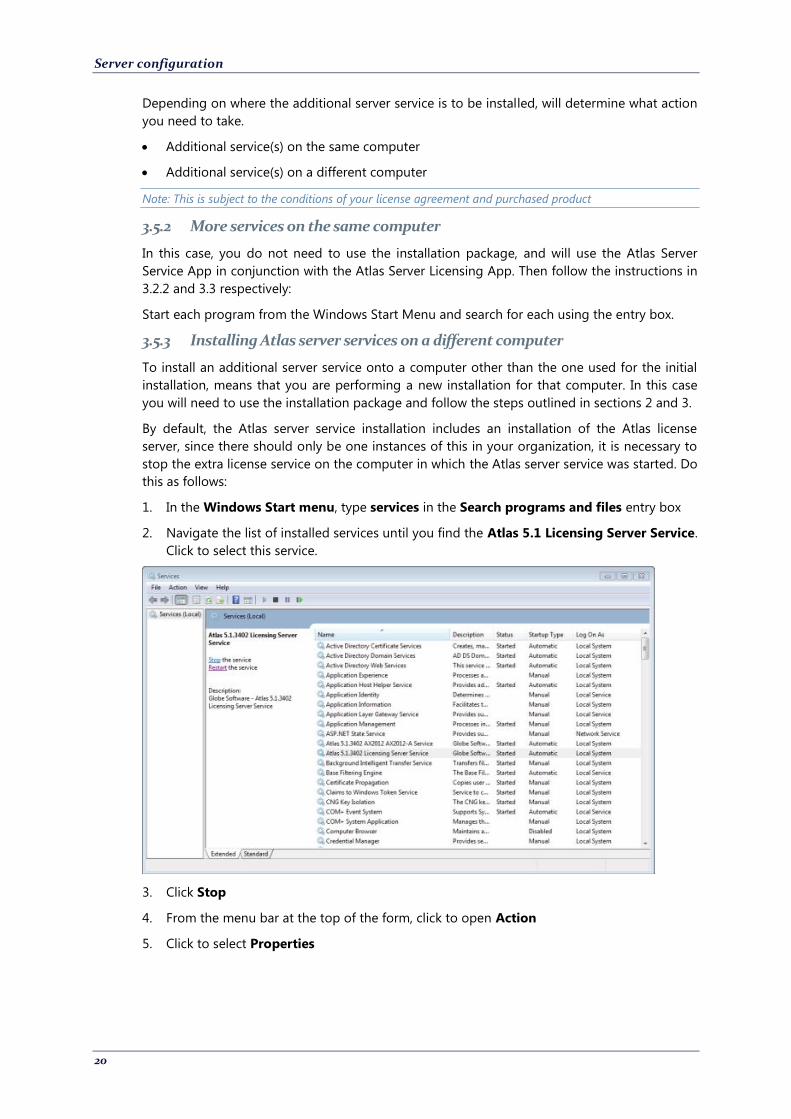
2. Navigate the list of installed services until you find the Atlas 5.1 Licensing Server Service.
Click to select this service.
3. Click Stop
4. From the menu bar at the top of the form, click to open Action
5. Click to select Properties
Server configuration
21
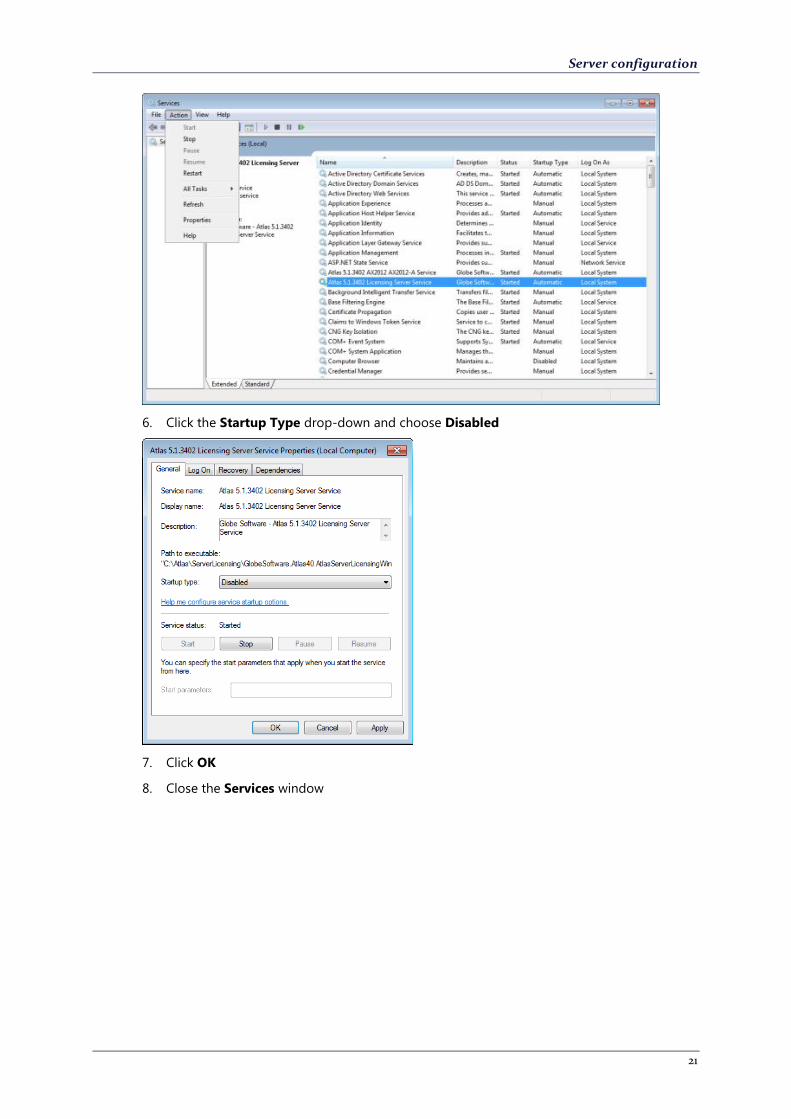
6. Click the Startup Type drop-down and choose Disabled
7. Click OK
8. Close the Services window
22
4 Client installation
4.1 Outline Install the client software for each person who needs to use Atlas. The installation can be on
individual workstations or it can be on terminal or Citrix servers. The Client installation process
uses the Atlas 5.1 distribution media and the installation software found therein.7 Save the
distribution media to a folder location that allows you to easily find and access it.
The installation software provides a wizard that takes you through all the steps necessary to
successfully complete the server installation. These include:
1. Welcome - Preparation for installation
2. License agreement
3. Readme information8
4. Destination folder location for the client software
5. Identification of installation type
6. Installation confirmation
7. Finish!
Before these steps are started you must un-pack the distribution media and run the program
file.
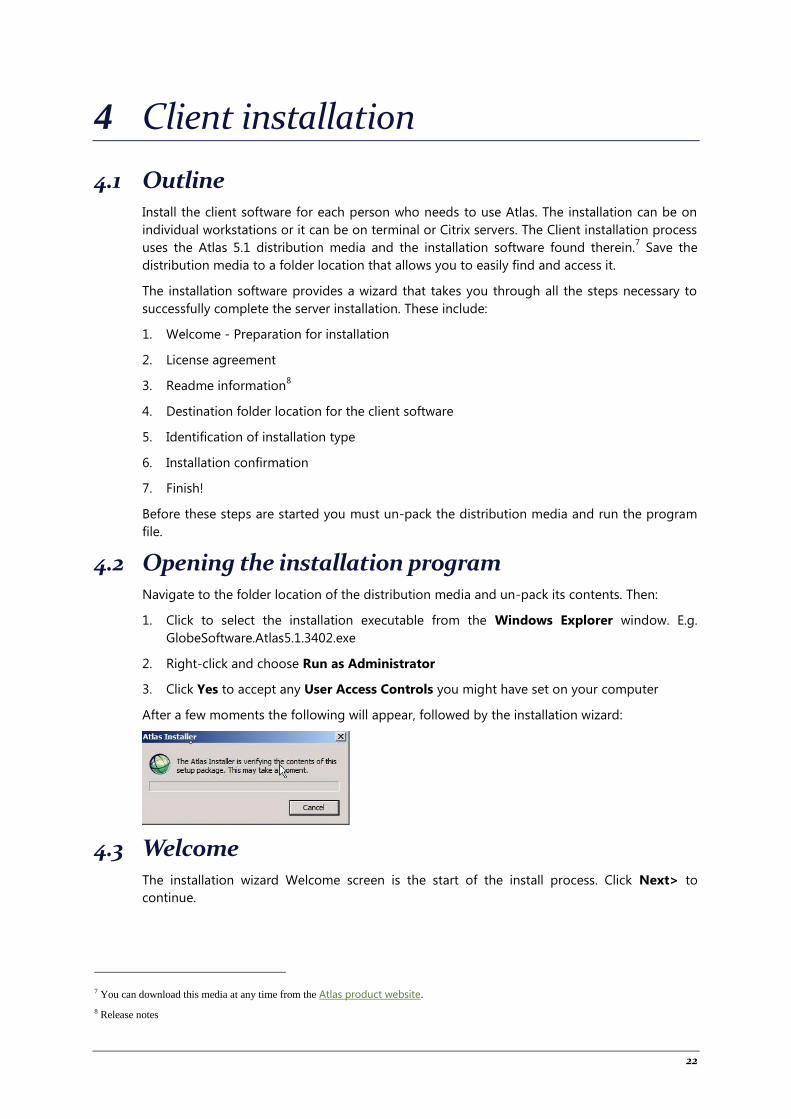
4.2 Opening the installation program Navigate to the folder location of the distribution media and un-pack its contents. Then:
1. Click to select the installation executable from the Windows Explorer window. E.g.
GlobeSoftware.Atlas5.1.3402.exe
2. Right-click and choose Run as Administrator
3. Click Yes to accept any User Access Controls you might have set on your computer
After a few moments the following will appear, followed by the installation wizard:
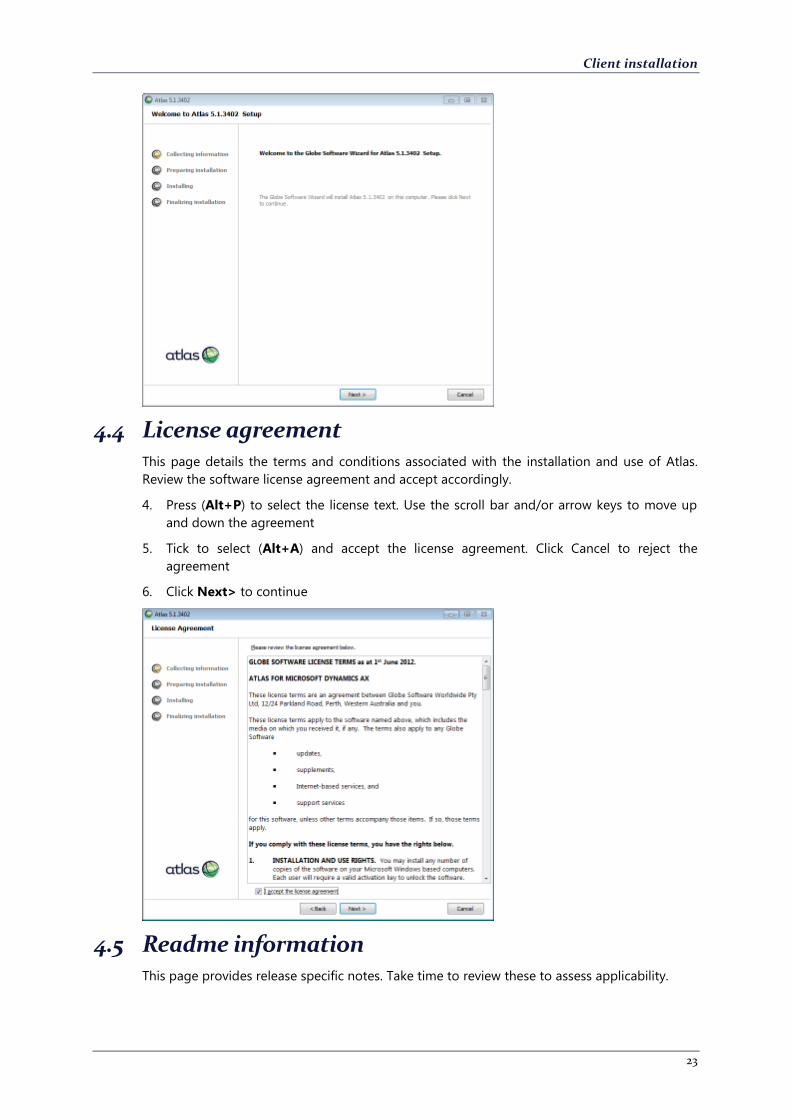
4.3 Welcome The installation wizard Welcome screen is the start of the install process. Click Next> to
continue.
7 You can download this media at any time from the Atlas product website.
8 Release notes
Client installation
23
4.4 License agreement This page details the terms and conditions associated with the installation and use of Atlas.
Review the software license agreement and accept accordingly.
4. Press (Alt+P) to select the license text. Use the scroll bar and/or arrow keys to move up
and down the agreement
5. Tick to select (Alt+A) and accept the license agreement. Click Cancel to reject the
agreement
6. Click Next> to continue
4.5 Readme information This page provides release specific notes. Take time to review these to assess applicability.
Client installation
24
Click Next> to continue.
4.6 Installation type Select the type of installation being performed.
8. In this case select Client (Alt+C)
9. Click Next> to continue
4.7 Destination folders Nominate the folder into which the Atlas client component will be installed. If you are not
satisfied with the default folder or there are local security policies that prohibit you from using
it, then you can nominate another location. You should note that the default location is
C:\Atlas
1. Navigate to the folder location into which you wish to install the Atlas components

Client installation
25
2. To create a new folder, use (Alt+F) to select the folder location entry box and type in the
path
3. Click Next> to continue
In the following example the location C:\Atlas has been chosen.
4.8 Ready to install This step allows you to pause before starting the installation script. To review the settings you
have entered, use the <Back button. If you are satisfied with the settings, click the Next>
button to start. This copies the program to the selected folder, registers any system
components.
Here is an example of what you will see when the installation starts:
Client installation
26
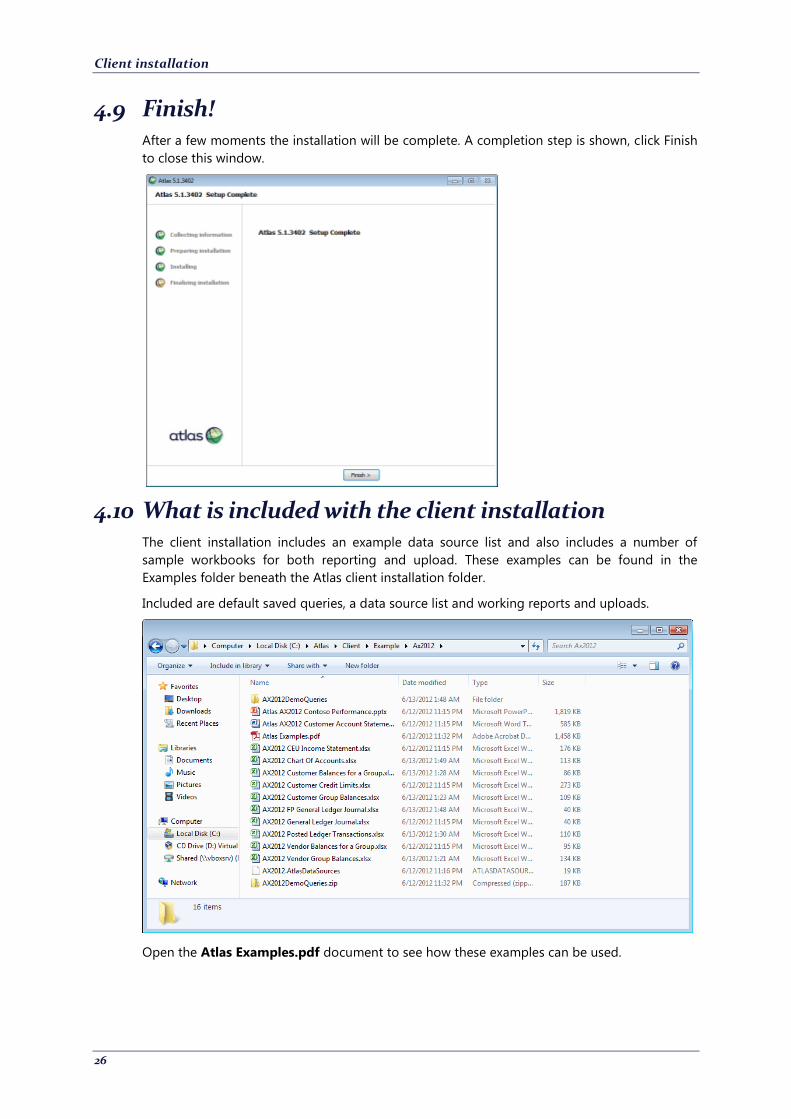
4.9 Finish! After a few moments the installation will be complete. A completion step is shown, click Finish
to close this window.
4.10 What is included with the client installation The client installation includes an example data source list and also includes a number of
sample workbooks for both reporting and upload. These examples can be found in the
Examples folder beneath the Atlas client installation folder.
Included are default saved queries, a data source list and working reports and uploads.
Open the Atlas Examples.pdf document to see how these examples can be used.
27
5 Client configuration
5.1 Outline When the client installation is complete, you will need to create Atlas client configurations to
match one or more server configurations created in section 3. Typically, there will be a client
configuration for each Atlas Server Service. E.g. PRODUCTION, TEST, etc. although you can
include many server configurations in one client configuration. The latter, will allow you to
draw data from each of the identified systems.
You can choose to deploy these client configurations locally on each user’s workstation or you
can deploy a shared configuration accessible by all users.
In this step you will:
Create a configuration to connect with an Atlas server
Sharing a configuration9
5.2 Creating a client configuration 5.2.1 Outline
By default each client installation is configured with an Original Configuration that is not
connected with an Atlas server. You can choose to modify this configuration to include the
data services you need or you can create a new configuration.
5.2.2 Starting the Atlas client
To create a configuration, you need to use the Atlas client software:
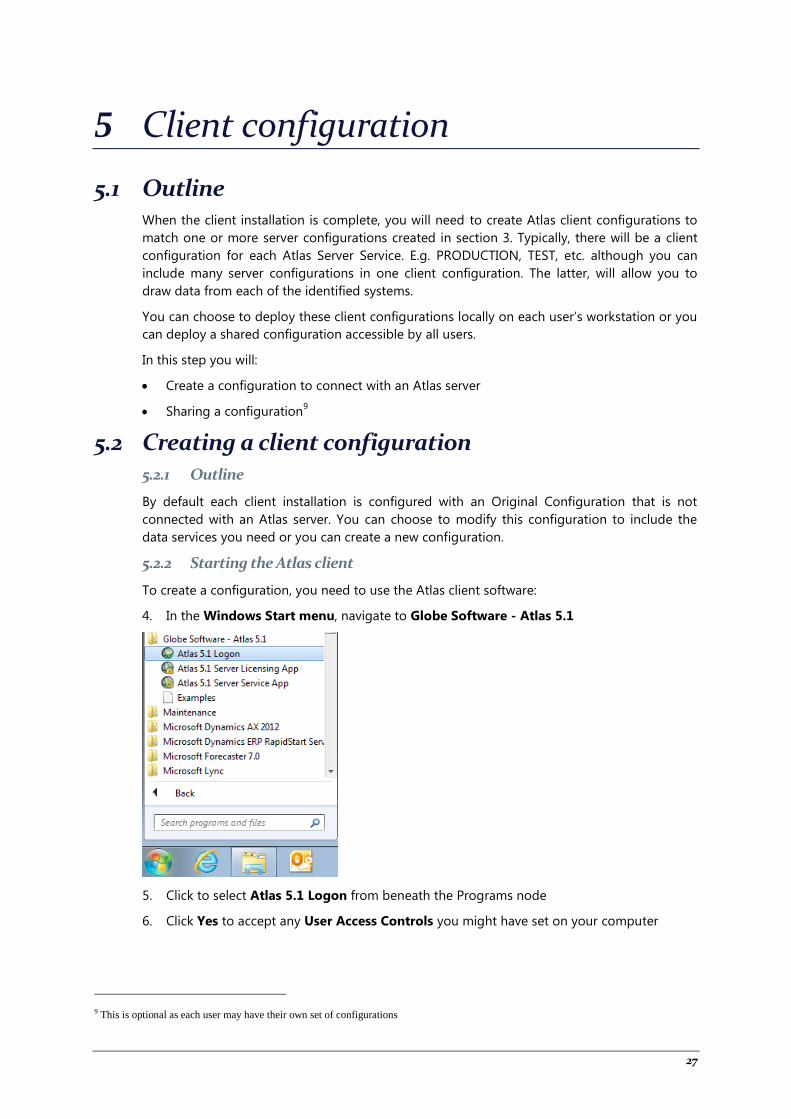
4. In the Windows Start menu, navigate to Globe Software - Atlas 5.1
5. Click to select Atlas 5.1 Logon from beneath the Programs node
6. Click Yes to accept any User Access Controls you might have set on your computer
9 This is optional as each user may have their own set of configurations
Client configuration
28
5.2.3 Creating a new configuration
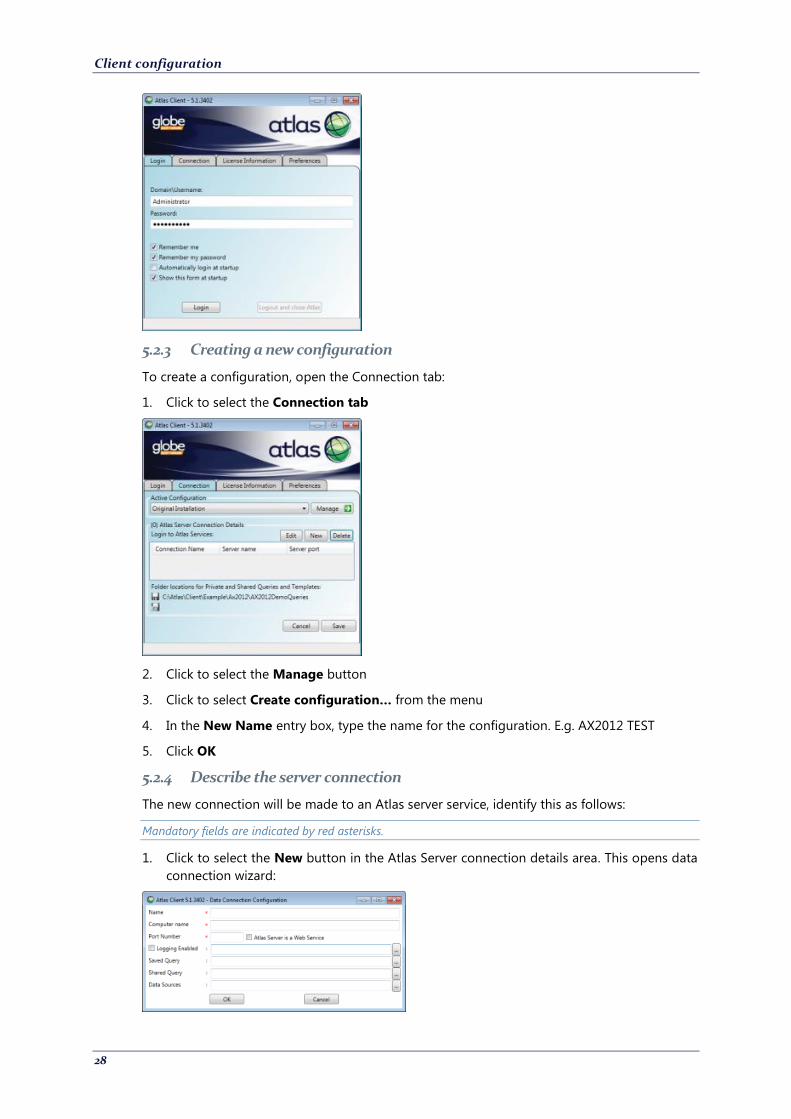
To create a configuration, open the Connection tab:
1. Click to select the Connection tab
2. Click to select the Manage button
3. Click to select Create configuration… from the menu
4. In the New Name entry box, type the name for the configuration. E.g. AX2012 TEST
5. Click OK
5.2.4 Describe the server connection
The new connection will be made to an Atlas server service, identify this as follows:
Mandatory fields are indicated by red asterisks.
1. Click to select the New button in the Atlas Server connection details area. This opens data
connection wizard:
Client configuration
29
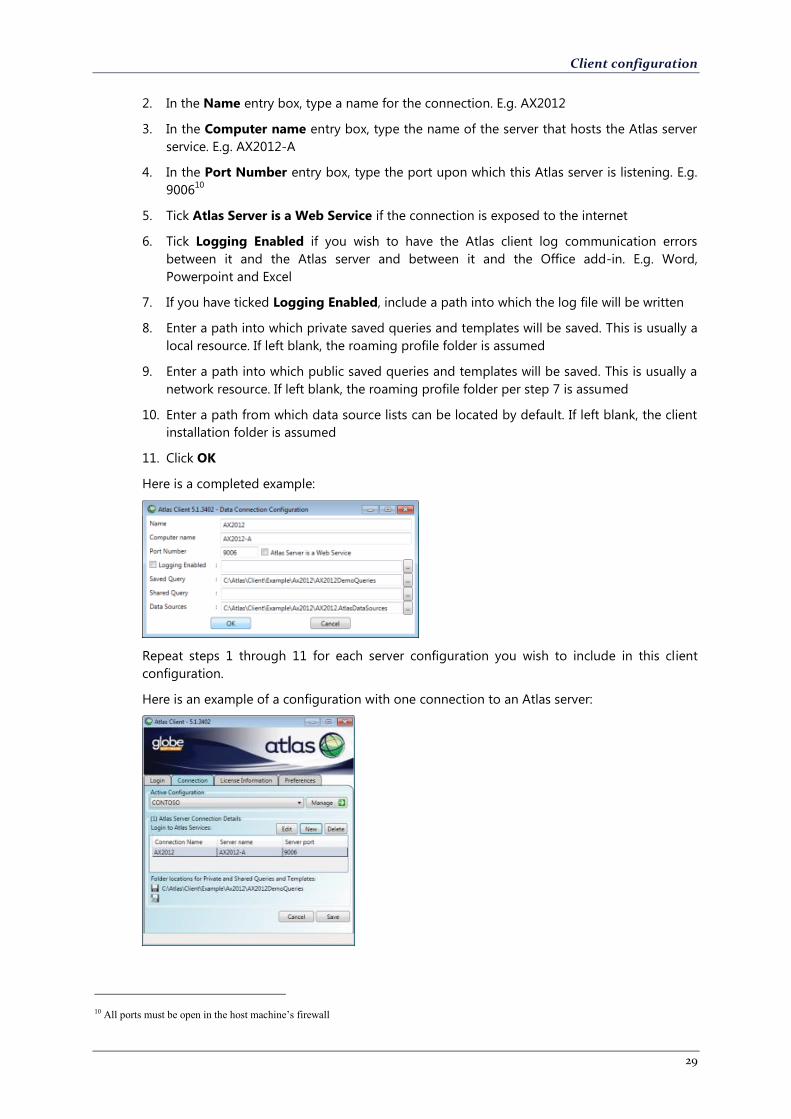
2. In the Name entry box, type a name for the connection. E.g. AX2012
3. In the Computer name entry box, type the name of the server that hosts the Atlas server
service. E.g. AX2012-A
4. In the Port Number entry box, type the port upon which this Atlas server is listening. E.g.
900610
5. Tick Atlas Server is a Web Service if the connection is exposed to the internet
6. Tick Logging Enabled if you wish to have the Atlas client log communication errors
between it and the Atlas server and between it and the Office add-in. E.g. Word,
Powerpoint and Excel
7. If you have ticked Logging Enabled, include a path into which the log file will be written
8. Enter a path into which private saved queries and templates will be saved. This is usually a
local resource. If left blank, the roaming profile folder is assumed
9. Enter a path into which public saved queries and templates will be saved. This is usually a
network resource. If left blank, the roaming profile folder per step 7 is assumed
10. Enter a path from which data source lists can be located by default. If left blank, the client
installation folder is assumed
11. Click OK
Here is a completed example:
Repeat steps 1 through 11 for each server configuration you wish to include in this client
configuration.
Here is an example of a configuration with one connection to an Atlas server:
10 All ports must be open in the host machine’s firewall
Client configuration
30
5.2.5 Saving the configuration
Before you can use the Atlas client you must save the settings made in the client configuration:
1. Click Save
2. Click Yes to restart the Atlas client software
5.2.6 Other connection related activities
5.2.6.1 Edit
You can edit a connection by selecting a row in the grid for the connection name you wish to
adjust and then click Edit.
5.2.6.2 Delete
You can delete a connection by selecting a row in the grid for the connection name you wish
to remove and then click Delete.
5.3 Adding additional client configurations You can add more services by using the Server Service Configuration form. Simply:
1. Click to select the Manage button from the Connection tab
2. Repeat steps 5.2.2 through 5.2.5
5.4 Sharing configurations 5.4.1 Outline
Client configurations can be shared by exporting the configuration to a file saved in a network
folder. Once saved, you must adjust the client configuration to use the shared folder as a
resource for the configuration.
5.4.2 Saving a configuration to a shared folder
Do this using the active configuration in the Atlas client software:
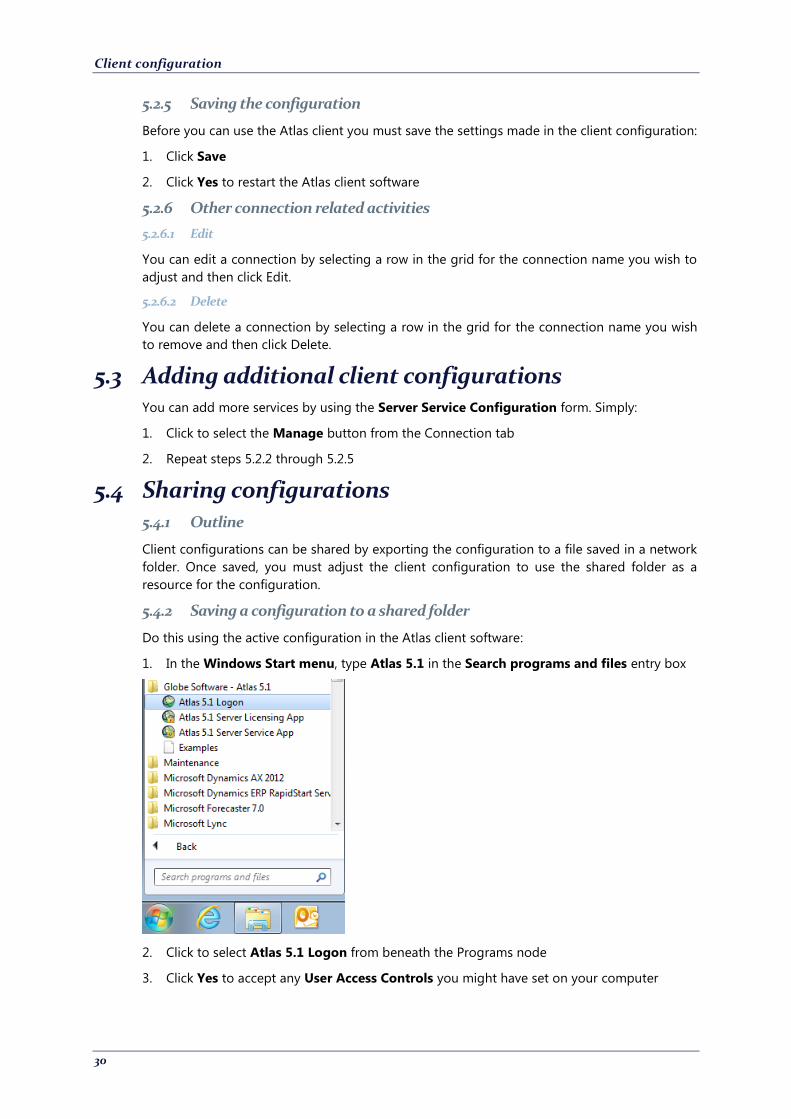
1. In the Windows Start menu, type Atlas 5.1 in the Search programs and files entry box
2. Click to select Atlas 5.1 Logon from beneath the Programs node
3. Click Yes to accept any User Access Controls you might have set on your computer
Client configuration
31
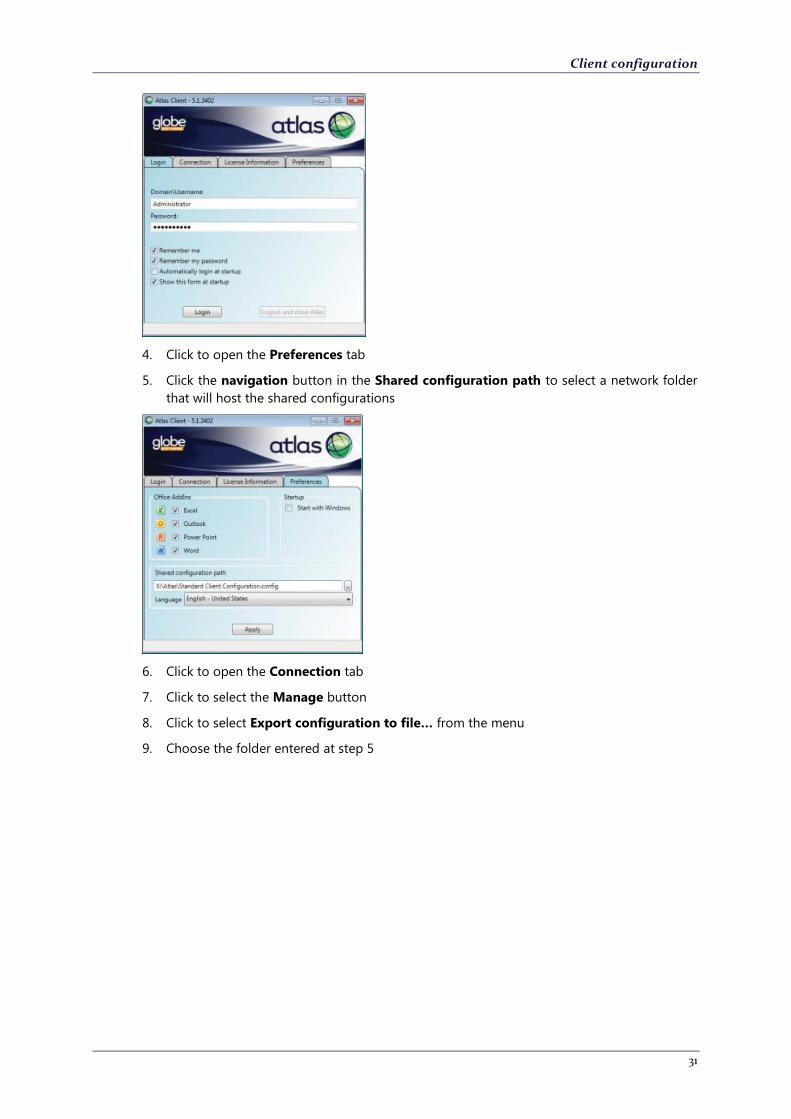
4. Click to open the Preferences tab
5. Click the navigation button in the Shared configuration path to select a network folder
that will host the shared configurations
6. Click to open the Connection tab
7. Click to select the Manage button
8. Click to select Export configuration to file… from the menu
9. Choose the folder entered at step 5
Client configuration
32
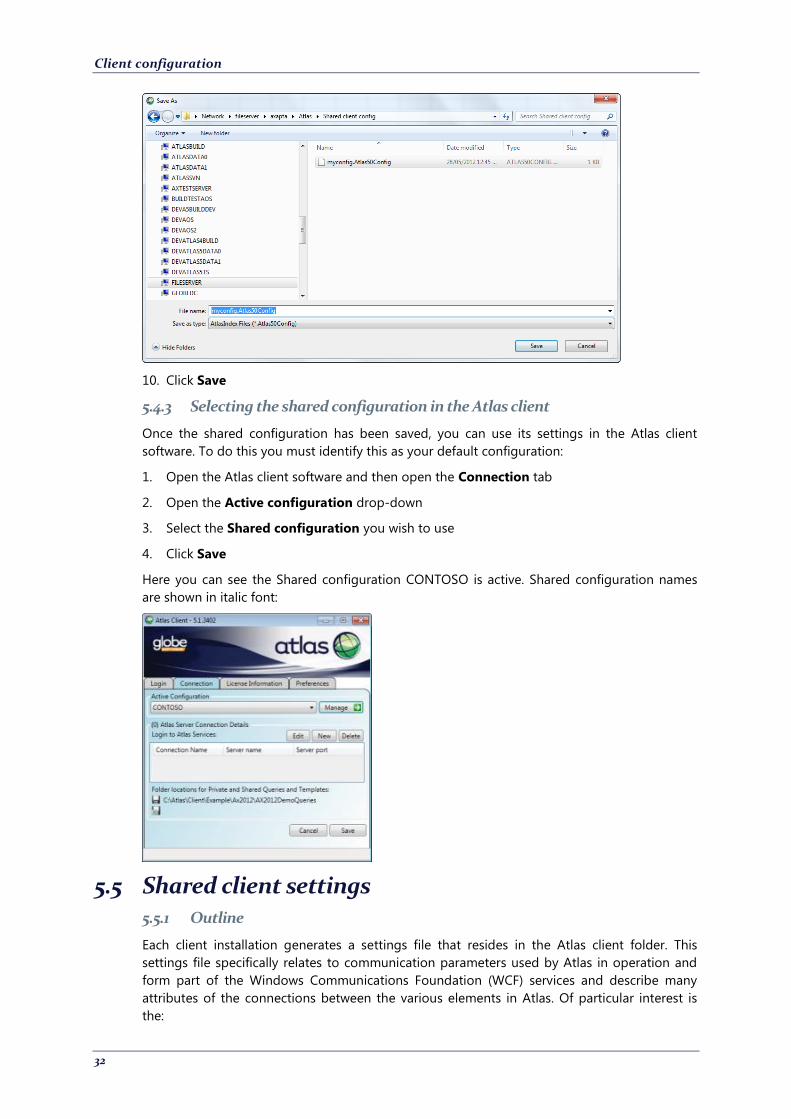
10. Click Save
5.4.3 Selecting the shared configuration in the Atlas client
Once the shared configuration has been saved, you can use its settings in the Atlas client
software. To do this you must identify this as your default configuration:
1. Open the Atlas client software and then open the Connection tab
2. Open the Active configuration drop-down
3. Select the Shared configuration you wish to use
4. Click Save
Here you can see the Shared configuration CONTOSO is active. Shared configuration names
are shown in italic font:
5.5 Shared client settings 5.5.1 Outline
Each client installation generates a settings file that resides in the Atlas client folder. This
settings file specifically relates to communication parameters used by Atlas in operation and
form part of the Windows Communications Foundation (WCF) services and describe many
attributes of the connections between the various elements in Atlas. Of particular interest is
the:
Client configuration
33
Time-out parameter
Maximum message size parameter
The time-out parameter governs how long a particular request will have before the system
determines it has taken too much time to complete. By default this is set to 5 minutes. The
maximum message size parameter governs how much data can be transferred between
Microsoft Dynamics AX and Atlas in one request. By default this is set to 100Mbytes.
Before you can adjust these settings you must share the settings file for all users. Also, the
corresponding server settings file will need to be adjusted too.
5.5.2 Sharing the Atlas client settings file
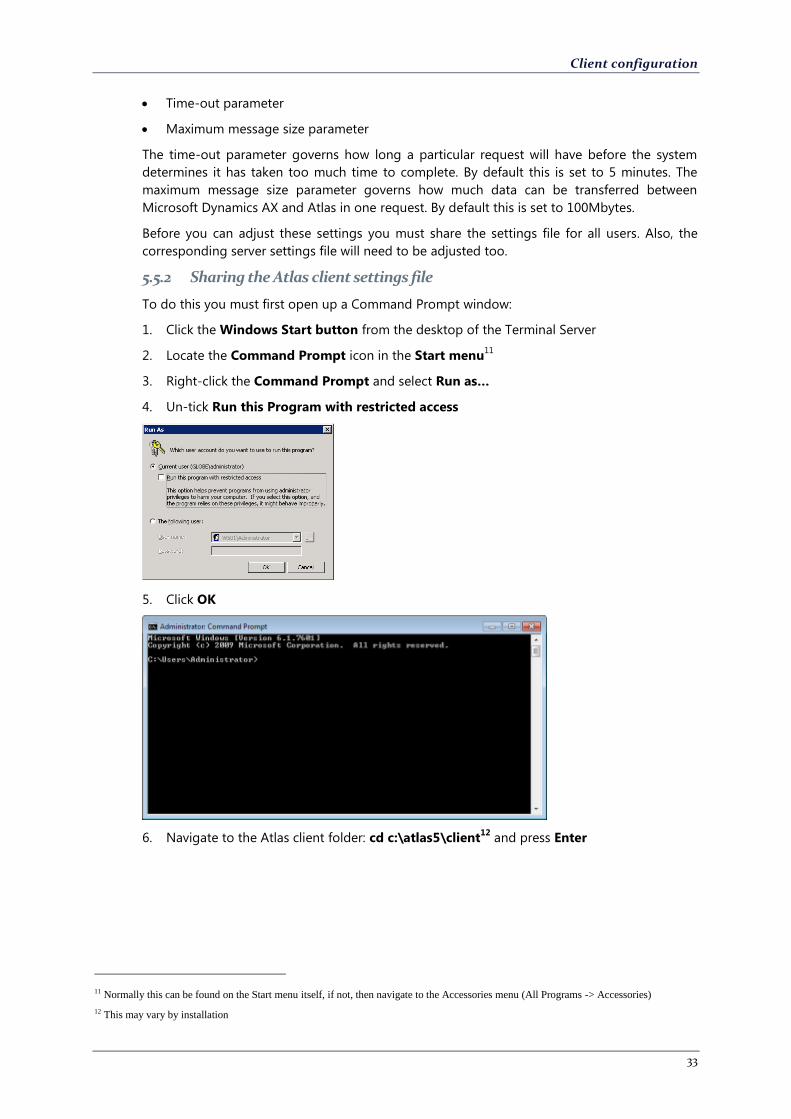
To do this you must first open up a Command Prompt window:
1. Click the Windows Start button from the desktop of the Terminal Server
2. Locate the Command Prompt icon in the Start menu11
3. Right-click the Command Prompt and select Run as…
4. Un-tick Run this Program with restricted access
5. Click OK
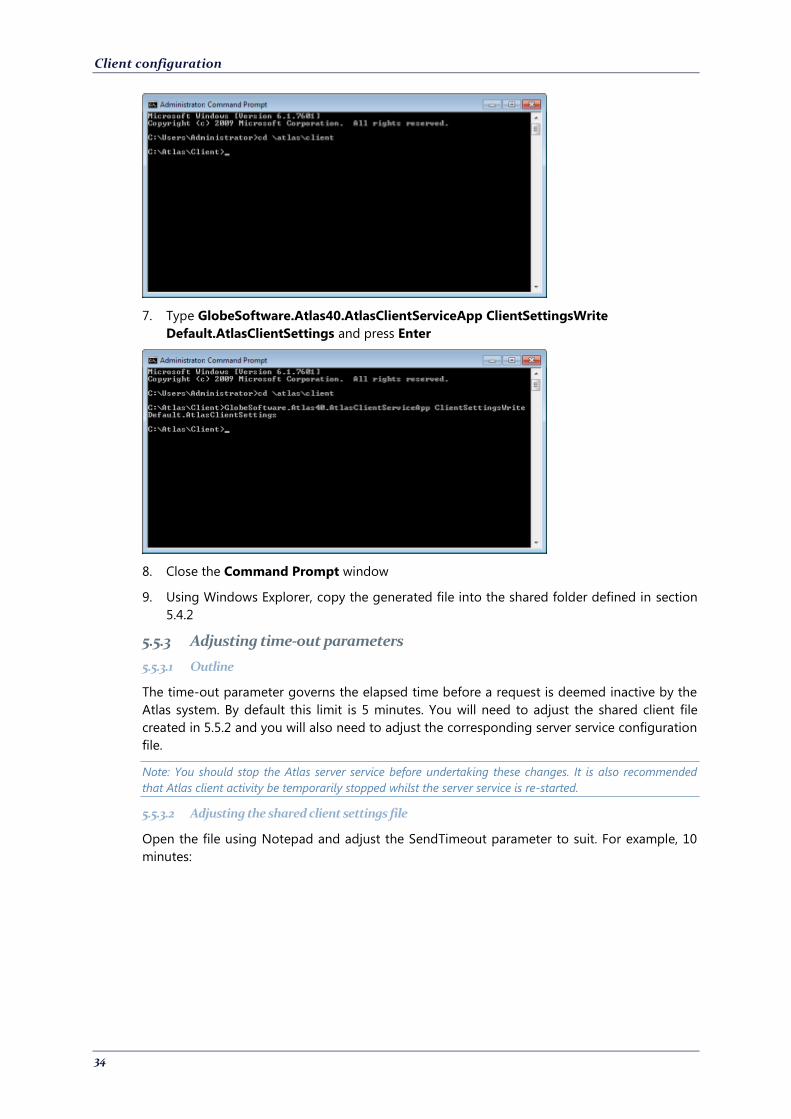
6. Navigate to the Atlas client folder: cd c:\atlas5\client12
and press Enter
11 Normally this can be found on the Start menu itself, if not, then navigate to the Accessories menu (All Programs -> Accessories)
12 This may vary by installation
Client configuration
34
7. Type GlobeSoftware.Atlas40.AtlasClientServiceApp ClientSettingsWrite
Default.AtlasClientSettings and press Enter
8. Close the Command Prompt window
9. Using Windows Explorer, copy the generated file into the shared folder defined in section
5.4.2
5.5.3 Adjusting time-out parameters
5.5.3.1 Outline
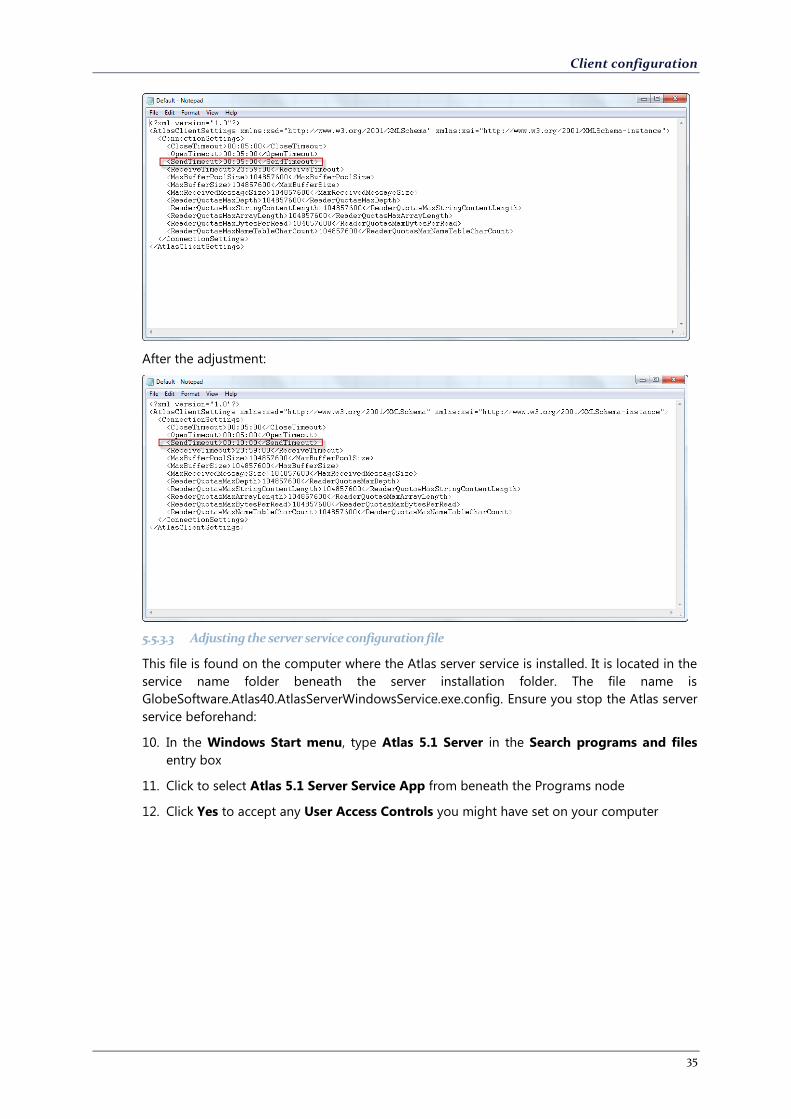
The time-out parameter governs the elapsed time before a request is deemed inactive by the
Atlas system. By default this limit is 5 minutes. You will need to adjust the shared client file
created in 5.5.2 and you will also need to adjust the corresponding server service configuration
file.
Note: You should stop the Atlas server service before undertaking these changes. It is also recommended
that Atlas client activity be temporarily stopped whilst the server service is re-started.
5.5.3.2 Adjusting the shared client settings file
Open the file using Notepad and adjust the SendTimeout parameter to suit. For example, 10
minutes:
Client configuration
35
After the adjustment:
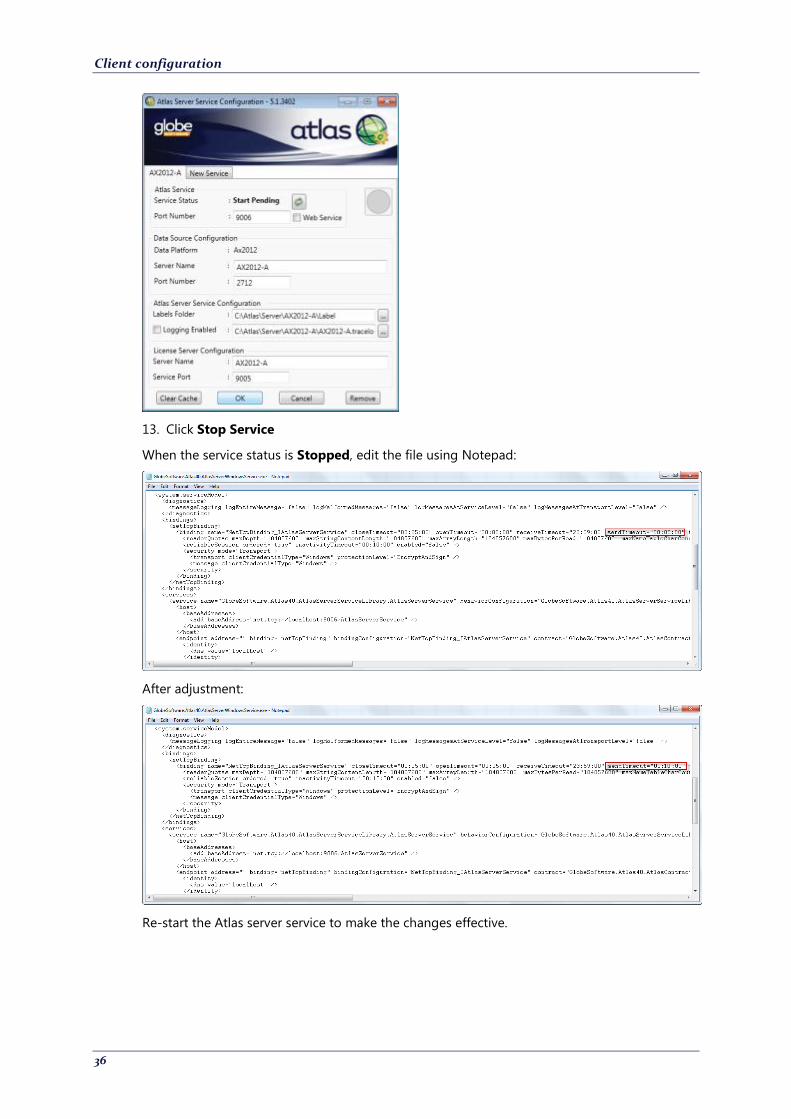
5.5.3.3 Adjusting the server service configuration file
This file is found on the computer where the Atlas server service is installed. It is located in the
service name folder beneath the server installation folder. The file name is
GlobeSoftware.Atlas40.AtlasServerWindowsService.exe.config. Ensure you stop the Atlas server
service beforehand:
10. In the Windows Start menu, type Atlas 5.1 Server in the Search programs and files
entry box
11. Click to select Atlas 5.1 Server Service App from beneath the Programs node
12. Click Yes to accept any User Access Controls you might have set on your computer
Client configuration
36
13. Click Stop Service
When the service status is Stopped, edit the file using Notepad:
After adjustment:
Re-start the Atlas server service to make the changes effective.
Client configuration
37
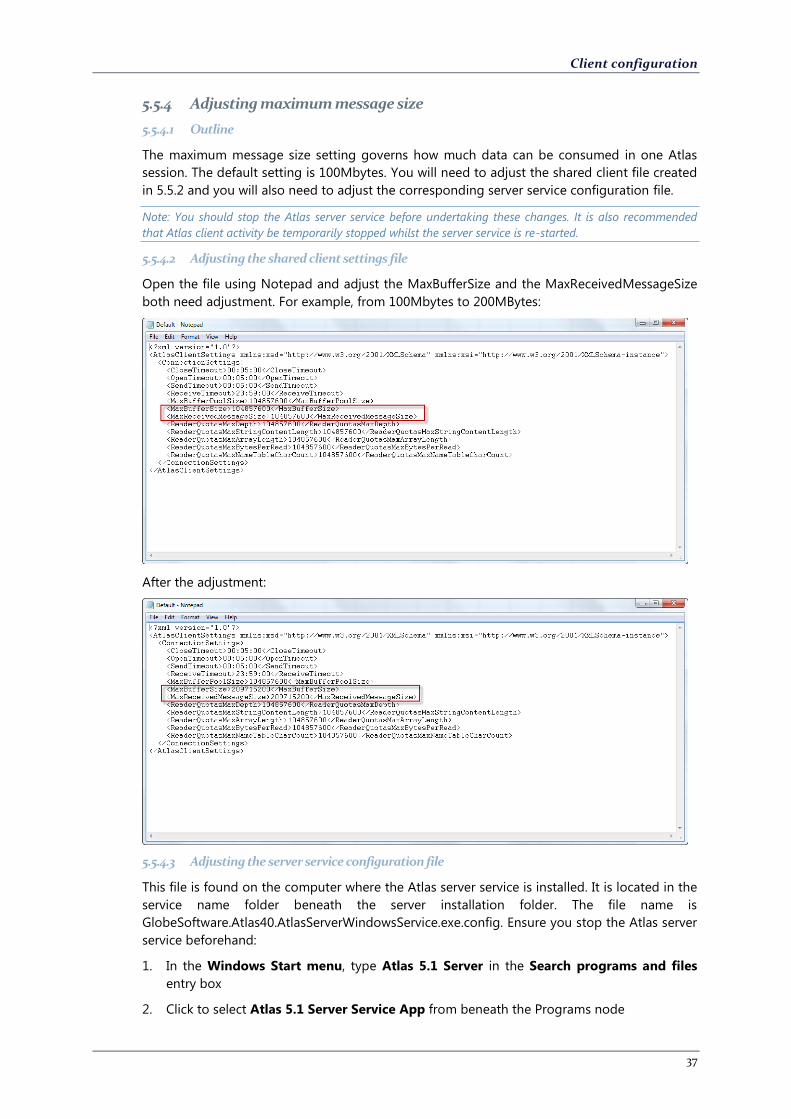
5.5.4 Adjusting maximum message size
5.5.4.1 Outline
The maximum message size setting governs how much data can be consumed in one Atlas
session. The default setting is 100Mbytes. You will need to adjust the shared client file created
in 5.5.2 and you will also need to adjust the corresponding server service configuration file.
Note: You should stop the Atlas server service before undertaking these changes. It is also recommended
that Atlas client activity be temporarily stopped whilst the server service is re-started.
5.5.4.2 Adjusting the shared client settings file
Open the file using Notepad and adjust the MaxBufferSize and the MaxReceivedMessageSize
both need adjustment. For example, from 100Mbytes to 200MBytes:
After the adjustment:
5.5.4.3 Adjusting the server service configuration file
This file is found on the computer where the Atlas server service is installed. It is located in the
service name folder beneath the server installation folder. The file name is
GlobeSoftware.Atlas40.AtlasServerWindowsService.exe.config. Ensure you stop the Atlas server
service beforehand:
1. In the Windows Start menu, type Atlas 5.1 Server in the Search programs and files
entry box
2. Click to select Atlas 5.1 Server Service App from beneath the Programs node
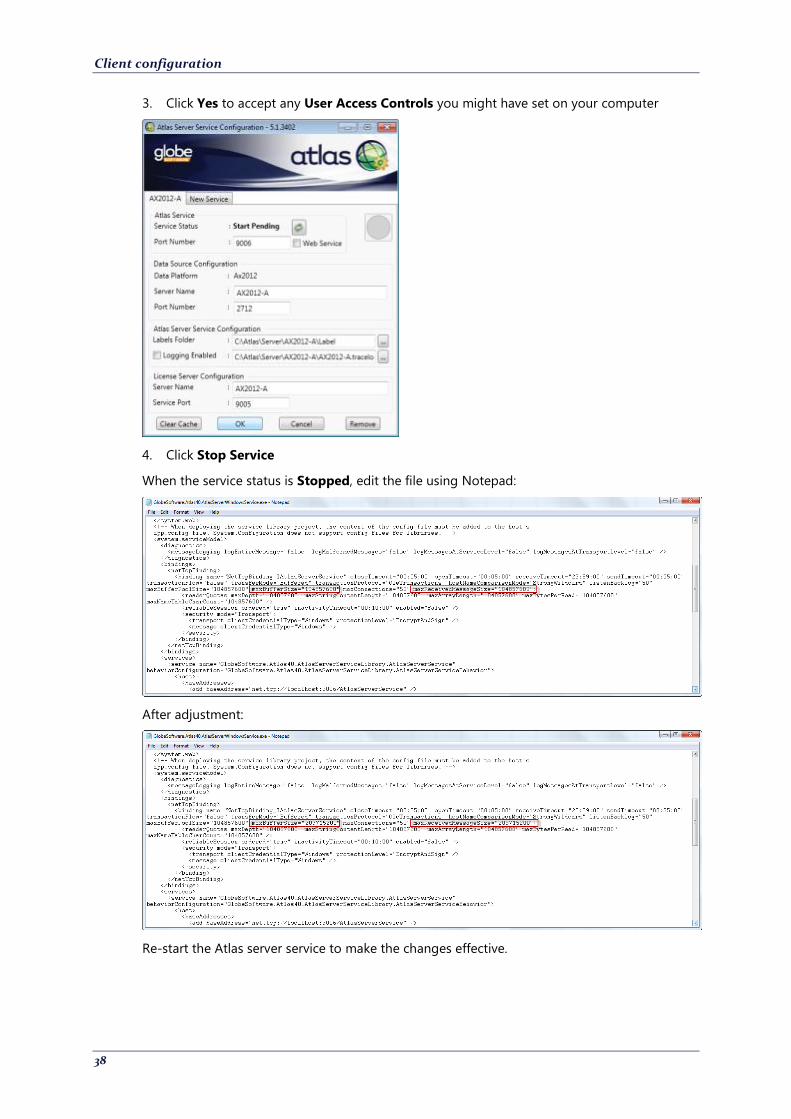
Client configuration
38
3. Click Yes to accept any User Access Controls you might have set on your computer
4. Click Stop Service
When the service status is Stopped, edit the file using Notepad:
After adjustment:
Re-start the Atlas server service to make the changes effective.
39
6 Demonstration installation
This mode of installation is intended for use for those organizations that need to demonstrate
Atlas from a mobile computer or virtual machine image. It is not intended to be used in a
commercial environment, unless the target Microsoft Dynamics AX installation is hosted on a
single, mobile computer.
A demonstration installation; combines the Atlas server installation and the Atlas client
installation at the same time.
Follow the steps outlined in section 2, 3, 4 and 5 to complete a Demonstration installation.
Note: Ensure that you have also installed the .NET Business Connector on the same computer on which the
demonstration installation will take place.
40
7 Logging in and license activation
7.1 Outline Depending on your license type, the setup required will vary. In the case where your
installation includes concurrent licenses, or a license pool, you must additionally include the
relevant keys into the Atlas License server.
First time log in will involve an activation step for all users; concurrent or named.
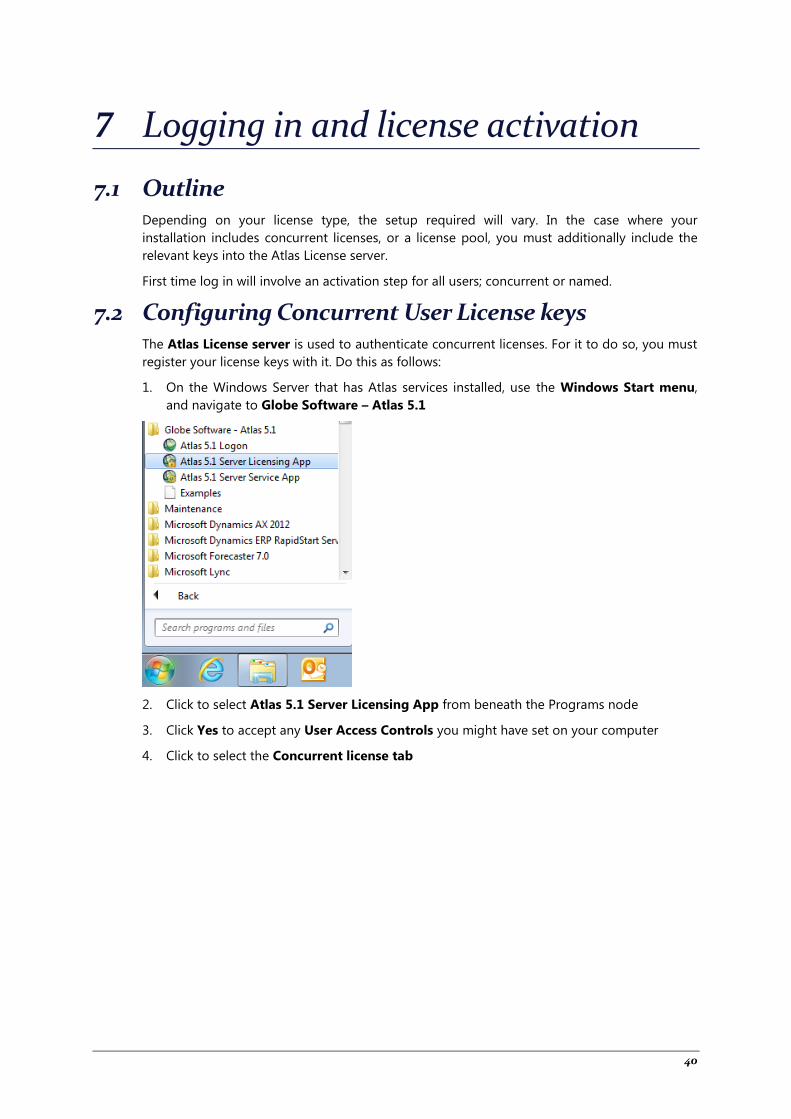
7.2 Configuring Concurrent User License keys The Atlas License server is used to authenticate concurrent licenses. For it to do so, you must
register your license keys with it. Do this as follows:
1. On the Windows Server that has Atlas services installed, use the Windows Start menu,
and navigate to Globe Software – Atlas 5.1
2. Click to select Atlas 5.1 Server Licensing App from beneath the Programs node
3. Click Yes to accept any User Access Controls you might have set on your computer
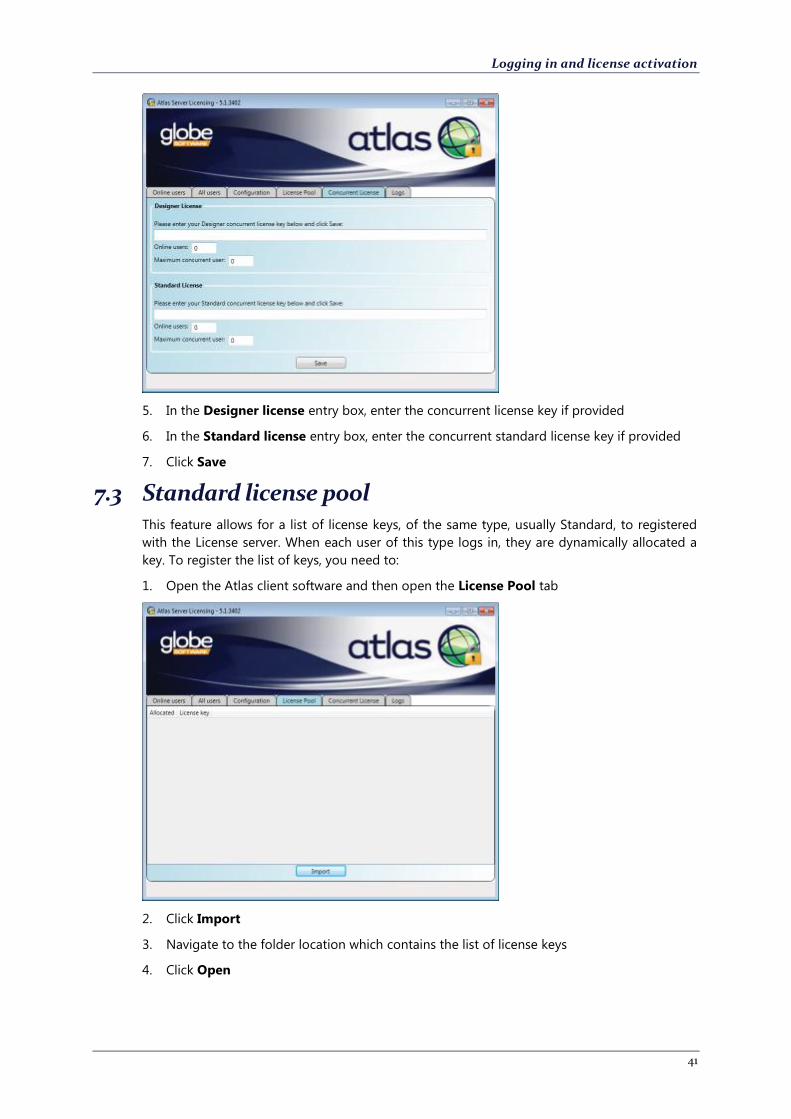
4. Click to select the Concurrent license tab
Logging in and license activation
41
5. In the Designer license entry box, enter the concurrent license key if provided
6. In the Standard license entry box, enter the concurrent standard license key if provided
7. Click Save
7.3 Standard license pool This feature allows for a list of license keys, of the same type, usually Standard, to registered
with the License server. When each user of this type logs in, they are dynamically allocated a
key. To register the list of keys, you need to:
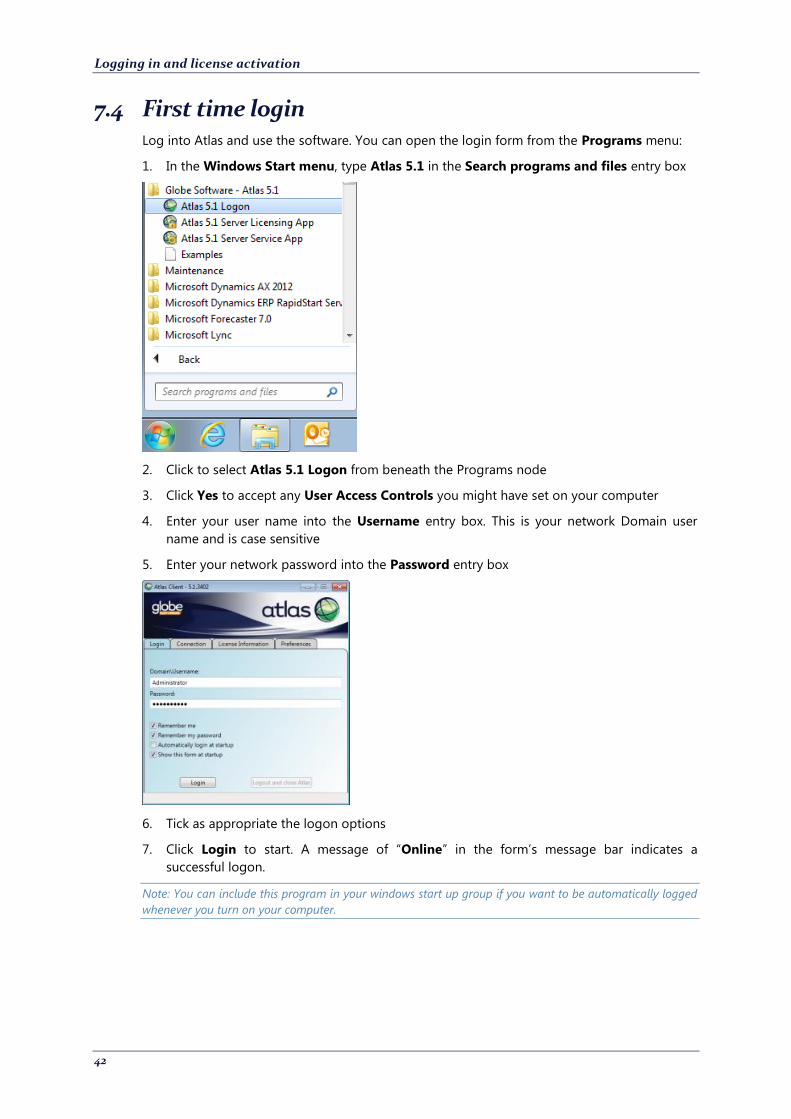
1. Open the Atlas client software and then open the License Pool tab
2. Click Import
3. Navigate to the folder location which contains the list of license keys
4. Click Open
Logging in and license activation
42
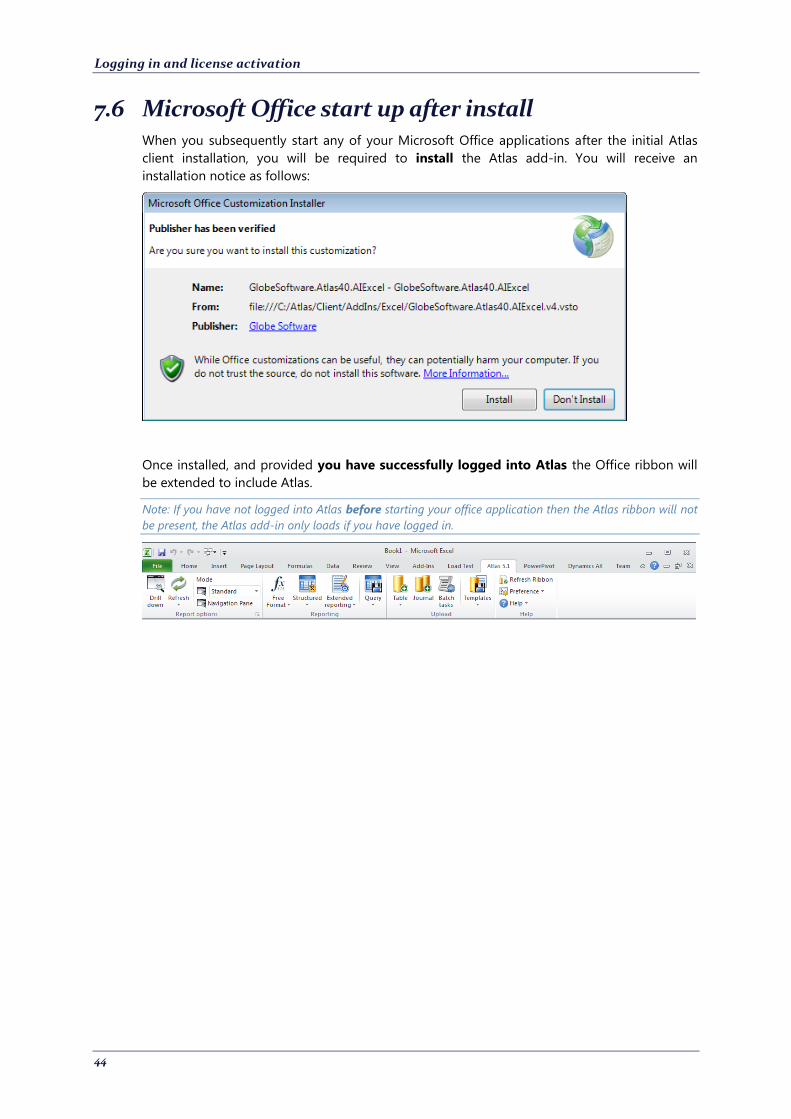
7.4 First time login Log into Atlas and use the software. You can open the login form from the Programs menu:
1. In the Windows Start menu, type Atlas 5.1 in the Search programs and files entry box
2. Click to select Atlas 5.1 Logon from beneath the Programs node
3. Click Yes to accept any User Access Controls you might have set on your computer
4. Enter your user name into the Username entry box. This is your network Domain user
name and is case sensitive
5. Enter your network password into the Password entry box
6. Tick as appropriate the logon options
7. Click Login to start. A message of “Online” in the form’s message bar indicates a
successful logon.
Note: You can include this program in your windows start up group if you want to be automatically logged
whenever you turn on your computer.
Logging in and license activation
43
7.5 License key activation The first time Atlas is used, license key activation is required. During login the following
form will appear, this needs to be completed before Login can continue:
8. Enter your First and Last (Family) names
9. Enter your work email address in the entry box provided.
10. Select the type of License code you wish to activate.
Enter named key below
Paste in the Named User License key given to you, eg:
Server to allocate Standard key (Named)
This feature is only used in conjunction with the License Pool (7.3)
Server to allocate Designer Key (Concurrent)
This is only value if a Designer Key has been entered in 7.2
Server to allocate Standard Key (Concurrent)
This is only value if a Standard Key has been entered in 7.2
11. Click Activate
Note: The Atlas Licensing Service requires a working internet connection to authenticate the license key.
This activation may take up to one minute to complete and is a once-only activity.
Logging in and license activation
44
7.6 Microsoft Office start up after install When you subsequently start any of your Microsoft Office applications after the initial Atlas
client installation, you will be required to install the Atlas add-in. You will receive an
installation notice as follows:
Once installed, and provided you have successfully logged into Atlas the Office ribbon will
be extended to include Atlas.
Note: If you have not logged into Atlas before starting your office application then the Atlas ribbon will not
be present, the Atlas add-in only loads if you have logged in.
45
8 Re-installation
8.1 Outline From time to time, you may be required to apply an update to your installed Atlas software. In
doing this, you might be required to re-install the Atlas server component, the Atlas client
software or both. Normally, you will install both as it is important to match server and client
build numbers.
To install a new version of the Atlas software you will:
Remove the existing installation
Install the server software components
Install the client software components
Note: Demonstration installation is a server install and a client install combined on one machine.
Since, the settings from your original installation are maintained, when you attempt to do a re-
installation, these defaults will be used for your convenience.
8.2 Removing the existing software You can choose to un-install the existing software manually or you can simply run the
installation package of the new version. If Atlas is already installed, this process will
automatically replace the current with this version being installed. All settings are retained.
To perform a manual un-install, follow the steps outlined in section 9.
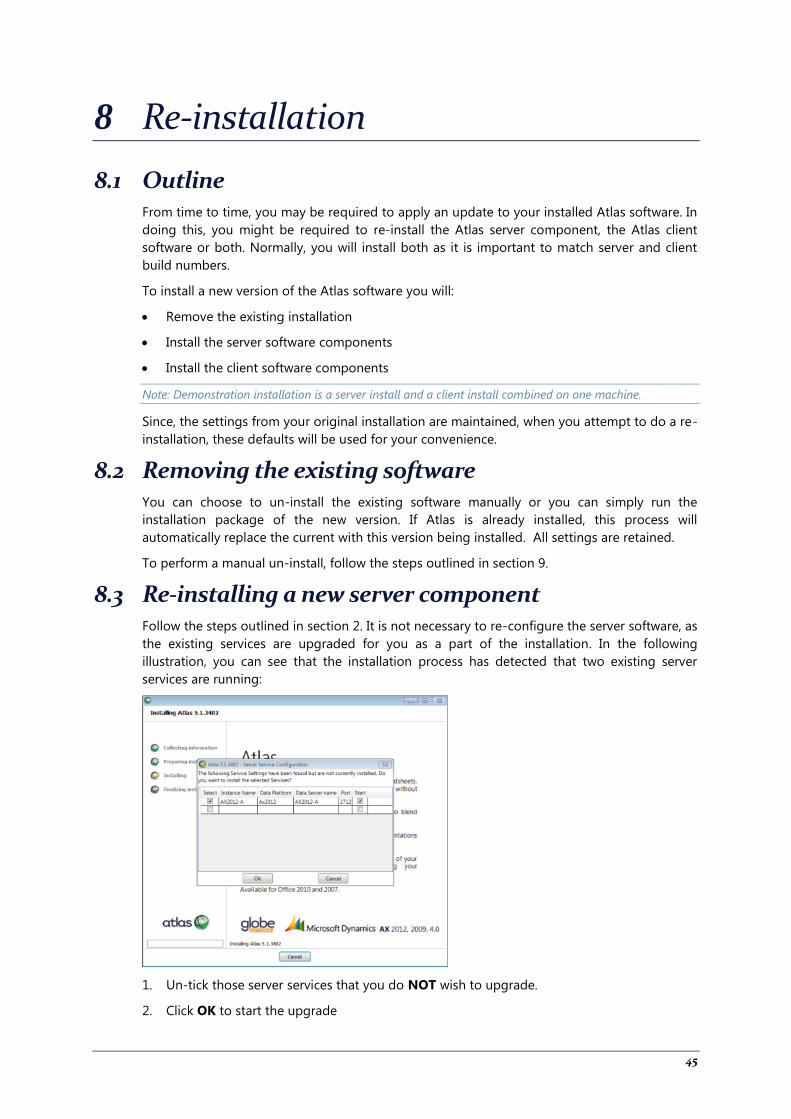
8.3 Re-installing a new server component Follow the steps outlined in section 2. It is not necessary to re-configure the server software, as
the existing services are upgraded for you as a part of the installation. In the following
illustration, you can see that the installation process has detected that two existing server
services are running:
1. Un-tick those server services that you do NOT wish to upgrade.
2. Click OK to start the upgrade
Re-installation
46
8.4 Re-installing the client software Follow the steps outlined in section 4. It is not necessary to re-configure the client software, as
the existing configurations are upgraded for you as a part of the installation.
8.5 How Atlas re-applies settings from a prior install 8.5.1 Installation settings file
The installation process records the settings applied during the software installation in a file
called:
GlobeSoftware.Atlas40.Setup.ini
The file is located in the %appdata%\GlobeSoftware\Atlas4\ folder.
At time of re-installation, the Atlas installation software will read this file and apply the settings
found therein. This behavior can be adjusted with an alternative setup file, supplied to the
installer via command line parameters.
8.5.2 Applying an alternative settings file
You can modify the settings file created during installation and modify it as required.13
To use
this modified settings file in a subsequent installations, simply supply the file name as a
command line parameter to the installation executable. The format of this being:
GlobeSoftware.Atlas5.1.3402.exe Setupini=\\ATLAS\Setup\GlobeSoftware.Atlas40.Setup.ini
You can use this option with the /s command line argument to achieve a silent installation
process.
13 It is recommended that you take a copy of the file and save it to a common, network folder prior to making any adjustments. Make the adjustments on the network file and use this in subsequent installations.
47
9 Un-installing the software
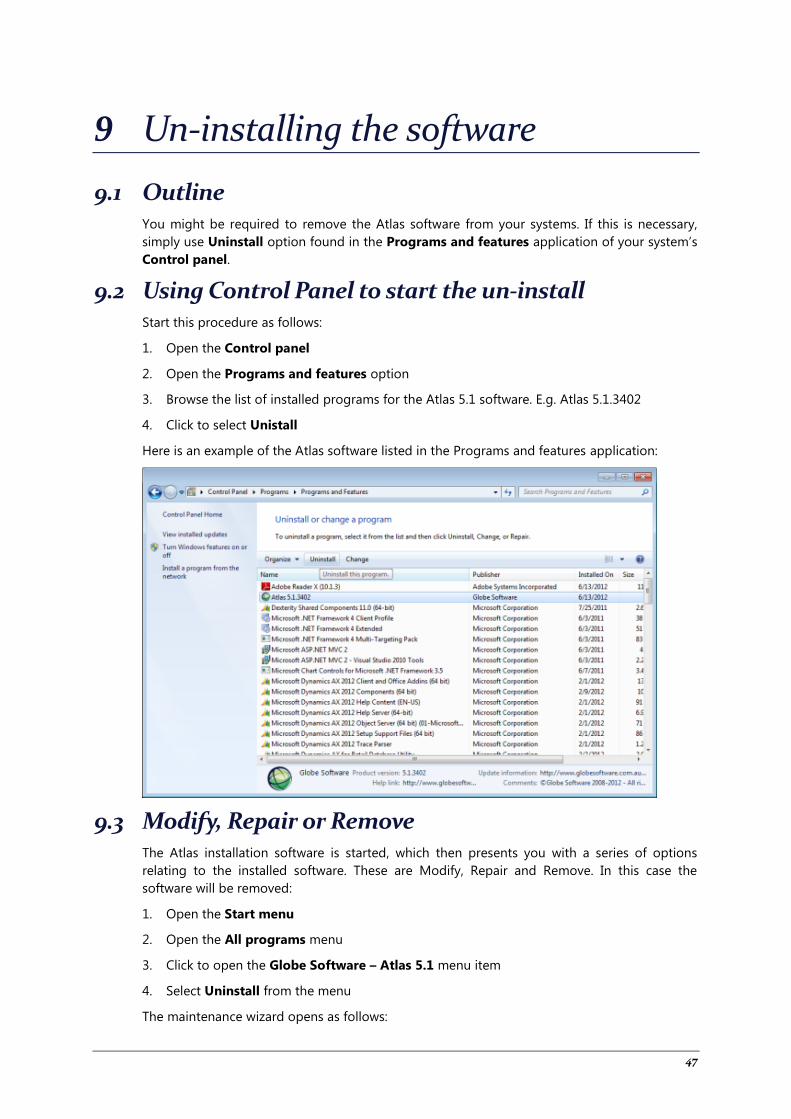
9.1 Outline You might be required to remove the Atlas software from your systems. If this is necessary,
simply use Uninstall option found in the Programs and features application of your system’s
Control panel.
9.2 Using Control Panel to start the un-install Start this procedure as follows:
1. Open the Control panel
2. Open the Programs and features option
3. Browse the list of installed programs for the Atlas 5.1 software. E.g. Atlas 5.1.3402
4. Click to select Unistall
Here is an example of the Atlas software listed in the Programs and features application:
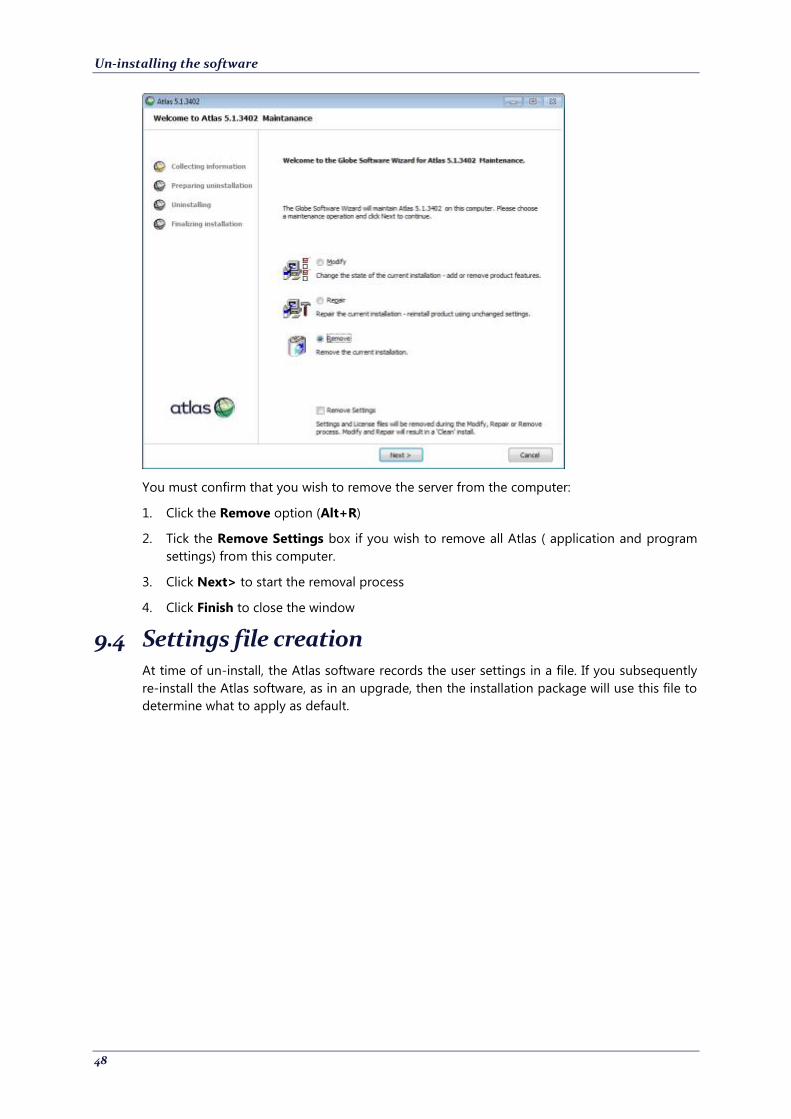
9.3 Modify, Repair or Remove The Atlas installation software is started, which then presents you with a series of options
relating to the installed software. These are Modify, Repair and Remove. In this case the
software will be removed:
1. Open the Start menu
2. Open the All programs menu
3. Click to open the Globe Software – Atlas 5.1 menu item
4. Select Uninstall from the menu
The maintenance wizard opens as follows:
Un-installing the software
48
You must confirm that you wish to remove the server from the computer:
1. Click the Remove option (Alt+R)
2. Tick the Remove Settings box if you wish to remove all Atlas ( application and program
settings) from this computer.
3. Click Next> to start the removal process
4. Click Finish to close the window
9.4 Settings file creation At time of un-install, the Atlas software records the user settings in a file. If you subsequently
re-install the Atlas software, as in an upgrade, then the installation package will use this file to
determine what to apply as default.
49
10 Troubleshooting guide
10.1 Outline This section intends to highlight the common errors you might experience after the installation
is completed. The list is organized by component:
Server startup messages
Client startup messages
Activation issues
10.2 Server service startup Symptom Issue Resolution
Message: The Atlas [ServiceName]
Service on [ComputerName]
started and then stopped. Some
services stop automatically if they
are not in use by other services or
programs
Atlas server service cache is
corrupt
Contact your Microsoft Dynamics AX
administrator.
The Cache for the server needs to be
cleared.
- Open the Atlas server
service app
- Click to select the relevant
server tab.
- Stop the service
- Click the Clear Cache button
10.3 Client startup and logging in Symptom Issue Resolution
Message: Connection to Atlas
Windows Service was successful,
Login(s) to Microsoft Dynamics AX
Failed
Microsoft Dynamics AX Business
Connector not installed
Install, using the Microsoft Dynamics
AX client installation media, the .NET
Business Connector onto the computer
where the Atlas server service is
installed. Contact a system
administrator to assist with this task.
Message: Connection to Atlas
Windows Service was successful,
Login(s) to Microsoft Dynamics AX
Failed.
Service: {ServiceName]
Server: {ComputerName]
Port: {PortNumber]
Type: [AXVer]
Contact your administrator to
ensure:
- The Microsoft Dynamics
AX Windows service is
Microsoft Dynamics AX AOS
services is not running OR the
reference to the Microsoft
Dynamics AX AOS in the Atlas
service is not correct
Contact your Microsoft Dynamics AX
administrator.
The Microsoft Dynamics AX server is
not available
OR
The reference to it in the Atlas server
service configuration incorrectly
identifies the Microsoft Dynamics AX
AOS server.
Troubleshooting guide
50
Symptom Issue Resolution
running
- The Atlas Windows
service settings are
correct
Message: Login failed: Either the
target name is incorrect or the
server has rejected the client
credentials
User name or password incorrectly
sent
Ensure the credentials you provided to
the Atlas client are correct.
Message: Login failed: The server
has rejected the client credentials
User name or password incorrectly
sent
Ensure the credentials you provided to
the Atlas client are correct.
Message: Login failed: Contact
your administrator to ensure:
- The Windows service is
running
- Your settings are correct
The Atlas server service named in
the client configuration is not
running OR the Atlas server service
is running and the reference to it
in your configuration is incorrect
Contact your Microsoft Dynamics AX
administrator.
Open the Atlas 5.1 Server service App
and start the stopped service
OR
Open the Atlas Client software and
ensure that the configuration in the
Connection tab matches that of the
running Atlas Server Service
See section 5.2.4
Message: Login failed: Unable to
connect to your local licensing
server. Please make sure that your
Atlas Licensing Windows Service is
started
Licensing server service is
shutdown OR the reference to the
Atlas Licensing server service in
the Atlas server service
configuration is incorrect
Contact your system administrator.
Start the Atlas licensing server service
from control panel of the computer
which hosts the Atlas licensing server
service
OR
Open the Atlas server service app and
ensure that the reference to the
licensing server is correct.
See section 3.2.5
Message: Login failed: The Atlas
server that you are connected to is
not in the list of servers Please add
the server using the Licensing
application
The reference to the Atlas server
services is not found in the
configuration tab of the Licensing
server app.
See section 3.3
Message: Successfully logged into
[ServiceName]
0 datasources preloaded
The location in which Atlas is
looking for your data source file
does not contain any valid data
source files
Data sources are stored per
connection within configuration. You
may see this if you are loading a new
configuration. Using, the Open.. menu
on the data sources tab in any Atlas
task pane, navigate to the folder that
contains your data source lists.
Troubleshooting guide
51
10.4 Microsoft Office Symptom Issue Resolution
Atlas is not in the Office Ribbon Atlas only loads into the Office
ribbon if logged in.
Login to Atlas and restart the office
application.
10.5 Activation messages Symptom Issue Resolution
Message: [ServiceName]: Your
license has expired, please enter a
new license key.
Your license keys have lapsed and
you cannot activate after the date
on which they lapsed.
Provide a new key or contact your
supplier to arrange for the key to be
extended
Message: Exception occurred while
trying to activate using local
licensing server.
It is possible that your machine's
time is out of sync. If so, please
synchronize the time using
Internet time.
If that does not fix it, please check
the Globe Software event logs for
more details
The time on the license activation
server at Globe Software differs
from the time on the local Atlas
license server service.
Synchronize the time on the Domain
Controller to that of Internet time. The
synchronization will then need to be
distributed to other servers in your
network. Contact support for more
details
10.6 Additional Resources (online) The following links can be used for additional support:
1. www.youtube.com/user/Atlas4Dynamics for on-demand movies demonstration all
aspects of the software
2. Register at www.globesoftware.com.au to download software updates, training
material and example reports and templates
3. Register as a Community User at http://support.globesoftware.com to access our wiki
pages
4. Email [email protected] for product support