Embed Size (px)
Citation preview
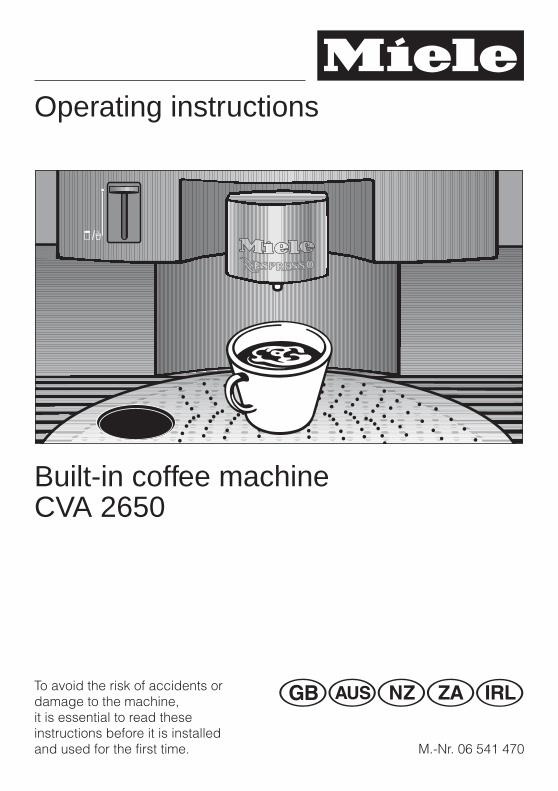
Operating instructions
Built-in coffee machineCVA 2650
To avoid the risk of accidents ordamage to the machine,it is essential to read theseinstructions before it is installedand used for the first time.
GWOZi
M.-Nr. 06 541 470
Guide to the machine. . . . . . . . . . . . . . . . . . . . . . . . . . . . . . . . . . . . . . . . . . . . . . . 4Caring for the environment . . . . . . . . . . . . . . . . . . . . . . . . . . . . . . . . . . . . . . . . . . 6Warning and Safety instructions . . . . . . . . . . . . . . . . . . . . . . . . . . . . . . . . . . . . . 7Brief description . . . . . . . . . . . . . . . . . . . . . . . . . . . . . . . . . . . . . . . . . . . . . . . . . 10A brief overview of the controls . . . . . . . . . . . . . . . . . . . . . . . . . . . . . . . . . . . . . 11Operating sequence . . . . . . . . . . . . . . . . . . . . . . . . . . . . . . . . . . . . . . . . . . . . . . . 11
Left-hand control dial . . . . . . . . . . . . . . . . . . . . . . . . . . . . . . . . . . . . . . . . . . . . 11Right-hand control dial . . . . . . . . . . . . . . . . . . . . . . . . . . . . . . . . . . . . . . . . . . . 11Left-hand display . . . . . . . . . . . . . . . . . . . . . . . . . . . . . . . . . . . . . . . . . . . . . . . 12Right-hand display . . . . . . . . . . . . . . . . . . . . . . . . . . . . . . . . . . . . . . . . . . . . . . 12
Before using for the first time. . . . . . . . . . . . . . . . . . . . . . . . . . . . . . . . . . . . . . . . . 13Switching off. . . . . . . . . . . . . . . . . . . . . . . . . . . . . . . . . . . . . . . . . . . . . . . . . . . . . . 14Settings: Customising your machine. . . . . . . . . . . . . . . . . . . . . . . . . . . . . . . . . 15Selecting a language. . . . . . . . . . . . . . . . . . . . . . . . . . . . . . . . . . . . . . . . . . . . . . . 16Setting time of day . . . . . . . . . . . . . . . . . . . . . . . . . . . . . . . . . . . . . . . . . . . . . . . . . 17Switching off after a pre-set time . . . . . . . . . . . . . . . . . . . . . . . . . . . . . . . . . . . . . . 18Switching on at a pre-set time . . . . . . . . . . . . . . . . . . . . . . . . . . . . . . . . . . . . . . . . 19Switching off at a pre-set time . . . . . . . . . . . . . . . . . . . . . . . . . . . . . . . . . . . . . . . . 20Deleting a set switching on or switching off time. . . . . . . . . . . . . . . . . . . . . . . . . . 21Setting the lighting, display contrast and display brightness . . . . . . . . . . . . . . . . 21Automatic rinsing . . . . . . . . . . . . . . . . . . . . . . . . . . . . . . . . . . . . . . . . . . . . . . . . . . 22Steam system . . . . . . . . . . . . . . . . . . . . . . . . . . . . . . . . . . . . . . . . . . . . . . . . . . . . 23Setting the water hardness . . . . . . . . . . . . . . . . . . . . . . . . . . . . . . . . . . . . . . . . . . 25Displaying the number of cups of coffee already dispensed (INFO) . . . . . . . . . . 27Saving different types of coffee . . . . . . . . . . . . . . . . . . . . . . . . . . . . . . . . . . . . . 28Allocating the types of coffee (Allocate type) . . . . . . . . . . . . . . . . . . . . . . . . . . . . 28Setting up user profiles . . . . . . . . . . . . . . . . . . . . . . . . . . . . . . . . . . . . . . . . . . . . 31Setting the user name . . . . . . . . . . . . . . . . . . . . . . . . . . . . . . . . . . . . . . . . . . . . . . 31Filling the machine with water and coffee capsules. . . . . . . . . . . . . . . . . . . . . 33Filling the water tank . . . . . . . . . . . . . . . . . . . . . . . . . . . . . . . . . . . . . . . . . . . . . . . 33Filling the capsule magazine . . . . . . . . . . . . . . . . . . . . . . . . . . . . . . . . . . . . . . . . . 34Taking capsules out of the capsule magazine . . . . . . . . . . . . . . . . . . . . . . . . . . . 35Making coffee . . . . . . . . . . . . . . . . . . . . . . . . . . . . . . . . . . . . . . . . . . . . . . . . . . . . 36Switching on . . . . . . . . . . . . . . . . . . . . . . . . . . . . . . . . . . . . . . . . . . . . . . . . . . . . . 36Before preparing the first drink . . . . . . . . . . . . . . . . . . . . . . . . . . . . . . . . . . . . . . . 37
Filling the system with water . . . . . . . . . . . . . . . . . . . . . . . . . . . . . . . . . . . . . . . 37
Contents
Pre-warming cups . . . . . . . . . . . . . . . . . . . . . . . . . . . . . . . . . . . . . . . . . . . . . . . . . 38Espresso or Coffee . . . . . . . . . . . . . . . . . . . . . . . . . . . . . . . . . . . . . . . . . . . . . . . . 38Espresso or coffee for a specific user profile . . . . . . . . . . . . . . . . . . . . . . . . . . . . 39Cappuccino . . . . . . . . . . . . . . . . . . . . . . . . . . . . . . . . . . . . . . . . . . . . . . . . . . . . . . 40Dispensing froth directly into a cup . . . . . . . . . . . . . . . . . . . . . . . . . . . . . . . . . . . . 41Frothing milk in the milk frother (cappuccinatore) . . . . . . . . . . . . . . . . . . . . . . . . . 43After frothing milk . . . . . . . . . . . . . . . . . . . . . . . . . . . . . . . . . . . . . . . . . . . . . . . . . . 44After use. . . . . . . . . . . . . . . . . . . . . . . . . . . . . . . . . . . . . . . . . . . . . . . . . . . . . . . . . 45Setting the portion sizes . . . . . . . . . . . . . . . . . . . . . . . . . . . . . . . . . . . . . . . . . . . 46Portion size for the standard profile . . . . . . . . . . . . . . . . . . . . . . . . . . . . . . . . . . . . 47Portion size for the different user profiles . . . . . . . . . . . . . . . . . . . . . . . . . . . . . . . 48System lock . . . . . . . . . . . . . . . . . . . . . . . . . . . . . . . . . . . . . . . . . . . . . . . . . . . . . 49Cleaning and care . . . . . . . . . . . . . . . . . . . . . . . . . . . . . . . . . . . . . . . . . . . . . . . . 50Rinsing . . . . . . . . . . . . . . . . . . . . . . . . . . . . . . . . . . . . . . . . . . . . . . . . . . . . . . . . . . 50Water container . . . . . . . . . . . . . . . . . . . . . . . . . . . . . . . . . . . . . . . . . . . . . . . . . . . 51Waste container . . . . . . . . . . . . . . . . . . . . . . . . . . . . . . . . . . . . . . . . . . . . . . . . . . . 51Drip tray . . . . . . . . . . . . . . . . . . . . . . . . . . . . . . . . . . . . . . . . . . . . . . . . . . . . . . . . 52Grille with drip tray cover . . . . . . . . . . . . . . . . . . . . . . . . . . . . . . . . . . . . . . . . . . . . 53Capsule magazine and magazine runners . . . . . . . . . . . . . . . . . . . . . . . . . . . . . . 53Coffee outlet cover. . . . . . . . . . . . . . . . . . . . . . . . . . . . . . . . . . . . . . . . . . . . . . . . . 55Interior . . . . . . . . . . . . . . . . . . . . . . . . . . . . . . . . . . . . . . . . . . . . . . . . . . . . . . . . . . 55Capsule plate. . . . . . . . . . . . . . . . . . . . . . . . . . . . . . . . . . . . . . . . . . . . . . . . . . . . . 55Steam valve . . . . . . . . . . . . . . . . . . . . . . . . . . . . . . . . . . . . . . . . . . . . . . . . . . . . . . 56Milk frother (cappuccinatore). . . . . . . . . . . . . . . . . . . . . . . . . . . . . . . . . . . . . . . . . 57Machine front . . . . . . . . . . . . . . . . . . . . . . . . . . . . . . . . . . . . . . . . . . . . . . . . . . . . . 58Stainless steel fronts . . . . . . . . . . . . . . . . . . . . . . . . . . . . . . . . . . . . . . . . . . . . . . . 59Aluminium fronts . . . . . . . . . . . . . . . . . . . . . . . . . . . . . . . . . . . . . . . . . . . . . . . . . . 60Maintenance . . . . . . . . . . . . . . . . . . . . . . . . . . . . . . . . . . . . . . . . . . . . . . . . . . . . . 60Descaling the machine . . . . . . . . . . . . . . . . . . . . . . . . . . . . . . . . . . . . . . . . . . . . 63Messages in the right hand display . . . . . . . . . . . . . . . . . . . . . . . . . . . . . . . . . . 66Problem solving guide. . . . . . . . . . . . . . . . . . . . . . . . . . . . . . . . . . . . . . . . . . . . . 68After Sales Service . . . . . . . . . . . . . . . . . . . . . . . . . . . . . . . . . . . . . . . . . . . . . . . 77Electrical connection U.K., ZA, IRL . . . . . . . . . . . . . . . . . . . . . . . . . . . . . . . . . . 78Installation . . . . . . . . . . . . . . . . . . . . . . . . . . . . . . . . . . . . . . . . . . . . . . . . . . . . . . 81
Building-in options . . . . . . . . . . . . . . . . . . . . . . . . . . . . . . . . . . . . . . . . . . . . . . 81Installation. . . . . . . . . . . . . . . . . . . . . . . . . . . . . . . . . . . . . . . . . . . . . . . . . . . . . 83
Glossary . . . . . . . . . . . . . . . . . . . . . . . . . . . . . . . . . . . . . . . . . . . . . . . . . . . . . . . . 85
Contents
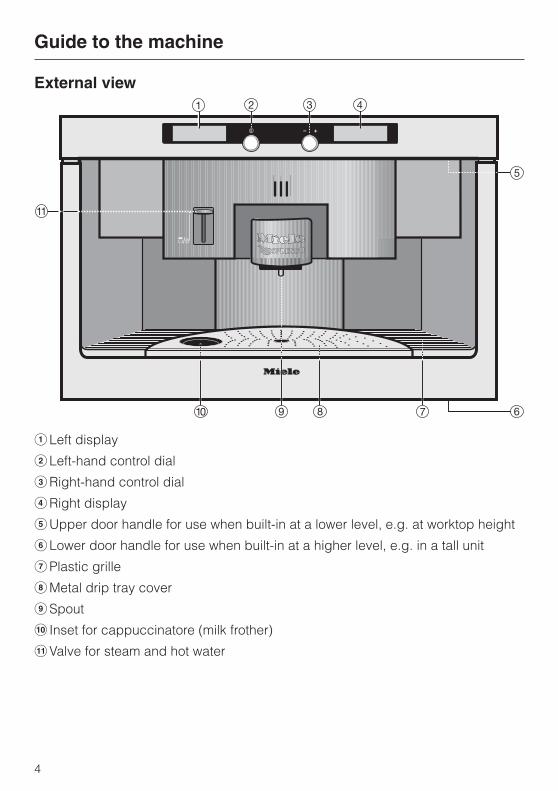
External view
aLeft display
bLeft-hand control dial
cRight-hand control dial
dRight display
eUpper door handle for use when built-in at a lower level, e.g. at worktop height
fLower door handle for use when built-in at a higher level, e.g. in a tall unit
gPlastic grille
hMetal drip tray cover
iSpout
j Inset for cappuccinatore (milk frother)
kValve for steam and hot water
Guide to the machine
4
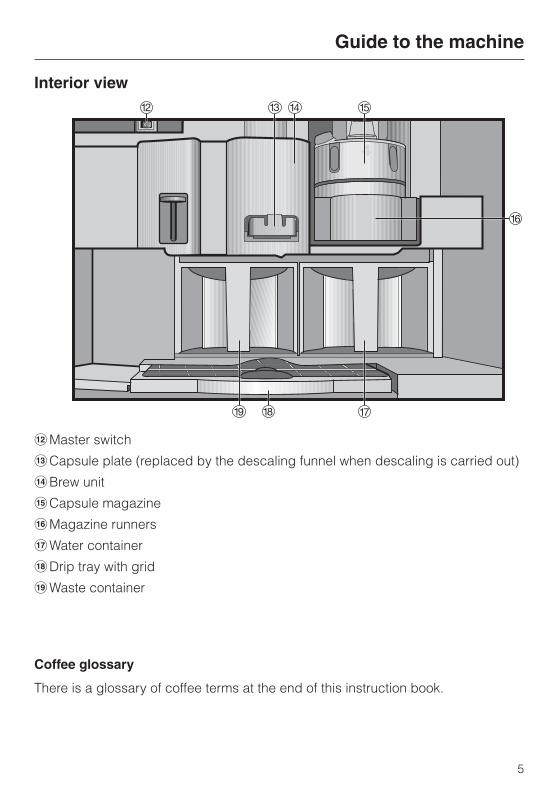
Interior view
lMaster switch
mCapsule plate (replaced by the descaling funnel when descaling is carried out)
nBrew unit
oCapsule magazine
pMagazine runners
qWater container
rDrip tray with grid
sWaste container
Coffee glossary
There is a glossary of coffee terms at the end of this instruction book.
Guide to the machine
5

Disposal of the packingmaterialThe transport and protective packinghas been selected from materials whichare environmentally friendly for disposaland can normally be recycled.
Ensure that any plastic wrappings,bags etc. are disposed of safely andkept out of the reach of babies andyoung children. Danger of suffocation.
Rather than just throwing thesematerials away, please ensure that theyare recycled.
Disposal of your old applianceor machineElectrical and electronic appliances /machines often contain materialswhich, if handled or disposed ofincorrectly, could be potentiallyhazardous to human health and to theenvironment. They are, however,essential for the correct functioning ofyour appliance or machine. Please donot therefore dispose of it with yourhousehold waste.
Please dispose of it at your localcommunity waste collection / recyclingcentre and ensure that it presents nodanger to children while being storedfor disposal.
It should be unplugged ordisconnected from the mains electricitysupply by a competent person. Theplug must be rendered useless and thecable cut off directly behind it toprevent misuse. See the "Warning andSafety" section of this booklet for furtherdetails.
Caring for the environment
6
This machine complies with allrelevant local and national safetyrequirements. Improper use can,however, present a risk of bothpersonal injury and materialdamage.
To avoid the risk of accidents ordamage to the machine it isessential to read these instructionsbefore it is installed or used for thefirst time. They contain importantnotes on installation, safety,operation and care of the machine.
This machine is not a toy! To avoidthe risk of injury, do not allowchildren to play on or near it, or toplay with the controls. Supervise itsuse by the elderly and infirm.
Keep these operating instructions ina safe place and pass them on toany future user.
Correct useThe machine is intended fordomestic use only for the
preparation of espresso, cappuccinoand coffee. Any other usage is notsupported by the manufacturer andcould be dangerous. The manufacturercannot be held liable for damagecaused by incorrect or improper use ofthe machine.
Technical safetyTo avoid the risk of damage to themachine, make sure that the rating
on the data plate corresponds to thevoltage and frequency of the householdsupply, before connecting it to themains supply. Consult a qualifiedelectrician if in any doubt.
The electrical safety of thismachine can only be guaranteed
when continuity is complete between itand an effective earthing system, whichcomplies with local and national safetyregulations. It is most important that thisbasic safety requirement is present andregularly tested, and where there is anydoubt the household wiring systemshould be inspected by a qualifiedelectrician.
The manufacturer cannot be held liablefor the consequences of an inadequateearthing system (e.g. electric shock).
The machine must be built inbefore operation to ensure that no
electrical components are accessible.Ensure power is not supplied to themachine until installation, repair work ormaintenance work has been carriedout.
Do not connect the machine to themains electricity supply by an
extension lead.Extension leads do not guarantee therequired safety of the machine (e.g.danger of overheating).
When installed in the mobile unit(optional extra), the machine is not
suitable for use in the open air.
Warning and Safety instructions
7
This equipment is not designed formaritime use or for use in mobile
installations such as caravans, aircraftetc. However it may be suitable forsuch usage subject to a riskassessment of the installation beingcarried out by a suitably qualifiedengineer.
Installation work and repairs mayonly be carried out by suitably
qualified and competent persons inaccordance with local and nationalsafety regulations. Repairs and otherwork by unqualified persons could bedangerous and the manufacturer willnot be held liable.
The machine is only completelyisolated from the electricity supply
when:
– the mains fuse is withdrawn
– or the screw-out fuse is removed (incountries where this is applicable)
– or it is switched off at the wall socketand the the plug is removed. (Pull onthe plug, not the cable).
Never open the housing of themachine. Tampering with electrical
connections or components andmechanical parts is highly dangerousto the user and can cause operationalfaults or electric shock.
If the machine is to be built inabove another machine, there must
be a full-width, closed shelf betweenthem (except when it is combined witha Miele built-in plate warming drawer).
In countries where there are areaswhich may be subject to infestation
by cockroaches or other vermin, payparticular attention to keeping themachine and its surroundings in aclean condition at all times. Anydamage caused by cockroaches orother vermin will not be covered by theguarantee.
Use
Warning. Danger of scalding. Theliquids dispensed are very hot.
Keep children away from themachine at all times, and supervise
them when you are using it. Their skin isvery sensitive and reacts to hottemperatures. Danger of scalding.Remember that coffee and espressoare not suitable drinks for children.
Do not reach into the brew unitwhen the machine is connected to
the electricity supply. Danger of injury.
Before making your first drink ofthe day it is important to rinse the
machine through and make sure thatthe steam spout and milk frother arethoroughly clean before using them.
Only cold, fresh drinking watershould be used to fill the water
container. Warm or hot water or otherliquids could damage the machine.Change the water every day to preventa build up of bacteria.
Do not on any account use mineralwater. Mineral water will cause
serious limescale deposits to build upin your machine and damage it.
Warning and Safety instructions
8
Never put anything other thanNespresso coffee capsules in the
capsule magazine. Othermanufacturer’s capsules etc. woulddamage the machine.
The coffee capsules must be intactbefore use. Do not use coffee
capsules which are damaged, brokenor dented. These could becomejammed in the machine and damage it.
Never place a drink with ignitedalcohol under the spout of the
coffee machine. The flames could meltplastic components and cause firedamage.
The hot water and steam couldcause scalding. Be very careful
when using these functions. Make sureyou do not come into contact with hotsteam or hot water. The machine mustnever be used for cleaning objects.
Do not use steam cleaningapparatus to clean this machine.
Pressurised steam could reach theelectrical components and cause ashort circuit.
Clean the machine every day toprevent a build-up of bacteria.
The machine should be descaledregularly, depending on the
hardness of the water, with thedescaling tablets supplied. The harderthe water, the more often the machinemust be descaled. The manufacturercannot be held liable for damagearising from insufficient descaling.
Only use the descaling tabletssupplied by Miele and follow the
instructions on the packet carefully. Usethe exact proportions recommended toavoid damage to the machine.
How quickly the capsule platebecomes soiled will depend on the
natural oils in the coffee used. Werecommend that you clean the capsuleplate every 1 to 2 months with acleaning tablet.
Never swing from or hang anythingon the front when it is open as this
could damage the machine.
Disposal of your old machineBefore throwing an old machineaway, switch it off and disconnect it
from the power supply. Cut off the cabledirectly behind it, then cut off the plugand render it useless to prevent misuse.
The manufacturer cannot be heldliable for damage caused bynon-compliance with these Warningand Safety instructions.
Warning and Safety instructions
9
The capsule magazine can hold up to20 coffee capsules. These 20 coffeecapsules are divided between 5chambers. This means that the capsulemagazine can be filled with 5 differenttypes of coffee. These 5 different typesare programmed into the machine sothat the type required can be selectedfrom the display.
If the machine is used by variouspeople with different tastes andpreferences, you can programmespecific settings for up to fourindividual users.
There is no need to remove eachindividual spent capsule as the usedcoffee capsules drop downautomatically into a waste container.The coffee capsules can be disposedof with your normal household waste.
The size of cup can be programmed inso that the correct amount isdispensed. If you decide to use asmaller cup than the programmed cupsize, preparation can be halted at anytime by pressing the right-hand controldial.
If a double portion of coffee orespresso is required, a double portioncan be selected. The machine willthen prepare two portions one after theother.
The hot water function is ideal forpre-warming the cups.
The machine features a system lock toprevent children from operating it.
The easy-to-use programming facilityallows, amongst other things, thelanguage in the display to be changedand the water hardness to beprogrammed in.
To ensure that the flavour can developfully and be maintained for longer, themachine has an additional function forautomatically rinsing the systemwhen the machine is cold. The samefunction is used to flush coffee remainsout of the system and the spout afteruse.
The machine can be programmed toswitch to stand-by mode so it is alwaysready for operation but does notconsume unnecessary electricity. Thiscan be programmed to happenbetween 20 minutes and 2 hours aftercoffee was last dispensed. It istherefore important to set the correcttime of day.
You can also programme the machineto switch on and off at a particulartime every day.
Brief description
10

Operating sequence
The following notes should help you get to know your coffeemachine before starting to use it.
Left-hand control dialThe dial can be pressed and turned.
Pressing the dial:
– Switches the machine on and off.
Turning the dial:
– Selects a programme option or setting.
Right-hand control dialThis dial can also be pressed and turned.
Turning the dial:
– Calls up a programme option or a setting.
Pressing the dial:
– Starts and stops drink preparation.
– Selects a programme option so that it can be altered andcustomised.
– Saves a setting in memory when the machine is switchedoff.
A brief overview of the controls
11
Left-hand display
COSI
K 1 2 3 4 5 L o n G k C
The basics are shown in the left-hand display, such as
– Drink selection: Up to 5 different coffee types K, Steam Land Hot water o.
– The user profile n for up to 4 different users.
– Important maintenance programmes: Rinsing G andDescaling k.
– Selection of: Settings C.
Right-hand displayThe right-hand display is used to
– Select an espresso or long coffee.
– Show you what is taking place at that moment,e.g. heating-up.
– Prompt you to do something, e.g. Close the door.
It is also used for selecting individual settings andinformation, such as
LANGUAGE
F Y K n I I J Z
Language F, Timer m, Allocation of coffee type K, Username n, Programming I, Tally of number of coffee portionsalready dispensed I, Maintenance J and Resetting to theoriginal factory default settingsZ.
The option currently selected will be highlighted in thedisplay.
A brief overview of the controls
12

Before using for the first time
Before using the machine for the first time ensure that it iscorrectly installed and connected (see "Electricalconnection and Installation").
If the machine is being switched on for the first time, awelcome screen and some other messages will appear in theright-hand display. The welcome screen will be displayedeach time the machine is switched on until 5 drinks (includessteam) have been prepared.
To switch the machine on:
^ Press the left-hand dial.
COSI
K 1 2 3 4 5 L o n G k CThe left-hand display will light up.
The welcome screen will appear in the right-hand display:
MíeleWillkommen!
You will then be prompted to select a language:
^ Turn the right-hand dial until the language you wantappears in the display.
^ Then press the right-hand dial.
Your chosen language is now set.
Follow the messages which now appear in the right-handdisplay and you will hear the capsule magazine moving intoposition. Wait until the following appears in the right-handdisplay:
ESPRESSO
q r s t
A brief overview of the controls
13
To get the best out of your coffee machine, and toset it up for your specific requirements pleasecontinue to work through these operating
instructions.
Switching off
To switch the machine off:
^ Press the left-hand dial for approx. 2 seconds until thedisplays go dark.
If the automatic rinsing function is switched on, bothdisplays will go out when you switch off. If the machinehad been used for making coffee it will then start therinsing process. A message will appear in the right-handdisplay to let you know that this is happening. When therinsing process has finished it will switch off automatically.
A brief overview of the controls
14

It is easy to customise your machine to suit your exactrequirements. The following settings are available:
Language: German, English (GB), English (USA), French,Dutch, Italian, Spanish, Portuguese, Turkish, Swedish,Norwegian, Danish, Finish, Greek, Polish, Russian, Czechand Hungarian.
Timer
– Setting the Time of day
– Switch off after: The machine can be set to switch off aftera pre-set time. A time of between 20 minutes to 2 hourscan be set.
– Switch on at: The machine can be set to switch on at aspecific time of day.
– Switch off at: The machine can be set to switch off at aspecific time of day.
Programming
– Lighting: Brightness of the indirect lighting.
– Automatic rinsing: On, Off
– Steam system: On, Off
– Water hardness: Soft, medium, hard, very hard
– Display Contrast: Brighter to dimmer
– Display Brightness: Brighter to dimmer
INFO Number of coffee portions
Factory default Resets the machine to its factory defaultsettings.
Settings: Customising your machine
15
Selecting a language
The language should be selected before the machine is usedfor the first time so that all display text will be in your ownlanguage.
SETTINGS FK 1 2 3 4 5 L o n G k C
^ Turn the left-hand dial until you reach the "Settings" menu.
LANGUAGE
F Y K n I I J Z
The language symbol will be highlighted in the right-handdisplay.
^ Press the right-hand dial to select the languagesprogramme option.
LANGUAGE
deutsch B ~
^ Turn the right-hand dial until the language you wantappears in the display.
A tick will appear to show which language has been set.
The following languages can be selected:
German, English (GB), English (USA), French, Dutch, Italian,Spanish, Portuguese, Turkish, Swedish, Norwegian, Danish,Finish, Greek, Polish, Russian, Czech and Hungarian.
^ Press the right-hand dial to select the language you want.
The setting is saved automatically and the display will goback to the previous screen.
All display texts will now appear in the language you havejust selected.
Settings: Customising your machine
16
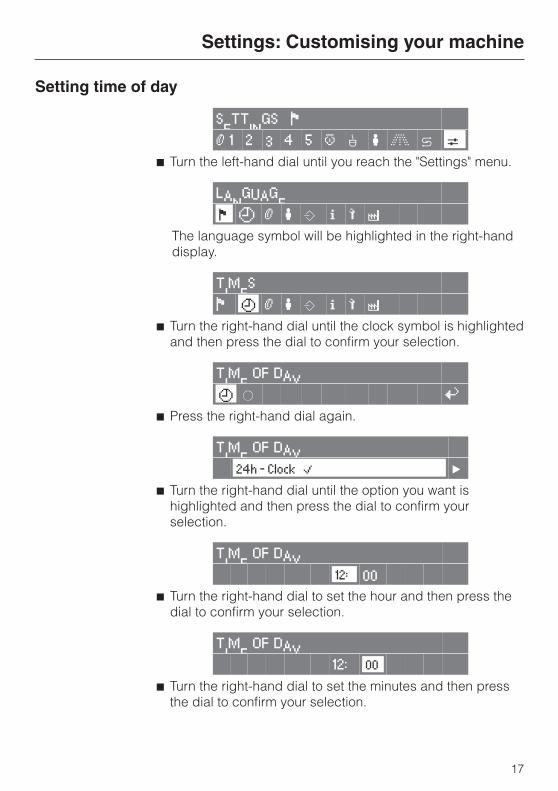
Setting time of day
SETTINGS FK 1 2 3 4 5 L o n G k C
^ Turn the left-hand dial until you reach the "Settings" menu.
LANGUAGE
F Y K n I I J Z
The language symbol will be highlighted in the right-handdisplay.
TIMES
F Y K n I I J Z
^ Turn the right-hand dial until the clock symbol is highlightedand then press the dial to confirm your selection.
TIME OF DAY
Y o A^ Press the right-hand dial again.
TIME OF DAY
24h - Clock B ~
^ Turn the right-hand dial until the option you want ishighlighted and then press the dial to confirm yourselection.
TIME OF DAY
12: 00
^ Turn the right-hand dial to set the hour and then press thedial to confirm your selection.
TIME OF DAY
12: 00
^ Turn the right-hand dial to set the minutes and then pressthe dial to confirm your selection.
Settings: Customising your machine
17
TIMES
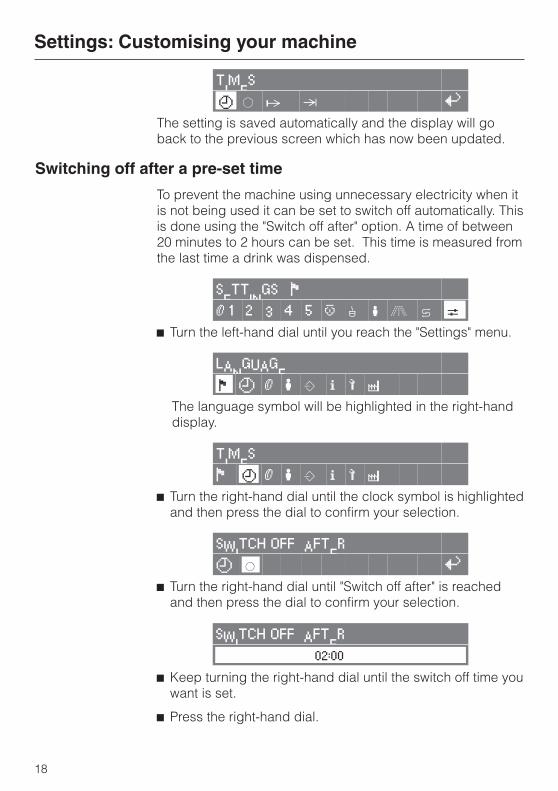
Y o f r AThe setting is saved automatically and the display will goback to the previous screen which has now been updated.
Switching off after a pre-set time
To prevent the machine using unnecessary electricity when itis not being used it can be set to switch off automatically. Thisis done using the "Switch off after" option. A time of between20 minutes to 2 hours can be set. This time is measured fromthe last time a drink was dispensed.
SETTINGS FK 1 2 3 4 5 L o n G k C
^ Turn the left-hand dial until you reach the "Settings" menu.
LANGUAGE
F Y K n I I J Z
The language symbol will be highlighted in the right-handdisplay.
TIMES
F Y K n I I J Z
^ Turn the right-hand dial until the clock symbol is highlightedand then press the dial to confirm your selection.
SWITCH OFF AFTER
Y o A^ Turn the right-hand dial until "Switch off after" is reached
and then press the dial to confirm your selection.
SWITCH OFF AFTER
02:00
^ Keep turning the right-hand dial until the switch off time youwant is set.
^ Press the right-hand dial.
Settings: Customising your machine
18
The setting is saved automatically and the display will goback to the previous screen.
If rinsing is set to "On" and machine had been used formaking drinks, it will automatically carry out a brief rinsebefore it switches itself off.
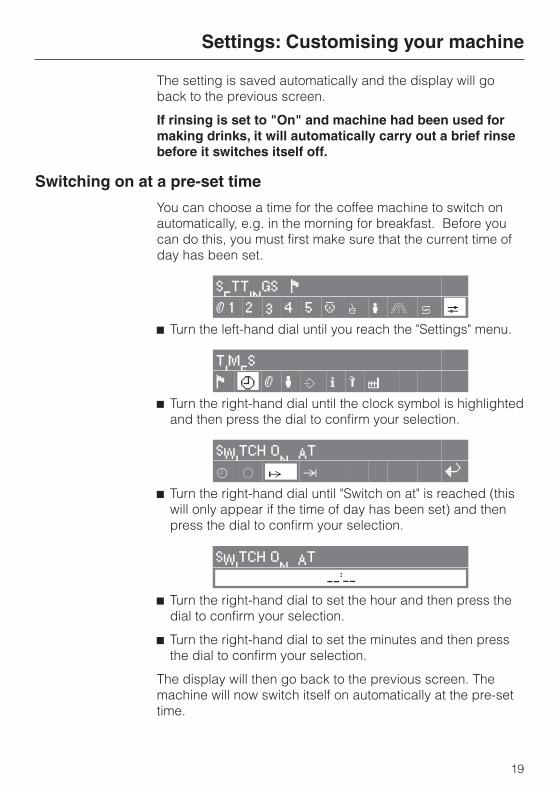
Switching on at a pre-set time
You can choose a time for the coffee machine to switch onautomatically, e.g. in the morning for breakfast. Before youcan do this, you must first make sure that the current time ofday has been set.
SETTINGS FK 1 2 3 4 5 L o n G k C
^ Turn the left-hand dial until you reach the "Settings" menu.
TIMES
F Y K n I I J Z
^ Turn the right-hand dial until the clock symbol is highlightedand then press the dial to confirm your selection.
SWITCH ON AT
m o f r A^ Turn the right-hand dial until "Switch on at" is reached (this
will only appear if the time of day has been set) and thenpress the dial to confirm your selection.
SWITCH ON AT__:__
^ Turn the right-hand dial to set the hour and then press thedial to confirm your selection.
^ Turn the right-hand dial to set the minutes and then pressthe dial to confirm your selection.
The display will then go back to the previous screen. Themachine will now switch itself on automatically at the pre-settime.
Settings: Customising your machine
19
If rinsing is set to "On", the machine will automaticallycarry out a brief rinse when it switches itself on.
If the machine has switched itself on automatically 3 timesand no drinks, hot water or steam have been displensedthe machine will not switch itself on again automatically!The programmed times will, however, remain in memoryand can be reactivated after manually switching themachine on again. This prevents the machine switchingitself on unnecessarily, for example whilst you are away onholiday, and you have not cancelled the automaticswitching on procedure.
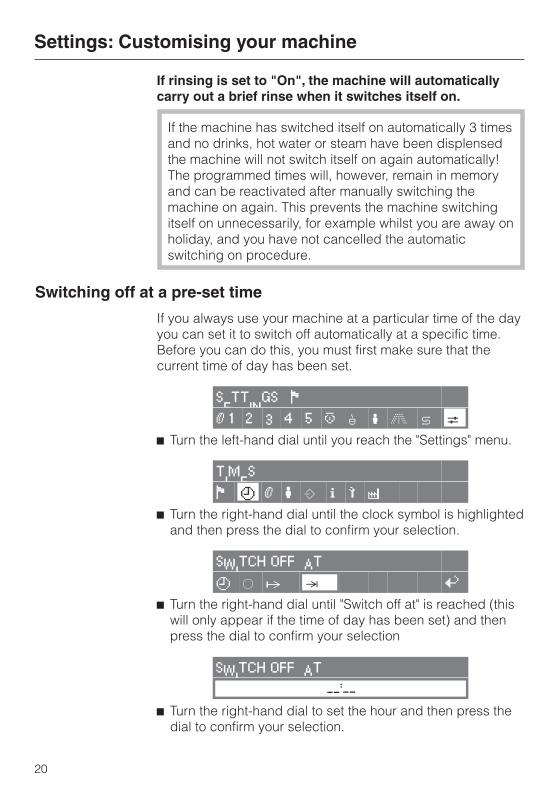
Switching off at a pre-set time
If you always use your machine at a particular time of the dayyou can set it to switch off automatically at a specific time.Before you can do this, you must first make sure that thecurrent time of day has been set.
SETTINGS FK 1 2 3 4 5 L o n G k C
^ Turn the left-hand dial until you reach the "Settings" menu.
TIMES
F Y K n I I J Z
^ Turn the right-hand dial until the clock symbol is highlightedand then press the dial to confirm your selection.
SWITCH OFF AT
Y o f r A^ Turn the right-hand dial until "Switch off at" is reached (this
will only appear if the time of day has been set) and thenpress the dial to confirm your selection
SWITCH OFF AT__:__
^ Turn the right-hand dial to set the hour and then press thedial to confirm your selection.
Settings: Customising your machine
20
^ Turn the right-hand dial to set the minutes and then pressthe dial to confirm your selection.
The display will then go back to the previous screen. Themachine will now switch itself off automatically at the pre-settime.
If rinsing is set to "On" and machine had been used formaking drinks, it will automatically carry out a brief rinsebefore it switches itself off.
Deleting a set switching on or switching off time
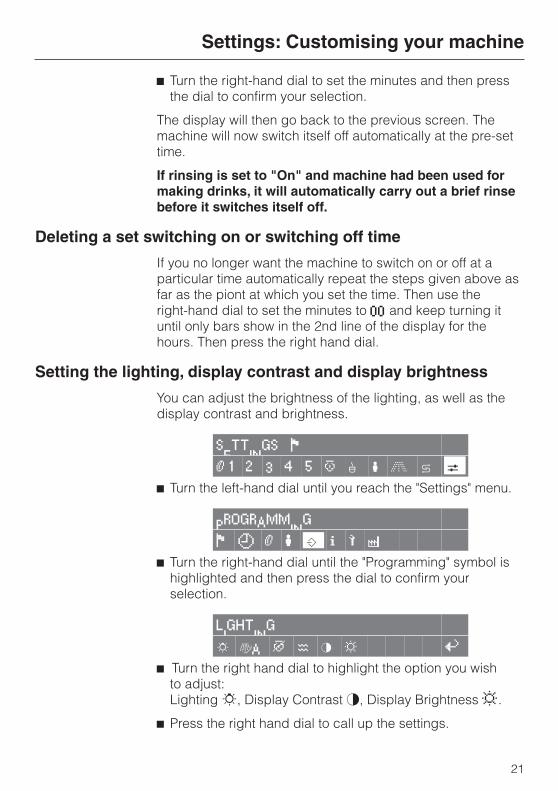
If you no longer want the machine to switch on or off at aparticular time automatically repeat the steps given above asfar as the piont at which you set the time. Then use theright-hand dial to set the minutes to 00 and keep turning ituntil only bars show in the 2nd line of the display for thehours. Then press the right hand dial.
Setting the lighting, display contrast and display brightness
You can adjust the brightness of the lighting, as well as thedisplay contrast and brightness.
SETTINGS FK 1 2 3 4 5 L o n G k C
^ Turn the left-hand dial until you reach the "Settings" menu.
PROGRAMMING
F Y K n I I J Z
^ Turn the right-hand dial until the "Programming" symbol ishighlighted and then press the dial to confirm yourselection.
LIGHTING
n IA M T U N A^ Turn the right hand dial to highlight the option you wish
to adjust:Lighting n, Display ContrastU, Display Brightness N.
^ Press the right hand dial to call up the settings.
Settings: Customising your machine
21
^ A bar will appear. Turning the right-hand dialanti-clockwise will make the bar smaller and decrease thelighting, contrast or brightness.Turning the right-hand dial clockwise will make the barbigger and increase the lighting, contrast or brightness.
^ Press the right-hand dial to save your setting.
The previous display menu will now appear and the Asymbol for "Back" will be highlighted in the display.
^ Press the right-hand dial again to reach the exit menu ofthis display.
PROGRAMMING
F Y K n I I J Z
Automatic rinsing
To remove any coffee grounds from the system, the waterpiping must be rinsed through before the first drink of the dayis prepared. If programme option "Automatic rinsing" is set to"On", rinsing will start automatically when the machine isswitched on and cold. This will also pre-heat the systembecause hot water is used for the rinse process. A messagewill appear in the display to let you know what is happening.The machine will also run an automatic rinse before itswitches off, if it has been used to prepare a drink.
To prevent water from running into the drip trayalways place an empty cup under the spoutsbefore making the first drink.
SETTINGS FK 1 2 3 4 5 L o n G k C
^ Turn the left-hand dial until you reach the "Settings" menu.
PROGRAMMING
F Y K n I I J Z
^ Turn the right-hand dial until the "Programming" symbol ishighlighted and then press the dial to confirm yourselection.
Settings: Customising your machine
22
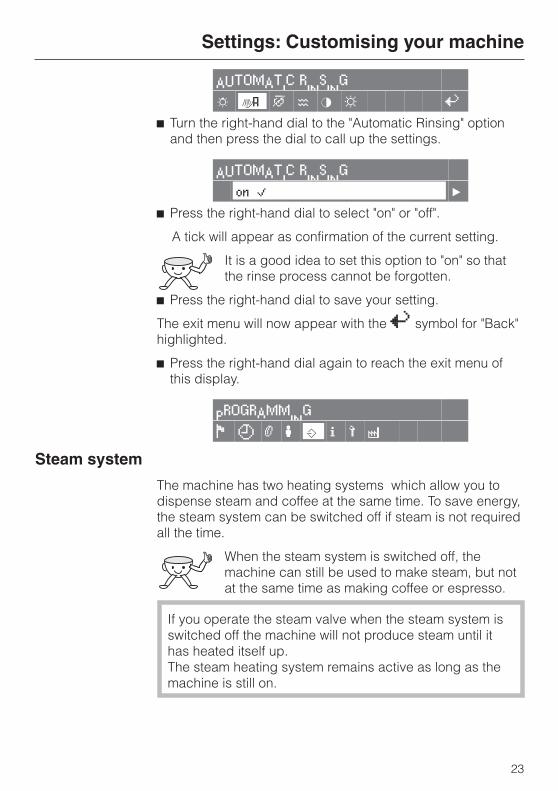
AUTOMATIC RINSING
n IA M T U N A^ Turn the right-hand dial to the "Automatic Rinsing" option
and then press the dial to call up the settings.
AUTOMATIC RINSING
on B ~
^ Press the right-hand dial to select "on" or "off".
A tick will appear as confirmation of the current setting.
It is a good idea to set this option to "on" so thatthe rinse process cannot be forgotten.
^ Press the right-hand dial to save your setting.
The exit menu will now appear with the A symbol for "Back"highlighted.
^ Press the right-hand dial again to reach the exit menu ofthis display.
PROGRAMMING
F Y K n I I J Z
Steam system
The machine has two heating systems which allow you todispense steam and coffee at the same time. To save energy,the steam system can be switched off if steam is not requiredall the time.
When the steam system is switched off, themachine can still be used to make steam, but notat the same time as making coffee or espresso.
If you operate the steam valve when the steam system isswitched off the machine will not produce steam until ithas heated itself up.The steam heating system remains active as long as themachine is still on.
Settings: Customising your machine
23
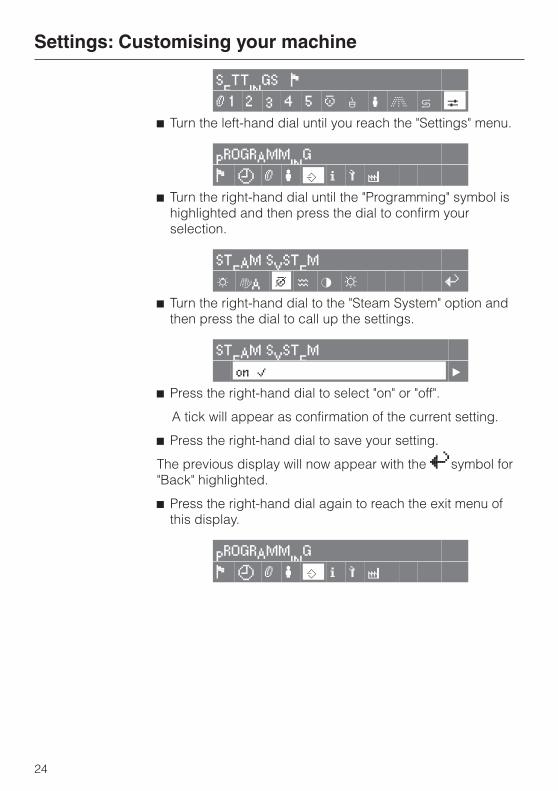
SETTINGS FK 1 2 3 4 5 L o n G k C
^ Turn the left-hand dial until you reach the "Settings" menu.
PROGRAMMING
F Y K n I I J Z
^ Turn the right-hand dial until the "Programming" symbol ishighlighted and then press the dial to confirm yourselection.
STEAM SYSTEM
n IA M T U N A^ Turn the right-hand dial to the "Steam System" option and
then press the dial to call up the settings.
STEAM SYSTEM
on B ~
^ Press the right-hand dial to select "on" or "off".
A tick will appear as confirmation of the current setting.
^ Press the right-hand dial to save your setting.
The previous display will now appear with the Asymbol for"Back" highlighted.
^ Press the right-hand dial again to reach the exit menu ofthis display.
PROGRAMMING
F Y K n I I J Z
Settings: Customising your machine
24
Setting the water hardness
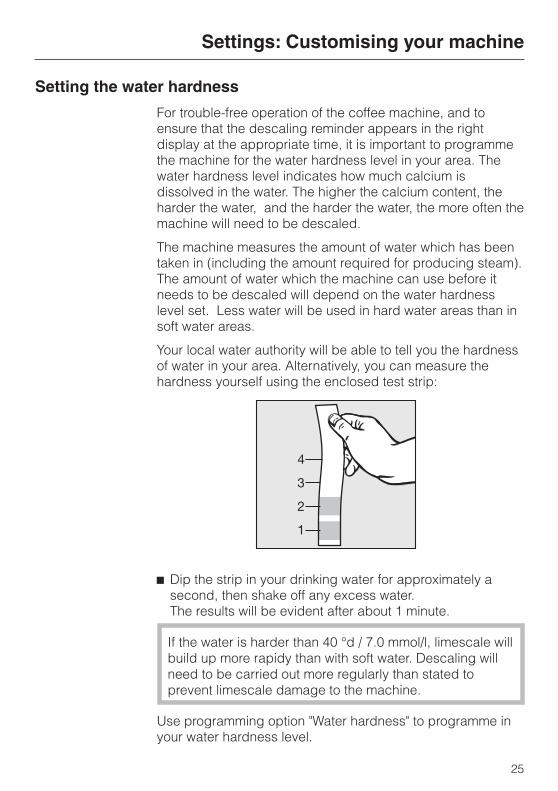
For trouble-free operation of the coffee machine, and toensure that the descaling reminder appears in the rightdisplay at the appropriate time, it is important to programmethe machine for the water hardness level in your area. Thewater hardness level indicates how much calcium isdissolved in the water. The higher the calcium content, theharder the water, and the harder the water, the more often themachine will need to be descaled.
The machine measures the amount of water which has beentaken in (including the amount required for producing steam).The amount of water which the machine can use before itneeds to be descaled will depend on the water hardnesslevel set. Less water will be used in hard water areas than insoft water areas.
Your local water authority will be able to tell you the hardnessof water in your area. Alternatively, you can measure thehardness yourself using the enclosed test strip:
^ Dip the strip in your drinking water for approximately asecond, then shake off any excess water.The results will be evident after about 1 minute.
If the water is harder than 40 °d / 7.0 mmol/l, limescale willbuild up more rapidy than with soft water. Descaling willneed to be carried out more regularly than stated toprevent limescale damage to the machine.
Use programming option "Water hardness" to programme inyour water hardness level.
Settings: Customising your machine
25
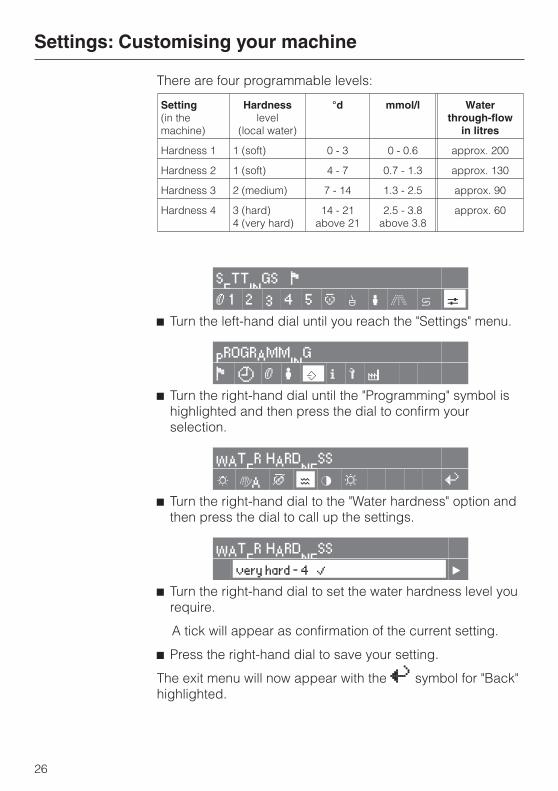
There are four programmable levels:
Setting(in themachine)
Hardnesslevel
(local water)
°d mmol/l Waterthrough-flow
in litres
Hardness 1 1 (soft) 0 - 3 0 - 0.6 approx. 200
Hardness 2 1 (soft) 4 - 7 0.7 - 1.3 approx. 130
Hardness 3 2 (medium) 7 - 14 1.3 - 2.5 approx. 90
Hardness 4 3 (hard)4 (very hard)
14 - 21above 21
2.5 - 3.8above 3.8
approx. 60
SETTINGS FK 1 2 3 4 5 L o n G k C
^ Turn the left-hand dial until you reach the "Settings" menu.
PROGRAMMING
F Y K n I I J Z
^ Turn the right-hand dial until the "Programming" symbol ishighlighted and then press the dial to confirm yourselection.
WATER HARDNESS
n IA M T U N A^ Turn the right-hand dial to the "Water hardness" option and
then press the dial to call up the settings.
WATER HARDNESS
very hard - 4 B ~
^ Turn the right-hand dial to set the water hardness level yourequire.
A tick will appear as confirmation of the current setting.
^ Press the right-hand dial to save your setting.
The exit menu will now appear with the A symbol for "Back"highlighted.
Settings: Customising your machine
26
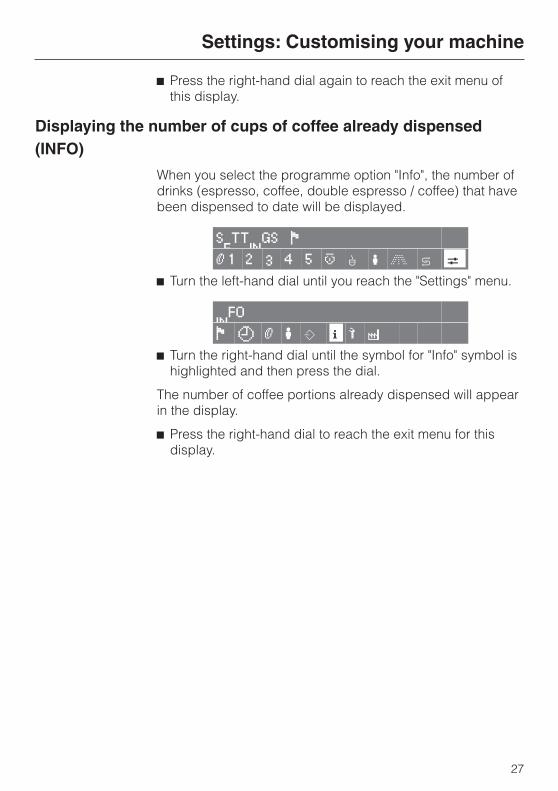
^ Press the right-hand dial again to reach the exit menu ofthis display.
Displaying the number of cups of coffee already dispensed(INFO)
When you select the programme option "Info", the number ofdrinks (espresso, coffee, double espresso / coffee) that havebeen dispensed to date will be displayed.
SETTINGS FK 1 2 3 4 5 L o n G k C
^ Turn the left-hand dial until you reach the "Settings" menu.
INFO
F Y K n I I J Z
^ Turn the right-hand dial until the symbol for "Info" symbol ishighlighted and then press the dial.
The number of coffee portions already dispensed will appearin the display.
^ Press the right-hand dial to reach the exit menu for thisdisplay.
Settings: Customising your machine
27
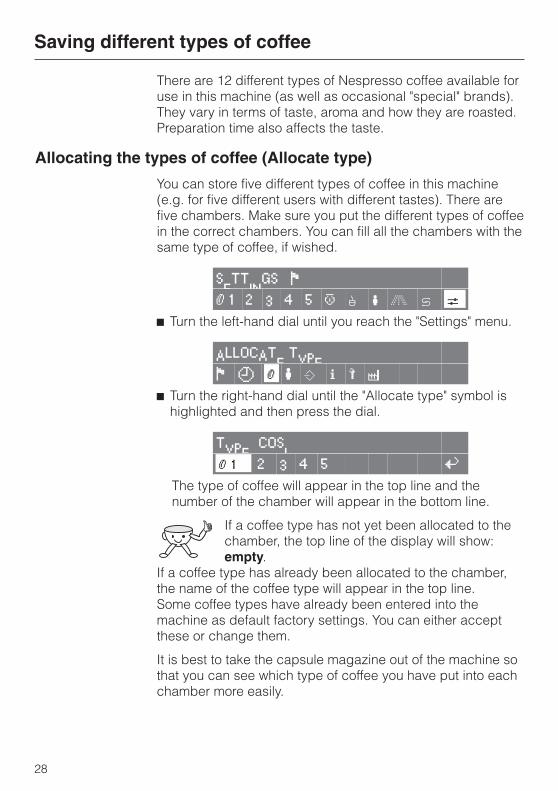
There are 12 different types of Nespresso coffee available foruse in this machine (as well as occasional "special" brands).They vary in terms of taste, aroma and how they are roasted.Preparation time also affects the taste.
Allocating the types of coffee (Allocate type)
You can store five different types of coffee in this machine(e.g. for five different users with different tastes). There arefive chambers. Make sure you put the different types of coffeein the correct chambers. You can fill all the chambers with thesame type of coffee, if wished.
SETTINGS FK 1 2 3 4 5 L o n G k C
^ Turn the left-hand dial until you reach the "Settings" menu.
ALLOCATE TYPE
F Y K n I I J Z
^ Turn the right-hand dial until the "Allocate type" symbol ishighlighted and then press the dial.
TYPE COSI
K 1 2 3 4 5 AThe type of coffee will appear in the top line and thenumber of the chamber will appear in the bottom line.
If a coffee type has not yet been allocated to thechamber, the top line of the display will show:empty.
If a coffee type has already been allocated to the chamber,the name of the coffee type will appear in the top line.Some coffee types have already been entered into themachine as default factory settings. You can either acceptthese or change them.
It is best to take the capsule magazine out of the machine sothat you can see which type of coffee you have put into eachchamber more easily.
Saving different types of coffee
28

TYPE ARPEGGIO
K 1 2 3 4 5 A^ Turn the dial to the chamber you want and then press it to
confirm your selection.
Allocating different types
CHAMBER 5
ARPEGGIO B ~
^ Turn the dial to a different type and press it to allocate thetype chosen to this chamber.
Entering a new type
CHAMBER 5
save as ~
^ Turn the right-hand dial to "Save as" if no type has yet beenentered or if you want to enter a type which has not yetbeen saved (or if you want to enter your own particularname for the type).
^ Press the right-hand dial.
CHAMBER 5 ...........
A B C D E F G H I ~
The alphabet will appear. When you turn the dial further tothe right, the remainder of the alphabet will appear,followed by the numbers 0 to 9.
To enter text:
^ Turn the right-hand dial to the first character and then pressit to confirm your selection.
The character selected will appear in the top line.
^ Now select the next character and continue until you haveentered the name you want.
Saving different types of coffee
29
If you make a mistake, turn the dial until "delete"appears in the display. Then press the dial andthe last character you entered will be deleted.
Then turn the dial back to the left to reach the alphabet againand complete your entry.
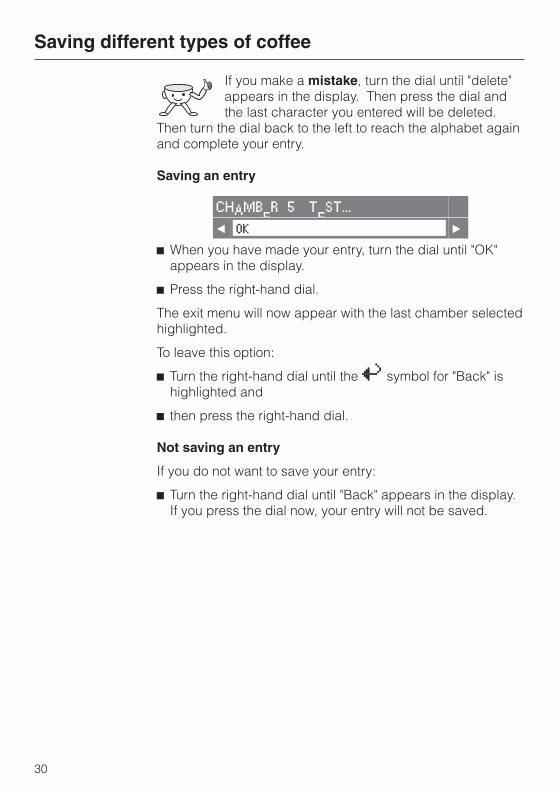
Saving an entry
CHAMBER 5 TEST...
+ OK ~
^ When you have made your entry, turn the dial until "OK"appears in the display.
^ Press the right-hand dial.
The exit menu will now appear with the last chamber selectedhighlighted.
To leave this option:
^ Turn the right-hand dial until the A symbol for "Back" ishighlighted and
^ then press the right-hand dial.
Not saving an entry
If you do not want to save your entry:
^ Turn the right-hand dial until "Back" appears in the display.If you press the dial now, your entry will not be saved.
Saving different types of coffee
30
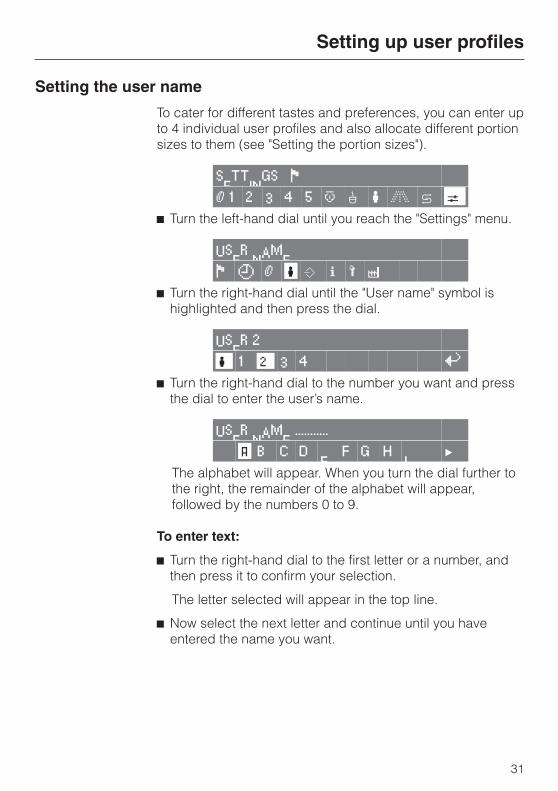
Setting the user name
To cater for different tastes and preferences, you can enter upto 4 individual user profiles and also allocate different portionsizes to them (see "Setting the portion sizes").
SETTINGS FK 1 2 3 4 5 L o n G k C
^ Turn the left-hand dial until you reach the "Settings" menu.
USER NAME
F Y K n I I J Z
^ Turn the right-hand dial until the "User name" symbol ishighlighted and then press the dial.
USER 2
n 1 2 3 4 A^ Turn the right-hand dial to the number you want and press
the dial to enter the user’s name.
USER NAME ...........
A B C D E F G H I ~
The alphabet will appear. When you turn the dial further tothe right, the remainder of the alphabet will appear,followed by the numbers 0 to 9.
To enter text:
^ Turn the right-hand dial to the first letter or a number, andthen press it to confirm your selection.
The letter selected will appear in the top line.
^ Now select the next letter and continue until you haveentered the name you want.
Setting up user profiles
31
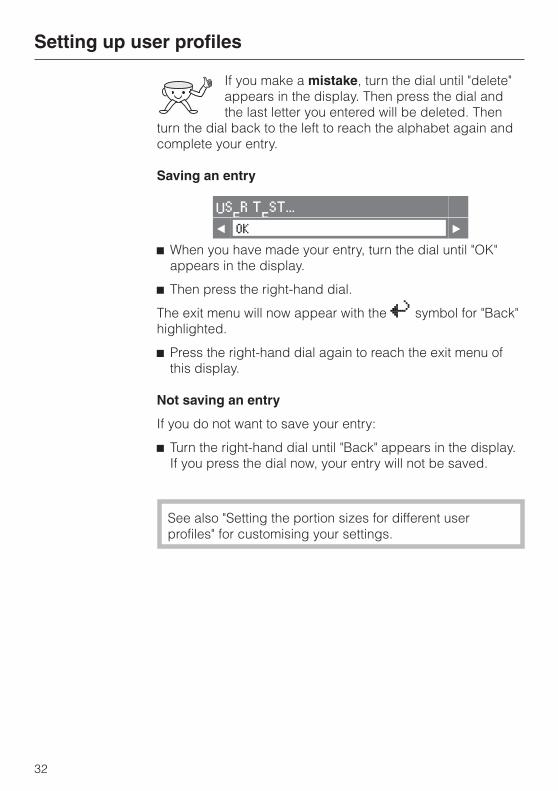
If you make a mistake, turn the dial until "delete"appears in the display. Then press the dial andthe last letter you entered will be deleted. Then
turn the dial back to the left to reach the alphabet again andcomplete your entry.
Saving an entry
USER TEST...
+ OK ~
^ When you have made your entry, turn the dial until "OK"appears in the display.
^ Then press the right-hand dial.
The exit menu will now appear with the A symbol for "Back"highlighted.
^ Press the right-hand dial again to reach the exit menu ofthis display.
Not saving an entry
If you do not want to save your entry:
^ Turn the right-hand dial until "Back" appears in the display.If you press the dial now, your entry will not be saved.
See also "Setting the portion sizes for different userprofiles" for customising your settings.
Setting up user profiles
32

Please clean the machine thoroughly before filling thewater container and the capsule magazine (see "Cleaningand care").
Filling the water tank
The quality of the water plays an important part inthe overall quality of the coffee. The watercontainer should therefore be emptied and filled
with fresh water every day.
Hot water and other liquids could damage the machine.Use cold, clean drinking water and fill the machine everyday. Do not on any account use mineral water. Mineralwater will cause serious limescale deposits to build up inyour machine and damage it.
^ Open the front of the machine.
^ Lift the water container up and pull it forwards to remove it.
Filling the machine with water and coffee capsules
33
^ Fill the water container with cold, clean drinking water up tothe "Max." level.
A valve at the front of the water container will ensure thatwater cannot escape.
^ Push the water container fully back into the machine.
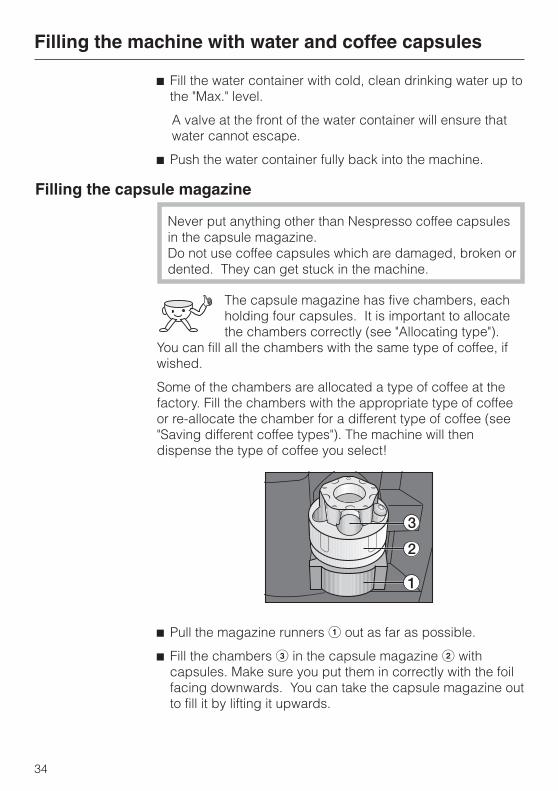
Filling the capsule magazine
Never put anything other than Nespresso coffee capsulesin the capsule magazine.Do not use coffee capsules which are damaged, broken ordented. They can get stuck in the machine.
The capsule magazine has five chambers, eachholding four capsules. It is important to allocatethe chambers correctly (see "Allocating type").
You can fill all the chambers with the same type of coffee, ifwished.
Some of the chambers are allocated a type of coffee at thefactory. Fill the chambers with the appropriate type of coffeeor re-allocate the chamber for a different type of coffee (see"Saving different coffee types"). The machine will thendispense the type of coffee you select!
^ Pull the magazine runners a out as far as possible.
^ Fill the chambers c in the capsule magazine b withcapsules. Make sure you put them in correctly with the foilfacing downwards. You can take the capsule magazine outto fill it by lifting it upwards.
Filling the machine with water and coffee capsules
34
Please note that the individual capsules sit loosely in thecapsule magazine to prevent them from becomingjammed.
^ If you have removed the capsule magazine, place it ontothe magazine runners before putting it back into themachine. You do not have to position it in a particular way,as the machine will automatically guide it into position.
^ Push the magazine runners fully back into the machine.
^ Close the front of the machine.
The machine will now align the capsule magazine. You willbe able to hear this happening.
Taking capsules out of the capsule magazine
If you want to change the capsules in the magazine:
^ Pull the magazine runners out.
^ Pull the capsule magazine upwards to remove it.
^ Push upwards on the ring at the base of the magazine andthen remove the capsules.
Filling the machine with water and coffee capsules
35
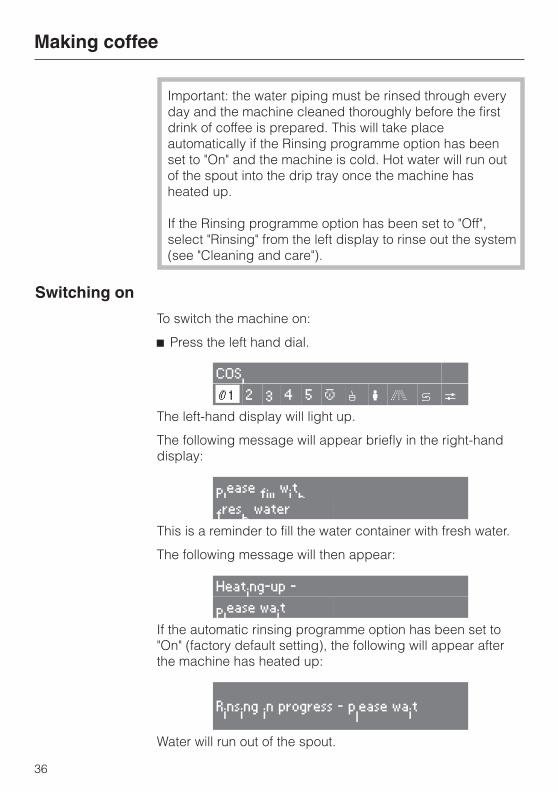
Important: the water piping must be rinsed through everyday and the machine cleaned thoroughly before the firstdrink of coffee is prepared. This will take placeautomatically if the Rinsing programme option has beenset to "On" and the machine is cold. Hot water will run outof the spout into the drip tray once the machine hasheated up.
If the Rinsing programme option has been set to "Off",select "Rinsing" from the left display to rinse out the system(see "Cleaning and care").
Switching on
To switch the machine on:
^ Press the left hand dial.
COSI
K 1 2 3 4 5 L o n G k CThe left-hand display will light up.
The following message will appear briefly in the right-handdisplay:
Please fill with
fresh water
This is a reminder to fill the water container with fresh water.
The following message will then appear:
Heating-up -
Please wait
If the automatic rinsing programme option has been set to"On" (factory default setting), the following will appear afterthe machine has heated up:
Rinsing in progress - please wait
Water will run out of the spout.
Making coffee
36

You will hear the capsule magazine moving into position.
The right-hand display will then show:
ESPRESSO
q r s t
Before preparing the first drink
Filling the system with waterThe machine is emptied completely before it leaves thefactory. You must allow water to be pumped through thesystem before the first drink of coffee or hot water isprepared.
HOT WATER
K 1 2 3 4 5 L o n G k C^ Turn the left hand dial until you reach the "Hot water" menu
option.
^ Place a cup under the steam valve.
^ Press the right-hand dial.
^ Run some hot water into the cup.
^ Press the right-hand dial again to switch off the water.
^ Press the steam valve down, and push it up again as soonas steam begins to come out of the nozzle.
The system is now filled with water, and the machine is readyto use.
Making coffee
37
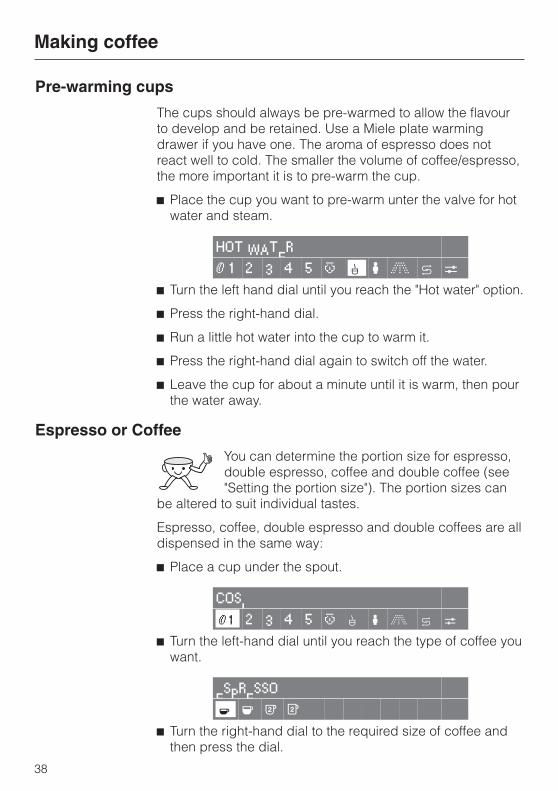
Pre-warming cups
The cups should always be pre-warmed to allow the flavourto develop and be retained. Use a Miele plate warmingdrawer if you have one. The aroma of espresso does notreact well to cold. The smaller the volume of coffee/espresso,the more important it is to pre-warm the cup.
^ Place the cup you want to pre-warm unter the valve for hotwater and steam.
HOT WATER
K 1 2 3 4 5 L o n G k C^ Turn the left hand dial until you reach the "Hot water" option.
^ Press the right-hand dial.
^ Run a little hot water into the cup to warm it.
^ Press the right-hand dial again to switch off the water.
^ Leave the cup for about a minute until it is warm, then pourthe water away.
Espresso or Coffee
You can determine the portion size for espresso,double espresso, coffee and double coffee (see"Setting the portion size"). The portion sizes can
be altered to suit individual tastes.
Espresso, coffee, double espresso and double coffees are alldispensed in the same way:
^ Place a cup under the spout.
COSI
K 1 2 3 4 5 L o n G k C^ Turn the left-hand dial until you reach the type of coffee you
want.
ESPRESSO
q r s t
^ Turn the right-hand dial to the required size of coffee andthen press the dial.
Making coffee
38
The drink you want will then run out of the spout.
If you select a double espresso or coffee, two portions will bedispensed one after the other.
Cancelling preparation
^ Press the right-hand dial.
Preparation will be halted.
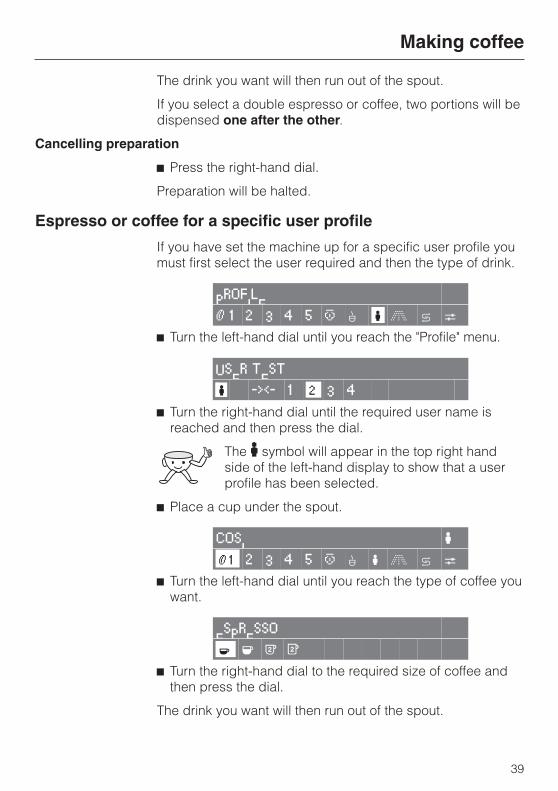
Espresso or coffee for a specific user profile
If you have set the machine up for a specific user profile youmust first select the user required and then the type of drink.
PROFILE
K 1 2 3 4 5 L o n G k C^ Turn the left-hand dial until you reach the "Profile" menu.
USER TEST
n -><- 1 2 3 4
^ Turn the right-hand dial until the required user name isreached and then press the dial.
The n symbol will appear in the top right handside of the left-hand display to show that a userprofile has been selected.
^ Place a cup under the spout.
COSI n
K 1 2 3 4 5 L o n G k C^ Turn the left-hand dial until you reach the type of coffee you
want.
ESPRESSO
q r s t
^ Turn the right-hand dial to the required size of coffee andthen press the dial.
The drink you want will then run out of the spout.
Making coffee
39

Cancelling preparation
^ Press the right-hand dial.
Preparation will be halted.
Cappuccino
This machine comes with a milk frother (cappuccinatore).With a little practice you will soon be able to makecappuccino like the professionals.
Before using the milk frother for the first time, make sureyou have cleaned it out properly. This is best done in thedishwasher (see "Cleaning and Care").
The milk frother must always be assembled correctly with diala above the handle and the spout for the froth on the side b.
^ Turning the milk frother dial controls the amount of steamreleased. Turn it towards (1) for more heat and less frothand towards (2) for more froth.
Milk can be frothed and dispensed straight into a cup, orfrothed in the jug first and then poured manually into the cup.
Frothing milk into the jug gives you warmer frothwith greater volume.
Making coffee
40

^ Turn the froth spout to the relevant symbol for the way youwant to create the froth (Cup 1, Jug 2).
Froth is best made from cold, skimmed orsemi-skimmed milk. It is very important to warmthe cup before pouring in the froth. See
"Pre-warming cups" for instructions!
Dispensing froth directly into a cup
^ Fill the milk frother a up to the top mark with cold milk, fitthe lid, and place it in position on the drip tray.
^ Place a pre-warmed cup b under the coffee spout.
^ Turn the froth spout towards the cup symbol so that thefrothed milk will be directed into the cup.
^ Turn the left-hand dial until you reach the type of coffee youwant.
^ Turn the right-hand dial to select the drink size.
^ Press the right-hand dial.
Espresso or coffee will run out of the spout.
Making coffee
41
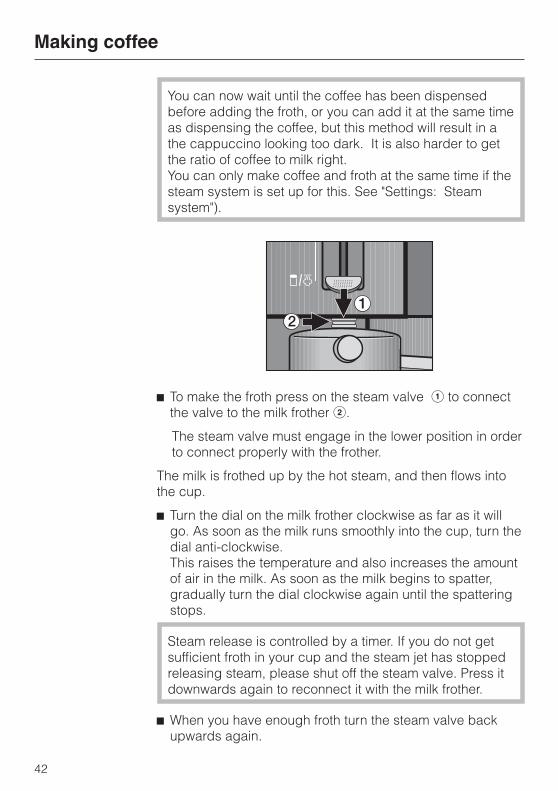
You can now wait until the coffee has been dispensedbefore adding the froth, or you can add it at the same timeas dispensing the coffee, but this method will result in athe cappuccino looking too dark. It is also harder to getthe ratio of coffee to milk right.You can only make coffee and froth at the same time if thesteam system is set up for this. See "Settings: Steamsystem").
^ To make the froth press on the steam valve a to connectthe valve to the milk frother b.
The steam valve must engage in the lower position in orderto connect properly with the frother.
The milk is frothed up by the hot steam, and then flows intothe cup.
^ Turn the dial on the milk frother clockwise as far as it willgo. As soon as the milk runs smoothly into the cup, turn thedial anti-clockwise.This raises the temperature and also increases the amountof air in the milk. As soon as the milk begins to spatter,gradually turn the dial clockwise again until the spatteringstops.
Steam release is controlled by a timer. If you do not getsufficient froth in your cup and the steam jet has stoppedreleasing steam, please shut off the steam valve. Press itdownwards again to reconnect it with the milk frother.
^ When you have enough froth turn the steam valve backupwards again.
Making coffee
42
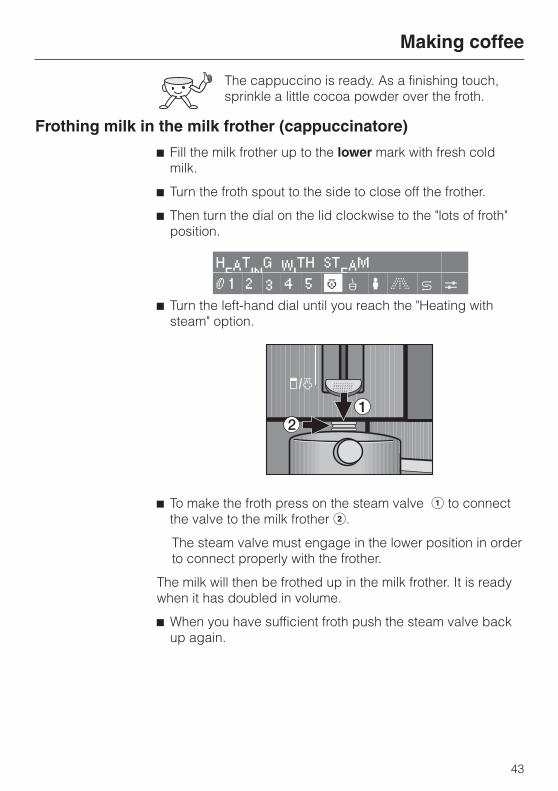
The cappuccino is ready. As a finishing touch,sprinkle a little cocoa powder over the froth.
Frothing milk in the milk frother (cappuccinatore)
^ Fill the milk frother up to the lower mark with fresh coldmilk.
^ Turn the froth spout to the side to close off the frother.
^ Then turn the dial on the lid clockwise to the "lots of froth"position.
HEATING WITH STEAM
K 1 2 3 4 5 L o n G k C^ Turn the left-hand dial until you reach the "Heating with
steam" option.
^ To make the froth press on the steam valve a to connectthe valve to the milk frother b.
The steam valve must engage in the lower position in orderto connect properly with the frother.
The milk will then be frothed up in the milk frother. It is readywhen it has doubled in volume.
^ When you have sufficient froth push the steam valve backup again.
Making coffee
43
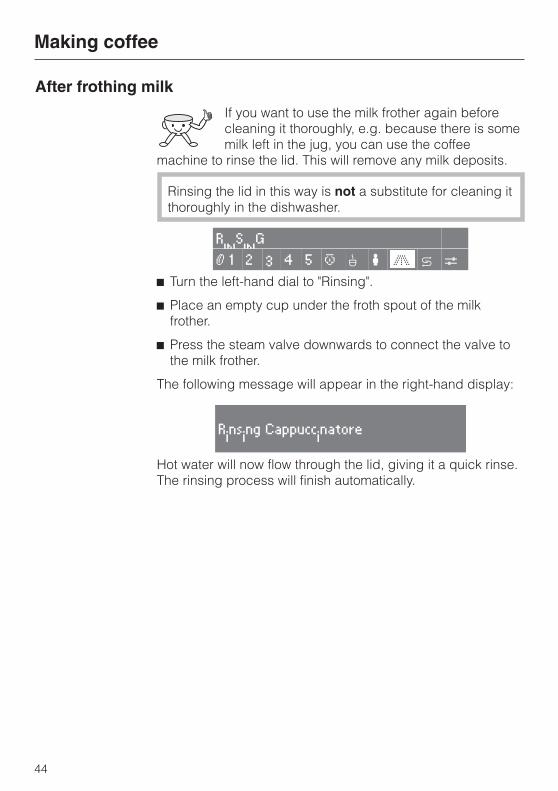
After frothing milk
If you want to use the milk frother again beforecleaning it thoroughly, e.g. because there is somemilk left in the jug, you can use the coffee
machine to rinse the lid. This will remove any milk deposits.
Rinsing the lid in this way is not a substitute for cleaning itthoroughly in the dishwasher.
RINSING
K 1 2 3 4 5 L o n G k C^ Turn the left-hand dial to "Rinsing".
^ Place an empty cup under the froth spout of the milkfrother.
^ Press the steam valve downwards to connect the valve tothe milk frother.
The following message will appear in the right-hand display:
Rinsing Cappuccinatore
Hot water will now flow through the lid, giving it a quick rinse.The rinsing process will finish automatically.
Making coffee
44
After use
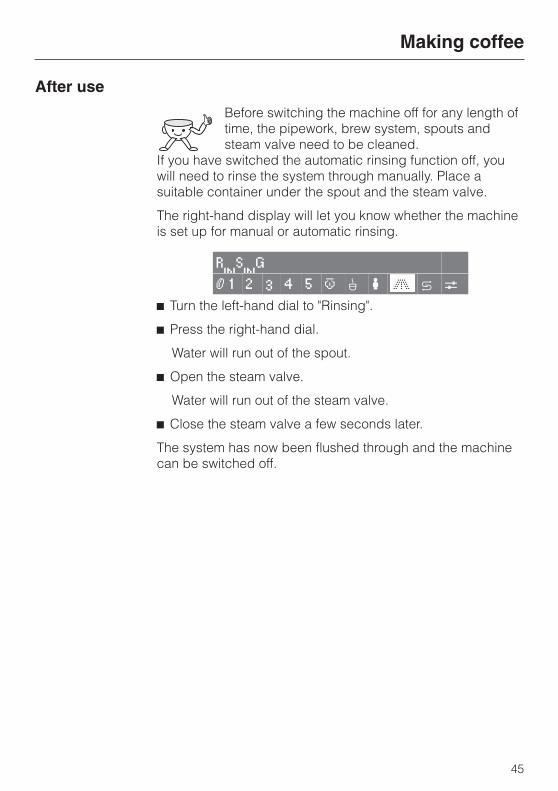
Before switching the machine off for any length oftime, the pipework, brew system, spouts andsteam valve need to be cleaned.
If you have switched the automatic rinsing function off, youwill need to rinse the system through manually. Place asuitable container under the spout and the steam valve.
The right-hand display will let you know whether the machineis set up for manual or automatic rinsing.
RINSING
K 1 2 3 4 5 L o n G k C^ Turn the left-hand dial to "Rinsing".
^ Press the right-hand dial.
Water will run out of the spout.
^ Open the steam valve.
Water will run out of the steam valve.
^ Close the steam valve a few seconds later.
The system has now been flushed through and the machinecan be switched off.
Making coffee
45
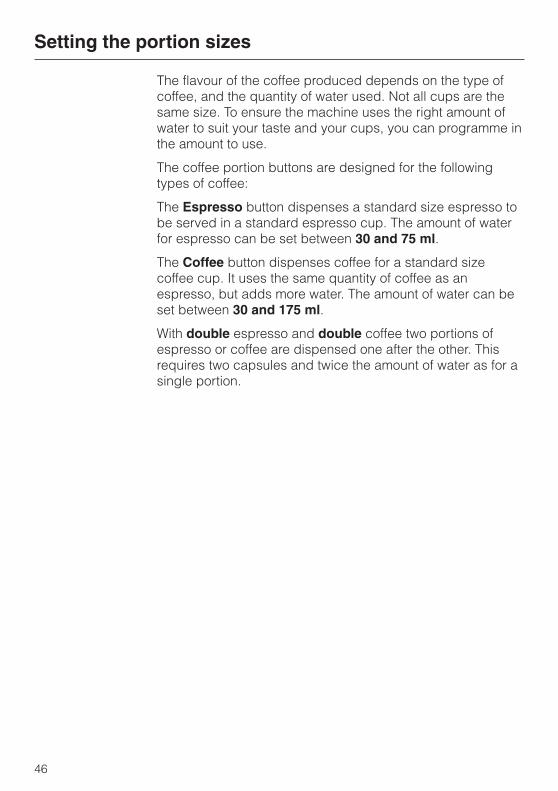
The flavour of the coffee produced depends on the type ofcoffee, and the quantity of water used. Not all cups are thesame size. To ensure the machine uses the right amount ofwater to suit your taste and your cups, you can programme inthe amount to use.
The coffee portion buttons are designed for the followingtypes of coffee:
The Espresso button dispenses a standard size espresso tobe served in a standard espresso cup. The amount of waterfor espresso can be set between 30 and 75 ml.
The Coffee button dispenses coffee for a standard sizecoffee cup. It uses the same quantity of coffee as anespresso, but adds more water. The amount of water can beset between 30 and 175 ml.
With double espresso and double coffee two portions ofespresso or coffee are dispensed one after the other. Thisrequires two capsules and twice the amount of water as for asingle portion.
Setting the portion sizes
46
Portion size for the standard profile
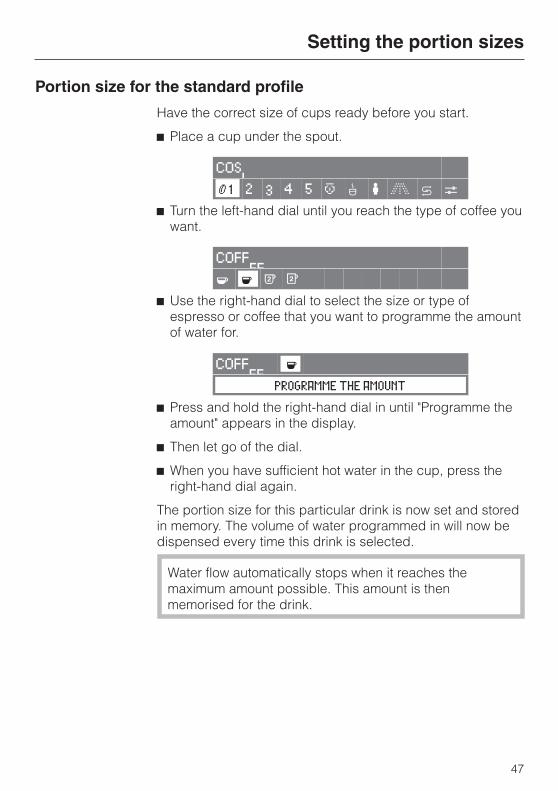
Have the correct size of cups ready before you start.
^ Place a cup under the spout.
COSI
K 1 2 3 4 5 L o n G k C^ Turn the left-hand dial until you reach the type of coffee you
want.
COFFEE
q r s t
^ Use the right-hand dial to select the size or type ofespresso or coffee that you want to programme the amountof water for.
COFFEE r
PROGRAMME THE AMOUNT
^ Press and hold the right-hand dial in until "Programme theamount" appears in the display.
^ Then let go of the dial.
^ When you have sufficient hot water in the cup, press theright-hand dial again.
The portion size for this particular drink is now set and storedin memory. The volume of water programmed in will now bedispensed every time this drink is selected.
Water flow automatically stops when it reaches themaximum amount possible. This amount is thenmemorised for the drink.
Setting the portion sizes
47
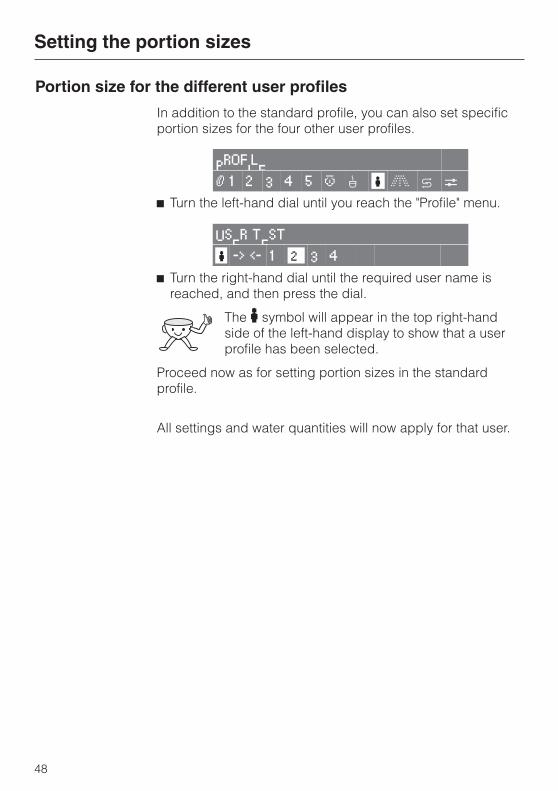
Portion size for the different user profiles
In addition to the standard profile, you can also set specificportion sizes for the four other user profiles.
PROFILE
K 1 2 3 4 5 L o n G k C^ Turn the left-hand dial until you reach the "Profile" menu.
USER TEST
n -> <- 1 2 3 4
^ Turn the right-hand dial until the required user name isreached, and then press the dial.
The n symbol will appear in the top right-handside of the left-hand display to show that a userprofile has been selected.
Proceed now as for setting portion sizes in the standardprofile.
All settings and water quantities will now apply for that user.
Setting the portion sizes
48
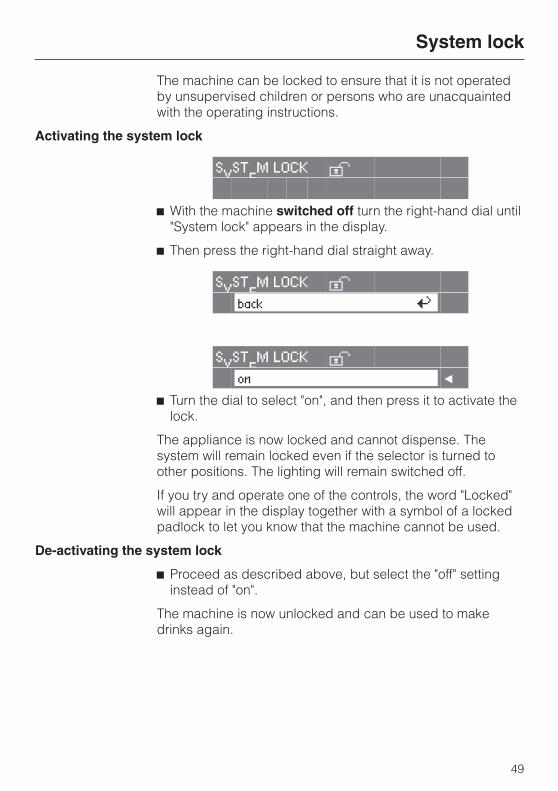
The machine can be locked to ensure that it is not operatedby unsupervised children or persons who are unacquaintedwith the operating instructions.
Activating the system lock
SYSTEM LOCK W
^ With the machine switched off turn the right-hand dial until"System lock" appears in the display.
^ Then press the right-hand dial straight away.
SYSTEM LOCK Wback A
SYSTEM LOCK Won +
^ Turn the dial to select "on", and then press it to activate thelock.
The appliance is now locked and cannot dispense. Thesystem will remain locked even if the selector is turned toother positions. The lighting will remain switched off.
If you try and operate one of the controls, the word "Locked"will appear in the display together with a symbol of a lockedpadlock to let you know that the machine cannot be used.
De-activating the system lock
^ Proceed as described above, but select the "off" settinginstead of "on".
The machine is now unlocked and can be used to makedrinks again.
System lock
49
Always allow the machine to cool down before cleaning.Danger of scalding.
Do not clean the machine with a steam cleaner as this willdamage the machine.
Never use cleaners containing chlorides, sand, soda orscouring agents. These would damage the surface.
It is important to clean the machine regularly, as coffeeremains will soon go mouldy.
With the exception of the plastic grille and the capsule plate,all removable parts can be cleaned in a dishwasher. If theparts are cleaned frequently in a dishwasher, they canbecome discoloured from regular contact with food residues(e.g. tomatoes) in the dishwasher.
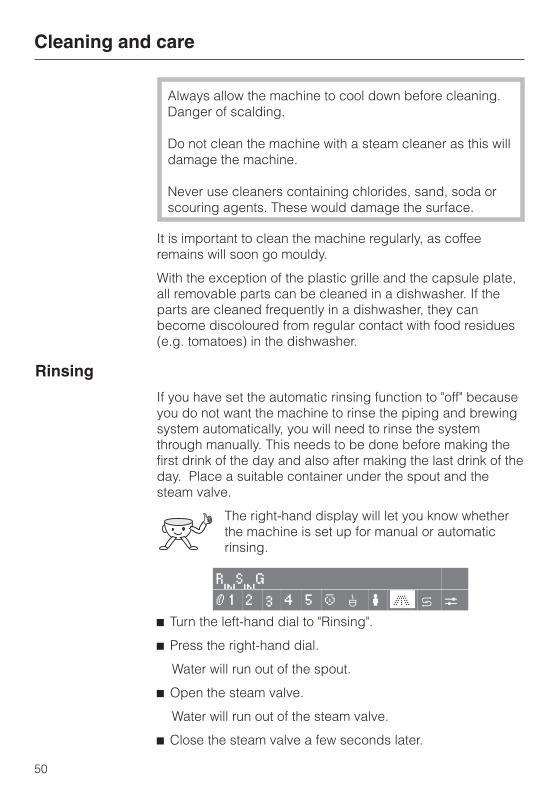
Rinsing
If you have set the automatic rinsing function to "off" becauseyou do not want the machine to rinse the piping and brewingsystem automatically, you will need to rinse the systemthrough manually. This needs to be done before making thefirst drink of the day and also after making the last drink of theday. Place a suitable container under the spout and thesteam valve.
The right-hand display will let you know whetherthe machine is set up for manual or automaticrinsing.
RINSING
K 1 2 3 4 5 L o n G k C^ Turn the left-hand dial to "Rinsing".
^ Press the right-hand dial.
Water will run out of the spout.
^ Open the steam valve.
Water will run out of the steam valve.
^ Close the steam valve a few seconds later.
Cleaning and care
50
The piping has now been rinsed through. You can nowprepare drinks or switch off the machine.
Water container
Empty the water container daily and fill to the max. level withfresh, cold tap water just before use.
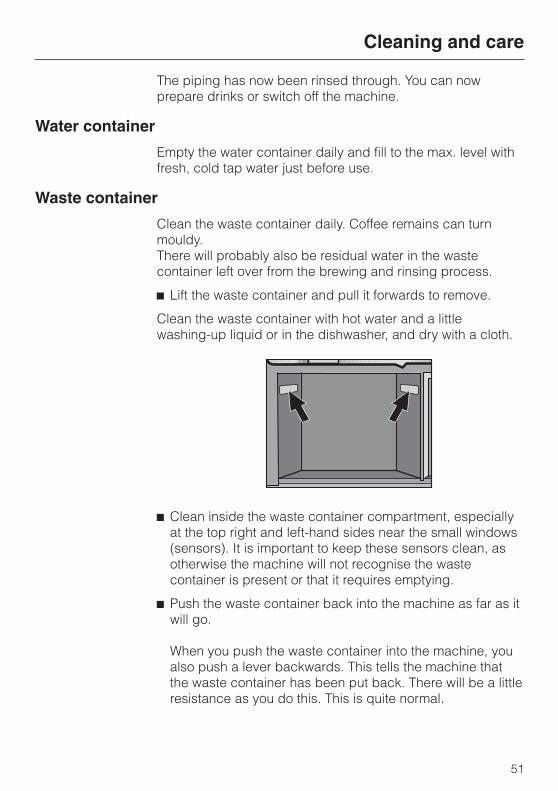
Waste container
Clean the waste container daily. Coffee remains can turnmouldy.There will probably also be residual water in the wastecontainer left over from the brewing and rinsing process.
^ Lift the waste container and pull it forwards to remove.
Clean the waste container with hot water and a littlewashing-up liquid or in the dishwasher, and dry with a cloth.
^ Clean inside the waste container compartment, especiallyat the top right and left-hand sides near the small windows(sensors). It is important to keep these sensors clean, asotherwise the machine will not recognise the wastecontainer is present or that it requires emptying.
^ Push the waste container back into the machine as far as itwill go.
When you push the waste container into the machine, youalso push a lever backwards. This tells the machine thatthe waste container has been put back. There will be a littleresistance as you do this. This is quite normal.
Cleaning and care
51
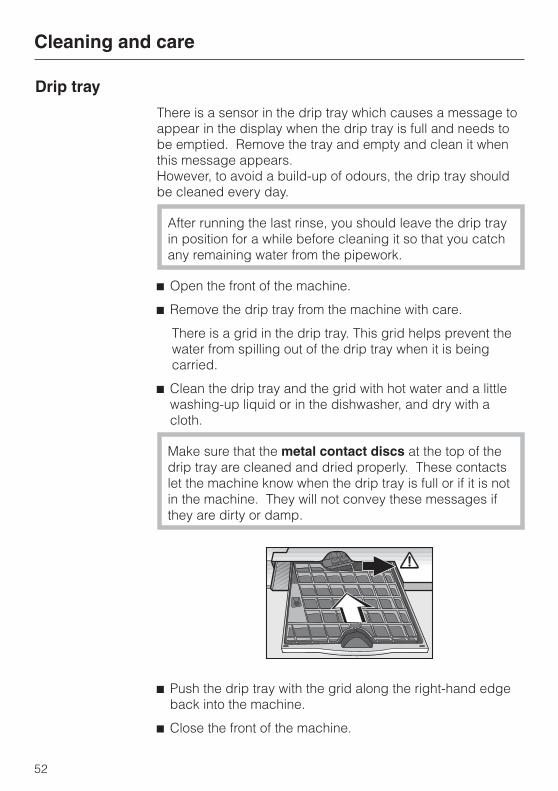
Drip tray
There is a sensor in the drip tray which causes a message toappear in the display when the drip tray is full and needs tobe emptied. Remove the tray and empty and clean it whenthis message appears.However, to avoid a build-up of odours, the drip tray shouldbe cleaned every day.
After running the last rinse, you should leave the drip trayin position for a while before cleaning it so that you catchany remaining water from the pipework.
^ Open the front of the machine.
^ Remove the drip tray from the machine with care.
There is a grid in the drip tray. This grid helps prevent thewater from spilling out of the drip tray when it is beingcarried.
^ Clean the drip tray and the grid with hot water and a littlewashing-up liquid or in the dishwasher, and dry with acloth.
Make sure that the metal contact discs at the top of thedrip tray are cleaned and dried properly. These contactslet the machine know when the drip tray is full or if it is notin the machine. They will not convey these messages ifthey are dirty or damp.
^ Push the drip tray with the grid along the right-hand edgeback into the machine.
^ Close the front of the machine.
Cleaning and care
52
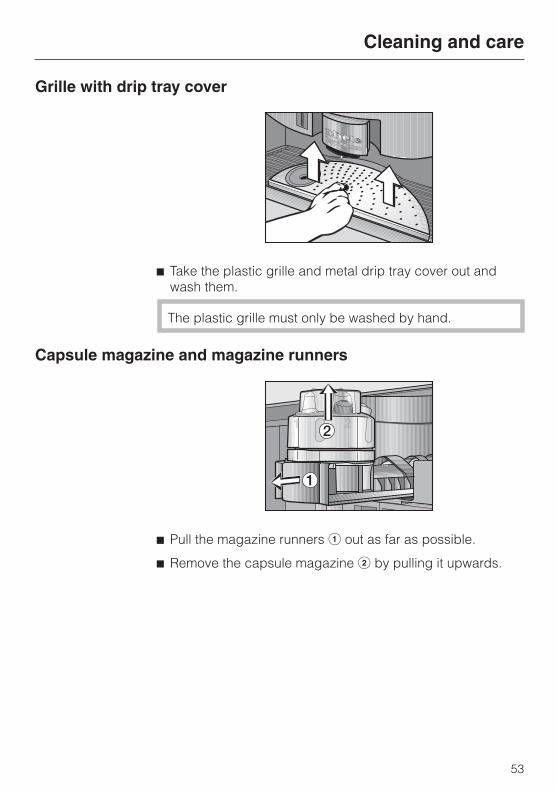
Grille with drip tray cover
^ Take the plastic grille and metal drip tray cover out andwash them.
The plastic grille must only be washed by hand.
Capsule magazine and magazine runners
^ Pull the magazine runners a out as far as possible.
^ Remove the capsule magazine b by pulling it upwards.
Cleaning and care
53
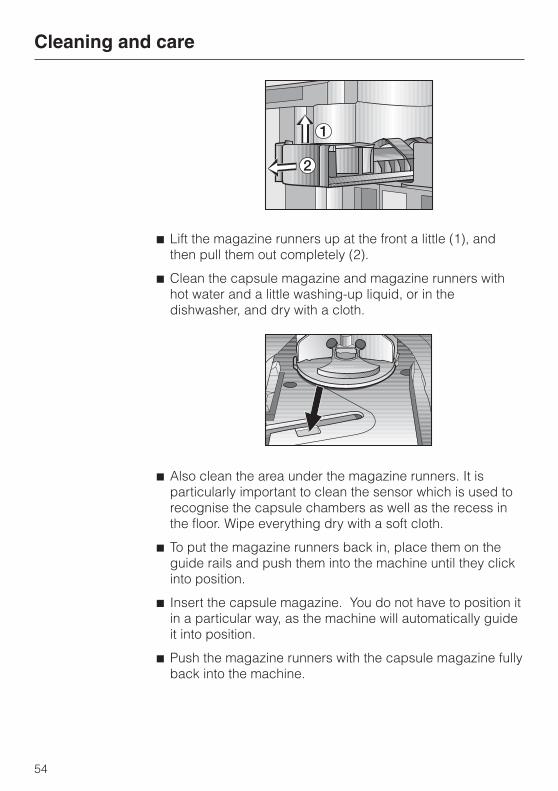
^ Lift the magazine runners up at the front a little (1), andthen pull them out completely (2).
^ Clean the capsule magazine and magazine runners withhot water and a little washing-up liquid, or in thedishwasher, and dry with a cloth.
^ Also clean the area under the magazine runners. It isparticularly important to clean the sensor which is used torecognise the capsule chambers as well as the recess inthe floor. Wipe everything dry with a soft cloth.
^ To put the magazine runners back in, place them on theguide rails and push them into the machine until they clickinto position.
^ Insert the capsule magazine. You do not have to position itin a particular way, as the machine will automatically guideit into position.
^ Push the magazine runners with the capsule magazine fullyback into the machine.
Cleaning and care
54
Coffee outlet cover
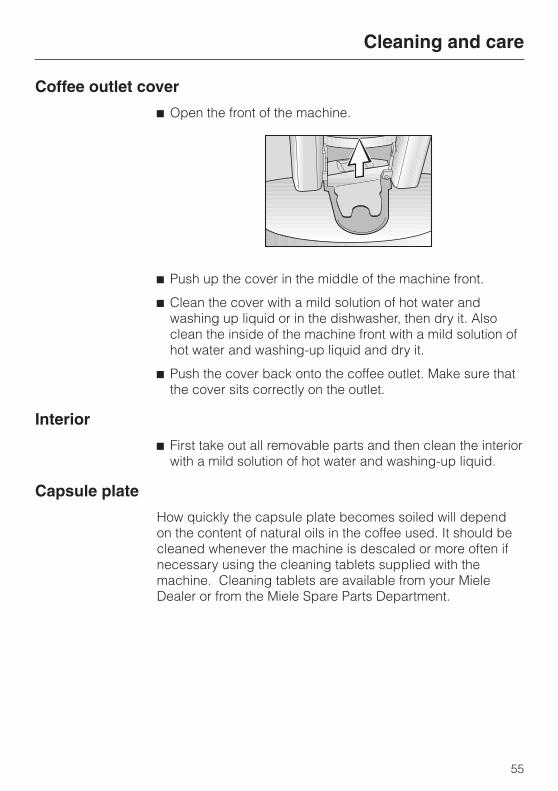
^ Open the front of the machine.
^ Push up the cover in the middle of the machine front.
^ Clean the cover with a mild solution of hot water andwashing up liquid or in the dishwasher, then dry it. Alsoclean the inside of the machine front with a mild solution ofhot water and washing-up liquid and dry it.
^ Push the cover back onto the coffee outlet. Make sure thatthe cover sits correctly on the outlet.
Interior
^ First take out all removable parts and then clean the interiorwith a mild solution of hot water and washing-up liquid.
Capsule plate
How quickly the capsule plate becomes soiled will dependon the content of natural oils in the coffee used. It should becleaned whenever the machine is descaled or more often ifnecessary using the cleaning tablets supplied with themachine. Cleaning tablets are available from your MieleDealer or from the Miele Spare Parts Department.
Cleaning and care
55
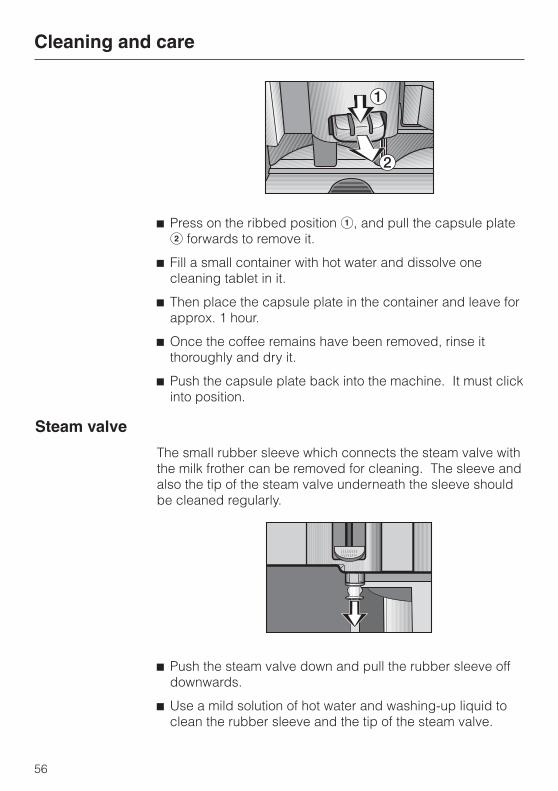
^ Press on the ribbed position a, and pull the capsule plateb forwards to remove it.
^ Fill a small container with hot water and dissolve onecleaning tablet in it.
^ Then place the capsule plate in the container and leave forapprox. 1 hour.
^ Once the coffee remains have been removed, rinse itthoroughly and dry it.
^ Push the capsule plate back into the machine. It must clickinto position.
Steam valve
The small rubber sleeve which connects the steam valve withthe milk frother can be removed for cleaning. The sleeve andalso the tip of the steam valve underneath the sleeve shouldbe cleaned regularly.
^ Push the steam valve down and pull the rubber sleeve offdownwards.
^ Use a mild solution of hot water and washing-up liquid toclean the rubber sleeve and the tip of the steam valve.
Cleaning and care
56

^ Dry them and then put the sleeve back onto the tip of thesteam valve. Make sure that the sleeve sits securely ontothe tip.
^ Push the steam valve back upwards.
If you forget to push it back up it could break when youshut the machine front.
Milk frother (cappuccinatore)
The milk frother must be dismantled into several parts toclean it properly. It is very important to clean each onethoroughly as otherwise the froth will not be producedproperly, if at all. All parts are dishwasher safe and should becleaned every day. An insert is available for cleaning thecappuccinatore jug in a Miele dishwasher.
^ Dismantle all the pieces and clean them. To remove thesteam spout grip it securely top and bottom as shown andpull it off.
Cleaning and care
57
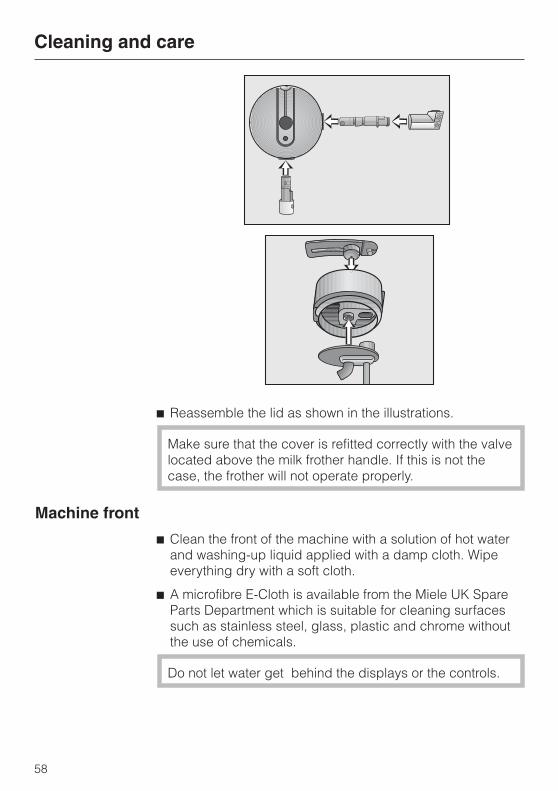
^ Reassemble the lid as shown in the illustrations.
Make sure that the cover is refitted correctly with the valvelocated above the milk frother handle. If this is not thecase, the frother will not operate properly.
Machine front
^ Clean the front of the machine with a solution of hot waterand washing-up liquid applied with a damp cloth. Wipeeverything dry with a soft cloth.
^ A microfibre E-Cloth is available from the Miele UK SpareParts Department which is suitable for cleaning surfacessuch as stainless steel, glass, plastic and chrome withoutthe use of chemicals.
Do not let water get behind the displays or the controls.
Cleaning and care
58
Avoid the following on all types of front:
– cleaning agents containing soda, acids or chlorides,
– abrasive cleaning agents, e.g. powder cleaners and creamcleaners,
– abrasive sponges, e.g. pot scourers or sponges whichhave been previously used with abrasive cleaning agents.
When descaling the machine wipe up any spillages ofdescaling agent immediately.
To prevent the risk of scratches and damage to thesurface structure of stainless steel and aluminium frontedmachines, pay particular attention to the followingcleaning instructions.
Stainless steel fronts
The appliance front is susceptible to scratches and abrasion.
Please observe the different cleaning instructions for- stainless steel surfaces and- stainless steel coloured controls
Stainless steel surfaces
Stainless steel surfaces can be cleaned using a proprietarynon-abrasive cleaning agent designed specifically for use onstainless steel, or with the Miele E-Cloth.
To help prevent re-soiling, a proprietaryconditioning agent for stainless steel can also beused. Apply sparingly with an even pressure in
the direction of the grain.
Stainless steel coloured controls
The controls may suffer discolouration or damage if soilingis left on them for too long. Remove any soiling straightaway with a damp cloth.
Cleaning and care
59

Aluminium fronts
Aluminium is affected by the way that light falls on it, by thesurrounding environment and by the angle you observe itfrom.
Aluminium surfaces and controls may suffer discolourationor damage if soiling is left on them for too long. Removeany soiling straight away with a damp cloth.
Warning: The surfaces and controls are susceptible toscratches and abrasion.
Avoid:
– stainless steel cleaners,
– cleaning agents containing descaling agents,
– diswasher detergent.
Maintenance
The capsule hopper in the brew unit needs to be replacedafter about 15,000 cups of coffee. Replacement capsulehoppers are available from the Miele Spare Parts Dept.
SETTINGS FK 1 2 3 4 5 L o n G k C
^ Turn the left-hand dial until you reach the "Settings" menu.
MAINTENANCE RQRD
F Y K n I I J Z^ Turn the right-hand dial until you reach "Mainenance rqrd".
MAINTENANCE RQRD
carry out A^ Press the right-hand dial and turn it to "carry out".
^ Press the right-hand dial.
Cleaning and care
60
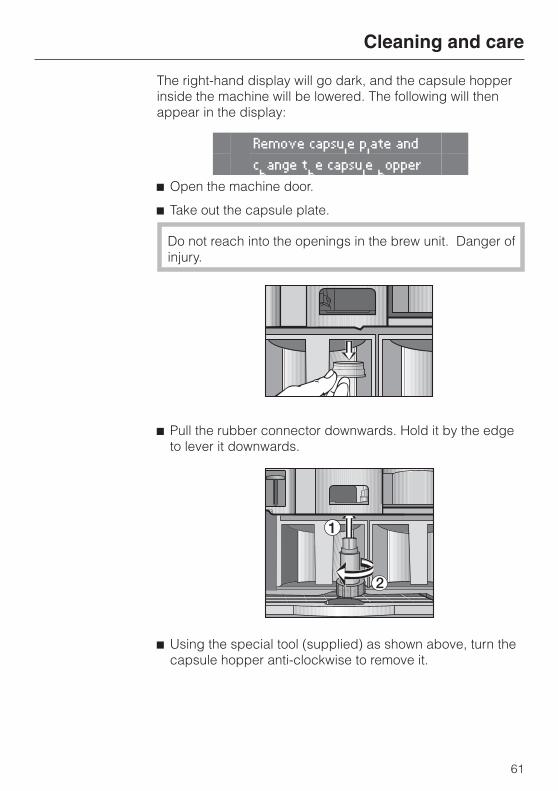
The right-hand display will go dark, and the capsule hopperinside the machine will be lowered. The following will thenappear in the display:
Remove capsule plate and
change the capsule hopper
^ Open the machine door.
^ Take out the capsule plate.
Do not reach into the openings in the brew unit. Danger ofinjury.
^ Pull the rubber connector downwards. Hold it by the edgeto lever it downwards.
^ Using the special tool (supplied) as shown above, turn thecapsule hopper anti-clockwise to remove it.
Cleaning and care
61
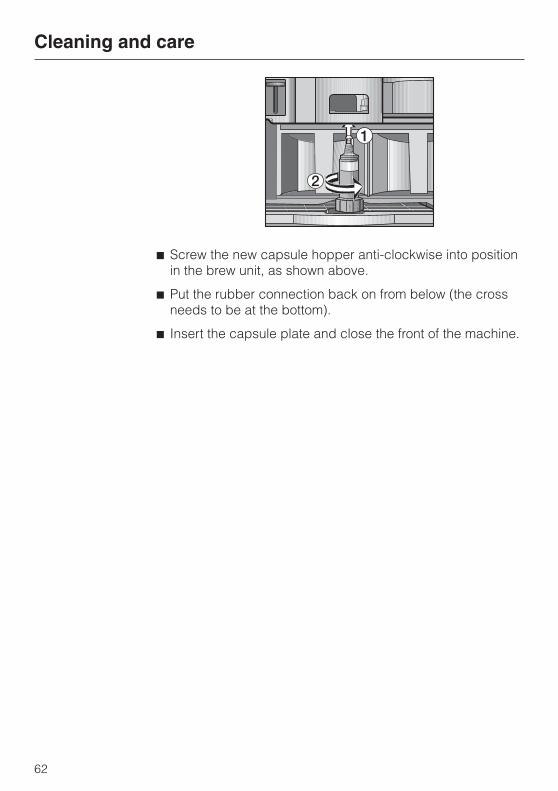
^ Screw the new capsule hopper anti-clockwise into positionin the brew unit, as shown above.
^ Put the rubber connection back on from below (the crossneeds to be at the bottom).
^ Insert the capsule plate and close the front of the machine.
Cleaning and care
62
The machine should be descaled regularly to ensure that itfunctions correctly. It will remind you when this needs to becarried out.
When you are at the stage where only 50 portions can bemade before the next descaling programme has to be run thefollowing message will appear in the right-hand display: "50no. of uses until descaling has to be done"This message will now appear after each drink has beenmade (coffee, espresso, steam, hot water). If you let it run to0 the machine will stop working and the Descale symbol kwill appear highlighted in the left hand display. The right handdisplay will prompt you to start the descaling programme withthe message "Confirm to start".
You cannot make any more drinks until the descalingprogramme has been carried out.
To descale the machine, you require descaling tablets andthe coloured descaling funnel.
You should only use the descaling tablets supplied withthe machine. These have been specially formulated foruse in this coffee machine. They are available from yourMiele dealer or the Miele Spare Parts Department.Other types of descaling agents will damage theappliance and affect the taste.Follow the instructions on the package carefully to avoiddamaging the machine.
Make sure that you wipe up any spillages or splashes ofdescaling agent immediately to avoid damage to themachine front.
After running the descaling programme, remember toclean the water container and the drip tray thoroughly toremove any descaling residues.
Descaling the machine
63
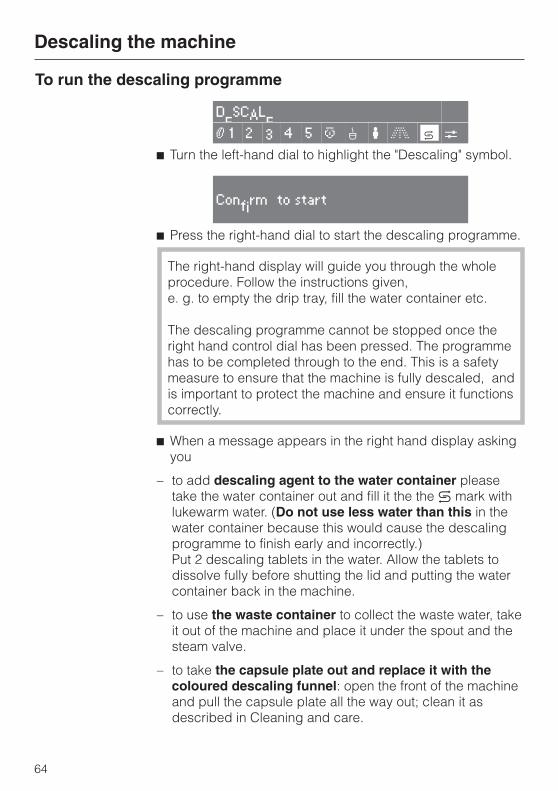
To run the descaling programme
DESCALE
K 1 2 3 4 5 L o n G k C^ Turn the left-hand dial to highlight the "Descaling" symbol.
Confirm to start
^ Press the right-hand dial to start the descaling programme.
The right-hand display will guide you through the wholeprocedure. Follow the instructions given,e. g. to empty the drip tray, fill the water container etc.
The descaling programme cannot be stopped once theright hand control dial has been pressed. The programmehas to be completed through to the end. This is a safetymeasure to ensure that the machine is fully descaled, andis important to protect the machine and ensure it functionscorrectly.
^ When a message appears in the right hand display askingyou
– to add descaling agent to the water container pleasetake the water container out and fill it the the k mark withlukewarm water. (Do not use less water than this in thewater container because this would cause the descalingprogramme to finish early and incorrectly.)Put 2 descaling tablets in the water. Allow the tablets todissolve fully before shutting the lid and putting the watercontainer back in the machine.
– to use the waste container to collect the waste water, takeit out of the machine and place it under the spout and thesteam valve.
– to take the capsule plate out and replace it with thecoloured descaling funnel: open the front of the machineand pull the capsule plate all the way out; clean it asdescribed in Cleaning and care.
Descaling the machine
64

Put the coloured descaling funnel in its place.
The descaling procedure will not start for another 5minutes or so. This time is needed to allow the descalingtablets to dissolve fully in the water. It will take longer thanthis to start if the appliance is too warm.
During descaling a little water and descaling agent will runout of the coffee and steam spouts. This is followed by anactivation period, before more descaling agent is drained out,and so on. A message will appear in the right-hand displayletting you know approximately how long this procedure willtake.
^ When a message asking you to fill the water containerwith fresh water appears in the right-hand display, youshould remove the container and rinse it out thoroughly withclean water. Make sure all traces of descaling agent areremoved, and then fill it with clean drinking water.Empty the waste container at the same time.
Water will flow out of both spouts during the rinsing process.The drip tray will need to be emptied several times duringthis process.
When descaling is finished, Programme finished, open thedoor will appear in the display. Open the machine front andfollow the instructions given in the right hand display.
The machine will run another brief rinsing programme, and isthen ready for use again.
Descaling the machine
65

The machine has an electronic safety system that reports any problems in theright hand display. Most faults are easily recitifed.
Message Reason Remedy
Chamber empty - pleaserefill
The chamber selected is empty. Refill with coffee capsules.
Please fill with freshwater
This is a reminder to fill the watercontainer with fresh water.
Please set the time ofday
The machine was disconnected from thepower supply and the time of day needsto be reset.
Set the time of day.
Empty drip tray andclean contacts
The drip tray is full and/or the metalcontact points in the tray are dirty.
Empty the drip tray and clean itthoroughly. Then dry thecontacts.
Please use descalingfunnel and close the door
The capsule plate needs to be taken outand replaced by the descaling funnel.
Remove the capsule plate andinsert the coloured descalingfunnel.
Please insert capsuleplate
The capsule plate or capsule hopper aremissing, or the descaling funnel is still inthe machine.
Refit the capsule plate orcapsule hopper.
Please insert capsulemagazine
The capsule magazine is missing or thesensor underneath the magazinerunners is dirty.
Refit the capsule magazine orwipe the sensor clean using asoft cloth.
Please open the valve Steam cannot be produced if the steamvalve is closed.
Turn the steam valvedownwards.
Please close the valve The steam valve is still pointingdownwards and is therefore still open.
Turn the steam valve upwards.
Maintenance required The capsule hopper needs to bereplaced after about 15,000 cups ofcoffee.
Turn the left-hand dial to thesettings position. Turn theright-hand dial to maintenanceand change the capsulehopper (see "Cleaning andcare").
Confirm to start The descaling process or anotherprocedure needs to be started.
Press the right-hand dial.
Confirm to continue The descaling process needs to becontinued.
Press the right-hand dial.
Messages in the right hand display
66

Message Reason Remedy
Empty You have selected a coffee chamberwhich has not been allocated a (coffee)name.
Allocate a type of coffee to thechamber.
No. of uses untildescaling has to be done
The machine counts the number ofdrinks made before descaling has to becarried out. Once this number isreached to the machine will not produceany more drinks until the descalingprogramme has been successfullycompleted.
Messages in the right hand display
67
Repairs to electrical appliances should only be carried outby a suitably qualified and competent person inaccordance with local and national safety regulations.Repairs and other work by unqualified persons could bedangerous. The manufacturer cannot be held liable forunauthorised work.
Various messages will appear in the right hand display towarn of certain problems. The section "Display messages"explains how to respond to these.
Other problems or situations which occur in general use aredescribed in this chapter. With the help of the following notesminor faults in the performance of the machine, some ofwhich may result from incorrect operation, can be put rightwithout contacting the Service Department.
What to do if . . .
. . . the machine does not light up after it has beenswitched on
^ Is the machine locked?
^ If not, then the lighting is defective. Call the ServiceDepartment.
. . . no messages appear in the display
The machine is not connected to the electricity supply.
^ Is the master switch in the 0 position?
^ Is it plugged in and switched on at the socket?
^ Check that the fuse is not defective and that the mains fusehas not blown. If it has, contact the Miele ServiceDepartment.
. . . the machine suddenly switches itself off
The machine will switch itself off automatically after a certainlength of time if it is not being used. This time depends on theprogrammed setting.
Problem solving guide
68
The water temperature could be too high. The machine willremain switched off until the water has cooled downsufficiently.
^ Is the plug correctly fitted in the socket?
. . . the lighting suddenly switches itself off
The lighting will switch off automatically after 10 minutes ofinactivity.
. . . the displays are not legible
If the machine is installed too low down, the display can behard to see.
^ Try and improve this by adjusting the display contrast orbrightness.
. . . you cannot open or close the door
The steam valve is not in the correct upward facing position.
^ Push the valve right down to start with, and then pull itupwards as far as it will go.
. . . the time of day needs to be reset
The time of day needs to be reset if the machine has beenswitched off with the master switch or at the wall socket. Anytimes programmed for switching on or off automaticallyremain in memory and do not need to be reset.
. . . drinks are not dispensed, even though the coffeecapsules are in the capsule magazine and there issufficient water in the water container
^ Remove the water container and replace it.
. . . coffee is not dispensed, even though the capsulemagazine is full and there is sufficient water in the watercontainer
A coffee capsule has jammed in the capsule magazine.
^ Open the front of the machine.
Problem solving guide
69
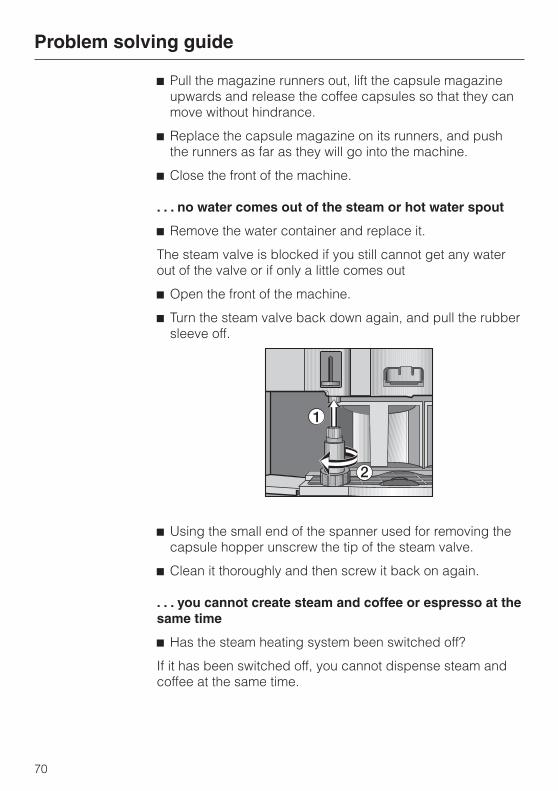
^ Pull the magazine runners out, lift the capsule magazineupwards and release the coffee capsules so that they canmove without hindrance.
^ Replace the capsule magazine on its runners, and pushthe runners as far as they will go into the machine.
^ Close the front of the machine.
. . . no water comes out of the steam or hot water spout
^ Remove the water container and replace it.
The steam valve is blocked if you still cannot get any waterout of the valve or if only a little comes out
^ Open the front of the machine.
^ Turn the steam valve back down again, and pull the rubbersleeve off.
^ Using the small end of the spanner used for removing thecapsule hopper unscrew the tip of the steam valve.
^ Clean it thoroughly and then screw it back on again.
. . . you cannot create steam and coffee or espresso at thesame time
^ Has the steam heating system been switched off?
If it has been switched off, you cannot dispense steam andcoffee at the same time.
Problem solving guide
70
. . . the steam system is switched off, but you can stillmake steam and coffee or espresso at the same time
If the steam system is still hot you will be able to do both atthe same time. Once it has cooled down again you will not beable to make steam and coffee at the same time.
. . . the steam smells of rubber
There will be a smell of rubber whilst the machine is still new.It will disappear with time.
. . . there is no froth from the milk frother (cappuccinatore)
^ Has the outlet been turned to the side so that froth can onlybe made in the milk frother?
^ Are the valve and the spout in the lid correctly positioned?(See Cleaning and care).
^ Are any components in the frother blocked up?
. . . coffee preparation has been interrupted
^ Have you selected a double espresso or a double coffee?
The machine uses two capsules for double portions. Ifthere was only one capsule left in the chamber themachine will not make the coffee.
. . . there are coffee grounds in the coffee
^ The capsule plate needs to be cleaned.
. . . a message appears asking you to empty the drip trayeven though it is empty
^ Have the contacts been properly cleaned and dried?
^ Is the drip tray securely located in the machine?
^ Switch the machine off and then back on again.
^ Buff the contacts a little, e.g. with fine sandpaper or emerycloth.
^ If this fault message continues to appear, please call theMiele Service department.
Problem solving guide
71
. . . the machine doesn’t rinse through when switched on,even though the rinse programme is set to "on".
If the temperature of the machine above 60 °C, rinsing cannottake place.
. . . water stopped flowing whilst programming in theamount to use
Water flow stops automatically when the maximum fill quantityis reached. The maximum quantity is stored in memory.
There is insufficient water in the water container. The quantityused previously was not saved to memory.
. . . the preparation time and the maximum fill quantity ofthe coffee varies considerably
The coffee grind varies depending on type of coffee. Differentproducers may also use different grinds for the same type ofcoffee. For this reason the preparation times and maximum fillquantities can vary.
. . . the espresso or coffee is not hot enough
^ Have the cups been pre-warmed?The smaller and thicker the cup, the more important it is topre-warm it.
^ Check whether the capsule plate is dirty. Clean the capsuleplate.
. . . the coffee is too weak
^ Make sure the amount of water programmed is not toomuch for the coffee.
^ Check to see how many coffees have already beendispensed.
If the amount of water is correct and 15,000 coffees havealready been dispensed you will need to replace thecapsule hopper in the brew unit. See "Cleaning and Care:Maintenance".
Problem solving guide
72
. . . there is water in the waste container
This is not a fault. The water is left over from the brewing andcleaning process.
. . . there is residual "coffee water" in the waste container
The capsule plate is not correctly pushed in.
^ Remove the capsule plate and replace it.
. . . the descaling process was started by mistake?
The descaling programme cannot be cancelled once youhave pressed the right hand dial. The programme has to becompleted through to the end. This is a safety measure toensure that the machine is fully descaled, and is importantfor protecting the machine and to ensure it functionscorrectly.
. . . the heating-up time is getting longer, the amount ofwater coming through is incorrect and the machine is notperforming properly
The machine needs descaling.
. . . the error message F 10 appears
Water has not been taken in.
^ Perhaps the system was not filled with water before the firstdrink was made. Fill the system with water as described in"Making coffee: Filling the system with water".
^ Or the water container has not been correctly positionedinside the machine. Remove the water container and pushit back into position again, making sure it engagescorrectly.
^ This error message also appears if the water container wasnot correctly filled for descaling. Fill the container to themark, and start the descaling process again.
^ If this fault message keeps on appearing, please call theMiele Service department, quoting the fault code.
Problem solving guide
73
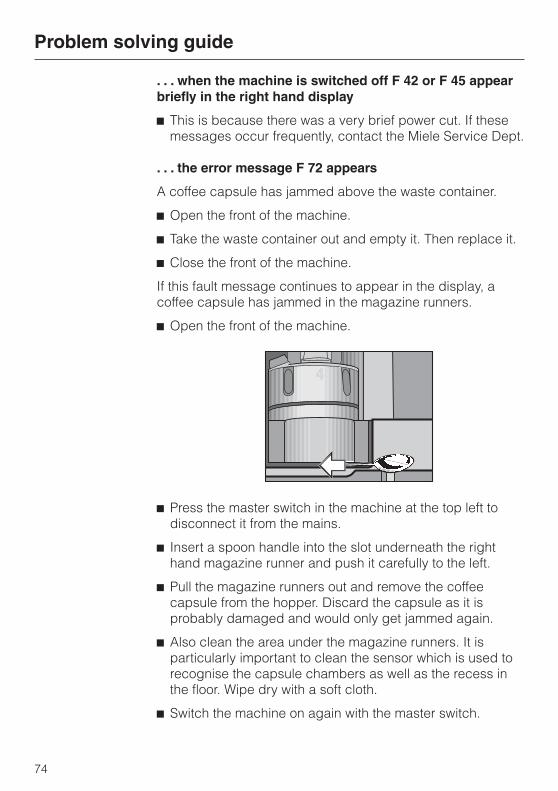
. . . when the machine is switched off F 42 or F 45 appearbriefly in the right hand display
^ This is because there was a very brief power cut. If thesemessages occur frequently, contact the Miele Service Dept.
. . . the error message F 72 appears
A coffee capsule has jammed above the waste container.
^ Open the front of the machine.
^ Take the waste container out and empty it. Then replace it.
^ Close the front of the machine.
If this fault message continues to appear in the display, acoffee capsule has jammed in the magazine runners.
^ Open the front of the machine.
^ Press the master switch in the machine at the top left todisconnect it from the mains.
^ Insert a spoon handle into the slot underneath the righthand magazine runner and push it carefully to the left.
^ Pull the magazine runners out and remove the coffeecapsule from the hopper. Discard the capsule as it isprobably damaged and would only get jammed again.
^ Also clean the area under the magazine runners. It isparticularly important to clean the sensor which is used torecognise the capsule chambers as well as the recess inthe floor. Wipe dry with a soft cloth.
^ Switch the machine on again with the master switch.
Problem solving guide
74
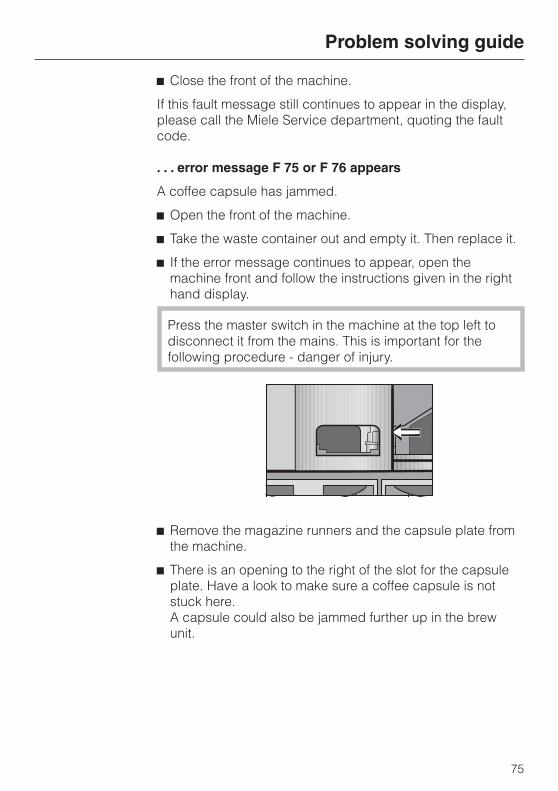
^ Close the front of the machine.
If this fault message still continues to appear in the display,please call the Miele Service department, quoting the faultcode.
. . . error message F 75 or F 76 appears
A coffee capsule has jammed.
^ Open the front of the machine.
^ Take the waste container out and empty it. Then replace it.
^ If the error message continues to appear, open themachine front and follow the instructions given in the righthand display.
Press the master switch in the machine at the top left todisconnect it from the mains. This is important for thefollowing procedure - danger of injury.
^ Remove the magazine runners and the capsule plate fromthe machine.
^ There is an opening to the right of the slot for the capsuleplate. Have a look to make sure a coffee capsule is notstuck here.A capsule could also be jammed further up in the brewunit.
Problem solving guide
75
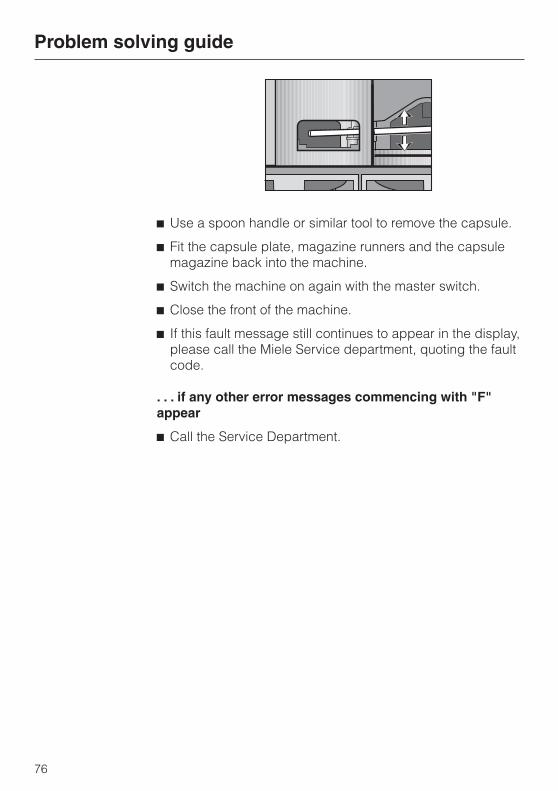
^ Use a spoon handle or similar tool to remove the capsule.
^ Fit the capsule plate, magazine runners and the capsulemagazine back into the machine.
^ Switch the machine on again with the master switch.
^ Close the front of the machine.
^ If this fault message still continues to appear in the display,please call the Miele Service department, quoting the faultcode.
. . . if any other error messages commencing with "F"appear
^ Call the Service Department.
Problem solving guide
76
In the event of a fault which you cannot correct yourself,please contact:
– your Miele Dealer
or
– the Miele Service Department (see back cover foraddress).
When contacting your Dealer or the Service Department,please quote the model and serial number of your machine.These are shown on the data plate inside the machine.
Please note that telephone calls may be monitored andrecorded for training purposes.
After sales service
77
All electrical work should be carried out only by a suitablyqualified and competent person, in strict accordance withnational and local safety regulations.
Installation, repairs and other work by unqualified personscould be dangerous. The manufacturer cannot be held liablefor unauthorised work.
Ensure power is not supplied to the appliance whileinstallation work is being carried out.
The voltage, rated load and fuse rating are given on the dataplate. Please ensure these match the household mainssupply.
Connection should be made via a fused plug and suitableswitched socket which is easily accessible after installation.
Do not connect via an extension lead.
For extra safety it is advisable to install a residual currentdevice (RCD), with a trip current of 30 mA (in accordancewith DIN VDE 0664, VDE 0100, Section 739).
If the socket is not accessible after installation (depending oncountry) an additional means of disconnection must beprovided for all poles.
When switched off there must be an all-pole contact gap of 3mm in the isolator switch (including switch, fuses and relaysaccording to EN 60 335).
Electrical connection U.K., ZA, IRL
78
Important
The appliance is supplied with a mains cable with mouldedplug for connection to a 230 - 240 V mains supply.
The wires in the mains lead are coloured in accordance withthe following code:
Green/yellow = earth
Blue = neutral
Brown = live
Where it is necessary to change plugs, if the colours of thewires in the mains lead of this appliance do not correspondwith the coloured markings identifying the terminals of yourplug, proceed as follows:
^ The wire which is coloured green and yellow must beconnected to the terminal in the plug which is marked withthe letter E or by the earth symbol z or coloured green, orgreen and yellow.
^ The wire which is coloured blue must be connected to theterminal in the plug which is marked with the letter N orcoloured black.
^ The wire which is coloured brown must be connected to theterminal in the plug which is marked with the letter L orcoloured red.
WARNING: THIS APPLIANCEMUST BE EARTHED
Electrical connection U.K., ZA, IRL
79
Non-rewireable plugs BS 1363
If this machine is fitted with a non-rewireable plug, thefollowing information applies:
If the socket outlets are not suitable for the plug supplied withthe product, it must be cut off and an appropriate plug fitted.The fuse carrier and fuse should be removed from the oldplug and disposed of. The old plug should then be disposedof and on no account be inserted into any socket elsewherein the house (electric shock hazard).The fuse cover must be refitted when changing the fuse, andif the fuse cover is lost, the plug must not be used until asuitable replacement is obtained. The colour of the correctreplacement cover is that of the coloured insert in the base ofthe plug, or the colour that is embossed in words on the baseof the plug (as applicable to the design of plug fitted).Replacement fuses should be ASTA approved to BS 1362and have the correct rating. Replacement fuses and fusecovers may be purchased from your local electrical supplier.
Electrical connection U.K., ZA, IRL
80
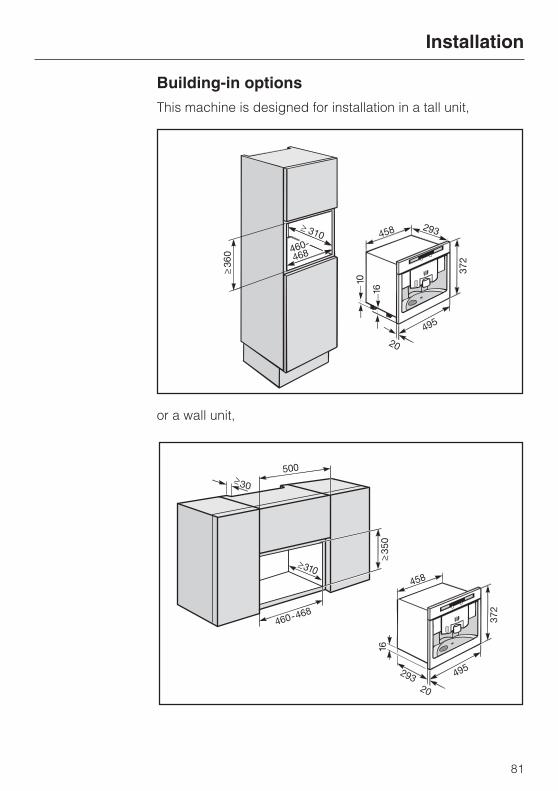
Building-in optionsThis machine is designed for installation in a tall unit,
or a wall unit,
Installation
81
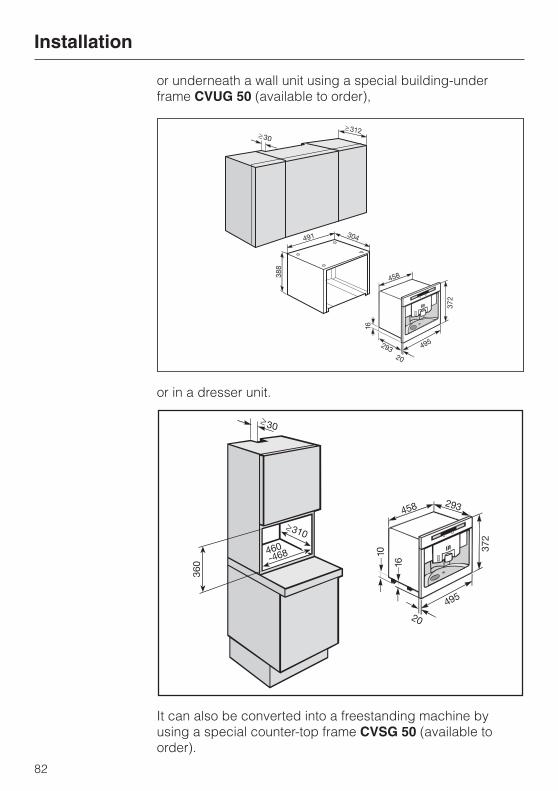
or underneath a wall unit using a special building-underframe CVUG 50 (available to order),
or in a dresser unit.
It can also be converted into a freestanding machine byusing a special counter-top frame CVSG 50 (available toorder).
Installation
82

Installation
Before installation make sure that there is no power supplyto the machine. This also applies should it ever need to betaken out of its housing unit.
The machine must be built in before it is operated.
You will need a size 3 and size 5 hexagon key for installingthe appliance.
^ Push it all the way into the niche until you feel resistance.
^ Check the height of the machine to make sure that it issitting centrally in the niche and that it is level.
If this is not the case you can adjust the height of the 4 feetunderneath the machine with an allen key.
The feet can be unscrewed by up to approx. 10 mm.
Installation
83

For units with 19 mm side walls:
^ If the furniture unit walls are 19 mm thick you will need todrill four holes in the sides for securing the machine. Tomark the position of these holes:
– Align the machine in the niche. Screw the side hexagonscrews inside the machine in a little so that they makeindents in the side walls and then unscrew them again.
– Take the machine out of the niche and drill ø 4.5 mm holes,2 mm deep where you made the indentations.
Securing the machine^ Connect the appliance to the electricity supply.
^ Push it all the way into the niche until you feel resistance.
^ Open the front of the machine and partially tighten the sidescrews.
^ Carefully turn the lower hexagon screws a to centre themachine in the niche.
^ Tighten both upper hexagon screws b to secure themachine in the unit. Do not overtighten them.
Installation
84
Blending is unique to each coffeeproducer. The blend gives coffee itsparticular taste and quality, and willvary depending on the type of coffeeyou want.
Caffè is the Italian term for a standardespresso. Its full name is caffèespresso. It tastes good after mealsand throughout the day.
Caffè americano is espresso madewith lots of water.
Caffè corretto is espresso with a dashof alcohol such as Grappa, brandy or aliqueur.
Caffè freddo is a long espresso withice cubes and sugar syrup added. Apopular summer drink.
Caffè latte is a double espresso in alarge cup filled with hot milk, toppedwith little or no froth, for people whoenjoy milk.
Caffè mocha consists of one thirdespresso, one third hot milk and onethird cocoa, served in a tall glass.
Caffè ristretto is the strongest, mostconcentrated espresso. The water isreduced to 30 ml per portion.
Cappuccino is espresso with frothedmilk. It is served in a ceramic cup withone third espresso, one third hot milkand one third froth. To obtain a goodfroth, the milk should be cold and madein a cold container.
Cappuccino chiaro is a "light"cappuccino with less espresso andmore hot milk.
Cappuccino scuro is a "dark"cappuccino with more espresso andless milk.
Coffee should be stored in therefrigerator in an airtight container tomaintain its flavour for longer.
Crema is the sign of the perfect cup ofespresso. Crema is a fine, nut orcinnamon brown froth on the surface ofthe espresso, which is only createdwhen the pressure is sufficiently high. Itcontains oils which are rich in flavourand aroma, and helps to keep theespresso warm.
Espresso, see Caffè
Espresso corto is a "short", strongespresso.
Espresso doppio is quite simply adouble portion of normal espresso.
Espresso lungo is the longer, lessconcentrated version served in astandard coffee cup.
Espresso ristretto is a doublestrength, bitter tasting espresso.
Macchiato is espresso with a tiny shotof hot, frothed milk which gives it adappled (macchiato) appearance.
Glossary
85
Pressure is important as it releases thesuspended particles in the coffee whichgive it its aroma. If the pressure is toolow, the aroma cannot develop fully. If itis too high, it releases tannin and abitter flavour. Pressure is also importantfor creating the crema.
Pre-warming the cups prevents theespresso from cooling too quickly.
Roasting is very important for theflavour and caffeine content of theespresso. Roasting releases theethereal oils which create the aromaand flavour. A darker roasting gives amore concentrated aroma, but burns offmore caffeine. So the darker the roast,the lower the caffeine content. Lightlyroasted beans have a more acidicflavour, and dark roasted beans tastemore bitter.
The caffeine content of espresso isonly a third or a half the caffeinenormally found in coffee. The darker theroast, the less caffeine the espresso willcontain.
Water hardness can affect the flavourof the espresso.
Glossary
86

87
M.-Nr. 06 541 470 / V01Alteration rights reserved / 1306
CVA 2650