Embed Size (px)
Citation preview

Informatica® PowerExchange for PeopleSoft(Version 8.6)
User Guide

Informatica PowerExchange for PeopleSoft User GuideVersion 8.6 June 2008
Copyright © 1999-2008 Informatica Corporation. All rights reserved. Printed in the USA.
This software and documentation contain proprietary information of Informatica Corporation and are provided under a license agreement containing restrictions on use and disclosure and are also protected by copyright law. Reverse engineering of the software is prohibited. No part of this document may be reproduced or transmitted in any form, by any means (electronic, photocopying, recording or otherwise) without prior consent of Informatica Corporation. This Software may be protected by U.S. and/or international Patents and other Patents Pending.
Use, duplication, or disclosure of the Software by the U.S. Government is subject to the restrictions set forth in the applicable software license agreement and as provided in DFARS 227.7202-1(a) and 227.7702-3(a) (1995), DFARS 252.227-7013(c)(1)(ii) (OCT 1988), FAR 12.212(a) (1995), FAR 52.227-19, or FAR 52.227-14 (ALT III), as applicable.
The information in this product or documentation is subject to change without notice. If you find any problems in this product or documentation, please report them to us in writing.
Informatica, PowerCenter, PowerCenterRT, PowerCenter Connect, PowerCenter Data Analyzer, PowerExchange, PowerMart, Metadata Manager, Informatica Data Quality, Informatica Data Explorer, Informatica B2B Data Exchange and Informatica On Demand are trademarks or registered trademarks of Informatica Corporation in the United States and in jurisdictions throughout the world. All other company and product names may be trade names or trademarks of their respective owners.
DISCLAIMER: Informatica Corporation provides this documentation “as is” without warranty of any kind, either express or implied, including, but not limited to, the implied warranties of non-infringement, merchantability, or use for a particular purpose. Informatica Corporation does not warrant that this software or documentation is error free. The information provided in this software or documentation may include technical inaccuracies or typographical errors. The information in this software and documentation is subject to change at any time without notice.
Part Number: PWX-PSU-86000-0001

Table of Contents
Preface . . . . . . . . . . . . . . . . . . . . . . . . . . . . . . . . . . . . . . . . . . . . . . . . . . . . . . . . . . . . . viiInformatica Resources . . . . . . . . . . . . . . . . . . . . . . . . . . . . . . . . . . . . . . . . . . . . . . . . . . . . . vii
Informatica Customer Portal . . . . . . . . . . . . . . . . . . . . . . . . . . . . . . . . . . . . . . . . . . . . . vii
Informatica Documentation . . . . . . . . . . . . . . . . . . . . . . . . . . . . . . . . . . . . . . . . . . . . . vii
Informatica Web Site . . . . . . . . . . . . . . . . . . . . . . . . . . . . . . . . . . . . . . . . . . . . . . . . . . vii
Informatica Knowledge Base . . . . . . . . . . . . . . . . . . . . . . . . . . . . . . . . . . . . . . . . . . . . . vii
Informatica Global Customer Support . . . . . . . . . . . . . . . . . . . . . . . . . . . . . . . . . . . . . . viii
Chapter 1: Understanding PowerExchange for PeopleSoft . . . . . . . . . . . . . . . . . . . . . 1Overview . . . . . . . . . . . . . . . . . . . . . . . . . . . . . . . . . . . . . . . . . . . . . . . . . . . . . . . . . . . . . . . 1
PeopleSoft Architecture . . . . . . . . . . . . . . . . . . . . . . . . . . . . . . . . . . . . . . . . . . . . . . . . . . . . . 1
PeopleSoft Security . . . . . . . . . . . . . . . . . . . . . . . . . . . . . . . . . . . . . . . . . . . . . . . . . . . . . 2
Importing PeopleSoft Sources . . . . . . . . . . . . . . . . . . . . . . . . . . . . . . . . . . . . . . . . . . . . . . . . 2
Creating Key Relationships . . . . . . . . . . . . . . . . . . . . . . . . . . . . . . . . . . . . . . . . . . . . . . . 3
PeopleSoft Records . . . . . . . . . . . . . . . . . . . . . . . . . . . . . . . . . . . . . . . . . . . . . . . . . . . . . . . . 3
Importing PeopleSoft Keys . . . . . . . . . . . . . . . . . . . . . . . . . . . . . . . . . . . . . . . . . . . . . . . 3
Importing Effective Dated Records . . . . . . . . . . . . . . . . . . . . . . . . . . . . . . . . . . . . . . . . . 3
PeopleSoft Trees . . . . . . . . . . . . . . . . . . . . . . . . . . . . . . . . . . . . . . . . . . . . . . . . . . . . . . . . . . 4
Tree Levels . . . . . . . . . . . . . . . . . . . . . . . . . . . . . . . . . . . . . . . . . . . . . . . . . . . . . . . . . . . 5
Detail Trees and the Detail Record . . . . . . . . . . . . . . . . . . . . . . . . . . . . . . . . . . . . . . . . . 6
Winter Trees . . . . . . . . . . . . . . . . . . . . . . . . . . . . . . . . . . . . . . . . . . . . . . . . . . . . . . . . . 7
Summary Trees . . . . . . . . . . . . . . . . . . . . . . . . . . . . . . . . . . . . . . . . . . . . . . . . . . . . . . . . 7
Flattening Trees . . . . . . . . . . . . . . . . . . . . . . . . . . . . . . . . . . . . . . . . . . . . . . . . . . . . . . . . . . 7
Horizontally Flattening Trees . . . . . . . . . . . . . . . . . . . . . . . . . . . . . . . . . . . . . . . . . . . . . 7
Vertically Flattening Trees . . . . . . . . . . . . . . . . . . . . . . . . . . . . . . . . . . . . . . . . . . . . . . . . 8
Chapter 2: Configuring PowerExchange for PeopleSoft . . . . . . . . . . . . . . . . . . . . . . 11Overview . . . . . . . . . . . . . . . . . . . . . . . . . . . . . . . . . . . . . . . . . . . . . . . . . . . . . . . . . . . . . . 11
Connection Requirements . . . . . . . . . . . . . . . . . . . . . . . . . . . . . . . . . . . . . . . . . . . . . . . 11
Step 1. Configure PeopleSoft Security . . . . . . . . . . . . . . . . . . . . . . . . . . . . . . . . . . . . . . . . . 12
Securing PeopleSoft Metadata . . . . . . . . . . . . . . . . . . . . . . . . . . . . . . . . . . . . . . . . . . . . 12
Securing PeopleSoft Source Data . . . . . . . . . . . . . . . . . . . . . . . . . . . . . . . . . . . . . . . . . . 13
Step 2. Configure an ODBC Data Source . . . . . . . . . . . . . . . . . . . . . . . . . . . . . . . . . . . . . . 13
Chapter 3: Working with PeopleSoft Sources. . . . . . . . . . . . . . . . . . . . . . . . . . . . . . . 15Overview . . . . . . . . . . . . . . . . . . . . . . . . . . . . . . . . . . . . . . . . . . . . . . . . . . . . . . . . . . . . . . 15
Organizing Definitions in the Navigator . . . . . . . . . . . . . . . . . . . . . . . . . . . . . . . . . . . . 15
Working with Records . . . . . . . . . . . . . . . . . . . . . . . . . . . . . . . . . . . . . . . . . . . . . . . . . . . . 16
Record Metadata . . . . . . . . . . . . . . . . . . . . . . . . . . . . . . . . . . . . . . . . . . . . . . . . . . . . . 16
Viewing Records on the Records Tab . . . . . . . . . . . . . . . . . . . . . . . . . . . . . . . . . . . . . . . 17
Viewing Records on the Panels Tab . . . . . . . . . . . . . . . . . . . . . . . . . . . . . . . . . . . . . . . . 17
Record Key Columns . . . . . . . . . . . . . . . . . . . . . . . . . . . . . . . . . . . . . . . . . . . . . . . . . . 17
iii
Creating Customized Key Relationships . . . . . . . . . . . . . . . . . . . . . . . . . . . . . . . . . . . . . 18
Working with Trees . . . . . . . . . . . . . . . . . . . . . . . . . . . . . . . . . . . . . . . . . . . . . . . . . . . . . . 19
Tree Metadata . . . . . . . . . . . . . . . . . . . . . . . . . . . . . . . . . . . . . . . . . . . . . . . . . . . . . . . 19
Importing Trees . . . . . . . . . . . . . . . . . . . . . . . . . . . . . . . . . . . . . . . . . . . . . . . . . . . . . . 20
Creating Tree Source Definitions . . . . . . . . . . . . . . . . . . . . . . . . . . . . . . . . . . . . . . . . . . 21
Importing the Detail Record . . . . . . . . . . . . . . . . . . . . . . . . . . . . . . . . . . . . . . . . . . . . . 22
Connecting to the PeopleSoft System . . . . . . . . . . . . . . . . . . . . . . . . . . . . . . . . . . . . . . . . . . 22
Entering Connection Information . . . . . . . . . . . . . . . . . . . . . . . . . . . . . . . . . . . . . . . . . 23
Filtering Available Records and Trees . . . . . . . . . . . . . . . . . . . . . . . . . . . . . . . . . . . . . . . 23
Importing PeopleSoft Source Definitions . . . . . . . . . . . . . . . . . . . . . . . . . . . . . . . . . . . . . . . 23
Creating Tree Source Definitions . . . . . . . . . . . . . . . . . . . . . . . . . . . . . . . . . . . . . . . . . . . . . 25
Step 1. Create a Tree Source Definition . . . . . . . . . . . . . . . . . . . . . . . . . . . . . . . . . . . . . 25
Step 2. Import Tree Attributes . . . . . . . . . . . . . . . . . . . . . . . . . . . . . . . . . . . . . . . . . . . 25
Editing PeopleSoft Source Definitions . . . . . . . . . . . . . . . . . . . . . . . . . . . . . . . . . . . . . . . . . 26
Chapter 4: Application Source Qualifier for PeopleSoft Sources . . . . . . . . . . . . . . . 29Overview . . . . . . . . . . . . . . . . . . . . . . . . . . . . . . . . . . . . . . . . . . . . . . . . . . . . . . . . . . . . . . 29
Using Table Names for PeopleSoft Records . . . . . . . . . . . . . . . . . . . . . . . . . . . . . . . . . . 30
Using Parameters and Variables with PeopleSoft Sources . . . . . . . . . . . . . . . . . . . . . . . . . 30
Understanding the Default Query . . . . . . . . . . . . . . . . . . . . . . . . . . . . . . . . . . . . . . . . . . . . 31
Editing the Default Query . . . . . . . . . . . . . . . . . . . . . . . . . . . . . . . . . . . . . . . . . . . . . . 31
Viewing the Default Query . . . . . . . . . . . . . . . . . . . . . . . . . . . . . . . . . . . . . . . . . . . . . . 31
Joining Source Data . . . . . . . . . . . . . . . . . . . . . . . . . . . . . . . . . . . . . . . . . . . . . . . . . . . . . . 32
Understanding the Default Join . . . . . . . . . . . . . . . . . . . . . . . . . . . . . . . . . . . . . . . . . . . . . . 32
Joining Records . . . . . . . . . . . . . . . . . . . . . . . . . . . . . . . . . . . . . . . . . . . . . . . . . . . . . . 33
Joining Detail Trees and Detail Records . . . . . . . . . . . . . . . . . . . . . . . . . . . . . . . . . . . . . 34
Joining Detail Trees with Non-Detail Records . . . . . . . . . . . . . . . . . . . . . . . . . . . . . . . . 35
Entering a Source Filter . . . . . . . . . . . . . . . . . . . . . . . . . . . . . . . . . . . . . . . . . . . . . . . . . . . 36
Filter Syntax . . . . . . . . . . . . . . . . . . . . . . . . . . . . . . . . . . . . . . . . . . . . . . . . . . . . . . . . 36
Creating a Source Filter . . . . . . . . . . . . . . . . . . . . . . . . . . . . . . . . . . . . . . . . . . . . . . . . 37
Validating Filter Syntax . . . . . . . . . . . . . . . . . . . . . . . . . . . . . . . . . . . . . . . . . . . . . . . . 37
Entering a Join Override . . . . . . . . . . . . . . . . . . . . . . . . . . . . . . . . . . . . . . . . . . . . . . . . . . . 38
Validating Join Override Syntax . . . . . . . . . . . . . . . . . . . . . . . . . . . . . . . . . . . . . . . . . . 38
Using an Extract Override . . . . . . . . . . . . . . . . . . . . . . . . . . . . . . . . . . . . . . . . . . . . . . . . . . 39
Creating an Extract Override . . . . . . . . . . . . . . . . . . . . . . . . . . . . . . . . . . . . . . . . . . . . 40
Sorting Ports . . . . . . . . . . . . . . . . . . . . . . . . . . . . . . . . . . . . . . . . . . . . . . . . . . . . . . . . . . . 40
Selecting Distinct Values . . . . . . . . . . . . . . . . . . . . . . . . . . . . . . . . . . . . . . . . . . . . . . . . . . . 41
Selecting Current Rows . . . . . . . . . . . . . . . . . . . . . . . . . . . . . . . . . . . . . . . . . . . . . . . . . . . . 42
Linking the TO_EFFDT Port . . . . . . . . . . . . . . . . . . . . . . . . . . . . . . . . . . . . . . . . . . . . . . . 42
Joining Effective Dated PeopleSoft Records . . . . . . . . . . . . . . . . . . . . . . . . . . . . . . . . . . . . . 43
Handling EFFSEQ when Extracting Current Rows . . . . . . . . . . . . . . . . . . . . . . . . . . . . . 44
Examples of Joining Effective Dated Records . . . . . . . . . . . . . . . . . . . . . . . . . . . . . . . . . 44
Configuring an Application Source Qualifier . . . . . . . . . . . . . . . . . . . . . . . . . . . . . . . . . . . . 48
Chapter 5: Accessing XLATTABLE Data . . . . . . . . . . . . . . . . . . . . . . . . . . . . . . . . . . . 51Overview . . . . . . . . . . . . . . . . . . . . . . . . . . . . . . . . . . . . . . . . . . . . . . . . . . . . . . . . . . . . . . 51
iv Table of Contents

Locating Accurate Values . . . . . . . . . . . . . . . . . . . . . . . . . . . . . . . . . . . . . . . . . . . . . . . 51
Sourcing XLATTABLE Data . . . . . . . . . . . . . . . . . . . . . . . . . . . . . . . . . . . . . . . . . . . . . . . . 52
Step 1. Import the XLATTABLE Table from PeopleSoft . . . . . . . . . . . . . . . . . . . . . . . . . 53
Step 2. Add the XLATTABLE Source Definition to the Mapping . . . . . . . . . . . . . . . . . . 53
Step 3. Override the Default Query . . . . . . . . . . . . . . . . . . . . . . . . . . . . . . . . . . . . . . . . 53
Step 4. Configure the Application Connection and Run Workflows . . . . . . . . . . . . . . . . . 54
Looking Up XLATTABLE Data . . . . . . . . . . . . . . . . . . . . . . . . . . . . . . . . . . . . . . . . . . . . . . 54
Step 1. Import the XLATTABLE Table from the Database . . . . . . . . . . . . . . . . . . . . . . . 55
Step 2. Create and Configure the Lookup Transformation . . . . . . . . . . . . . . . . . . . . . . . . 55
Step 3. Configure a PeopleSoft Application Connection . . . . . . . . . . . . . . . . . . . . . . . . . 58
Step 4. Enter Location Information in the Mapping or Session . . . . . . . . . . . . . . . . . . . . 58
Chapter 6: Creating PeopleSoft Sessions and Workflows . . . . . . . . . . . . . . . . . . . . . 59Configuring a Session for PeopleSoft Sources . . . . . . . . . . . . . . . . . . . . . . . . . . . . . . . . . . . . 59
Entering a Source Table Owner Name . . . . . . . . . . . . . . . . . . . . . . . . . . . . . . . . . . . . . . 60
Configuring a PeopleSoft Session to Partition Data . . . . . . . . . . . . . . . . . . . . . . . . . . . . 60
Scheduling a Workflow . . . . . . . . . . . . . . . . . . . . . . . . . . . . . . . . . . . . . . . . . . . . . . . . . . . . 60
Appendix A: PeopleSoft Datatypes . . . . . . . . . . . . . . . . . . . . . . . . . . . . . . . . . . . . . . 61PeopleSoft and Transformation Datatypes . . . . . . . . . . . . . . . . . . . . . . . . . . . . . . . . . . . . . . 61
Unsupported Datatypes . . . . . . . . . . . . . . . . . . . . . . . . . . . . . . . . . . . . . . . . . . . . . . . . 62
PeopleSoft Datatypes . . . . . . . . . . . . . . . . . . . . . . . . . . . . . . . . . . . . . . . . . . . . . . . . . . 62
PeopleSoft SubRecords . . . . . . . . . . . . . . . . . . . . . . . . . . . . . . . . . . . . . . . . . . . . . . . . . 62
Appendix B: PeopleSoft Language Codes . . . . . . . . . . . . . . . . . . . . . . . . . . . . . . . . . 63
Appendix C: Glossary of Terms . . . . . . . . . . . . . . . . . . . . . . . . . . . . . . . . . . . . . . . . . 65
Index . . . . . . . . . . . . . . . . . . . . . . . . . . . . . . . . . . . . . . . . . . . . . . . . . . . . . . . . . . . . . . . 69
Table of Contents v

vi Table of Contents

Preface
The PowerExchange for PeopleSoft User Guide provides information to build PeopleSoft mappings and extract data from PeopleSoft into a data warehouse. It is written for the database administrator and developers who are responsible for extracting data from the PeopleSoft system into the data warehouse.
This guide assumes you have knowledge of relational database concepts and the database engines, PowerCenter, and the PeopleSoft system. You should also be familiar with the interface requirements for other supporting applications.
Informatica Resources
Informatica Customer PortalAs an Informatica customer, you can access the Informatica Customer Portal site at http://my.informatica.com. The site contains product information, user group information, newsletters, access to the Informatica customer support case management system (ATLAS), the Informatica Knowledge Base, Informatica Documentation Center, and access to the Informatica user community.
Informatica DocumentationThe Informatica Documentation team takes every effort to create accurate, usable documentation. If you have questions, comments, or ideas about this documentation, contact the Informatica Documentation team through email at [email protected]. We will use your feedback to improve our documentation. Let us know if we can contact you regarding your comments.
Informatica Web SiteYou can access the Informatica corporate web site at http://www.informatica.com. The site contains information about Informatica, its background, upcoming events, and sales offices. You will also find product and partner information. The services area of the site includes important information about technical support, training and education, and implementation services.
Informatica Knowledge BaseAs an Informatica customer, you can access the Informatica Knowledge Base at http://my.informatica.com. Use the Knowledge Base to search for documented solutions to known technical issues about Informatica products. You can also find answers to frequently asked questions, technical white papers, and technical tips.
vii
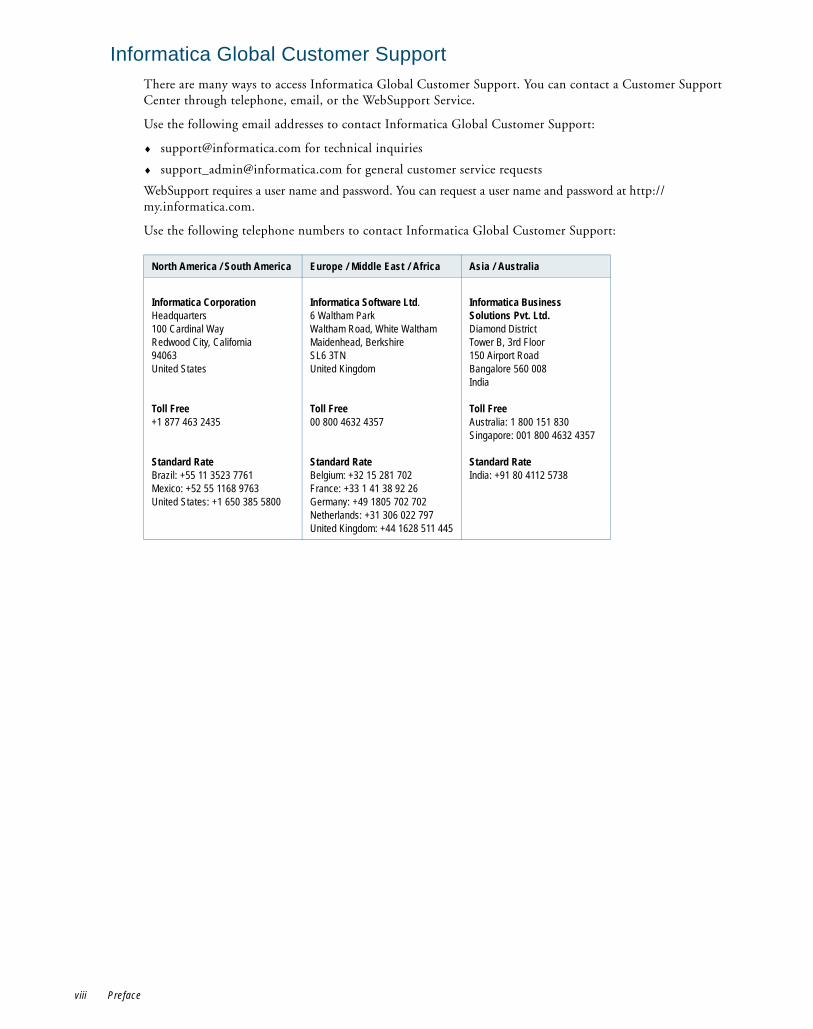
Informatica Global Customer SupportThere are many ways to access Informatica Global Customer Support. You can contact a Customer Support Center through telephone, email, or the WebSupport Service.
Use the following email addresses to contact Informatica Global Customer Support:
♦ [email protected] for technical inquiries
♦ [email protected] for general customer service requests
WebSupport requires a user name and password. You can request a user name and password at http://my.informatica.com.
Use the following telephone numbers to contact Informatica Global Customer Support:
North America / South America Europe / Middle East / Africa Asia / Australia
Informatica Corporation Headquarters100 Cardinal WayRedwood City, California 94063United States
Toll Free +1 877 463 2435
Standard RateBrazil: +55 11 3523 7761 Mexico: +52 55 1168 9763 United States: +1 650 385 5800
Informatica Software Ltd.6 Waltham ParkWaltham Road, White WalthamMaidenhead, BerkshireSL6 3TNUnited Kingdom
Toll Free 00 800 4632 4357
Standard RateBelgium: +32 15 281 702France: +33 1 41 38 92 26Germany: +49 1805 702 702Netherlands: +31 306 022 797United Kingdom: +44 1628 511 445
Informatica Business Solutions Pvt. Ltd.Diamond DistrictTower B, 3rd Floor150 Airport RoadBangalore 560 008India
Toll Free Australia: 1 800 151 830Singapore: 001 800 4632 4357
Standard RateIndia: +91 80 4112 5738
viii Preface

C H A P T E R 1
Understanding PowerExchange for PeopleSoft
This chapter includes the following topics:
♦ Overview, 1
♦ PeopleSoft Architecture, 1
♦ Importing PeopleSoft Sources, 2
♦ PeopleSoft Records, 3
♦ PeopleSoft Trees, 4
♦ Flattening Trees, 7
OverviewPowerExchange for PeopleSoft extracts data from PeopleSoft systems. To extract data from a PeopleSoft system, complete the following steps:
1. Define connection information for the PowerCenter Client and Integration Service to connect to the PeopleSoft system.
2. Import a source definition.
3. Create a mapping.
4. Create a session and workflow.
Although the overall steps for extracting from PeopleSoft are similar to extracting from other relational databases, completing them can differ. For example, to use an Oracle source definition in a mapping, you must connect it to a Source Qualifier transformation. To use a PeopleSoft source definition, you connect it to an Application Source Qualifier transformation.
This chapter provides an overview of the interactions between the PowerCenter and PeopleSoft systems.
PeopleSoft ArchitecturePowerExchange for PeopleSoft supports extraction from PeopleSoft systems.
1
Earlier versions of PeopleSoft have a two-tier, client-server architecture consisting of PeopleSoft applications and the underlying database server. Later versions of PeopleSoft have a three-tier architecture that provides an additional application server to increase the performance of certain application transactions.
PeopleSoft saves metadata in metadata tables. PeopleSoft metadata provides a description and logical view of data stored in underlying physical database tables. It can include information such as the datatype or physical location of columns.
To import a PeopleSoft source definition, the Designer uses ODBC to connect to the PeopleSoft metadata tables and import PeopleSoft metadata.
PeopleSoft stores data in underlying physical database tables and uses SQL to communicate with the database server.
The Integration Service runs directly against the underlying physical database tables to extract data. The Integration Service uses the database connection code page to perform code page conversions.
PeopleSoft lets you keep language-sensitive metadata and data in multiple languages. Use PeopleSoft language codes to import language-sensitive metadata into the PowerCenter repository. You can also use PeopleSoft language codes to extract language-sensitive data.
PeopleSoft SecurityYou can extract data from a PeopleSoft system without compromising existing PeopleSoft security.
To access PeopleSoft metadata and data, the PowerCenter Client and Integration Service require a database username and password to read PeopleSoft metadata tables and underlying physical database tables. While you can use the table owner names as the database username, you can keep PeopleSoft metadata and source data secure by creating new database usernames with read-only access.
You can create two users: one for metadata analysis and one for source data extraction. Alternatively, you can create a single user to access both metadata and application data.
RELATED TOPICS:♦ “Step 1. Configure PeopleSoft Security” on page 12
Importing PeopleSoft SourcesBefore extracting data from a source, you need to import a source definition. Use the Designer to connect to the PeopleSoft metadata tables for PeopleSoft source metadata.
PowerExchange for PeopleSoft extracts source data from two types of PeopleSoft objects:
♦ Records
♦ Trees
You cannot configure some metadata imported from PeopleSoft records in the Designer. Therefore, always import PeopleSoft records from the Sources > Import from PeopleSoft menu in the Source Analyzer.
Importing trees is different than importing records. The Integration Service needs to denormalize trees to extract data from them. Depending on how you want to denormalize a tree, you can choose to import or create a source definition for a tree.
When you use a PeopleSoft source definition in a mapping, you connect it to an Application Source Qualifier transformation. Use the Application Source Qualifier to define the record set you want from PeopleSoft sources by creating a filter or extract override. You can also use the Application Source Qualifier to join data from related sources.
2 Chapter 1: Understanding PowerExchange for PeopleSoft
Creating Key RelationshipsAfter you import PeopleSoft record definitions, you can create primary-foreign key relationships between them in the Source Analyzer. The primary-foreign key relationships exist in the metadata only. You can join PeopleSoft records in the Application Source Qualifier if the records have primary-foreign key relationships.
PeopleSoft RecordsA PeopleSoft record is a table-like logical structure. Like a relational table, a record can contain columns with defined datatypes, precision, scale, and keys.
PowerCenter supports extracting data from the following PeopleSoft records:
♦ SQL table. Has a one-to-one relationship with an underlying physical database table. Key columns in SQL tables are unique.
♦ SQL view. Like a database view, SQL views offer an alternative view of information in one or more database tables. Key columns in SQL views can contain duplicate values.
Metadata related to each record is saved in the PeopleSoft metadata tables. Data for each record is saved in underlying database tables. By default, PeopleSoft names the underlying database tables after the record, PS_Record_Name. For example, data for the PeopleSoft record AE_REQUEST is saved in the PS_AE_REQUEST database table.
When you import a PeopleSoft record, the Designer imports both the PeopleSoft source name and the underlying database table name. By default, the Designer uses the PeopleSoft source name as the name of the source definition. The Integration Service uses the underlying database table name to extract source data.
When you import a PeopleSoft record, the Designer creates a source definition containing a column for each column in the record. The Designer also imports key information and effective date information.
Importing PeopleSoft KeysPeopleSoft systems allow key columns that can contain unique values or duplicate values. The Designer uses the PeopleSoft key type to represent both types of key columns. When you import a source definition for a PeopleSoft SQL table record or view record into a PowerCenter repository, the Designer creates PeopleSoft key columns for both SQL table and view key columns.
RELATED TOPICS:♦ “Record Key Columns” on page 17
♦ “Creating Customized Key Relationships” on page 18
Importing Effective Dated RecordsPeopleSoft uses effective dates in records to maintain data history. Using the effective date record column, EFFDT, you can store future, current, and past data. You can store multiple occurrences of data based on when it goes into effect.
Some PeopleSoft records also use an effective sequence column, EFFSEQ, to track changes. This column is used in conjunction with effective date columns when an effective date alone is not a sufficient indicator of the most recent data.
When you import an effective dated PeopleSoft record, the Designer adds a new column to the source definition, TO_EFFDT. You can link the TO_EFFDT field in the Application Source Qualifier to other transformations and targets.
PeopleSoft Records 3
By default, the Integration Service extracts all data from a PeopleSoft record. However, if a record contains effective date or effective sequence columns, you can perform the following tasks in the Application Source Qualifier to filter source data:
♦ Specify to extract current rows for the default query.
♦ Enter a user-defined filter.
♦ Enter a user-defined extract override.
♦ Enter a user-defined join.
RELATED TOPICS:♦ “Linking the TO_EFFDT Port” on page 42
♦ “Joining Effective Dated PeopleSoft Records” on page 43
PeopleSoft TreesA PeopleSoft tree is an object that defines the groupings and hierarchical relationships between the values of a database field. A tree specifies how the PeopleSoft system groups the values of a database field for purposes of reporting or security access.
PeopleSoft uses levels to define and organize the relationship between different nodes. PowerExchange for PeopleSoft extracts data from trees with either of the following characteristics:
♦ Strictly enforced levels
♦ Loosely enforced levels
PowerExchange for PeopleSoft extracts data from the following PeopleSoft tree structure types:
♦ Detail trees. Extracts data from loose-level and strict-level detail trees with static detail ranges.
♦ Winter trees. Extracts data from loose-level and strict-level node-oriented trees. Winter trees contain no detail ranges or detail records.
♦ Summary trees. Extracts data from loose-level and strict-level summary trees. Summary trees provide an alternate view of the nodes in a detail tree.
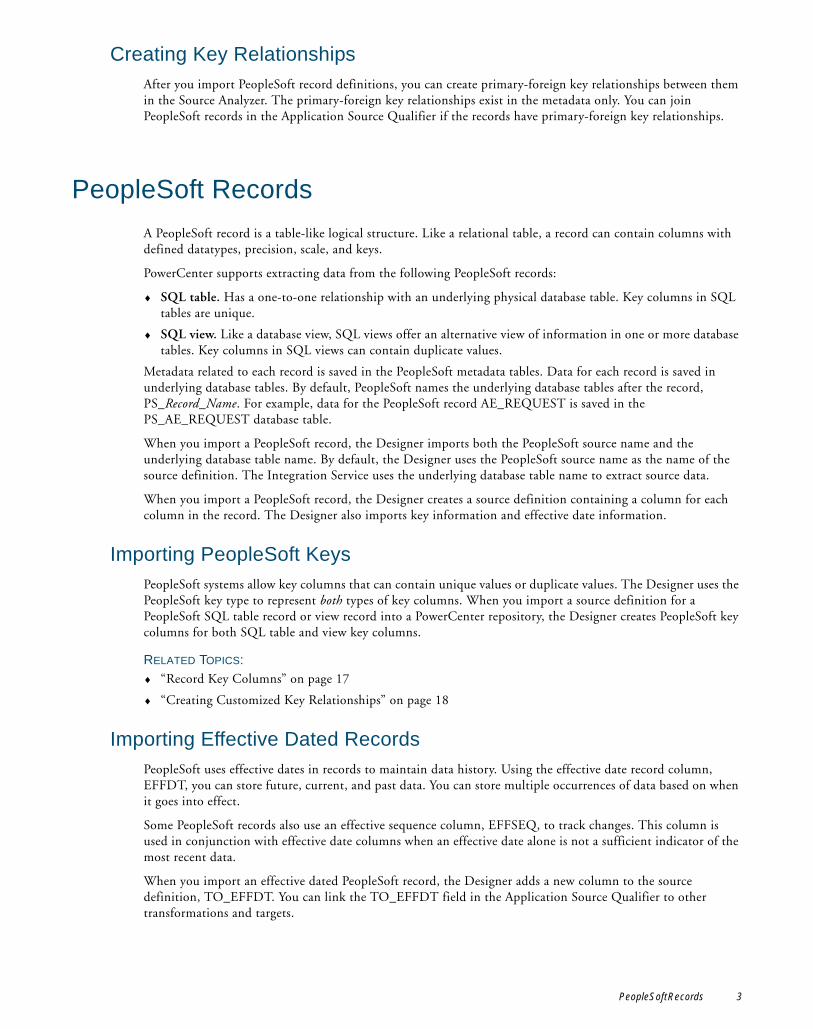
Each individual element in the tree is called a node. A tree can have two types of nodes:
♦ Root. The first level of the tree. All other nodes in the tree branch from the root node.
♦ Branch. Nodes extending from the root node containing information organized by the tree.
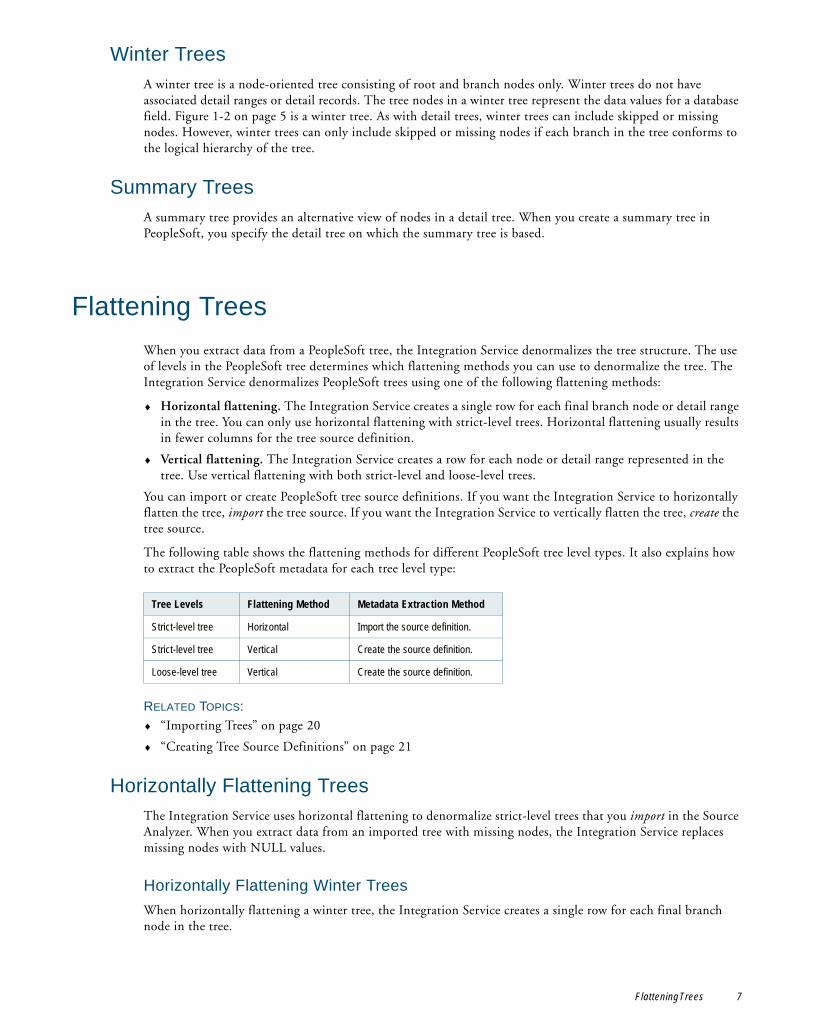
A logical unit of nodes extending from the root node level to the final branch node level of a tree is known as a branch.
Figure 1-1 represents a simple tree structure:
In addition, detail trees have detail ranges. Detail ranges represent the data in a related PeopleSoft record that is organized by the tree. The PeopleSoft record is the detail record for the tree.
Figure 1-1. Tree Representation
Root Node
Branch Nodes
Branch
4 Chapter 1: Understanding PowerExchange for PeopleSoft
Tree LevelsIn PeopleSoft, you can use levels in a tree. PeopleSoft uses levels to define and organize the relationship between different nodes. The use of levels in a PeopleSoft tree can either be strictly enforced, loosely enforced, or not used.
PowerExchange for PeopleSoft extracts data from the following trees:
♦ Strict-level trees. A PeopleSoft tree with strictly enforced levels. All nodes at a particular level represent the same kind of information.
♦ Loose-level trees. A PeopleSoft tree with loosely enforced levels. Each level can contain nodes with different kinds of information.
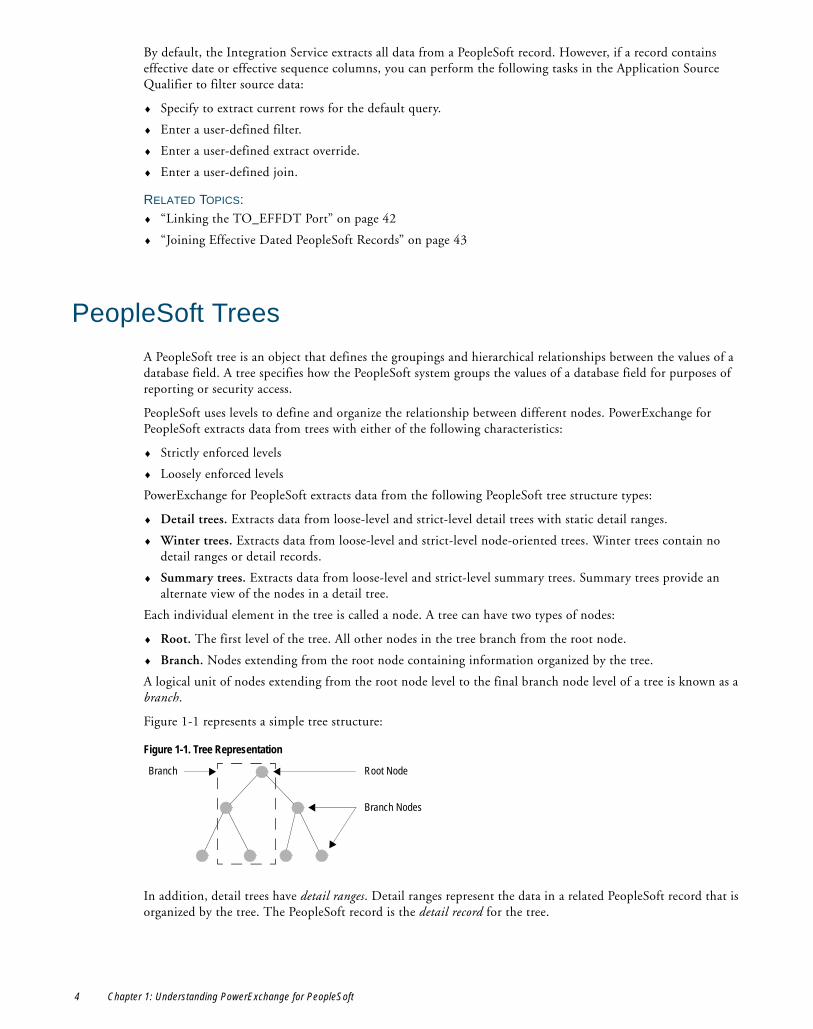
Strict-Level TreesPowerExchange for PeopleSoft supports trees with strictly enforced levels. In a strict-level tree, each branch of the tree progresses logically through the hierarchy of levels from the root node to the final branch node of a winter tree or the detail range of a detail tree. PeopleSoft assigns a level to each node based on its position in the tree.
Strict-level trees can contain branches with skipped or missing nodes. Skipped or missing nodes result in different sets of data but do not affect the structure of the tree or the imported source definition.
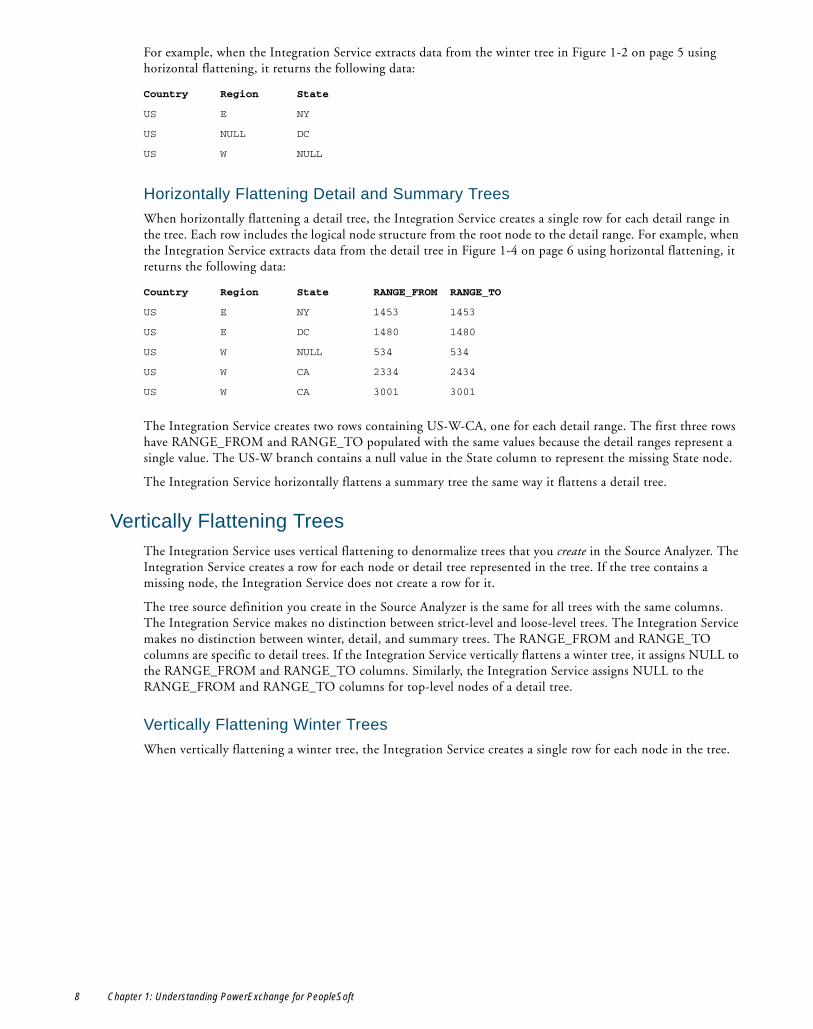
For example, Figure 1-1 on page 4 has no skipped or missing nodes. In contrast, Figure 1-2 is a strict-level tree with missing nodes. The tree contains defined levels, and all branches progress logically through the hierarchy of levels. The top level, or root node level, is the country US. Level 2 is a branch node level with the East and West regions. Level 3 is another branch node level consisting of states in each region:
The US-DC branch skips the region node level. The tree also contains a branch, US-W, with a missing state node level. In this strict-level tree, branches cannot be configured to alter or reverse the hierarchy of levels. For example, you cannot have the state node above the country node, such as DC-US.
The Integration Service denormalizes strict-level trees using either vertical or horizontal flattening.
Loose-Level TreesPowerExchange for PeopleSoft supports trees with loosely enforced levels. In a loose-level tree, one level can contain nodes with different kinds of information. Also, nodes representing the same type of information can appear at multiple levels. Loose-level trees do not have strict hierarchical structures.
Loose-level trees can contain branches with skipped or missing nodes. Skipped or missing nodes result in different sets of data but do not affect the structure of the tree or the imported source definition.
Figure 1-2. Strict-Level Winter Tree with Missing Nodes
NYBranch with Skipped Level
Level 1, Root Node: Country
Level 2, Branch Node: Region
Level 3, Branch Node: State
E
US
W
DC
PeopleSoft Trees 5
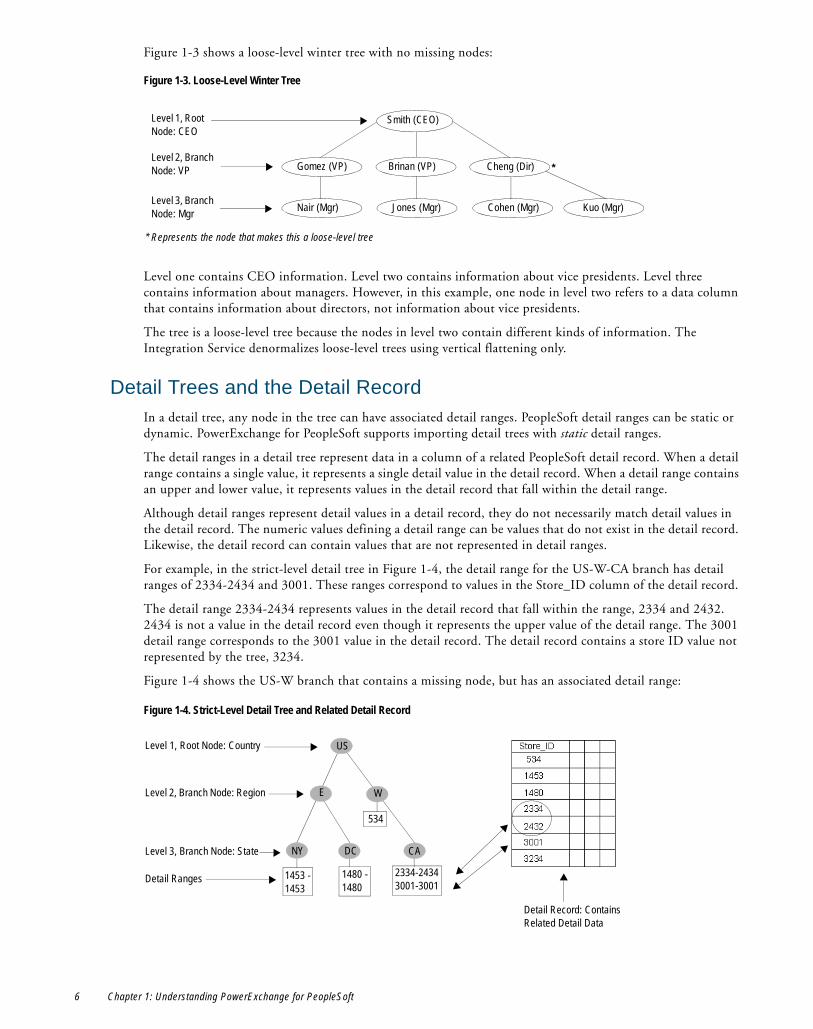
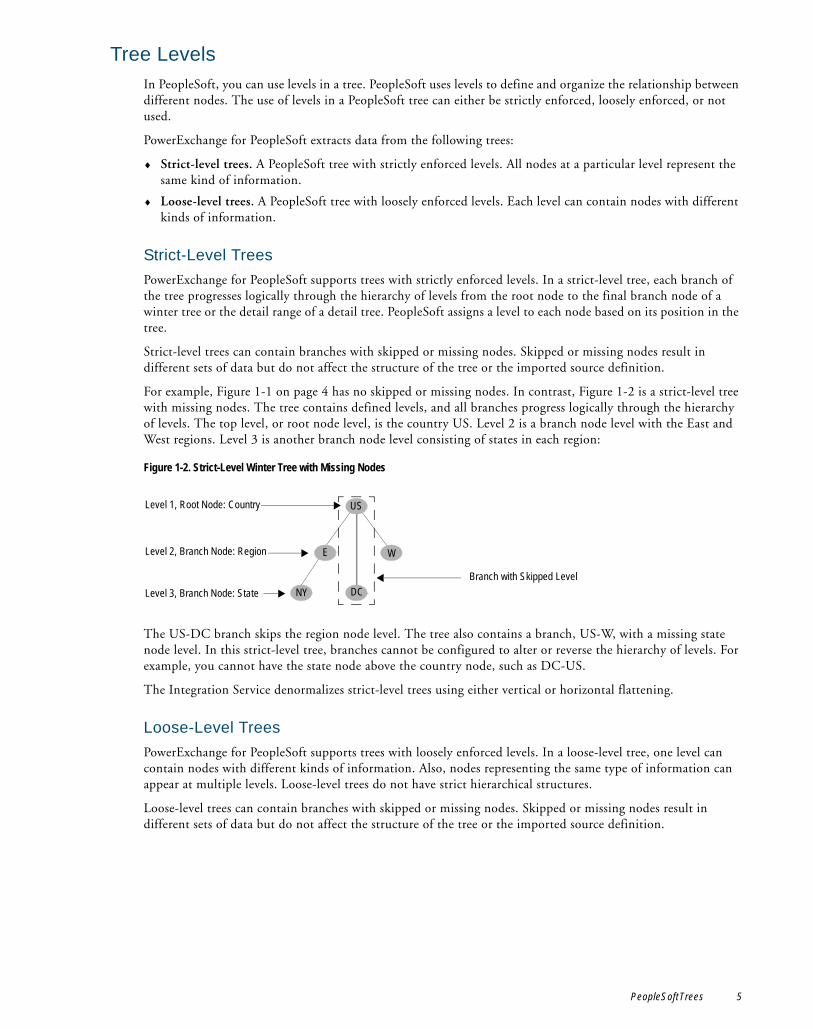
Figure 1-3 shows a loose-level winter tree with no missing nodes:
Level one contains CEO information. Level two contains information about vice presidents. Level three contains information about managers. However, in this example, one node in level two refers to a data column that contains information about directors, not information about vice presidents.
The tree is a loose-level tree because the nodes in level two contain different kinds of information. The Integration Service denormalizes loose-level trees using vertical flattening only.
Detail Trees and the Detail RecordIn a detail tree, any node in the tree can have associated detail ranges. PeopleSoft detail ranges can be static or dynamic. PowerExchange for PeopleSoft supports importing detail trees with static detail ranges.
The detail ranges in a detail tree represent data in a column of a related PeopleSoft detail record. When a detail range contains a single value, it represents a single detail value in the detail record. When a detail range contains an upper and lower value, it represents values in the detail record that fall within the detail range.
Although detail ranges represent detail values in a detail record, they do not necessarily match detail values in the detail record. The numeric values defining a detail range can be values that do not exist in the detail record. Likewise, the detail record can contain values that are not represented in detail ranges.
For example, in the strict-level detail tree in Figure 1-4, the detail range for the US-W-CA branch has detail ranges of 2334-2434 and 3001. These ranges correspond to values in the Store_ID column of the detail record.
The detail range 2334-2434 represents values in the detail record that fall within the range, 2334 and 2432. 2434 is not a value in the detail record even though it represents the upper value of the detail range. The 3001 detail range corresponds to the 3001 value in the detail record. The detail record contains a store ID value not represented by the tree, 3234.
Figure 1-4 shows the US-W branch that contains a missing node, but has an associated detail range:
Figure 1-3. Loose-Level Winter Tree
Figure 1-4. Strict-Level Detail Tree and Related Detail Record
Level 1, Root Node: CEO
Level 2, Branch Node: VP Gomez (VP)
Smith (CEO)
Brinan (VP) Cheng (Dir)
Nair (Mgr) Jones (Mgr) Cohen (Mgr)Level 3, Branch Node: Mgr
*
* Represents the node that makes this a loose-level tree
Kuo (Mgr)
534
2334-24343001-3001
1480 - 1480
Detail Record: Contains Related Detail Data
1453 -1453
Level 1, Root Node: Country
Level 2, Branch Node: Region
Level 3, Branch Node: State
Detail Ranges
US
E W
NY DC CA
6 Chapter 1: Understanding PowerExchange for PeopleSoft
Winter TreesA winter tree is a node-oriented tree consisting of root and branch nodes only. Winter trees do not have associated detail ranges or detail records. The tree nodes in a winter tree represent the data values for a database field. Figure 1-2 on page 5 is a winter tree. As with detail trees, winter trees can include skipped or missing nodes. However, winter trees can only include skipped or missing nodes if each branch in the tree conforms to the logical hierarchy of the tree.
Summary TreesA summary tree provides an alternative view of nodes in a detail tree. When you create a summary tree in PeopleSoft, you specify the detail tree on which the summary tree is based.
Flattening TreesWhen you extract data from a PeopleSoft tree, the Integration Service denormalizes the tree structure. The use of levels in the PeopleSoft tree determines which flattening methods you can use to denormalize the tree. The Integration Service denormalizes PeopleSoft trees using one of the following flattening methods:
♦ Horizontal flattening. The Integration Service creates a single row for each final branch node or detail range in the tree. You can only use horizontal flattening with strict-level trees. Horizontal flattening usually results in fewer columns for the tree source definition.
♦ Vertical flattening. The Integration Service creates a row for each node or detail range represented in the tree. Use vertical flattening with both strict-level and loose-level trees.
You can import or create PeopleSoft tree source definitions. If you want the Integration Service to horizontally flatten the tree, import the tree source. If you want the Integration Service to vertically flatten the tree, create the tree source.
The following table shows the flattening methods for different PeopleSoft tree level types. It also explains how to extract the PeopleSoft metadata for each tree level type:
RELATED TOPICS:♦ “Importing Trees” on page 20
♦ “Creating Tree Source Definitions” on page 21
Horizontally Flattening TreesThe Integration Service uses horizontal flattening to denormalize strict-level trees that you import in the Source Analyzer. When you extract data from an imported tree with missing nodes, the Integration Service replaces missing nodes with NULL values.
Horizontally Flattening Winter TreesWhen horizontally flattening a winter tree, the Integration Service creates a single row for each final branch node in the tree.
Tree Levels Flattening Method Metadata Extraction Method
Strict-level tree Horizontal Import the source definition.
Strict-level tree Vertical Create the source definition.
Loose-level tree Vertical Create the source definition.
Flattening Trees 7
For example, when the Integration Service extracts data from the winter tree in Figure 1-2 on page 5 using horizontal flattening, it returns the following data:
Horizontally Flattening Detail and Summary TreesWhen horizontally flattening a detail tree, the Integration Service creates a single row for each detail range in the tree. Each row includes the logical node structure from the root node to the detail range. For example, when the Integration Service extracts data from the detail tree in Figure 1-4 on page 6 using horizontal flattening, it returns the following data:
The Integration Service creates two rows containing US-W-CA, one for each detail range. The first three rows have RANGE_FROM and RANGE_TO populated with the same values because the detail ranges represent a single value. The US-W branch contains a null value in the State column to represent the missing State node.
The Integration Service horizontally flattens a summary tree the same way it flattens a detail tree.
Vertically Flattening TreesThe Integration Service uses vertical flattening to denormalize trees that you create in the Source Analyzer. The Integration Service creates a row for each node or detail tree represented in the tree. If the tree contains a missing node, the Integration Service does not create a row for it.
The tree source definition you create in the Source Analyzer is the same for all trees with the same columns. The Integration Service makes no distinction between strict-level and loose-level trees. The Integration Service makes no distinction between winter, detail, and summary trees. The RANGE_FROM and RANGE_TO columns are specific to detail trees. If the Integration Service vertically flattens a winter tree, it assigns NULL to the RANGE_FROM and RANGE_TO columns. Similarly, the Integration Service assigns NULL to the RANGE_FROM and RANGE_TO columns for top-level nodes of a detail tree.
Vertically Flattening Winter TreesWhen vertically flattening a winter tree, the Integration Service creates a single row for each node in the tree.
Country Region State
US E NY
US NULL DC
US W NULL
Country Region State RANGE_FROM RANGE_TO
US E NY 1453 1453
US E DC 1480 1480
US W NULL 534 534
US W CA 2334 2434
US W CA 3001 3001
8 Chapter 1: Understanding PowerExchange for PeopleSoft
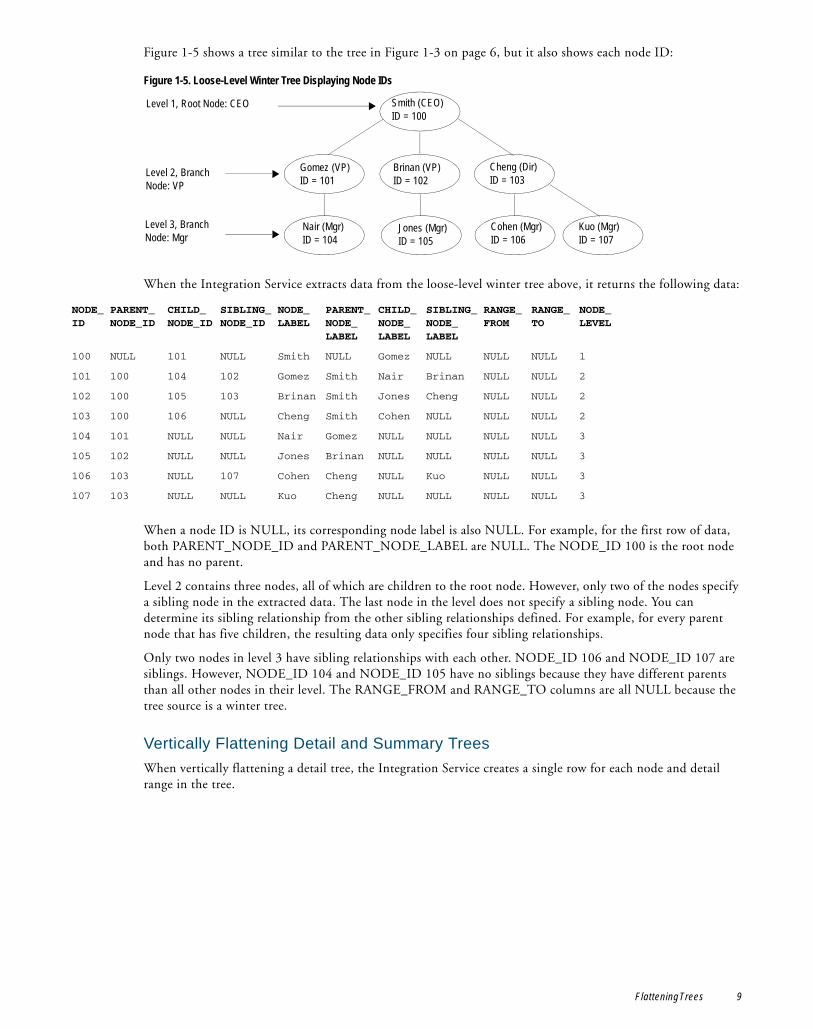
Figure 1-5 shows a tree similar to the tree in Figure 1-3 on page 6, but it also shows each node ID:
When the Integration Service extracts data from the loose-level winter tree above, it returns the following data:
When a node ID is NULL, its corresponding node label is also NULL. For example, for the first row of data, both PARENT_NODE_ID and PARENT_NODE_LABEL are NULL. The NODE_ID 100 is the root node and has no parent.
Level 2 contains three nodes, all of which are children to the root node. However, only two of the nodes specify a sibling node in the extracted data. The last node in the level does not specify a sibling node. You can determine its sibling relationship from the other sibling relationships defined. For example, for every parent node that has five children, the resulting data only specifies four sibling relationships.
Only two nodes in level 3 have sibling relationships with each other. NODE_ID 106 and NODE_ID 107 are siblings. However, NODE_ID 104 and NODE_ID 105 have no siblings because they have different parents than all other nodes in their level. The RANGE_FROM and RANGE_TO columns are all NULL because the tree source is a winter tree.
Vertically Flattening Detail and Summary TreesWhen vertically flattening a detail tree, the Integration Service creates a single row for each node and detail range in the tree.
Figure 1-5. Loose-Level Winter Tree Displaying Node IDs
NODE_ID
PARENT_ NODE_ID
CHILD_ NODE_ID
SIBLING_ NODE_ID
NODE_ LABEL
PARENT_ NODE_ LABEL
CHILD_ NODE_ LABEL
SIBLING_ NODE_ LABEL
RANGE_ FROM
RANGE_ TO
NODE_ LEVEL
100 NULL 101 NULL Smith NULL Gomez NULL NULL NULL 1
101 100 104 102 Gomez Smith Nair Brinan NULL NULL 2
102 100 105 103 Brinan Smith Jones Cheng NULL NULL 2
103 100 106 NULL Cheng Smith Cohen NULL NULL NULL 2
104 101 NULL NULL Nair Gomez NULL NULL NULL NULL 3
105 102 NULL NULL Jones Brinan NULL NULL NULL NULL 3
106 103 NULL 107 Cohen Cheng NULL Kuo NULL NULL 3
107 103 NULL NULL Kuo Cheng NULL NULL NULL NULL 3
Level 1, Root Node: CEO
Level 2, Branch Node: VP
Gomez (VP)ID = 101
Smith (CEO)ID = 100
Brinan (VP)ID = 102
Cheng (Dir)ID = 103
Nair (Mgr)ID = 104
Jones (Mgr)ID = 105
Cohen (Mgr)ID = 106
Level 3, Branch Node: Mgr
Kuo (Mgr)ID = 107
Flattening Trees 9
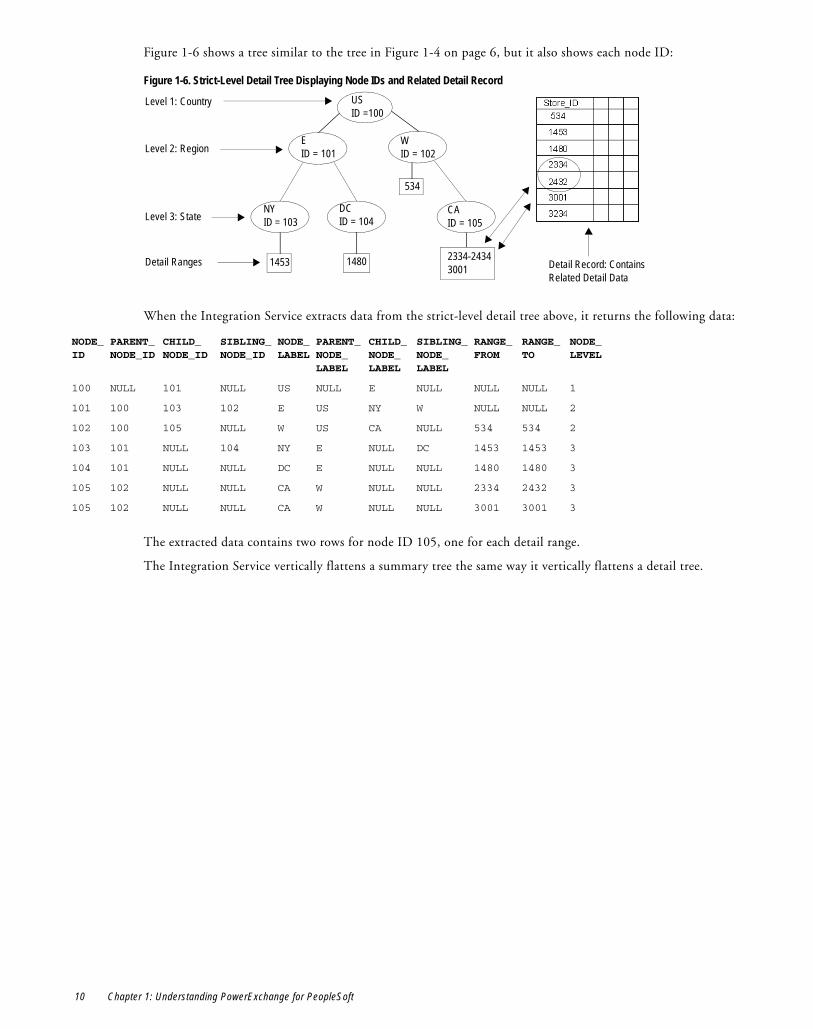
Figure 1-6 shows a tree similar to the tree in Figure 1-4 on page 6, but it also shows each node ID:
When the Integration Service extracts data from the strict-level detail tree above, it returns the following data:
The extracted data contains two rows for node ID 105, one for each detail range.
The Integration Service vertically flattens a summary tree the same way it vertically flattens a detail tree.
Figure 1-6. Strict-Level Detail Tree Displaying Node IDs and Related Detail Record
NODE_ ID
PARENT_ NODE_ID
CHILD_ NODE_ID
SIBLING_ NODE_ID
NODE_ LABEL
PARENT_ NODE_ LABEL
CHILD_ NODE_ LABEL
SIBLING_ NODE_ LABEL
RANGE_ FROM
RANGE_ TO
NODE_ LEVEL
100 NULL 101 NULL US NULL E NULL NULL NULL 1
101 100 103 102 E US NY W NULL NULL 2
102 100 105 NULL W US CA NULL 534 534 2
103 101 NULL 104 NY E NULL DC 1453 1453 3
104 101 NULL NULL DC E NULL NULL 1480 1480 3
105 102 NULL NULL CA W NULL NULL 2334 2432 3
105 102 NULL NULL CA W NULL NULL 3001 3001 3
534
2334-24343001
1480 Detail Record: Contains Related Detail Data
USID =100
EID = 101
NYID = 103
1453
DCID = 104
CAID = 105
WID = 102
Level 1: Country
Level 2: Region
Level 3: State
Detail Ranges
10 Chapter 1: Understanding PowerExchange for PeopleSoft
C H A P T E R 2
Configuring PowerExchange for PeopleSoft
This chapter includes the following topics:
♦ Overview, 11
♦ Step 1. Configure PeopleSoft Security, 12
♦ Step 2. Configure an ODBC Data Source, 13
OverviewBefore configuring PowerExchange for PeopleSoft, you need to install and configure PowerCenter and one or more supported versions of PeopleSoft. The administrators for each of these systems should perform the installation and configuration tasks for their respective systems.
To configure PowerExchange for PeopleSoft, complete the following steps:
1. Configure PeopleSoft security.
2. Configure an ODBC data source.
Connection RequirementsTo connect to PeopleSoft with the PowerCenter Client and Integration Service, you need the following information:
♦ A database user name and password for PeopleSoft metadata tables. The user name must have SELECT permission to read metadata from PeopleSoft metadata tables.
♦ A database user name and password for the underlying physical database tables for the PeopleSoft system. The user name must have SELECT permission to read source data from physical tables in the underlying database of the PeopleSoft system. This user name can be the same as the database user name above.
♦ Native connect string for the underlying database. To import PeopleSoft metadata, configure an ODBC data source using the native connect string for the underlying database. When importing PeopleSoft source definitions, the Designer uses the ODBC data source and a database user name and password with SELECT permission for the PeopleSoft metadata tables to connect to the PeopleSoft metadata tables.
To extract source data, you configure an application connection for a PeopleSoft database in the Workflow Manager. When you configure the application connection, you use the native connect string and a database user name and password with SELECT permission for the physical tables on the underlying database. The
11
Integration Service uses the database connection to extract source data from underlying physical database tables.
Step 1. Configure PeopleSoft SecurityYou can extract data from a PeopleSoft system while protecting the PeopleSoft metadata and data. To access PeopleSoft metadata and data, the PowerCenter Client and Integration Service require a database user name and password to read both the PeopleSoft metadata tables and the underlying physical database tables. While you can use the table owner names as the database user name, you can keep PeopleSoft metadata and source data secure by creating new database user names with read-only access. You can create one user for metadata and one user for source data. Alternatively, you can create a single user to access both metadata and source data.
Securing PeopleSoft MetadataTo protect PeopleSoft metadata, create a new database user and grant the user SELECT permission for PeopleSoft metadata tables. PeopleSoft system table names begin with PS, such as PSRECDEFN.
Enter this database user name in the Import from PeopleSoft dialog box when you use the Designer to import PeopleSoft source definitions. Since this user name is not the owner of the PeopleSoft system tables, you also enter the table owner name to import PeopleSoft source definitions.
To allow the Designer to import PeopleSoft source definitions, the database user requires SELECT permission on the following PeopleSoft metadata tables:
♦ PSDBFIELD
♦ PSDBFIELDLANG
♦ PSDBFLDLABL
♦ PSDBFLDLABLLANG
♦ PSLOCK
♦ PSMENUDEFN
♦ PSMENUDEFNLANG
♦ PSMENUITEM
♦ PSMENUITEMLANG
♦ PSOPTIONS
♦ PSPNLDEFN
♦ PSPNLFIELD
♦ PSPNLGROUP
♦ PSPNLGROUPLANG
♦ PSRECDEFN
♦ PSRECDEFNLANG
♦ PSRECFIELD
♦ PSSTATUS
♦ PSTREEDEFN
♦ PSTREEDEFNLANG
♦ PSTREELEAF
♦ PSTREELEVEL
♦ PSTREENODE
♦ PSTREESTRCT
12 Chapter 2: Configuring PowerExchange for PeopleSoft

Note: Not all versions of PeopleSoft use the listed tables.
You can alternatively grant SELECT permission to all PeopleSoft metadata tables to enable importing PeopleSoft source definitions.
Securing PeopleSoft Source DataTo protect PeopleSoft source data, create a database user and grant the user SELECT permission for the underlying physical database tables containing source data. Underlying physical table names begin with PS_, such as PS_LEDGER. To access the XLATTABLE table as a source, grant the user SELECT permission on the XLATTABLE table as well.
Use this database user name to configure the connection object in the Workflow Manager. The Integration Service uses this connection object to extract PeopleSoft source data.
When you configure a session to extract PeopleSoft source data, enter the owner name as the source table name prefix to access source data.
Step 2. Configure an ODBC Data SourceTo import a PeopleSoft source definition, create an ODBC data source for each PeopleSoft system you want to access. The PowerCenter Designer uses ODBC to connect to the PeopleSoft metadata tables to import PeopleSoft metadata.
When creating an ODBC data source, configure the data source to connect to the underlying database for the PeopleSoft system. For example, if the PeopleSoft system resides on an Oracle database, configure an ODBC data source to connect to the Oracle database. For more information about ODBC data sources, see the PowerCenter Configuration Guide.
Step 2. Configure an ODBC Data Source 13

14 Chapter 2: Configuring PowerExchange for PeopleSoft

C H A P T E R 3
Working with PeopleSoft Sources
This chapter includes the following topics:
♦ Overview, 15
♦ Working with Records, 16
♦ Working with Trees, 19
♦ Connecting to the PeopleSoft System, 22
♦ Importing PeopleSoft Source Definitions, 23
♦ Creating Tree Source Definitions, 25
♦ Editing PeopleSoft Source Definitions, 26
OverviewUse the following PeopleSoft sources in a mapping:
♦ Records. Similar to a relational table. You can import PeopleSoft SQL table and SQL view records.
♦ Trees. An object describing the hierarchical relationships between values in a single column of the detail record. You can import detail trees, summary trees, and winter trees.
You can either import or create source definitions. You can only import PeopleSoft records. When importing a PeopleSoft source definition, the Designer imports PeopleSoft metadata that is not configurable in the Source Analyzer. Therefore, do not manually create source definitions for PeopleSoft records.
You can either import a PeopleSoft tree or create a tree source definition for a tree, depending on the tree type. You can only import strict-level trees. You can create a tree source definition for either strict-level or loose-level trees.
When you import an effective dated PeopleSoft record, you connect to the PeopleSoft system to access the PeopleSoft metadata tables. The Designer uses metadata in these tables to create the source definition. You cannot configure this metadata manually. For information about configuring PeopleSoft metadata, see “Record Metadata” on page 16 and “Tree Metadata” on page 19.
Organizing Definitions in the NavigatorAfter you import or create a PeopleSoft record or tree, the Navigator displays and organizes sources by the PeopleSoft record or tree name by default.
15

You can click Tools > Options to display business names for sources. The Designer displays sources by PeopleSoft business names and user-defined business names for created tree source definitions. Record and tree names appear in parentheses, adjacent to the business name.
Working with RecordsWhen you import a PeopleSoft record, you connect to the PeopleSoft system to access the PeopleSoft metadata tables. The Designer uses metadata in these tables to create the source definition. You cannot configure this metadata manually.
You can import the following PeopleSoft record definitions into the repository:
♦ SQL table. PeopleSoft metadata similar to a relational table.
♦ SQL view. PeopleSoft metadata similar to a relational view.
You can import records from two tabs in the Import from PeopleSoft dialog box:
♦ Records tab. Records appear in alphabetical order on the Records tab.
♦ Panels tab. Records used by panels appear in the PeopleSoft organizational hierarchy on the Panels tab.
In the Import from PeopleSoft dialog box, the Designer displays the record name as it appears in the underlying database. Since the record name might differ from the PeopleSoft business name, the Import from PeopleSoft dialog box also displays the PeopleSoft business name for each record.
When you import a PeopleSoft record with an effective date, the Designer adds a new column to the source definition, TO_EFFDT. The TO_EFFDT column defines the end date for a range of valid dates.
Record MetadataWhen you import a record as a source, the Designer imports column names and datatypes as it would any other relational source table. In addition, the Designer imports PeopleSoft record metadata. You can extend this record metadata by using metadata extensions.
The following table lists the PeopleSoft record metadata the Designer imports:
For example, in the following PeopleSoft source definition, the PeopleSoft object type, PeopleSoft Record, appears in the Table Type field. The PeopleSoft business name, Body Parts Codes, appears in the Business Name field.
On the Attributes tab, the Designer lists language-sensitive columns, such as DESCR100 and DESCRSHORT. It does not list columns that are not language sensitive.
Source Definition Field Contains
Source Name Record name.
Table Type PeopleSoft object type (record).
Business Name PeopleSoft business name.
Attribute IsLang. Indicates a column is language-sensitive and might have data available in different languages. The Designer only lists language-sensitive columns.
Extension Name Metadata extension name.
Physical Table Name*
Name of the physical database table containing source data.
Language Table Name*
Name of the related language table containing language-sensitive data in different languages.
* Appears only on the Attributes tab of the source definition when opened in the Mapping Designer.
16 Chapter 3: Working with PeopleSoft Sources
On the Properties tab, the Designer displays the database table name for the record and the related language table. For example, the database table for the BODY_PART_TBL source is PS_BODY_PART_TBL, and the related language table is PS_BODY_PART_LANG. In this case, the related language table contains translated values for the language-sensitive fields, DESCR100 and DESCRSHORT.
On the Metadata Extensions tab, the Designer lists metadata extensions defined for the record. You use metadata extensions to extend the metadata stored in the repository by associating information with individual repository objects.
Viewing Records on the Records TabWhen you import a record, the Designer lists records in alphabetical order in the Records folder on the Records tab. Each record displays with the PeopleSoft business name.
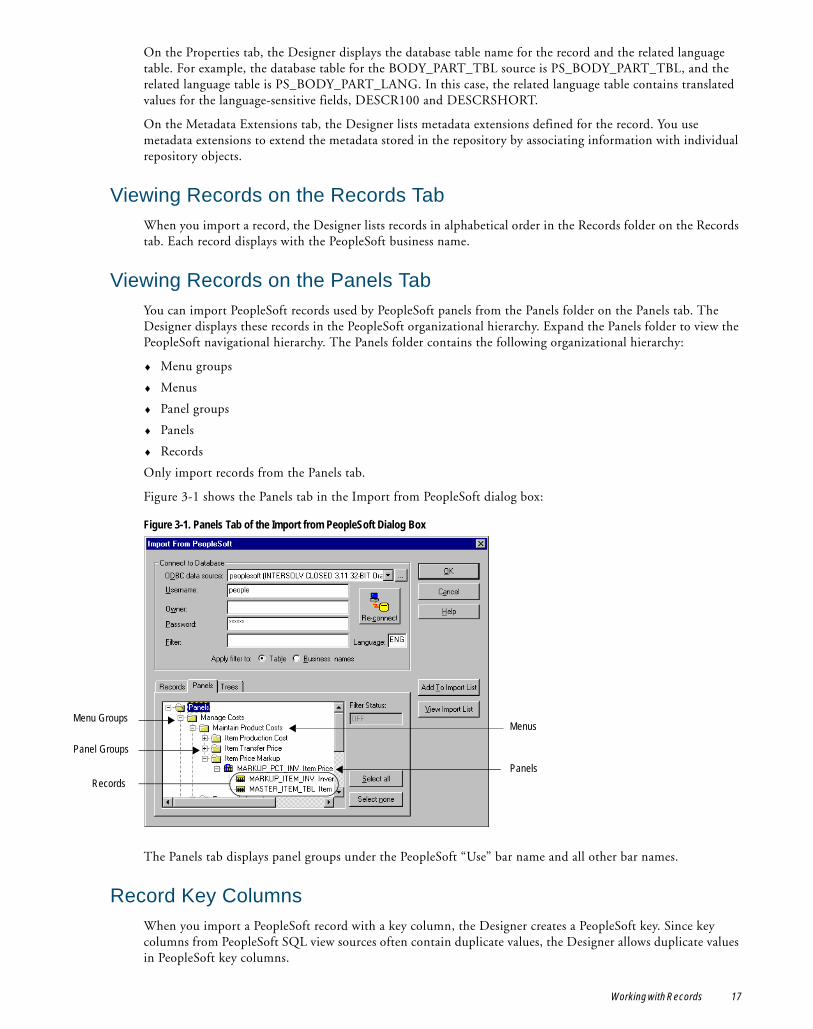
Viewing Records on the Panels TabYou can import PeopleSoft records used by PeopleSoft panels from the Panels folder on the Panels tab. The Designer displays these records in the PeopleSoft organizational hierarchy. Expand the Panels folder to view the PeopleSoft navigational hierarchy. The Panels folder contains the following organizational hierarchy:
♦ Menu groups
♦ Menus
♦ Panel groups
♦ Panels
♦ Records
Only import records from the Panels tab.
Figure 3-1 shows the Panels tab in the Import from PeopleSoft dialog box:
The Panels tab displays panel groups under the PeopleSoft “Use” bar name and all other bar names.
Record Key ColumnsWhen you import a PeopleSoft record with a key column, the Designer creates a PeopleSoft key. Since key columns from PeopleSoft SQL view sources often contain duplicate values, the Designer allows duplicate values in PeopleSoft key columns.
Figure 3-1. Panels Tab of the Import from PeopleSoft Dialog Box
Menu Groups
Panel Groups
Menus
PanelsRecords
Working with Records 17
Columns in PeopleSoft sources are related if they have matching column names and at least one column is a PeopleSoft key column. The Designer uses connectors to display key relationships between imported records.
The columns are related because columns in ABSENCE_CAL have PeopleSoft key columns with matching column names in ABSENCE_CAL_VW.
The Integration Service uses the key relationships to create default joins in the Application Source Qualifier.
RELATED TOPICS:♦ “Joining Source Data” on page 32
Creating Customized Key RelationshipsYou can join records in the Application Source Qualifier if the records have primary-foreign key relationships. You can create primary-foreign key relationships in the Source Analyzer. These columns do not have to be keys, but you can increase performance by including them in the index for each table.
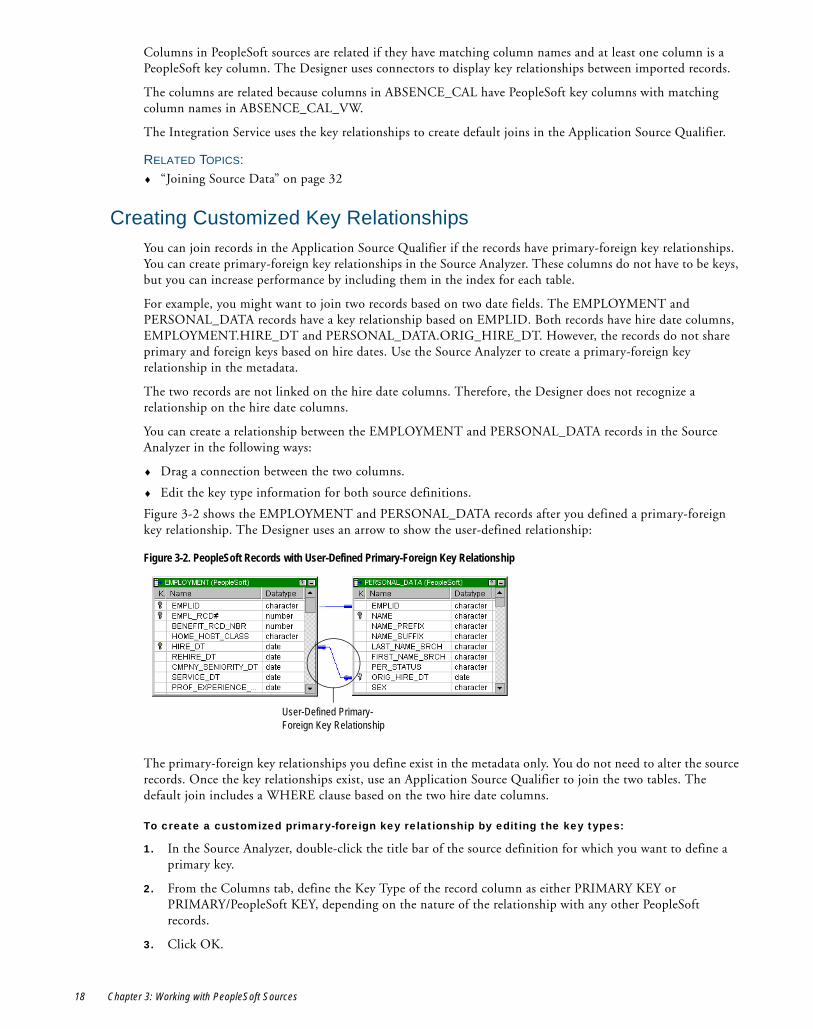
For example, you might want to join two records based on two date fields. The EMPLOYMENT and PERSONAL_DATA records have a key relationship based on EMPLID. Both records have hire date columns, EMPLOYMENT.HIRE_DT and PERSONAL_DATA.ORIG_HIRE_DT. However, the records do not share primary and foreign keys based on hire dates. Use the Source Analyzer to create a primary-foreign key relationship in the metadata.
The two records are not linked on the hire date columns. Therefore, the Designer does not recognize a relationship on the hire date columns.
You can create a relationship between the EMPLOYMENT and PERSONAL_DATA records in the Source Analyzer in the following ways:
♦ Drag a connection between the two columns.
♦ Edit the key type information for both source definitions.
Figure 3-2 shows the EMPLOYMENT and PERSONAL_DATA records after you defined a primary-foreign key relationship. The Designer uses an arrow to show the user-defined relationship:
The primary-foreign key relationships you define exist in the metadata only. You do not need to alter the source records. Once the key relationships exist, use an Application Source Qualifier to join the two tables. The default join includes a WHERE clause based on the two hire date columns.
To create a customized primary-foreign key relationship by editing the key types:
1. In the Source Analyzer, double-click the title bar of the source definition for which you want to define a primary key.
2. From the Columns tab, define the Key Type of the record column as either PRIMARY KEY or PRIMARY/PeopleSoft KEY, depending on the nature of the relationship with any other PeopleSoft records.
3. Click OK.
Figure 3-2. PeopleSoft Records with User-Defined Primary-Foreign Key Relationship
User-Defined Primary-Foreign Key Relationship
18 Chapter 3: Working with PeopleSoft Sources
4. Double-click the title bar of the source definition for which you want to define a foreign key.
5. From the Columns tab, define the Key Type of the record column as FOREIGN KEY.
6. Select the table in which you defined the PRIMARY/PeopleSoft KEY in the Primary Table field.
7. Select the column you defined as the PRIMARY/PeopleSoft KEY in the Primary Column field.
8. Click OK.
The Designer shows a link between the two record source definitions with an arrow.
Working with TreesYou can import a PeopleSoft tree or create a tree source definition for a tree, depending on the tree type. You can only import strict-level trees. You can create a tree source definition for either strict-level or loose-level trees.
When you create a tree source definition, the Designer denormalizes the tree using vertical flattening. When you import a PeopleSoft tree, the Designer denormalizes the tree using horizontal flattening.
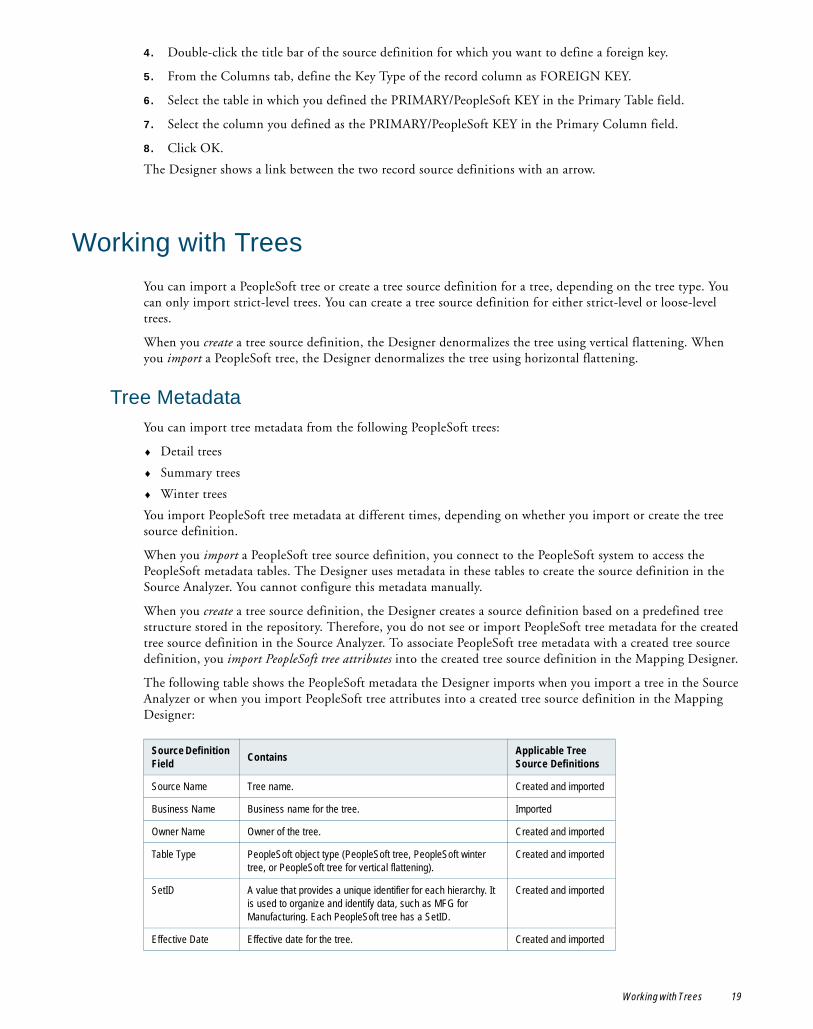
Tree MetadataYou can import tree metadata from the following PeopleSoft trees:
♦ Detail trees
♦ Summary trees
♦ Winter trees
You import PeopleSoft tree metadata at different times, depending on whether you import or create the tree source definition.
When you import a PeopleSoft tree source definition, you connect to the PeopleSoft system to access the PeopleSoft metadata tables. The Designer uses metadata in these tables to create the source definition in the Source Analyzer. You cannot configure this metadata manually.
When you create a tree source definition, the Designer creates a source definition based on a predefined tree structure stored in the repository. Therefore, you do not see or import PeopleSoft tree metadata for the created tree source definition in the Source Analyzer. To associate PeopleSoft tree metadata with a created tree source definition, you import PeopleSoft tree attributes into the created tree source definition in the Mapping Designer.
The following table shows the PeopleSoft metadata the Designer imports when you import a tree in the Source Analyzer or when you import PeopleSoft tree attributes into a created tree source definition in the Mapping Designer:
Source Definition Field Contains Applicable Tree
Source Definitions
Source Name Tree name. Created and imported
Business Name Business name for the tree. Imported
Owner Name Owner of the tree. Created and imported
Table Type PeopleSoft object type (PeopleSoft tree, PeopleSoft winter tree, or PeopleSoft tree for vertical flattening).
Created and imported
SetID A value that provides a unique identifier for each hierarchy. It is used to organize and identify data, such as MFG for Manufacturing. Each PeopleSoft tree has a SetID.
Created and imported
Effective Date Effective date for the tree. Created and imported
Working with Trees 19
Note: To add or view metadata for a created PeopleSoft tree source definition, open the Edit Transformations dialog box for the source definition in the Mapping Designer.
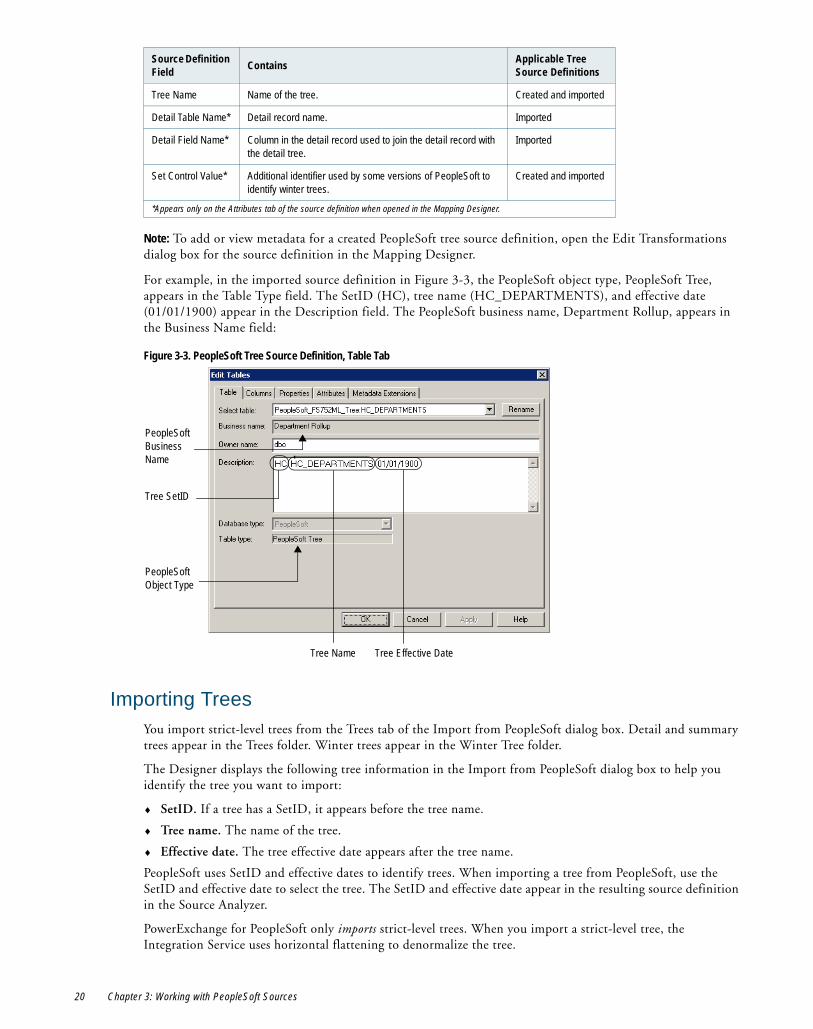
For example, in the imported source definition in Figure 3-3, the PeopleSoft object type, PeopleSoft Tree, appears in the Table Type field. The SetID (HC), tree name (HC_DEPARTMENTS), and effective date (01/01/1900) appear in the Description field. The PeopleSoft business name, Department Rollup, appears in the Business Name field:
Importing TreesYou import strict-level trees from the Trees tab of the Import from PeopleSoft dialog box. Detail and summary trees appear in the Trees folder. Winter trees appear in the Winter Tree folder.
The Designer displays the following tree information in the Import from PeopleSoft dialog box to help you identify the tree you want to import:
♦ SetID. If a tree has a SetID, it appears before the tree name.
♦ Tree name. The name of the tree.
♦ Effective date. The tree effective date appears after the tree name.
PeopleSoft uses SetID and effective dates to identify trees. When importing a tree from PeopleSoft, use the SetID and effective date to select the tree. The SetID and effective date appear in the resulting source definition in the Source Analyzer.
PowerExchange for PeopleSoft only imports strict-level trees. When you import a strict-level tree, the Integration Service uses horizontal flattening to denormalize the tree.
Tree Name Name of the tree. Created and imported
Detail Table Name* Detail record name. Imported
Detail Field Name* Column in the detail record used to join the detail record with the detail tree.
Imported
Set Control Value* Additional identifier used by some versions of PeopleSoft to identify winter trees.
Created and imported
*Appears only on the Attributes tab of the source definition when opened in the Mapping Designer.
Figure 3-3. PeopleSoft Tree Source Definition, Table Tab
Source Definition Field Contains Applicable Tree
Source Definitions
Tree SetID
Tree Effective Date
PeopleSoft Object Type
PeopleSoft Business Name
Tree Name
20 Chapter 3: Working with PeopleSoft Sources
Note: To use a loose-level tree as a source, you must create the source definition.
When you import strict-level trees, the Designer creates columns for the following:
♦ Root node level. The Designer creates single column for the root node level and names it LEVEL_RootNodeName.
♦ Branch node levels. The Designer creates a column for each branch node level in the tree and names each column LEVEL_BranchNodeLevel.
♦ Detail ranges. The Designer creates columns named RANGE_FROM and RANGE_TO to represent the detail ranges in detail and summary trees. Winter trees do not have detail ranges.
All columns are Character datatypes with a precision of 30.
Creating Tree Source DefinitionsYou can create a tree source definition in the Source Analyzer. However, when you create a tree source definition, the Integration Service always uses vertical flattening to denormalize the tree.
To use a loose-level PeopleSoft tree as a source in a mapping, you must create the source definition. However, you can create tree source definitions for either loose-level or strict-level trees. You cannot import loose-level trees.
When you create a tree source definition, the Designer uses a predefined source in the repository that specifies the column definitions. You cannot manually edit the tree source definition.
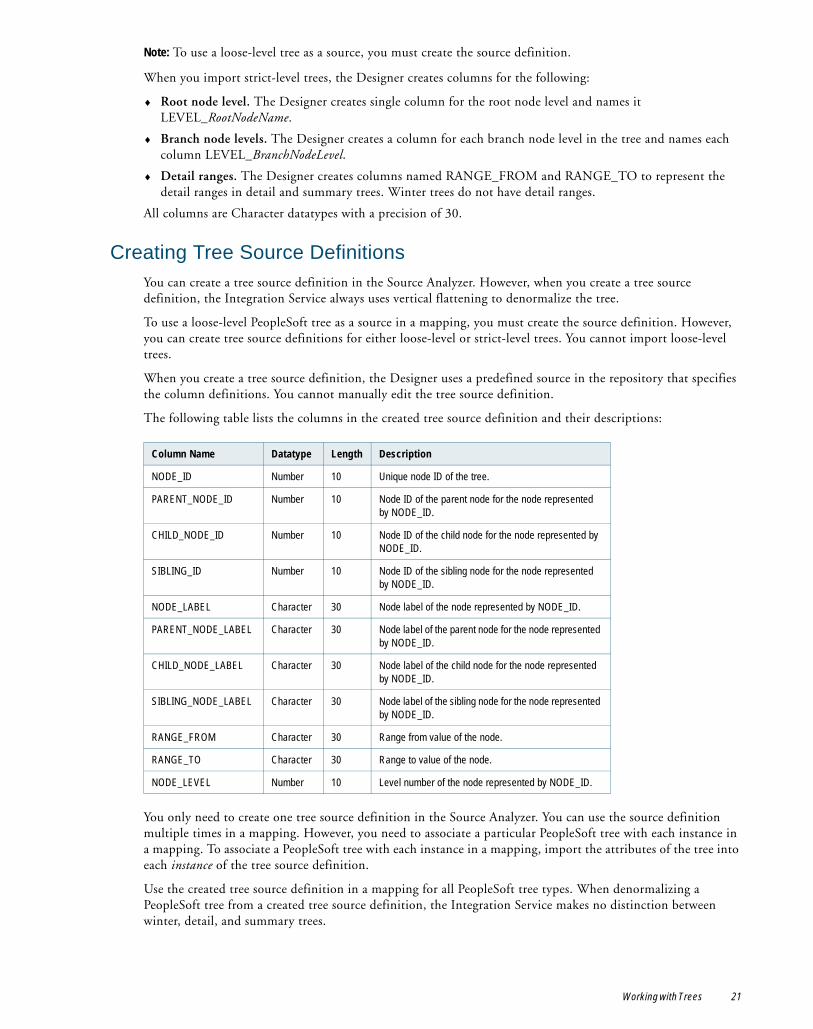
The following table lists the columns in the created tree source definition and their descriptions:
You only need to create one tree source definition in the Source Analyzer. You can use the source definition multiple times in a mapping. However, you need to associate a particular PeopleSoft tree with each instance in a mapping. To associate a PeopleSoft tree with each instance in a mapping, import the attributes of the tree into each instance of the tree source definition.
Use the created tree source definition in a mapping for all PeopleSoft tree types. When denormalizing a PeopleSoft tree from a created tree source definition, the Integration Service makes no distinction between winter, detail, and summary trees.
Column Name Datatype Length Description
NODE_ID Number 10 Unique node ID of the tree.
PARENT_NODE_ID Number 10 Node ID of the parent node for the node represented by NODE_ID.
CHILD_NODE_ID Number 10 Node ID of the child node for the node represented by NODE_ID.
SIBLING_ID Number 10 Node ID of the sibling node for the node represented by NODE_ID.
NODE_LABEL Character 30 Node label of the node represented by NODE_ID.
PARENT_NODE_LABEL Character 30 Node label of the parent node for the node represented by NODE_ID.
CHILD_NODE_LABEL Character 30 Node label of the child node for the node represented by NODE_ID.
SIBLING_NODE_LABEL Character 30 Node label of the sibling node for the node represented by NODE_ID.
RANGE_FROM Character 30 Range from value of the node.
RANGE_TO Character 30 Range to value of the node.
NODE_LEVEL Number 10 Level number of the node represented by NODE_ID.
Working with Trees 21
Importing Tree AttributesTo import PeopleSoft tree attributes, use the Import Attributes from PeopleSoft dialog box in the Mapping Designer. You import PeopleSoft tree attributes from the Trees tab of the Import from PeopleSoft dialog box.
All available loose-level and strict-level trees appear in the Trees tab. There is only one folder, the Trees folder, where the Designer lists all trees. The Designer does not distinguish between winter, detail, and summary trees when you import tree attributes into created tree source definitions.
The Designer displays the following tree information in the Import from PeopleSoft dialog box to help you identify the tree whose attributes you want to import:
♦ SetID. If a tree has a SetID, it appears before the tree name.
♦ Tree name. The name of the tree.
♦ Effective date. The tree effective date appears after the tree name.
The Import Attributes from PeopleSoft dialog box shows only one folder in the Trees tab, where it lists all available trees.
Importing the Detail RecordWhen you import a detail tree, you import the tree metadata only. Similarly, when you import the attributes of a detail tree into a created tree source definition, you import the tree metadata only. To join the created tree with the detail record, you must import the detail record also.
Imported Detail TreesThe tree source definition of an imported tree displays the name of the associated detail record. The detail record name appears in the Detail Table Name field on the Properties tab when you edit the source definition. The column name for detail data appears in Detail Field Name.
Import the detail record. You can join the tree and detail record in a single Application Source Qualifier in a mapping.
Created Tree Source DefinitionsA created tree source definition does not display the name of the associated detail record. To determine the associated detail record, refer to the PeopleSoft software.
Import the detail record. Use a Joiner transformation to join the created tree source definition and the detail record.
Connecting to the PeopleSoft SystemTo import PeopleSoft objects, use the Import from PeopleSoft dialog box to connect to the PeopleSoft system. You can enter a filter to reduce the number of objects the Designer displays in the selection list. You can also enter PeopleSoft language codes to specify the language in which you want language-sensitive metadata, such as column names and descriptions.
You can import a PeopleSoft objects from the Source Analyzer and Mapping Designer. When you import PeopleSoft objects from the Source Analyzer, you can import PeopleSoft records and PeopleSoft trees for horizontal flattening. When you import PeopleSoft objects from the Mapping Designer, you can import tree attributes into a created tree source definition.
22 Chapter 3: Working with PeopleSoft Sources
Entering Connection InformationThe Designer uses an ODBC data source and database username and password to connect to the PeopleSoft metadata tables to import PeopleSoft object definitions or tree attributes. The database username you enter must have SELECT permission on the PeopleSoft metadata tables.
If the database username is the owner of the PeopleSoft metadata tables, you can leave the Owner field blank. If the database username is not the owner of the PeopleSoft metadata tables, you must enter the owner name in the Import from PeopleSoft dialog box. This allows the Designer to access the metadata tables to import PeopleSoft source definitions.
Filtering Available Records and TreesWhen you import PeopleSoft sources, you can enter a filter condition to limit the number of records and trees displayed in the Import from PeopleSoft dialog box. If you do not enter a filter, the Designer displays all available records and trees in the PeopleSoft system. You might use the filter to improve the speed at which the Designer displays records and trees.
You can filter records and trees as follows:
♦ Records on the Records tab based on the record or business name
♦ Trees on the Trees tab based on tree name
Note: When you import tree attributes for a created tree source definition in the Mapping Designer, the Import Attributes from PeopleSoft dialog box only displays the Trees tab.
You cannot filter records that appear on the Panels tab, since they are organized by the PeopleSoft organizational hierarchy.
When you enter a filter, use the following guidelines:
♦ Enter one filter criterion at a time.
♦ Enter case-sensitive text.
♦ Use an underscore (_) or the percent symbol (%) as wildcard characters. Use an underscore to represent a single character. Use the percent symbol to represent multiple characters.
For example, to find a PeopleSoft record with “AGING” as part of the record name, enter the following filter:
%AGING%
The filter returns records containing AGING in the record name. If you know the record name begins with AGING, you can enter the filter without the first wildcard.
To perform a similar filter on PeopleSoft business names, which can contain a mix of uppercase and lowercase text, enter %Aging% or Aging%.
To change a filter condition, enter the new condition and reconnect to the database.
Tip: When filtering trees, SetID and effective date are not part of the actual tree name.
Importing PeopleSoft Source DefinitionsYou can import PeopleSoft records and trees for horizontal flattening. For information about importing a tree for vertical flattening, see “Creating Tree Source Definitions” on page 25.
When you import PeopleSoft sources, you add them to an import list. You can import more than one PeopleSoft object at once by making multiple selections and adding them to the import list. Once the import list is complete, you can import all listed PeopleSoft objects at once.
Importing PeopleSoft Source Definitions 23

To import a PeopleSoft source definition:
1. In the Source Analyzer, click Sources > Import From PeopleSoft.
After you connect to a PeopleSoft system, the Panels/Pages tab changes to the Panels tab or the Pages tab, depending on the version of PeopleSoft you are running. For example, if you connect to a PeopleSoft 8 system, the Panels/Pages tab changes to Panels. If you connect to an earlier version of PeopleSoft, the Panels/Pages tab changes to Pages.
2. Select the PeopleSoft ODBC connection, and then enter the database username and password to connect to the PeopleSoft metadata tables in the underlying database.
Note: This username must have SELECT permission on the PeopleSoft metadata tables.
If you need to create or modify an ODBC data source, click the button next to the list of existing data sources to open the ODBC Administrator. Create the appropriate data source, and click OK. In the Import Tables dialog box, select the new ODBC data source.
3. Optionally, enter the owner name of the PeopleSoft metadata tables.
If the database username you entered is not the owner of the PeopleSoft metadata tables, enter the table owner name to view available records and trees.
4. Optionally, enter a filter criterion and how to apply the filter.
When entering a filter criterion, use an underscore (_) as a wildcard to represent a single character. Use the percent symbol (%) to represent multiple characters.
The Designer filters the records on the Records tab and trees on the Trees tab. The Designer does not filter records on the Panels tab.
Tip: To filter table names, enter capitalized text. To filter business names, capitalize the initial letter of each word.
5. Optionally, enter a PeopleSoft language code.
To import metadata in the base language of the PeopleSoft system, leave this option blank.
If you want the Designer to import language-sensitive metadata in a particular language, enter the corresponding PeopleSoft language code.
6. Click Connect.
7. Select the Records, Panels, or Trees tab.
PeopleSoft records appear on the Records tab and the Panels tab. Strict-level PeopleSoft trees appear on the Trees tab. Winter trees appear in the Winter trees folder. Detail and summary trees appear in the Trees folder.
8. Open the folders for the objects you want to import.
Select the object or objects and click Add to Import List. You can add both records and trees to the import list.
9. Select the objects you want to add from a single tab and click Add to Import List.
Select a different tab to add other objects. You can select and add multiple objects to the import list at one time:
♦ Hold down the SHIFT key to select blocks within one folder.
♦ Hold down the CTRL key to make non-contiguous selections within a folder.
♦ Use the Select All button to select all tables within a folder.
To clear all selected sources, click Select None. To enter a different filter, enter the new filter criterion and click Re-Connect.
10. To see the objects on the Import List, click View Import List.
The Import List dialog box appears.
Tip: To remove an object from the list, select it and click Delete.
24 Chapter 3: Working with PeopleSoft Sources
11. To close the Import List, click Close.
12. To import all listed PeopleSoft objects, click OK.
After you import a PeopleSoft source, the Designer displays it in the Navigator below the Sources node in the folder. The Designer organizes PeopleSoft sources by the ODBC data source used to import the source and the PeopleSoft object type. Records appear in a folder named DataSourceName_Records. Trees appear in a folder named DataSourceName_Trees. If the source record, panel, or tree changes after you create the source definition, reimport or update the source definition accordingly.
Creating Tree Source DefinitionsTo import a tree for vertical flattening, complete the following tasks:
1. Create a tree source definition in the Source Analyzer.
2. Include the tree source definition in a mapping and import the PeopleSoft tree attributes in the source definition instance.
You can use a tree source definition multiple times in a mapping and import the attributes of different PeopleSoft trees into each instance of the source definition.
Step 1. Create a Tree Source DefinitionCreate one tree source definition for all mappings.
To manually create a tree source definition:
1. In the Source Analyzer, click Sources > Create.
The Create Source dialog box appears.
2. Enter a name for the tree source definition in the appropriate field.
3. Select PeopleSoft as the database type.
4. Enter a name in the Database Name field.
In the Navigator, the database name appears below the Sources node in the folder. All created tree source definitions defined with this database name appear below it in the Navigator.
5. Click Create. Click Done.
The source definition does not contain any tree attributes. You import tree attributes for each instance of the source definition you include in a mapping.
Step 2. Import Tree AttributesYou can add multiple instances of the source definition to a mapping. For each instance, import the attributes of a PeopleSoft tree. The Designer uses the tree attributes to associate a PeopleSoft tree with the instance of the definition.
To import tree attributes into a tree source definition:
1. In the Mapping Designer, create a mapping.
2. Drag a created tree source definition into the workspace.
3. Double-click the source definition and click the Properties tab.
The attributes are empty.
4. Click the Add button in the Import Vertical Tree Attributes field.
Creating Tree Source Definitions 25
The Import Attributes from PeopleSoft dialog box appears.
5. Select the PeopleSoft ODBC connection.
To create or modify an ODBC data source, click the button next to the list of existing data sources to open the ODBC Administrator. Create the appropriate data source, and click OK. Then in the Import Tables dialog box, select the new ODBC data source.
6. Enter the database username and password to connect to the PeopleSoft metadata tables in the underlying database.
Note: The username must have SELECT permission on the PeopleSoft metadata tables.
7. Optionally, enter the owner name of the PeopleSoft metadata tables.
If the database username is not the owner of the PeopleSoft metadata tables, enter the table owner name to view available records and trees.
8. Optionally, enter a filter criterion and how to apply the filter.
You can filter tree names using the Table option, but not business names. The Designer returns all trees if you apply the filter to business names.
Use an underscore (_) as a wildcard to represent a single character. Use the percent symbol (%) to represent multiple characters.
The Designer filters trees on the Trees tab. To filter tree names, enter capitalized text.
9. Optionally, enter a PeopleSoft language code.
To import metadata in the base language of the PeopleSoft system, leave this option blank. If you want the Designer to import language-sensitive metadata in a particular language, enter the corresponding PeopleSoft language code.
10. Click Connect.
Strict-level and loose-level trees appear on the Trees tab below the Trees folder.
11. Select the tree and click OK.
The Designer displays the tree attributes on the Properties tab. If there are attributes you do not want, click Revert to remove them.
The Import Vertical Tree Attributes field is empty after you import the tree attributes.
12. Click OK to close the Edit Transformations dialog box.
If the tree changes after you import the tree attributes, reimport or update the tree attributes accordingly.
Editing PeopleSoft Source DefinitionsYou can edit a PeopleSoft source definition to add descriptions or accommodate minor changes to the source. You can change source or port names, enter descriptions, change the port order, or delete ports. You can also change key types for PeopleSoft records to create primary-foreign key relationships.
Note: Because source definitions must match the source, import definitions instead of creating them manually.
26 Chapter 3: Working with PeopleSoft Sources
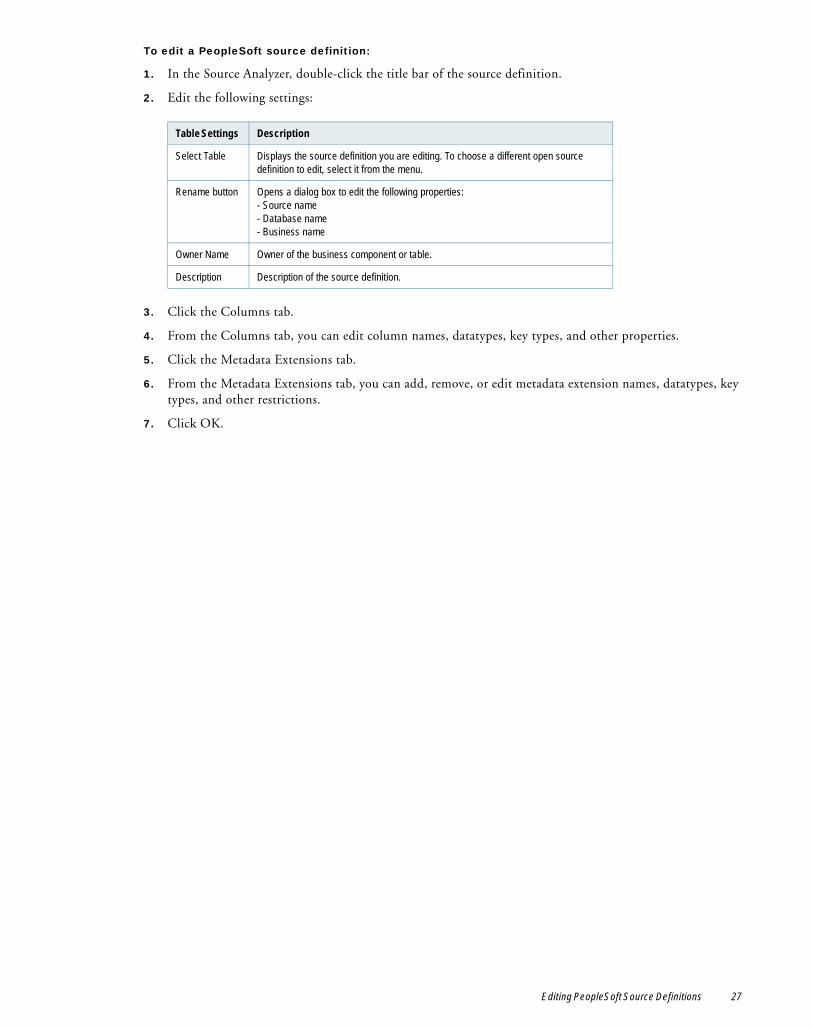
To edit a PeopleSoft source definition:
1. In the Source Analyzer, double-click the title bar of the source definition.
2. Edit the following settings:
3. Click the Columns tab.
4. From the Columns tab, you can edit column names, datatypes, key types, and other properties.
5. Click the Metadata Extensions tab.
6. From the Metadata Extensions tab, you can add, remove, or edit metadata extension names, datatypes, key types, and other restrictions.
7. Click OK.
Table Settings Description
Select Table Displays the source definition you are editing. To choose a different open source definition to edit, select it from the menu.
Rename button Opens a dialog box to edit the following properties:- Source name- Database name- Business name
Owner Name Owner of the business component or table.
Description Description of the source definition.
Editing PeopleSoft Source Definitions 27

28 Chapter 3: Working with PeopleSoft Sources

C H A P T E R 4
Application Source Qualifier for PeopleSoft Sources
This chapter includes the following topics:
♦ Overview, 29
♦ Understanding the Default Query, 31
♦ Joining Source Data, 32
♦ Understanding the Default Join, 32
♦ Entering a Source Filter, 36
♦ Entering a Join Override, 38
♦ Using an Extract Override, 39
♦ Sorting Ports, 40
♦ Selecting Distinct Values, 41
♦ Selecting Current Rows, 42
♦ Linking the TO_EFFDT Port, 42
♦ Joining Effective Dated PeopleSoft Records, 43
♦ Configuring an Application Source Qualifier, 48
OverviewWhen you use a PeopleSoft source definition in a mapping, you connect it to an Application Source Qualifier. The Application Source Qualifier represents the record set you want the Integration Service to return when you run the session. Use the Application Source Qualifier to represent application data in PeopleSoft systems.
The Designer generates a query to extract source data based on the Application Source Qualifier connected ports, transformation properties, and the relationships between connected and associated source definitions.
In the Application Source Qualifier, you can complete the following tasks:
♦ Specify sorted ports. When you specify a number for sorted ports, the Designer adds an ORDER BY clause to the default query for PeopleSoft records. This orders source data by the number of ports you enter.
♦ Select only distinct values from the source. When you choose Select Distinct, the Designer adds a SELECT DISTINCT statement to the default query. This returns only distinct source rows.
29
♦ Join data from the same PeopleSoft system. When you join sources, the Designer adds the join conditions to a WHERE clause in the default query. You can join two or more PeopleSoft records with key relationships by connecting them to one Application Source Qualifier. You can also join a detail tree with its detail record for imported tree sources. Use the default join or create a custom join.
♦ Filter data. When you enter a source filter, the Designer adds the filter conditions to a WHERE clause in the default query. Use a source filter to remove source rows you do not need in the data flow.
♦ Create a custom extract query. You can create an extract override for PeopleSoft records. An extract override replaces the default query. You can create an extract override that includes defined transformation settings, or you can override all existing transformation settings.
♦ Extract current data. You can include a WHERE clause in the default query to return only the current rows according to the date you specify.
The Application Source Qualifier includes the following transformation options:
♦ Filter
♦ Join Override
♦ Extract Override
♦ Number of Sorted Fields
♦ Tracing Level
♦ Select Distinct
♦ Extract Current Rows
♦ Extract Date
♦ Effective Date Join Order
The Properties tab of the Application Source Qualifier only shows the applicable transformation options for the particular source definition. For example, the Extract Current Rows option only appears for Application Source Qualifiers with effective dated PeopleSoft records.
Using Table Names for PeopleSoft RecordsPeopleSoft saves data for a PeopleSoft record in an underlying database table. By default, the database table name is PS_Record_Name. Since the Integration Service extracts data from underlying database tables, the Designer uses the database table name in the default query.
Make sure you use the database table name rather than the source definition name when you alter the default query using any of the following transformation options:
♦ Filter
♦ Join Override
♦ Extract Override
Tip: To ensure you have the correct database table name, select ports from the Ports column in the Source Editor instead of manually entering the table name.
Using Parameters and Variables with PeopleSoft SourcesUse mapping parameters and variables in the following transformation properties of an Application Source Qualifier transformation for PeopleSoft. You can also use the system variable $$$SessStartTime:
♦ Extract Override
♦ Join Override
♦ Filter
♦ Extract Date
Note: When you use a mapping parameter or variable for the Extract Date transformation option, the Designer includes single quotes around the mapping parameter or variable when you generate the SQL statement in the
30 Chapter 4: Application Source Qualifier for PeopleSoft Sources
Extract Override option. Verify that the SQL statement in the extract override complies with the underlying database.
You can also use mapping parameters and variables in the following transformation properties in the source definition of a created tree source definition in the Mapping Designer:
♦ Tree Name
♦ SetID
♦ Effective Date
♦ Set Control Value
Understanding the Default QueryThe default query is a SELECT statement in the Application Source Qualifier transformation. The Designer creates the default query based on the following:
♦ Connected transformation input and output ports
♦ Transformation settings
♦ Relationships between sources connected to the same Application Source Qualifier
The Integration Service uses the default query as the basis for the extract query for the session. The following factors cause the Integration Service to alter or expand the default query:
♦ The Integration Service process code page differs from the code page of the PeopleSoft underlying database, which requires the Integration Service to perform code page translations.
♦ You enter a PeopleSoft language code in the application connection for a PeopleSoft source, which requires the Integration Service to join source tables with their related language tables.
The Integration Service writes the extract query into the session log.
The default query includes only the ports in the Application Source Qualifier that are connected to other transformations.
Although all ports in the source definition are connected to the Application Source Qualifier, only three ports are connected to the Expression transformation. In this case, the Designer generates a default query that selects only those three columns:
SELECT PS_PROJ_VARY_BA_VW.SETID, PS_PROJ_VARY_BA_VW.BUSINESS_UNIT, PS_PROJ_VARY_BA_VW.PROJECT_ID FROM PS_PROJ_VARY_BA_VW
Editing the Default QueryYou can edit the default query in the Application Source Qualifier by editing the transformation properties. This includes editing the transformation settings or changing the connected ports in the transformation.
When you edit the Application Source Qualifier, the Designer includes these settings in the default query. The Integration Service uses the default query to create the extract query for the session.
You can also override the default query with the Extract Override option. When you enter an Extract Override, the Integration Service uses the defined extract override.
Viewing the Default QueryYou can view the default query for PeopleSoft records in the Application Source Qualifier transformation. For accurate results, connect all the input and output ports you want to use in the mapping before generating the query.
Understanding the Default Query 31
To view the default query for PeopleSoft records:
1. From the Properties tab, select Extract Override.
The SQL Editor appears.
Note: If a source definition for a PeopleSoft tree is connected to or associated with the Application Source Qualifier transformation, the Extract Override option is disabled.
2. Select Generate SQL.
Unless you change or override this query, the Integration Service uses this query to generate the extract query.
3. Click Cancel to exit.
If you do not cancel the extract override, the Integration Service uses the resulting query. It ignores subsequent changes you make to the transformation and does not perform automatic language code translations.
Joining Source DataIf you have multiple PeopleSoft sources in a mapping, you can connect them to a single Application Source Qualifier. This allows the Integration Service to read all connected tables in a single pass. Single pass reads can reduce the total connection time to the source system and improve session performance.
You can connect multiple PeopleSoft sources to an Application Source Qualifier if all of the following conditions are true:
♦ All sources are located in the same database.
♦ All sources have logical relationships.
♦ All sources are imported, not created in the Designer.
When you join sources in one Application Source Qualifier, the Designer creates a join based on the relationships between sources.
Note: If you need to join a created tree source definition with another source, for example a detail record, you must use a Joiner transformation.
The Application Source Qualifier provides two types of joins:
♦ Default join. The Designer creates a default join based on connected import ports and the implicit relationships between connected or associated sources.
♦ Join override. You can enter a join override to customize the default join.
Understanding the Default JoinWhen you connect multiple PeopleSoft source definitions to one Application Source Qualifier, the Designer joins them based on logical relationships between connected and associated sources.
32 Chapter 4: Application Source Qualifier for PeopleSoft Sources

The following table describes how the Designer can create a default join for PeopleSoft source definitions:
Joining RecordsWhen you connect multiple PeopleSoft record source definitions to one Application Source Qualifier, the Designer creates the default join based on logical key column and column name relationships. The Designer can create a default join of PeopleSoft records when both of the following conditions are true:
♦ Source columns have matching names.
♦ At least one matching-name column is a PeopleSoft key.
The Designer also creates a default join of PeopleSoft records if you create primary-foreign key relationships in the Source Analyzer.
You can, therefore, join two records in the following cases:
♦ Sources have PeopleSoft key columns with matching names. The Designer joins two key columns if they have matching names. Columns must be PeopleSoft keys.
For example, you connect two PeopleSoft sources to an Application Source Qualifier. Both sources have a PeopleSoft key column named EmployeeNumber. The Designer joins the two columns.
♦ A PeopleSoft key column name matches a non-key column name. The Designer joins two columns when a PeopleSoft key column name in one source matches a non-key column name in another source.
For example, if one of the connected sources has a PeopleSoft key column named EmployeeNumber and another source has a column of the same name marked not-a-key, the Designer joins the two columns.
♦ Sources have a user-defined primary-foreign key relationship. The Designer joins two key columns if they have a primary-foreign key relationship.
To join sources, you connect source columns to one Application Source Qualifier. The default join is an inner equijoin. The Integration Service generates a SELECT statement that includes columns used for the join in the WHERE clause:
Source1.Column_Name = Source2.Column_Name AND Source1.Column_Name = Source2.Column_Name...
If the default join does not join source tables the way you want, you can enter a join override in the Application Source Qualifier.
By default, the Integration Service joins all rows from all PeopleSoft records. When you connect one or more effective dated records to an Application Source Qualifier, you can alter the default join by selecting certain transformation options.
RELATED TOPICS:♦ “Joining Effective Dated PeopleSoft Records” on page 43
Source Type Join With Default Join Condition
PeopleSoft record PeopleSoft record Joins if records are related.Records are related when both of the following are true:- Records contain source columns with matching names.- At least one of the matching-name columns is a PeopleSoft
key.Records are also related if you define a primary-foreign key relationship in the Source Analyzer.If records are not related, you can join them with a join override.
Imported PeopleSoft detail tree
Detail record None. You can always join an imported detail tree with the detail record.
Imported PeopleSoft detail tree
Non-detail record Joins if all of the following are true:- The record is related to the detail record for the imported tree.- The detail record is connected to or associated with the
Application Source Qualifier.
Understanding the Default Join 33
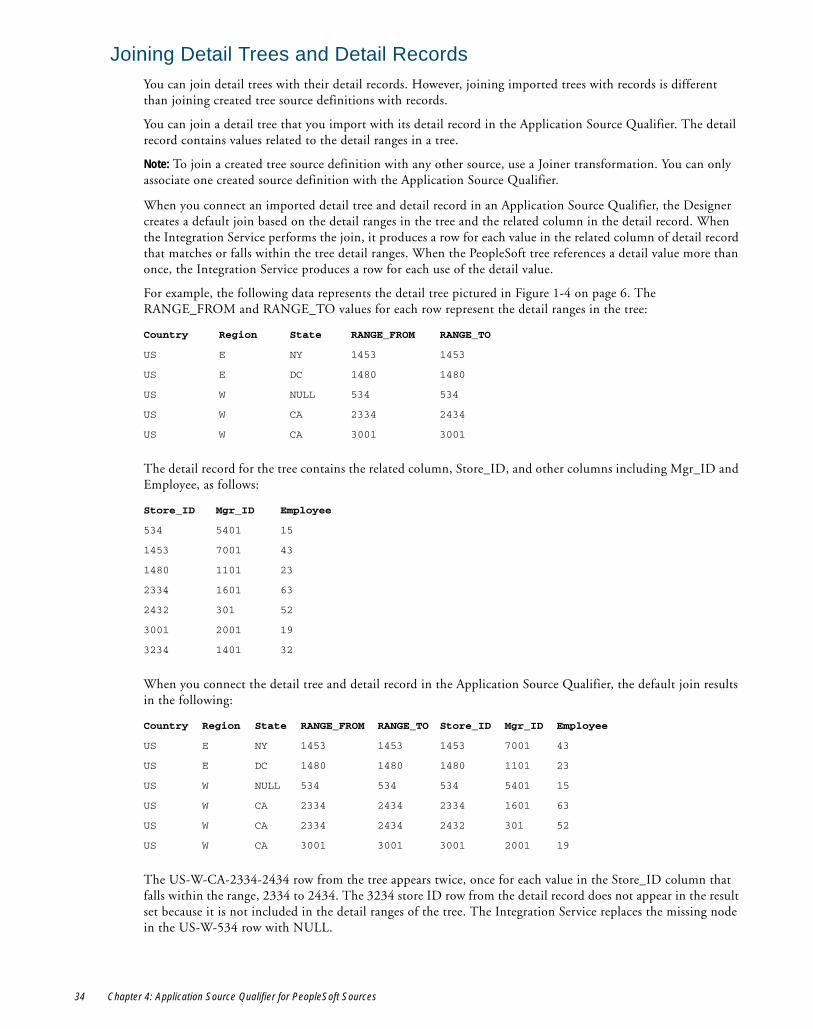
Joining Detail Trees and Detail RecordsYou can join detail trees with their detail records. However, joining imported trees with records is different than joining created tree source definitions with records.
You can join a detail tree that you import with its detail record in the Application Source Qualifier. The detail record contains values related to the detail ranges in a tree.
Note: To join a created tree source definition with any other source, use a Joiner transformation. You can only associate one created source definition with the Application Source Qualifier.
When you connect an imported detail tree and detail record in an Application Source Qualifier, the Designer creates a default join based on the detail ranges in the tree and the related column in the detail record. When the Integration Service performs the join, it produces a row for each value in the related column of detail record that matches or falls within the tree detail ranges. When the PeopleSoft tree references a detail value more than once, the Integration Service produces a row for each use of the detail value.
For example, the following data represents the detail tree pictured in Figure 1-4 on page 6. The RANGE_FROM and RANGE_TO values for each row represent the detail ranges in the tree:
The detail record for the tree contains the related column, Store_ID, and other columns including Mgr_ID and Employee, as follows:
When you connect the detail tree and detail record in the Application Source Qualifier, the default join results in the following:
The US-W-CA-2334-2434 row from the tree appears twice, once for each value in the Store_ID column that falls within the range, 2334 to 2434. The 3234 store ID row from the detail record does not appear in the result set because it is not included in the detail ranges of the tree. The Integration Service replaces the missing node in the US-W-534 row with NULL.
Country Region State RANGE_FROM RANGE_TO
US E NY 1453 1453
US E DC 1480 1480
US W NULL 534 534
US W CA 2334 2434
US W CA 3001 3001
Store_ID Mgr_ID Employee
534 5401 15
1453 7001 43
1480 1101 23
2334 1601 63
2432 301 52
3001 2001 19
3234 1401 32
Country Region State RANGE_FROM RANGE_TO Store_ID Mgr_ID Employee
US E NY 1453 1453 1453 7001 43
US E DC 1480 1480 1480 1101 23
US W NULL 534 534 534 5401 15
US W CA 2334 2434 2334 1601 63
US W CA 2334 2434 2432 301 52
US W CA 3001 3001 3001 2001 19
34 Chapter 4: Application Source Qualifier for PeopleSoft Sources
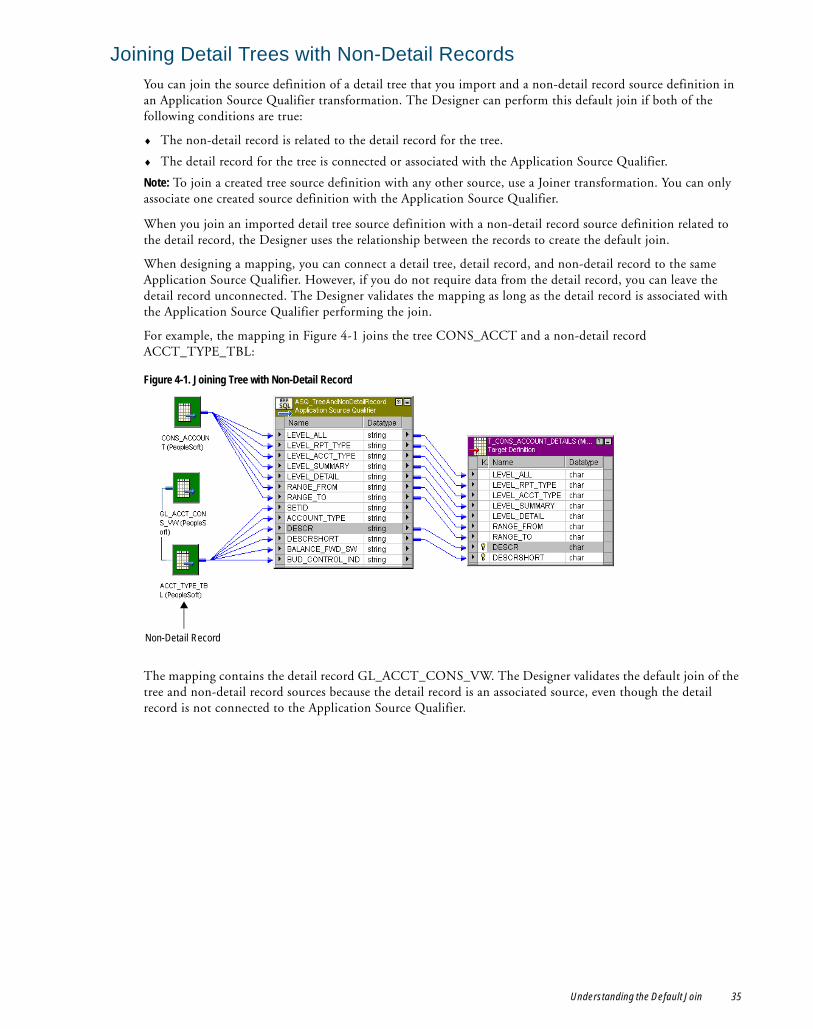
Joining Detail Trees with Non-Detail RecordsYou can join the source definition of a detail tree that you import and a non-detail record source definition in an Application Source Qualifier transformation. The Designer can perform this default join if both of the following conditions are true:
♦ The non-detail record is related to the detail record for the tree.
♦ The detail record for the tree is connected or associated with the Application Source Qualifier.
Note: To join a created tree source definition with any other source, use a Joiner transformation. You can only associate one created source definition with the Application Source Qualifier.
When you join an imported detail tree source definition with a non-detail record source definition related to the detail record, the Designer uses the relationship between the records to create the default join.
When designing a mapping, you can connect a detail tree, detail record, and non-detail record to the same Application Source Qualifier. However, if you do not require data from the detail record, you can leave the detail record unconnected. The Designer validates the mapping as long as the detail record is associated with the Application Source Qualifier performing the join.
For example, the mapping in Figure 4-1 joins the tree CONS_ACCT and a non-detail record ACCT_TYPE_TBL:
The mapping contains the detail record GL_ACCT_CONS_VW. The Designer validates the default join of the tree and non-detail record sources because the detail record is an associated source, even though the detail record is not connected to the Application Source Qualifier.
Figure 4-1. Joining Tree with Non-Detail Record
Non-Detail Record
Understanding the Default Join 35
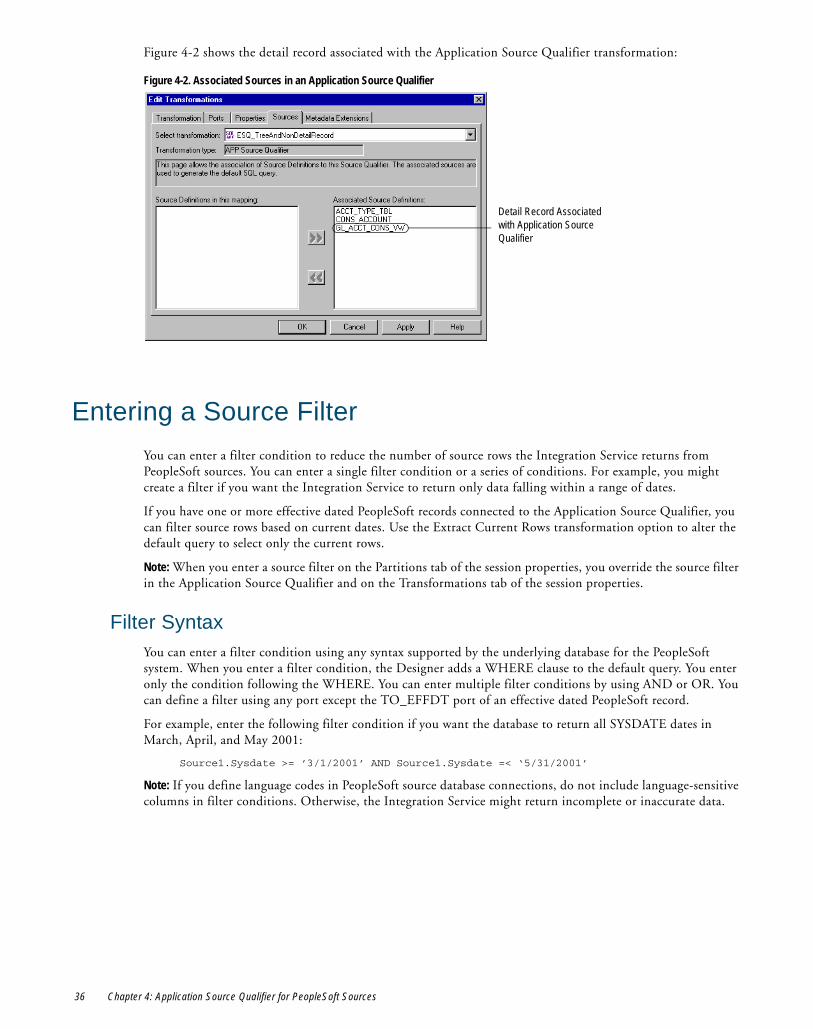
Figure 4-2 shows the detail record associated with the Application Source Qualifier transformation:
Entering a Source FilterYou can enter a filter condition to reduce the number of source rows the Integration Service returns from PeopleSoft sources. You can enter a single filter condition or a series of conditions. For example, you might create a filter if you want the Integration Service to return only data falling within a range of dates.
If you have one or more effective dated PeopleSoft records connected to the Application Source Qualifier, you can filter source rows based on current dates. Use the Extract Current Rows transformation option to alter the default query to select only the current rows.
Note: When you enter a source filter on the Partitions tab of the session properties, you override the source filter in the Application Source Qualifier and on the Transformations tab of the session properties.
Filter SyntaxYou can enter a filter condition using any syntax supported by the underlying database for the PeopleSoft system. When you enter a filter condition, the Designer adds a WHERE clause to the default query. You enter only the condition following the WHERE. You can enter multiple filter conditions by using AND or OR. You can define a filter using any port except the TO_EFFDT port of an effective dated PeopleSoft record.
For example, enter the following filter condition if you want the database to return all SYSDATE dates in March, April, and May 2001:
Source1.Sysdate >= ’3/1/2001’ AND Source1.Sysdate =< ‘5/31/2001’
Note: If you define language codes in PeopleSoft source database connections, do not include language-sensitive columns in filter conditions. Otherwise, the Integration Service might return incomplete or inaccurate data.
Figure 4-2. Associated Sources in an Application Source Qualifier
Detail Record Associated with Application Source Qualifier
36 Chapter 4: Application Source Qualifier for PeopleSoft Sources

Creating a Source FilterUse the following procedure to create a source filter.
To create a source filter:
1. In the Mapping Developer, edit an Application Source Qualifier transformation, and select the Properties tab.
2. Click the right corner of the Filter option to open the Source Editor.
3. Enter a filter condition supported by your source database.
Use SQL syntax supported by the underlying database for the PeopleSoft source system. Do not enter WHERE.
Use database tables names in the filter syntax. Database table names for PeopleSoft record sources typically begin with PS_. For example, the database table name for the PeopleSoft record PROJ_MILE_TBL is PS_PROJ_MILE_TBL.
Select port names from the Ports tab to ensure the database table name is correct. You can define a filter using any port except the TO_EFFDT port of an effective dated PeopleSoft record.
Warning: Do not use language-sensitive columns in the filter.
4. Click OK to return to the Edit Transformations dialog box. Click OK again to return to the Designer.
Validating Filter SyntaxYou can validate filter syntax for PeopleSoft records with the Validate button in the Extract Override option. When validating filter syntax, note that any errors that appear might be related to other options configured in the Application Source Qualifier.
To validate filter syntax, you need a source database username and password and the ODBC data source used to connect to the source.
To validate filter syntax:
1. In the Mapping Developer, edit the Application Source Qualifier, and select the Properties tab.
2. Click the right corner of the Extract Override option.
If a source definition for a PeopleSoft tree is connected to or associated with the Application Source Qualifier transformation, the Extract Override option is disabled.
3. Click Generate SQL.
The Designer generates the extract SQL query using the filter condition and any other conditions entered in the transformation.
4. Select the ODBC Data Source used to connect to the source system, and enter the database username and password to connect to the database.
5. Click Validate.
The Designer connects to the source database and tests the query syntax. The Designer displays a message that states whether the syntax is valid.
6. Click Cancel to cancel the Extract Override.
If you do not cancel the Extract Override, the Designer uses the generated SQL as an extract override. The Integration Service uses the extract override. It ignores subsequent changes you make to the transformation and does not perform automatic language code translations.
7. Click Cancel to close the transformation or correct and validate the filter.
Entering a Source Filter 37
Entering a Join OverrideYou can create a custom join to override the default join in the Application Source Qualifier. In the join, you can enter any expression supported by the underlying database for the PeopleSoft source system. The Designer appends the join to existing WHERE clauses in the default query.
You might create a join override under the following conditions:
♦ The names of key columns do not match. For example, you might have one source with a key column in Source1 named EmployeeNum. You want to join the source with another with a non-key column in Source2 named EmployeeNumber. Since the column names differ, the Application Source Qualifier does not join them. You can enter the following join override:
Source1.EmployeeNum = Source2.EmployeeNumber
♦ To perform an outer join. For example, you enter a left outer join to pass all of Source1 and join Source2 with Source1 where the Social_Security columns are equal:
Source1.Social_Security(+) = Source2.Social_Security
You can define a join override using any column except the TO_EFFDT column of an effective dated PeopleSoft record.
To create a join override:
1. Create an Application Source Qualifier transformation containing data from multiple sources or associated sources.
2. Edit the Application Source Qualifier and select the Properties tab.
3. Click the right corner of the Join Override option to open the Source Editor.
4. Enter the syntax for the join.
Enter only statements supported by the underlying database for the PeopleSoft source system.
Use database tables names in the join syntax. Database table names for PeopleSoft record sources typically begin with PS_. For example, the database table name for the PeopleSoft record PROJ_MILE_TBL is PS_PROJ_MILE_TBL.
Select port names from the Ports tab to ensure the database table name is correct. You can define a join override using any port except the TO_EFFDT port of an effective dated PeopleSoft record.
5. Click OK to return to the Edit Transformations dialog box. Click OK again to return to the Designer.
The Application Source Qualifier adds the join override to the default query.
When you create a custom join, the Designer assumes the join is valid. If the join is not valid, the session fails. You can validate a join override.
Validating Join Override SyntaxYou can validate the syntax of a join override for PeopleSoft records with the Validate button in the Extract Override option. When validating the join override syntax, any errors that appear might be related to other options configured in the Application Source Qualifier.
To validate join override syntax, you need a source database username and password and the ODBC data source used to connect to the source.
To validate join override syntax:
1. In the Mapping Developer, edit the Application Source Qualifier in which you have a join override, and click the Properties tab.
2. Click the right corner of the Extract Override option.
38 Chapter 4: Application Source Qualifier for PeopleSoft Sources
If a source definition for a PeopleSoft tree is connected to or associated with the Application Source Qualifier transformation, the Extract Override option is disabled.
3. Click Generate SQL.
The Designer generates the extract SQL query using the override join condition and any other conditions entered in the transformation.
4. Select the ODBC Data Source used to connect to the source system, and enter the database username and password to connect to the database.
5. Click Validate.
The Designer connects to the source database and tests the query. The Designer displays a message stating whether the syntax of the query is valid.
6. Click Cancel to cancel the Extract Override.
If you do not cancel the Extract Override, the Designer uses the generated SQL as an extract override. The Integration Service uses the extract override. It ignores subsequent changes you make to the transformation and does not perform automatic language code translations.
7. Click Cancel to close the transformation or correct and validate the join override.
Using an Extract OverrideYou can create an extract override to override the Application Source Qualifier default query for PeopleSoft records. Use any SQL statement supported by the underlying database for the PeopleSoft source system. The Integration Service uses the extract override to extract data from connected sources.
Use an extract override for an Application Source Qualifier connected to PeopleSoft records only. The Integration Service does not perform extract overrides for Application Source Qualifiers connected to PeopleSoft trees. When you connect an Application Source Qualifier to a PeopleSoft tree, the Designer disables the Extract Override option.
When you create an extract override for PeopleSoft records, you can either:
♦ Generate and edit the default query. To use the existing transformation options in the extract override, generate and edit the default query. When the Designer generates the default query, it incorporates all other configured options, such as a filter or number of sorted ports. The resulting query overrides all other options you might subsequently configure in the transformation.
♦ Manually enter the entire extract override. The resulting query overrides all other options configured in the transformation.
For example, an Application Source Qualifier is already configured with the following join override:
PS_AB_CREDITBU_VW.CUST_ID = PS_AB_CREDITCP_VW.CORPORATE_CUST_ID AND PS_AB_CREDITBU_VW.CR_LIMIT = PS_AB_CREDITCP_VW.CR_LIMIT AND PS_AB_CREDITCP_VW.CR_LIMIT_RANGE > 100
When you generate the default query, the Designer incorporates the join override in the WHERE clause:
SELECT PS_AB_CREDITCP_VW.CORPORATE_SETID, PS_AB_CREDITCP_VW.CORPORATE_CUST_ID, PS_AB_CREDITCP_VW.NAME1, PS_AB_CREDITCP_VW.ROLEUSER, PS_AB_CREDITCP_VW.BAL_AMT, PS_AB_CREDITCP_VW.CR_LIMIT, PS_AB_CREDITCP_VW.CR_LIMIT_CORP, PS_AB_CREDITCP_VW.CR_LIMIT_REV_DT, PS_AB_CREDITCP_VW.CR_LIMIT_RANGE, PS_AB_CREDITCP_VW.CURRENCY_CD, PS_AB_CREDITBU_VW.SETID, PS_AB_CREDITBU_VW.CUST_ID, PS_AB_CREDITBU_VW.NAME1, PS_AB_CREDITBU_VW.ROLEUSER, PS_AB_CREDITBU_VW.BAL_AMT, PS_AB_CREDITBU_VW.CR_LIMIT, PS_AB_CREDITBU_VW.CR_LIMIT_REV_DT, PS_AB_CREDITBU_VW.CR_LIMIT_RANGE, PS_AB_CREDITBU_VW.CREDIT_CLASS, PS_AB_CREDITBU_VW.CURRENCY_CD FROM PS_AB_CREDITCP_VW, PS_AB_CREDITBU_VW WHEREPS_AB_CREDITBU_VW.CUST_ID = PS_AB_CREDITCP_VW.CORPORATE_CUST_ID AND PS_AB_CREDITBU_VW.CR_LIMIT = PS_AB_CREDITCP_VW.CR_LIMIT AND PS_AB_CREDITCP_VW.CR_LIMIT_RANGE > 100
To use the join override in the extract override, you can generate the default query, and then edit the rest of the query, rather than entering the entire extract override.
Using an Extract Override 39
Verify that the SQL statement syntax in the extract override is valid for the underlying database of your PeopleSoft system. For example, when you generate and edit the default query for an effective dated PeopleSoft record, you might need to edit the SQL statement. If you link the TO_EFFDT port to another transformation or target, the default query includes a NULL statement. If the underlying database is Oracle, for example, you need to change NULL to to_date(NULL).
Note: When you enter an extract override on the Partitions tab of the session properties, you override the extract override in the Application Source Qualifier and on the Transformations tab of the session properties.
Creating an Extract OverrideTo incorporate configured transformation options in the Application Source Qualifier in an extract override, generate and customize the default query. Before generating the default query, connect the Application Source Qualifier transformation to all subsequent transformations. The Designer uses both connected input and output ports to generate the appropriate extract query.
Once you enter an extract override, the Designer accepts the override and ignores any subsequent changes you might make to the Application Source Qualifier transformation. The Integration Service uses the extract override to query sources.
Note: When you enter an extract override, the Integration Service does not perform language code queries. It ignores any language code entered in the session database connection.
To create and validate an extract override:
1. In the Mapping Developer, edit an Application Source Qualifier transformation, and select the Properties tab.
2. Click the right corner of the Extract Override option to open the Source Editor.
3. To use existing transformation properties in the override, click Generate SQL, and then edit the extract query.
To ignore any existing transformation configurations, enter the extract override. Use SQL syntax supported by the underlying database for the PeopleSoft source system.
Use database table names in the extract override. Database table names for PeopleSoft record sources typically begin with PS_. For example, the database table name for the PeopleSoft record PROJ_MILE_TBL is PS_PROJ_MILE_TBL.
Select port names from the Ports tab to ensure the database table name is correct.
4. To validate extract override syntax, select the ODBC data source used to connect to the source database, enter the database username and password and click Validate.
The Designer connects to the source database and tests the query syntax. The Designer displays a message stating whether the syntax is valid.
5. Click OK to save the query and return to the Edit Transformations dialog box.
6. Click OK again to return to the Designer.
The Designer replaces the default query with the extract override. The Integration Service uses this override to query sources unless you update or delete the extract override. The Integration Service does not append language code queries to an extract override.
Sorting PortsYou can sort source data from PeopleSoft records using the Number of Sorted Ports option in the Application Source Qualifier. When you specify the Number of Sorted Ports, the Designer adds an ORDER BY clause to the default query and then includes the configured number of PeopleSoft record ports in the ORDER BY
40 Chapter 4: Application Source Qualifier for PeopleSoft Sources
clause. The Designer adds ports to the ORDER BY clause starting with the ports appearing at the top of the Application Source Qualifier.
For example, you set the number of sorted ports to 2 in an Application Source Qualifier. The Designer adds an ORDER BY for the default query that includes the first two ports in the transformation, as follows:
SELECT PS_PROJ_VARY_BA_VW.SETID, PS_PROJ_VARY_BA_VW.BUSINESS_UNIT, PS_PROJ_VARY_BA_VW.PROJECT_ID FROM PS_PROJ_VARY_BA_VW ORDER BY PS_PROJ_VARY_BA_VW.SETID, PS_PROJ_VARY_BA_VW.BUSINESS_UNIT
You might use sorted ports to improve performance in Aggregator transformations or to ensure the Integration Service reads columns in a specified order.
The Number of Sorted Ports option applies to ports in a PeopleSoft record. When the Application Source Qualifier is connected only to a PeopleSoft tree, it ignores the Number of Sorted Ports option. When the Application Source Qualifier is connected to a tree and records, it sorts only ports connected to records, ignoring ports connected to a tree.
You can also use a Sorter transformation to sort ports from a PeopleSoft source.
To enter a number of sorted ports:
1. In the Mapping Developer, edit an Application Source Qualifier transformation, and select the Properties tab.
2. Enter the number of ports you want the Integration Service to sort by.
3. Click the Ports tab.
4. Use the Up/Down arrows to move the ports you want the Integration Service to sort to the top of the list of ports.
The Designer adds the configured number of ports to an ORDER BY clause in the default query, starting with the first listed port. The Designer adds only ports from PeopleSoft record sources.
Selecting Distinct ValuesIf you want the Integration Service to select only unique values from a PeopleSoft Record, use the Select Distinct option.
For example, you enable the select distinct in an Application Source Qualifier. The Designer adds SELECT DISTINCT to the default query, as follows:
SELECT DISTINCT PS_PROJ_VARY_BA_VW.SETID, PS_PROJ_VARY_BA_VW.BUSINESS_UNIT, PS_PROJ_VARY_BA_VW.PROJECT_ID FROM PS_PROJ_VARY_BA_VW
You might use Select Distinct to extract unique customer IDs from a table listing total sales. You can filter out unnecessary data early in the data flow, which improves session performance.
By default, the Integration Service uses a SELECT statement to select all data.
To use Select Distinct:
1. In the Mapping Developer, edit an Application Source Qualifier transformation, and select the Properties tab.
2. Check Select Distinct.
3. Click OK to close the dialog box and save your changes.
The Designer adds SELECT DISTINCT to the default query.
Selecting Distinct Values 41
Selecting Current RowsBy default, the Integration Service extracts all rows from PeopleSoft records. However, you can specify to select only the current rows from the effective dated PeopleSoft record. Use the following transformation options in the Application Source Qualifier to alter the default query for effective dated PeopleSoft Records:
♦ Extract Current Rows
♦ Extract Date
When you select Extract Current Rows, the default query includes a WHERE clause to select rows from records that meet the current date requirements. Use the Extract Date option to specify the current date when extracting current rows. Leave the option blank to use the Integration Service current date.
Linking the TO_EFFDT PortThe Designer adds a new column, TO_EFFDT, to the source definition when you import an effective dated PeopleSoft record. The Designer determines the value of TO_EFFDT by the next value of EFFDT for the same key.
When you link TO_EFFDT to another transformation or target, the default query includes a self join to determine the value of TO_EFFDT. When there are no future rows for the same key, the Designer assigns NULL to TO_EFFDT.
The TO_EFFDT port in the Application Source Qualifier is linked to a port in another transformation and ultimately to the target. The following SQL statement is the default query for this Application Source Qualifier:
SELECT PS_EMP_SAL.EFFDT, PS_EMP_SAL.EMP_ID, PS_EMP_SAL.EMP_SAL, A0.EFFDT FROM PS_EMP_SAL, PS_EMP_SAL A0 WHERE PS_EMP_SAL.EMP_ID = A0.EMP_IDAND A0.EFFDT IN (SELECT MIN(EFFDT) FROM PS_EMP_SAL A1 WHERE A1.EMP_ID = PS_EMP_SAL.EMP_ID AND A1.EFFDT > PS_EMP_SAL.EFFDT)UNION ALLSELECT PS_EMP_SAL.EFFDT, PS_EMP_SAL.EMP_ID, PS_EMP_SAL.EMP_SAL, NULL FROM PS_EMP_SALWHERE PS_EMP_SAL.EFFDT IN (SELECT MAX(EFFDT) FROM PS_EMP_SAL A0 WHERE PS_EMP_SAL.EMP_ID = A0.EMP_ID)
The SQL statement above includes a self join. It selects a value for the TO_EFFDT port by selecting a different EFFDT value from the same table. The WHERE clause determines the particular EFFDT value it selects. If the Integration Service finds a row with the same key value with a greater value in EFFDT, it selects the greater EFFDT value as the value for TO_EFFDT.
The SQL statement includes a UNION ALL statement. After the UNION ALL statement, the query selects NULL for the TO_EFFDT port. It selects NULL for rows where the EFFDT value is the greatest in the table for the same key.
For example, you have the following data in the EMP_SAL table:
EFFDT EMP_ID SALARY
1990-01-01 00:00:00.000 1000 35,000.00
1992-01-01 00:00:00.000 1000 45,000.00
1994-01-01 00:00:00.000 1000 70,000.00
1990-01-01 00:00:00.000 9999 50,000.00
42 Chapter 4: Application Source Qualifier for PeopleSoft Sources
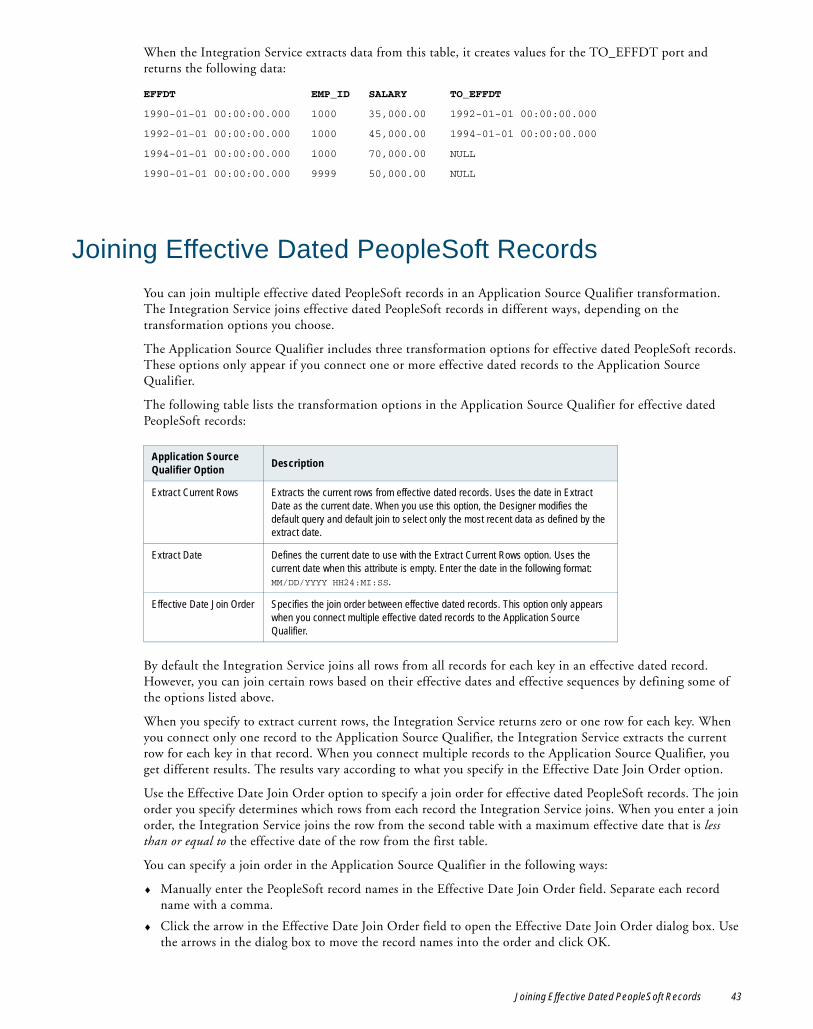
When the Integration Service extracts data from this table, it creates values for the TO_EFFDT port and returns the following data:
Joining Effective Dated PeopleSoft RecordsYou can join multiple effective dated PeopleSoft records in an Application Source Qualifier transformation. The Integration Service joins effective dated PeopleSoft records in different ways, depending on the transformation options you choose.
The Application Source Qualifier includes three transformation options for effective dated PeopleSoft records. These options only appear if you connect one or more effective dated records to the Application Source Qualifier.
The following table lists the transformation options in the Application Source Qualifier for effective dated PeopleSoft records:
By default the Integration Service joins all rows from all records for each key in an effective dated record. However, you can join certain rows based on their effective dates and effective sequences by defining some of the options listed above.
When you specify to extract current rows, the Integration Service returns zero or one row for each key. When you connect only one record to the Application Source Qualifier, the Integration Service extracts the current row for each key in that record. When you connect multiple records to the Application Source Qualifier, you get different results. The results vary according to what you specify in the Effective Date Join Order option.
Use the Effective Date Join Order option to specify a join order for effective dated PeopleSoft records. The join order you specify determines which rows from each record the Integration Service joins. When you enter a join order, the Integration Service joins the row from the second table with a maximum effective date that is less than or equal to the effective date of the row from the first table.
You can specify a join order in the Application Source Qualifier in the following ways:
♦ Manually enter the PeopleSoft record names in the Effective Date Join Order field. Separate each record name with a comma.
♦ Click the arrow in the Effective Date Join Order field to open the Effective Date Join Order dialog box. Use the arrows in the dialog box to move the record names into the order and click OK.
EFFDT EMP_ID SALARY TO_EFFDT
1990-01-01 00:00:00.000 1000 35,000.00 1992-01-01 00:00:00.000
1992-01-01 00:00:00.000 1000 45,000.00 1994-01-01 00:00:00.000
1994-01-01 00:00:00.000 1000 70,000.00 NULL
1990-01-01 00:00:00.000 9999 50,000.00 NULL
Application Source Qualifier Option Description
Extract Current Rows Extracts the current rows from effective dated records. Uses the date in Extract Date as the current date. When you use this option, the Designer modifies the default query and default join to select only the most recent data as defined by the extract date.
Extract Date Defines the current date to use with the Extract Current Rows option. Uses the current date when this attribute is empty. Enter the date in the following format: MM/DD/YYYY HH24:MI:SS.
Effective Date Join Order Specifies the join order between effective dated records. This option only appears when you connect multiple effective dated records to the Application Source Qualifier.
Joining Effective Dated PeopleSoft Records 43
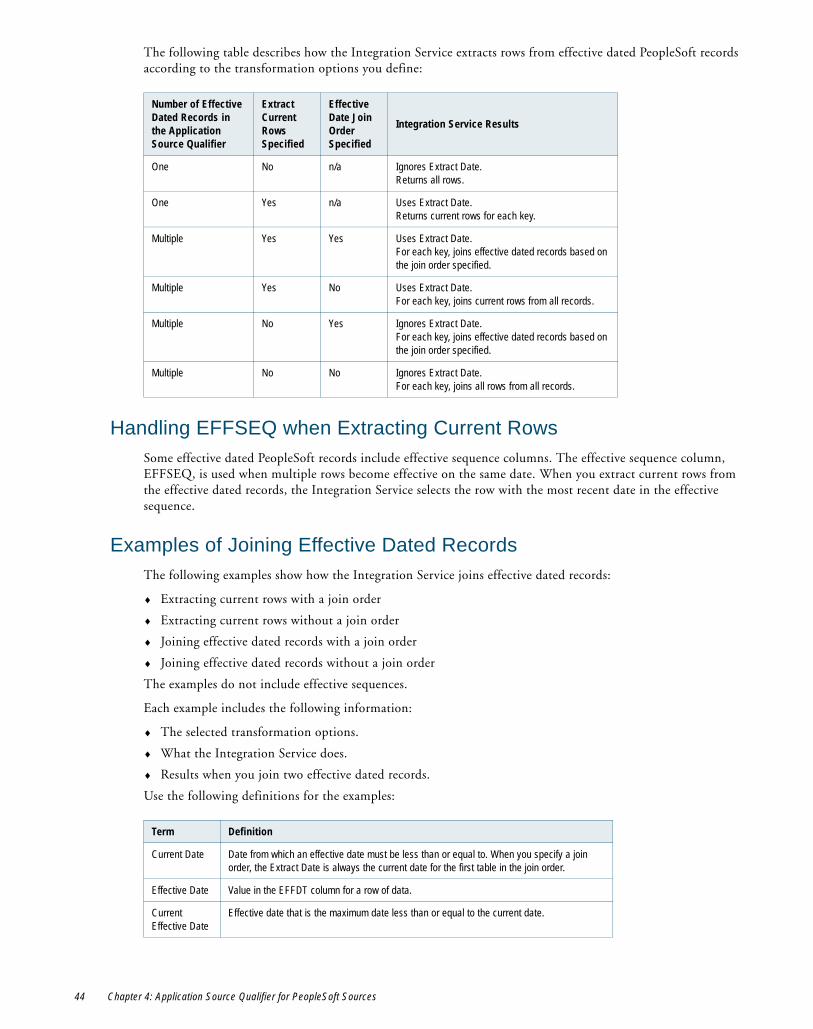
The following table describes how the Integration Service extracts rows from effective dated PeopleSoft records according to the transformation options you define:
Handling EFFSEQ when Extracting Current RowsSome effective dated PeopleSoft records include effective sequence columns. The effective sequence column, EFFSEQ, is used when multiple rows become effective on the same date. When you extract current rows from the effective dated records, the Integration Service selects the row with the most recent date in the effective sequence.
Examples of Joining Effective Dated RecordsThe following examples show how the Integration Service joins effective dated records:
♦ Extracting current rows with a join order
♦ Extracting current rows without a join order
♦ Joining effective dated records with a join order
♦ Joining effective dated records without a join order
The examples do not include effective sequences.
Each example includes the following information:
♦ The selected transformation options.
♦ What the Integration Service does.
♦ Results when you join two effective dated records.
Use the following definitions for the examples:
Number of Effective Dated Records in the Application Source Qualifier
Extract Current Rows Specified
Effective Date Join Order Specified
Integration Service Results
One No n/a Ignores Extract Date.Returns all rows.
One Yes n/a Uses Extract Date.Returns current rows for each key.
Multiple Yes Yes Uses Extract Date.For each key, joins effective dated records based on the join order specified.
Multiple Yes No Uses Extract Date.For each key, joins current rows from all records.
Multiple No Yes Ignores Extract Date.For each key, joins effective dated records based on the join order specified.
Multiple No No Ignores Extract Date.For each key, joins all rows from all records.
Term Definition
Current Date Date from which an effective date must be less than or equal to. When you specify a join order, the Extract Date is always the current date for the first table in the join order.
Effective Date Value in the EFFDT column for a row of data.
Current Effective Date
Effective date that is the maximum date less than or equal to the current date.
44 Chapter 4: Application Source Qualifier for PeopleSoft Sources
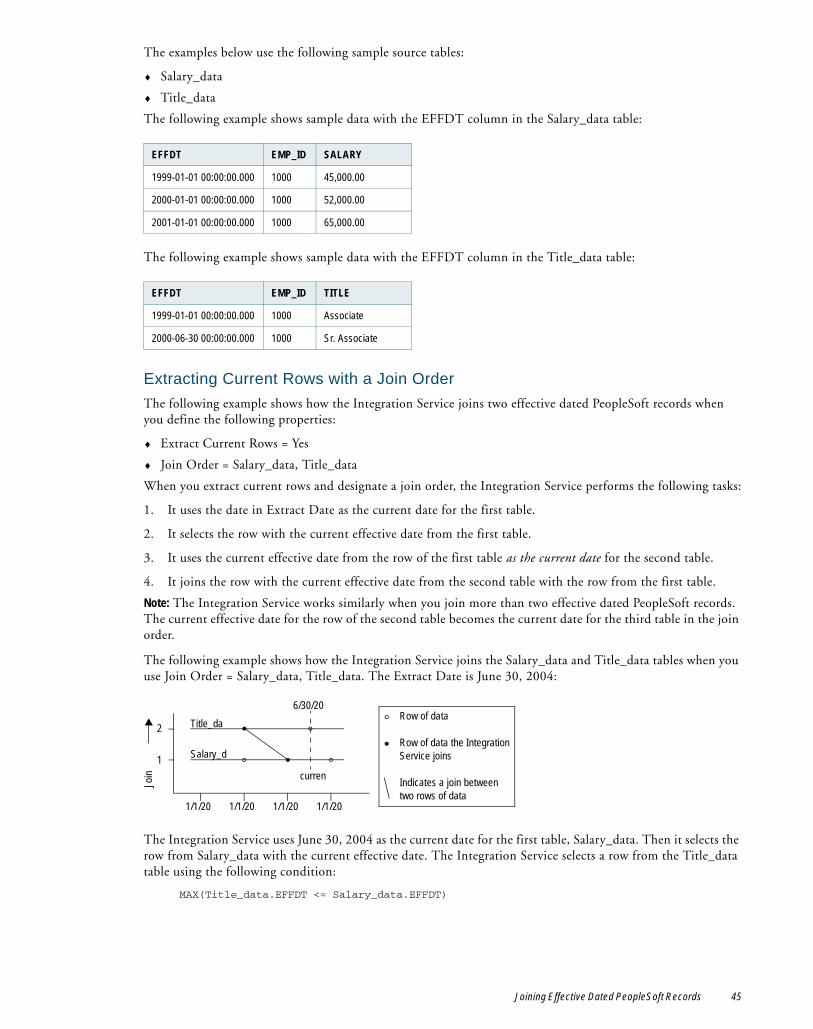
The examples below use the following sample source tables:
♦ Salary_data
♦ Title_data
The following example shows sample data with the EFFDT column in the Salary_data table:
The following example shows sample data with the EFFDT column in the Title_data table:
Extracting Current Rows with a Join OrderThe following example shows how the Integration Service joins two effective dated PeopleSoft records when you define the following properties:
♦ Extract Current Rows = Yes
♦ Join Order = Salary_data, Title_data
When you extract current rows and designate a join order, the Integration Service performs the following tasks:
1. It uses the date in Extract Date as the current date for the first table.
2. It selects the row with the current effective date from the first table.
3. It uses the current effective date from the row of the first table as the current date for the second table.
4. It joins the row with the current effective date from the second table with the row from the first table.
Note: The Integration Service works similarly when you join more than two effective dated PeopleSoft records. The current effective date for the row of the second table becomes the current date for the third table in the join order.
The following example shows how the Integration Service joins the Salary_data and Title_data tables when you use Join Order = Salary_data, Title_data. The Extract Date is June 30, 2004:
The Integration Service uses June 30, 2004 as the current date for the first table, Salary_data. Then it selects the row from Salary_data with the current effective date. The Integration Service selects a row from the Title_data table using the following condition:
MAX(Title_data.EFFDT <= Salary_data.EFFDT)
EFFDT EMP_ID SALARY
1999-01-01 00:00:00.000 1000 45,000.00
2000-01-01 00:00:00.000 1000 52,000.00
2001-01-01 00:00:00.000 1000 65,000.00
EFFDT EMP_ID TITLE
1999-01-01 00:00:00.000 1000 Associate
2000-06-30 00:00:00.000 1000 Sr. Associate
1/1/20 1/1/20 1/1/20 1/1/20
Join curren
2
1
Row of data
Row of data the Integration Service joins
Indicates a join between two rows of data
6/30/20Title_da
Salary_d
Joining Effective Dated PeopleSoft Records 45
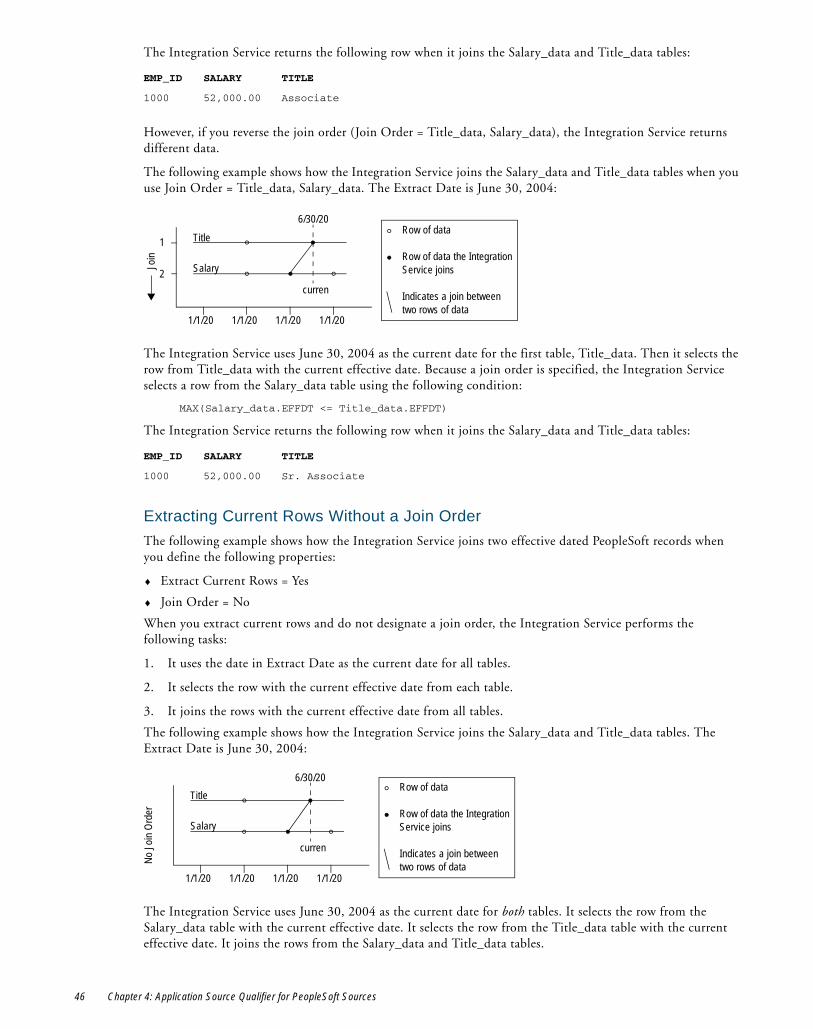
The Integration Service returns the following row when it joins the Salary_data and Title_data tables:
However, if you reverse the join order (Join Order = Title_data, Salary_data), the Integration Service returns different data.
The following example shows how the Integration Service joins the Salary_data and Title_data tables when you use Join Order = Title_data, Salary_data. The Extract Date is June 30, 2004:
The Integration Service uses June 30, 2004 as the current date for the first table, Title_data. Then it selects the row from Title_data with the current effective date. Because a join order is specified, the Integration Service selects a row from the Salary_data table using the following condition:
MAX(Salary_data.EFFDT <= Title_data.EFFDT)
The Integration Service returns the following row when it joins the Salary_data and Title_data tables:
Extracting Current Rows Without a Join OrderThe following example shows how the Integration Service joins two effective dated PeopleSoft records when you define the following properties:
♦ Extract Current Rows = Yes
♦ Join Order = No
When you extract current rows and do not designate a join order, the Integration Service performs the following tasks:
1. It uses the date in Extract Date as the current date for all tables.
2. It selects the row with the current effective date from each table.
3. It joins the rows with the current effective date from all tables.
The following example shows how the Integration Service joins the Salary_data and Title_data tables. The Extract Date is June 30, 2004:
The Integration Service uses June 30, 2004 as the current date for both tables. It selects the row from the Salary_data table with the current effective date. It selects the row from the Title_data table with the current effective date. It joins the rows from the Salary_data and Title_data tables.
EMP_ID SALARY TITLE
1000 52,000.00 Associate
EMP_ID SALARY TITLE
1000 52,000.00 Sr. Associate
1/1/20 1/1/20 1/1/20 1/1/20
Join
curren
1
2
Row of data
Row of data the Integration Service joins
Indicates a join between two rows of data
6/30/20
Title
Salary
1/1/20 1/1/20 1/1/20 1/1/20
No Jo
in Or
der
curren
Row of data
Row of data the Integration Service joins
Indicates a join between two rows of data
6/30/20Title
Salary
46 Chapter 4: Application Source Qualifier for PeopleSoft Sources
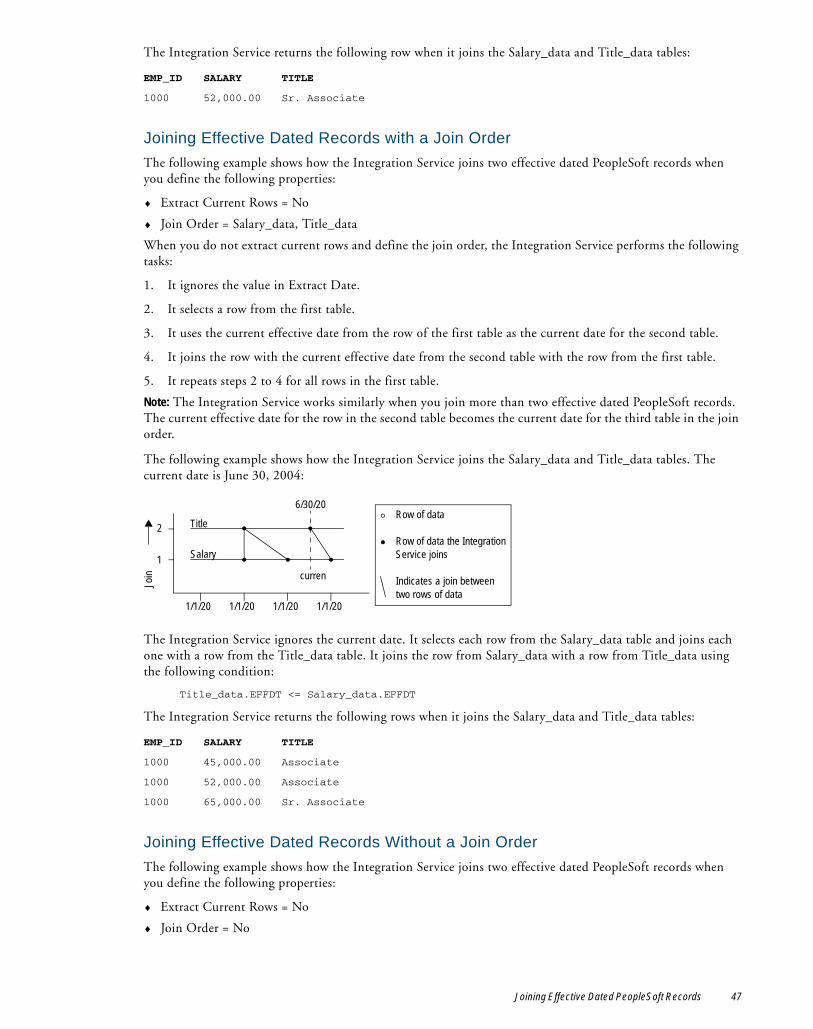
The Integration Service returns the following row when it joins the Salary_data and Title_data tables:
Joining Effective Dated Records with a Join OrderThe following example shows how the Integration Service joins two effective dated PeopleSoft records when you define the following properties:
♦ Extract Current Rows = No
♦ Join Order = Salary_data, Title_data
When you do not extract current rows and define the join order, the Integration Service performs the following tasks:
1. It ignores the value in Extract Date.
2. It selects a row from the first table.
3. It uses the current effective date from the row of the first table as the current date for the second table.
4. It joins the row with the current effective date from the second table with the row from the first table.
5. It repeats steps 2 to 4 for all rows in the first table.
Note: The Integration Service works similarly when you join more than two effective dated PeopleSoft records. The current effective date for the row in the second table becomes the current date for the third table in the join order.
The following example shows how the Integration Service joins the Salary_data and Title_data tables. The current date is June 30, 2004:
The Integration Service ignores the current date. It selects each row from the Salary_data table and joins each one with a row from the Title_data table. It joins the row from Salary_data with a row from Title_data using the following condition:
Title_data.EFFDT <= Salary_data.EFFDT
The Integration Service returns the following rows when it joins the Salary_data and Title_data tables:
Joining Effective Dated Records Without a Join OrderThe following example shows how the Integration Service joins two effective dated PeopleSoft records when you define the following properties:
♦ Extract Current Rows = No
♦ Join Order = No
EMP_ID SALARY TITLE
1000 52,000.00 Sr. Associate
EMP_ID SALARY TITLE
1000 45,000.00 Associate
1000 52,000.00 Associate
1000 65,000.00 Sr. Associate
1/1/20 1/1/20 1/1/20 1/1/20
Join
2
1curren
Row of data
Row of data the Integration Service joins
Indicates a join between two rows of data
6/30/20
Title
Salary
Joining Effective Dated PeopleSoft Records 47
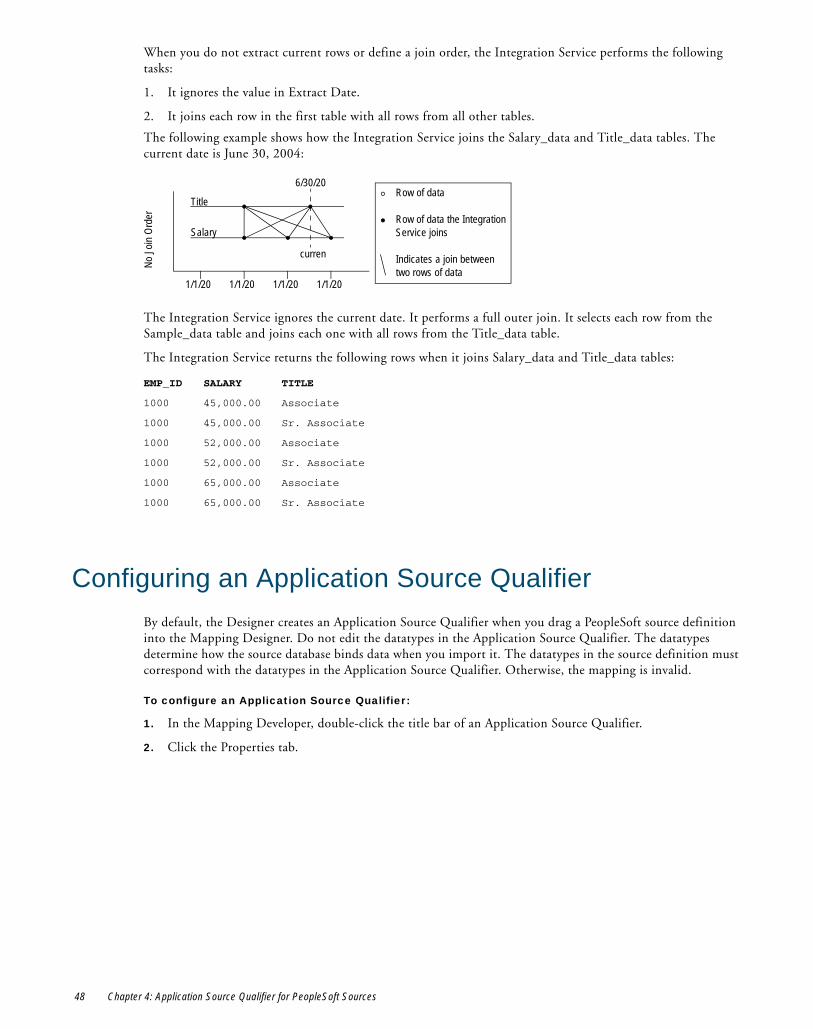
When you do not extract current rows or define a join order, the Integration Service performs the following tasks:
1. It ignores the value in Extract Date.
2. It joins each row in the first table with all rows from all other tables.
The following example shows how the Integration Service joins the Salary_data and Title_data tables. The current date is June 30, 2004:
The Integration Service ignores the current date. It performs a full outer join. It selects each row from the Sample_data table and joins each one with all rows from the Title_data table.
The Integration Service returns the following rows when it joins Salary_data and Title_data tables:
Configuring an Application Source QualifierBy default, the Designer creates an Application Source Qualifier when you drag a PeopleSoft source definition into the Mapping Designer. Do not edit the datatypes in the Application Source Qualifier. The datatypes determine how the source database binds data when you import it. The datatypes in the source definition must correspond with the datatypes in the Application Source Qualifier. Otherwise, the mapping is invalid.
To configure an Application Source Qualifier:
1. In the Mapping Developer, double-click the title bar of an Application Source Qualifier.
2. Click the Properties tab.
EMP_ID SALARY TITLE
1000 45,000.00 Associate
1000 45,000.00 Sr. Associate
1000 52,000.00 Associate
1000 52,000.00 Sr. Associate
1000 65,000.00 Associate
1000 65,000.00 Sr. Associate
1/1/20 1/1/20 1/1/20 1/1/20
No Jo
in Or
der
curren
Row of data
Row of data the Integration Service joins
Indicates a join between two rows of data
6/30/20
Title
Salary
48 Chapter 4: Application Source Qualifier for PeopleSoft Sources
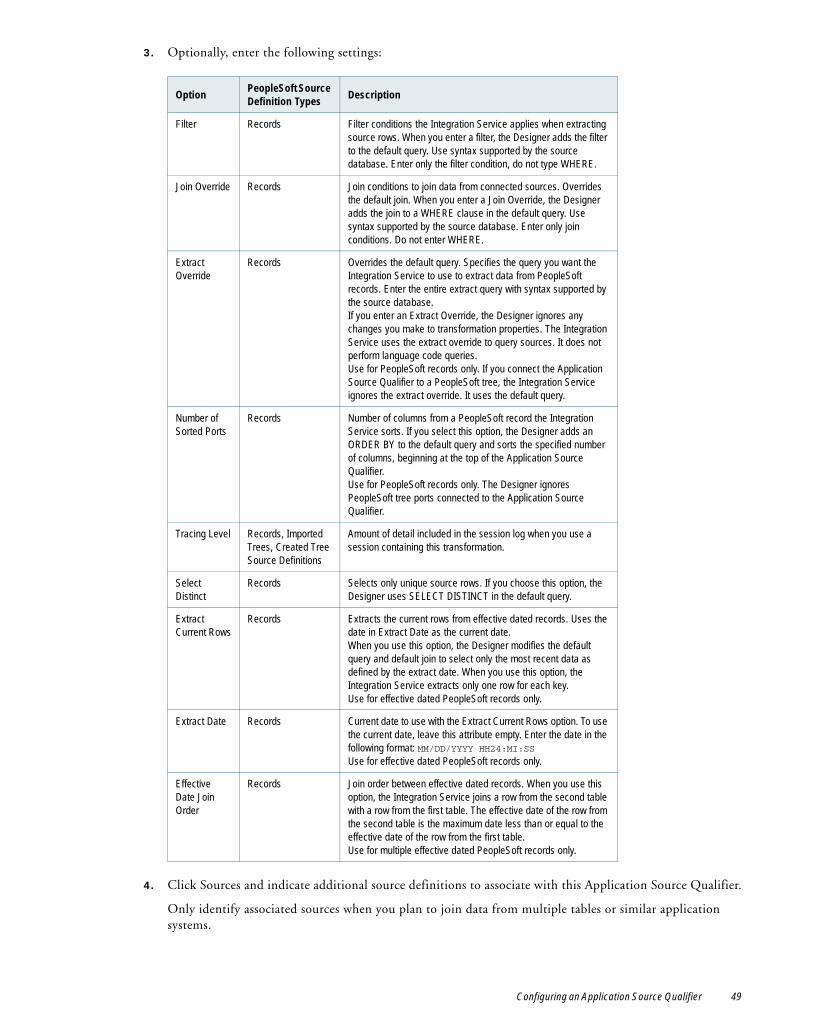
3. Optionally, enter the following settings:
4. Click Sources and indicate additional source definitions to associate with this Application Source Qualifier.
Only identify associated sources when you plan to join data from multiple tables or similar application systems.
Option PeopleSoft Source Definition Types Description
Filter Records Filter conditions the Integration Service applies when extracting source rows. When you enter a filter, the Designer adds the filter to the default query. Use syntax supported by the source database. Enter only the filter condition, do not type WHERE.
Join Override Records Join conditions to join data from connected sources. Overrides the default join. When you enter a Join Override, the Designer adds the join to a WHERE clause in the default query. Use syntax supported by the source database. Enter only join conditions. Do not enter WHERE.
Extract Override
Records Overrides the default query. Specifies the query you want the Integration Service to use to extract data from PeopleSoft records. Enter the entire extract query with syntax supported by the source database.If you enter an Extract Override, the Designer ignores any changes you make to transformation properties. The Integration Service uses the extract override to query sources. It does not perform language code queries.Use for PeopleSoft records only. If you connect the Application Source Qualifier to a PeopleSoft tree, the Integration Service ignores the extract override. It uses the default query.
Number of Sorted Ports
Records Number of columns from a PeopleSoft record the Integration Service sorts. If you select this option, the Designer adds an ORDER BY to the default query and sorts the specified number of columns, beginning at the top of the Application Source Qualifier. Use for PeopleSoft records only. The Designer ignores PeopleSoft tree ports connected to the Application Source Qualifier.
Tracing Level Records, Imported Trees, Created Tree Source Definitions
Amount of detail included in the session log when you use a session containing this transformation.
Select Distinct
Records Selects only unique source rows. If you choose this option, the Designer uses SELECT DISTINCT in the default query.
Extract Current Rows
Records Extracts the current rows from effective dated records. Uses the date in Extract Date as the current date.When you use this option, the Designer modifies the default query and default join to select only the most recent data as defined by the extract date. When you use this option, the Integration Service extracts only one row for each key.Use for effective dated PeopleSoft records only.
Extract Date Records Current date to use with the Extract Current Rows option. To use the current date, leave this attribute empty. Enter the date in the following format: MM/DD/YYYY HH24:MI:SS Use for effective dated PeopleSoft records only.
Effective Date Join Order
Records Join order between effective dated records. When you use this option, the Integration Service joins a row from the second table with a row from the first table. The effective date of the row from the second table is the maximum date less than or equal to the effective date of the row from the first table.Use for multiple effective dated PeopleSoft records only.
Configuring an Application Source Qualifier 49

5. From the Metadata Extensions tab, create user-defined metadata extensions.
Use metadata extensions to associate information with repository metadata.
6. Click OK.
50 Chapter 4: Application Source Qualifier for PeopleSoft Sources
C H A P T E R 5
Accessing XLATTABLE Data
This chapter includes the following topics:
♦ Overview, 51
♦ Sourcing XLATTABLE Data, 52
♦ Looking Up XLATTABLE Data, 54
OverviewPeopleSoft systems use the XLATTABLE table to define codes used in PeopleSoft records. Use PowerExchange for PeopleSoft to access XLATTABLE data to define those codes. For example, a PeopleSoft record might have a row with “A” in the STATUS column. By accessing the XLATTABLE table, you can determine that A stands for “Available.”
In a mapping, you can access the XLATTABLE table in two ways:
♦ As a PeopleSoft source. You can import the XLATTABLE table as a PeopleSoft source definition and then join it with a PeopleSoft record in an Application Source Qualifier.
When you join source definitions in the Application Source Qualifier, the Integration Service performs an inner equijoin. Use the XLATTABLE table as a source when all source rows in the PeopleSoft record have corresponding records in the XLATTABLE table.
♦ As a database lookup table. You can also import the XLATTABLE table from the underlying database of the PeopleSoft system. As a relational table, use the XLATTABLE table in a Lookup transformation. You cannot create Lookup transformations based on PeopleSoft sources.
As a Lookup transformation, you can look up corresponding data in the XLATTABLE table. Use this option to look up more than one column or to perform more complicated queries against the XLATTABLE table, such as choosing the first or last results of a multiple match or replacing null values.
Locating Accurate ValuesTo ensure the Integration Service extracts accurate information from the XLATTABLE table, each time you use the XLATTABLE table, enter the following information:
♦ A condition to indicate which columns to compare
♦ A filter to remove unrelated code definitions and definitions in unnecessary languages
When you use the XLATTABLE table as a PeopleSoft source, enter a join override and filter conditions to extract XLATTABLE data.
51
When you use the XLATTABLE table as a lookup table, enter lookup conditions and a lookup SQL override to extract XLATTABLE data.
Codes defined in the XLATTABLE table can contain more than one definition for a given code. For example, “A” might stand for “Active” in one PeopleSoft record, and it might stand for “Assets” in another. To differentiate between different codes, the XLATTABLE table contains two columns that are directly referenced by PeopleSoft records:
♦ FIELDVALUE. Contains codes defined within the XLATTABLE table and used by PeopleSoft records.
♦ FIELDNAME. Contains a text string. The text string is the name of the column in the related PeopleSoft record that contains the code. For example, the code “A” is in the STATUS column of a PeopleSoft record. The corresponding row in the XLATTABLE table has “A” in the FIELDVALUE column and “STATUS” in the FIELDNAME column.
Additional columns define the codes, including the following columns:
♦ LANGUAGE_CD. PeopleSoft language code. You can define a code in the XLATTABLE table in different languages. The language code for each row indicates the language of the description. When the XLATTABLE table defines codes in different languages, you can add a filter condition to extract data in the language you want.
♦ EFFDT. Effective date of the row.
♦ XLATLONGNAME. A long description of the code.
♦ XLATSHORTNAME. A short description of the code.
For example, a PeopleSoft record contains a column named BD_WKBOOK_TYPE. The column contains codes representing different workbook types, such as A and E. The codes defined in the XLATTABLE table as follows:
In the XLATTABLE table, “BD_WKBOOK_TYPE” identifies the codes in the FIELDVALUE column. Definitions of these codes appear in the XLATSHORTNAME and XLATLONGNAME columns. The short description of the “A” workbook type is “Assets.” The long description is “Assets Workbook.”
Sourcing XLATTABLE DataYou can access XLATTABLE data as a PeopleSoft source and join it to a related PeopleSoft record in a single Application Source Qualifier transformation. The join type in an Application Source Qualifier is an inner equijoin. With an inner equijoin, the Integration Service extracts data from one source table when it finds a matching row in the other source table. It does not extract rows without matching rows. If you want the Integration Service to extract all rows from a PeopleSoft record, regardless of whether the matching row appears in the XLATTABLE table, use the XLATTABLE table as a lookup table.
Complete the following steps to use the XLATTABLE table as a source:
1. Import the XLATTABLE table as a PeopleSoft source definition.
2. Add the XLATTABLE source definition to the mapping.
3. Override the default query in the Application Source Qualifier transformation.
4. Configure the database connection and run the workflow.
FIELDNAME FIELDVALUE EFFDT XLATLONGNAME XLATSHORTNAME
BD_WKBOOK_TYPE A 01-JAN-00 Assets Workbook Assets
BD_WKBOOK_TYPE E 01-JAN-00 Expenses Workbook Expenses
BD_WKBOOK_TYPE P 01-JAN-00 Payroll Workbook Payroll
BD_WKBOOK_TYPE R 01-JAN-00 Revenue Workbook Revenue
52 Chapter 5: Accessing XLATTABLE Data
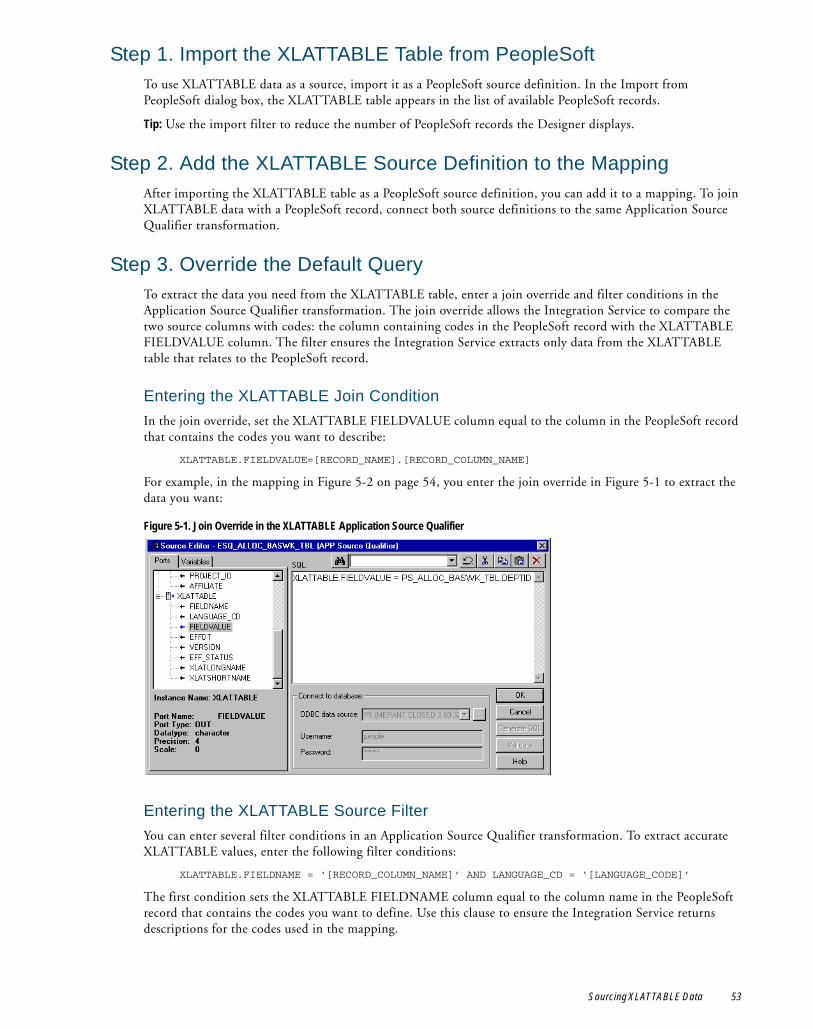
Step 1. Import the XLATTABLE Table from PeopleSoftTo use XLATTABLE data as a source, import it as a PeopleSoft source definition. In the Import from PeopleSoft dialog box, the XLATTABLE table appears in the list of available PeopleSoft records.
Tip: Use the import filter to reduce the number of PeopleSoft records the Designer displays.
Step 2. Add the XLATTABLE Source Definition to the MappingAfter importing the XLATTABLE table as a PeopleSoft source definition, you can add it to a mapping. To join XLATTABLE data with a PeopleSoft record, connect both source definitions to the same Application Source Qualifier transformation.
Step 3. Override the Default QueryTo extract the data you need from the XLATTABLE table, enter a join override and filter conditions in the Application Source Qualifier transformation. The join override allows the Integration Service to compare the two source columns with codes: the column containing codes in the PeopleSoft record with the XLATTABLE FIELDVALUE column. The filter ensures the Integration Service extracts only data from the XLATTABLE table that relates to the PeopleSoft record.
Entering the XLATTABLE Join ConditionIn the join override, set the XLATTABLE FIELDVALUE column equal to the column in the PeopleSoft record that contains the codes you want to describe:
XLATTABLE.FIELDVALUE=[RECORD_NAME].[RECORD_COLUMN_NAME]
For example, in the mapping in Figure 5-2 on page 54, you enter the join override in Figure 5-1 to extract the data you want:
Entering the XLATTABLE Source FilterYou can enter several filter conditions in an Application Source Qualifier transformation. To extract accurate XLATTABLE values, enter the following filter conditions:
XLATTABLE.FIELDNAME = ‘[RECORD_COLUMN_NAME]’ AND LANGUAGE_CD = ‘[LANGUAGE_CODE]’
The first condition sets the XLATTABLE FIELDNAME column equal to the column name in the PeopleSoft record that contains the codes you want to define. Use this clause to ensure the Integration Service returns descriptions for the codes used in the mapping.
Figure 5-1. Join Override in the XLATTABLE Application Source Qualifier
Sourcing XLATTABLE Data 53
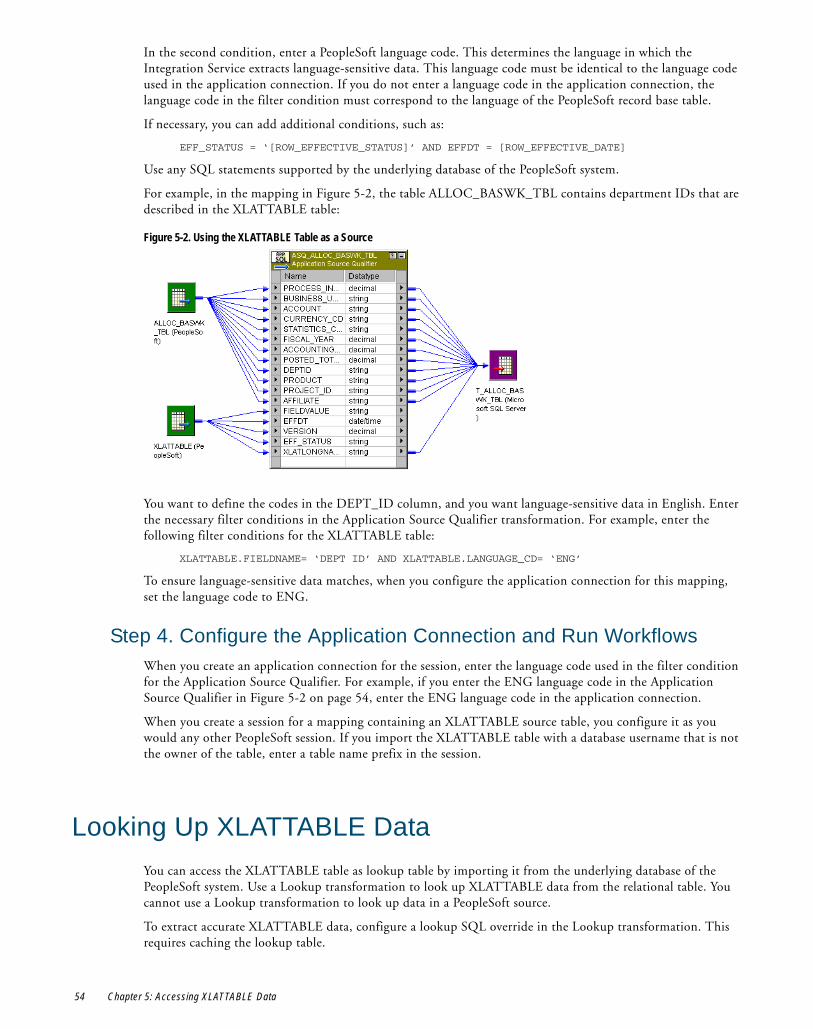
In the second condition, enter a PeopleSoft language code. This determines the language in which the Integration Service extracts language-sensitive data. This language code must be identical to the language code used in the application connection. If you do not enter a language code in the application connection, the language code in the filter condition must correspond to the language of the PeopleSoft record base table.
If necessary, you can add additional conditions, such as:
EFF_STATUS = ‘[ROW_EFFECTIVE_STATUS]’ AND EFFDT = [ROW_EFFECTIVE_DATE]
Use any SQL statements supported by the underlying database of the PeopleSoft system.
For example, in the mapping in Figure 5-2, the table ALLOC_BASWK_TBL contains department IDs that are described in the XLATTABLE table:
You want to define the codes in the DEPT_ID column, and you want language-sensitive data in English. Enter the necessary filter conditions in the Application Source Qualifier transformation. For example, enter the following filter conditions for the XLATTABLE table:
XLATTABLE.FIELDNAME= ‘DEPT ID’ AND XLATTABLE.LANGUAGE_CD= ‘ENG’
To ensure language-sensitive data matches, when you configure the application connection for this mapping, set the language code to ENG.
Step 4. Configure the Application Connection and Run WorkflowsWhen you create an application connection for the session, enter the language code used in the filter condition for the Application Source Qualifier. For example, if you enter the ENG language code in the Application Source Qualifier in Figure 5-2 on page 54, enter the ENG language code in the application connection.
When you create a session for a mapping containing an XLATTABLE source table, you configure it as you would any other PeopleSoft session. If you import the XLATTABLE table with a database username that is not the owner of the table, enter a table name prefix in the session.
Looking Up XLATTABLE DataYou can access the XLATTABLE table as lookup table by importing it from the underlying database of the PeopleSoft system. Use a Lookup transformation to look up XLATTABLE data from the relational table. You cannot use a Lookup transformation to look up data in a PeopleSoft source.
To extract accurate XLATTABLE data, configure a lookup SQL override in the Lookup transformation. This requires caching the lookup table.
Figure 5-2. Using the XLATTABLE Table as a Source
54 Chapter 5: Accessing XLATTABLE Data
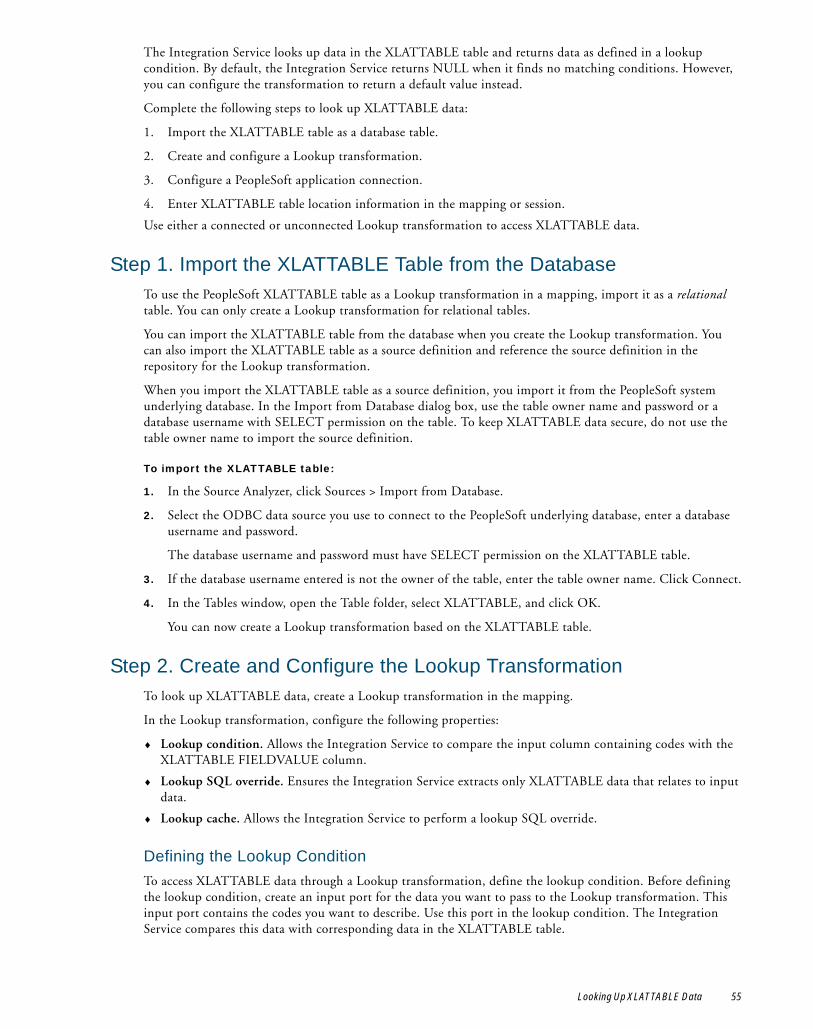
The Integration Service looks up data in the XLATTABLE table and returns data as defined in a lookup condition. By default, the Integration Service returns NULL when it finds no matching conditions. However, you can configure the transformation to return a default value instead.
Complete the following steps to look up XLATTABLE data:
1. Import the XLATTABLE table as a database table.
2. Create and configure a Lookup transformation.
3. Configure a PeopleSoft application connection.
4. Enter XLATTABLE table location information in the mapping or session.
Use either a connected or unconnected Lookup transformation to access XLATTABLE data.
Step 1. Import the XLATTABLE Table from the DatabaseTo use the PeopleSoft XLATTABLE table as a Lookup transformation in a mapping, import it as a relational table. You can only create a Lookup transformation for relational tables.
You can import the XLATTABLE table from the database when you create the Lookup transformation. You can also import the XLATTABLE table as a source definition and reference the source definition in the repository for the Lookup transformation.
When you import the XLATTABLE table as a source definition, you import it from the PeopleSoft system underlying database. In the Import from Database dialog box, use the table owner name and password or a database username with SELECT permission on the table. To keep XLATTABLE data secure, do not use the table owner name to import the source definition.
To import the XLATTABLE table:
1. In the Source Analyzer, click Sources > Import from Database.
2. Select the ODBC data source you use to connect to the PeopleSoft underlying database, enter a database username and password.
The database username and password must have SELECT permission on the XLATTABLE table.
3. If the database username entered is not the owner of the table, enter the table owner name. Click Connect.
4. In the Tables window, open the Table folder, select XLATTABLE, and click OK.
You can now create a Lookup transformation based on the XLATTABLE table.
Step 2. Create and Configure the Lookup TransformationTo look up XLATTABLE data, create a Lookup transformation in the mapping.
In the Lookup transformation, configure the following properties:
♦ Lookup condition. Allows the Integration Service to compare the input column containing codes with the XLATTABLE FIELDVALUE column.
♦ Lookup SQL override. Ensures the Integration Service extracts only XLATTABLE data that relates to input data.
♦ Lookup cache. Allows the Integration Service to perform a lookup SQL override.
Defining the Lookup ConditionTo access XLATTABLE data through a Lookup transformation, define the lookup condition. Before defining the lookup condition, create an input port for the data you want to pass to the Lookup transformation. This input port contains the codes you want to describe. Use this port in the lookup condition. The Integration Service compares this data with corresponding data in the XLATTABLE table.
Looking Up XLATTABLE Data 55
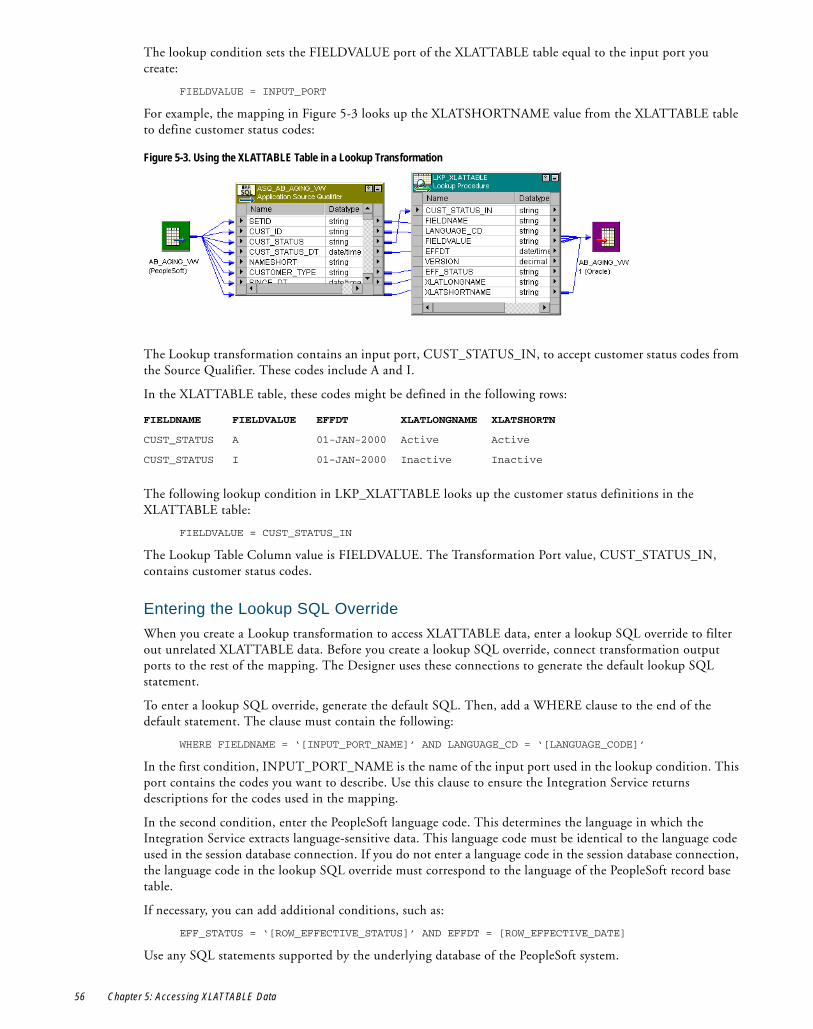
The lookup condition sets the FIELDVALUE port of the XLATTABLE table equal to the input port you create:
FIELDVALUE = INPUT_PORT
For example, the mapping in Figure 5-3 looks up the XLATSHORTNAME value from the XLATTABLE table to define customer status codes:
The Lookup transformation contains an input port, CUST_STATUS_IN, to accept customer status codes from the Source Qualifier. These codes include A and I.
In the XLATTABLE table, these codes might be defined in the following rows:
The following lookup condition in LKP_XLATTABLE looks up the customer status definitions in the XLATTABLE table:
FIELDVALUE = CUST_STATUS_IN
The Lookup Table Column value is FIELDVALUE. The Transformation Port value, CUST_STATUS_IN, contains customer status codes.
Entering the Lookup SQL OverrideWhen you create a Lookup transformation to access XLATTABLE data, enter a lookup SQL override to filter out unrelated XLATTABLE data. Before you create a lookup SQL override, connect transformation output ports to the rest of the mapping. The Designer uses these connections to generate the default lookup SQL statement.
To enter a lookup SQL override, generate the default SQL. Then, add a WHERE clause to the end of the default statement. The clause must contain the following:
WHERE FIELDNAME = ‘[INPUT_PORT_NAME]’ AND LANGUAGE_CD = ‘[LANGUAGE_CODE]’
In the first condition, INPUT_PORT_NAME is the name of the input port used in the lookup condition. This port contains the codes you want to describe. Use this clause to ensure the Integration Service returns descriptions for the codes used in the mapping.
In the second condition, enter the PeopleSoft language code. This determines the language in which the Integration Service extracts language-sensitive data. This language code must be identical to the language code used in the session database connection. If you do not enter a language code in the session database connection, the language code in the lookup SQL override must correspond to the language of the PeopleSoft record base table.
If necessary, you can add additional conditions, such as:
EFF_STATUS = ‘[ROW_EFFECTIVE_STATUS]’ AND EFFDT = [ROW_EFFECTIVE_DATE]
Use any SQL statements supported by the underlying database of the PeopleSoft system.
Figure 5-3. Using the XLATTABLE Table in a Lookup Transformation
FIELDNAME FIELDVALUE EFFDT XLATLONGNAME XLATSHORTN
CUST_STATUS A 01-JAN-2000 Active Active
CUST_STATUS I 01-JAN-2000 Inactive Inactive
56 Chapter 5: Accessing XLATTABLE Data
The Designer generates the following SQL statement for the Lookup transformation LKP_XLATTABLE in Figure 5-3 on page 56:
SELECT XLATTABLE.FIELDNAME as FIELDNAME, XLATTABLE.LANGUAGE_CD as LANGUAGE_CD, XLATTABLE.EFFDT as EFFDT, XLATTABLE.VERSION as VERSION, XLATTABLE.EFF_STATUS as EFF_STATUS, XLATTABLE.XLATLONGNAME as XLATLONGNAME, XLATTABLE.XLATSHORTNAME as XLATSHORTNAME, XLATTABLE.FIELDVALUE as FIELDVALUE FROM XLATTABLE
You can then add a WHERE clause with additional conditions as follows:
WHERE FIELDNAME = ‘CUST_STATUS’ AND LANGUAGE_CD = ‘ENG’ AND EFF_STATUS = ‘A’ AND EFFDT = (SELECT MAX(EFFDT) FROM XLATTABLE SECONDARY_NAME WHERE FIELDNAME = ‘CUST_STATUS’ AND EFF_STATUS = ‘A’ AND LANGUAGE_CD = ‘ENG’ AND SECONDARY_NAME.FIELDVALUE = XLATTABLE.FIELDVALUE)
This clause ensures the Integration Service returns values from the XLATTABLE table where the FIELDNAME is “CUST_STATUS,” the language is English, the status is active, and the effective date is the most recent. This statement uses “SECONDARY_NAME” as a secondary reference for the XLATTABLE table to allow a self-join.
Note: Do not edit the existing syntax of the default lookup SQL statement.
Adding the Owner NameWhen you import the XLATTABLE table using a database username that is not the owner of the table, enter the table owner name in the lookup SQL override. When you enter the table owner name to the SQL statement, you define the XLATTABLE table as “ownername.XLATTABLE.” To ensure the lookup SQL override remains valid, you must also rename the table XLATTABLE.
For example, the owner of the XLATTABLE table used in the Lookup transformation LKP_XLATTABLE in Figure 5-3 on page 56 is jdoe. You import the table using a different database username.
When you enter the lookup SQL override, first generate the default SQL:
SELECT XLATTABLE.FIELDNAME as FIELDNAME, XLATTABLE.LANGUAGE_CD as LANGUAGE_CD, XLATTABLE_EFFDT as EFFDT, XLATTABLE.VERSION as VERSION, XLATTABLE.EFF_STATUS as EFF_STATUS, XLATTABLE.XLATLONGNAME as XLATLONGNAME, XLATTABLE.XLATSHORTNAME as XLATSHORTNAME, XLATTABLE.FIELDVALUE as FIELDVALUE FROM XLATTABLE
To enter the XLATTABLE table owner name and rename the table XLATTABLE, edit the table name as follows:
FROM jdoe.XLATTABLE XLATTABLE
You can then add a WHERE clause and additional conditions as follows:
WHERE FIELDNAME = ‘CUST_STATUS’ AND LANGUAGE_CD = ‘ENG’ AND EFF_STATUS = ‘A’ AND EFFDT = (SELECT MAX(EFFDT) FROM jdoe.XLATTABLE SECONDARY_NAME WHERE FIELDNAME = ‘CUST_STATUS’ AND EFF_STATUS = ‘A’ AND LANGUAGE_CD = ‘ENG’ AND SECONDARY_NAME.FIELDVALUE = XLATTABLE.FIELDVALUE)
As in the previous example, this clause ensures the Integration Service returns values from the XLATTABLE table where the FIELDNAME is “CUST_STATUS,” the language is English, the status is active, and the effective date is the most recent. This statement uses “SECONDARY_NAME” as a secondary reference for the XLATTABLE table to allow a self-join. It also includes the table owner name “jdoe.XLATTABLE.”
The complete lookup SQL override for the Lookup transformation is as follows:
SELECT XLATTABLE.FIELDNAME as FIELDNAME, XLATTABLE.LANGUAGE_CD as LANGUAGE_CD, XLATTABLE_EFFDT as EFFDT, XLATTABLE.VERSION as VERSION, XLATTABLE.EFF_STATUS as EFF_STATUS, XLATTABLE.XLATLONGNAME as XLATLONGNAME, XLATTABLE.XLATSHORTNAME as XLATSHORTNAME, XLATTABLE.FIELDVALUE as FIELDVALUE FROM jdoe.XLATTABLE XLATTABLE WHERE FIELDNAME = ‘CUST_STATUS’ AND LANGUAGE_CD = ‘ENG’ AND EFF_STATUS = ‘A’ AND EFFDT = (SELECT MAX(EFFDT) FROM jdoe.XLATTABLE SECONDARY_NAME WHERE FIELDNAME = ‘CUST_STATUS’ AND EFF_STATUS = ‘A’ AND LANGUAGE_CD = ‘ENG’ AND SECONDARY_NAME.FIELDVALUE = XLATTABLE.FIELDVALUE)
Looking Up XLATTABLE Data 57
Validating Lookup SQL Override SyntaxAfter you enter the lookup SQL override, you can validate the syntax of the statement.
To validate lookup SQL override syntax:
1. In the SQL Editor, select the ODBC data source to connect to the XLATTABLE table.
This data source connects to the PeopleSoft underlying database.
2. Enter a database username and password to connect to the database and click Validate.
Caching the Lookup TableWhen you use a lookup SQL override, you must also cache the lookup table. Lookup transformations cache the lookup table by default.
If the data in the XLATTABLE is static, you can configure the Lookup transformation for a persistent lookup cache. This allows the Integration Service to save the lookup cache to file and reuse data in the file the next time you run the session. If you use a persistent lookup cache, you can optionally define a name for the lookup cache files.
Step 3. Configure a PeopleSoft Application ConnectionWhen you create an application connection for the workflow, enter the language code used in the lookup SQL override. For example, for the mapping in Figure 5-3 on page 56, you enter the ENG language code in the application connection.
Step 4. Enter Location Information in the Mapping or Session When using a Lookup transformation to access XLATTABLE data, configure the Location Information property on the Properties tab of the Lookup transformation. The Integration Service uses information in the Location Information property to locate the XLATTABLE table.
By default, the Location Information value is $Source for the XLATTABLE table, since you import it from a source database. When you accept the default, the Integration Service uses the session source application connection to locate the XLATTABLE table. You can select a database connection to replace the default location.
The database connection the Integration Service uses to access the XLATTABLE table must have the same database username, password, and connect string as the ODBC data source used to import the table.
If the session database connection does not fit this criteria, select a database connection for the Lookup transformation in the Lookup transformation or in the session properties.
58 Chapter 5: Accessing XLATTABLE Data

C H A P T E R 6
Creating PeopleSoft Sessions and Workflows
This chapter includes the following topics:
♦ Configuring a Session for PeopleSoft Sources, 59
♦ Scheduling a Workflow, 60
Configuring a Session for PeopleSoft SourcesWhen you create a session using PeopleSoft source data, ensure the session is configured to connect to the PeopleSoft source system.
Note: The Integration Service does not perform extract overrides when an Application Source Qualifier is connected to a PeopleSoft tree. When the Integration Service ignores an extract override, it notes the change in the session log.
To configure a session for PeopleSoft sources:
1. In the Task Developer, double-click a PeopleSoft session to open the session properties.
The Edit Tasks dialog box appears.
2. Click the Mapping tab.
If the mapping contains a PeopleSoft source definition, the session uses Application for the source type by default
3. Choose a value for the application connection.
Use the application connection for the underlying database containing PeopleSoft data. For example, if the PeopleSoft system is on an Oracle database, select the application connection configured for the Oracle database.
If the session contains both PeopleSoft and non-PeopleSoft sources, you need to configure a heterogeneous PeopleSoft session and connections for each source.
To create a heterogeneous PeopleSoft session:
1. Select the Mapping tab in the session properties.
2. Select the appropriate connection type for each source.
59
As with a non-heterogeneous PeopleSoft session, use the application connection for the PeopleSoft underlying database to access the PeopleSoft source.
Entering a Source Table Owner NameThe database user in the application connection must have SELECT permission on the source tables accessed in the session. If this database user is not the owner of the source tables, enter the table owner name in the session as a source table prefix.
Note: If the mapping contains a Source Qualifier with an SQL Override or an Application Source Qualifier with an extract override, the Integration Service ignores the table name prefix setting for all connected sources.
To enter a source table prefix in the session:
1. In the session properties, click a target on the Mapping tab.
2. Enter the owner name in the Table Name Prefix field for each listed table.
3. Click OK.
Configuring a PeopleSoft Session to Partition DataIf you need to extract a large amount of source data, you can partition the sources to improve session performance. Partitioning sources allows the Integration Service to create multiple connections to sources and process partitions of source data concurrently. You can partition sources if the Integration Service can maintain data consistency when it processes the partitioned data.
By default, the Workflow Manager sets the partition type to pass-through for PeopleSoft trees. In pass-through partitioning, the Integration Service passes all rows at one partition point to the next partition point without redistributing them. You can also specify key range partitioning for PeopleSoft trees. In key range partitioning, the Integration Service passes data through each partition depending on the ranges specified for each port.
You cannot create multiple partitions on an Application Source Qualifier for PeopleSoft when it is connected to or associated with a PeopleSoft tree.
Scheduling a WorkflowBefore you run a workflow, configure and schedule the workflow. You can schedule a non-reusable scheduler for a workflow. Or, you can create a reusable scheduler to use with the workflow.
You can schedule a workflow to run continuously, run at a given time or interval, or you can manually start a workflow. The Integration Service runs scheduled workflows through the duration of the schedule unless the workflow fails.
60 Chapter 6: Creating PeopleSoft Sessions and Workflows
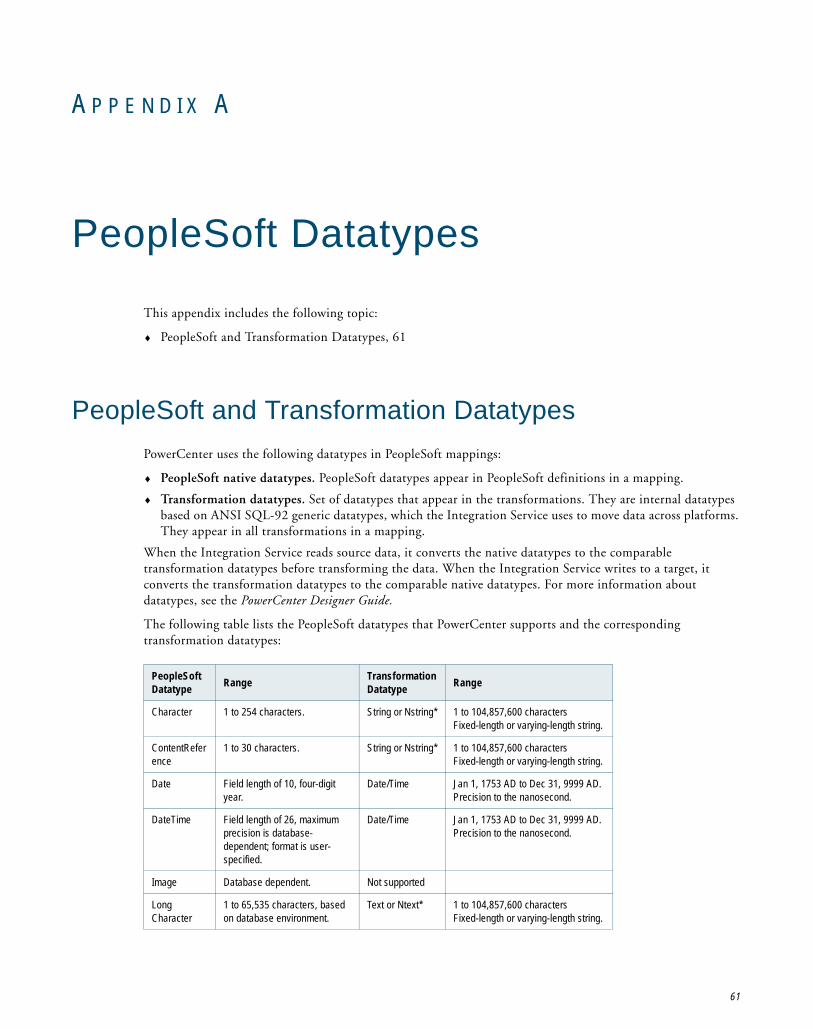
A P P E N D I X A
PeopleSoft Datatypes
This appendix includes the following topic:
♦ PeopleSoft and Transformation Datatypes, 61
PeopleSoft and Transformation DatatypesPowerCenter uses the following datatypes in PeopleSoft mappings:
♦ PeopleSoft native datatypes. PeopleSoft datatypes appear in PeopleSoft definitions in a mapping.
♦ Transformation datatypes. Set of datatypes that appear in the transformations. They are internal datatypes based on ANSI SQL-92 generic datatypes, which the Integration Service uses to move data across platforms. They appear in all transformations in a mapping.
When the Integration Service reads source data, it converts the native datatypes to the comparable transformation datatypes before transforming the data. When the Integration Service writes to a target, it converts the transformation datatypes to the comparable native datatypes. For more information about datatypes, see the PowerCenter Designer Guide.
The following table lists the PeopleSoft datatypes that PowerCenter supports and the corresponding transformation datatypes:
PeopleSoft Datatype Range Transformation
Datatype Range
Character 1 to 254 characters. String or Nstring* 1 to 104,857,600 characters Fixed-length or varying-length string.
ContentReference
1 to 30 characters. String or Nstring* 1 to 104,857,600 characters Fixed-length or varying-length string.
Date Field length of 10, four-digit year.
Date/Time Jan 1, 1753 AD to Dec 31, 9999 AD. Precision to the nanosecond.
DateTime Field length of 26, maximum precision is database-dependent; format is user-specified.
Date/Time Jan 1, 1753 AD to Dec 31, 9999 AD. Precision to the nanosecond.
Image Database dependent. Not supported
Long Character
1 to 65,535 characters, based on database environment.
Text or Ntext* 1 to 104,857,600 characters Fixed-length or varying-length string.
61
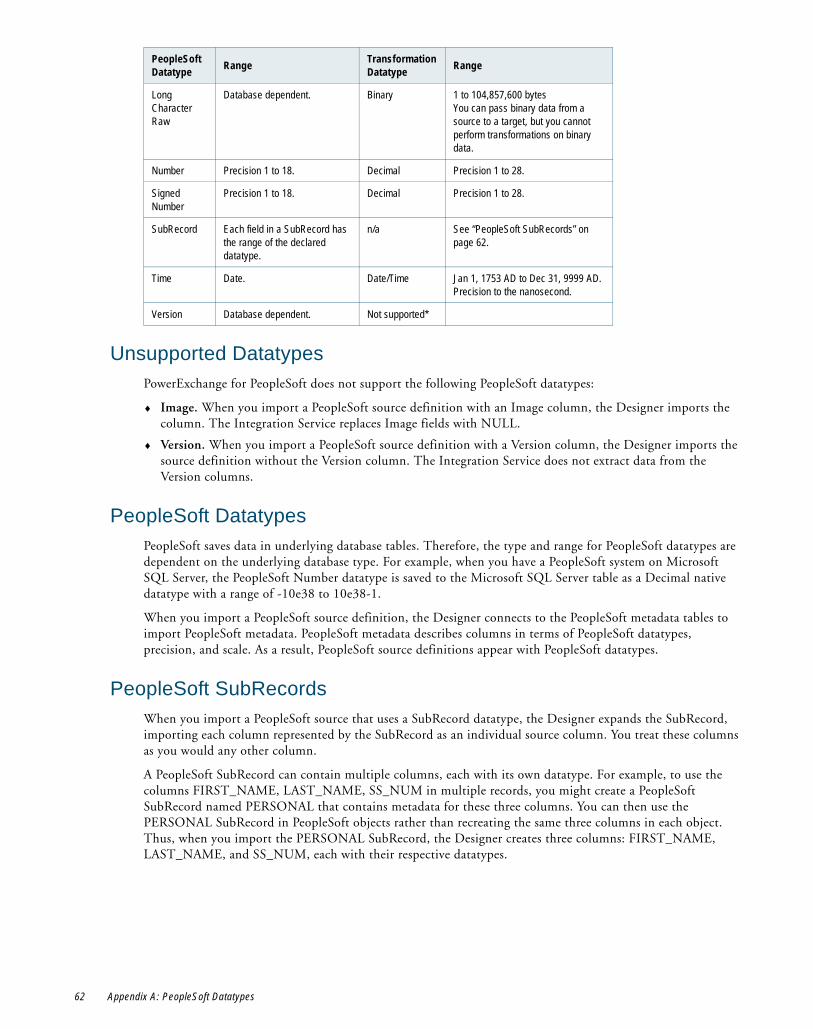
Unsupported DatatypesPowerExchange for PeopleSoft does not support the following PeopleSoft datatypes:
♦ Image. When you import a PeopleSoft source definition with an Image column, the Designer imports the column. The Integration Service replaces Image fields with NULL.
♦ Version. When you import a PeopleSoft source definition with a Version column, the Designer imports the source definition without the Version column. The Integration Service does not extract data from the Version columns.
PeopleSoft DatatypesPeopleSoft saves data in underlying database tables. Therefore, the type and range for PeopleSoft datatypes are dependent on the underlying database type. For example, when you have a PeopleSoft system on Microsoft SQL Server, the PeopleSoft Number datatype is saved to the Microsoft SQL Server table as a Decimal native datatype with a range of -10e38 to 10e38-1.
When you import a PeopleSoft source definition, the Designer connects to the PeopleSoft metadata tables to import PeopleSoft metadata. PeopleSoft metadata describes columns in terms of PeopleSoft datatypes, precision, and scale. As a result, PeopleSoft source definitions appear with PeopleSoft datatypes.
PeopleSoft SubRecordsWhen you import a PeopleSoft source that uses a SubRecord datatype, the Designer expands the SubRecord, importing each column represented by the SubRecord as an individual source column. You treat these columns as you would any other column.
A PeopleSoft SubRecord can contain multiple columns, each with its own datatype. For example, to use the columns FIRST_NAME, LAST_NAME, SS_NUM in multiple records, you might create a PeopleSoft SubRecord named PERSONAL that contains metadata for these three columns. You can then use the PERSONAL SubRecord in PeopleSoft objects rather than recreating the same three columns in each object. Thus, when you import the PERSONAL SubRecord, the Designer creates three columns: FIRST_NAME, LAST_NAME, and SS_NUM, each with their respective datatypes.
Long Character Raw
Database dependent. Binary 1 to 104,857,600 bytes You can pass binary data from a source to a target, but you cannot perform transformations on binary data.
Number Precision 1 to 18. Decimal Precision 1 to 28.
Signed Number
Precision 1 to 18. Decimal Precision 1 to 28.
SubRecord Each field in a SubRecord has the range of the declared datatype.
n/a See “PeopleSoft SubRecords” on page 62.
Time Date. Date/Time Jan 1, 1753 AD to Dec 31, 9999 AD. Precision to the nanosecond.
Version Database dependent. Not supported*
PeopleSoft Datatype Range Transformation
Datatype Range
62 Appendix A: PeopleSoft Datatypes

A P P E N D I X B
PeopleSoft Language Codes
In PeopleSoft, you create metadata using a base language specified in the PeopleSoft application. You can also include non-base language translations for language-sensitive metadata. Language-sensitive metadata can include column names, business names, descriptions, and comments.
When you import a PeopleSoft source definition, the Designer imports metadata in the base language by default. If you want language-sensitive metadata in a different language, enter a PeopleSoft language code. If the source has language-sensitive metadata for the language code, the Designer imports it. If the source does not have language-sensitive metadata for the language code, the Designer imports metadata in the base language.
For example, you want to import a source definition that uses French as its base language. You want to import the PeopleSoft records with English metadata. In the Import from PeopleSoft dialog box, enter the PeopleSoft language code ENG to import English translations. The Designer imports available English metadata for the records you select. If English translations are not available, the Designer imports French metadata.
By default, PeopleSoft stores data for each source in a base table. Typically, language-sensitive data in the base table is in the base language. PeopleSoft stores translations of language-sensitive data in a related language table.
By default, the Integration Service extracts all data for a PeopleSoft source from the base table. If you want language-sensitive data in a particular language, enter the corresponding PeopleSoft language code in the application connection for the PeopleSoft system.
The Integration Service queries both the base table and the related language table. When language-sensitive data exists for the specified language code, the Integration Service extracts the data. When data does not exist for the specified language code, the Integration Service extracts all data from the base table.
The following table lists common PeopleSoft language codes:
The language codes associated with a PeopleSoft system might differ based on the PeopleSoft version and installation. For details specific to your installation, see the PeopleSoft documentation.
Language (Long Name) Language (Short Name) PeopleSoft Language Code
Canadian French Can French CFR
Dutch Dutch DUT
English English ENG
Spanish Spanish ESP
French French FRA
German German GER
International English Intl Eng INE
Japanese Japanese JPN
Portuguese Portuguese POR
63

64 Appendix B: PeopleSoft Language Codes
A P P E N D I X C
Glossary of Terms
branchA unit of a tree. A branch is a logical unit of nodes that extends from the root node to the detail range. Branches allow skipped or missing nodes.
branch nodeA node of a tree containing hierarchical information.
created tree source definitionA source definition you create in the Source Analyzer by choosing Import From PeopleSoft from the Sources menu. The Integration Service vertically flattens all created tree source definitions.
detail rangeA numeric range associated with a node in a detail tree. Detail ranges represent ranges of key values in the related detail record of the tree.
detail recordA PeopleSoft record associated with a PeopleSoft tree. Detail records contain data identified by a PeopleSoft tree.
detail treeA type of PeopleSoft tree that contains detail ranges.
EFFDTThe name of a column used by some PeopleSoft source tables to version data.
EFFSEQThe name of a column used by some PeopleSoft source tables in conjunction with the EFFDT column to version data. Also used independently for general sequences.
flatteningSee horizontal flattening on page 65 and vertical flattening on page 66.
horizontal flatteningA method of extracting data from PeopleSoft trees that results in a row for each unique branch and detail combination. See also vertical flattening on page 66.
65
loose-level treeA type of PeopleSoft tree. In a loose-level tree, one level can contain nodes with different kinds of information. Also, nodes representing the same kind of information can appear at multiple levels. Loose-level trees can contain branches with skipped or missing nodes.
nodeA unit of a tree. A node contains categorical or contextual information.
Note: In PowerCenter documentation, a node is different from the PeopleSoft object known as a “node.”
panelA type of PeopleSoft metadata. Each panel can reference several PeopleSoft records.
PeopleSoft keysA key type reserved for PeopleSoft sources that contain both unique and non-unique key columns.
recordA type of PeopleSoft metadata with a table-like logical structure. Like a relational table, a PeopleSoft record can contain columns with defined datatypes, precision, scale, and keys.
root nodeThe highest node in the structure of the hierarchy. It is the origin of all other nodes.
SetIDA value that provides a unique identifier for each hierarchy.
SQL tableA type of PeopleSoft record, similar to a database table.
SQL viewA type of PeopleSoft record, similar to a database view.
strict-level treeA type of PeopleSoft tree. In a strict level tree, each branch progresses through a specific hierarchy of tree levels, from the root node to the detail range. Strict-level trees support branches with skipped or missing nodes as long as existing nodes do not violate the logical order of tree levels.
summary treeA type of PeopleSoft tree. Summary trees provide an alternative view of nodes in a detail tree. Summary trees contain no detail ranges.
treeA type of PeopleSoft metadata. A PeopleSoft tree defines a hierarchy of relationships for values in a single column of data in the related PeopleSoft record known as a detail record.
vertical flatteningA method of extracting data from PeopleSoft trees that results in a row for each node or detail range represented in the tree. See also horizontal flattening on page 65.
vertical treeSee created tree source definition on page 65.
66 Appendix C: Glossary of Terms

winter treeA type of PeopleSoft tree. A winter tree extracts data from loose-level and strict-level node-oriented trees. It contains no detail ranges or detail records.
XLATTABLE tableA PeopleSoft system table used to store data referenced by PeopleSoft records.
67

68 Appendix C: Glossary of Terms
I N D E X
Aapplication connections
PeopleSoft language codes 63PeopleSoft username 60
Application Source Qualifierdefault join for PeopleSoft records 32default query for PeopleSoft records 31Extract Override property for PeopleSoft records 39extracting current rows from PeopleSoft records 45filtering data from PeopleSoft sources 36Join Override property for PeopleSoft records 32, 38joining sources for PeopleSoft records 32linking TO_EFFDT port for PeopleSoft records 42PeopleSoft, configuring 48PeopleSoft, default join 32PeopleSoft, mapping parameters and variables 30PeopleSoft, overview 29PeopleSoft, XLATTABLE SQL override 53Select Distinct option, for a PeopleSoft record 41sorting ports for PeopleSoft records 40
architecturePeopleSoft 1
Bbranch
PeopleSoft, description 4branch nodes
definition for PeopleSoft 65PeopleSoft, importing levels 21
branchesdefinition for PeopleSoft 65PeopleSoft, description 4
business namesdisplaying business names in PeopleSoft 16
Ccolumn names
joining PeopleSoft records 33connect string
to import PeopleSoft metadata 11connectivity
PeopleSoft requirements 11PeopleSoft, overview 1
created tree source definitiondefinition for PeopleSoft 65
Ddata extraction
default query for PeopleSoft records 31Extract Override property for PeopleSoft records 39horizontal PeopleSoft trees 7PeopleSoft import permissions 13PeopleSoft records 3PeopleSoft, username 12vertical PeopleSoft trees 8XLATTABLE 51, 52, 54
database table namefor PeopleSoft records 16, 30
datatypeshorizontal PeopleSoft trees 21PeopleSoft native datatypes 62PowerExchange for PeopleSoft 61unsupported in PeopleSoft 62
datesfiltering PeopleSoft records 3
default joinApplication Source Qualifier for PeopleSoft sources 32PeopleSoft records 33PeopleSoft tree and detail record 34PeopleSoft tree and non-detail record 35PeopleSoft, effective dates 33PeopleSoft, effective sequences 33
default queryApplication Source Qualifier, for PeopleSoft records 31editing for PeopleSoft records 31extract current rows from PeopleSoft records 42generating for PeopleSoft records 31PeopleSoft, overriding for XLATTABLE 53PeopleSoft, specifying current date 42
detail rangesdefinition for PeopleSoft 65PeopleSoft join behavior 34PeopleSoft, importing 21
detail recordsdefinition for PeopleSoft 65importing from PeopleSoft 22importing name with PeopleSoft tree 20joining with PeopleSoft trees 34PeopleSoft, description 4relationship to PeopleSoft detail tree 6
detail treesdefinition for PeopleSoft 65flattening 8joining with PeopleSoft records 34PeopleSoft, description 4
69
PeopleSoft, static detail ranges 6PeopleSoft, strict-level example 6vertically flattening 9
distinct valuesselecting from a PeopleSoft record 41
EEFFDT
See also effective datesdefinition for PeopleSoft 65description 52
Effective Date Join OrderPeopleSoft, description 43PeopleSoft, examples 44
effective datesdefault join for PeopleSoft records 33filtering PeopleSoft records 3joining PeopleSoft records 43PeopleSoft TO_EFFDT port 3PeopleSoft TO_EFFDT port, adding 42PeopleSoft trees, importing 22, 23PeopleSoft, importing 19PeopleSoft, in XLATTABLE 52selecting current rows from PeopleSoft records 42trees 20
effective sequencesdefault join for PeopleSoft records 33filtering PeopleSoft records 3
EFFSEQSee also effective datesSee also effective sequencesdefinition for PeopleSoft 65PeopleSoft, description 3
Extract Current RowsPeopleSoft, description 43PeopleSoft, overview 42
Extract Datemapping parameters and variables in PeopleSoft 42PeopleSoft, description 43PeopleSoft, mapping parameters and variables 30PeopleSoft, overview 42
extract overridePeopleSoft, Application Source Qualifier 29PeopleSoft, creating 40PeopleSoft, validating 40
Extract Override (property)Application Source Qualifier connected to PeopleSoft records 39
FFIELDNAME
in XLATTABLE lookup SQL override 56in XLATTABLE source filter 53PeopleSoft, description 52
FIELDVALUEin XLATTABLE join condition 53in XLATTABLE lookup condition 56PeopleSoft, description 52
filteringPeopleSoft, record business names 23PeopleSoft, record names 23
PeopleSoft, tree names 23PeopleSoft, XLATTABLE data 53XLATTABLE data 56
filtersSee also source filtersPeopleSoft, validating 37
flatteningdefinition for PeopleSoft 65PeopleSoft trees 34
Gglossary
PeopleSoft terms 65
Hhorizontal flattening
definition for PeopleSoft 65
Jjoin override
PeopleSoft, creating 38PeopleSoft, validating 38
Join Override (property)PeopleSoft, Application Source Qualifier 29, 32, 38
Joiner transformationPeopleSoft, joining sources 34
joiningSee also PowerCenter Designer Guidedetail PeopleSoft trees and non-detail records 35PeopleSoft records and detail trees 34PeopleSoft records and trees 34related PeopleSoft records 32, 33
joinsPeopleSoft, creating key relationships for 3
Kkeys
joining PeopleSoft records 33PeopleSoft, creating for joins 3, 18PeopleSoft, handling 3PeopleSoft, importing 3PeopleSoft, in records 17PeopleSoft, primary 3PeopleSoft, source definitions 3
Llanguage codes
in XLATTABLE 52PeopleSoft, overview 63
language table namePeopleSoft, for records 16
LANGUAGE_CDSee also language codesin XLATTABLE lookup SQL override 56in XLATTABLE source filter 53
70 Index
PeopleSoft, description 52levels
See also loose-level treesSee also strict-level treesPeopleSoft, description 4PeopleSoft, skipping 5, 7, 8
location informationPeopleSoft, Lookup transformation 58PeopleSoft, session property sheet 58
lookup cachesSee Lookup transformation (for XLATTABLE)
lookup SQL overridePeopleSoft, validating 58
Lookup transformationcreating for XLATTABLE data 55lookup SQL override for XLATTABLE data 56PeopleSoft, adding owner name 57PeopleSoft, cache 58PeopleSoft, configuring database connection 58PeopleSoft, configuring session 58PeopleSoft, location information 58PeopleSoft, lookup condition 55XLATTABLE data 51
loose-level treesdefinition for PeopleSoft 66description 5PeopleSoft source definition, creating 21winter tree example 6
Mmapping parameters
in Application Source Qualifier for PeopleSoft 30mapping variables
PeopleSoft, in Application Source Qualifier 30metadata extensions
PeopleSoft, using 17metadata tables
PeopleSoft, import permissions 12PeopleSoft, username and permissions for import 11PeopleSoft, username for 12
Nnodes
definition for PeopleSoft 66PeopleSoft, missing 5, 7, 8
non-detail recordsjoining with PeopleSoft trees 35
OODBC data sources
PeopleSoft, configuring 13PeopleSoft, to import metadata 11
ORDER BYextract query for PeopleSoft records 40
overrideextract for PeopleSoft records 39PeopleSoft, default join 38PeopleSoft, XLATTABLE SQL override 53
XLATTABLE lookup SQL override 56owner name
in PeopleSoft sessions 60PeopleSoft table 12XLATTABLE table 55, 57
Ppanels
definition for PeopleSoft 66PeopleSoft, records 17
partitioningPeopleSoft, sessions 60
PeopleSoftarchitecture 1connectivity 1metadata table permissions 12security 2source table permissions 13
PeopleSoft keysdefinition for PeopleSoft 66
permissionsPeopleSoft, to extract source data 11PeopleSoft, to import metadata tables 11XLATTABLE table 55
physical table namefor PeopleSoft records 16
primary keysPeopleSoft, importing 3
Rrecords
definition for PeopleSoft 66filtering PeopleSoft record 3importing database table name for PeopleSoft 16joining with PeopleSoft detail trees 34joining with PeopleSoft records 33PeopleSoft detail 6PeopleSoft, creating key relationships 3PeopleSoft, description 3, 15PeopleSoft, importing 15, 16, 17PeopleSoft, importing language table name 16PeopleSoft, in panels 17PeopleSoft, joining with detail trees 33PeopleSoft, joining with records 33PeopleSoft, key columns 17PeopleSoft, metadata 16PeopleSoft, related 17PeopleSoft, using database table names in queries 30PeopleSoft, viewing 17sorting source data from PeopleSoft records 40
rootPeopleSoft, description 4
root nodesdefinition for PeopleSoft 66PeopleSoft, importing levels 21
Index 71
Ssecurity
configuring for PeopleSoft 12PeopleSoft metadata tables 12PeopleSoft overview 2PeopleSoft source tables 13XLATTABLE tables 57
Select Distinct (property)PeopleSoft, Application Source Qualifier 29PeopleSoft, extract query 41
sequencesfiltering PeopleSoft records 3
sessionsPeopleSoft sources, creating 59PeopleSoft, partitioning 60PeopleSoft, table name prefix 60
Set Control ValuePeopleSoft, importing 20
SetIDdefinition for PeopleSoft 66PeopleSoft, importing 19trees 20
sorted portsPeopleSoft, Application Source Qualifier 29PeopleSoft, overview 40PeopleSoft, procedure 41
Sorter transformationPeopleSoft data, sorting 41
source definitionsdefault query for PeopleSoft records 31displaying business names in PeopleSoft 16Extract Override property for PeopleSoft records 39filtering data from PeopleSoft sources 36horizontal PeopleSoft trees 7PeopleSoft records 3PeopleSoft, editing 26PeopleSoft, extract override 29PeopleSoft, filtering data 29PeopleSoft, for XLATTABLE data 53PeopleSoft, importing 23PeopleSoft, joining 29, 32, 38PeopleSoft, selecting distinct values 29PeopleSoft, sorting source data 29PeopleSoft, XLATTABLE data 51selecting distinct values from a PeopleSoft record 41sorting source data from PeopleSoft records 40vertical PeopleSoft trees 8
source filtersApplication Source Qualifier for PeopleSoft records 36PeopleSoft, Application Source Qualifier 29PeopleSoft, creating 37PeopleSoft, syntax 36PeopleSoft, validating 37
source tablesPeopleSoft, username and permissions for import 11permissions to secure PeopleSoft data 13
SQL overridePeopleSoft, XLATTABLE 53
SQL tabledefinition for PeopleSoft 66PeopleSoft, description 3, 16PeopleSoft, key columns 17
PeopleSoft, key handling 3SQL view
definition for PeopleSoft 66PeopleSoft, description 3, 16PeopleSoft, key columns 17PeopleSoft, key handling 3
strict-level treesdefinition for PeopleSoft 66description 5missing nodes 5PeopleSoft, detail tree example 6
structurestrees 6
summary treesdefinition for PeopleSoft 66description 7flattening 8PeopleSoft, description 4vertically flattening 9
syntaxPeopleSoft, filters 36
Ttable name prefix
See owner nametable names
PeopleSoft, language 16PeopleSoft, physical 16
TO_EFFDT portSee also effective datesdescription 3linking 42
treesSee also detail treesSee also loose-level treesSee also strict-level treesSee also winter treesdefinition for PeopleSoft 66denormalizing 7description 15detail data from PeopleSoft trees 22detail PeopleSoft records 22effective dates 20, 22, 23flattening 7, 8, 34flattening horizontally 7flattening vertically 8importing 15importing attributes 22importing horizontal 20joining with PeopleSoft records 34, 35joining with records 33loose-level 5mapping parameters and variables 31missing nodes 7, 8overview 4, 19PeopleSoft detail records 6PeopleSoft metadata 19PeopleSoft, creating source definition 25PeopleSoft, description 4PeopleSoft, importing attributes 25PeopleSoft, supported 4
72 Index
SetID 20, 22, 23summary 6vertical flattening 25
Uusername
PeopleSoft database 12, 13
Vvertical flattening
definition for PeopleSoft 66vertical trees
definition for PeopleSoft 66
Wwinter trees
See also treesdefinition for PeopleSoft 67description 4, 7flattening 7supported 4vertically flattening 8
XXLATLONGNAME
description 52XLATSHORTNAME
description 52XLATTABLE data
description 51extracting 51looking up 51, 54overview 51sourcing 52
XLATTABLE tableas lookup table 55configuring database connections 54definition for PeopleSoft 67owner name 55, 57PeopleSoft source definition, importing 53, 55permissions 55source filter, entering 53
Index 73

74 Index

NOTICES
This Informatica product (the “Software”) includes certain drivers (the “DataDirect Drivers”) from DataDirect Technologies, an operating company of Progress Software Corporation (“DataDirect”) which are subject to the following terms and conditions:
1. THE DATADIRECT DRIVERS ARE PROVIDED “AS IS” WITHOUT WARRANTY OF ANY KIND, EITHER EXPRESSED OR IMPLIED, INCLUDING BUT NOT LIMITED TO, THE IMPLIED WARRANTIES OF MERCHANTABILITY, FITNESS FOR A PARTICULAR PURPOSE AND NON-INFRINGEMENT.
2. IN NO EVENT WILL DATADIRECT OR ITS THIRD PARTY SUPPLIERS BE LIABLE TO THE END-USER CUSTOMER FOR ANY DIRECT, INDIRECT, INCIDENTAL, SPECIAL, CONSEQUENTIAL OR OTHER DAMAGES ARISING OUT OF THE USE OF THE ODBC DRIVERS, WHETHER OR NOT INFORMED OF THE POSSIBILITIES OF DAMAGES IN ADVANCE. THESE LIMITATIONS APPLY TO ALL CAUSES OF ACTION, INCLUDING, WITHOUT LIMITATION, BREACH OF CONTRACT, BREACH OF WARRANTY, NEGLIGENCE, STRICT LIABILITY, MISREPRESENTATION AND OTHER TORTS.