Embed Size (px)
Citation preview

1
Process Operation Manual
October 13, 2021

Process Operation Manual
2
Introduction
Year-end adjustment
The year-end adjustment is the process of adjusting the excess or insufficient income tax by re-calculating
the salary, bonuses, benefits, etc. that a company, etc. paid to a salaried employee in one year (January to
December) and the withholding for income tax on the last payment day of December in principle. The salary
calculation system enables you to calculate the year-end adjustment and refund amounts, create withholding
slips, register the payroll and perform other year-end adjustment tasks.
eNEN
eNEN is an information collection system that enables you to collect information online to perform year-end
adjustments, to link the collected information to the salary calculation system and to calculate the income tax
using the salary calculation system.
Use the salary calculation system to calculate the withholding and refund amounts of income tax at the year-
end adjustment.
Process Your Year-End Adjustment
Enables you to file your declaration as if you were writing on the Application for (Change in) Exemption for
Dependents of Employment Income Earner; Application for Basic Exemption of Employment Income Earner,
Exemption for Spouse of Employment Income Earner and Exemption of Amount of Income Adjustment;
Application for Deduction for Insurance Premiums for Employment Income Earner; and (Dwellings, etc.)
Special Credit for Loans forms necessary for your year-end adjustment.
Usable terminals
[Computer]
OS Windows 7 or above
Browser Internet Explorer 11, Edge, Chrome
*Microsoft 社のサポート終了まで
[Smartphones/Tablets]
OS iOS, Android
Browser Safari, Chrome

3
Contents
Registering An Email Address ··················································································································· 7
1-1 Electronic Deduction Certificate ····································································································· 13
1-2 File Deductions for Dependents, Basic, Spouse and Income Adjustment ············································· 16
1-3 Declare Dependents for the Next Year ····························································································· 26
1-4 File Insurance Premium Deductions ································································································ 28
1-5 About Filing Special Deductions for Housing Loans ········································································· 34
1-6 Print Out/Submit the Attachment Mount ·························································································· 39
1-7 Complete Year-End Adjustment ······································································································ 40
Revision History ····································································································································· 43

Process Operation Manual
4
Logging In (When using eNEN for the first time)
Logging In (When using eNEN for the first time)
Start the specified browser, enter the URL
notified by your company and then start the
system.
If you do not know the URL, contact your
management division.
Enter the URL in the search box at the top of the
browser.
Enter the Login ID and Password notified by
your company, and then click the Login button.
Confirm that the entered password is correct.
You can check the entered password by
checking Display Password under the
password entry box.
Example: “●●●●●●” is displayed as
“Abcdef123”
The password notified by the company is
temporary. Change it to one you can
remember. It will be required when you log in to
eNEN from the next time.
Use a password with a combination of eight or
more upper and lower case alphanumeric
characters.

5
If an email address is registered (The password is not notified)
Start the specified browser, enter the URL
notified by your company and then start the
system.
If you do not know the URL, contact your
management division.
Enter the URL in the search box at the top of the
browser.
Click “If you set, reset or forget the password”
on the Login screen.
Send an email to the registered email address
to set a password. Enter the email address in
the Email Address box, and then click the Send
button.
The Password Set/Reset email is sent to the
registered email address. Click the Password
Set/Reset or the URL below it.

Process Operation Manual
6
Change it to one you can remember on the
Password Change screen. It will be required
when you log in to eNEN from the next time.
Use a password with a combination of eight or
more upper and lower case alphanumeric
characters.
If you forget the password
1. If no email address is registered
Contact your system administrator to initialize
the password.
Log in with the initialized password and then
change the password.
For how to change the password, see ③ in
“Logging In (When you use eNEN for the first
time).”
Change it to one you can remember.
2. If an email address is registered
See “If an email address is registered (The
password is not notified).”

7
Registering an email address
If no email address is registered, register an email address.
If you want to change the registered email address, perform
the same procedure. If an email address is registered,
when you forget the password, you can change it without
contacting the management division.
If no email address is registered, the Please register
your e-mail address message is displayed after you log
in. The message is not displayed if an email is
registered.
You cannot register an email address until you log in. You
need to obtain a temporary password beforehand.
The login user’s name is displayed on the upper right of
the menu screen. Click ▼ next to the name, and then
click Change Email address.
The Change Email Address screen appears. Enter an
email address, and then click Change.
Use a password with a combination of eight or more upper
and lower case alphanumeric characters.
When you register an email address for the first time, also
use the Change Email Address screen.
If an email address is registered, the email address is
displayed. Check it.
To prevent the Register Email Address message from
appearing, uncheck Unregister notification.
Registering An Email Address

Process Operation Manual
8
Menu
Menu screen
Display the declaration menu to start your year-
end adjustment.
To import electronic data for your premium
deduction or special deduction for your housing
loan, prepare the XML file or use API link with
your My Number Card.
Confirm that the pencil buttons are displayed.
Note that you cannot start the declaration if
pencil buttons are not displayed.
If you do not handle the year-end adjustment at
your company, see the lower part of the screen
and select YES to submit the Application for
(Change in) Exemption for Dependents only.
If YES is selected, you cannot submit the
Application for Deduction for Insurance Premiums
and Special Credit for Loans. If you accidentally
clicked YES, contact your system administrator.
You can restore it to NO.
You need to select YES if:
- Your salary income is 20,000,000 yen or more
- Your situation falls under the Disaster Exemption
Act
- You regard us as your secondary income source
If you have nothing to declare for the Deduction
for Insurance Premiums and Special Credit for
Loans, click the button under each declaration
menu to complete each declaration. To take
deductions for life insurance premiums or
housing loans, click the pencil button and then
enter the information.

9
Flow from Start Year-end adjustment
1-1 Electronic deduction certificate On Mynaportal, link the certificates for premium deduction, special
deduction for housing loan and balance statements from financial
institutions to eNEN. You need to submit applications to the insurance
company, financial institution and tax office. If not completed, you need to
submit the certificates.
▼ 1-2 File deductions for Dependents,
Basic, Spouse and Income
Adjustment
Submit the Application for (Change in) Exemption for Dependents and
Application for Basic Exemption of Employment Income Earner,
Exemption for Spouse of Employment Income Earner and Exemption of
Amount of Income Adjustment. The deductions for spouse or income
adjustment are determined in the system based on the entered
information.
▼
1-3 Declare dependents for the next
year
Submit the Application for (Change in) Exemption for Dependents for the
next year. If your dependents change, declare the changes.
▼
1-4 File insurance premium
deductions
Apply for deductions for the premiums you are paying for.
▼
1- 5 File the special deduction for
housing loans
File the special deduction for your housing loans.
▼
1-6 Print out and submit the
attachment mount
Print out the mount, attach the certificates and submit it.
▼
1-7 Complete year-end adjustment Submit all your year-end adjustment documents.

Process Operation Manual
10
Prepare Year-End Adjustment Documents
Some documents are required for year-end adjustment. Check and prepare them.
1. Who needs withholding slips?
A new employee who received income from other
sources by working part-time or in other ways before
joining the company
A mid-career recruited employee who received a salary
from their previous company
Make sure that the year of issuance of the
withholding slip is the one when the year-end
adjustment is done. The old withholding slips are
not applicable.
2. Who needs a disability certificate?
A person who has a disability certificate
A person whose spouse or dependents have a disability
certificate
3. Who needs Student IDs?
A person who is a student
[Requirements for working students]
• High schools, colleges/universities, technical schools,
etc. stipulated by the School Education Act
• Specialized training colleges and other schools
established by the country, local governments, private
school boards, etc. where students need to take a
specified curriculum
• Vocational training corporations giving certified
vocational training stipulated by the Human Resources
Development Promotion Act where students need to
take a specified curriculum including skills required for
jobs
If you are unsure if your school meets the
requirement, check with the school.

Process Operation Manual
11
4. Who needs a relative certificate?
A person whose dependent relatives live abroad
* If your multiple dependent relatives are living abroad, you
need a certificate for each of them.
5. Who needs a remittance certificate?
A person whose dependent relatives in Section 1-1-4 live
abroad
* You need a certificate showing that you sent money to each
of them.
(Certificate of remittance by money order or by credit card)
6. Who needs an insurance premium payment
certificate?
A person who pays premiums in person
A person who pays premiums for dependent relatives
If the electronic data for the insurance was imported,
no certificate needs to be submitted.
You need to submit the original certificates. The
copies or premium payment notices are not available.

Process Operation Manual
12
7. Who needs a special deduction report attached to
housing loans?
A person who starts living in a purchased house or on
purchased land
A person who filed a tax return and has kept the declaration
form after purchasing a house
* If you purchased a house, you need to file a tax return to take a
deduction.
After filing a tax return, you will receive a (Dwellings, etc.)
Special Credit for Loans form from the tax office.
The sheets are prepared for the necessary years (excluding the
first year). Be sure to keep them in a safe place. (If you have lost
them, contact the relevant tax office.)
* Any joint obligor will also receive the declaration form. Prepare
your own declaration form.
8. Who needs a balance statement?
A person who takes the housing deduction in Section 1-1-7
* You will receive the balance statement from your financial
institution around every October.
If you are borrowing from several financial institutions, you need
a balance statement from each financial institution.
* Any joint obligor will also receive the balance statement.
Prepare your own balance statement.

Process Operation Manual
13
You can download your insurance premium deduction certificate from the portal site of your insurance
company and import it to eNEN. If you do so, you will not need to submit the certificate. The file is
downloaded in xml format, so upload it as is. The uploaded file is displayed on the Application for Insurance
Premium Deduction screen. The displayed file cannot be corrected. If an incorrect file was uploaded, delete
it.
Step 1: Upload the certificate
After logging in, click the Upload Electronic Deduction
Certificate (xml) icon on the upper part of the declaration
page.
The xml file upload screen of the insurance company is
displayed.
Click Browse; then specify the insurance company xml file
stored in your computer.
1-1 Electronic Deduction Certificate

Process Operation Manual
14
Confirm that the xml file name is correct; then click Import.
The import of the xml file is completed, and the completion
message and imported file are displayed.
To import multiple files, repeat the procedure.
You can import XML files one by one. You cannot
import multiple files simultaneously.
Only you can import XML files.
The system administrator cannot import them.

Process Operation Manual
15
Step 2: Check the import
When the upload is completed, the declaration menu
reappears.
Check the result after importing all XML files or
after importing each file. The checking method is
the same.
Click the pencil button under 保.
The details with Category: Electronic have been imported
from the electronic deduction certificate.
If, for example, an incorrect file has been imported, click
Delete.
The details can only be deleted. The amount cannot
be corrected. If an incorrect file has been imported,
delete it and then import the correct file.
Process Operation Manual
16
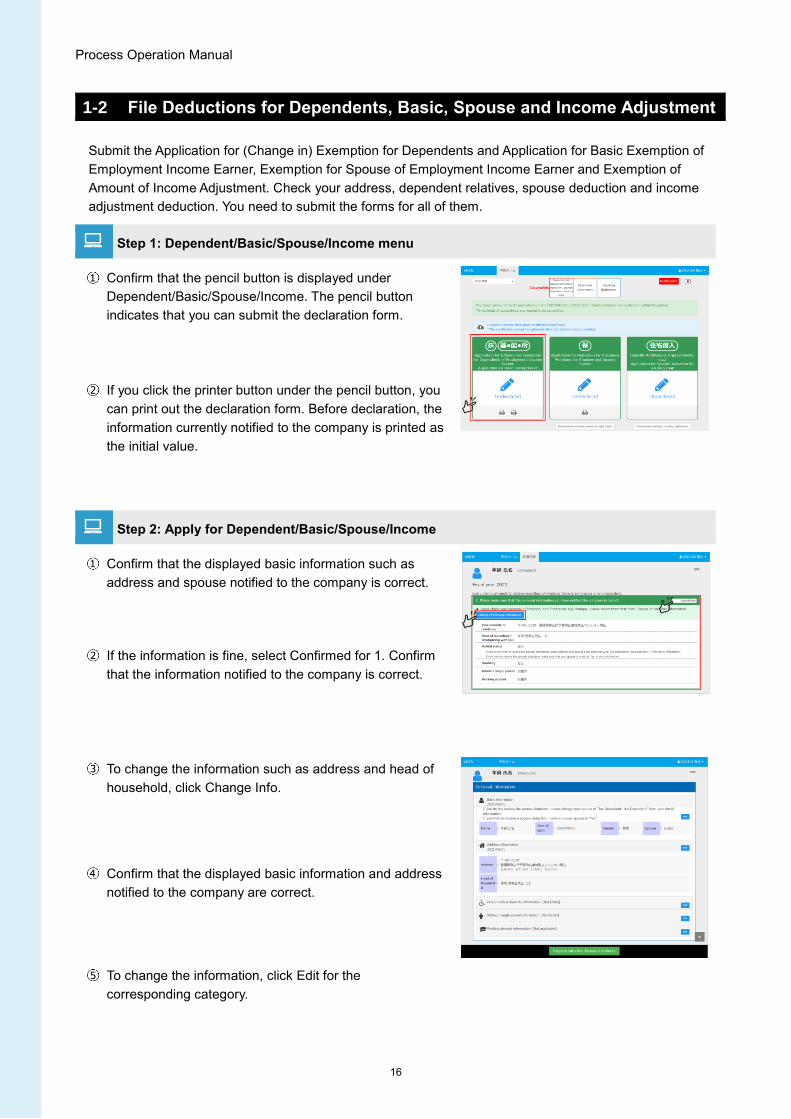
Submit the Application for (Change in) Exemption for Dependents and Application for Basic Exemption of
Employment Income Earner, Exemption for Spouse of Employment Income Earner and Exemption of
Amount of Income Adjustment. Check your address, dependent relatives, spouse deduction and income
adjustment deduction. You need to submit the forms for all of them.
Step 1: Dependent/Basic/Spouse/Income menu
Confirm that the pencil button is displayed under
Dependent/Basic/Spouse/Income. The pencil button
indicates that you can submit the declaration form.
If you click the printer button under the pencil button, you
can print out the declaration form. Before declaration, the
information currently notified to the company is printed as
the initial value.
Step 2: Apply for Dependent/Basic/Spouse/Income
Confirm that the displayed basic information such as
address and spouse notified to the company is correct.
If the information is fine, select Confirmed for 1. Confirm
that the information notified to the company is correct.
To change the information such as address and head of
household, click Change Info.
Confirm that the displayed basic information and address
notified to the company are correct.
To change the information, click Edit for the
corresponding category.
1-2 File Deductions for Dependents, Basic, Spouse and Income Adjustment

Process Operation Manual
17
When changing information such as the address, add the
reason and date of change.
Select when the change takes effect. For the
dependents for this year, select a date before or on
December 31st this year. For the dependents for the
next year, select a date between January 1st and
December 31st next year.
Confirm that your displayed dependent relatives are
correct. If you would like to add a dependent relative or
no longer support a dependent relative, click Family
information change and change the information.
Your registered dependents are listed. Click a dependent
to go to the basic information display.
(For how to change information, see Step 5: Change the
information of your dependent relatives.)
To enter the income, click the pencil button in yellow under
2. Report your expected income for this year.
Your salary income may have been registered at
company. To correct the information, click the
pencil button in yellow and then change the
amount.
The income entry screen appears. Click the pencil button
for the corresponding income and then enter the amount.
Enter the monthly amounts of salary and pension
income; the annual income is automatically calculated.
After entering the amounts, click Save. The total amount
of your income is displayed.

Process Operation Manual
18
If you take the spouse deduction, your spouse’s name is
displayed. Enter your spouse’s annual income amount.
Click the pencil button for the corresponding income, and
the income entry box appears. After entering the amount,
click Save.
If your income is over 10,000,000 yen, you will not
be eligible for spouse deduction.
To take spouse deduction, your spouse’s income
must be between 0 and 2,015,999 yen.
If you are not eligible for spouse deduction, you
cannot apply for it. Click Family information
change and then change Tax dependent to Do not
support.
If your spouse is living abroad, enter the amount of
money you sent to your spouse in Making a living.
If you have not sent money or sent by credit card,
you will not be eligible for spouse deduction.
Confirm that your displayed dependent relatives are
correct. Click the pencil button for the corresponding
dependent relative; then enter the annual income
amount. After entering the amount, click Save.
If the dependent relative is living abroad, enter the
amount of money you sent to the dependent relative in
Making a living.
If you have not sent money or sent by credit card,
you will not be eligible for dependent deduction.
Confirm that the entered amount is correct. If the
information is correct, click Start declaration to complete
year-end adjustment for this year.
Your income and your spouse’s income will
determine if you are eligible for spouse deduction.

Process Operation Manual
19
Step 3: Change your information
To change your information such as your address or head of
household, click Information to display the Information screen.
Click Edit for Basic Info, Address, Disability, Widow/Single
Parent and Working Student; then change the information.
For Date, select when the change took effect or will take
effect.
To change the target year of year-end adjustment, enter a
date before or on December 31 this year.
After changing the information, click Save.
After completing the changes, click Start declaration.
To change for the next year, enter a date between
January 1st and December 31st next year.
. If you forget to click it, the changes do not apply to
Application for (Change in) Exemption for
Dependents.
If you have finished submitting Application for
(Change in) Exemption for Dependents, you cannot
change your information. Confirm that the pencil
button Undeclared is displayed.

Process Operation Manual
20
To file as a widow, the total amount of your annual income must be 5 million yen or less, and you must meet
one of the following requirements:
• You have not married after your husband’s death (including a missing husband)
• You have not married after your divorce, and you have a dependent relative (total annual income is
480,000 yen or less)
To file as a single parent, the total amount of your annual income must be 5 million yen or less, and you
must meet all of the following requirements:
• You are single (including divorce, death, missing spouse)
• You have a dependent child who earns 480,000 yen or less annually
• You have not been in a de facto marital relationship with anyone
Step 4: Change the details of your spouse
To change your spouse’s address or dependent status, click
your spouse’s name in the list of dependent relatives to go to
the basic information on your spouse.
To change your spouse’s dependent status, click Edit in
Basic Information.
Select YES (Take spouse deduction) or NO in Tax
dependent.
After changing the information, click Save.
If your spouse’s salary income is between 0 and
2,015,999, he/she is eligible for spouse deduction
or spouse special deduction. If the calculated
income is between 0 and 1,330,000, your spouse is
eligible for spouse deduction or spouse special
deduction.
In this case, the calculated income will be between
0 and 1,330,000.
In the above case, select YES (Including spouse
deduction).
Requirements for widow/single-parent

Process Operation Manual
21
After completing all the changes, click Start declaration.
If you forget to click the button, the changes do not
apply to Application for (Change in) Exemption for
Dependents. Be sure to click it.
【List of Exemptions for Spouses】
9 million yen or
less
(10.95 million yen
or less)
Over 9 million yen
to
9.5 million yen or
less
(Over 10.95
million yen to
11.45 million yen
or less)
Over 9.5 million
yen to
10 million yen or
less
(Over 11.45
million yen to
11.95 million yen
or less)
380,000 yen 260,000 yen 130,000 yen
Qualified spouse for tax deduction over
70 years of age480,000 yen 320,000 yen 160,000 yen
380,000 yen 260,000 yen 130,000 yenOver 1,030,000 yen
1,500,000 yen or less
360,000 yen 240,000 yen 120,000 yenOver 1,500,000 yen
1,550,000 yen or less
310,000 yen 210,000 yen 110,000 yenOver 1,550,000 yen
1,600,000 yen or less
260,000 yen 180,000 yen 90,000 yenOver 1,600,000 yen
1,667,999 yen or less
210,000 yen 140,000 yen 70,000 yenOver 1,667,999 yen
1,751,999 yen or less
160,000 yen 110,000 yen 60,000 yenOver 1,751,999 yen
1,831,999 yen or less
110,000 yen 80,000 yen 40,000 yenOver 1,831,999 yen
1,903,999 yen or less
60,000 yen 40,000 yen 20,000 yenOver 1,903,999 yen
1,971,999 yen or less
30,000 yen 20,000 yen 10,000 yenOver 1,971,999 yen
2,015,999 yen or less
0 yen 0 yen 0 yen Over 2,015,999 yenOver 1.33 million yen
Special deduction for
spouse
Spouse’s total income amount
Over 480,000 yen - 950,000 yen or less
Over 950,000 yen - 1 million yen or less
Over 1 million yen - 1.05 million or less
Over 1.05 million yen - 1.1 million or less
Over 1.1 million yen - 1.15 million or less
Over 1.15 million yen - 1.2 million yen or less
Over 1.2 million yen - 1.25 million yen or less
Over 1.25 million yen - 1.3 million yen or less
Over 1.3 million yen - 1.33 million or less
Net Income Amount
(Salary income amount of earner of only salary income)
[Reference]
(Salary income
amount of spouse
earning only salary
income)
Spouse deduction
Spouse’s total income amount
480,000 yen or less1,030,000 yen or less

Process Operation Manual
22
Step 5: Change the information of dependent relatives
To change a dependent relative’s address or dependent status,
click the dependent relative’s name in the list of dependent
relatives to go to the basic information on the dependent
relative.
To change a dependent relative’s dependent status, click
Edit in Basic Information.
Select YES or NO in Tax dependent.
After changing the information, click Save.
If the dependent relative’s income is 480,000 yen or
less (salary income is 1,030,000 yen or less), you are
eligible for dependent deduction.
To change a dependent relative’s address, click Edit in
Address. Correct the registered address; then click Save.
After correcting the information, click Save.
If Residence Category is Separated (Abroad), enter
the country name in Prefecture and the address
other than the country name in Town.
To change a dependent relative’s disability, click Edit in
Disability.
If the dependent relative has multiple disabilities,
register the most severe one. To register the details
of multiple disabilities, enter them in Remarks and
then click Save. Entering them is optional.

Process Operation Manual
23
To add a dependent relative, click Add Family to display
the basic information screen.
Enter the name, relationship and date of addition; then
click Save.
The added dependent relatives are listed. Click a name to
go to the dependent relative’s information display.
Click Edit in Address and Disability of the registered
dependent relative; then enter the address and disability.
After entering the information, click Start declaration.
If you forget to click the button, the dependent
relative’s name is not displayed in Application for
(Change in) Exemption for Dependents.

Process Operation Manual
24
Step 6: Apply for Dependent/Basic/Spouse/Income for this year
Confirm that the Dependent/Basic/Spouse/Income information
is correct. If the information is correct, click Start declaration.
The confirmation message appears. Confirm the message
and then start declaration.
After you declare, you cannot declare again by
yourself. To declare again, ask your system
administrator to return the declaration form.
Check the content from the top.
When the declaration is completed, the completion screen
appears. If the Attachment mount button is displayed, click
the button to print out the attachment mount.
[Conditions where the Attachment mount button is displayed]
1. Your spouse or dependents live abroad
2. You, your spouse or dependents have a disability
3. You are a working student
The details entered in Application for (Change in)
Exemption for Dependents are displayed on the
attachment mount. Check the details, attach necessary
documents and then submit it. If there are many
documents, also use the back of the mount.
Confirm that you can see the employee number and
name on the upper part after attaching the
documents.
If there are multiple spouses and dependent relatives
living abroad, confirm that you attached the relative
and remittance certificates for each target.

Process Operation Manual
25
Click Return on the completion screen to go to the
declaration menu.
The ✔ mark, Declared and the date are displayed for the
already submitted declaration forms. They indicate that the
Dependent/Basic/Spouse/Income declaration has been
completed.
If you forgot to print out the attachment mount, click the
clip mark next to the printer button.
To print out the declaration form, click the printer button
.
You can print out the declaration forms before
declaration.

Process Operation Manual
26
1-3 Declare Dependents for the Next Year
Step 1: Apply for dependent deductions for the next year
After the Dependent/Basic/Spouse/Income declaration for
this year is completed, the Next Declaration button
appears.
To change the dependent status in Application for
(Change in) Exemption for Dependents for the next
year, click Next Declaration.
Click Next Declaration to display the screen of the
Dependent/Basic/Spouse/Income declaration for the next
year.
To change the information such as address and head of
household, click Change Info.
If your information changes next year, select when
the change will take effect. (For Date of occurrence,
select a date between January 1st and December
31st for the year.)
To change the dependent status of your spouse or
dependent relatives, click Family information change to
display the family list.
Click a name to go to the spouse or dependent relative’s
information display.
Click Edit in the category to change the details. Correct the
information; then click Save.
If the dependent status changes, make a change to
Tax dependent in Basic Information.
Do not make deletion by clicking in the family
list.

Process Operation Manual
27
To add a dependent relative, click Add Family.
Save Basic Information; then enter Address and Disability.
After entering the information, click Save.
After adding to or correcting the information, click Start
declaration.
The added or corrected information is displayed on the
dependent deduction screen. Check the information; then
click Start declaration to submit the Application for
(Change in) Exemption for Dependents for the next year.
The ✔ mark, Declared and the date are displayed for the
declaration forms for the next year.
You do not need to submit the Application for
Deduction for Insurance Premiums and Special
Credit for Loans. The Prohibit mark is displayed for
them.
The Application for (Change in) Exemption for Dependents
and Application for Basic Exemption of Employment
Income Earner, Exemption for Spouse of Employment
Income Earner and Exemption of Amount of Income
Adjustment have been submitted.
Depending on the entered content, the system
automatically prints out the persons subject to
spouse subject to withholding tax, spouse
deduction, spouse special deduction, income
adjustment deduction, etc. If declaration is not
completed, the content is tentative.

Process Operation Manual
28
1-4 File Insurance Premium Deductions
File the life insurance, nursing care insurance, personal pension insurance, social insurance premiums and
small business mutual aid contributions you are paying for. Refer to the premium deduction certificate(s) sent
by your insurance company(ies). The premium deduction notice is not accepted. If you have an electronic
certificate(s), refer to 1-1 Electronic Deduction Certificate(s).
Step 1: Check the initial display of the life insurance
If you have joined the payroll deduction group insurance at
your company, the details are displayed for each type of
insurance.
Group insurance cannot be corrected or deleted.
Group is displayed for the declaration category.
To be imported as group insurance
• General life insurance
• Long-term care insurance
• Personal pension insurance
• Earthquake insurance
• Former long-term casualty insurance
Corporate pension defined in the Defined Contribution Pension
Act
The premium details imported as electronic deduction
certificates are displayed for each type of insurance.
The premium details imported as an electronic
deduction certificate cannot be corrected. To correct
the information, delete it and then import it again.
Electronic is displayed for the declaration category.
Step 2: Add a life insurance policy
See the premium deduction certificate at hand to check the
type of insurance. Check if it is life insurance, nursing care
insurance, personal pension insurance, earthquake
insurance deduction, former long-term casualty insurance,
social insurance premiums or small business mutual aid
contributions.
Confirm that the year is the one when year-end
adjustment is done.
Confirm that it is not the premium deduction notice.
Confirm that it is the premium deduction certificate.

Process Operation Manual
29
The type of insurance subject to deduction is described on
the upper part of each premium deduction certificate.
Check it.
Life insurance, nursing care insurance, personal pension
insurance, earthquake insurance deduction, former long-
term casualty insurance, social insurance premiums or
small business mutual aid contributions
Check the premium category, and then select YES for the
corresponding premium.
The Add button is displayed. Click Add to display the
premium entry screen.
The sample of a premium deduction certificate is displayed
on the right. Compare it to your certificate and then enter
the details.
Click Save.
To add another premium deduction certificate, repeat
the above steps ② to ⑥.
The deductible amount is calculated by the system,
so you do not need to calculate it.
Step 3: Correct the details of insurance premium deductions for the last year
The details whose category is described as Last are for the
premiums deducted last year.
To change the premium deduction amount, click Edit. After
correcting the information, click Save.

Process Operation Manual
30
If premium deduction was canceled, click Delete to delete
it.
The deleted details cannot be restored. If you deleted
them incorrectly, enter them again.
Step 4: Correct the added insurance premiums
The category of the added insurance premiums is
displayed as New.
To correct the information, click Edit to display the entry
screen.
Correct the corresponding item.
After correcting the information, click Save.
To make additional corrections, repeat steps ① to ③
above.
Step 5: File insurance premium deductions
After entering all the information, click Start declaration.
Check the displayed information, and then click Start
declaration.
The deductible amount is displayed. You cannot take
deduction for the amount exceeding the upper limit.
After the electronic certificate is imported, if the same
applicable premium, name of insurance company, etc. are
imported, the alert message appears.
Confirm that the imported data is correct; then start your
declaration.
The duplicate types of insurance are displayed.
Confirm the content. If incorrect data has been
imported, delete it.

Process Operation Manual
31
If the information is correct, click YES to display the
declaration dialog box. To start your declaration, click YES
to complete filing your premium deductions.
To correct the information after completing
declaration, ask the management division to return
the form..
After correcting the information in the returned form,
submit the form again.
Step 6: If you have no deductions to declare
If you have no certificates to take deductions for life
insurance, earthquake insurance, former long-term
casualty insurance, etc., click Declare without deductions
under the Application for Insurance Premium Deductions
menu.
If you have joined group insurance or insurance
with electronic certificate, the Declare without
deduction button is not available. If you have not
joined insurance subject to premium deduction, click
this button.
After completing your declaration, you cannot fill in the
Application for Insurance Premium Deductions any longer.
Check the information before declaring.
To enter the details of premium deduction, ask your
system administrator to return the form.
Step 7: Complete your declaration
Click Declare without deductions to complete your
declaration.

Process Operation Manual
32
Enter the content of the certificates; then click Start
declaration to complete declaration.
If information other than group insurance or electronic
certificates was entered, the Attachment mount and
Return buttons are displayed on the completion screen.
Click Attachment mount to print out the attachment
mount for certificates.
Click Return to return to the declaration menu.
To print out the attachment mount later, click to
download it. Print out the downloaded attachment mount,
attach the certificates to it and then submit it.
Step 8: Attachment mount
You do not need to attach certificates for the highlighted
parts.
You need to submit certificates for the categories New,
Excess and Last.
Check the certificates and then submit them.
[Category]
Group: Imported as group insurance
Electronic: Imported as an electronic certificate
New: Registered this year
Last: Registered last year
Excess: Registered for deduction, but exceeding the
deductible amount
To submit
Use the attachment mount as a check sheet. Confirm the
content, and then place a ✔ in Check: You.
Use it as a check sheet when submitting it.

Process Operation Manual
33
Step 9: Make corrections after filing
For example, if you found a certificate after completing your declaration or if some information is incorrect,
contact your management division.
The system administrator will return your form; then the pencil button will appear on the menu screen and
you will be able to correct the information.

Process Operation Manual
34
To take special deductions for housing loans, you need to file a tax return in the year you purchase your
home. Confirm that you have the (Dwellings, etc.) Special Credit for Loans sent from the tax office in the
jurisdiction where you reside. After filing your tax return, submit the declaration form to the tax office.
Step 1: Take special deductions for housing loans
To take the housing deduction, click the pencil button to
display the housing deduction screen.
To take special deductions for housing loans, select YES
to display the entry screen.
The address confirmation screen appears.
If the address on the residence certificate and the address
for the housing deduction are different, enter the latter.
Check the type of housing deduction; then select YES for
the corresponding item.
• Matters relating to newly built or purchased houses
• Renovation
• Duplicate application for disaster
Select from the above.
Check if the declaration form you have is the one before or
after the tax increase in October 2019.
1-5 About Filing Special Deductions for Housing Loans

Process Operation Manual
35
If (イ) Start date of residence to (ヲ) (Dwellings, etc.)
Special Credit for Loans is selected, the before tax
increase screen appears.
Enter the information described on the lower line of the
Special Credit for Loans.
If there is a joint obligor for housing, enter the information
about the obligor. If there are multiple joint obligors,
register all of them.
If there are multiple joint obligors, enter the name
and debt ratio of each joint obligor.
Enter the loan balance. If you are borrowing from multiple
financial institutions, enter the balance for each financial
institution.
If there is a joint obligor, select Category: Joint Loan
Balance to calculate your ratio balance.
If there is no joint obligor, select Category: Single
Balance. The entered balance will be your year-end
balance.
If you have refinanced, change Refinancing to YES. Enter
the amount at the time of refinancing, year-end balance
before refinancing, refinancing amount at the time of
refinancing and year-end balance.
Remember to enter the year-end balance before
refinancing and refinancing amount at the time of
refinancing. The information is required to calculate
the deductible amount.
If unknown, check with the financial institution you
borrowed from..

Process Operation Manual
36
Enter the year-end balance to calculate your loan
apportionment ratio if there is a joint obligor.
Your year-end balance by apportionment ratio is
calculated.
Select a category to take special deductions for housing
loans.
Select the start date of residence and the category to
calculate the deductible amount.
Click the category to list the categories. Select the correct
category.
If you do not know which category to select, select the
content described in I of the certificate of Special Credit for
Loans from Select the content described in I of the
certificate.
Confirm that Special exception [特例], Special specific [特
別特定] and Special exception [特別特例] are described
after the start date of residence.
The category is automatically selected.
Select the start date of residence and the category to
calculate the deductible amount.
You cannot take deduction for the amount exceeding
the upper limit.

Process Operation Manual
37
Step 2: Take no housing deduction 1
Click Declare without deduction under Housing loans to
complete the declaration.
If the housing deduction is not necessary, click YES at
confirmation to complete your declaration without the
deduction.
Step 3: Take no housing deduction 2
To declare, display the special deductions for the housing
loans screen. Click the pencil button for the Housing
deduction to display the housing deduction screen.
Answer the question: Are you filing a special deduction for
housing loans?
If the housing deduction is not necessary, click Start
declaration without changing NO.
File with NO to complete declaration without
deduction.

Process Operation Manual
38
Step 4: File housing deductions
Follow Take special deductions for housing loans to enter
the information for housing deductions. Click Start
declaration to complete filing for the housing deductions.
To take multiple deductions, select YES for the target
items to enter the details.
There are the following types: Newly built or
purchased, Renovation, and Duplicate application
for disaster. Check your certificates to enter the
information.
To correct the information after completing
declaration, contact the management division. The
system administrator returns your form, and then
you will be able to correct the information.
The Attachment mount button is displayed on the
completion screen. Click the button to display the
attachment mount. Attach the certificates to the attachment
mount; then submit it.
If you forgot to print out the attachment mount, click the
clip mark of the declaration menu.
Print out the attachment mount from the declaration
completion screen or home screen.

Process Operation Manual
39
1-6 Print Out/Submit the Attachment Mount
Step 1: Print out the attachment mount from the declaration completion screen
The Attachment mount button is displayed on the completion
screen. Click the button to print out the attachment mount;
then attach the certificates.
Conditions where the Attachment mount button is displayed
[Application for (Change in) Exemption for Dependents]
• Your spouse or dependents live abroad
• You, your spouse or dependents have a disability
• You are a student
[Deduction for Insurance Premiums]
• You are paying for the premiums
(Life insurance, casualty insurance, social insurance
premiums, small business mutual aid contributions)
If the premiums are deducted from your salary or if an
electronic certificate was imported, you are not eligible for
deductions.
[Special Credit for Loans]
• You took special deductions for housing loans
[Withholding slip]
You entered the information in the withholding slip from your
previous company
Step 2: Print out the attachment mount from the home screen
If you did not print out the attachment mount from the
completion screen, click on the menu on the home
screen.
You can print out the attachment mount repeatedly.
If you corrected the declaration form and also need
to change the certificate, print out another
attachment mount, attach the certificate, and then
submit it.

Process Operation Manual
40
1-7 Complete Year-End Adjustment
When all your declarations are completed, the year-end adjustment is completed. After submitting the
declaration forms, if you attach the certificates on the attachment mount and then submit it, all year-end
adjustment declarations are completed.
Step 1: Complete declarations
① The ✔ mark indicates that the declaration is completed.
② Completion of the progress bar on the upper part of the
home screen indicates that all declarations have been
completed.
If is displayed, you can use the attachment mount
(check sheet) for the declaration.
If is displayed, you can print out the declaration
form.

Process Operation Manual
41
Step 2: Attach the certificates to the attachment mount
Print out the attachment mount; then attach the certificates to it. Confirm that you can see your name and the
information described on the attachment mount after attaching the certificates.
[Application for (Change in) Exemption for Dependents]
If you have a spouse and/or dependent relatives living
abroad, attach the relative and remittance certificates for
each of them.
Clarify the relationship on the relative certificate.
(For example, put a circle on the relationship
description)
Attach a copy of each disability certificate.
If you are a working student, attach a copy of your student
ID.
[Deduction for Insurance Premiums]
Attach the certificates of premiums you are paying for.
Confirm that you can see your name, employee
number and the information described on the
attachment mount after attaching the certificates.
Process Operation Manual
42
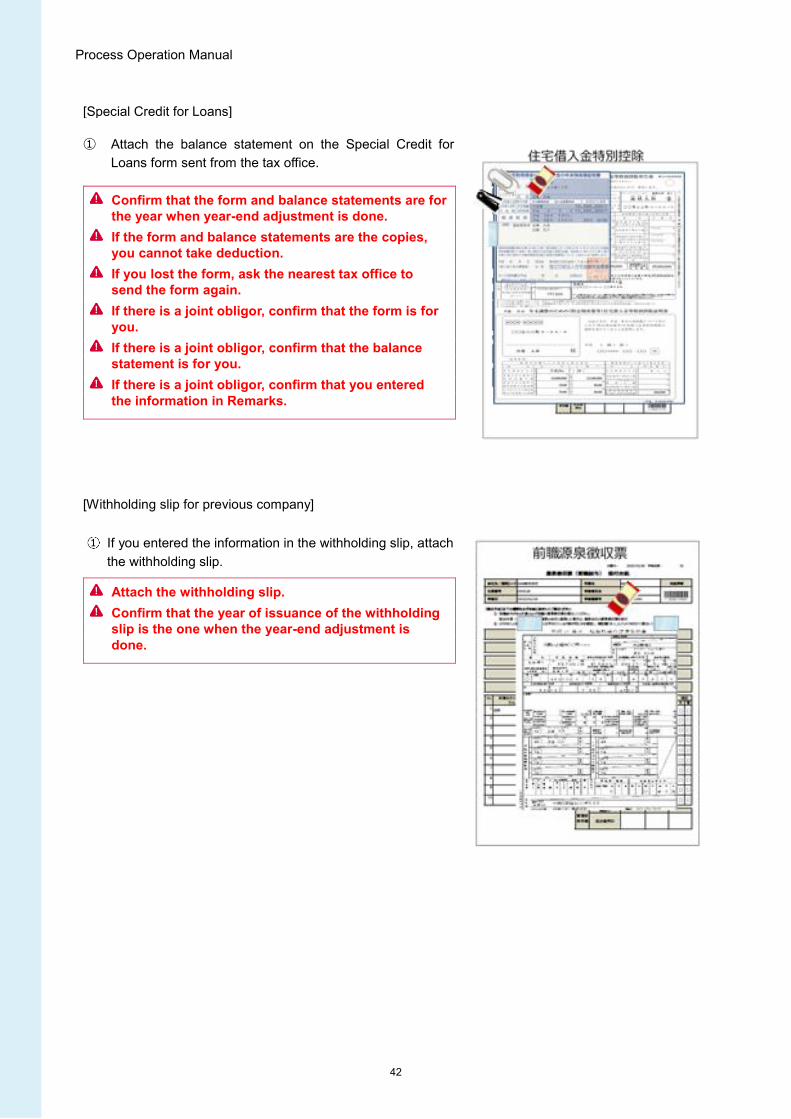
[Special Credit for Loans]
① Attach the balance statement on the Special Credit for
Loans form sent from the tax office.
Confirm that the form and balance statements are for
the year when year-end adjustment is done.
If the form and balance statements are the copies,
you cannot take deduction.
If you lost the form, ask the nearest tax office to
send the form again.
If there is a joint obligor, confirm that the form is for
you.
If there is a joint obligor, confirm that the balance
statement is for you.
If there is a joint obligor, confirm that you entered
the information in Remarks.
[Withholding slip for previous company]
If you entered the information in the withholding slip, attach
the withholding slip.
Attach the withholding slip.
Confirm that the year of issuance of the withholding
slip is the one when the year-end adjustment is
done.

Process Operation Manual
43
Date Revised by Content
August 25, 2020 First version (Tentative)
Tuesday, September 29, 2020 Nishimoto Version 1 (Tentative)
Wednesday, June 2, 2021 Nishimoto Version 1.1 (Tentative)
Wednesday, June 30, 2021 Nishimoto Version 1.2 (Tentative)
Monday,September,27,2021 Nishimoto Version 1.3
Wednesday, October 13, 2021 Nishimoto Version 1.4(Correct the password contents)
Revision History


![SR-SaaSに係る 年度更新取扱説明書download.shalom-house.jp/sr-saas/sr-fukui/manual/SrFukui_NendKo… · 事業所台帳]、 [従業員名簿]のボタンをクリ ックして下さい。事業所台帳、あるいは](https://img.pdfslide.net/doc/110x75/6008e5e4e83812773600625d/srisaas-e-cfoeff.jpg)


![SR-SaaS 年度更新 説明書download.shalom-house.jp/sr-saas/sr-hyogo/manual/...してSRに提出します。 [12]一括有期事業報告書と [13]一括有期総括表(B5対応)から](https://img.pdfslide.net/doc/110x75/5f32671858d497561e363fe9/srisaas-e-sr-12oeoe.jpg)