Embed Size (px)
Citation preview
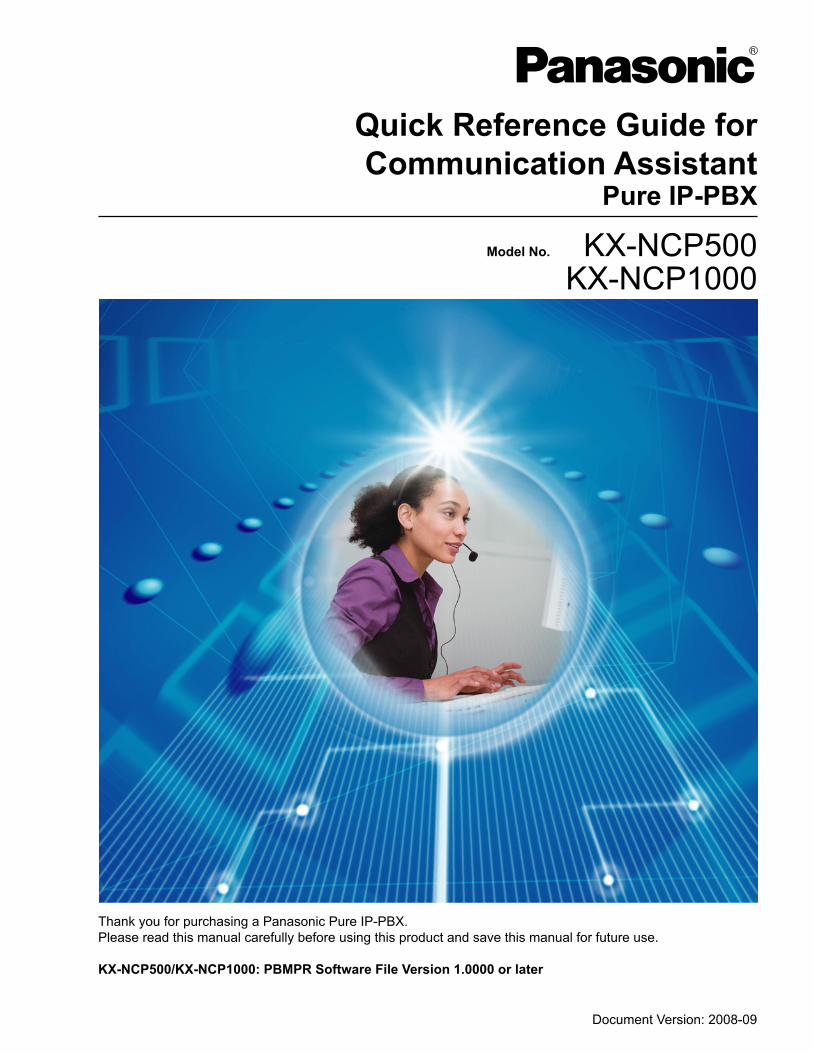
Model No. KX-NCP500KX-NCP1000
Pure IP-PBX
Quick Reference Guide for
Communication Assistant
Document Version: 2008-09
Thank you for purchasing a Panasonic Pure IP-PBX.
Please read this manual carefully before using this product and save this manual for future use.
KX-NCP500/KX-NCP1000: PBMPR Software File Version 1.0000 or later
IntroductionCommunication Assistant (CA) is a Computer Telephony Integration (CTI) application that integrates with yourPanasonic PBX, and allows you to perform many telephone operations from your PC.About the Quick Reference Guide
This Quick Reference Guide is designed to serve as an overview of the features, setup and installation ofCommunication Assistant.The Quick Reference Guide is divided into the following sections:1 Specifications
This section provides general information about the features in Communication Assistant.2 System Connection Diagram
This section shows how Communication Assistant fits into your network.3 System Requirements
This section provides the minimum and recommended system requirements for installingCommunication Assistant on a PC.
4 Software InstallationThis section explains how to install and uninstall Communication Assistant.
IMPORTANTCA stores personal information. In order to prevent data theft and leakage, we recommend the following:• Set a password-protected screensaver to activate after your computer has been idle for a set amount
of time.• When users change extensions, desks, etc., make sure that the access rights for their previous and
new extensions are correct.• Use Windows Update to keep your system up-to-date with the latest software patches.• Set a login password that is at least 5 characters long, and contains a combination of letters and
numbers.
Trademarks:• Microsoft, Internet Explorer, Outlook, Windows, and Windows Vista are either registered trademarks or
trademarks of Microsoft Corporation in the United States and/or other countries.• Intel, Celeron and Pentium are trademarks of Intel Corporation in the U.S. and other countries.• All other trademarks identified herein are the property of their respective owners.• Microsoft product screen shots reprinted with permission from Microsoft Corporation.
2 Quick Reference Guide for Communication Assistant Document Version 2008-09
Introduction
Table of Contents1 Specifications ...........................................................................................42 System Connection Diagram ................................................................113 System Requirements ...........................................................................124 Software Installation ..............................................................................134.1 Installing and Starting Communication Assistant .......................................................134.2 Uninstalling Communication Assistant ........................................................................15
Document Version 2008-09 Quick Reference Guide for Communication Assistant 3
Table of Contents
1 SpecificationsFeatures
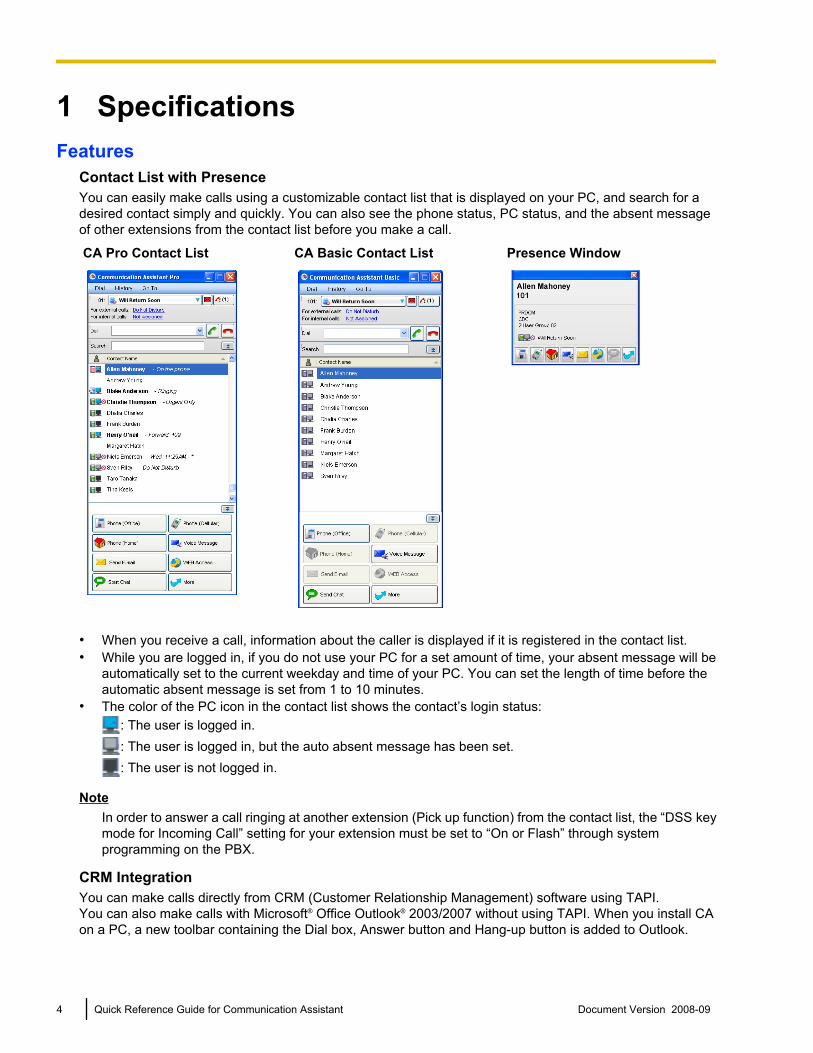
Contact List with PresenceYou can easily make calls using a customizable contact list that is displayed on your PC, and search for adesired contact simply and quickly. You can also see the phone status, PC status, and the absent messageof other extensions from the contact list before you make a call.
CA Pro Contact List CA Basic Contact List Presence Window
• When you receive a call, information about the caller is displayed if it is registered in the contact list.• While you are logged in, if you do not use your PC for a set amount of time, your absent message will be
automatically set to the current weekday and time of your PC. You can set the length of time before theautomatic absent message is set from 1 to 10 minutes.
• The color of the PC icon in the contact list shows the contact’s login status:: The user is logged in.: The user is logged in, but the auto absent message has been set.: The user is not logged in.
NoteIn order to answer a call ringing at another extension (Pick up function) from the contact list, the “DSS keymode for Incoming Call” setting for your extension must be set to “On or Flash” through systemprogramming on the PBX.
CRM IntegrationYou can make calls directly from CRM (Customer Relationship Management) software using TAPI.You can also make calls with Microsoft® Office Outlook® 2003/2007 without using TAPI. When you install CAon a PC, a new toolbar containing the Dial box, Answer button and Hang-up button is added to Outlook.
4 Quick Reference Guide for Communication Assistant Document Version 2008-09
NoteThis feature may not work with some CRM software depending on the software’s specifications.
Call HistoryYou can view your incoming and outgoing call history. Information such as the destination and duration of thecall, the time of the call, and whether the call was answered is displayed for each call.You can also save the history list to a CSV file.
Absent Message/Forward/Do Not DisturbYou can change the absent message, forward, and do not disturb (DND) settings of your extension.When you change your absent message, your forward/DND settings can be changed automatically, and afeature number, such as “Extension dial lock” can be dialed automatically.
Call ControlWhen a conversation starts, operation buttons are automatically displayed on your PC for telephone functionssuch as transferring a call, holding a call, and establishing a conference.
IP Camera Integration (Panasonic HX-HCM/BB-HCM/BL-C series cameras)If a Panasonic IP Camera is available on the network, you can view images or streaming video from the IPcamera while talking with the other party (e.g., extension, doorphone).
NoteThis feature requires Internet Explorer® version 6.0 or higher.
Voice Processing System (VPS) IntegrationYou can record conversations to voice mail automatically or manually. When a message is left on your mailbox,a message waiting indication is displayed.
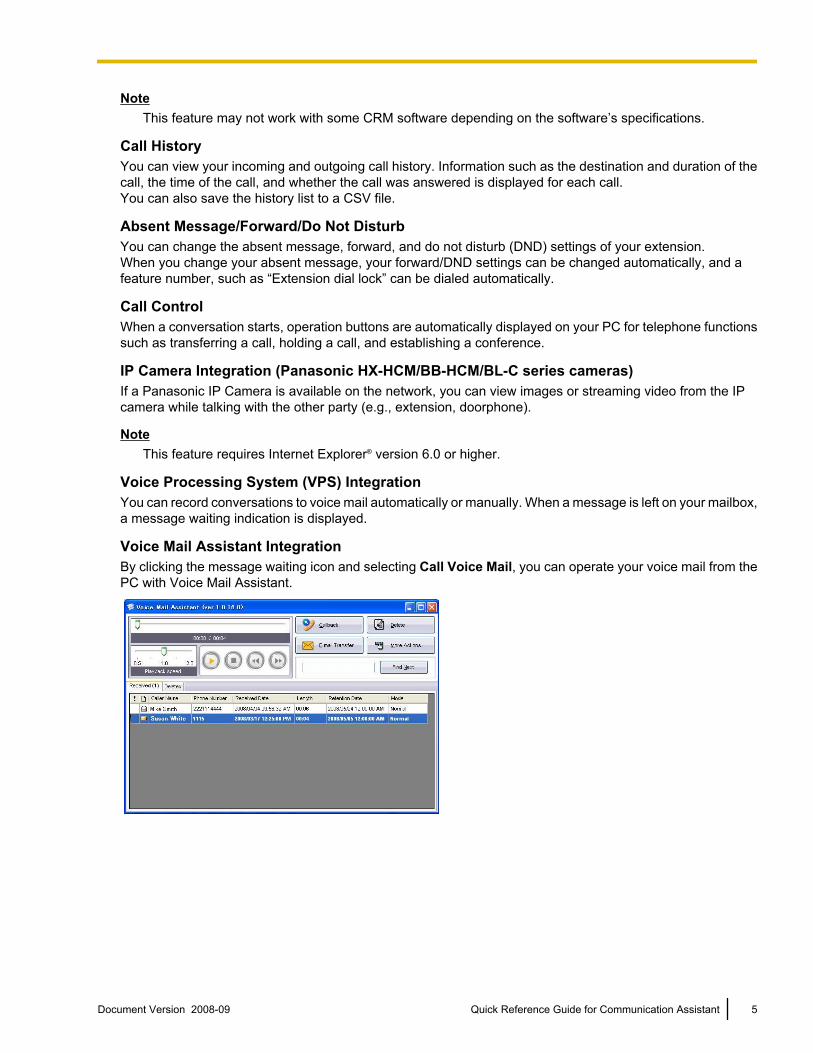
Voice Mail Assistant IntegrationBy clicking the message waiting icon and selecting Call Voice Mail, you can operate your voice mail from thePC with Voice Mail Assistant.
Document Version 2008-09 Quick Reference Guide for Communication Assistant 5
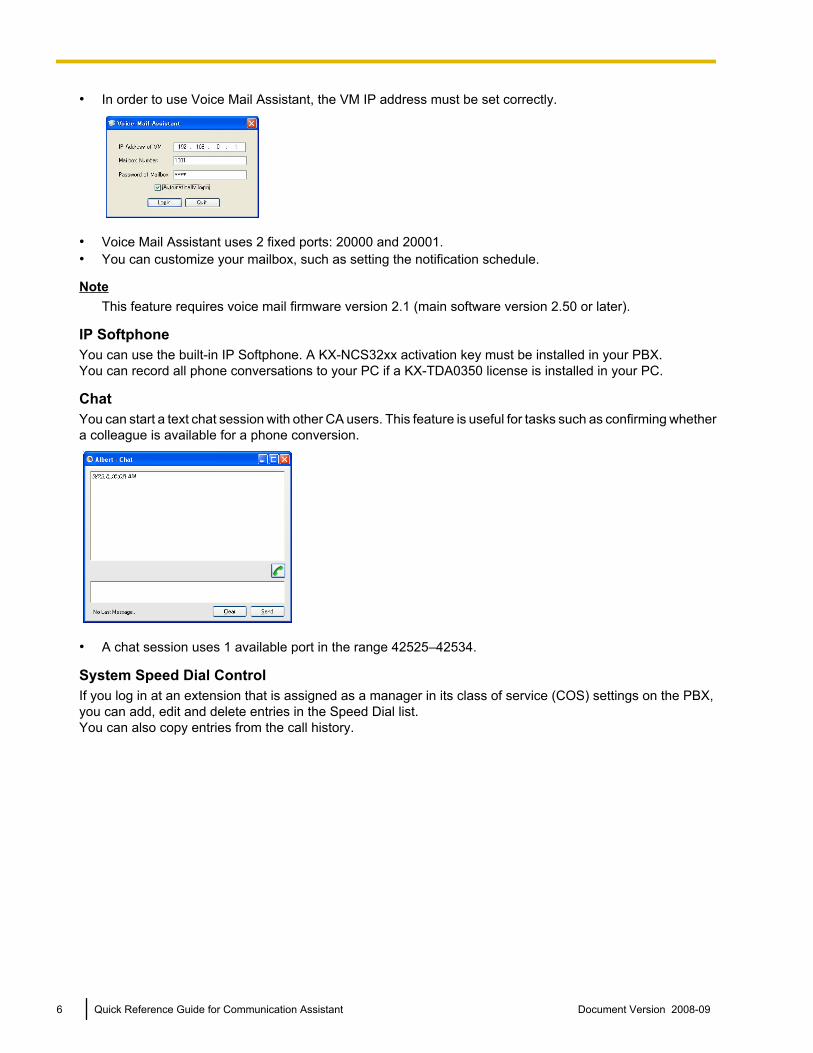
• In order to use Voice Mail Assistant, the VM IP address must be set correctly.
• Voice Mail Assistant uses 2 fixed ports: 20000 and 20001.• You can customize your mailbox, such as setting the notification schedule.
NoteThis feature requires voice mail firmware version 2.1 (main software version 2.50 or later).
IP SoftphoneYou can use the built-in IP Softphone. A KX-NCS32xx activation key must be installed in your PBX.You can record all phone conversations to your PC if a KX-TDA0350 license is installed in your PC.
ChatYou can start a text chat session with other CA users. This feature is useful for tasks such as confirming whethera colleague is available for a phone conversion.
• A chat session uses 1 available port in the range 42525–42534.
System Speed Dial ControlIf you log in at an extension that is assigned as a manager in its class of service (COS) settings on the PBX,you can add, edit and delete entries in the Speed Dial list.You can also copy entries from the call history.
6 Quick Reference Guide for Communication Assistant Document Version 2008-09
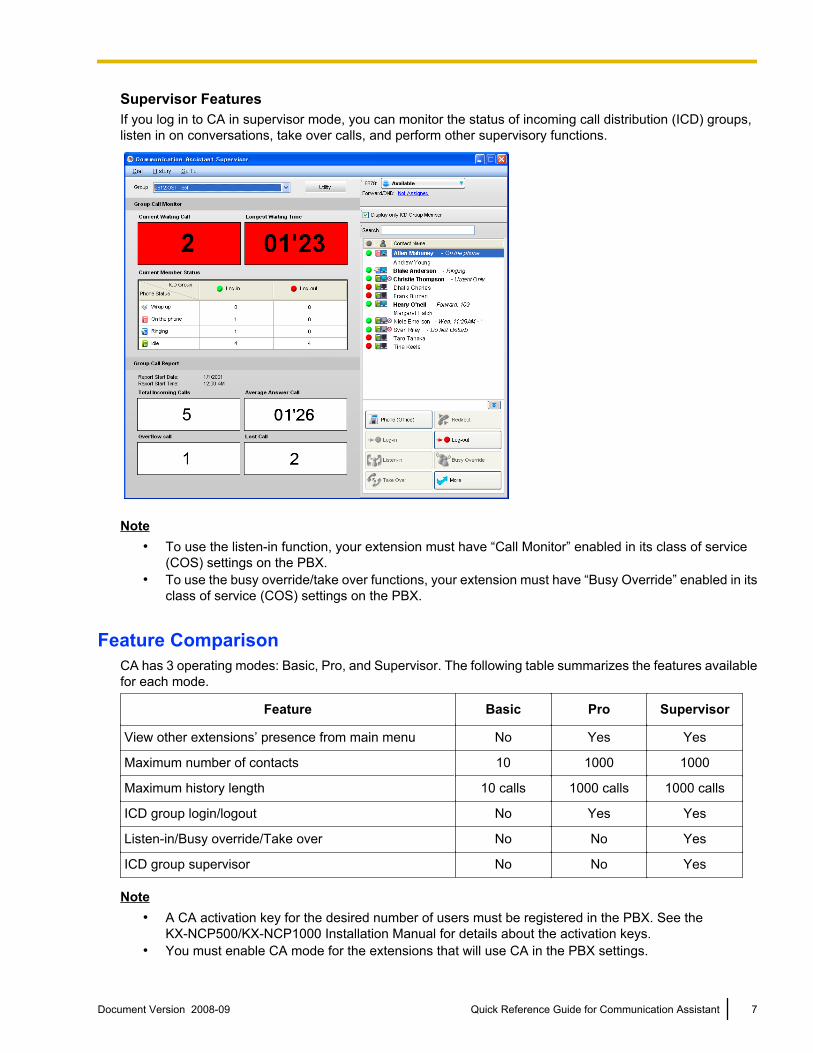
Supervisor FeaturesIf you log in to CA in supervisor mode, you can monitor the status of incoming call distribution (ICD) groups,listen in on conversations, take over calls, and perform other supervisory functions.
Note• To use the listen-in function, your extension must have “Call Monitor” enabled in its class of service
(COS) settings on the PBX.• To use the busy override/take over functions, your extension must have “Busy Override” enabled in its
class of service (COS) settings on the PBX.
Feature ComparisonCA has 3 operating modes: Basic, Pro, and Supervisor. The following table summarizes the features availablefor each mode.
Feature Basic Pro Supervisor
View other extensions’ presence from main menu No Yes Yes
Maximum number of contacts 10 1000 1000
Maximum history length 10 calls 1000 calls 1000 calls
ICD group login/logout No Yes Yes
Listen-in/Busy override/Take over No No Yes
ICD group supervisor No No Yes
Note• A CA activation key for the desired number of users must be registered in the PBX. See the
KX-NCP500/KX-NCP1000 Installation Manual for details about the activation keys.• You must enable CA mode for the extensions that will use CA in the PBX settings.
Document Version 2008-09 Quick Reference Guide for Communication Assistant 7
• To use Supervisor mode, you must set the appropriate extension as an ICD group supervisor in thePBX settings.
• CA Pro has a 60-day trial mode, where you can use all of the features of CA Pro without installing anactivation key (CA Pro trial). The 60-day trial period begins once you have installed CA on a PC.
• Up to 5 users can use CA Basic without installing an activation key.
Login CapabilitiesA total of 128 users can simultaneously log in to CA.The following table shows the maximum number of users that can simultaneously log in for each mode.
Login Mode/Software No. of Users
CA Basic 128
CA Pro 128
CA Pro trial 2
CA Supervisor 4
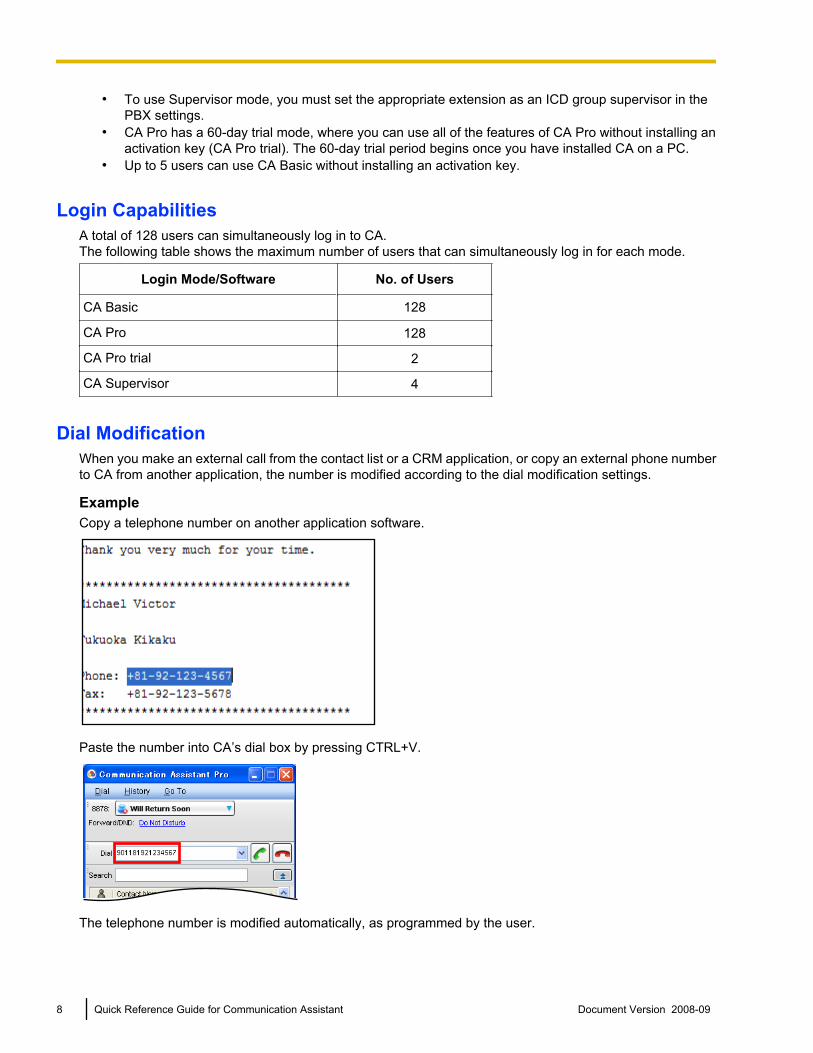
Dial ModificationWhen you make an external call from the contact list or a CRM application, or copy an external phone numberto CA from another application, the number is modified according to the dial modification settings.
ExampleCopy a telephone number on another application software.
Paste the number into CA’s dial box by pressing CTRL+V.
The telephone number is modified automatically, as programmed by the user.
8 Quick Reference Guide for Communication Assistant Document Version 2008-09

1. On the Go To menu, select Options, and then select Dial Modification.The following window is displayed:
A
B
C
A Minimum digits of public telephone numberSpecifies the minimum number of digits required to treat the dialed number as an external telephonenumber. If the number of digits dialed is less than the specified value, it will not be treated as an externalcall. The default value is 7. For example, a number is treated as below by default.1234576 = 7 digits ® External telephone number123456 = 6 digits ® Not an external telephone number
B Remove “(0)” check boxDeletes the string “(0)” from a copied external telephone number.[Example]+81-(0)1-2345-6789P12 ® +81-1-2345-6789P12
C Telephone Number ModificationA dialed number is modified according to the Telephone Number Modification table.[Example]
Dial Modification Settings
No. Leading Digits to Remove(Max. 16 digits)
Added Number(Max. 8 digits)
1 301
2 +1703 703
3 +1 1
4 + 011
Modifications
Dialed Number CorrespondingTable No.
RemovedDigits
AddedDigits Modified Number
301-555-0123 1 301 — 555-0123
+1-703-555-0199 2 +1703 703 703-555-0199
+1-202-555-0156 3 +1 1 1-202-555-0156
Document Version 2008-09 Quick Reference Guide for Communication Assistant 9
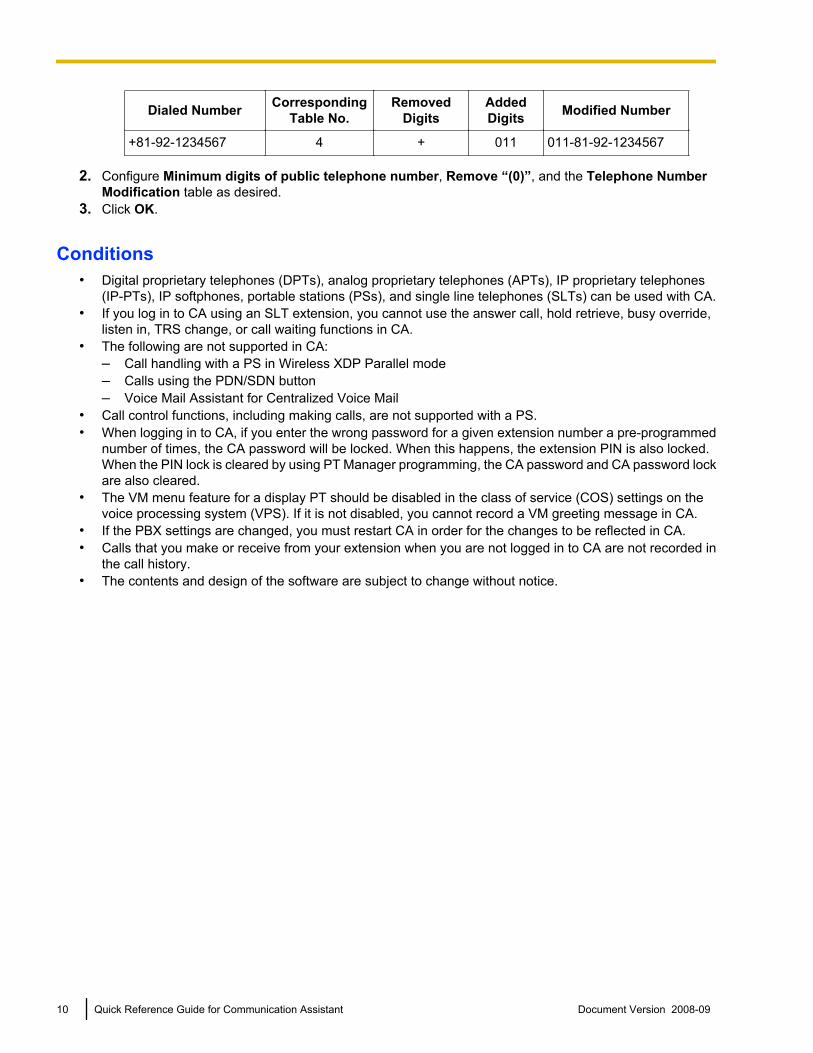
Dialed Number CorrespondingTable No.
RemovedDigits
AddedDigits Modified Number
+81-92-1234567 4 + 011 011-81-92-1234567
2. Configure Minimum digits of public telephone number, Remove “(0)”, and the Telephone NumberModification table as desired.
3. Click OK.
Conditions• Digital proprietary telephones (DPTs), analog proprietary telephones (APTs), IP proprietary telephones
(IP-PTs), IP softphones, portable stations (PSs), and single line telephones (SLTs) can be used with CA.• If you log in to CA using an SLT extension, you cannot use the answer call, hold retrieve, busy override,
listen in, TRS change, or call waiting functions in CA.• The following are not supported in CA:
– Call handling with a PS in Wireless XDP Parallel mode– Calls using the PDN/SDN button– Voice Mail Assistant for Centralized Voice Mail
• Call control functions, including making calls, are not supported with a PS.• When logging in to CA, if you enter the wrong password for a given extension number a pre-programmed
number of times, the CA password will be locked. When this happens, the extension PIN is also locked.When the PIN lock is cleared by using PT Manager programming, the CA password and CA password lockare also cleared.
• The VM menu feature for a display PT should be disabled in the class of service (COS) settings on thevoice processing system (VPS). If it is not disabled, you cannot record a VM greeting message in CA.
• If the PBX settings are changed, you must restart CA in order for the changes to be reflected in CA.• Calls that you make or receive from your extension when you are not logged in to CA are not recorded in
the call history.• The contents and design of the software are subject to change without notice.
10 Quick Reference Guide for Communication Assistant Document Version 2008-09

2 System Connection DiagramThe figure below illustrates an example network setup using CA.
1
2
3
4
5
7
8
9
6
6
10
Remote Office
A Telephone CompanyB Panasonic KX-NCP Series PBXC LAND Panasonic Network CameraE Voice Processing SystemF PC running CAG Proprietary Telephone or Single Line TelephoneH Doorphone and Door OpenerI IP Proprietary TelephoneJ PC running CA with Softphone
Document Version 2008-09 Quick Reference Guide for Communication Assistant 11
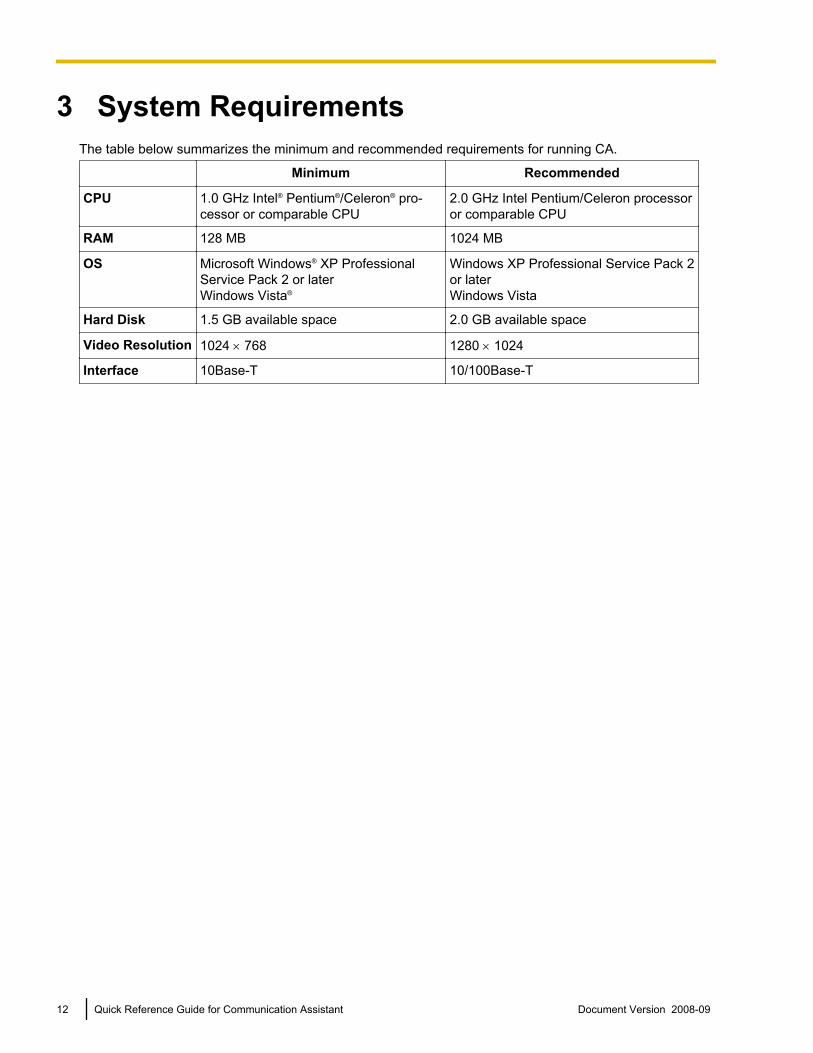
3 System RequirementsThe table below summarizes the minimum and recommended requirements for running CA.
Minimum Recommended
CPU 1.0 GHz Intel® Pentium®/Celeron® pro-cessor or comparable CPU
2.0 GHz Intel Pentium/Celeron processoror comparable CPU
RAM 128 MB 1024 MB
OS Microsoft Windows® XP ProfessionalService Pack 2 or laterWindows Vista®
Windows XP Professional Service Pack 2or laterWindows Vista
Hard Disk 1.5 GB available space 2.0 GB available space
Video Resolution 1024 ´ 768 1280 ´ 1024
Interface 10Base-T 10/100Base-T
12 Quick Reference Guide for Communication Assistant Document Version 2008-09
4 Software Installation
4.1 Installing and Starting Communication AssistantNote
When you start CA, make sure you are logged in to an account that has administrator privileges.
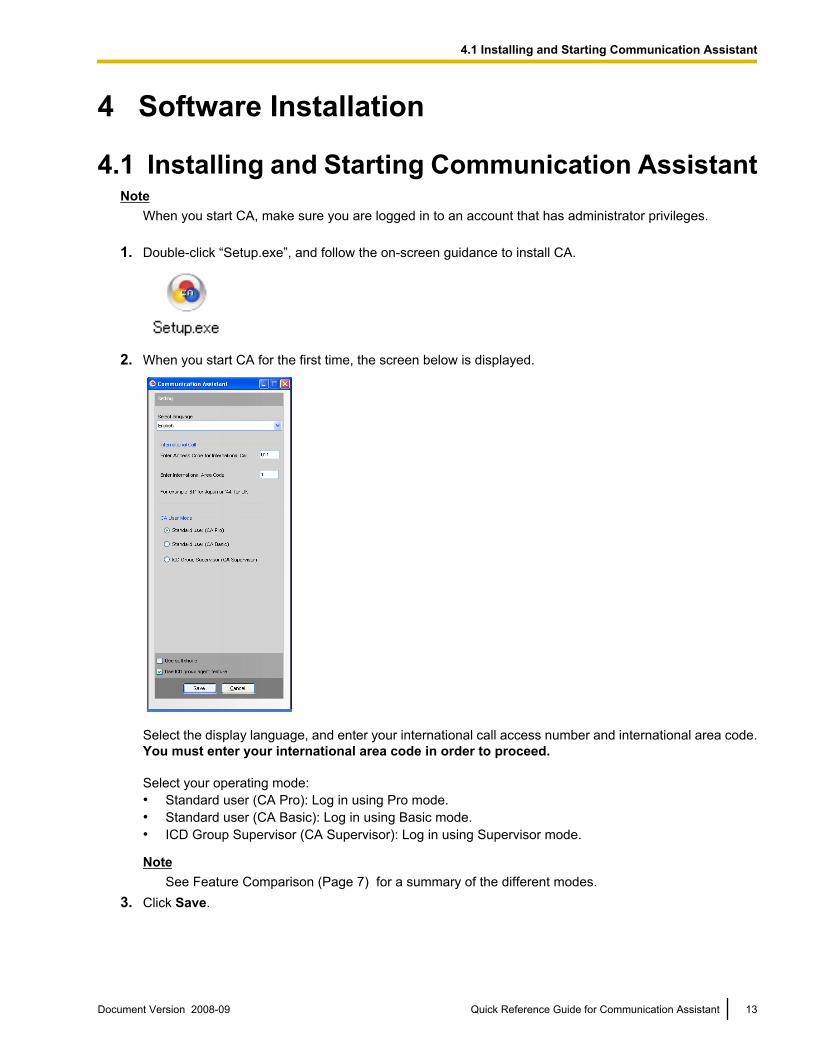
1. Double-click “Setup.exe”, and follow the on-screen guidance to install CA.
2. When you start CA for the first time, the screen below is displayed.
Select the display language, and enter your international call access number and international area code.You must enter your international area code in order to proceed.
Select your operating mode:• Standard user (CA Pro): Log in using Pro mode.• Standard user (CA Basic): Log in using Basic mode.• ICD Group Supervisor (CA Supervisor): Log in using Supervisor mode.
NoteSee Feature Comparison (Page 7) for a summary of the different modes.
3. Click Save.
Document Version 2008-09 Quick Reference Guide for Communication Assistant 13
4.1 Installing and Starting Communication Assistant
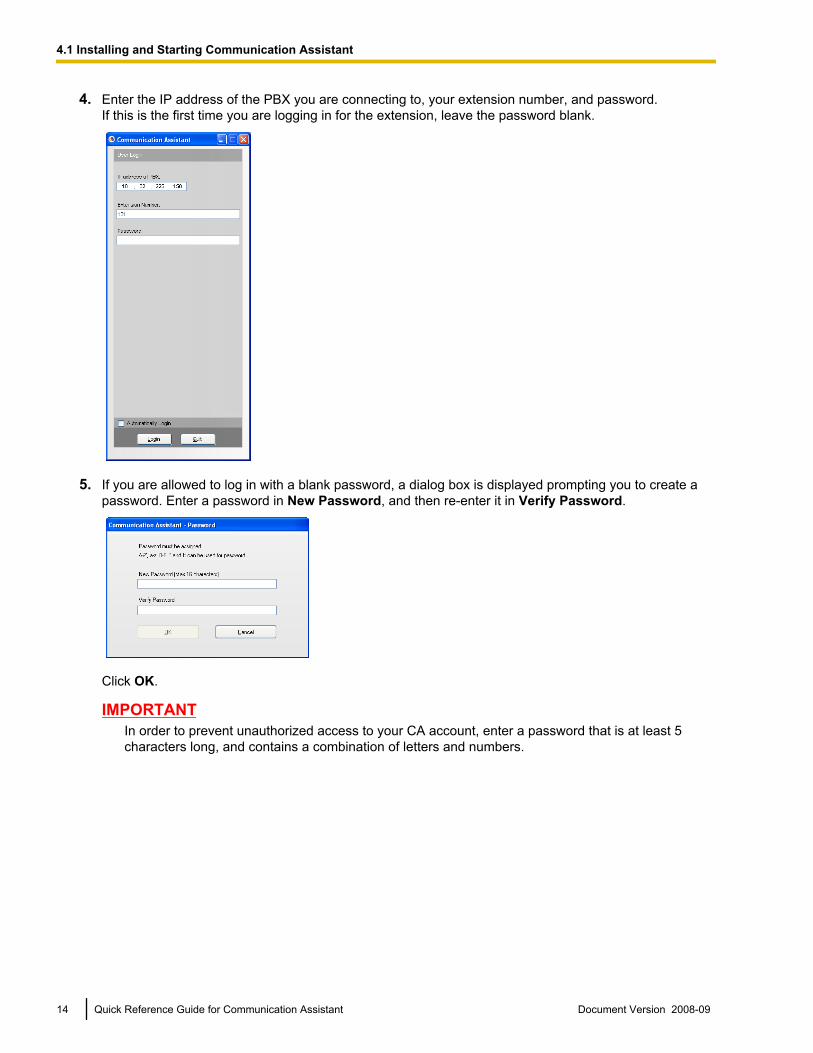
4. Enter the IP address of the PBX you are connecting to, your extension number, and password.If this is the first time you are logging in for the extension, leave the password blank.
5. If you are allowed to log in with a blank password, a dialog box is displayed prompting you to create apassword. Enter a password in New Password, and then re-enter it in Verify Password.
Click OK.
IMPORTANTIn order to prevent unauthorized access to your CA account, enter a password that is at least 5characters long, and contains a combination of letters and numbers.
14 Quick Reference Guide for Communication Assistant Document Version 2008-09
4.1 Installing and Starting Communication Assistant

After you have entered a new password, the CA main screen is displayed.
4.2 Uninstalling Communication Assistant1. To uninstall CA, perform one of the following procedures.
• On the Start menu, point to All Programs ® Panasonic ® Communication Assistant, and selectUninstall.
• From the Control Panel, double-click Add or Remove Programs, select CommunicationAssistant, and then click Remove.
Document Version 2008-09 Quick Reference Guide for Communication Assistant 15
4.2 Uninstalling Communication Assistant

Panasonic Consumer Electronics Company,
Division of Panasonic Corporation of North America
One Panasonic Way, Secaucus, New Jersey 07094
http://www.panasonic.com/csd
Copyright:
This material is copyrighted by Panasonic Communications Co., Ltd., and may be reproduced for internal
use only. All other reproduction, in whole or in part, is prohibited without the written consent of Panasonic
Communications Co., Ltd.
© Panasonic Communications Co., Ltd. 2008
PSQX4924ZA KK0908MP0