Embed Size (px)
Citation preview
1
© 2015 GMT Games, LLC—revised Mar. 2016
THE U.S. CIVIL WAR
R U L E S O F P L A YRevised Mar. 3rd, 2016
T H E U . S .
Civil War 1. Introduction ......................................................... 2 2. Game Components .............................................. 2 3. Sequence of Play Outline ................................... 3 4. Action Phases ...................................................... 3 5. Movement ........................................................... 4 6. Control ................................................................ 6 7. Generals .............................................................. 7 8. Cavalry ................................................................ 8 9. Reaction Movement ............................................ 9 10. Fortifications ....................................................... 10 11. Battle ................................................................... 11 12. Demoralization and Rally ................................... 13 13. Supply ................................................................. 13 14. Reinforcements ................................................... 15 15. Strategic Movement ............................................ 17 16. Leader Management ............................................ 17
17. Special Rules ....................................................... 18 18. Special Actions .................................................... 18 19. The End Phase and Automatic Victory ............... 19 20. Naval Rules ......................................................... 20 21. Naval Rules (Advanced Rules) ........................... 22 22. Optional Rules .................................................... 27 S1. The 1861 Scenario .............................................. 28 S2. The 1862 Scenario .............................................. 28 S3. The 1863 Scenario .............................................. 28 S4. The Campaign Game .......................................... 29 Examples of Play ......................................................... 30Map Notes .................................................................... 34Special Hexes and Spaces ............................................ 37Hints on Play ................................................................ 38Design Notes ................................................................ 38Index ............................................................................ 40
TABLE OF CONTENTS
© 2015 GMT Games, LLC • P.O. Box 1308, Hanford, CA 93232-1308
THE U.S. CIVIL WAR2
© 2015 GMT Games, LLC—revised Mar. 2016
1. INTRODUCTION“Mind what I tell you: You fellows will catch the devil before you get through with this business.” —UnionAdmiralDavidFarraguttohisfellowofficerswhoquitthe U.S. Navy to join the Confederacy.
The U.S. Civil War is a 2-player strategic war game of the American Civil War. One side controls the North (the Union), the other the South (the Confederacy). The South tries to defend their new nation and break the North’s will to continue the war; the North tries to put down the rebellion.
The following acronyms are used in these rules:BP = Build PointCRT = Combat Results TableCSA = Confederate States of AmericaDRM=DieRollModifierLOC = Line of CommunicationLOS = Line of SupplyMA = Movement AllowanceMP = Movement PointNSP = Naval Strength PointSM = Strategic MovementSP = Strength PointTEC = Terrain Effects ChartTRT = Turn Record TrackVP = Victory PointZOI=ZoneofInfluence
Advanced Game rules that are mentioned in the Basic Game are tint-ed grey. These rules may be ignored when playing the Basic Game.
2. GAME COMPONENTS2.1 Map(2.1.1) Theaters: The map is divided into three theaters of war: East, West, and the Trans-Mississippi. The boundary between the Trans-Mississippi and the West is the Mississippi River. The bound-ary between the West and the East is indicated by a dashed red line.(2.1.2) States: There are three types of states: Northern, Border, and Southern. The Union player controls the Northern States (tinted blue), the Confederate player controls the Southern States (tinted gray-green), while Missouri, Kentucky, and West Virginia are Border States (tinted white). A hex with a state border running through it is located solely in the state of the city, town or port that is located within the hex. Otherwise, the hex is considered to be simultaneously located in both states.(2.1.3) Map Spaces: There are four types of map spaces: hexes, islands (white squares), Coastal Fortresses (octagons), and the Chesapeake Bay Box (rectangle).(2.1.4) Objective/Resource Hexes: Town and City hexes outlined in gray in Border and Northern states are Objective Hexes. Confed-erate capture of these hexes can generate BPs from the Border States (14.3.3) and VPs for the Northern States (19.3.2). Those outlined in gray in the Confederate states are Resource Hexes. These hexes provide BPs for Confederate Reinforcements (14.3.2).(2.1.5) Texas Off-Map Resources: The two Resources on the west map edge are non-playable half-hexes. They do, however, provide resources and a source of supply for the Confederate player.(2.1.6) River Crossing Towns:When a riverflows through themiddle of a hex it is ignored. Some Town hexes are bordered with light blue or light green as a visual reminder of this.
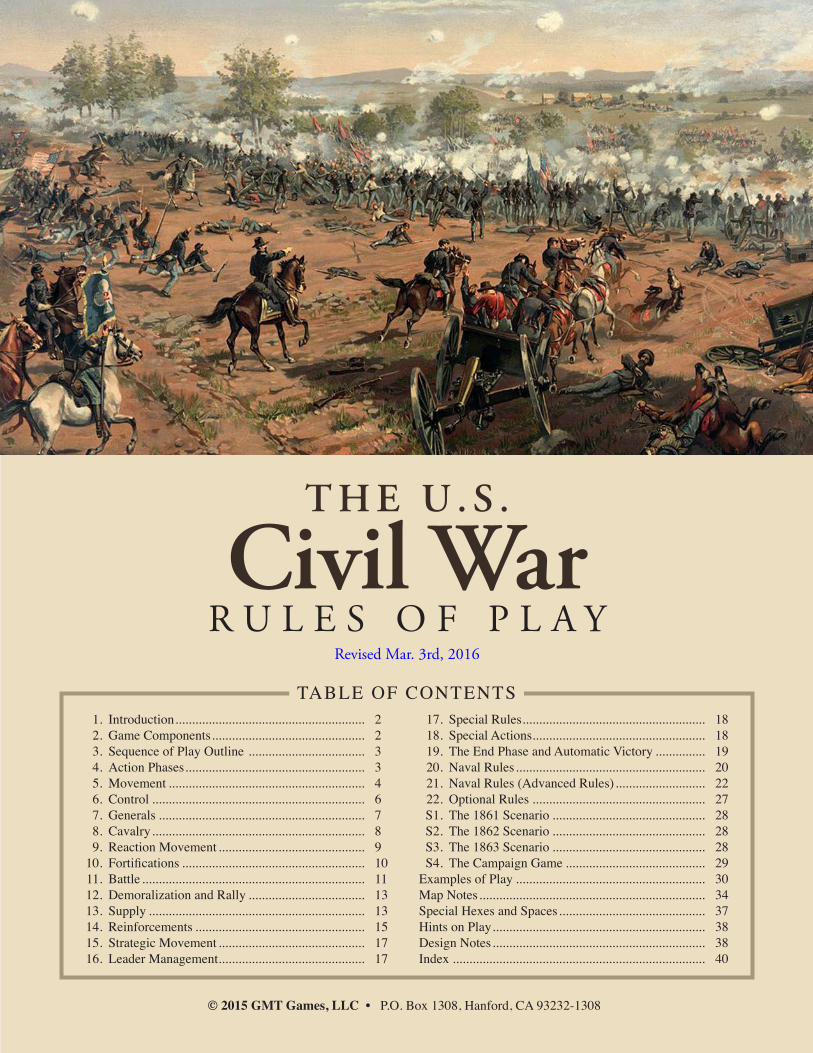
Generals
Turn of EntryArrival LocationMovementAllowanceRed box indicates Cautious General (7.7)
TypeNSP ValueBattle DRM
Battle DRMNSP Value
NameRank
Attack RatingDefense Rating
Sample Markers
Demoral-ized
Arsenal
Foraging SurrenderPoints
UnionControl
ConfederateControl
Destroyed OceangoingIronclads
BlockadeZone DRM
ArmyMarker
FortEntrench-ment
State MilitiaStrength Points
MississippiVP Marker
Naval Units
Ironclad RiverFlotilla
Naval Battery
OceangoingNSPs
RiverNSPs
Cavalry IndicatorParenthesis indicates ratings are used only when operating inde-
pendently (8.5)
A complete game of The U.S. Civil War includes:2 map boards 2 setup cards3 counter sheets 2 identical Player Aid Cards1 rules booklet 2 Army Displays30 Action Cards 6 six-sided dice
3
© 2015 GMT Games, LLC—revised Mar. 2016
THE U.S. CIVIL WAR
(2.1.7) The Mississippi and Ohio: A dotted line runs through the mid-dle of the Mississippi and Ohio Rivers to indicate that they are Type 2 Navigable Rivers (20.1.3). All other Navigable Rivers are Type 1. (2.1.8) Coastal Hex:Thisisdefinedasanyhexcontainingland,thedark blue water, and the thin black coast line.
2.2 Counters(2.2.1) Types: There are four types of counters: SPs (2.2.3), Generals (7.0), Naval Units (21.2), and markers. Naval Units are only used in the Advanced Game.(2.2.2) Definition of Force: The term “force” is used throughout the rules. Any stack containing SPs, with or without a General, is considered a force. (2.2.3) Strength Points (SPs): Each SP represents approximately 5,000 men. SPs are interchangeable, like money. Thus, four 1 SPs may be combined into one 4 SP unit, and vice-versa. SPs may be freely combined and broken down during play at any time as long as the total strength remains the same. The number supplied in the game is not a limit; players can make more if needed. Militia are considered SPs with a value of 0. However, Militia may not use Movement (5.), Reaction Movement (9.), Strategic Movement (15.) or Naval Transport (20.3).
2.3 Special Action CardsThese are explained in full in rule section 18.0. Each player has 15 cards.
3. SEQUENCE OF PLAY OUTLINEEach game turn consists of the following phases listed in the order they must be followed.
3.1 Reinforcement PhaseA. Union Reinforcement Segment (14.2)Place the following Reinforcements:• 6SPsintheEast• 3SPsinOhio/Indiana• 3SPsinIllinois• 2SPsinSt.Louis• PlaceorUpgradeoneFort(10.2.3,10.26)• DrawtwoSpecialActionCards(18.2)• PlaceanyavailableUnionNavalReinforcements(21.9.1)• Place1Riverand1OceangoingNSPifavailablefromtheNaval
Pool to a friendly Shipyard (21.9.2)
B. Confederate Reinforcement Segment (14.3 and 14.4)Perform this segment in the following order:1. Upgrade one Resource Hex by 1 BP (War Industry 14.5).2. Determine the number of SPs the Confederate player receives
using the following formula: Total BPs from: Resource Hexes + Arsenals + Border
State Recruits + Blockade Running, minus (–) the current Maintenance Value. Build 1 SP for every 10 BPs (fractions of 10 are lost). Place 1 SP in the Trans-Mississippi Theater and then divide the remainder as evenly as possible between the Eastern and the Western Theaters. Odd-numbered SPs go to the East.
3. Draw two Special Action Cards (18.2).4. Roll on the CSA Naval Reinforcement Table (21.10).
C. Units in the Displaced Box Return to the Map (14.6) TheUnionplayerfirst,followedbytheConfederateplayer.Generals,Militia, and half the SPs (round down) return to play.
3.2 Strategic Movement PhaseA. Union Strategic Movement Segment (15.0)The Union player conducts the following types of Strategic Move-ment listed below in any order.• StrategicRailMovement[12SPs](15.2)• StrategicRiverMovement[3SPs](15.3)• StrategicOceanMovement[3SPs](15.4)• StrategicRoadMovement[1SPperTheater] (15.5)• StrategicNavalRedeployment(21.2.6)B. Confederate Strategic Movement SegmentThe Confederate player conducts the three types of Strategic Move-ment listed below in any order.• StrategicRailMovement[7SPs](15.2)• StrategicRiverMovement[1SP](15.3)• StrategicRoadMovement[1SPperTheater](15.5)
NOTE: The Confederate player has no Strategic Ocean Movement or Naval Redeployment.
3.3 The Leader Management Phase (16.0)TheUnionplayerfirst,followedbytheConfederateplayer.
3.4 The Action Cycle (4.0)Conduct Action Phases 1 through 4.
3.5 End Phase (19.0)A. Control Segment (19.1)B. End Turn Rally (19.2)C. Check for Automatic Victory (19.3)D. Naval Repair Segment (21.8)E. Confederate Ironclad Completion Die Roll (21.10.3)
4. ACTION PHASES4.1 The Action Cycle(4.1.1) In General: Each turn of The U.S. Civil War has an Action Cycle composed of 4 Action Phases. At the start of each Action Phase both players roll a 6-sided die and compare the results. The player whorolledthehighernumbergoesfirstinthatActionPhase.Thedifference between the two rolls determines how many Action Points the players receive for that Action Phase. Record this difference on the Dice Differential Track with the appropriate marker. When the firstplayerhasusedallhisActionPoints,conductedallhisbattlesand has checked Supply, the second player conducts his Action PhaseusingthesamenumberofActionPointsasthefirstplayer.Since both players use the same dice difference they always have the same number of Action Points to use.EXAMPLE: If the Union player rolled a 5 and the Confederate playera3,thentheUnionplayerwouldgofirstwith2ActionPoints(5–3=2).Afterhefinishes,theConfederateplayerwouldget2Action Points.
(4.1.2) Doubles: If both players roll the same number, then both players immediately receive a Special Action Card (18.0) then roll again. If doubles are rolled again, another Special Action Card is received—this can happen repeatedly, but neither player can have more thanfiveSpecialActionCards (18.2).Keep rollinguntilnodoubles are rolled.
(4.1.3) Dice Difference of 1: When the dice difference is only 1, the 1 is applied to each Theater of War (2.1.1). That is, 1 Action Point for the East, 1 for the West and 1 for the Trans-Mississippi. This triple
THE U.S. CIVIL WAR4
© 2015 GMT Games, LLC—revised Mar. 2016
effect only occurs with a difference of 1—all other dice differences are not multiplied and the Action Points may be used in any Theater. Units activated with these (Theater-based) Action Points must start their movement or Transfer in the Theater but may cross Theater boundaries during the activation.(4.1.4) On to Richmond!: If the dice difference is 4 or 5 and Rich-mond is still under Confederate control, then the Union player must use at least one Action Point to activate a force to attack or capture a hex in Virginia (not West Virginia), Maryland, or Pennsylvania con-taining a Resource Hex or a Confederate SP or Fort. Failure to do so requires the Union player to immediately sacrifice one Action Point and remove 1 Union SP from the map (his choice, but the SP must be in Full Supply). If no battle takes place because the Confederate units successfully Avoided Battle, then no SP needs to be removed.
(4.1.5) Phasing and non-Phasing Player: The player whose Action Phase is in progress is termed the Phasing player; his opponent is the non-Phasing player.
4.2 Sequence of an Action PhaseA. Initiative Segment: Both players roll one die and compare the difference(4.1).Theplayerwhorolledhighermustgofirst.B. First Player Action Phase: Each Player Action Phase is con-ducted in the following order: a. Movement and Combat Segment: The Phasing Player con-
ducts as many Actions allowed by the dice difference. Any combat that an activated General initiates is resolved immediately before the next General is activated.
b. Supply Segment: The Phasing Player checks the supply state of all his units:
• UnitsthatareOutofSupplyreceiveaForagingmarker(13.2.1)and suffer Supply Attrition (13.2.2).
• Units, Forts, andCoastal Forts that are Isolated check forSurrender (13.6).
• NavalUnits that areOut ofSupply receive aLowonCoalmarker (21.2.7).
C. Second Player Action Phase: This phase is identical to the First Player Action Phase except the opposing player now moves.
4.3 List of ActionsBelow is a complete list of Actions allowed in the Basic Game and their Action Point cost:Cost Action 1 MOVE: Activate one General for movement. The General
may carry any number of subordinates and as many SPs as his rank allows (7.3). The General may be moved up to his MA (5.2) and conduct one or more battles (11.0). SPs and Generals may be dropped off and picked up as the stack moves. See also Cautious Generals (7.7).
1 MOVE: Activate up to 3 SPs located in the same hex for movement. No General is necessary (5.10).
1 NAVAL TRANSPORT: Activate one stack for Naval Trans-port (20.3).
1 RALLY: Recover from Demoralization any one stack that has an LOC (13.5) to a Supply Source.
1 LEADER TRANSFERS: Reposition any two friendly 1-star or 2-star Generals on the map (7.8). 3- and 4-star Generals and Cavalry Generals may not be repositioned.
1 ENTRENCH: Place an Entrenchment marker (10.1) in any space containing a friendly Militia or SP that is located in a friendly-controlled state. Entrenching can also occur during movement by a force with 2 or more SPs, paying 2 MPs.
1 TRAINING: For every 10 Action Points committed to Train-ing, the owning player earns 1 SP (17.3).
0 Rearrange some, none, or all friendly Militia units (17.2). 0 DISPERSE SPs: Any number of non-Isolated (13.6.2) friend-
ly units may be placed in the theater’s Displaced Box (14.6).
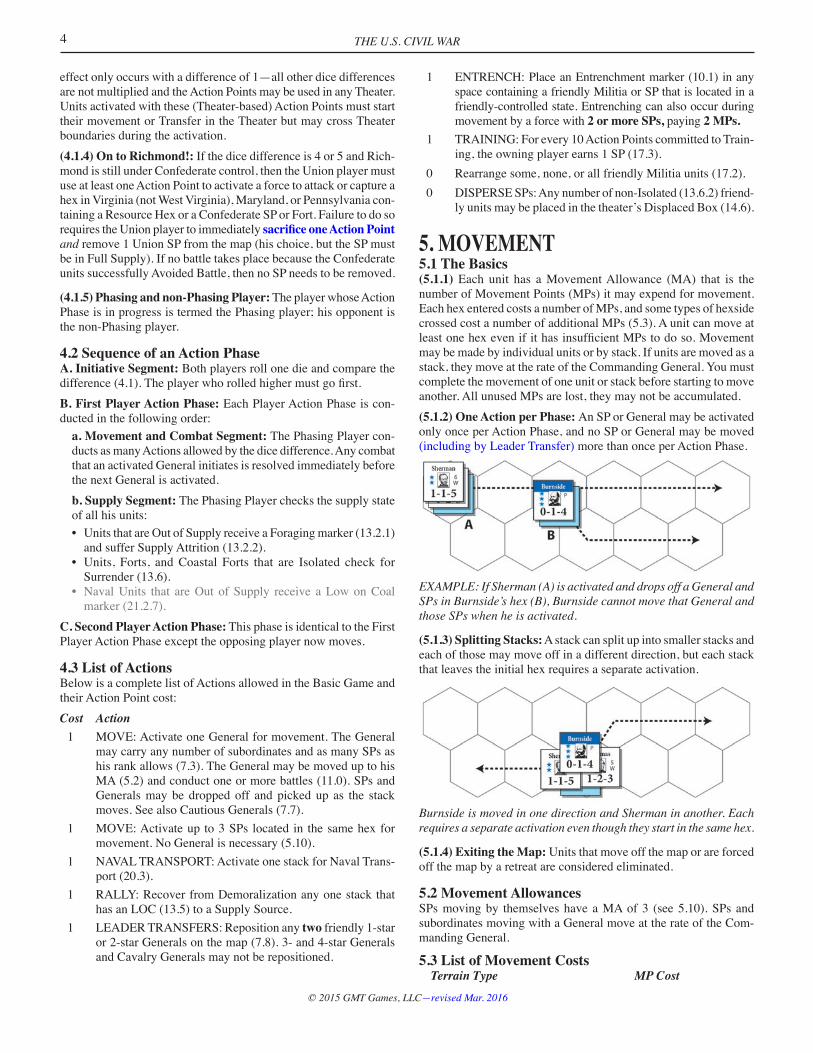
5. MOVEMENT5.1 The Basics(5.1.1) Each unit has a Movement Allowance (MA) that is the number of Movement Points (MPs) it may expend for movement. Each hex entered costs a number of MPs, and some types of hexside crossed cost a number of additional MPs (5.3). A unit can move at leastonehexevenifithasinsufficientMPstodoso.Movementmay be made by individual units or by stack. If units are moved as a stack, they move at the rate of the Commanding General. You must complete the movement of one unit or stack before starting to move another. All unused MPs are lost, they may not be accumulated. (5.1.2) One Action per Phase: An SP or General may be activated only once per Action Phase, and no SP or General may be moved (including by Leader Transfer) more than once per Action Phase.
EXAMPLE: If Sherman (A) is activated and drops off a General and SPs in Burnside’s hex (B), Burnside cannot move that General and those SPs when he is activated.
(5.1.3) Splitting Stacks: A stack can split up into smaller stacks and each of those may move off in a different direction, but each stack that leaves the initial hex requires a separate activation.
Burnside is moved in one direction and Sherman in another. Each requiresaseparateactivationeventhoughtheystartinthesamehex.
(5.1.4) Exiting the Map: Units that move off the map or are forced off the map by a retreat are considered eliminated.
5.2 Movement AllowancesSPs moving by themselves have a MA of 3 (see 5.10). SPs and subordinates moving with a General move at the rate of the Com-manding General.
5.3 List of Movement Costs Terrain Type MP Cost

5
© 2015 GMT Games, LLC—revised Mar. 2016
THE U.S. CIVIL WAR
Clear . . . . . . . . . . . . . . . . . . . . . . . . . . . . . . .1 Railroads and Roads (5.4, 5.5) . . . . . . . . . . .1 Woods. . . . . . . . . . . . . . . . . . . . . . . . . . . . . .1 Marsh (5.5). . . . . . . . . . . . . . . . . . . . . . . . . .2 Mountain (5.6) . . . . . . . . . . . . . . . . . . . . . . .1 Swamp (5.7) . . . . . . . . . . . . . . . . . . . . . ProhibitedHexside Terrain: Minor River hexside (5.8.2) +1 NavigableRiverhexside(5.8.3) +1/+2* Railroad Ferry hexside (5.4.4) +1 Mountain hexside (5.6) +1 Railroad Bridge or Gap hexside (5.4.3, 5.6) +0 Mountain Pass hexside (5.6) +0 Other Movement Actions MP Cost Place Control marker (6.2.1) 1 RemoveControlmarker(6.2.2) 0or1** Regroup (5.9) 1 Entrench (10.1.2) 2
*Friendly-controlled or uncontrolled Navigable Rivers cost +1 MP tocross,enemy-controlledNavigableRiverscost+2MPs.**Cavalry Units pay +1 MP to remove a Control marker (8.3), all other units pay 0 MPs.
5.4 Railroads and Movement(5.4.1) Railroad MP Cost: Units that follow the path of a Railroad pay only 1 MP per hex and ignore the additional MP cost of crossing Minor Rivers, Navigable Rivers and Mountain hexsides. A Railroad that crosses a Mountain hexside is called a Railroad Gap.(5.4.2) Rail Movement Bonus: An activated force that starts and ends its movement on a rail hex and spends its entire movement moving along a friendly-controlled railroad, may disregard its MA and move up to 10 MPs (paying 1 MP per hex and +1 MP per Rail-roadFerry[5.4.4]).AforceusingRailMovementhasthefollowingrestrictions:• Nomorethan2 SPs may use the Rail Movement Bonus per Action
Phase. Any number of Generals may accompany the SPs.• MaynotpickupSPsalongtheway.• MaystartintheZOI(9.1)ofanenemyforce,butmaynotenter
one unless the hex is occupied by a friendly SP.NOTE: The Rail Movement Bonus is different from Strategic Rail Movement which occurs at the start of the turn.
(5.4.3) Railroad Bridges: Railroad bridges that cross Navigable Rivers may only be used if the player has Naval Control (20.1) or neither player has Naval Control of that river hexside. If the opposing player has Naval Control then treat the Navigable River hexside as if no railroad bridge exists there.(5.4.4) Railroad Ferries: Some railroad lines end at a Navigable River hexside and start back up on the far side. For Land Movement and Reaction it is treated as an unbridged hexside, but for supply purposes, Strategic Movement, and the Rail Movement Bonus (5.4.2) the railroad is considered connected (unbroken). Railroad Ferries may not be used if the opposing player has Naval Control of the Navigable River hexside.PLAY NOTE: The Mobile-Blakeley ferry connects the railroad line located on each side of Mobile Bay (5.8.5).
(5.4.5) New Railroads: At the beginning of the game the yel-low-highlighted dashed railroads are not yet built. At the beginning
of the Winter 1864 Game Turn all of these railroads are considered built no matter which side controls them.
5.5 Roads and MarshesRoads only exist through Marsh terrain. Units that follow the path of a Road (or rail) through a Marsh hex pay only 1 MP instead of 2 MPs.
5.6 Mountain Hexes and HexsidesEntering a Mountain hex costs 1 MP. Crossing a Mountain hexside costs +1 MP. Units that cross a Mountain hexside using a Pass or Railroad Gap ignore the +1 MP cost.
EXAMPLE: Grant moves across the mountains paying 1 MP per Clear and Mountain hex, plus 1 MP for each Mountain hexside. There is no additional cost to cross a Pass hexside.
5.7 Non-Playable TerrainLand units are prohibited from entering hexes that are completely non-playable unless they are using Naval Transport (20.3); Naval Units may enter such hexes but may not stop. Some hexes have only part of their terrain indicated as non-playable; in this case the hex is playable but Land Movement into and out of the hex is prohibited across the non-playable portion unless a railroad line or Ferry exist at that hexside (see Galveston, TX and Simmesport, LA).
5.8 Rivers and Movement(5.8.1) Types: There are two types of rivers in this game:• MinorRivers(5.8.2)• NavigableRivers(5.8.3).**TheMississippiandOhioRiversareclassifiedasType2NavigableRiverswhichonlyaffectsNavalControl(20.1.3).Formovementandcombat purposes the two types of Navigable Rivers are identical and are collectively called Navigable Rivers.
(5.8.2) Minor Rivers: Crossing a Minor River hexside without a bridge costs +1 MP; crossing at a bridge has no extra cost (+0 MPs). Bridges exist wherever a Road or Railroad crosses a river. (5.8.3) Navigable Rivers: The cost to cross a Navigable River hexside depends on whether the enemy player has Naval Control over that hexside:• Enemy-Controlled: It costs +2 MPs to cross a Navigable River
hexside where your opponent has Naval Control. Furthermore, no more than 1 SP (and any number of Generals) may cross such a hexside per Activation.
DESIGN NOTE: Enemy-controlled Navigable Rivers are formidable barriers except to 1 SP forces.
• Friendly-Controlled or Uncontrolled: It costs +1 MP to cross a Navigable River hexside where the moving player has Naval Control or if neither player has Naval Control (see 20.1).
• Seealso11.5forattackingacrossaNavigableRiver.(5.8.4) Rivers Inside Hexes: IgnoreMinorRiversthatflowthroughthe middle of a hex—the importance of the river as a barrier to move-ment is canceled by the Marsh terrain or Town in the hex. Navigable
THE U.S. CIVIL WAR6
© 2015 GMT Games, LLC—revised Mar. 2016
Riversthatflowthroughthemiddleofahex(e.g.,NewMadrid)can also be ignored by land units but can be used by Naval units.
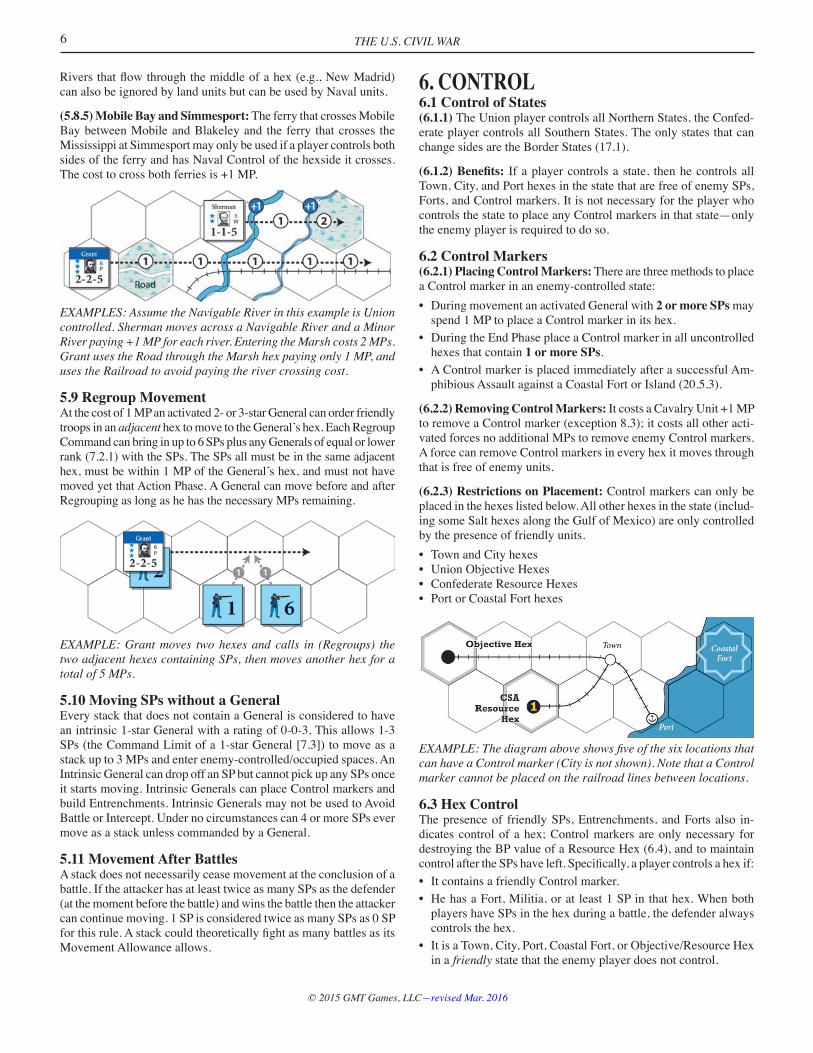
(5.8.5) Mobile Bay and Simmesport: The ferry that crosses Mobile Bay between Mobile and Blakeley and the ferry that crosses the Mississippi at Simmesport may only be used if a player controls both sides of the ferry and has Naval Control of the hexside it crosses. The cost to cross both ferries is +1 MP.
EXAMPLES: Assume the Navigable River in this example is Union controlled. Sherman moves across a Navigable River and a Minor Riverpaying+1MPforeachriver.EnteringtheMarshcosts2MPs.Grant uses the Road through the Marsh hex paying only 1 MP, and uses the Railroad to avoid paying the river crossing cost.
5.9 Regroup MovementAt the cost of 1 MP an activated 2- or 3-star General can order friendly troops in an adjacent hex to move to the General’s hex. Each Regroup Command can bring in up to 6 SPs plus any Generals of equal or lower rank (7.2.1) with the SPs. The SPs all must be in the same adjacent hex, must be within 1 MP of the General’s hex, and must not have moved yet that Action Phase. A General can move before and after Regrouping as long as he has the necessary MPs remaining.
EXAMPLE: Grant moves two hexes and calls in (Regroups) the two adjacent hexes containing SPs, then moves another hex for a total of 5 MPs.
5.10 Moving SPs without a GeneralEvery stack that does not contain a General is considered to have an intrinsic 1-star General with a rating of 0-0-3. This allows 1-3 SPs(theCommandLimitofa1-starGeneral[7.3])tomoveasastackupto3MPsandenterenemy-controlled/occupiedspaces.AnIntrinsic General can drop off an SP but cannot pick up any SPs once it starts moving. Intrinsic Generals can place Control markers and build Entrenchments. Intrinsic Generals may not be used to Avoid Battle or Intercept. Under no circumstances can 4 or more SPs ever move as a stack unless commanded by a General.
5.11 Movement After BattlesA stack does not necessarily cease movement at the conclusion of a battle. If the attacker has at least twice as many SPs as the defender (at the moment before the battle) and wins the battle then the attacker can continue moving. 1 SP is considered twice as many SPs as 0 SP forthisrule.AstackcouldtheoreticallyfightasmanybattlesasitsMovement Allowance allows.
6. CONTROL6.1 Control of States(6.1.1) The Union player controls all Northern States, the Confed-erate player controls all Southern States. The only states that can change sides are the Border States (17.1).
(6.1.2) Benefits: If a player controls a state, then he controls all Town, City, and Port hexes in the state that are free of enemy SPs, Forts, and Control markers. It is not necessary for the player who controls the state to place any Control markers in that state—only the enemy player is required to do so.
6.2 Control Markers(6.2.1) Placing Control Markers: There are three methods to place a Control marker in an enemy-controlled state:• DuringmovementanactivatedGeneralwith2 or more SPs may
spend 1 MP to place a Control marker in its hex.• DuringtheEndPhaseplaceaControlmarkerinalluncontrolled
hexes that contain 1 or more SPs.• AControlmarkerisplacedimmediatelyafterasuccessfulAm-
phibious Assault against a Coastal Fort or Island (20.5.3).
(6.2.2) Removing Control Markers: It costs a Cavalry Unit +1 MP to remove a Control marker (exception 8.3); it costs all other acti-vated forces no additional MPs to remove enemy Control markers. A force can remove Control markers in every hex it moves through that is free of enemy units.
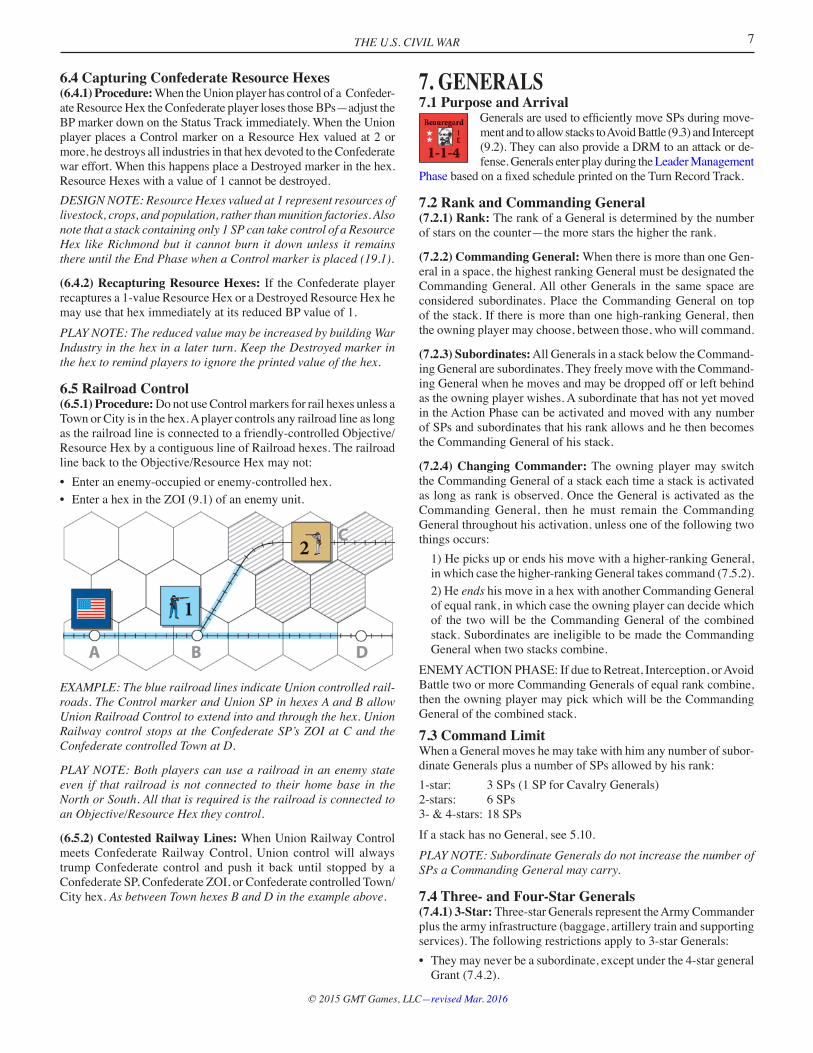
(6.2.3) Restrictions on Placement: Control markers can only be placed in the hexes listed below. All other hexes in the state (includ-ing some Salt hexes along the Gulf of Mexico) are only controlled by the presence of friendly units.• TownandCityhexes• UnionObjectiveHexes• ConfederateResourceHexes• PortorCoastalForthexes
EXAMPLE:Thediagramaboveshowsfiveofthesixlocationsthatcan have a Control marker (City is not shown). Note that a Control marker cannot be placed on the railroad lines between locations.
6.3 Hex ControlThe presence of friendly SPs, Entrenchments, and Forts also in-dicates control of a hex; Control markers are only necessary for destroying the BP value of a Resource Hex (6.4), and to maintain controlaftertheSPshaveleft.Specifically,aplayercontrolsahexif:• ItcontainsafriendlyControlmarker.• HehasaFort,Militia,oratleast1SPinthathex.Whenboth
players have SPs in the hex during a battle, the defender always controls the hex.
• ItisaTown,City,Port,CoastalFort,orObjective/ResourceHexin a friendly state that the enemy player does not control.
7
© 2015 GMT Games, LLC—revised Mar. 2016
THE U.S. CIVIL WAR
6.4 Capturing Confederate Resource Hexes(6.4.1) Procedure: When the Union player has control of a Confeder-ate Resource Hex the Confederate player loses those BPs—adjust the BP marker down on the Status Track immediately. When the Union player places a Control marker on a Resource Hex valued at 2 or more, he destroys all industries in that hex devoted to the Confederate war effort. When this happens place a Destroyed marker in the hex. Resource Hexes with a value of 1 cannot be destroyed.DESIGN NOTE: Resource Hexes valued at 1 represent resources of livestock, crops, and population, rather than munition factories. Also note that a stack containing only 1 SP can take control of a Resource Hex like Richmond but it cannot burn it down unless it remains there until the End Phase when a Control marker is placed (19.1).
(6.4.2) Recapturing Resource Hexes: If the Confederate player recaptures a 1-value Resource Hex or a Destroyed Resource Hex he may use that hex immediately at its reduced BP value of 1.PLAY NOTE: The reduced value may be increased by building War Industry in the hex in a later turn. Keep the Destroyed marker in the hex to remind players to ignore the printed value of the hex.
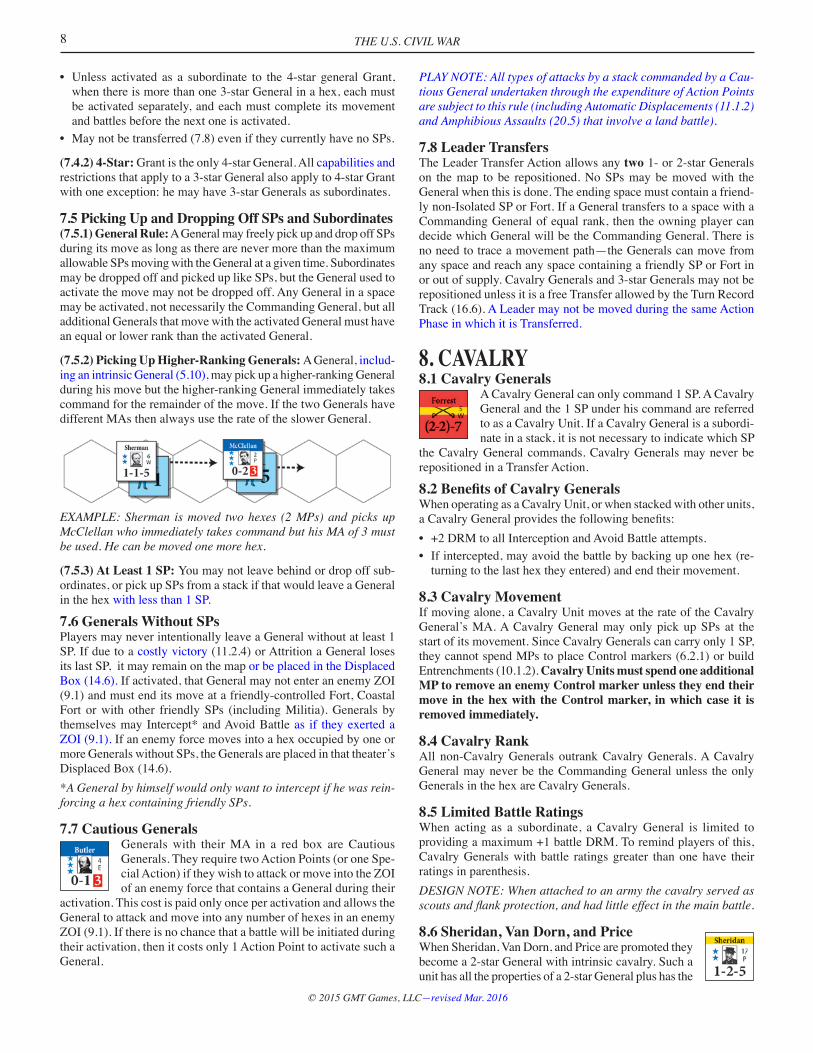
6.5 Railroad Control(6.5.1) Procedure: Do not use Control markers for rail hexes unless a Town or City is in the hex. A player controls any railroad line as long astherailroadlineisconnectedtoafriendly-controlledObjective/Resource Hex by a contiguous line of Railroad hexes. The railroad linebacktotheObjective/ResourceHexmaynot:• Enteranenemy-occupiedorenemy-controlledhex.• EnterahexintheZOI(9.1)ofanenemyunit.
EXAMPLE: The blue railroad lines indicate Union controlled rail-roads. The Control marker and Union SP in hexes A and B allow Union Railroad Control to extend into and through the hex. Union Railway control stops at the Confederate SP’s ZOI at C and the Confederate controlled Town at D.
PLAY NOTE: Both players can use a railroad in an enemy state even if that railroad is not connected to their home base in the NorthorSouth.Allthatisrequiredistherailroadisconnectedtoan Objective/Resource Hex they control.
(6.5.2) Contested Railway Lines: When Union Railway Control meets Confederate Railway Control, Union control will always trump Confederate control and push it back until stopped by a ConfederateSP,ConfederateZOI,orConfederatecontrolledTown/City hex. As between Town hexes B and D in the example above.
7. GENERALS7.1 Purpose and Arrival
GeneralsareusedtoefficientlymoveSPsduringmove-ment and to allow stacks to Avoid Battle (9.3) and Intercept (9.2). They can also provide a DRM to an attack or de-fense. Generals enter play during the Leader Management
PhasebasedonafixedscheduleprintedontheTurnRecordTrack.
7.2 Rank and Commanding General(7.2.1) Rank: The rank of a General is determined by the number of stars on the counter—the more stars the higher the rank.
(7.2.2) Commanding General: When there is more than one Gen-eral in a space, the highest ranking General must be designated the Commanding General. All other Generals in the same space are considered subordinates. Place the Commanding General on top of the stack. If there is more than one high-ranking General, then the owning player may choose, between those, who will command.
(7.2.3) Subordinates: All Generals in a stack below the Command-ing General are subordinates. They freely move with the Command-ing General when he moves and may be dropped off or left behind as the owning player wishes. A subordinate that has not yet moved in the Action Phase can be activated and moved with any number of SPs and subordinates that his rank allows and he then becomes the Commanding General of his stack.
(7.2.4) Changing Commander: The owning player may switch the Commanding General of a stack each time a stack is activated as long as rank is observed. Once the General is activated as the Commanding General, then he must remain the Commanding General throughout his activation, unless one of the following two things occurs: 1) He picks up or ends his move with a higher-ranking General,
in which case the higher-ranking General takes command (7.5.2). 2) He ends his move in a hex with another Commanding General
of equal rank, in which case the owning player can decide which of the two will be the Commanding General of the combined stack. Subordinates are ineligible to be made the Commanding General when two stacks combine.
ENEMY ACTION PHASE: If due to Retreat, Interception, or Avoid Battle two or more Commanding Generals of equal rank combine, then the owning player may pick which will be the Commanding General of the combined stack.
7.3 Command LimitWhen a General moves he may take with him any number of subor-dinate Generals plus a number of SPs allowed by his rank:1-star: 3 SPs (1 SP for Cavalry Generals)2-stars: 6 SPs3- & 4-stars: 18 SPsIf a stack has no General, see 5.10.PLAY NOTE: Subordinate Generals do not increase the number of SPs a Commanding General may carry.
7.4 Three- and Four-Star Generals(7.4.1) 3-Star: Three-star Generals represent the Army Commander plus the army infrastructure (baggage, artillery train and supporting services). The following restrictions apply to 3-star Generals:• Theymayneverbeasubordinate,exceptunderthe4-stargeneral
Grant (7.4.2).
THE U.S. CIVIL WAR8
© 2015 GMT Games, LLC—revised Mar. 2016
• Unless activated as a subordinate to the 4-star generalGrant,when there is more than one 3-star General in a hex, each must be activated separately, and each must complete its movement and battles before the next one is activated.
• Maynotbetransferred(7.8)eveniftheycurrentlyhavenoSPs.
(7.4.2) 4-Star: Grant is the only 4-star General. All capabilities and restrictions that apply to a 3-star General also apply to 4-star Grant with one exception: he may have 3-star Generals as subordinates.
7.5 Picking Up and Dropping Off SPs and Subordinates(7.5.1) General Rule: A General may freely pick up and drop off SPs during its move as long as there are never more than the maximum allowable SPs moving with the General at a given time. Subordinates may be dropped off and picked up like SPs, but the General used to activate the move may not be dropped off. Any General in a space may be activated, not necessarily the Commanding General, but all additional Generals that move with the activated General must have an equal or lower rank than the activated General.
(7.5.2) Picking Up Higher-Ranking Generals: A General, includ-ing an intrinsic General (5.10), may pick up a higher-ranking General during his move but the higher-ranking General immediately takes command for the remainder of the move. If the two Generals have different MAs then always use the rate of the slower General.
EXAMPLE:Sherman ismoved twohexes (2MPs)andpicksupMcClellan who immediately takes command but his MA of 3 must be used. He can be moved one more hex.
(7.5.3) At Least 1 SP: You may not leave behind or drop off sub-ordinates, or pick up SPs from a stack if that would leave a General in the hex with less than 1 SP.
7.6 Generals Without SPsPlayers may never intentionally leave a General without at least 1 SP. If due to a costly victory (11.2.4) or Attrition a General loses its last SP, it may remain on the map or be placed in the Displaced Box (14.6). If activated, that General may not enter an enemy ZOI (9.1) and must end its move at a friendly-controlled Fort, Coastal Fort or with other friendly SPs (including Militia). Generals by themselvesmayIntercept*andAvoidBattleas if they exerted a ZOI (9.1). If an enemy force moves into a hex occupied by one or more Generals without SPs, the Generals are placed in that theater’s Displaced Box (14.6). *A General by himself would only want to intercept if he was rein-forcing a hex containing friendly SPs.
7.7 Cautious GeneralsGenerals with their MA in a red box are Cautious Generals. They require two Action Points (or one Spe-cial Action) if they wish to attack or move into the ZOI of an enemy force that contains a General during their
activation. This cost is paid only once per activation and allows the General to attack and move into any number of hexes in an enemy ZOI (9.1). If there is no chance that a battle will be initiated during their activation, then it costs only 1 Action Point to activate such a General.
PLAY NOTE: All types of attacks by a stack commanded by a Cau-tious General undertaken through the expenditure of Action Points aresubjecttothisrule(includingAutomaticDisplacements(11.1.2)andAmphibiousAssaults(20.5)thatinvolvealandbattle).
7.8 Leader TransfersThe Leader Transfer Action allows any two 1- or 2-star Generals on the map to be repositioned. No SPs may be moved with the General when this is done. The ending space must contain a friend-ly non-Isolated SP or Fort. If a General transfers to a space with a Commanding General of equal rank, then the owning player can decide which General will be the Commanding General. There is no need to trace a movement path—the Generals can move from any space and reach any space containing a friendly SP or Fort in or out of supply. Cavalry Generals and 3-star Generals may not be repositioned unless it is a free Transfer allowed by the Turn Record Track (16.6). A Leader may not be moved during the same Action Phase in which it is Transferred.
8. CAVALRY8.1 Cavalry Generals
A Cavalry General can only command 1 SP. A Cavalry General and the 1 SP under his command are referred to as a Cavalry Unit. If a Cavalry General is a subordi-nate in a stack, it is not necessary to indicate which SP
the Cavalry General commands. Cavalry Generals may never be repositioned in a Transfer Action.
8.2 Benefits of Cavalry GeneralsWhen operating as a Cavalry Unit, or when stacked with other units, aCavalryGeneralprovidesthefollowingbenefits:• +2DRMtoallInterceptionandAvoidBattleattempts.• Ifintercepted,mayavoidthebattlebybackinguponehex(re-
turning to the last hex they entered) and end their movement.
8.3 Cavalry MovementIf moving alone, a Cavalry Unit moves at the rate of the Cavalry General’s MA. A Cavalry General may only pick up SPs at the start of its movement. Since Cavalry Generals can carry only 1 SP, they cannot spend MPs to place Control markers (6.2.1) or build Entrenchments (10.1.2). Cavalry Units must spend one additional MP to remove an enemy Control marker unless they end their move in the hex with the Control marker, in which case it is removed immediately.
8.4 Cavalry RankAll non-Cavalry Generals outrank Cavalry Generals. A Cavalry General may never be the Commanding General unless the only Generals in the hex are Cavalry Generals.
8.5 Limited Battle RatingsWhen acting as a subordinate, a Cavalry General is limited to providing a maximum +1 battle DRM. To remind players of this, Cavalry Generals with battle ratings greater than one have their ratings in parenthesis.DESIGN NOTE: When attached to an army the cavalry served as scoutsandflankprotection,andhadlittleeffectinthemainbattle.
8.6 Sheridan, Van Dorn, and PriceWhen Sheridan, Van Dorn, and Price are promoted they become a 2-star General with intrinsic cavalry. Such a unit has all the properties of a 2-star General plus has the
9
© 2015 GMT Games, LLC—revised Mar. 2016
THE U.S. CIVIL WAR
benefitsofaCavalryGeneral(8.2).AswithotherCavalryGenerals,they can no longer be Transferred (7.8).
8.7 Cavalry 1-Turn DelayIf a Cavalry General is sent to the Displaced Box it must spend the remainder of the turn, and the entire next turn, out of play. Flip the GeneraltoitsbacksidewhenitenterstheDisplacedBox,flipittoitsfrontsideinthefirstReinforcementPhase.InthenextReinforcementPhase it may re-enter play.
9. REACTION MOVEMENTImportant: Only the non-Phasing player may conduct Reaction Movement. This type of movement does not cost Action Points or expend MPs.
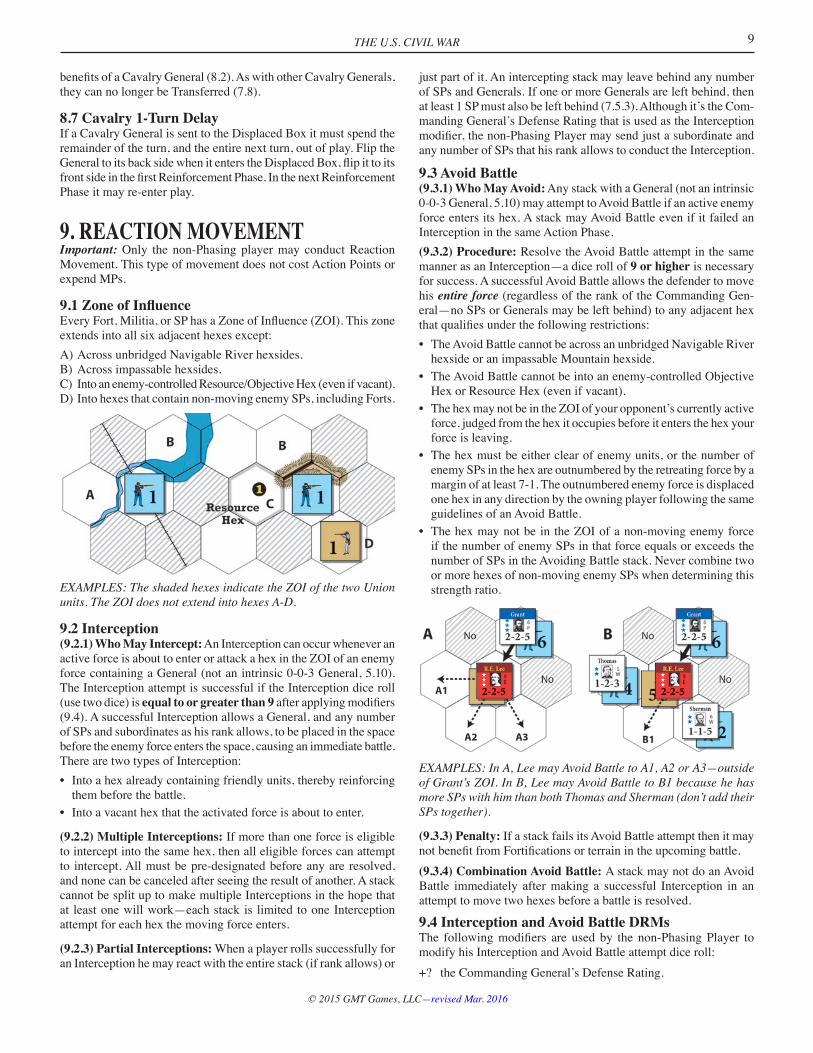
9.1 Zone of InfluenceEveryFort,Militia,orSPhasaZoneofInfluence(ZOI).Thiszoneextends into all six adjacent hexes except:A) Across unbridged Navigable River hexsides. B) Across impassable hexsides.C) Intoanenemy-controlledResource/ObjectiveHex(evenifvacant).D) Into hexes that contain non-moving enemy SPs, including Forts.
EXAMPLES: The shaded hexes indicate the ZOI of the two Union units. The ZOI does not extend into hexes A-D.
9.2 Interception(9.2.1) Who May Intercept: An Interception can occur whenever an active force is about to enter or attack a hex in the ZOI of an enemy force containing a General (not an intrinsic 0-0-3 General, 5.10). The Interception attempt is successful if the Interception dice roll (use two dice) is equal to or greater than 9afterapplyingmodifiers(9.4). A successful Interception allows a General, and any number of SPs and subordinates as his rank allows, to be placed in the space before the enemy force enters the space, causing an immediate battle. There are two types of Interception:• Intoahexalreadycontainingfriendlyunits,therebyreinforcing
them before the battle.• Intoavacanthexthattheactivatedforceisabouttoenter.
(9.2.2) Multiple Interceptions: If more than one force is eligible to intercept into the same hex, then all eligible forces can attempt to intercept. All must be pre-designated before any are resolved, and none can be canceled after seeing the result of another. A stack cannot be split up to make multiple Interceptions in the hope that at least one will work—each stack is limited to one Interception attempt for each hex the moving force enters.
(9.2.3) Partial Interceptions: When a player rolls successfully for an Interception he may react with the entire stack (if rank allows) or
just part of it. An intercepting stack may leave behind any number of SPs and Generals. If one or more Generals are left behind, then at least 1 SP must also be left behind (7.5.3). Although it’s the Com-manding General’s Defense Rating that is used as the Interception modifier,thenon-PhasingPlayermaysendjustasubordinateandany number of SPs that his rank allows to conduct the Interception.
9.3 Avoid Battle(9.3.1) Who May Avoid: Any stack with a General (not an intrinsic 0-0-3 General, 5.10) may attempt to Avoid Battle if an active enemy force enters its hex. A stack may Avoid Battle even if it failed an Interception in the same Action Phase. (9.3.2) Procedure: Resolve the Avoid Battle attempt in the same manner as an Interception—a dice roll of 9 or higher is necessary for success. A successful Avoid Battle allows the defender to move his entire force (regardless of the rank of the Commanding Gen-eral—no SPs or Generals may be left behind) to any adjacent hex thatqualifiesunderthefollowingrestrictions:• TheAvoidBattlecannotbeacrossanunbridgedNavigableRiver
hexside or an impassable Mountain hexside.• TheAvoidBattlecannotbeintoanenemy-controlledObjective
Hex or Resource Hex (even if vacant).• ThehexmaynotbeintheZOIofyouropponent’scurrentlyactive
force, judged from the hex it occupies before it enters the hex your force is leaving.
• Thehexmustbeeitherclearofenemyunits,orthenumberofenemy SPs in the hex are outnumbered by the retreating force by a margin of at least 7-1. The outnumbered enemy force is displaced one hex in any direction by the owning player following the same guidelines of an Avoid Battle.
• ThehexmaynotbeintheZOIofanon-movingenemyforceif the number of enemy SPs in that force equals or exceeds the number of SPs in the Avoiding Battle stack. Never combine two or more hexes of non-moving enemy SPs when determining this strength ratio.
EXAMPLES:InA,LeemayAvoidBattletoA1,A2orA3—outsideof Grant’s ZOI. In B, Lee may Avoid Battle to B1 because he has more SPs with him than both Thomas and Sherman (don’t add their SPs together).
(9.3.3) Penalty: If a stack fails its Avoid Battle attempt then it may notbenefitfromFortificationsorterrainintheupcomingbattle.(9.3.4) Combination Avoid Battle: A stack may not do an Avoid Battle immediately after making a successful Interception in an attempt to move two hexes before a battle is resolved.
9.4 Interception and Avoid Battle DRMsThe followingmodifiers are used by the non-PhasingPlayer tomodify his Interception and Avoid Battle attempt dice roll:+? the Commanding General’s Defense Rating.
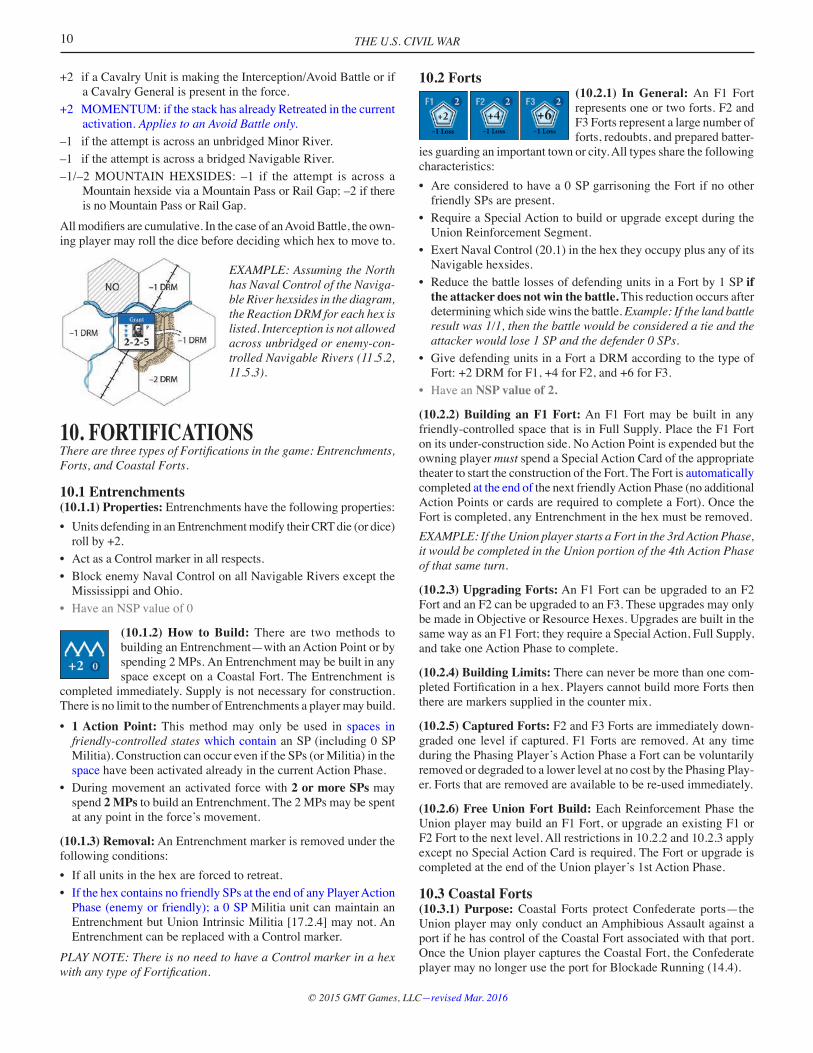
THE U.S. CIVIL WAR10
© 2015 GMT Games, LLC—revised Mar. 2016
+2 ifaCavalryUnitismakingtheInterception/AvoidBattleorifa Cavalry General is present in the force.
+2 MOMENTUM: if the stack has already Retreated in the current activation. Applies to an Avoid Battle only.
–1 if the attempt is across an unbridged Minor River.–1 if the attempt is across a bridged Navigable River. –1/–2MOUNTAINHEXSIDES: –1 if the attempt is across a
Mountain hexside via a Mountain Pass or Rail Gap; –2 if there is no Mountain Pass or Rail Gap.
Allmodifiersarecumulative.InthecaseofanAvoidBattle,theown-ing player may roll the dice before deciding which hex to move to.
EXAMPLE: Assuming the North has Naval Control of the Naviga-ble River hexsides in the diagram, the Reaction DRM for each hex is listed. Interception is not allowed across unbridged or enemy-con-trolledNavigableRivers(11.5.2,11.5.3).
10. FORTIFICATIONSTherearethreetypesofFortificationsinthegame:Entrenchments,Forts, and Coastal Forts.
10.1 Entrenchments(10.1.1) Properties: Entrenchments have the following properties:• Units defending in an Entrenchment modify their CRT die (or dice)
roll by +2.• ActasaControlmarkerinallrespects.• BlockenemyNavalControlonallNavigableRiversexceptthe
Mississippi and Ohio.• HaveanNSPvalueof0
(10.1.2) How to Build: There are two methods to building an Entrenchment—with an Action Point or by spending 2 MPs. An Entrenchment may be built in any space except on a Coastal Fort. The Entrenchment is
completed immediately. Supply is not necessary for construction. There is no limit to the number of Entrenchments a player may build. • 1 Action Point: This method may only be used in spaces in
friendly-controlled states which contain an SP (including 0 SP Militia). Construction can occur even if the SPs (or Militia) in the space have been activated already in the current Action Phase.
• During movement an activated force with 2 or more SPs may spend 2 MPs to build an Entrenchment. The 2 MPs may be spent at any point in the force’s movement.
(10.1.3) Removal: An Entrenchment marker is removed under the following conditions:• Ifallunitsinthehexareforcedtoretreat.• If the hex contains no friendly SPs at the end of any Player Action
Phase (enemy or friendly); a 0 SP Militia unit can maintain an EntrenchmentbutUnionIntrinsicMilitia[17.2.4]maynot.AnEntrenchment can be replaced with a Control marker.
PLAY NOTE: There is no need to have a Control marker in a hex withanytypeofFortification.
10.2 Forts(10.2.1) In General: An F1 Fort represents one or two forts. F2 and F3 Forts represent a large number of forts, redoubts, and prepared batter-
ies guarding an important town or city. All types share the following characteristics:• Areconsideredtohavea0SPgarrisoningtheFortifnoother
friendly SPs are present.• RequireaSpecialActiontobuildorupgradeexceptduringthe
Union Reinforcement Segment.• ExertNavalControl(20.1)inthehextheyoccupyplusanyofits
Navigable hexsides.• ReducethebattlelossesofdefendingunitsinaFortby1SPif
the attacker does not win the battle. This reduction occurs after determining which side wins the battle. Example: If the land battle result was 1/1, then the battle would be considered a tie and the attacker would lose 1 SP and the defender 0 SPs.
• GivedefendingunitsinaFortaDRMaccordingtothetypeofFort: +2 DRM for F1, +4 for F2, and +6 for F3.
• HaveanNSP value of 2.
(10.2.2) Building an F1 Fort: An F1 Fort may be built in any friendly-controlled space that is in Full Supply. Place the F1 Fort on its under-construction side. No Action Point is expended but the owning player must spend a Special Action Card of the appropriate theater to start the construction of the Fort. The Fort is automatically completed at the end of the next friendly Action Phase (no additional Action Points or cards are required to complete a Fort). Once the Fort is completed, any Entrenchment in the hex must be removed. EXAMPLE: If the Union player starts a Fort in the 3rd Action Phase, it would be completed in the Union portion of the 4th Action Phase of that same turn.
(10.2.3) Upgrading Forts: An F1 Fort can be upgraded to an F2 Fort and an F2 can be upgraded to an F3. These upgrades may only be made in Objective or Resource Hexes. Upgrades are built in the same way as an F1 Fort; they require a Special Action, Full Supply, and take one Action Phase to complete.
(10.2.4) Building Limits: There can never be more than one com-pletedFortificationinahex.PlayerscannotbuildmoreFortsthenthere are markers supplied in the counter mix.
(10.2.5) Captured Forts: F2 and F3 Forts are immediately down-graded one level if captured. F1 Forts are removed. At any time during the Phasing Player’s Action Phase a Fort can be voluntarily removed or degraded to a lower level at no cost by the Phasing Play-er. Forts that are removed are available to be re-used immediately.
(10.2.6) Free Union Fort Build: Each Reinforcement Phase the Union player may build an F1 Fort, or upgrade an existing F1 or F2 Fort to the next level. All restrictions in 10.2.2 and 10.2.3 apply except no Special Action Card is required. The Fort or upgrade is completed at the end of the Union player’s 1st Action Phase.
10.3 Coastal Forts(10.3.1) Purpose: Coastal Forts protect Confederate ports—the Union player may only conduct an Amphibious Assault against a port if he has control of the Coastal Fort associated with that port. Once the Union player captures the Coastal Fort, the Confederate player may no longer use the port for Blockade Running (14.4).

11
© 2015 GMT Games, LLC—revised Mar. 2016
THE U.S. CIVIL WAR
(10.3.2) Properties: There are no Coastal Fort counters—the Forts are printed on the map. Coastal Forts are never destroyed, they just change sides. Coastal Forts have the following properties:• MOVEMENT:LandmovementtoandfromaCoastalFortisonly
allowed via its associated Ocean Port. Land movement between these two spaces costs 1 MP.
• STACKING:Bothsidesare limited to stacking3SPs ineachCoastal Fort.
• REACTION:Ifthenon-PhasingPlayercontrolsboththeCoastalFort and its associated port, then Interception and Avoid Battle is automatically successful between the two spaces and does not require a General or a dice roll.
• PORTS:AllCoastalFortsareconsideredOceanPorts(20.2.1).• COMBAT:Same as a F1 Fort (+2 DRM and reduce battle losses
of defending units by 1 SP if attacker does not win the battle).• SUPPLY:ConfederateunitsinsideaCoastalFortareinsupply
as long as the associated port is also in supply. Union units are always in Full Supply in a captured Coastal Fort.
• NAVALCOMBAT:CoastalFortshaveanNSP strength of 4. This value cannot be reduced, even after capture.
(10.3.3) Attacking a Coastal Fort by Sea: In the Basic Game the Union player must play a “Naval” or “Any” Special Action Card to conduct an Amphibious Assault. The defenders in the Coastal Fort receive the +2 DRM for the Fort plus the Commanding General’s (if any) Defense Rating. The Union player (always limited to 3 SPs in an Amphibious Assault) will get the Commanding General’s Attack Rating and possibly +1 for Naval Support (21.3).
(10.3.4) Attacking a Coastal Fort from Land: This is resolved in the same way as attacking across a Navigable River (11.5). The same rules apply if units are attacking the port hex from the Coastal Fort.
(10.3.5) Surrender of Coastal Forts: If the Port that is associated with a Confederate controlled Coastal Fort is captured (or con-trolled) by the Union player, then roll for the Surrender (13.6) of the Coastal Fort in the Supply Segment of each CSA Action Phase until the Coastal Fort Surrenders or the associated Port is no longer Union controlled.
11. BATTLE11.1 In General(11.1.1) How a Battle is Initiated: A battle is initiated when the moving player moves a force into a hex containing an enemy Fort, Coastal Fort or SPs and those enemy SPs do not, cannot, or fail to Avoid Battle. The movement of the active force is suspended and a battle is resolved immediately. The moving (activated) force is always the attacker and the non-moving force is always the defender, regardless of Interceptions or the overall strategic situation.
(11.1.2) Automatic Displacement: If the attacker has 7:1 odds against the defender, then no battle takes place and the defender’s SPs and Generals are placed in that theater’s Displaced Box and any Forts are Captured (10.2.5) and any Entrenchments are removed. The attacker may continue moving if the stack has any MPs remaining. If the defender’s force consist of only a 0 SP Militia and/or an un-occupied Fort or Coastal Fort, then only 4 SPs is required to achieve 7:1 odds. Do not count DRMs when calculating the 7:1 odds.
11.2 Battle Resolution(11.2.1) Procedure:STEP 1: Each player counts up the number of SPs in their force and findsthecolumnontheCRTthatcorrespondstothatamount.Thecolumn on the CRT also determines how many dice that player uses.STEP 2: Players then determine their DRMs (11.4).STEP3:Eachplayerrollsadie(ordice),modifiesitascalculatedin Step 2, and then consults the CRT. The CRT indicates the number of SPs the opponent’s force loses in the battle.STEP4:EachsideremovesthespecifiednumberofSPs.STEP 5: The loser of the battle is Demoralized (12.2) and must retreat (11.6).
(11.2.2) Determine Who Won the Battle: The side that took the most losses on the CRT (not those actually taken) loses the battle; the other player wins the battle. CRT Results with an asterisk or diamond “◊”willbeatthesamenumberwithouttheasteriskordiamond,withthe asterisk ranking higher than a diamond. For example a 1* beats a 1◊,anda 1◊beats a 1. TIES: In the case where both sides rolled the same result, neither side wins, but the attacker must back up to the space it entered the battle from. See 13.1.5 for the effects of supply in Tied Battles.
(11.2.3) If the Winner is Eliminated: The elimination of the winner does not change who won. If the attacker wins but is eliminated, the defender is still required to retreat. Likewise, if the defender in the battle wins but is totally eliminated, the attacker still retreats.
(11.2.4) Displacement of Generals: If all the SPs in a defeated force are eliminated in battle, all Generals in the defeated stack are placed in that theater’s Displaced Box (14.6) and brought back into play during the next Reinforcement Phase. If all SPs in a victorious force are eliminated, the owning player has the choice of displacing the Generals or keeping them on the map in the battle hex. For this rule only, a Tied Battle is considered a victory for both sides.
11.3 Battle RatingsEach General has an Attack and a Defense Rating. These ratings are used as a DRM for battle resolution. The number of Generals that may be used in each battle is determined by the number of SPs in the force: 0-6 = The Commanding General only. 7-12 = The Commanding General plus one other friendly General
in the hex (owner’s choice and any rank). 13+ = The Commanding General plus two other friendly Generals
in the hex (owner’s choice and any rank).
The attacker uses his Attack Ratings and the defender uses his Defense Ratings.PLAY NOTE: Even though a 3-star General may not be a subordi-nate for movement purposes, it is possible for the defender to have two or more in a hex at the same time. If this happens, the 3-star Generals that are not the Commanding General may be subordinates for the battle.
THE U.S. CIVIL WAR12
© 2015 GMT Games, LLC—revised Mar. 2016
11.4 Battle Resolution Die Roll Modifiers ATTACKER’S DRMs: –2 Attacking when Demoralized (12.2). +? Commanding General’s Attack Rating plus any subordinate
ratings that are allowed per 11.3. +2 For a Special Action Card used for a Battle DRM (18.1). +1 Naval Support (21.3)
DEFENDER’S DRMs: +? Commanding General’s Defense Rating plus any subordinate
ratings that are allowed per 11.3. +2 DefendinginanEntrenchmentorCoastalFort.* +? DefendinginaFort(+2/+4/+6).* +1 The attacker is attacking across a Mountain hexside, Rail Gap,
orMountainPass.* +1 The attacker is attacking across a River (Minor or Navigable)
orintooroutofaMarshhexwithorwithoutaRoad.* +1 Naval Support (21.3)*Important: Fortificationbenefitsand terrainbenefitsarenevercumulative—youcanuseeitheraFortification(EntrenchmentorFort) or one terrain type, not both.
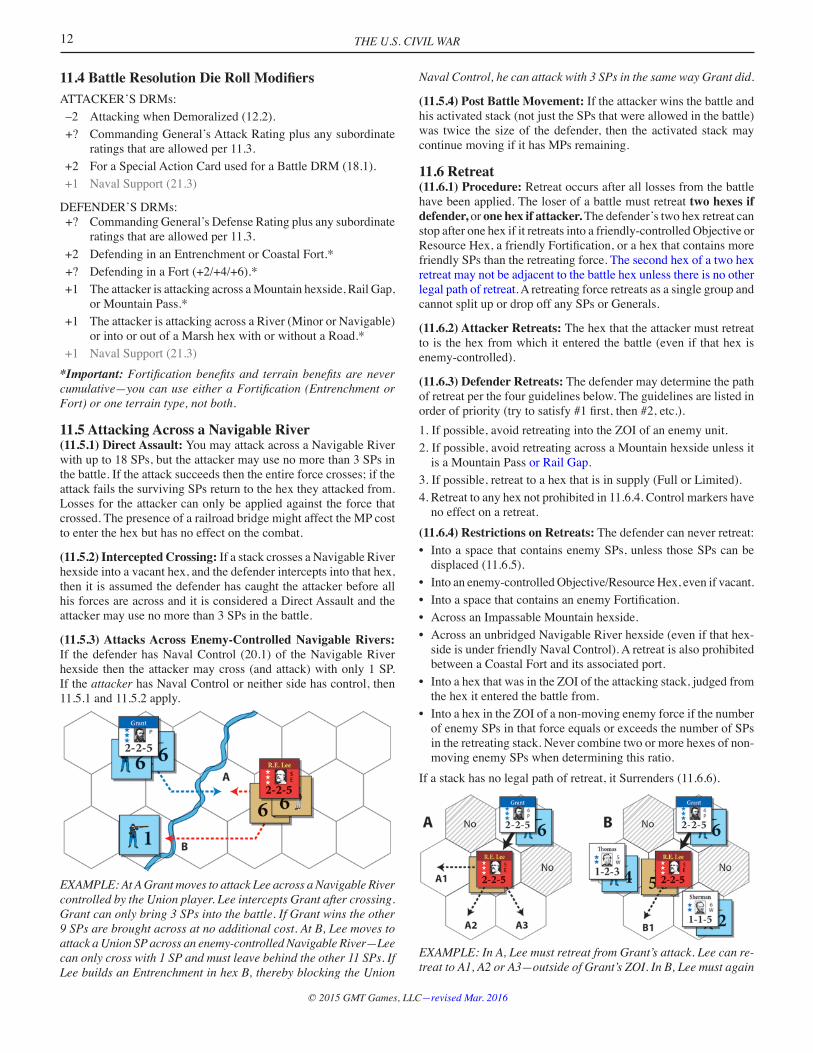
11.5 Attacking Across a Navigable River(11.5.1) Direct Assault: You may attack across a Navigable River with up to 18 SPs, but the attacker may use no more than 3 SPs in the battle. If the attack succeeds then the entire force crosses; if the attack fails the surviving SPs return to the hex they attacked from. Losses for the attacker can only be applied against the force that crossed. The presence of a railroad bridge might affect the MP cost to enter the hex but has no effect on the combat.
(11.5.2) Intercepted Crossing: If a stack crosses a Navigable River hexside into a vacant hex, and the defender intercepts into that hex, then it is assumed the defender has caught the attacker before all his forces are across and it is considered a Direct Assault and the attacker may use no more than 3 SPs in the battle.
(11.5.3) Attacks Across Enemy-Controlled Navigable Rivers: If the defender has Naval Control (20.1) of the Navigable River hexside then the attacker may cross (and attack) with only 1 SP. If the attacker has Naval Control or neither side has control, then 11.5.1 and 11.5.2 apply.
EXAMPLE: At A Grant moves to attack Lee across a Navigable River controlled by the Union player. Lee intercepts Grant after crossing. Grant can only bring 3 SPs into the battle. If Grant wins the other 9 SPs are brought across at no additional cost. At B, Lee moves to attack a Union SP across an enemy-controlled Navigable River—Lee can only cross with 1 SP and must leave behind the other 11 SPs. If Lee builds an Entrenchment in hex B, thereby blocking the Union
Naval Control, he can attack with 3 SPs in the same way Grant did.
(11.5.4) Post Battle Movement: If the attacker wins the battle and his activated stack (not just the SPs that were allowed in the battle) was twice the size of the defender, then the activated stack may continue moving if it has MPs remaining.
11.6 Retreat(11.6.1) Procedure: Retreat occurs after all losses from the battle have been applied. The loser of a battle must retreat two hexes if defender, or one hex if attacker. The defender’s two hex retreat can stop after one hex if it retreats into a friendly-controlled Objective or ResourceHex,afriendlyFortification,orahexthatcontainsmorefriendly SPs than the retreating force. The second hex of a two hex retreat may not be adjacent to the battle hex unless there is no other legal path of retreat. A retreating force retreats as a single group and cannot split up or drop off any SPs or Generals.
(11.6.2) Attacker Retreats: The hex that the attacker must retreat to is the hex from which it entered the battle (even if that hex is enemy-controlled).
(11.6.3) Defender Retreats: The defender may determine the path of retreat per the four guidelines below. The guidelines are listed in orderofpriority(trytosatisfy#1first,then#2,etc.).1. If possible, avoid retreating into the ZOI of an enemy unit. 2. If possible, avoid retreating across a Mountain hexside unless it
is a Mountain Pass or Rail Gap.3. If possible, retreat to a hex that is in supply (Full or Limited).4. Retreat to any hex not prohibited in 11.6.4. Control markers have
no effect on a retreat.(11.6.4) Restrictions on Retreats: The defender can never retreat:• IntoaspacethatcontainsenemySPs,unlessthoseSPscanbe
displaced (11.6.5).• Intoanenemy-controlledObjective/ResourceHex,evenifvacant.• IntoaspacethatcontainsanenemyFortification.• AcrossanImpassableMountainhexside.• AcrossanunbridgedNavigableRiverhexside(evenifthathex-
side is under friendly Naval Control). A retreat is also prohibited between a Coastal Fort and its associated port.
• IntoahexthatwasintheZOIoftheattackingstack,judgedfromthe hex it entered the battle from.
• IntoahexintheZOIofanon-movingenemyforceifthenumberof enemy SPs in that force equals or exceeds the number of SPs in the retreating stack. Never combine two or more hexes of non-moving enemy SPs when determining this ratio.
If a stack has no legal path of retreat, it Surrenders (11.6.6).
EXAMPLE: In A, Lee must retreat from Grant’s attack. Lee can re-treattoA1,A2orA3—outsideofGrant’sZOI.InB,Leemustagain

13
© 2015 GMT Games, LLC—revised Mar. 2016
THE U.S. CIVIL WAR
retreat; but this time he only has one choice (B1) which is allowed since Lee has more SPs than Thomas or Sherman.(11.6.5) Displacing an Enemy Force in Retreat: If the retreating force has 7 times as many SPs as the enemy force, and that enemy force is not in a Fort, the retreating force may push the smaller force out of the way. The force that is pushed is moved one hex by the owning player following all the restrictions of Avoid Battle.(11.6.6) Surrender: If a force cannot Retreat, then it Surrenders—the SPs are eliminated and the Generals are placed in that theater’s Displaced Box (they have escaped).
12. DEMORALIZATION AND RALLY12.1 In GeneralSPs become Demoralized due to combat. SPs that have an LOC to a Supply Source can recover (Rally) from Demoralization. Generals, Forts, Militia, and markers are never affected by Demoralization.
12.2 DemoralizedAny time a force loses a battle, suffers Heavy Losses (12.3), or is Tied in a battle without Full Supply (13.1) it becomes Demoralized and must be marked with a Demoralized marker. A Demoralized force suffers the
following penalties:• –2DRMwhenattacking. • IfDemoralizedagain,thestackloses1additionalSP.Ifthestack
does not have 1 SP to lose (the stack was eliminated, or contained only a Fort or Militia) then ignore the extra loss.
• Ifitendsitsmoveorretreatinahexwithotherfriendlyunits,itcauses those units to also become Demoralized.
PLAY NOTE: A Demoralized stack defends at full strength.
12.3 Heavy LossesAny time the attacker or defender loses 3 or more SPs in a battle it becomes Demoralized (even if it wins the battle). Ignore this effect if the stack is already Demoralized or will be Demoralized from the battle—Heavy Losses never causes an additional step loss.
12.4 Abilities of Demoralized UnitsA Demoralized force defends at full strength and may move, Avoid Battle, and Intercept normally. Any time a General leaves a stack of Demoralized units, the General immediately recovers; in effect, Demoralization only affects the SPs in the stack.
12.5 Rally(12.5.1) Rally removes the Demoralized marker from a stack. There are two methods of Rally:
(12.5.2) Action Phase Rally: It costs 1 Action Point to Rally a stack in the Action Phase. Only stacks that have an LOC to a Sup-ply Source may Rally. Units may either Rally or move in the same Action Phase—they cannot do both.
(12.5.3) End of Turn Rally: At the end of the Game Turn (3.5.B), all Demoralized units that have an LOC to a Supply Source imme-diately Rally at no cost in Action Points. Those stacks that do not have an LOC to a Supply Source remain Demoralized.
13. SUPPLY13.1 Supply Determination and Effects(13.1.1) Types of Supply: Units can be in one of three supply states: Full Supply, Limited Supply, or Out of Supply. Units are in Full Supply if they can trace a Supply Path (13.4); units are in Limited Supply if they can’t trace a Supply Path but can trace an LOC (13.5) to a Supply Source; units are Out of Supply if they cannot trace either. In these rules, the term “in supply” refers to a unit that is either in Full or Limited Supply.
(13.1.2) Out of Supply Effects: Units that are Out of Supply suffer the following penalties:• TheymaynotRally(12.5).SupplyisjudgedatthemomentofRally.• IfOutofSupplyduring theowningplayer’sSupplySegment,
then place a Foraging marker on the stack (13.2.1).• TheysufferAttrition(13.2.2).• TheymustrollforSurrenderiftheycannottraceanLOCofany
length (regardless of Depots) to a Primary Supply Source.PLAY NOTE: A stack can suffer both Attrition and a Surrender Check in the same Supply Segment.
(13.1.3) Limited Supply: Units need Limited Supply to avoid the penalties above. In addition, Limited Supply provides the following benefits:• TheymayreceiveSPsviaStrategicRoadMovement(15.5).• ReinforcementsmaybeplacedinObjective/ResourceHexesthat
have an LOC to a Primary Supply Source.
(13.1.4) Full Supply: Full Supply is needed:• TobuildaFort(10.2.2).• ToavoidbecomingDemoralizedinaTiedBattle(13.1.5).• ToplaceaNavalUnitreinforcement(21.9,21.10).
(13.1.5) Tied Battles: If the attacker or defender is not in Full Supply in a Tied Battle they become Demoralized. If already De-moralized, then the force loses one additional SP. The Supply Path for the attacker is determined after he retreats back to the hex he attacked from. The Supply Path for the defender is determined after the attacker retreats.
13.2 Foraging Markers and Attrition(13.2.1) Foraging Markers: Thismarkersignifiesthatthe force is not concentrated, but rather spread out to better sustain itself on the countryside. The marker is only received or removed in the owning player’s Supply
Segment. If a stack is Out of Supply at this time, the stack receives a Foraging marker. If a stack has a Foraging marker from a previous Action Phase, but is now no longer Out of Supply, the marker is removed. The marker has the following effects:• Ifthestack,orsubsetofthestack,isactivateditsMAisreduced
by 1 MP.• ItcostsoneadditionalMPtopickupunitsfromastackthathas
a Foraging marker.• Ifattacked,thestacksuffersonecolumnshift leftontheCRT
when making their roll. If this shift forces it into a column that supports one less General, then the defender must abide by the new leader limit.
EXAMPLE: A stack of 7 SPs with a Foraging marker would use the 6 column of the CRT and use only one general and 1 die.
THE U.S. CIVIL WAR14
© 2015 GMT Games, LLC—revised Mar. 2016
• AstacksuffersnopenaltyifitattackswithaForagingmarkersince the –1 MP penalty implies the stack is again concentrated and ready for battle.
(13.2.2) Supply Attrition: All friendly stacks with a Foraging marker (even those that just received the marker) suffer Attrition during the Supply Segment. Use the Attrition Table to determine the number of SPs Displaced for each applicable stack. Modify the dierollbythefollowingmodifiers:–? The Commanding General’s Attack Rating+2 If the SPs are DemoralizedSEASON MODIFIERS:+3 During a Winter turn+1 During a Spring or Fall turnTERRAIN MODIFIERS:+1 If the stack is in a Woods hex+2 If the stack is in a Mountain or a non-City Marsh hexAllmodifiersarecumulative.DisplacedSPsareplacedintheDis-placed Box. If the Commanding General loses all his SPs the owning player has the choice of displacing the General(s) or keeping them on the map (see 7.6).
13.3 Supply Sources(13.3.1) Primary Union Supply Sources: Union supply is available at any of the following:• Anyrailroadhexalongthenorthmapedgethatexitsoffthenorth
map edge.• AnyUnioncontrolledOcean Port where the access to the sea
(Atlantic Ocean or Gulf) via Navigable Waterways (20.1.2) does not pass a Confederate controlled Coastal Fort, Fort, Naval Battery or Naval Unit.
• AnyUnioncontrolledCityorstate/nationalcapitalthatislocatedin a Northern or Border State that has an LOC to another Union controlled Objective Hex (this second Objective Hex does not need to be a City or state capital). Note: There are no Objective Hexes in West Virginia—those are Resource Hexes.
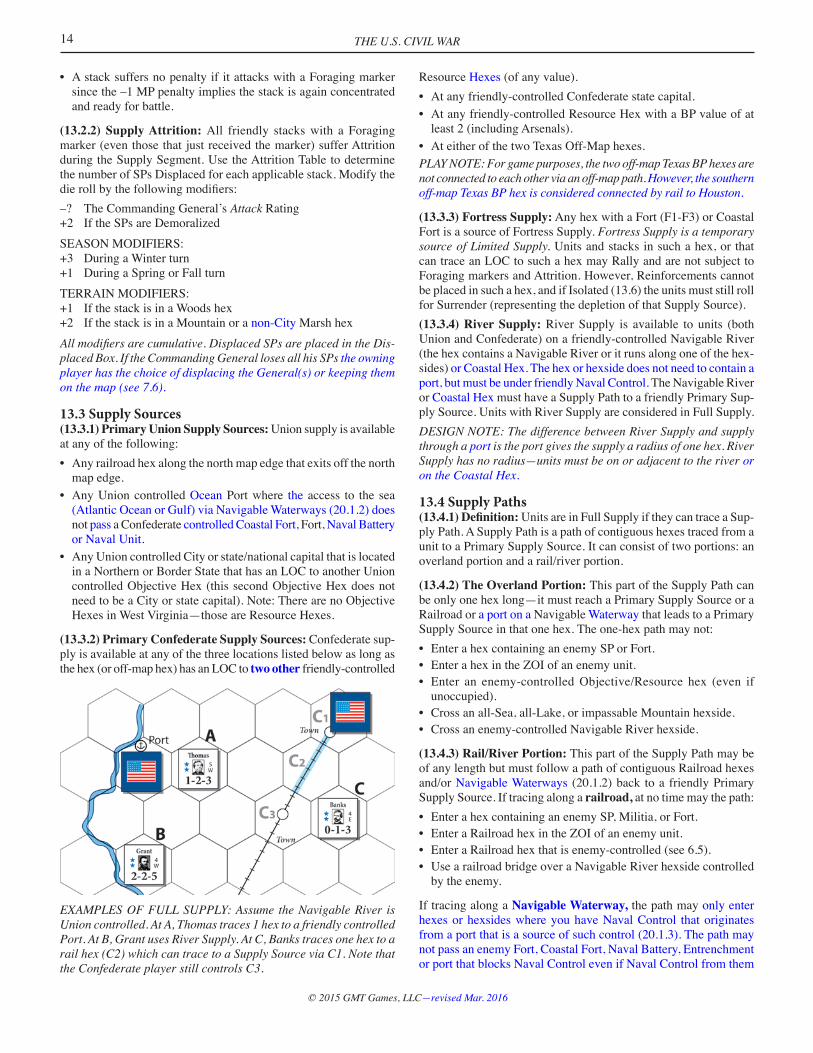
(13.3.2) Primary Confederate Supply Sources: Confederate sup-ply is available at any of the three locations listed below as long as the hex (or off-map hex) has an LOC to two other friendly-controlled
Resource Hexes (of any value).• Atanyfriendly-controlledConfederatestatecapital.• Atanyfriendly-controlledResourceHexwithaBPvalueofat
least 2 (including Arsenals).• AteitherofthetwoTexasOff-Maphexes.PLAY NOTE: For game purposes, the two off-map Texas BP hexes are not connected to each other via an off-map path. However, the southern off-map Texas BP hex is considered connected by rail to Houston.
(13.3.3) Fortress Supply: Any hex with a Fort (F1-F3) or Coastal Fort is a source of Fortress Supply. Fortress Supply is a temporary source of Limited Supply. Units and stacks in such a hex, or that can trace an LOC to such a hex may Rally and are not subject to Foraging markers and Attrition. However, Reinforcements cannot be placed in such a hex, and if Isolated (13.6) the units must still roll for Surrender (representing the depletion of that Supply Source).(13.3.4) River Supply: River Supply is available to units (both Union and Confederate) on a friendly-controlled Navigable River (the hex contains a Navigable River or it runs along one of the hex-sides) or Coastal Hex. The hex or hexside does not need to contain a port, but must be under friendly Naval Control. The Navigable River or Coastal Hex must have a Supply Path to a friendly Primary Sup-ply Source. Units with River Supply are considered in Full Supply. DESIGN NOTE: The difference between River Supply and supply through a port is the port gives the supply a radius of one hex. River Supply has no radius—units must be on or adjacent to the river or on the Coastal Hex.
13.4 Supply Paths(13.4.1) Definition: Units are in Full Supply if they can trace a Sup-ply Path. A Supply Path is a path of contiguous hexes traced from a unit to a Primary Supply Source. It can consist of two portions: an overlandportionandarail/riverportion.
(13.4.2) The Overland Portion: This part of the Supply Path can be only one hex long—it must reach a Primary Supply Source or a Railroad or a port on a Navigable Waterway that leads to a Primary Supply Source in that one hex. The one-hex path may not:• EnterahexcontaininganenemySPorFort.• EnterahexintheZOIofanenemyunit.• Enter an enemy-controlledObjective/Resource hex (even if
unoccupied).• Crossanall-Sea,all-Lake,orimpassableMountainhexside.• Crossanenemy-controlledNavigableRiverhexside.
(13.4.3) Rail/River Portion: This part of the Supply Path may be of any length but must follow a path of contiguous Railroad hexes and/orNavigable Waterways (20.1.2) back to a friendly Primary Supply Source. If tracing along a railroad, at no time may the path:• EnterahexcontaininganenemySP,Militia,orFort.• EnteraRailroadhexintheZOIofanenemyunit.• EnteraRailroadhexthatisenemy-controlled(see6.5).• UsearailroadbridgeoveraNavigableRiverhexsidecontrolled
by the enemy.
If tracing along a Navigable Waterway, the path may only enter hexes or hexsides where you have Naval Control that originates from a port that is a source of such control (20.1.3). The path may not pass an enemy Fort, Coastal Fort, Naval Battery, Entrenchment or port that blocks Naval Control even if Naval Control from them
EXAMPLES OF FULL SUPPLY: Assume the Navigable River is Union controlled. At A, Thomas traces 1 hex to a friendly controlled Port. At B, Grant uses River Supply. At C, Banks traces one hex to a railhex(C2)whichcantracetoaSupplySourceviaC1.Notethatthe Confederate player still controls C3.
15
© 2015 GMT Games, LLC—revised Mar. 2016
THE U.S. CIVIL WAR
has been trumped (20.1.5). PLAY NOTE: Due to Union Naval Control along the coast the CSA player would never be able to trace supply to the Ship Island and Atchafalaya Bay boxes. Palmico Sound (NC) is different, CSA supply is possible to Roanoke Island and Hatteras Inlet boxes if their Tidal River Path is connected to a port that is in supply.
(13.4.4) Combining Rail and Rivers: A Supply Path may use a combination of railroads and Navigable Waterways. A Supply Path that uses a railroad may only connect to a Navigable Waterway in a hex containing a friendly port. The opposite is also true: a Navigable River Supply Path may only connect to a railroad at a friendly port. There is no limit to the number of times that the Supply Path may switch back and forth from rail to Navigable Waterways.
13.5 Lines of Communications (LOC)(13.5.1) Purpose: Units need an LOC to be in Limited Supply.(13.5.2) Depots: LOCs are composed of a string of Depots. Any hex that contains either a friendly SP/Fort, or a friendly-controlled Town, City, or Port hex is considered a Depot.
(13.5.3) How To Trace an LOC: A unit has an LOC if it can trace 4 MPs to a friendly Depot which is either a Supply Source or is part of a network that leads to a Supply Source. A Depot projects an LOC 4 MPs from its location. So if the 4 MPs reaches another friendly Depot then the LOC is extended 4 more MPs from there. In such a manner an LOC can extend an unlimited distance as long as each segmentbetweenDepotsisnomorethan4MPs.ThefinalDepotin the network must be in Full Supply. No portion of the LOC may:• EnterahexcontaininganenemySPorFort.• EnterahexintheZOIofanenemyunit.• Enter an enemy-controlledObjective/Resource hex (even if
unoccupied).• Crossanall-Sea,all-Lake,orimpassableMountainhexside.• Crossanenemy-controlledNavigableRiverhexside.Segments between Depots can use contiguous Railroad hexes and Navigable Waterways (20.1.2) under the rules and restrictions for theRail/RiverPortionofSupplyPaths(13.4.3and13.4.4).Thistypeof segment can be of any length and is not subject to the normal 4 MP limit.
(13.5.4) Enemy-controlled Towns: As long as the Town is not an Objective/ResourceHex,anLOCcanbe traced throughanene-my-controlled Town hex at a cost of one additional MP.
13.6 Isolation and Surrender(13.6.1) In General: Any unit, Fort, Coastal Fort or stack that cannot trace a path of hexes of any length to a Primary Supply Source is Isolated. Use the same restrictions that are listed in the bullet-points of 13.5.3. Each Isolated unit or group of Isolated units must check for Surrender during the Supply Segment of each friendly Action Phase. Fortress Supply does not exempt a unit from a Surrender Check.
(13.6.2) Definition of an Isolated Group: An Isolated Group may be of any size, but each stack in the group must be able to trace a 4-MP LOC to at least one other unit in the Isolated Group. If units are part of a group then they will Surrender as a group. (13.6.3) Procedure: Roll one die for each Isolated Group and consult the Surrender Table. The result is the number of Surrender Points the Isolated Group accumulates. An Isolated Group Surrenders if it accumulates 3 or more Surrender Points. Surrendered units are
immediately removed from play (SPs and Entrenchments are elim-inated, Forts are Captured (10.2.5), and Generals and Militia are Displaced). When a Coastal Fort or unit, stack or Fort on an Island Surrenders, place the new owner’s Control marker there immediately.(13.6.4) Surrender Table: Roll one die for each Isolated Group andapplymodifiers.
SURRENDER TABLEDie Roll Results 1,2 3 3,4 2 5-7 1 8+ 0
Die Roll Modifiers+? Any one General’s Defense Rating.+2 IftheIsolatedGroupcontainsafriendly-controlledObjective/
Resource Hex containing a Fort (F1- F3).+1 Sameasabove,excepttheObjective/ResourceHexdoesnot
contain a Fort.Explanation of Results3 = Stack Surrenders immediately0,1,2 = Surrender Points incurred.
VICKSBURG EXAMPLE: A Confederate force of 6 SPs is in a fortified Vicksburg surrounded by Union forces. The CSA player rolls a 4 and consults the Surrender Table. Pemberton provides a +1 DRM, Vicks-burg provides a +2 DRM. The modified die roll is 7 which results in 1 Surrender Point against the stack in Vicksburg.
(13.6.5) Splitting and Combining Isolated Groups: If an Isolated Group splits into separate parts due to friendly or enemy action then each of the splinter groups becomes a separate group with its own Surrender Point marker. If two Isolated Groups combine then the combined group uses only the Surrender Points of the larger group. LargerisdefinedasthegroupwiththegreaternumberofSPs.Ifthetwo groups are identical in size, then use the greater of the Surrender Points. The Surrender Points are removed from an Isolated Group if during the friendly Supply Segment at least one unit in the group can trace an LOC of any length.
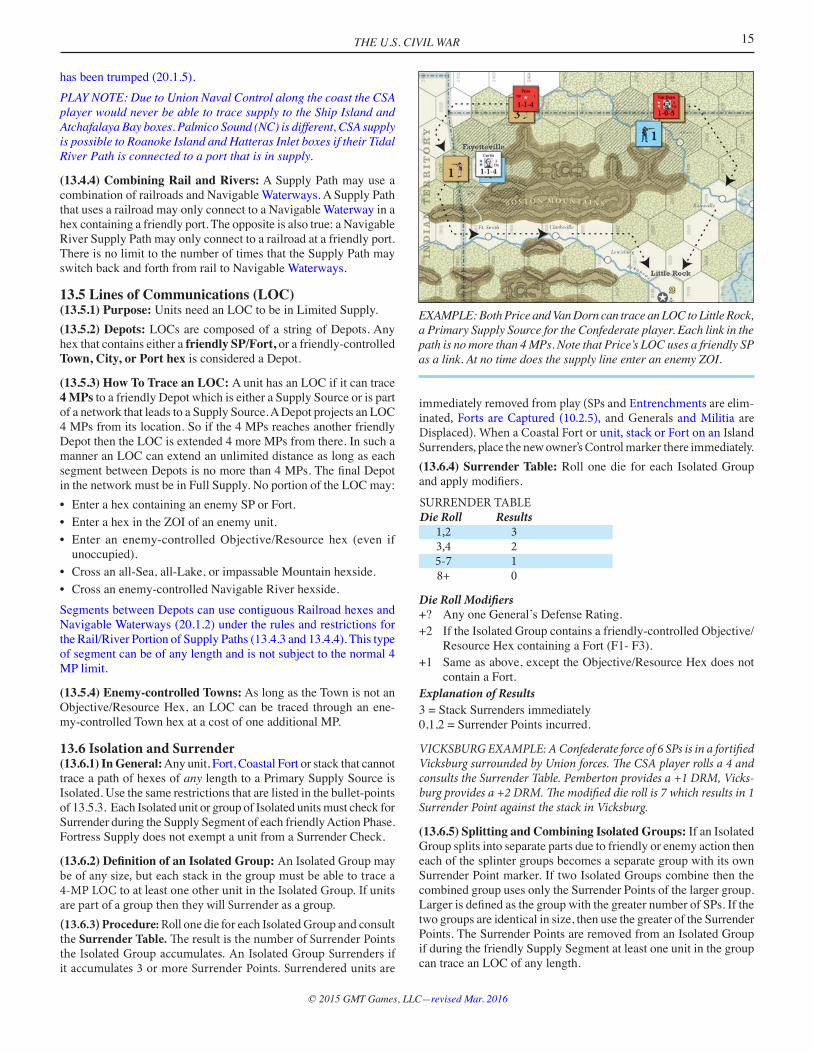
EXAMPLE: Both Price and Van Dorn can trace an LOC to Little Rock, a Primary Supply Source for the Confederate player. Each link in the path is no more than 4 MPs. Note that Price’s LOC uses a friendly SP as a link. At no time does the supply line enter an enemy ZOI.
THE U.S. CIVIL WAR16
© 2015 GMT Games, LLC—revised Mar. 2016
14. REINFORCEMENTS14.1 When(14.1.1) In General: Both sides receive new units and resources during the Reinforcement Phase of each non-Winter game turn.(14.1.2) Winter: During Winter turns the Union player receives no additional SPs, while the Confederate player must reduce his Reinforcements by 10 SPs. If this brings the Confederate reinforce-ments to a negative number, then that many non-Isolated SPs must be removed from the map (his choice). Both players still receive Naval Reinforcements, Naval Replacements, two Special Action Cards, and the Union player may upgrade or place a Fort. EXAMPLE: If after calculating BPs, the Confederate player is set to earn 8 SPs, then he would receive no new SPs and must remove 2existingSPsfromthemap.
14.2 Union Reinforcements(14.2.1) The Union player receives 14 SPs per non-Winter turn distributed between the East, West and Trans-Mississippi theaters. • EAST:TheUnionplayerreceives6 SPs which may be distributed
as the Union player wishes between Objective Hexes in the Eastern Theater and the Chesapeake Bay Holding Box (20.2.2).
• WEST:TheUnionplayerreceives6 SPs in the West which is divided into two areas— 3 SPs in any Objective Hexes in Ohio and Indiana and 3 SPs in any Objective Hexes in Illinois.
• TRANS-MISSISSIPPI:TheUnionplayerreceives2 SPs in St. Louis. If St. Louis is Confederate controlled then the SPs are lost.
(14.2.2) Placement Restrictions: Union Reinforcement SPs in the East and West must be placed in Union controlled Objective Hexes in Northern States that are in Full Supply. SPs can be placed adja-cent to enemy units since a CSA ZOI does not extend into a Union controlled Objective Hex. If no legal spaces are available then the SPs for that area are lost.
14.3 Confederate Reinforcements(14.3.1) In General: Confederate Reinforcements are generated by BuildPoints(BPs).Every10BPscanbuild1SP.Thefirst10BPsarealways devoted to Maintenance (14.3.4) and so are subtracted from the total. BPs come from Confederate Resource Hexes (14.3.2), Ar-senals (14.5), the Border States of Missouri and Kentucky (14.3.3), and Blockade Running (14.4). BPs may not be accumulated from turntoturn—anythatarenotusedarelosttograftandinflation.EXAMPLE:OnTurn2theConfederateplayergains96BPsfromResourceHexes, 2 BPs fromArsenals, 28BPs fromBlockadeRunnersand2BPsfromBorderStatesforatotalof128BPs.Aftersubtracting the 10 BPs for Maintenance he has 118 remaining. He can build 11 SPs. The 8 BPs remaining are lost.
(14.3.2) Confederate Resource Hexes: There are 100 BPs worth of Resource Hexes printed on the map. The amount of BPs a Resource Hex provides is printed in the hex. In the 1861 Scenario and Campaign Game,
Confederate BPs from Resource Hexes starts at 99 (Harper’s Ferry is Union controlled) and is reduced each time the Union player takes control of a Resource Hex. Keep track of BPs from Resource Hex-es with the Resource BPs markers. Do not include BPs from Arse-nals, the Border States of Missouri and Kentucky, or Blockade Running with this total.
(14.3.3) Border States: The Confederate player receives 2 BPs for each Objective Hex in Kentucky and Missouri that he controls. A
Supply Path or LOC back to a Confederate state is not necessary. No more than 8 BPs per Border State may be gained each turn.DESIGN NOTE: These BPs represent volunteers from
these states.
(14.3.4) Maintenance Cost: This value starts at 10 and canbeincreasedlaterinthewarbyInflation(14.4.5).This value is subtracted from the Confederate player’s BP total before he builds his SPs. Keep track of the
current Maintenance Cost with the Maintenance markers on the Status Track.
(14.3.5) Placement of Confederate Reinforcements Once built, reinforcements are placed as follows:• Place1SPintheTrans-MississippiTheater.• TheremainingSPsaredistributedasevenlyaspossiblebetween
the Eastern and Western Theater. If the number of SPs is odd, then the extra SP must be placed in the Eastern Theater.
• PLACEMENT:SPsmustbeplaced in friendly-controlledRe-source Hexes that have an LOC to a Primary Supply Source. No more than 2 SPs per state. SPs can be placed adjacent to enemy units since a Union ZOI does not extend into a CSA controlled Resource Hex. If no legal spaces are available then the SPs for that area are lost.
14.4 Blockade Running(14.4.1) Blockade Zones: There are three Blockade Zones: North Atlantic, South Atlantic and the Gulf. Each turn the Confederate player rolls one die for each Blockade Zone to determine if he receives additional BPs for reinforcements.(14.4.2) Open Ports: Confederate ports are either open or closed. An open port is one which is Confederate controlled, and whose associated Coastal Fort, if any, is also Confederate controlled. Any port which does not meet those two conditions is closed.
(14.4.3) Die Roll Modifiers: Printed next to most Confederate Ocean PortsisaBlockadeRunnerModifier.Iftheportisopen(14.4.2)theConfederateplayerusesthatnumberasapositivemodifiertohis Blockade Running die roll. Keep track of a Blockade Zone’s current DRM with the Blockade markers on the Status Track. Tally upallopenportsandusethesumasthemodifier.IfaBlockadeZone no longer has any open Blockade Runner Ports then modify the die roll by –1.EXAMPLE:IfWilmington(+2)andRoanokeIsland(+1)aretheonlyopen Blockade Running Ports in the North Atlantic Blockade Zone then the Confederate player would modify his Blockade Running die roll by +3 for that zone.
(14.4.4) Blockade Table: For each Blockade Zone, the Confederate playerrollsadieandmodifiesitasdescribedabove.TheConfederateplayercross-referencesthemodifieddierollbythecurrentyeartodetermine how many BPs he receives.
(14.4.5) Inflation: If the result on the Blockade Runner die roll is+2M,theninflationisaffectingtheSoutherneconomyandtheMaintenance Cost (14.3.4) immediately goes up by 2 points. It is possible for all three Blockade Runner die rolls to get this result, causing the Maintenance Cost to go up 6 points. The Maintenance Cost never goes down.
17
© 2015 GMT Games, LLC—revised Mar. 2016
THE U.S. CIVIL WAR
(14.4.6) Brownsville/Matamoros (Southwest corner of map): This Blockade Runner Port only becomes active if Galveston is Union controlled.
14.5 Confederate War IndustryThe South began the war as an agrarian nation importing nearly all its heavy machinery from the North. During the war the South made a huge effort to create their own munition factories, foundries and arsenals to support the war effort.
Arsenals add additional BPs to the Confederacy. During each Confederate Reinforcement Phase, the Confederate player upgrades one on-map Resource Hex by 1 BP. To determine which state it must be built in, he rolls two dice
and consults the Random States Table. The result indicates the state in which the Arsenal upgrade occurs. The Arsenal must be placed in a friendly-controlled Confederate Resource Hex. Place an Arsenal marker of the appropriate value in the Resource Hex. The additional BP is used in this turn’s BP count. If all Resource Hexes in that state are Union controlled, then the Arsenal upgrade is forfeited.PLACEMENT RESTRICTION: No Confederate Resource Hex can ever grow beyond triple its original BP value.FOREXAMPLE:Atlantastartsat2,itcangrowto6.
14.6 The Displaced BoxDuring the Reinforcement Phase of each turn each player returns all his Displaced Generals, all his Militia, and half (round down if an odd number) of his Displaced SPs from the Displaced Box to the map. Displaced SPs and Generals must return to the same theater which they were displaced from. Union SPs must be placed on friendly-controlled Objective Hexes in Northern States, while CSA SPs must be placed on friendly-controlled Resource Hexes. Placement hexes must be in Full Supply. Generals may be placed with any friendly SP that has an LOC to a Primary Supply Source. An equal number of Displaced SPs are eliminated. If there was an odd number of SPs in the box, then leave 1 SP in the box.Provided St. Louis is under Union control, returning Union Dis-placed Trans-Mississippi units may be placed in St. Louis. Returning Displaced Militia are always placed pursuant to the State Militia (17.2.1) rules, not the rules for SPs.
EXAMPLE: There are 5 SPs in the Union West Theater Displaced Box. Therefore,2returntoplay,2areeliminated,and1remainsinthebox.
15. STRATEGIC MOVEMENT15.1 Strategic Movement In GeneralThere are four types of Strategic Movement—Rail, Ocean, River and Road. A limited number of SPs may use each type in each Stra-tegic Movement Phase. Generals cannot be moved in the Strategic Movement Phase—only SPs. SPs may combine the different types during a single Strategic Move, but it counts against the limit on each.EXAMPLE: A Union SP that rails to a port, and then moves through the Ocean to New Orleans, then up the Mississippi to Vicksburg, then along the railroad to Jackson, would count against Ocean and River Strategic Movement, and twice against Rail Strategic Movement.
15.2 Strategic Rail MovementThe Union player may move up to 12 SPs by rail, the Confederate player 7 SPs. SPs moved by rail may move an unlimited distance through contiguous rail hexes. All hexes in the railroad line must be free of enemy SPs, outside the ZOI of enemy units, and all Towns
along the railroad line must be friendly controlled. For the Union player only, all Railroads that exit the north map edge are connected to each other and the Chesapeake Bay Holding Box.
15.3 Strategic River MovementThe Union player may move up to 3 SPs by Navigable Waterways (20.1.2), the Confederate player 1 SP. SPs moved this way may travel an unlimited distance along Navigable Waterways as long as they either embark or debark at a Port (either type). The entire path mustbeunderfriendlyNavalControl(20.1)andthefinaldebarkinghex or Island must be friendly controlled and outside the ZOI of enemy land units.
15.4 Union Strategic Ocean MovementThe Union player may move up to 3 SPs from one Union controlled Ocean Port on the Atlantic Ocean or Gulf by sea to another Union controlled Ocean Port on the Atlantic Ocean or Gulf. No enemy Coastal Forts, Forts, Naval Batteries, or Naval Units may be passed. The Confederate player may not use Strategic Ocean Movement.
15.5 Strategic Road MovementBoth sides may move 1 SP in each theater an unlimited distance under the following restrictions:• TheSPmustremaininthetheater.• TheremustbeanLOCbetweenthestartingandendinghexes.
15.6 Restrictions on Strategic MovementYou may not use Strategic Movement to remove the last SP from a stack containing one or more Generals. SPs that use Strategic Movement must always end their move in one of three places:• Afriendly-controlledResource/ObjectiveHex.• AspacecontainingafriendlyGeneral.• Aspacecontainingafriendly-controlledFort,CoastalFort,Port,
or Town hex. DESIGN NOTE: This represents the necessary infrastructure needed to handle incoming troops. You can’t strategic move an SP to an empty hex in the hinterland.
16. LEADER MANAGEMENT16.1 The Leader Management PhaseDuring this phase both players place, promote, demote, remove, and transfer Generals. All these activities can be done in any order, but the Union player must complete his management before the Confederate player starts his.
16.2 Bringing Generals Into PlayThe Turn Record Track indicates when Generals arrive, depart and when they are promoted. Generals are placed in the theater indicated on the Turn Record Track (E = East, W = West, TM = Trans-Mis-sissippi). A General must be placed in a space that has an LOC to a Primary Supply Source and has at least 1 friendly SP. In addition to the three theater abbreviations the following abbreviations are also used on the Turn Record Track:
P = Promote (16.3.1) DM = Demote (16.3.2)R = Remove (16.4) T = Free Transfer (16.6)U = Unassigned Box (16.5.2) Rtn = Return (16.5.2)r/w=replacewith
THE U.S. CIVIL WAR18
© 2015 GMT Games, LLC—revised Mar. 2016
16.3 Promotions and Demotions(16.3.1) Promotions: A promotion occurs when indicated on the Turn Record Track. The named General is replaced with the same General but at a higher rank. If a General is promoted and relieves a General, then the promoted General is immediately moved to the location of the relieved General. The relieved General (16.4) is removed from play.
(16.3.2) Demotions: The General returns to his previous rank and remains in the same location.
16.4 Relieving a GeneralA General is relieved from command if his name is in red on the Turn Record Track. Remove the General from play and place the replace-ment General (if any) in the same space as the departing General.
16.5 Leader Casualties, Removal and Return(16.5.1) Casualties: Casualties among Generals from severe or mortal injury generally occur at the historical times per the Turn Record Track. If all SPs accompanying a General are lost in battle (11.2.4), or if a General is caught alone in a hex by enemy units the General is placed in the Displaced Box (14.6).
(16.5.2) Unassigned Generals: Most Generals removed from play never return, but two Generals (Butler and J. Johnston) will return to play at a later point. Place them in the Unassigned Generals Box in the lower right corner of the map until they return.
16.6 Leader TransferDuring this phase the owning player may Transfer (7.8) any two 1- or 2-star non-Cavalry Generals for free. If a (T) symbol is next to a General’s name on the Turn Record Track, then that General may be immediately Transferred for free to the space where the General he shares a box with under the Turn Track is located. If he does not share a box with another General, then he may be Transferred to any legal space. The Transfer is optional but if not used immediately, it is forfeited.EXAMPLE: On Turn 10 Holmes is demoted and Kirby Smith can be Transferred to his location.
17. SPECIAL RULES17.1 Border States(17.1.1) In General: Only the states of Missouri, Kentucky and West Virginia can switch sides in the game. Missouri starts in Union control, Kentucky starts as neutral and West Virginia starts in Confederate control. If a player gains control of all Objective/Resource Hexes in the state, then the state becomes friendly to that player (17.1.4). Kentucky and Missouri contain Objective Hexes. West Virginia contains Resource Hexes.(17.1.2) West Virginia: For game purposes it is considered the part ofVirginiawestoftheAlleghenyMountains,andisspecificallyde-finedastheResourceHexesofCharleston,Wheeling,andGrafton,plus all Towns and Ports in that area color coded blue-white. These Resource Hexes, Towns and Ports are also considered part of Virginia when they are under Confederate control with the exception that the Virginia Militia unit may not be placed in West Virginia.DESIGN NOTE: The state of West Virginia did not exist in 1861, it was only admitted into the Union in June of 1863. It took another 10 years to legally determine its exact border.
(17.1.3) Kentucky: If a player “invades” Kentucky in 1861 it will immediately join the other side. If neither player invades Kentucky in 1861, then it becomes Union controlled at the start of 1862 (Turn 4).AninvasionisdefinedasmovinganSP,NSP, or General into a hex or hexside entirely inside Kentucky or moving into a hex containing a Town, City or Port in Kentucky. While Kentucky is neutral, LOC and Supply Paths may not enter into a hex or hexside entirely inside Kentucky or a hex containing a Town, City or Port in Kentucky. Naval Control may not enter river hexsides completely in Kentucky while Kentucky is neutral.(17.1.4) Capturing a Border State: During the End Phase, if a playerhascontrolofallObjective/ResourceHexesinaneutralorenemy-controlled Border State, then that Border State immediately joins that side (he now controls the state). At that time he removes all his Control markers from the state and the opposing player places Control markers in each Town or Port hex in that state where he has SPs or Forts—all other Cities, Towns and Port hexes in the state are considered friendly to the controlling player. While a player controls a state he does not place Control markers in the state—only the opposing player does. (17.1.5) Recapturing a Border State: If a Border State joins the other side, it will only rejoin your side during an End Phase if you againhave control of allObjective/ResourceHexes in the state.Follow the same procedure in 17.1.4.(17.1.6) Summary of Border State Characteristics• Aretheonlystatesthatcanchangesides(6.1.1,17.1).• AretheonlystateswherebothplayerscanhaveMilitiapresent
(17.2.2).• ProvidetheConfederateplayerwith2BPsforeachObjectiveHex
he controls in Kentucky and Missouri (14.3.3) and the BP value foreachResourceHexhecontrolsinWestVirginia(14.3.2).
17.2 Militia(17.2.1) State Militia: Every Confederate and Border state has a 0 SP Militia unit for defense and quick de-ployment. This unit may never leave its home state. If eliminated, place it in the Displaced Box—it returns to
play for free in the next Reinforcement Phase. This unit must be placed in one of the state’s Resource or Objective Hexes that is friendly controlled and not Isolated (13.6). If no such hex is available it remains in the Displaced Box until the next Reinforcement Phase when placement is again possible. (17.2.2) Border State Militia: These units act like regular Militia in all respects. Both players may have Militia active in a Border State at the same time. Border State Militia can be placed even if the opposing player controls the state.
(17.2.3) Characteristics: Militia have the following characteristics:• May be repositioned to any friendly-controlled Resource/
Objective Hex in their state for free each Action Phase. An open path is not necessary—simply pick up the unit and place it in the other hex. All, some or none of a player’s Militia units can be repositioned each friendly Action Phase. Militia marked with Surrender Points (13.6.3) lose them when they are repositioned. Militia may never be repositioned to a Resource or Objective Hex that is Isolated (13.6).
• Must alwaysbe inaResource/ObjectiveHexand if forced toretreat are Displaced.
• ArenotaffectedbyDemoralization,ForagingmarkersorAttrition.• Militiamaybe repositionedout of, but not into a hex that is
19
© 2015 GMT Games, LLC—revised Mar. 2016
THE U.S. CIVIL WAR
Isolated. When an Isolated Group surrenders any Militia units in the group are Displaced.
• Mayneverattack,onlydefend.IfstackedwithotherSPsprovideno additional strength and may not be removed to satisfy a SP loss.
• Mayberemovedfromtheirstate’sHoldingBoxandplacedinany non-Isolated friendly-controlled Resource or Objective Hex within their state when Displaced units are returned to the map (3.C and 14.6).
PLAY NOTE: All Forts have an intrinsic 0 SP so there is never a need to place a Militia unit with a Fort.
(17.2.4) Union Intrinsic Garrisons: All Objective hexes in Northern States contain an intrinsic 0 SP Union garrison. Border States have no intrinsic garrisons even if they become Union controlled. These intrinsic garrisons defend like 0 SP Militia, but have no ZOI and may not maintain Entrenchments. If attacked by 4 or more enemy SPstheywillautomaticallyfleewithoutabattle.Ifdefeatedinbattletheyareeliminated.Intrinsicgarrisonsthatfleeorareeliminatedwillreappear when the hex is recaptured by the Union player or if the hex contains no Confederate SPs at the start of the Union player’s Action Phase. The reappearance of the intrinsic garrison removes the Control marker if one was present.(17.2.5) Confederate Control Markers in Northern States: During the Control Segment of each End Phase, remove any Con-federate Control marker that does not have an LOC to at least 1 Confederate SP.DESIGN NOTE: The displacement represents Union Militia, that is not represented in the game, chasing down small Confederate raids.
17.3 Training ActionsPlayers may use Action Points for generating addition-al SPs. This represents improving troop morale, training and infrastructure. Some, none or all the Action Points a player receives may be used on Training each Action
Phase. Every 10 Action Points used for this provides 1 additional SP. The SP arrives immediately but must be placed in a Resource Space (Confederate) or an Objective Hex in an original Northern State (Union). Keep track of these points using the Training markers on the Status Track. When an SP is earned, slide the Training mark-er back to 0.DESIGN NOTE: This rule is provided as an outlet to use unneeded Action Points. However, once players become familiar with the game this option will probably be used less and less.
18. SPECIAL ACTIONS18.1 In GeneralEach player has a deck of 15 Special Action Cards. Players only draw cards from their own deck. After a card is used for a Special Action it isreturnedtothedeck.Beforeeachcarddrawplayersshouldshuffletheir deck. Only the Phasing Player may use Special Action Cards. Cards may only be used in the theater indicated on the card. Cards that say “Any” may be used in any theater including for naval activities. Use the theater in which the force starts its activation—it does not matter if the force enters a different theater during its move. For land battles, including those resulting from an Amphibious Assault (20.5), use the theater where the battle is being fought. Naval Action cards may be used for Naval Battles, Naval Units, Naval Transport, Naval Assist, or Amphibious Assaults.Each card may be used for the following purposes:
• AllowsthePhasingPlayertotakeanadditionalaction(anyofthose listed in 4.3).
• Providesa+2 DRM to the attacker in a land battle (18.3.2). • ActivateaCautiousGeneralwithoutpayingthe2APs(7.7).• SUPPLY:AllowsoneOutofSupplystacktoignoreAttritionfor
one Action Phase.• FORCEMARCH:AllowsanyoneactivatedGeneraltoincrease
its MA by 2. The Special Action must be played at the start of the General’s move and is in addition to the Action Point required to activate the General. Demoralized SPs may not be Force Marched.
• NAVALASSIST(BasicGameonly):AllowsanactivatedUnionGeneral and his SPs to cross a Confederate controlled Navigable River hexside as if the hexside was friendly controlled.
• AMPHIBIOUSASSAULT(Required in Basic Game): See 20.5.• FORTMARKERS:AplayerisrequiredtospendaSpecialAction
to build or upgrade a Fort during the Action Phase.18.2 How They Are GainedThey are gained in two ways: at the start of each turn each player randomly draws two cards, and each time doubles are rolled to de-termine Initiative, each player draws one card. If a player receives morethanfive,hemustdiscard(hischoice)downtofive.
18.3 How They Are Used(18.3.1) In General: There is no limit to the number (or type) of Special Actions a player may use in a single Action Phase—he may useallfiveorsavethemforfutureActionPhases.EXAMPLE: A player who has saved up to three “East” and two “Any”SpecialActionscanuseallfiveforadditionalactionsintheEastern Theater in the same Action Phase.
(18.3.2) In Combat: Special Action Cards may be used in land and Naval Battles to provide a favorable DRM. Only the attacker may use a Special Action Card in a battle and it must be committed before any die rolls are made. No more than one is allowed in each battle. Only Naval and Any Cards can be used for Naval Battles. Naval Cards may not be used for land battles including land battles resulting from an Amphibious Assault.
19. THE END PHASE AND AUTOMATIC VICTORY19.1 The Control Segment(19.1.1) Hex Control: Place a Control marker in every Port, Town, Resource/ObjectiveHexlocatedinanenemystatethatcontainsoneor more of your SPs. Ignore locations that already contain a friendly Control marker. PLAY NOTE: This is the only way that a force with only 1 SP (e.g., a Cavalry Unit) can place a Control marker. (19.1.2) Confederate Control in the North: Remove all Confed-erate Control markers in Northern States that do not have an LOC to a Confederate SP.
(19.1.3) State Control: Determine control of Border States at this time (17.1.3 and 17.1.4).
19.2 End Turn RallyAll Demoralized units that have an LOC to a Supply Source imme-diately rally at no cost in Action Points. Those that do not have an LOC remain Demoralized.
THE U.S. CIVIL WAR20
© 2015 GMT Games, LLC—revised Mar. 2016
19.3 Automatic VictoryThe game can end before the last turn if one side has achieved an Automatic Victory.(19.3.1) Union VPs: Keep track of the current number of BPs cap-tured and destroyed (including Arsenals) by the Union player with the US VP markers (award 1 VP for each BP captured or destroyed). Note that the Union player earns no VPs for the Objective Hexes in Kentucky and Missouri. BURNED BUT RECAPTURED: If the Union player destroys a Resource Hex (6.4) but it is recaptured by the Confederate player, the Union player still counts the BPs that were destroyed.EXAMPLE: The Union player burns down Nashville (BP 3) but it is soon recaptured and providing the Confederacy with 1 BP. The Unionplayercountsthatas2VPs.
MISSISSIPPI RIVER CONTROL: If during the End Phase, Union Naval Control extends the length of the Mississippi River from the north map edge to the Gulf of Mexico, then award the Union player 3 VPs. This can be lost and re-earned if Union Naval Control on the Mississippi River is again blocked and again re-opened.
(19.3.2) Confederate VPs: The Confederate player earns VPs by capturing Washington DC and by invading the North. • NATIONALPANIC:TheConfederateplayerearns3 VPs the
instant he occupies Washington DC with 1 or more SPs. This is a once per game bonus earned for forcing the Union to relocate his capital. These three VPs are never lost.
• INVADINGTHENORTH:During theEndPhase award theConfederate player 2 VPs for each Objective Hex in a Northern State (not Border State) that the Confederate player controls. Record these VPs with the CSA VP marker. These VPs are semi-permanent (see Fading Glory) and are not lost when the Objective Hex is recaptured by the Union player.
• FADINGGLORY:IfduringtheAutomaticVictorySegmenttheConfederate player has no Control markers in any Northern State, then he must reduce his total VP count for Invading the North by 1, but never below 0.
EXAMPLE: During the End Phase of Turn 5 the Confederate player hascontrolofHarrisburgPAearninghim2VPs.OnTurn6hehascontrol of Harrisburg plus Baltimore MD, so gains 4 more VPs. He now has 6 VPs. On Turn 7 he has no Control markers in any Northern State, reducing his VPs by 1. He now has 5 VPs.
(19.3.3) Benchmark Numbers: The Union player needs to capture or destroy 2 to 4 BPs worth of Confederate Resource Hexes each turn to remain on schedule. This running total is printed in the lower right corner of each game turn on the Game Turn Track.DESIGN NOTE: This represents public expectations and political pressure.
(19.3.4) End Phase Victory Calculation: During the End Phase subtract the current CSA VPs from the current Union VPs. If this number is at least 12 VPs less than the turn’s Union Benchmark number, then the Confederate player wins an Automatic Victory. If it is at least 12 VPs more, then the Union player wins an Automatic Victory. If it is neither, the game continues.EXAMPLE:ItistheendofTurn11andtheUnionplayerhas27VPsandtheConfederateplayerhas3VPs.Thedifferenceis24(27–3=24).TheUnionBenchmarknumberforTurn11is30.TheUnionplayer is behind by 6 points, but not enough for a Confederate Automatic Victory so the game continues.
20. NAVAL RULESThis section contains all the naval rules necessary to play the game. Naval Units are only used in the Advanced Game.
20.1 Naval Control(20.1.1) Benefits: Wherever a player has Naval Control, he enjoys thefollowingbenefits:• MayuseRailroadBridgesacrossNavigableRivers(5.4.3).• MaycrossNavigableRiverhexsidesbypayingonly+1MP(5.8.3).• MaytraceaSupplyPathalongNavigableRivers(13.3.4).• MayuseNavalTransport(20.3).
(20.1.2) Navigable Waterways: For the sake of brevity, Navigable Rivers, Lakes, Tidal River Paths (20.4), and contiguous Coastal hexes will be collectively called Navigable Waterways.
(20.1.3) Where Naval Control Originates• Union Naval Control originates at all Union controlled ports
located in Northern and Border States. The control then continues along Navigable Waterways and through the Atlantic and Gulf of Mexico until it is blocked (20.1.4). Union Naval Control from the Atlantic Ocean and the Gulf extends into and up every Navigable Waterway until blocked. The Union player always has Naval Control over the Atchafalaya Bay and Ship Island spaces.
• Confederate Naval Control originates at all Confederate controlled ports located in Southern States. The control then continues along Navigable Waterways until it is blocked or encounters Union Naval Control. Union Naval Control always trumps Confederate Naval Control and pushes it back until the Union Naval Control is blocked. Confederate Naval Control never extends out to sea.
• Muscle Shoals: The player that controls both River Ports of Decatur AL (hex 3221) and Stevenson AL (hex 3125) controls the stretch of the Tennessee River above the Muscle Shoals.
• Forts and Coastal Forts are not a source of Naval Control but they do provide Naval Control over the hex they occupy plus any of its Navigable hexsides. This control can only be negated by an enemy Naval Unit or Fort.
(20.1.4) Blocking Enemy Naval Control: When Naval Control is blocked, it is prevented from entering any of the navigable hexsides tangenttotheblockingunit/hexorgoingbeyondit.Thefollowingunits and locations block enemy Naval Control:• EntrenchmentsonType1NavigableRivers.• In the Southern States (only), aConfederate controlled Port
blocks Union Naval Control on Type 1 Navigable Rivers. The Confederates made great use of torpedoes, snipers, fallen
SP orGeneral
Enemy Unitor Location
Water Type
Type 1Navigable
Rivers
Type 2Navigable
Rivers
Lake orCoastalHexes
Tidal RiverPath orOcean
No No No No
Yes No No No
Yes Yes Yes No
Port orEntrenchment
Fort, Batteryor Naval Unit
21
© 2015 GMT Games, LLC—revised Mar. 2016
THE U.S. CIVIL WAR
trees,armedriverboats,andfieldartillerytomakemostriversinhospitable to Union ships.
PLAY NOTE: The Port affects all Navigable hexsides in the hex, not just the hexside closest to the Town. In cases where two different unconnected rivers run along the same hex (like Dover), the port only affects the river the port is on.
• Forts block enemyNavalControl onboth typesofNavigableRivers plus on Lake and Coastal hexes.
• TheGalveston,HatterasInletandRoanokeIslandspacesblockenemy Naval control even if vacant.
• Confederate-controlledCoastalFortsblockUnionNavalControlfrom reaching the associated port or entering any Navigable River or bay they protect (see list below).
PLAY NOTE: SPs and Generals never block enemy Naval Control and Naval Control can never be blocked or negated in the Ocean area or the Tidal River Paths.The above rules are summarized in the matrix on this page.(20.1.5) Trumping Enemy Naval Control: Situations can occur where both players have a Naval Unit, Fort, or Entrenchment tangent to the same hexside as the opposing player. When this occurs, follow this hierarchy: Naval Control from Naval Units always trumps Naval Control from Forts; Naval Control from Forts always trumps the blocking ability of Entrenchments or enemy Ports. If both sides have a Fort facing the same Navigable River hexside, and neither player has Naval Units at that location, then both cancel out and neither player controls that hexside.(20.1.6) Uncontrolled Navigable Rivers: If due to Naval Units, Forts, Entrenchments or Ports neither side controls a section of a Navigable River, then it is considered uncontrolled. Such Uncon-trolled Navigable River hexsides can be crossed as if they were friendly-controlled (5.8.3 and 11.5).
(20.1.7) 1861 Union Naval Control: In the Basic Game Union Na-val Control, Amphibious Assaults and River Transport DOWN the Mississippiisprohibitedpasthex2516until1862.
20.2 Ports(20.2.1) Ports: There are two types of Ports—Ocean and River. Both have the following functions and properties:• UnioncontrolledOceanPortsareaPrimarySupplySourcefor
Union units (13.3).
• PortsserveasaconduitbetweenRiver/OceanSupplyPathsandRail Supply Paths (13.4).
• ArenecessaryforNavalTransport(20.3).• ConfederatecontrolledPortsinSouthernStatesblockUnionNaval
Control on Type 1 Navigable Rivers (20.1.4).
(20.2.2) The Chesapeake Bay Holding Box: This box represents the Chesapeake Bay plus all Union ports north of Washington DC. It is considered a Port that only Union units may enter. Union SPs and Generals may enter the box during the Action Cycle via Naval Transport. During the Reinforcement and Leader Management Phases, respectively, Union SPs and Generals may be placed directly into the box. Union SPs may also be strategically moved by rail (via the north-map edge) or sea into or out of the box. Union Generals may be transferred into and out of the box (7.8 and 16.6).
20.3 Naval Transport(20.3.1) Naval Transport in General: Units that start in a hex where friendly Naval Control exists may use Naval Transport. There are two types of Naval Transport—Ocean and River. A Naval Transport action that ends in an enemy-controlled or enemy-occupied space must be performed as an Amphibious Assault (20.5).• COST:NavalTransport costs 1ActionPoint for every stack
moved. Moving by Naval Transport costs the stack its entire MA.• CAPACITY:AUnionstackcancontainupto3SPs,aConfederate
stack can only contain 1 SP. There is no limit to the number of Generals that may accompany the stack. A General is not required for Naval Transport.
• MOVEMENT:ThestackmovingbyNavalTransportmaydropoffSPs/Generalsduringmovementin hexes that are not enemy-controlled or enemy-occupied, but may not pick up additional SPs/Generals.
EXAMPLE: A stack of 3 Union SPs activated for Naval Transport could land 1 SP in three different locations.
(20.3.2) Multiple Transport Actions: There is no limit to the number of SPs that may use Naval Transport each Action Phase, as long as the capacity restriction for each Naval Transport is not exceeded (3 for Union, 1 for Confederate) and 1 Action Point is used for each stack.EXAMPLE: If the Union player used 5 Action Points he could transport 15 SPs in the same Action Phase.
(20.3.3) Naval Control Required: Naval Transport may only travel where that player has Naval Control. Bypassing an enemy Fort, Coastal Fort, Naval Battery, Entrenchment, or port that blocks Naval Control is prohibited even if Naval Control from them has been trumped (20.1.5).(20.3.4) River Transport: Both the Union and Confederate players may use River Transport. Such movement must follow a path of Navigable Waterways. If the movement ends at a hexside, place the land units on either side of the river. River Transport can carry units an unlimited length under the following restrictions:• Musteither start or end in a friendly-controlled Port or Coastal Fort.• May travel onlywhere friendlyNavalControl existsand that
Naval Control originates from a port that is a source of such control (20.1.3).
• Maytravelalongcontiguous Coastal hexes, but may not enter the area of the Atlantic or the Gulf of Mexico that is void of hexes.
The Confederate player may not use River Transport anywhere on the east coast north of the Hampton and Fort Monroe spaces.
What each Coastal Fort protectsA Confederate-controlled Coastal Fort protects the following:Fort St. Philip/Jackson: protects the Mississippi RiverFort Morgan: protects Mobile BayFort Pickins: protects the Pensacola hex (4722)Fort Pulaski: protects the Savannah hex (4137) including access to the Savannah RiverFort Sumter: protects the Charleston hex (3839)Fort Johnson: protects the Wilmington hex (3345)Fort Macon: protects the Beaufort hex (3148) —but from the Ocean-side onlyFort Monroe: protects the Hampton hex (2349). A Confed-erate-controlled Fort Monroe would also protect the Norfolk hex (2449) from an Amphibious Assault and open up that port for Blockade Running.

THE U.S. CIVIL WAR22
© 2015 GMT Games, LLC—revised Mar. 2016
(20.3.5) Ocean Transport: Only the Union player may use Ocean Transport. Unlike with River Transport, Ocean Transport must start and end in an Ocean Port. Ocean Transport may move through Coastal hexes, Tidal River Paths, the Mississippi Delta (see below), and the hex-less Gulf and Atlantic area. There is no delay to move between the Gulf and the Atlantic. Ocean Transport movement is not counted in hexes but must stop for the following reasons:• NAVIGABLERIVERS:OceanTransport is not allowed up
Navigable Rivers and Lakes except to enter the Mississippi Delta (see below). Ocean Transport is allowed along Tidal River Paths (20.4), but must follow those paths and may only be conducted from Ocean Port to Ocean Port.
• MISSISSIPPIDELTA:IfOceanTransportsailsuptheMississippitheSPsmuststopinNewOrleansorFortJackson/St.Philip.
20.4 Tidal River PathsThese are indicated by light blue arrows, either solid or dotted. In the Basic Game, the two different types of Tidal River Paths are treated the same. Naval Transport can be performed using Tidal River Paths, but Ocean Transport, as always, may only be conducted from Ocean Port to Ocean Port (20.3.5). The normal River Transport restrictions (20.3.4) still apply as well. Tidal River Paths cannot be controlled or blocked by Ports, Entrenchments, Forts or Coastal Forts. Both the Union and Confederate player are allowed to use these paths with the exception that the Confederate player may not use Naval Transport in any form on the Chesapeake Bay Tidal River Paths.
20.5 Amphibious Assaults(20.5.1) In General: An Amphibious Assault is a Naval Transport action that ends in an enemy-controlled or enemy-occupied hex. An Amphibious Assault is only allowed if the stack is activated for Naval Transport using a Naval or “Any” Special Action Card. This activation costs no Action Points. Unlike Naval Transport, an Amphibious Assault may enter one enemy controlled hex or hexside where friendly naval control does not exist in order to land at the target hex, but it may never bypass such a hex or hexside.
(20.5.2) Procedure: The Union player may conduct an Amphibious Assault with up to 3 SPs while the Confederate player may conduct an Amphibious Assault with only 1 SP. A General is not necessary in an Amphibious Assault, but if a General is present then the Commanding General’s Attack Rating is used in any battle that may take place. Follow the same procedures and use the same DRMs as in a land battle for any battle that may result from an Amphibious Assault. Any Naval Transport action into a vacant hex, but which results in a battle due to a successful interception, is for all purposes resolved as if it had been an Amphibious Assault.EXAMPLE: The Union player conducts an Amphibious Assault with 3 SPs and Burnside. The defender is a single SP in a Coastal Fort. The Union player gets +1 DRM for Burnside and rolls one die on the 3 column. The Confederate player rolls one die on the 1 column andmodifieshisdierollby+2fortheCoastalFort.
PLAY NOTE: The attacker may use a Special Action Card to give himanother+2DRMintheAmphibiousAssault.
(20.5.3) Successful Amphibious Assault: If the assault was suc-cessful then surviving defending units must retreat and become De-moralized. Land units involved in a successful Amphibious Assault may not continue moving. If the Amphibious Assault was against an Island or Coastal Fortress, a Control marker is immediately placed in the hex without the need to spend the 1 MP.
(20.5.4) Failed Amphibious Assaults: If the Amphibious Assault fails, the surviving SPs must immediately re-embark and either return to the Port they sailed from or sail to a friendly-controlled Port they could have reached at the start of their move.
(20.5.5) Confederate Amphibious Assaults: When the Confederate player conducts an Amphibious Assault assume Confederate Naval Control temporarily trumps Union Naval Control until blocked (by Union controlled Ports and Entrenchments on Type 1 Navigable Rivers and Forts, Coastal Forts and Naval Units on all types of Navigable Waterways). This temporary control ends as soon as the Amphibious Assault ends. CSA Amphibious Assaults are not allowed through the hex-less Ocean Area or anywhere on the east coast north of the Hampton and Fort Monroe spaces.PLAY NOTE: Except for purposes of this rule, Union controlled ports never block Confederate Naval Control. However, note that Union controlled ports located in Northern and Border states are a source of Union Naval Control that normally trumps Confederate Naval Control that originates out of Confederate controlled ports located in Southern states.
(20.5.6) Union Amphibious Assaults: The only time the Union player needs a Naval or “Any” Special Action Card for an Am-phibious Assault in the Basic Game is when he is attacking a Fort or Coastal Fort. All other Union Amphibious Assaults (vs. SPs, Entrenchments, vacant enemy ports, Islands, etc.) can also be ini-tiated with a Naval Transport (20.3) activation. All Confederate Amphibious Assaults in the Basic Game require an “Any” Card.
STOPYou have read enough rules to play all of the
scenarios. We recommend you play at least one before moving on to the Advanced Rules.
ADVANCED RULES21. NAVAL RULES (ADVANCED GAME)21.1 The Free Naval ActionEach Action Phase, both players receive one free Action Point to be used for the activation of one stack of friendly Naval Units including any naval leaders anywhere on the map. The action can lead to naval combat and Naval Support (21.3.1). This free naval action cannot be used to Transport SPs, land Generals, conduct an Amphibious Assault, or Train (17.3). Regular Action Points and Special Action Cards may also be used to activate Naval Units.
21.2 Naval Units(21.2.1) In General: Both players have Naval Units. The Union player has Naval Leaders, Oceangoing NSPs and River NSPs, while the Confederate player has River Flotillas and
River Ironclads. Naval Units cannot control the land portion of a hex, nor do they exert Naval Control beyond their hex. All Naval Units have a ZOI (21.4.1) for Reaction Movement.DESIGNNOTE:NavalUnitsrepresentthefront-linefightingele-ments of the navy. If these ships have sailed past an enemy Fort they are operating in a tight group and under severe logistical limitations due to their dependency on coal.
23
© 2015 GMT Games, LLC—revised Mar. 2016
THE U.S. CIVIL WAR
(21.2.2) Making Change with NSPs: The Union player may freely break down a multi-point NSP into smaller units of the same type and vice-versa at any time. For example, he can split a 5 NSP unit into a 3anda2NSP. The number supplied in the counter mix, however, is a strict limit, and the Union player must make sure he never exceeds 8 River NSPs and 5 Oceangoing NSPs. The Confederate player may never break down his River Flotillas or Ironclads into smaller units.
(21.2.3) Stacking and Placement: There is no limit to the number of Naval Units that may be in the same hex. When not in the prox-imity of enemy NSPs there is no need to indicate which hexside a Naval Unit is in—the owning player can decide at the moment it is necessary. However, there are two cases where a more precise location is necessary:• IfthehextheNavalUnitsareinadjoinstwodifferentrivers,or
the hex contains non-contiguous coasts, then point the bow (front) of the Naval Units towards the river the Naval Units are on.
• IfaNavalUnitisadjacenttoahexthatcontainsenemyNSPs,theexact hexside the Naval Unit is in must be indicated by pointing the bow of the ship towards that hexside.
Ending Hex Restriction: Naval Units of the Phasing Player can never end the Player Action Phase in an island, hex or hexside with enemy Forts, Coastal Forts, Naval Batteries or Naval Units. After all Movement and Combat is completed, all such Naval Units must conduct a Naval Retreat (21.6.8). This rule also applies to non-Phas-ing Player Naval Units, but only to the extent the non-Phasing Player Naval Units violate this restriction after the Phasing Player has completed all of his Naval Retreats. Non-Phasing Player Naval Retreats are conducted as if the Naval Units were a defender that lost a Naval Battle.
(21.2.4) Movement: It cost 1 Action Point to move a stack of Naval Units. Naval Units move within the restrictions of 21.2.5. They may enter hexes and hexsides where the enemy has Naval Control. They do not need to start or end their move in a Port. A stack of Naval Units may drop off Naval Units as they move but may not pick up additional Naval Units. Naval Units must stop moving and conduct a Naval Battle (21.6) when they enter a hex containing an enemy NSP. If they win the battle and had twice as many NSPs as the defender, the Naval Units can continue moving with any undamaged ships.
(21.2.5) Movement Restrictions: • OceangoingNSPsmayonlyoperate inAll-Sea areas,Coastal
hexes, solid Tidal River Paths and on the Mississippi River up to Vicksburg (inclusive). They may not move up any other rivers. “Upariver”isdefinedassailingtowardsthesourceoftheriverand away from the Ocean.
• RiverNSPsandRiverFlotillasmayoperateinNavigableRivers,Tidal River Paths (both types), and Coastal hexes. They may not enter the Ocean (the area void of hexes) or round Florida.
• NEWORLEANS:OceangoingandRivergoingNSPsmustalwaysstopatNewOrleansorFortsSt.Philip/Jacksonbeforeproceedingfurther up the Mississippi or out to the Gulf of Mexico.
EXAMPLE: Oceangoing NSPs may not sail from Galveston to Vicksburg inonemove.Theymustfirstmove toNewOrleans,stop, and then move up to Vicksburg in the next Action Phase.
(21.2.6) Strategic Redeployment of Naval Units: During the Strategic Movement Phase, the Union player may move some or all his Oceangoing NSPs to one friendly Ocean Port. Likewise, he
may move some or all his Rivergoing NSPs to one friendly River Port. The NSPs may start in different locations, but must all end at the same location, may not be moved past enemy NSPs or Forts, and may only travel where Union Naval Control exist.
(21.2.7) Low on Coal: Players must check the supply status of their Naval Units at the end of each friendly Action Phase at the same time and in the same manner he checks his land units. Naval Units must be able to
trace a Supply Path along Navigable Waterways to a friendly-con-trolled Port that is in Full Supply. Naval Units that are not in supply at this time have a Low on Coal marker placed on them. If already marked as Low on Coal, there is no further effect.
EFFECTS: Due to their dependency on coal, Naval Units suffer the following effects when marked as Low on Coal:• maynotrecoverfromDemoralization.• ifaNavalUnitwithaLowonCoalmarkermoves, itwillbe
eliminated at the end of its move unless it ends its move back in Supply. As long as the Naval Unit does not move it can remain OutofSupplyindefinitely.Assume the ships carry enough coal for one move.
(21.2.8) Naval Leaders: The Union player has three Naval Leaders—Farragut, Porter and Foote. Naval Leaders move in the same way as Naval Units and may move with a stack of Naval Units when it is activated.
Naval Leaders provide a DRM in Naval Combat, but have no effect on land combat. No more than one Naval Leader may be used in each Naval Battle. A Naval Leader is Displaced if all NSPs they are with are sunk.
21.3 Naval Support in Land Battles(21.3.1) Offensive Naval Support: Land units stacked with a Naval Unit with a NSP value of 1 or more receive a +1 CRT DRM when attackingaFort,PortorIsland.TheNavalUnitsmustfirstsurvivethe Naval Battle against the installation. If the defender is not in a Fort,Port,orIslandthereisnobenefit(the battle is assumed to be taking place away from the water).
NAVAL SUPPORT EXAMPLE: In this example, the Union player will activate Grant to attack Memphis. But before he does, he uses his “Free” Naval Action Point to activate Porter and his 8 River-going NSPs and sends them against Memphis. The Naval Battle is 8NSPsto4NSPs.IftheUnionfleetwinstheNavalBattle,theshipscan remain in the hex and provide a +1 Naval Support DRM for Grant’s upcoming activation. If Grant loses the battle, the Naval Units will have to return to a friendly-controlled port at the end of the Union Action Phase.
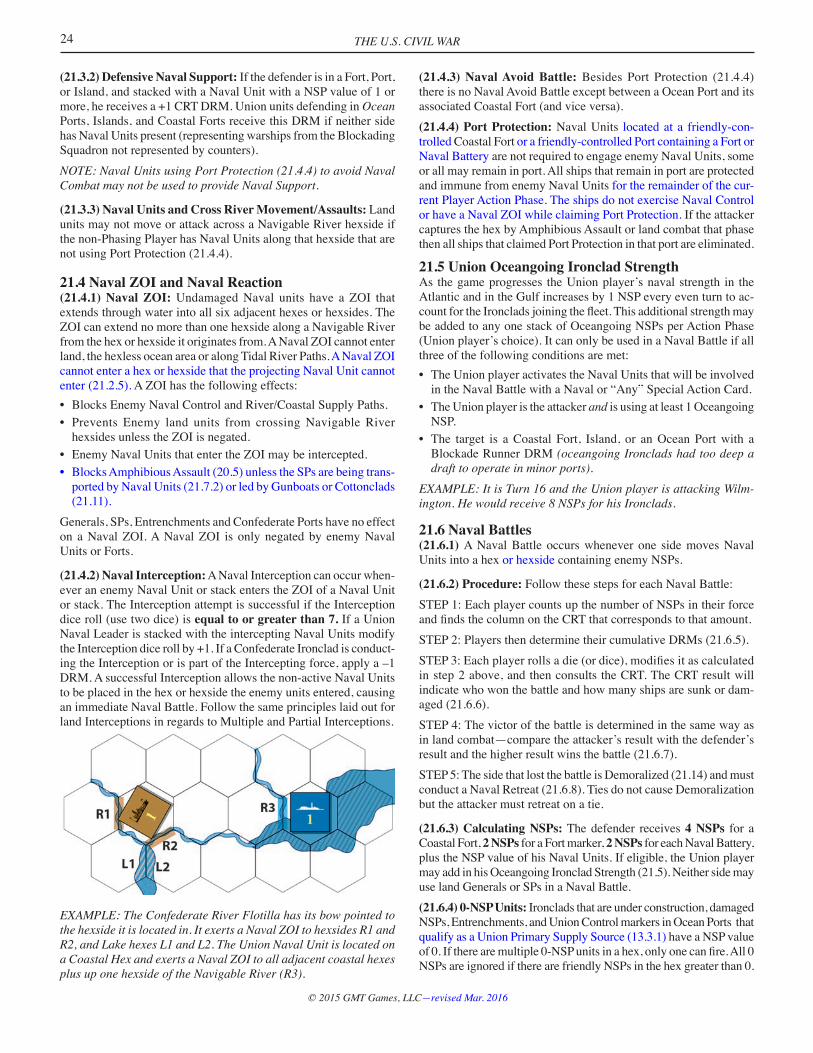
THE U.S. CIVIL WAR24
© 2015 GMT Games, LLC—revised Mar. 2016
(21.3.2) Defensive Naval Support: If the defender is in a Fort, Port, or Island, and stacked with a Naval Unit with a NSP value of 1 or more, he receives a +1 CRT DRM. Union units defending in Ocean Ports, Islands, and Coastal Forts receive this DRM if neither side has Naval Units present (representing warships from the Blockading Squadron not represented by counters).NOTE:NavalUnitsusingPortProtection(21.4.4)toavoidNavalCombat may not be used to provide Naval Support.
(21.3.3) Naval Units and Cross River Movement/Assaults: Land units may not move or attack across a Navigable River hexside if the non-Phasing Player has Naval Units along that hexside that are not using Port Protection (21.4.4).
21.4 Naval ZOI and Naval Reaction(21.4.1) Naval ZOI: Undamaged Naval units have a ZOI that extends through water into all six adjacent hexes or hexsides. The ZOI can extend no more than one hexside along a Navigable River from the hex or hexside it originates from. A Naval ZOI cannot enter land, the hexless ocean area or along Tidal River Paths. A Naval ZOI cannot enter a hex or hexside that the projecting Naval Unit cannot enter (21.2.5). A ZOI has the following effects:• BlocksEnemyNavalControlandRiver/CoastalSupplyPaths.• Prevents Enemy land units from crossingNavigable River
hexsides unless the ZOI is negated. • EnemyNavalUnitsthatentertheZOImaybeintercepted.• BlocksAmphibiousAssault(20.5)unlesstheSPsarebeingtrans-
ported by Naval Units (21.7.2) or led by Gunboats or Cottonclads (21.11).
Generals, SPs, Entrenchments and Confederate Ports have no effect on a Naval ZOI. A Naval ZOI is only negated by enemy Naval Units or Forts.
(21.4.2) Naval Interception: A Naval Interception can occur when-ever an enemy Naval Unit or stack enters the ZOI of a Naval Unit or stack. The Interception attempt is successful if the Interception dice roll (use two dice) is equal to or greater than 7. If a Union Naval Leader is stacked with the intercepting Naval Units modify the Interception dice roll by +1. If a Confederate Ironclad is conduct-ing the Interception or is part of the Intercepting force, apply a –1 DRM. A successful Interception allows the non-active Naval Units to be placed in the hex or hexside the enemy units entered, causing an immediate Naval Battle. Follow the same principles laid out for land Interceptions in regards to Multiple and Partial Interceptions.
EXAMPLE: The Confederate River Flotilla has its bow pointed to the hexside it is located in. It exerts a Naval ZOI to hexsides R1 and R2,andLakehexesL1andL2.TheUnionNavalUnitislocatedona Coastal Hex and exerts a Naval ZOI to all adjacent coastal hexes plus up one hexside of the Navigable River (R3).
(21.4.3) Naval Avoid Battle: Besides Port Protection (21.4.4) there is no Naval Avoid Battle except between a Ocean Port and its associated Coastal Fort (and vice versa).(21.4.4) Port Protection: Naval Units located at a friendly-con-trolled Coastal Fort or a friendly-controlled Port containing a Fort or Naval Battery are not required to engage enemy Naval Units, some or all may remain in port. All ships that remain in port are protected and immune from enemy Naval Units for the remainder of the cur-rent Player Action Phase. The ships do not exercise Naval Control or have a Naval ZOI while claiming Port Protection. If the attacker captures the hex by Amphibious Assault or land combat that phase then all ships that claimed Port Protection in that port are eliminated.
21.5 Union Oceangoing Ironclad StrengthAs the game progresses the Union player’s naval strength in the Atlantic and in the Gulf increases by 1 NSP every even turn to ac-countfortheIroncladsjoiningthefleet.Thisadditionalstrengthmaybe added to any one stack of Oceangoing NSPs per Action Phase (Union player’s choice). It can only be used in a Naval Battle if all three of the following conditions are met:• TheUnionplayeractivatestheNavalUnitsthatwillbeinvolved
in the Naval Battle with a Naval or “Any” Special Action Card.• TheUnionplayeristheattackerand is using at least 1 Oceangoing
NSP.• The target is aCoastal Fort, Island, or anOceanPortwith a
Blockade Runner DRM (oceangoing Ironclads had too deep a draft to operate in minor ports).
EXAMPLE: It is Turn 16 and the Union player is attacking Wilm-ington. He would receive 8 NSPs for his Ironclads.
21.6 Naval Battles(21.6.1) A Naval Battle occurs whenever one side moves Naval Units into a hex or hexside containing enemy NSPs.
(21.6.2) Procedure: Follow these steps for each Naval Battle:STEP 1: Each player counts up the number of NSPs in their force andfindsthecolumnontheCRTthatcorrespondstothatamount.STEP 2: Players then determine their cumulative DRMs (21.6.5).STEP3:Eachplayerrollsadie(ordice),modifiesitascalculatedin step 2 above, and then consults the CRT. The CRT result will indicate who won the battle and how many ships are sunk or dam-aged (21.6.6).STEP 4: The victor of the battle is determined in the same way as in land combat—compare the attacker’s result with the defender’s result and the higher result wins the battle (21.6.7).STEP 5: The side that lost the battle is Demoralized (21.14) and must conduct a Naval Retreat (21.6.8). Ties do not cause Demoralization but the attacker must retreat on a tie.
(21.6.3) Calculating NSPs: The defender receives 4 NSPs for a Coastal Fort, 2 NSPs for a Fort marker, 2 NSPs for each Naval Battery, plus the NSP value of his Naval Units. If eligible, the Union player may add in his Oceangoing Ironclad Strength (21.5). Neither side may use land Generals or SPs in a Naval Battle.(21.6.4) 0-NSP Units: Ironclads that are under construction, damaged NSPs, Entrenchments, and Union Control markers in Ocean Ports that qualify as a Union Primary Supply Source (13.3.1) have a NSP value of0.Iftherearemultiple0-NSPunitsinahex,onlyonecanfire.All0NSPs are ignored if there are friendly NSPs in the hex greater than 0.
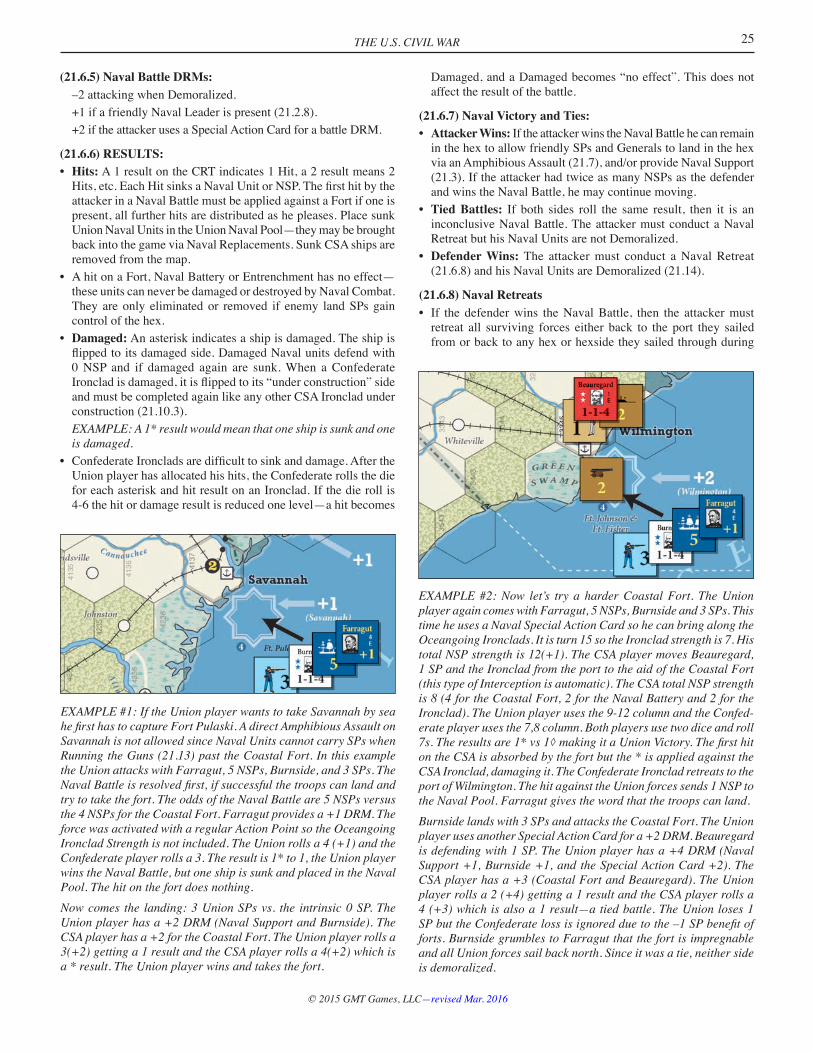
25
© 2015 GMT Games, LLC—revised Mar. 2016
THE U.S. CIVIL WAR
(21.6.5) Naval Battle DRMs: –2 attacking when Demoralized. +1 if a friendly Naval Leader is present (21.2.8). +2 if the attacker uses a Special Action Card for a battle DRM.
(21.6.6) RESULTS: • Hits: A 1 result on the CRT indicates 1 Hit, a 2 result means 2 Hits,etc.EachHitsinksaNavalUnitorNSP.Thefirsthitbytheattacker in a Naval Battle must be applied against a Fort if one is present, all further hits are distributed as he pleases. Place sunk Union Naval Units in the Union Naval Pool—they may be brought back into the game via Naval Replacements. Sunk CSA ships are removed from the map.
• AhitonaFort,NavalBatteryorEntrenchmenthasnoeffect—these units can never be damaged or destroyed by Naval Combat. They are only eliminated or removed if enemy land SPs gain control of the hex.
• Damaged: An asterisk indicates a ship is damaged. The ship is flippedtoitsdamagedside.DamagedNavalunitsdefendwith0 NSP and if damaged again are sunk. When a Confederate Ironcladisdamaged,itisflippedtoits“underconstruction”sideand must be completed again like any other CSA Ironclad under construction (21.10.3).
EXAMPLE: A 1* result would mean that one ship is sunk and one is damaged.
• ConfederateIroncladsaredifficulttosinkanddamage.AftertheUnion player has allocated his hits, the Confederate rolls the die for each asterisk and hit result on an Ironclad. If the die roll is 4-6 the hit or damage result is reduced one level—a hit becomes
Damaged, and a Damaged becomes “no effect”. This does not affect the result of the battle.
(21.6.7) Naval Victory and Ties: • Attacker Wins: If the attacker wins the Naval Battle he can remain
in the hex to allow friendly SPs and Generals to land in the hex viaanAmphibiousAssault(21.7),and/orprovideNavalSupport(21.3). If the attacker had twice as many NSPs as the defender and wins the Naval Battle, he may continue moving.
• Tied Battles: If both sides roll the same result, then it is an inconclusive Naval Battle. The attacker must conduct a Naval Retreat but his Naval Units are not Demoralized.
• Defender Wins: The attacker must conduct a Naval Retreat (21.6.8) and his Naval Units are Demoralized (21.14).
(21.6.8) Naval Retreats• If the defenderwins theNavalBattle, then the attackermust
retreat all surviving forces either back to the port they sailed from or back to any hex or hexside they sailed through during
EXAMPLE#2:Now let’s try a harderCoastalFort. TheUnionplayer again comes with Farragut, 5 NSPs, Burnside and 3 SPs. This time he uses a Naval Special Action Card so he can bring along the Oceangoing Ironclads. It is turn 15 so the Ironclad strength is 7. His totalNSPstrengthis12(+1).TheCSAplayermovesBeauregard,1 SP and the Ironclad from the port to the aid of the Coastal Fort (this type of Interception is automatic). The CSA total NSP strength is8(4fortheCoastalFort,2fortheNavalBatteryand2fortheIronclad).TheUnionplayerusesthe9-12columnandtheConfed-erate player uses the 7,8 column. Both players use two dice and roll 7s.Theresultsare1*vs1◊makingitaUnionVictory.Thefirsthiton the CSA is absorbed by the fort but the * is applied against the CSA Ironclad, damaging it. The Confederate Ironclad retreats to the port of Wilmington. The hit against the Union forces sends 1 NSP to the Naval Pool. Farragut gives the word that the troops can land. Burnside lands with 3 SPs and attacks the Coastal Fort. The Union playerusesanotherSpecialActionCardfora+2DRM.Beauregardis defending with 1 SP. The Union player has a +4 DRM (Naval Support+1,Burnside+1,andtheSpecialActionCard+2).TheCSA player has a +3 (Coastal Fort and Beauregard). The Union playerrollsa2(+4)gettinga1resultandtheCSAplayerrollsa4 (+3) which is also a 1 result—a tied battle. The Union loses 1 SPbuttheConfederatelossisignoredduetothe–1SPbenefitofforts. Burnside grumbles to Farragut that the fort is impregnable and all Union forces sail back north. Since it was a tie, neither side is demoralized.
EXAMPLE #1: If the Union player wants to take Savannah by sea hefirsthastocaptureFortPulaski.AdirectAmphibiousAssaultonSavannah is not allowed since Naval Units cannot carry SPs when RunningtheGuns(21.13)pasttheCoastalFort.Inthisexamplethe Union attacks with Farragut, 5 NSPs, Burnside, and 3 SPs. The NavalBattleisresolvedfirst,ifsuccessfulthetroopscanlandandtry to take the fort. The odds of the Naval Battle are 5 NSPs versus the 4 NSPs for the Coastal Fort. Farragut provides a +1 DRM. The force was activated with a regular Action Point so the Oceangoing Ironclad Strength is not included. The Union rolls a 4 (+1) and the Confederate player rolls a 3. The result is 1* to 1, the Union player wins the Naval Battle, but one ship is sunk and placed in the Naval Pool. The hit on the fort does nothing.Now comes the landing: 3 Union SPs vs. the intrinsic 0 SP. The Unionplayerhasa+2DRM(NavalSupportandBurnside).TheCSAplayerhasa+2fortheCoastalFort.TheUnionplayerrollsa3(+2)gettinga1resultandtheCSAplayerrollsa4(+2)whichisa * result. The Union player wins and takes the fort.
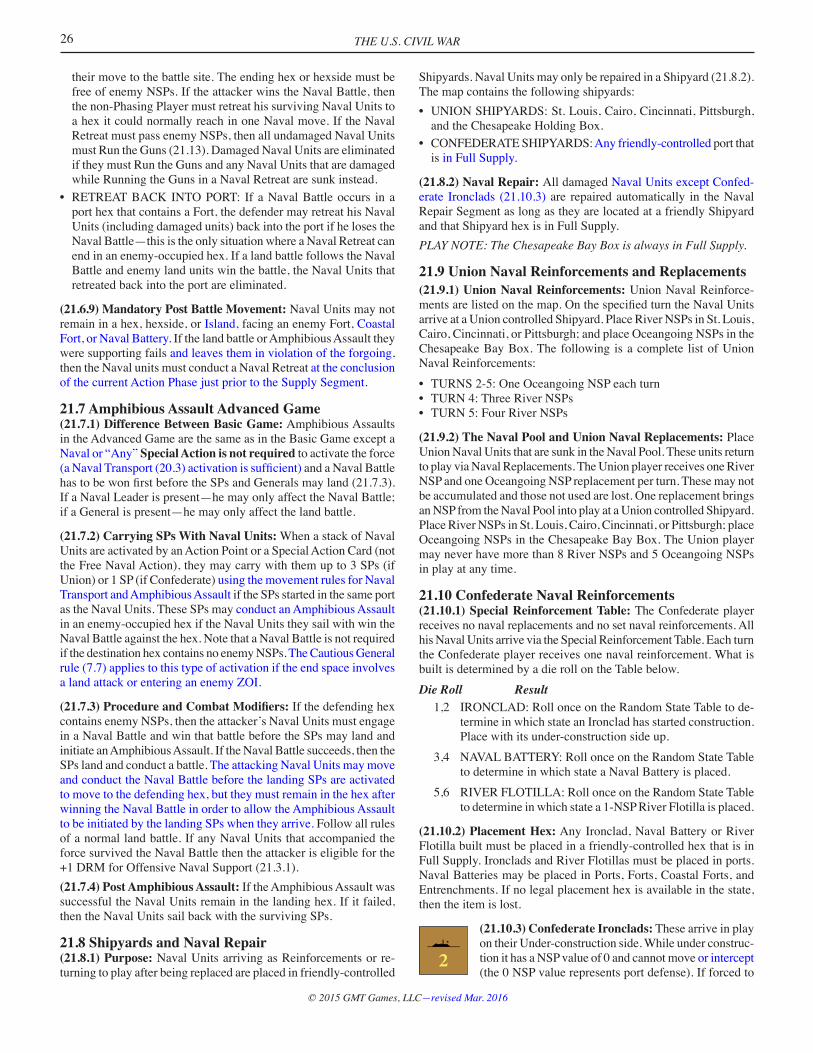
THE U.S. CIVIL WAR26
© 2015 GMT Games, LLC—revised Mar. 2016
their move to the battle site. The ending hex or hexside must be free of enemy NSPs. If the attacker wins the Naval Battle, then the non-Phasing Player must retreat his surviving Naval Units to a hex it could normally reach in one Naval move. If the Naval Retreat must pass enemy NSPs, then all undamaged Naval Units must Run the Guns (21.13). Damaged Naval Units are eliminated if they must Run the Guns and any Naval Units that are damaged while Running the Guns in a Naval Retreat are sunk instead.
• RETREATBACKINTOPORT: If aNavalBattleoccurs inaport hex that contains a Fort, the defender may retreat his Naval Units (including damaged units) back into the port if he loses the Naval Battle—this is the only situation where a Naval Retreat can end in an enemy-occupied hex. If a land battle follows the Naval Battle and enemy land units win the battle, the Naval Units that retreated back into the port are eliminated.
(21.6.9) Mandatory Post Battle Movement: Naval Units may not remain in a hex, hexside, or Island, facing an enemy Fort, Coastal Fort, or Naval Battery. If the land battle or Amphibious Assault they were supporting fails and leaves them in violation of the forgoing, then the Naval units must conduct a Naval Retreat at the conclusion of the current Action Phase just prior to the Supply Segment.
21.7 Amphibious Assault Advanced Game(21.7.1) Difference Between Basic Game: Amphibious Assaults in the Advanced Game are the same as in the Basic Game except a Naval or “Any” Special Action is not required to activate the force (aNavalTransport(20.3)activationissufficient) and a Naval Battle hastobewonfirstbeforetheSPsandGeneralsmayland(21.7.3).If a Naval Leader is present—he may only affect the Naval Battle; if a General is present—he may only affect the land battle.
(21.7.2) Carrying SPs With Naval Units: When a stack of Naval Units are activated by an Action Point or a Special Action Card (not the Free Naval Action), they may carry with them up to 3 SPs (if Union) or 1 SP (if Confederate) using the movement rules for Naval Transport and Amphibious Assault if the SPs started in the same port as the Naval Units. These SPs may conduct an Amphibious Assault in an enemy-occupied hex if the Naval Units they sail with win the Naval Battle against the hex. Note that a Naval Battle is not required if the destination hex contains no enemy NSPs. The Cautious General rule (7.7) applies to this type of activation if the end space involves a land attack or entering an enemy ZOI.
(21.7.3) Procedure and Combat Modifiers: If the defending hex contains enemy NSPs, then the attacker’s Naval Units must engage in a Naval Battle and win that battle before the SPs may land and initiate an Amphibious Assault. If the Naval Battle succeeds, then the SPs land and conduct a battle. The attacking Naval Units may move and conduct the Naval Battle before the landing SPs are activated to move to the defending hex, but they must remain in the hex after winning the Naval Battle in order to allow the Amphibious Assault to be initiated by the landing SPs when they arrive. Follow all rules of a normal land battle. If any Naval Units that accompanied the force survived the Naval Battle then the attacker is eligible for the +1 DRM for Offensive Naval Support (21.3.1).(21.7.4) Post Amphibious Assault: If the Amphibious Assault was successful the Naval Units remain in the landing hex. If it failed, then the Naval Units sail back with the surviving SPs.
21.8 Shipyards and Naval Repair(21.8.1) Purpose: Naval Units arriving as Reinforcements or re-turning to play after being replaced are placed in friendly-controlled
Shipyards. Naval Units may only be repaired in a Shipyard (21.8.2). The map contains the following shipyards:• UNIONSHIPYARDS:St.Louis,Cairo,Cincinnati,Pittsburgh,
and the Chesapeake Holding Box.• CONFEDERATESHIPYARDS:Any friendly-controlled port that
is in Full Supply.
(21.8.2) Naval Repair: All damaged Naval Units except Confed-erate Ironclads (21.10.3) are repaired automatically in the Naval Repair Segment as long as they are located at a friendly Shipyard and that Shipyard hex is in Full Supply.PLAY NOTE: The Chesapeake Bay Box is always in Full Supply.
21.9 Union Naval Reinforcements and Replacements(21.9.1) Union Naval Reinforcements: Union Naval Reinforce-mentsarelistedonthemap.OnthespecifiedturntheNavalUnitsarrive at a Union controlled Shipyard. Place River NSPs in St. Louis, Cairo, Cincinnati, or Pittsburgh; and place Oceangoing NSPs in the Chesapeake Bay Box. The following is a complete list of Union Naval Reinforcements:• TURNS2-5:OneOceangoingNSPeachturn• TURN4:ThreeRiverNSPs• TURN5:FourRiverNSPs
(21.9.2) The Naval Pool and Union Naval Replacements: Place Union Naval Units that are sunk in the Naval Pool. These units return to play via Naval Replacements. The Union player receives one River NSP and one Oceangoing NSP replacement per turn. These may not be accumulated and those not used are lost. One replacement brings an NSP from the Naval Pool into play at a Union controlled Shipyard. Place River NSPs in St. Louis, Cairo, Cincinnati, or Pittsburgh; place Oceangoing NSPs in the Chesapeake Bay Box. The Union player may never have more than 8 River NSPs and 5 Oceangoing NSPs in play at any time.
21.10 Confederate Naval Reinforcements(21.10.1) Special Reinforcement Table: The Confederate player receives no naval replacements and no set naval reinforcements. All his Naval Units arrive via the Special Reinforcement Table. Each turn the Confederate player receives one naval reinforcement. What is built is determined by a die roll on the Table below. Die Roll Result 1,2 IRONCLAD: Roll once on the Random State Table to de-
termine in which state an Ironclad has started construction. Place with its under-construction side up.
3,4 NAVAL BATTERY: Roll once on the Random State Table to determine in which state a Naval Battery is placed.
5,6 RIVER FLOTILLA: Roll once on the Random State Table to determine in which state a 1-NSP River Flotilla is placed.
(21.10.2) Placement Hex: Any Ironclad, Naval Battery or River Flotilla built must be placed in a friendly-controlled hex that is in Full Supply. Ironclads and River Flotillas must be placed in ports. Naval Batteries may be placed in Ports, Forts, Coastal Forts, and Entrenchments. If no legal placement hex is available in the state, then the item is lost.
(21.10.3) Confederate Ironclads: These arrive in play on their Under-construction side. While under construc-tion it has a NSP value of 0 and cannot move or intercept (the 0 NSP value represents port defense). If forced to
27
© 2015 GMT Games, LLC—revised Mar. 2016
THE U.S. CIVIL WAR
retreat it is eliminated. During the Naval Repair Segment of each turn the Confederate player rolls one die. On a 5 or 6 he may com-plete the construction of one Ironclad currently under construction (his choice). A die roll of 1-4 has no effect. It is possible that many Ironclads can be under construction and few get built.
MOVEMENT: Completed Ironclads may move along Navigable Waterways, but not out to sea. Due to their weight and inadequate engines, Confederate Ironclads that move up a Navigable River may not pass more than one Port per activation (so they could reach a sec-ond Port during movement). Confederate Ironclads can move down Navigable Rivers and along Tidal River Paths with no restrictions.
(21.10.4) Naval Batteries: They have no effect on land combat but provide 2 NSPs in Naval Battles. They are not Naval Units. For Naval purposes they are treated the same as Forts except as noted herein. If caught alone
in a hex by enemy SPs they are immediately eliminated with no delay to the moving SPs. Naval Batteries may not move by land, but may be moved by Rail Movement (10 MPs) and Naval Trans-port—each counting as moving 1 SP. Alternatively, the Confederate player may use a Special Action to reposition a Naval Battery to a different friendly-controlled Port, Fort, Coastal Fort or Entrenchment as long as an LOC exists between the two locations. As it moves to its new location, a Naval Battery has no ability to block or negate Union Naval Control.
(21.10.5) Confederate River Flotillas: Confederate River Flotillas arrive in play completed. They have a strength of 1 and may move an unlimited distance along Navigable Waterways. They may not move into the
hex-less sea area.
21.11 Union Gunboats and Confederate CottoncladsThe Union player has access to screw gunboats which can travel up the Confederate rivers from the ocean. The Confederate player has Cottonclads—armed steamboats protected by cotton bales. Both types of ships have an NSP value of 0 and are not represented by counters. Their function is to allow an Amphibious Assault where regular Naval Units are not allowed or when not available.
RULE: Both players may conduct an Amphibious Assault without Naval Units and claim that it is being led by Gunboats (Union) or Cottonclads (Confederate). Follow all rules of Amphibious Assault but if a Naval Battle occurs, the Phasing Player uses the 0 column of the CRT. Both players have an endless supply of Gunboats and Cottonclads so sunk and damage results have no effect. As with regular Amphibious Assault, units can enter one enemy controlled hex or hexside where friendly naval control does not exist in or-der to land at the target hex, but may never bypass such a hex or hexside. The Confederate player may only claim Cottonclads if his invasion is activated with an “Any” Special Action Card. The Confederate Amphibious Assaults exception (20.5.5) applies to the use of Cottonclads. Union Gunboats cannot be used with the Free Naval Action Point.DESIGN NOTE: This rule allows the Union player to conduct an Amphibious Assault up a Confederate Navigable River from an Ocean Port. The invasion force must start at a port on that river. This rule is also helpful for the Confederate player to retake the Outer Banks of North Carolina or any island the Union player has failed to garrison.
21.12 Naval Special ActionsWhen using Naval Units, a Special Action Card may also be used for the following:• MOVEMENT:MoveastackofNavalUnits.• BATTLES:Providesa+2 DRM to the attacker in a Naval Battle
(the card must be a Naval or an “Any” type card). • OCEANGOINGIRONCLADS:A Naval or “Any” card allows
the Union player to activate a Naval stack for Naval Movement or an Amphibious Assault. If the movement of the Naval Units results in a battle at a Blockade Runner Port, the Union Ironclad Strength (21.5) may be added to the Naval Battle.
• COTTONCLADS:An “Any” card allows the Confederate player to conduct an Amphibious Assault without a Naval Unit against a space containing enemy NSPs (21.11).
• NAVALBATTERY:MoveoneNavalBatterytoadifferentlocation(21.10.4).
21.13 Running the Guns(21.13.1) In General: Naval Units may attempt to sail past enemy NSPs from Forts, Coastal Forts, Naval Batteries, or Naval Units. This is called Running the Guns. 0-NSP Units (21.6.4) have no effect and maynotfireonNavalUnitsRunningtheGuns.Naval Units may not transport SPs (21.7.2) past any Port or NSP that blocks Naval Control, even if the enemy Port or NSP has been trumped (20.1.5). This restriction also applies to the use of Gunboats and Cottonclads.
When Running the Guns, the player forgoes his CRT roll. Only the non-Phasing Player rolls for Naval Combat, modifying his die roll by –2. When Running the Guns, treat Naval Units as follows:• Ifsunk,putthemintheNavalPool(Union)orremovethemfrom
the map (Confederate).• Ifdamaged,theymustreturntotheportoforigin.Iftheyhaveto
pass enemy NSPs in the retreat, they are eliminated.• IftheNavalUnitsaresailingupriverwhileRunningtheGuns,eachdiamondresult“◊”forcesoneNSPtoreturntotheportoforigin without damage. See also 21.13.4.
• Iftheysurvive,theymaycontinuemoving.
(21.13.2) Forts and Batteries on Multiple River Hexsides: If a Fort or Battery is located such that it is adjacent to more than one riverhexside(suchasMemphis),NavalUnitsneedonlyfighttheFort/BatteryonceeachtimetheyenterorpasstheFort/Battery—theydonothavetofightitateachhexsidetheyenter.
(21.13.3) Forts adjacent to Two or More Rivers: If there are two different rivers adjacent to a Fort (as at Dover), the Fort affects both rivers (it represents two Forts). In this case, Running the Guns combat would occur twice —if the Naval Units sailed past the same Fort twice each time on a different river.
(21.13.4) Up River: If the player is sailing up river when Running the Guns, then the enemy player rolls twice for Naval Combat (modifying each roll by –2) adding together the two results for a combined total. In addition, each diamond result forces one ship to fail its attempt to Run the Guns and must return to its port of origin (if this is Naval Retreat then the NSP is eliminated).
21.14 Demoralized Naval UnitsThe only effect of Demoralization on Naval Units is the –2 when attacking. Demoralized Naval Units do not demoralize friendly land units when stacked together and vice versa.
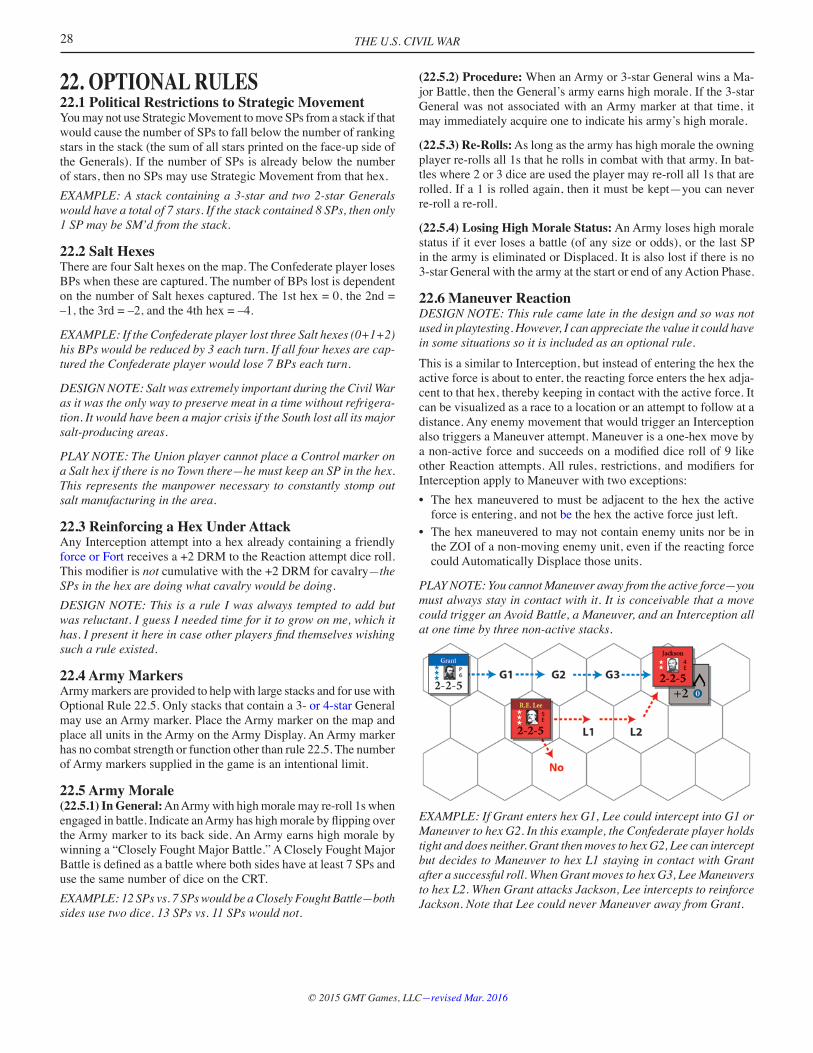
THE U.S. CIVIL WAR28
© 2015 GMT Games, LLC—revised Mar. 2016
22. OPTIONAL RULES22.1 Political Restrictions to Strategic MovementYou may not use Strategic Movement to move SPs from a stack if that would cause the number of SPs to fall below the number of ranking stars in the stack (the sum of all stars printed on the face-up side of the Generals). If the number of SPs is already below the number of stars, then no SPs may use Strategic Movement from that hex.EXAMPLE:Astackcontaininga3-starandtwo2-starGeneralswould have a total of 7 stars. If the stack contained 8 SPs, then only 1 SP may be SM’d from the stack.
22.2 Salt HexesThere are four Salt hexes on the map. The Confederate player loses BPs when these are captured. The number of BPs lost is dependent on the number of Salt hexes captured. The 1st hex = 0, the 2nd = –1, the 3rd = –2, and the 4th hex = –4.
EXAMPLE:IftheConfederateplayerlostthreeSalthexes(0+1+2)his BPs would be reduced by 3 each turn. If all four hexes are cap-tured the Confederate player would lose 7 BPs each turn.
DESIGN NOTE: Salt was extremely important during the Civil War as it was the only way to preserve meat in a time without refrigera-tion. It would have been a major crisis if the South lost all its major salt-producing areas.
PLAY NOTE: The Union player cannot place a Control marker on a Salt hex if there is no Town there—he must keep an SP in the hex. This represents the manpower necessary to constantly stomp out salt manufacturing in the area.
22.3 Reinforcing a Hex Under AttackAny Interception attempt into a hex already containing a friendly force or Fort receives a +2 DRM to the Reaction attempt dice roll. Thismodifierisnot cumulative with the +2 DRM for cavalry—the SPs in the hex are doing what cavalry would be doing.DESIGN NOTE: This is a rule I was always tempted to add but was reluctant. I guess I needed time for it to grow on me, which it has.Ipresentithereincaseotherplayersfindthemselveswishingsuch a rule existed.
22.4 Army MarkersArmy markers are provided to help with large stacks and for use with Optional Rule 22.5. Only stacks that contain a 3- or 4-star General may use an Army marker. Place the Army marker on the map and place all units in the Army on the Army Display. An Army marker has no combat strength or function other than rule 22.5. The number of Army markers supplied in the game is an intentional limit.
22.5 Army Morale(22.5.1) In General: An Army with high morale may re-roll 1s when engagedinbattle.IndicateanArmyhashighmoralebyflippingoverthe Army marker to its back side. An Army earns high morale by winning a “Closely Fought Major Battle.” A Closely Fought Major Battleisdefinedasabattlewherebothsideshaveatleast7SPsanduse the same number of dice on the CRT.EXAMPLE:12SPsvs.7SPswouldbeaCloselyFoughtBattle—bothsides use two dice. 13 SPs vs. 11 SPs would not.
(22.5.2) Procedure: When an Army or 3-star General wins a Ma-jor Battle, then the General’s army earns high morale. If the 3-star General was not associated with an Army marker at that time, it may immediately acquire one to indicate his army’s high morale.
(22.5.3) Re-Rolls: As long as the army has high morale the owning player re-rolls all 1s that he rolls in combat with that army. In bat-tles where 2 or 3 dice are used the player may re-roll all 1s that are rolled. If a 1 is rolled again, then it must be kept—you can never re-roll a re-roll.
(22.5.4) Losing High Morale Status: An Army loses high morale status if it ever loses a battle (of any size or odds), or the last SP in the army is eliminated or Displaced. It is also lost if there is no 3-star General with the army at the start or end of any Action Phase.
22.6 Maneuver ReactionDESIGN NOTE: This rule came late in the design and so was not used in playtesting. However, I can appreciate the value it could have in some situations so it is included as an optional rule.This is a similar to Interception, but instead of entering the hex the active force is about to enter, the reacting force enters the hex adja-cent to that hex, thereby keeping in contact with the active force. It can be visualized as a race to a location or an attempt to follow at a distance. Any enemy movement that would trigger an Interception also triggers a Maneuver attempt. Maneuver is a one-hex move by anon-activeforceandsucceedsonamodifieddicerollof9likeotherReactionattempts.All rules, restrictions,andmodifiersfor Interception apply to Maneuver with two exceptions:• Thehexmaneuveredtomustbeadjacenttothehextheactive
force is entering, and not be the hex the active force just left.• Thehexmaneuveredtomaynotcontainenemyunitsnorbein
the ZOI of a non-moving enemy unit, even if the reacting force could Automatically Displace those units.
PLAY NOTE: You cannot Maneuver away from the active force—you must always stay in contact with it. It is conceivable that a move could trigger an Avoid Battle, a Maneuver, and an Interception all at one time by three non-active stacks.
EXAMPLE: If Grant enters hex G1, Lee could intercept into G1 or ManeuvertohexG2.Inthisexample,theConfederateplayerholdstightanddoesneither.GrantthenmovestohexG2,Leecaninterceptbut decides to Maneuver to hex L1 staying in contact with Grant after a successful roll. When Grant moves to hex G3, Lee Maneuvers tohexL2.WhenGrantattacksJackson,LeeinterceptstoreinforceJackson. Note that Lee could never Maneuver away from Grant.

29
© 2015 GMT Games, LLC—revised Mar. 2016
THE U.S. CIVIL WAR
SCENARIOSGETTING STARTEDPick the scenario you want to play and set up the pieces using the scenario setup cards. Use the scenario data to place the markers. The game starts with each player rolling one die to determine Initiative. Thewinnerofthatrollmovesfirst.
Additional Turn Track Information:• Turn 6: The Union player may choose to transfer Grant to
Halleck’s location. • Turn 17: The Union player may choose to not remove Hunter.
If Hunter is not removed, Sheridan may not be transferred.
S1. THE 1861 SCENARIOS1.1 Setup and Scenario Data• Game Length: 3 turns. Starts on Turn 1 and ends in the Victory
Check Phase of Turn 3.• First Player: Determined by Initiative die roll.• Setup: Use the 1861 At Start Card. Allow the Union player to
start one of his SPs listed for D.C. in Alexandria (hex 1747).• Special Action Cards: Each player starts with two—drawn
randomly.• Start with the Action Phase: Skip the Reinforcement, Strategic Movement,andLeaderManagementPhasesonthefirstturn.
• Border States: West Virginia is Confederate controlled, Kentucky is Neutral, and Missouri is Union Controlled.
• Blockade Markers: N.Atl = 5, S.Atl = 7, Gulf = 8.• Status Track Markers: Arsenals = 1; Maintenance = 10; Re-
source BPs = 99; Union VPs = 1 (Harper’s Ferry); Union Ironclads = 0; CSA Training = 0; Union Training = 0.
S1.2 Scenario Victory ConditionsUnion Victory: The Union player wins if he has 7 VPs at the end of the scenario. If the Confederate player has any VPs, those must be subtracted from the Union VPs before determining victory.In addition to the normal VPs listed in the Automatic Victory section, also award the Union and Confederate players the following VPs at the end of the scenario:• UNION:1/2 VP (retain fractions) for each Blockade DRM Point
currently in Union control.• CONFEDERATE:1VPforeachBorderStateObjectiveHexin
CSA control.
Confederate Victory: The Confederate player wins if the Union player has failed to achieve his victory conditions. Note that the Union player starts with 1 VP for Harper’s Ferry and 1 VP for the Blockade Runner ports of Norfolk and Pensacola.
S1.3 Special Rules1861 Union Naval Control: In the Basic Game Union Naval Control, Amphibious Assaults and River Transport DOWN the Mississippi is prohibited past hex 2516 until 1862.
1861 Naval Ramp Up: The Union SP capability for Naval Transport, Strategic River Movement and Strategic Ocean Movement is limited to 0 SP on Turn 1, 1 SP on Turn 2, 2 SP on Turn 3 and 3 SP thereafter.
The Confederate SP capability for Naval Transport and Strategic River Movement is limited to 0 SP on Turn 1 and 1 SP thereafter.
S1.4 Optional Rules1861: Use the following in 1861 to slow down the action during the early months of the war:• NeitherplayerstartswithSpecialActionCards.• Useonly3ActionPhasesperturn.• TheUnionplayerneedsonly5VPstowinthe1861Scenario.
S2. THE 1862 SCENARIOS2.1 Setup and Scenario Data• Game Length: 5 turns. Starts on Turn 4 (Winter, 1862) and ends
at the completion of the End Phase of Turn 8 (Fall, 1862).• First Player: Determined by Initiative die roll.• Setup: Use the 1862 At Start Card. • Special Action Cards: Each player starts with three—drawn
randomly.• Start with the Action Phase: Skip the Reinforcement, Strategic Movement,andLeaderManagementPhasesonthefirstturn.
• Arsenals Destroyed: None• Border States: West Virginia, Missouri and Kentucky are Union
Controlled.• Blockade Markers: N.Atl = 4, S.Atl = 6, Gulf = 7• StatusTrackMarkers:Arsenals=4;Maintenance=10;Resource
BPs = 96; Union VPs = 4 (West Virginia and Harper’s Ferry); Union Ironclads = 2; CSA Training = 0; Union Training = 0.
S2.2 Scenario Victory ConditionsUnion Victory: The Union player wins if he has 24 VPs at the end of the game. If the Confederate player has any VPs, those must be subtracted from the Union VPs before determining victory.
In addition to the normal VPs listed in the Automatic Victory section, also award the Union and Confederate players the following VPs at the end of the scenario:• UNION:1/2 VP (retain fractions) for each Blockade DRM Point
currently in Union control.• CONFEDERATE:1VPforeachBorderStateObjectiveHexin
CSA control.
PLAY NOTE: The Union player starts with 4 VPs of CSA Resource Hexes (Harper’s Ferry, Charleston WV, Grafton WV, and Wheeling WV);2.5VPsfor5capturedBlockadeDRMs;and–2VPsforCSAcontrol of Bowling Green and Columbus. A net of 4.5 VPs.
Confederate Victory: The Confederate player wins if the Union player has failed to achieve his victory conditions.
THE U.S. CIVIL WAR30
© 2015 GMT Games, LLC—revised Mar. 2016
CREDITSGame Design: Mark SimonitchDeveloper: Jim DauphinaisDevelopment Advisors: Jim Lauffenburger and Henrik Re-schreiter.Special Thanks to Eric Lee Smith (designer of Victory’s The Civil War game) and Mark Herman (designer of GMT’s For The People game), who inspired many of the concepts used in this game. To Sebastian Chedal for early guidance and support. To Rick Young (designer of GMT’s Europe Engulfed) for providing the idea of the Special Action system.Box Art and Package Design: Rodger B. MacGowanMap Art: Mark SimonitchCounter Art: Mark Simonitch and Rodger B. MacGowanPlaytesting: Joseph Acker, Art Bennett, Ramón Real Bernal, Rob Bottos, John Charbonneau, Rob Doane, Paul Dobbins, Gerry Germond, Mark Herman, John Holden, Dave Knoyle, Jim Lauffenburger, John Leggat, Simone Melchiori, Jason Pipes, Henrik Reschreiter, Ellis Simpson, John Steidl, Dick Whitaker, Bill Wood.Quality Control: Kai JensenProofreading: Hans Korting, Ellis Simpson, Steve CareyProduction Coordination: Tony CurtisProducers: Tony Curtis, Rodger B. MacGowan, Andy Lewis, Gene Billingsley and Mark Simonitch
S3. THE 1863 SCENARIOS3.1 Setup and Scenario Data• Game Length: 5 turns. Starts on Turn 9 (Winter, 1863) and ends
on the End Phase of Turn 13.• First Player: Determined by Initiative die roll• Setup: Use the 1863 At Start Card.• Union Control Markers: Besides those listed on the Setup card
place a Union Control marker in the following four hexes in Tennessee: Union City (2616), McKenzie (2718), Jackson (2917), and Brownsville (2915).
• Special Action Cards: Each player starts with three—drawn randomly.
• Start with the Action Phase: Skip the Reinforcement, Strategic Movement,andLeaderManagementPhasesonthefirstturn.
• Arsenals Destroyed: None• Border States: West Virginia, Missouri and Kentucky are Union
Controlled.• Blockade Markers: N.Atl = 2, S.Atl = 2, Gulf = 3• Status Track Markers: Arsenals = 9; Maintenance = 10;
Resource BPs = 78; Union VPs = 24; Union Ironclads = 4; CSA Training = 0; Union Training = 0.
• Union Removed Generals: Buell, Fremont, Halleck, Lyon, McClellan, Patterson, Pope, and Sumner.
• Unassigned Box: J. Johnston (CSA), Butler (Union) (16.5.2).S3.2 Scenario Victory ConditionsUnion Victory: The Union player wins if he has 39 VPs at the end of the game. If the Confederate player has any VPs, those must be subtracted from the Union VPs before determining victory.
In addition to the normal VPs listed in the Automatic Victory section, also award the Union and Confederate players the following VPs at the end of the scenario:
• UNION:1/2 VP (retain fractions) for each Blockade DRM Point currently in Union control.
• CONFEDERATE:1VPforeachBorderStateObjectiveHexinCSA control.
Confederate Victory: The Confederate player wins if the Union player has failed to achieve his victory conditions.ATSTARTERRATA:WashingtonDCshouldbeaF3fort.Unioncontrol markers start in Beaufort (3148), Ft. Macon, and Ft. St. Phillip/Jackson. Nashville and Memphis have destroyed markers.
S4. THE CAMPAIGN GAMES4.1 Setup and Scenario DataGame Length: 20 turns. Starts on Turn 1 and ends in the Victory Check Phase of Turn 20.
1861 Start: For the 1861 start, use all the data from the 1861 Scenario.
Variable Start: Players can also start the Campaign Game in 1862 or 1863. To do that, use that scenario’s setup information and the Campaign Game’s victory conditions.
S4.2 Campaign Game Victory ConditionsIf neither player has won an Automatic Victory by the end of the last turn, then the Union player wins if he has 60 or more VPs. The Confederate player wins if the Union player has less than that.DESIGN NOTE: A Confederate victory at the end of the game does not mean the South wins the war, but rather they are able to ask for more terms at the peace table.
S4.3 The 1864 Presidential ElectionDuring the Victory Check Phase of Turn 18 temporarily reduce Union VPs by 5 points. If this triggers a Confederate Automatic Victory, then it is assumed McClellan wins the 1864 election and initiates peace talks. The game immediately ends as a Confederate victory. If the temporary reduction does not trigger a Confederate Automatic Victory then Lincoln wins re-election, the 5 VPs are restored and the game continues.

31
© 2015 GMT Games, LLC—revised Mar. 2016
THE U.S. CIVIL WAR
Generals of Equal Rank
In example A, Sherman moves faster but Thomas has a better defense rating. The Union player cannot move the stack with Sherman and then put Thomas in command when the stack stops. In example B, Sherman stops in a hex with two Generals of equal rank. Either Sherman or Thomas can become the Commanding General of the combined stack—not Couch. However, if Couch has not yet been activated, the Union player may activate him and move him with any Generals and SPs that have not yet moved. Couch can even return to the stack and be placed in command of the combined stack.
Cautious Generals
The Union player wishes to activate McClellan who is a Cautious General. If he takes path A it would require two Action Points to activate him since that takes him into Lee’s ZOI. If Lee does not intercept at A1, McClellan could be moved to hex A2 without any additional Action Point cost—the initial cost covers the entire ac-tivation, it is not a cost paid per enemy ZOI entered. If McClellan was moved on path B it would require only 1 Action Point since no enemy ZOI is entered.
InterceptionsA successful Interception requires the non-Phasing Player to roll a 9 or higher with two dice. Cavalry provides a +2 DRM and the Commanding General provides his Defense Rating.
ThefourcasesabovehavethefollowingInterceptionmodifiers:A: Cannot intercept—a General is required for Interception.B: +1 for Beauregard’s Defense RatingC: +4 (+2 for Cavalry and +2 for Forrest’s Defense Rating)D: +3: (+2 for Cavalry and +1 for Bragg’s Defense Rating)
An Interception attempt is allowed in each hex in the Zone of In-fluenceofanon-movingGeneral.Intheexampleabove,Leecouldtry an Interception at C even if he failed at A and B.
An Interception attempt is allowed even if the force has conducted an Avoid Battle in the same activation. In the example above Lee could Avoid Battle to A1 and then intercept into A2 if Grant tries to move around him. However, you cannot do a combination Intercep-tion-AvoidBattleinto/fromthesamehex.Jacksoncannotinterceptinto hex B1 then immediately Avoid Battle into hex B2—a battle wouldoccurinhexB1first.
In the example above Grant moves to attack Lee. Jackson cannot Intercept Grant at A because Interceptions are not allowed across unbridged Navigable Rivers. Neither Jackson or Lee can intercept into hex B because of the non-moving Union SP there. Lee could intercept into hex C but decides not to. If Grant enters hex D, Jackson could intercept into hex D to reinforce Lee.
EXAMPLES OF PLAY
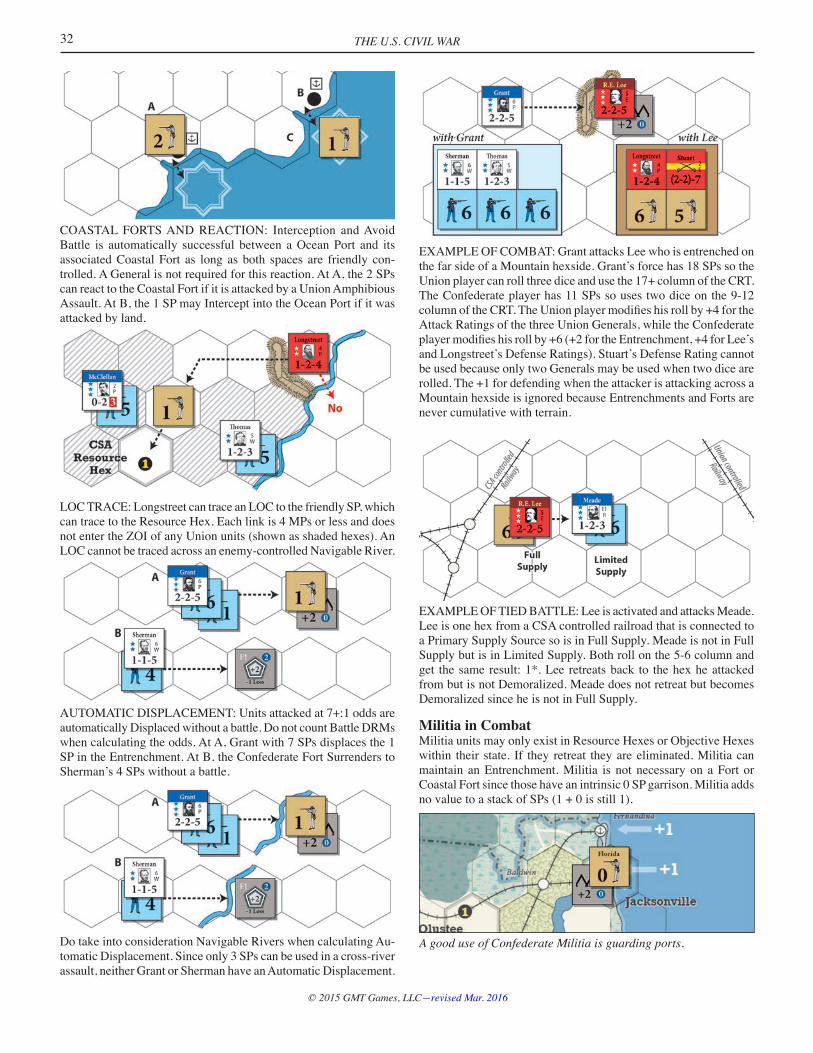
THE U.S. CIVIL WAR32
© 2015 GMT Games, LLC—revised Mar. 2016
COASTAL FORTS AND REACTION: Interception and Avoid Battle is automatically successful between a Ocean Port and its associated Coastal Fort as long as both spaces are friendly con-trolled. A General is not required for this reaction. At A, the 2 SPs can react to the Coastal Fort if it is attacked by a Union Amphibious Assault. At B, the 1 SP may Intercept into the Ocean Port if it was attacked by land.
LOC TRACE: Longstreet can trace an LOC to the friendly SP, which can trace to the Resource Hex. Each link is 4 MPs or less and does not enter the ZOI of any Union units (shown as shaded hexes). An LOC cannot be traced across an enemy-controlled Navigable River.
AUTOMATIC DISPLACEMENT: Units attacked at 7+:1 odds are automatically Displaced without a battle. Do not count Battle DRMs when calculating the odds. At A, Grant with 7 SPs displaces the 1 SP in the Entrenchment. At B, the Confederate Fort Surrenders to Sherman’s 4 SPs without a battle.
Do take into consideration Navigable Rivers when calculating Au-tomatic Displacement. Since only 3 SPs can be used in a cross-river assault, neither Grant or Sherman have an Automatic Displacement.
EXAMPLE OF COMBAT: Grant attacks Lee who is entrenched on the far side of a Mountain hexside. Grant’s force has 18 SPs so the Union player can roll three dice and use the 17+ column of the CRT. The Confederate player has 11 SPs so uses two dice on the 9-12 columnoftheCRT.TheUnionplayermodifieshisrollby+4fortheAttack Ratings of the three Union Generals, while the Confederate playermodifieshisrollby+6(+2fortheEntrenchment,+4forLee’sand Longstreet’s Defense Ratings). Stuart’s Defense Rating cannot be used because only two Generals may be used when two dice are rolled. The +1 for defending when the attacker is attacking across a Mountain hexside is ignored because Entrenchments and Forts are never cumulative with terrain.
EXAMPLE OF TIED BATTLE: Lee is activated and attacks Meade. Lee is one hex from a CSA controlled railroad that is connected to a Primary Supply Source so is in Full Supply. Meade is not in Full Supply but is in Limited Supply. Both roll on the 5-6 column and get thesameresult:1*.Leeretreatsback to thehexheattackedfrom but is not Demoralized. Meade does not retreat but becomes Demoralized since he is not in Full Supply.
Militia in CombatMilitia units may only exist in Resource Hexes or Objective Hexes within their state. If they retreat they are eliminated. Militia can maintain an Entrenchment. Militia is not necessary on a Fort or Coastal Fort since those have an intrinsic 0 SP garrison. Militia adds no value to a stack of SPs (1 + 0 is still 1).
A good use of Confederate Militia is guarding ports.

33
© 2015 GMT Games, LLC—revised Mar. 2016
THE U.S. CIVIL WAR
Important SP Numbers
1 SP: May cross enemy-controlled Navigable Rivers. Maximum amount that can be carried by a Cavalry General, by a CSA Amphibious Assault, or a CSA Naval Transport action.2 SPs: Minimum required to build an Entrenchment or place a Control marker during movement. 3 SPs: The maximum amount that can be carried by a 1-star General, a Union Amphibious Assault, or a Union Naval Transport action.6 SPs: Maximum amount a 2-star General may carry.18 SPs: Maximum amount a 3- or 4-star General may carry.
Automatic Victory CheckThisstepcanbesimplifiedifyoucountthecapturedResourceHexesby state and move in a clockwise direction. Start in West Virginia (usually 3) and move to Virginia, down the coast to Florida, along the Gulf to Texas, up to Arkansas, and ending in Tennessee. Once you have the number of Union VPs from the BP values printed on the map you also have the number of Confederate Resource BPs if you subtract it from 100.
Confederate ReinforcementsCalculatingConfederateReinforcementscanbedauntingthefirsttime, so here are some suggestions:
1. BPs from Resource Hexes: The easiest way to determine this is to add up the BP values printed on the map that the Union player has captured or burned and subtract that value from 100 to determine Confederate BPs. For example, say it is the start of Turn 5. The Union player has captured all three Resource Hexes in West Virginia (3), still has control of Harper’s Ferry (1), has captured Clarksville, TN (1), andburnedNashvillebutitwasrecaptured(2)foratotalofseven.100 – 7 = 93 BPs.
2. Arsenals: The key here is to realize that the number of Arsenals on the map and in the Arsenals Destroyed box is always equal to the turn number. So if you keep careful track of destroyed Arsenals you never have to hunt the map to count up your Arsenal markers.If there are no Arsenals in the Destroyed box on Turn 5, then the Confederate player adds 5 BPs for Arsenals.
3. Border State Militia: This is usually pretty easy: 2 BPs per Ob-jective Hex controlled in Kentucky or Missouri up to a maximum of 8 BPs in each of the two states.If theConfederateplayercontrolsSpringfield,MOandBowlingGreen, KY he would receive 4 BPs.
4. Blockade Running: Roll one die for each of the Blockade Zones going from the North Atlantic to the Gulf applying the appropriate modifiers.
5. Tally Up: With those four steps completed you can calculate your BPs. Lets assume in our Turn 5 example the Confederate player earned 26 BPs from Blockade Running, and Maintenance is currently 10. 93 (Resource Hexes) + 5 (Arsenals) + 4 (Border States) + 26 BPs (Blockade Running) – 10 (Maintenance) = 118. Divide by 10 = 11 SPs.
Railroad Control
EXAMPLES: For these examples assume Union Railroad Control originatesfromaResource/ObjectiveHexofftheimagetotheleft,and Confederate Railroad Control originates off to the right. Union Railroad Control is indicated with a blue highlight, while Confeder-ate control is indicated in brown. At A, the Union Railroad Control is blocked by Lee’s ZOI. Likewise, Confederate Railroad control is blocked by Grant’s ZOI. At B, Union Railroad control trumps Con-federate control and extends all the way to the edge of the next Town hex. At C, the Union Railroad Control is stopped by the Confederate unit and its ZOI. Confederate Railroad Control extends the rest of the way. At D, the Confederate SP blocks Union Railroad Control while the Union SP negates the Confederate Railroad control. At E, Jackson’s ZOI blocks enemy railroad control except in hexes containing enemy units.
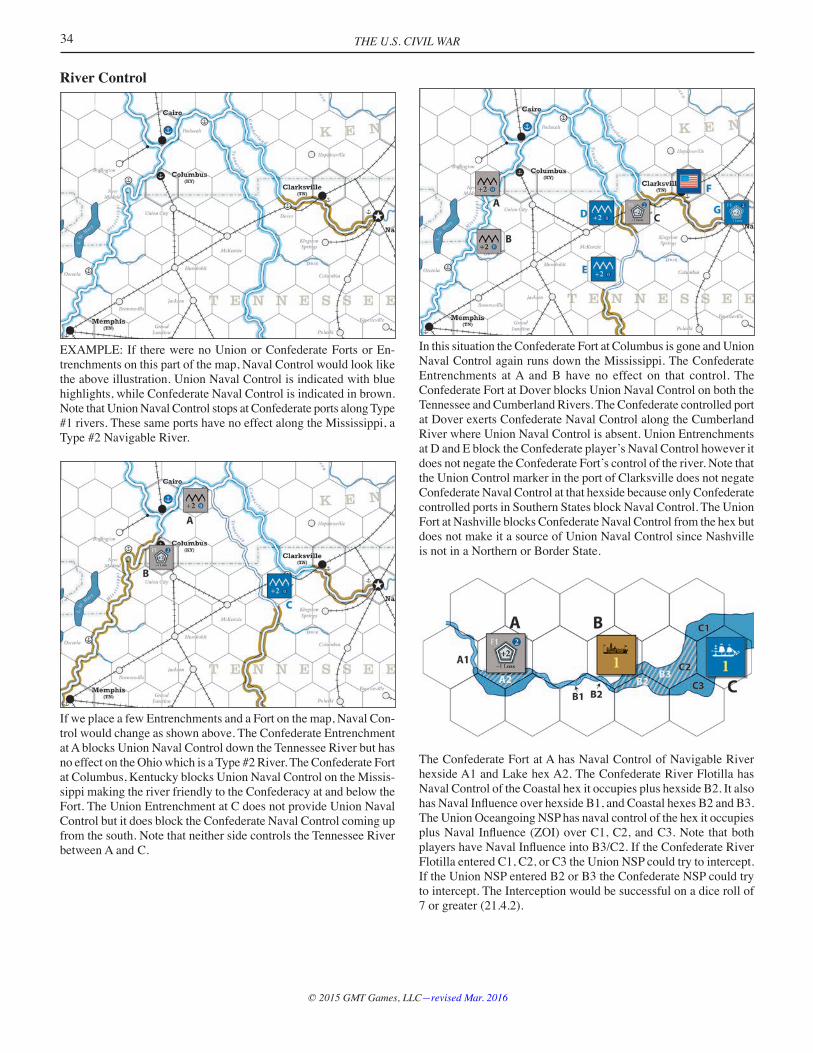
THE U.S. CIVIL WAR34
© 2015 GMT Games, LLC—revised Mar. 2016
River Control
EXAMPLE: If there were no Union or Confederate Forts or En-trenchments on this part of the map, Naval Control would look like the above illustration. Union Naval Control is indicated with blue highlights, while Confederate Naval Control is indicated in brown. Note that Union Naval Control stops at Confederate ports along Type #1 rivers. These same ports have no effect along the Mississippi, a Type #2 Navigable River.
If we place a few Entrenchments and a Fort on the map, Naval Con-trol would change as shown above. The Confederate Entrenchment at A blocks Union Naval Control down the Tennessee River but has no effect on the Ohio which is a Type #2 River. The Confederate Fort at Columbus, Kentucky blocks Union Naval Control on the Missis-sippi making the river friendly to the Confederacy at and below the Fort. The Union Entrenchment at C does not provide Union Naval Control but it does block the Confederate Naval Control coming up from the south. Note that neither side controls the Tennessee River between A and C.
In this situation the Confederate Fort at Columbus is gone and Union Naval Control again runs down the Mississippi. The Confederate Entrenchments at A and B have no effect on that control. The Confederate Fort at Dover blocks Union Naval Control on both the Tennessee and Cumberland Rivers. The Confederate controlled port at Dover exerts Confederate Naval Control along the Cumberland River where Union Naval Control is absent. Union Entrenchments at D and E block the Confederate player’s Naval Control however it does not negate the Confederate Fort’s control of the river. Note that the Union Control marker in the port of Clarksville does not negate Confederate Naval Control at that hexside because only Confederate controlled ports in Southern States block Naval Control. The Union Fort at Nashville blocks Confederate Naval Control from the hex but does not make it a source of Union Naval Control since Nashville is not in a Northern or Border State.
The Confederate Fort at A has Naval Control of Navigable River hexside A1 and Lake hex A2. The Confederate River Flotilla has Naval Control of the Coastal hex it occupies plus hexside B2. It also hasNavalInfluenceoverhexsideB1,andCoastalhexesB2andB3.The Union Oceangoing NSP has naval control of the hex it occupies plusNavalInfluence(ZOI)overC1,C2,andC3.NotethatbothplayershaveNavalInfluenceintoB3/C2.IftheConfederateRiverFlotilla entered C1, C2, or C3 the Union NSP could try to intercept. If the Union NSP entered B2 or B3 the Confederate NSP could try to intercept. The Interception would be successful on a dice roll of 7 or greater (21.4.2).
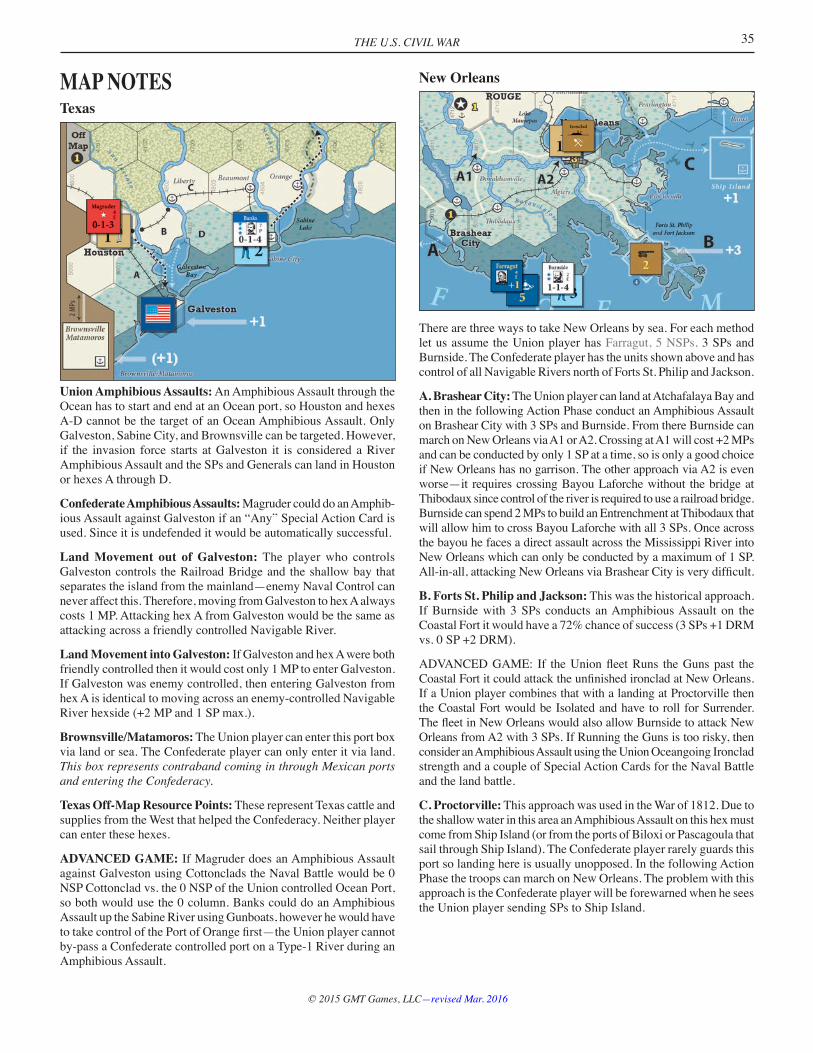
35
© 2015 GMT Games, LLC—revised Mar. 2016
THE U.S. CIVIL WAR
MAP NOTESTexas
Union Amphibious Assaults: An Amphibious Assault through the Ocean has to start and end at an Ocean port, so Houston and hexes A-D cannot be the target of an Ocean Amphibious Assault. Only Galveston, Sabine City, and Brownsville can be targeted. However, if the invasion force starts at Galveston it is considered a River Amphibious Assault and the SPs and Generals can land in Houston or hexes A through D.
Confederate Amphibious Assaults: Magruder could do an Amphib-ious Assault against Galveston if an “Any” Special Action Card is used. Since it is undefended it would be automatically successful.
Land Movement out of Galveston: The player who controls Galveston controls the Railroad Bridge and the shallow bay that separates the island from the mainland—enemy Naval Control can never affect this. Therefore, moving from Galveston to hex A always costs 1 MP. Attacking hex A from Galveston would be the same as attacking across a friendly controlled Navigable River.
Land Movement into Galveston: If Galveston and hex A were both friendly controlled then it would cost only 1 MP to enter Galveston. If Galveston was enemy controlled, then entering Galveston from hex A is identical to moving across an enemy-controlled Navigable River hexside (+2 MP and 1 SP max.).
Brownsville/Matamoros: The Union player can enter this port box via land or sea. The Confederate player can only enter it via land. This box represents contraband coming in through Mexican ports and entering the Confederacy.
Texas Off-Map Resource Points: These represent Texas cattle and supplies from the West that helped the Confederacy. Neither player can enter these hexes.
ADVANCED GAME: If Magruder does an Amphibious Assault against Galveston using Cottonclads the Naval Battle would be 0 NSP Cottonclad vs. the 0 NSP of the Union controlled Ocean Port, so both would use the 0 column. Banks could do an Amphibious Assault up the Sabine River using Gunboats, however he would have totakecontrolofthePortofOrangefirst—theUnionplayercannotby-pass a Confederate controlled port on a Type-1 River during an Amphibious Assault.
New Orleans
There are three ways to take New Orleans by sea. For each method let us assume the Union player has Farragut, 5 NSPs, 3 SPs and Burnside. The Confederate player has the units shown above and has control of all Navigable Rivers north of Forts St. Philip and Jackson.
A. Brashear City: The Union player can land at Atchafalaya Bay and then in the following Action Phase conduct an Amphibious Assault on Brashear City with 3 SPs and Burnside. From there Burnside can march on New Orleans via A1 or A2. Crossing at A1 will cost +2 MPs and can be conducted by only 1 SP at a time, so is only a good choice if New Orleans has no garrison. The other approach via A2 is even worse—it requires crossing Bayou Laforche without the bridge at Thibodaux since control of the river is required to use a railroad bridge. Burnside can spend 2 MPs to build an Entrenchment at Thibodaux that will allow him to cross Bayou Laforche with all 3 SPs. Once across the bayou he faces a direct assault across the Mississippi River into New Orleans which can only be conducted by a maximum of 1 SP. All-in-all,attackingNewOrleansviaBrashearCityisverydifficult.
B. Forts St. Philip and Jackson: This was the historical approach. If Burnside with 3 SPs conducts an Amphibious Assault on the Coastal Fort it would have a 72% chance of success (3 SPs +1 DRM vs. 0 SP +2 DRM).
ADVANCEDGAME: If theUnionfleetRuns theGunspast theCoastalFortitcouldattacktheunfinishedironcladatNewOrleans.If a Union player combines that with a landing at Proctorville then the Coastal Fort would be Isolated and have to roll for Surrender. ThefleetinNewOrleanswouldalsoallowBurnsidetoattackNewOrleans from A2 with 3 SPs. If Running the Guns is too risky, then consider an Amphibious Assault using the Union Oceangoing Ironclad strength and a couple of Special Action Cards for the Naval Battle and the land battle.
C. Proctorville: This approach was used in the War of 1812. Due to the shallow water in this area an Amphibious Assault on this hex must come from Ship Island (or from the ports of Biloxi or Pascagoula that sail through Ship Island). The Confederate player rarely guards this port so landing here is usually unopposed. In the following Action Phase the troops can march on New Orleans. The problem with this approach is the Confederate player will be forewarned when he sees the Union player sending SPs to Ship Island.
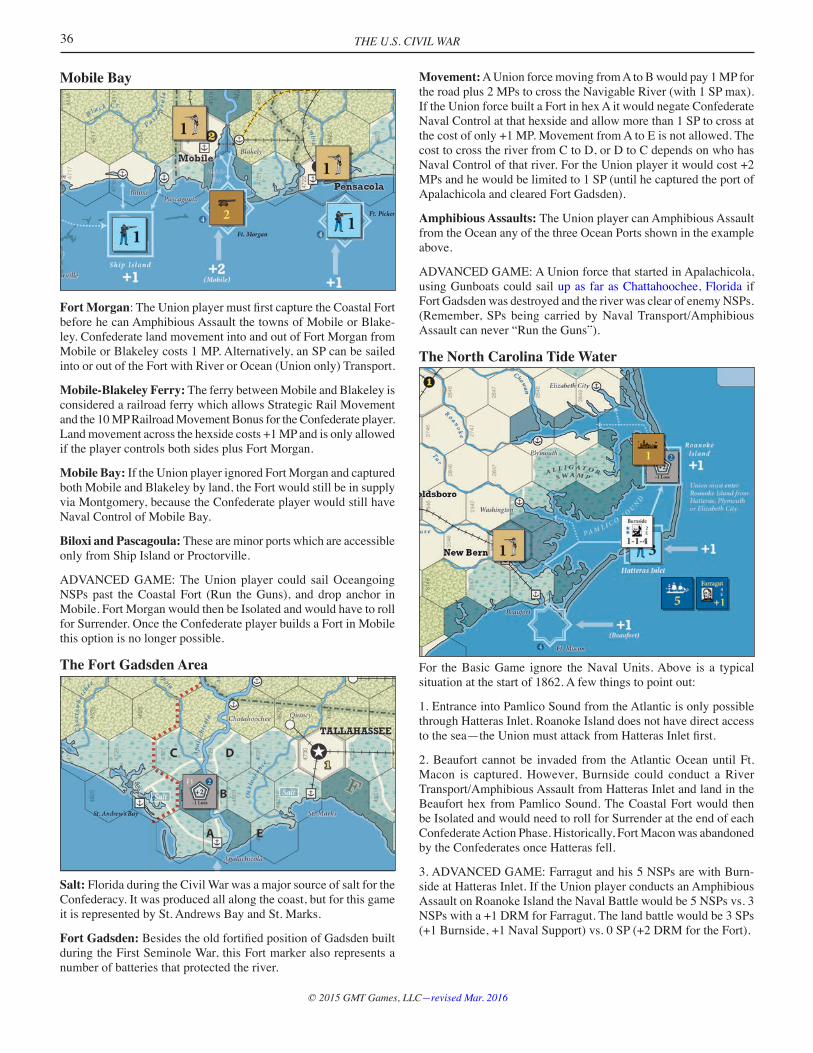
THE U.S. CIVIL WAR36
© 2015 GMT Games, LLC—revised Mar. 2016
Mobile Bay
Fort Morgan:TheUnionplayermustfirstcapturetheCoastalFortbefore he can Amphibious Assault the towns of Mobile or Blake-ley. Confederate land movement into and out of Fort Morgan from Mobile or Blakeley costs 1 MP. Alternatively, an SP can be sailed into or out of the Fort with River or Ocean (Union only) Transport.
Mobile-Blakeley Ferry: The ferry between Mobile and Blakeley is considered a railroad ferry which allows Strategic Rail Movement and the 10 MP Railroad Movement Bonus for the Confederate player. Land movement across the hexside costs +1 MP and is only allowed if the player controls both sides plus Fort Morgan.
Mobile Bay: If the Union player ignored Fort Morgan and captured both Mobile and Blakeley by land, the Fort would still be in supply via Montgomery, because the Confederate player would still have Naval Control of Mobile Bay.
Biloxi and Pascagoula: These are minor ports which are accessible only from Ship Island or Proctorville.
ADVANCED GAME: The Union player could sail Oceangoing NSPs past the Coastal Fort (Run the Guns), and drop anchor in Mobile. Fort Morgan would then be Isolated and would have to roll for Surrender. Once the Confederate player builds a Fort in Mobile this option is no longer possible.
The Fort Gadsden Area
Salt: Florida during the Civil War was a major source of salt for the Confederacy. It was produced all along the coast, but for this game it is represented by St. Andrews Bay and St. Marks.
Fort Gadsden:BesidestheoldfortifiedpositionofGadsdenbuiltduring the First Seminole War, this Fort marker also represents a number of batteries that protected the river.
Movement: A Union force moving from A to B would pay 1 MP for the road plus 2 MPs to cross the Navigable River (with 1 SP max). If the Union force built a Fort in hex A it would negate Confederate Naval Control at that hexside and allow more than 1 SP to cross at the cost of only +1 MP. Movement from A to E is not allowed. The cost to cross the river from C to D, or D to C depends on who has Naval Control of that river. For the Union player it would cost +2 MPs and he would be limited to 1 SP (until he captured the port of Apalachicola and cleared Fort Gadsden).
Amphibious Assaults: The Union player can Amphibious Assault from the Ocean any of the three Ocean Ports shown in the example above.
ADVANCED GAME: A Union force that started in Apalachicola, using Gunboats could sail up as far as Chattahoochee, Florida if Fort Gadsden was destroyed and the river was clear of enemy NSPs. (Remember, SPs being carried byNavalTransport/AmphibiousAssault can never “Run the Guns”).
The North Carolina Tide Water
For the Basic Game ignore the Naval Units. Above is a typical situation at the start of 1862. A few things to point out:
1. Entrance into Pamlico Sound from the Atlantic is only possible through Hatteras Inlet. Roanoke Island does not have direct access tothesea—theUnionmustattackfromHatterasInletfirst.
2. Beaufort cannot be invaded from the Atlantic Ocean until Ft. Macon is captured. However, Burnside could conduct a River Transport/AmphibiousAssaultfromHatterasInletandlandintheBeaufort hex from Pamlico Sound. The Coastal Fort would then be Isolated and would need to roll for Surrender at the end of each Confederate Action Phase. Historically, Fort Macon was abandoned by the Confederates once Hatteras fell.
3. ADVANCED GAME: Farragut and his 5 NSPs are with Burn-side at Hatteras Inlet. If the Union player conducts an Amphibious Assault on Roanoke Island the Naval Battle would be 5 NSPs vs. 3 NSPs with a +1 DRM for Farragut. The land battle would be 3 SPs (+1 Burnside, +1 Naval Support) vs. 0 SP (+2 DRM for the Fort).

37
© 2015 GMT Games, LLC—revised Mar. 2016
THE U.S. CIVIL WAR
Defending Vicksburg
TheConfederateplayershouldconsiderbuildingupthefortificationsof Vicksburg to a Level F3 after Memphis falls to the Union player. 2 SPs with a +1 General and a F3 Fort guarantees the Fort will not fall from an Amphibious Assault.
The Yazoo River: Note that the Fort and Naval Batteries in Vicks-burg do not affect river movement in hex A. Movement and Combat between hex A and Vicksburg is prohibited. The Union player can freely sail into the Yazoo River.
Chickasaw Bluffs: Vicksburg is vulnerable from hex B which is the rough location of Chickasaw Bluffs. If the Confederate player can afford it, he should have an Entrenched SP in this hex to make the Unionplayerfightforalandinghere.AUnionSPinhexBwouldbe in Full Supply (River Supply) and would be a depot for other units tracing an LOC to it for Limited Supply.
How Safe is Cairo?
For the Basic Game ignore all the Naval Units in this example. If you are the Confederate player and would like to take Cairo, here are a few methods:
1. Send Morgan after it. From his position in the example he can reach Cairo in 7 MPs, spending 2 MPs to cross the Ohio River at R2. The Confederate player rolls on the 1 column with a +2 DRM, while the Union player rolls on the 0 column with a +2 DRM. Morgan has a 44% chance of taking the town.
2. Use an “Any” Special Action Card to conduct an Amphibious Assault. 1 SP vs. 0 SP and the +2 DRM for the Fort has a 22% chance of success. Use another Special Action Card for the +2 DRM and the odds go up to 44%.
3. Send Polk’s force to attack the Fort directly. Since the Navigable River is enemy controlled only 1 SP can be used in the attack.
ADVANCEDGAME:We are assuming theUnionfleet is busyhelping Grant at Nashville and the Union player has left only the Fort in Cairo. With the Advanced rules and the two Confederate River Flotillas (2 NSPs) the situation changes as follows:1. No change.2. The 2 NSPs accompany the Amphibious Assault and will have towintheNavalBattleagainsttheFortbeforethe1SPmayland.*3. If the 2 NSPs win a Naval Battle against the Fort then 3 SPs from Polk’sstackcanbeusedintheattack.**Incase#2and#3,ifatleastonesquadronsurvivesitprovidestheConfederate player with a +1 for Naval Support.4. New Option: The Confederate player could run the 2 NSPs past the Fort and park the ships in the Paducah hex to allow Polk to cross at R2. Since it is an upriver Running the Guns (21.13.4), the Union player rolls twice on the 2 column with a –2 DRM on each roll. There is a 55% chance that at least 1 NSP will make it. The Confederate player will need to use a Special Action Card for a Force March since it is 5 MPs from Columbus to Cairo. Once there 4 SPs vs. 0 SP (with a +2 DRM) gives Polk a 61% of success.
How Safe is Washington?
It is always a good idea to build up Washington DC to a level 3 Fort, but even with that it is vulnerable to a strong Confederate attack. In the example above Lee attacks Washington while McClellan is busy in the valley. It takes Lee 5 MPs to reach DC from Fredericksburg because crossing the Potomac River costs +1 MP. The Confederate player avoids the direct attack from Alexandria because of the Navigable River hexside there.
The odds of the attack are 11 SPs to 5 SPs. The CSA player uses a Special Action Card for a +2 DRM so his total DRM is now +6 (including Lee and Jackson). The Union player has a +7 DRM (McDowell and the Fort). Let’s assume average die rolls for both players: the Confederate rolls a 7 and the Union a 4. CSA: 7 + 6 = 13 = 3 result. Union: 4 + 7 = 11 = 2 result. The Confederate player wins and takes Washington DC.
A couple other points about this battle: the Union player did not get tousethe+1DRMfortheriverbecauseterrainmodifiersarenevercumulativewithEntrenchmentandFortbenefits.Also,LeewasinFull Supply when he attacked because the hex he attacked from is one hex from a friendly railroad at Manassas Junction.
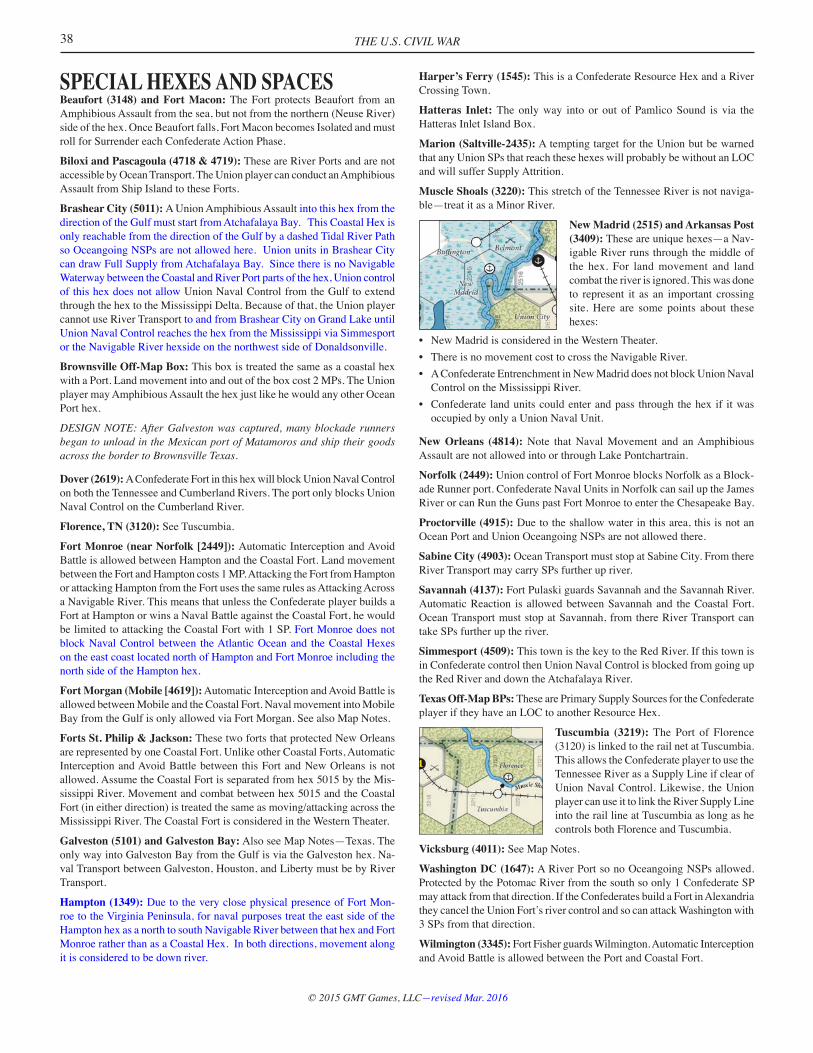
THE U.S. CIVIL WAR38
© 2015 GMT Games, LLC—revised Mar. 2016
SPECIAL HEXES AND SPACESBeaufort (3148) and Fort Macon: The Fort protects Beaufort from an Amphibious Assault from the sea, but not from the northern (Neuse River) side of the hex. Once Beaufort falls, Fort Macon becomes Isolated and must roll for Surrender each Confederate Action Phase.
Biloxi and Pascagoula (4718 & 4719): These are River Ports and are not accessible by Ocean Transport. The Union player can conduct an Amphibious Assault from Ship Island to these Forts.
Brashear City (5011): A Union Amphibious Assault into this hex from the direction of the Gulf must start from Atchafalaya Bay. This Coastal Hex is only reachable from the direction of the Gulf by a dashed Tidal River Path so Oceangoing NSPs are not allowed here. Union units in Brashear City can draw Full Supply from Atchafalaya Bay. Since there is no Navigable Waterway between the Coastal and River Port parts of the hex, Union control of this hex does not allow Union Naval Control from the Gulf to extend through the hex to the Mississippi Delta. Because of that, the Union player cannot use River Transport to and from Brashear City on Grand Lake until Union Naval Control reaches the hex from the Mississippi via Simmesport or the Navigable River hexside on the northwest side of Donaldsonville.
Brownsville Off-Map Box: This box is treated the same as a coastal hex with a Port. Land movement into and out of the box cost 2 MPs. The Union player may Amphibious Assault the hex just like he would any other Ocean Port hex.
DESIGN NOTE: After Galveston was captured, many blockade runners began to unload in the Mexican port of Matamoros and ship their goods across the border to Brownsville Texas.
Dover (2619): A Confederate Fort in this hex will block Union Naval Control on both the Tennessee and Cumberland Rivers. The port only blocks Union Naval Control on the Cumberland River.
Florence, TN (3120): See Tuscumbia.
Fort Monroe (near Norfolk [2449]): Automatic Interception and Avoid Battle is allowed between Hampton and the Coastal Fort. Land movement between the Fort and Hampton costs 1 MP. Attacking the Fort from Hampton or attacking Hampton from the Fort uses the same rules as Attacking Across a Navigable River. This means that unless the Confederate player builds a Fort at Hampton or wins a Naval Battle against the Coastal Fort, he would be limited to attacking the Coastal Fort with 1 SP. Fort Monroe does not block Naval Control between the Atlantic Ocean and the Coastal Hexes on the east coast located north of Hampton and Fort Monroe including the north side of the Hampton hex.
Fort Morgan (Mobile [4619]): Automatic Interception and Avoid Battle is allowed between Mobile and the Coastal Fort. Naval movement into Mobile Bay from the Gulf is only allowed via Fort Morgan. See also Map Notes.
Forts St. Philip & Jackson: These two forts that protected New Orleans are represented by one Coastal Fort. Unlike other Coastal Forts, Automatic Interception and Avoid Battle between this Fort and New Orleans is not allowed. Assume the Coastal Fort is separated from hex 5015 by the Mis-sissippi River. Movement and combat between hex 5015 and the Coastal Fort(ineitherdirection)istreatedthesameasmoving/attackingacrosstheMississippi River. The Coastal Fort is considered in the Western Theater.
Galveston (5101) and Galveston Bay: Also see Map Notes—Texas. The only way into Galveston Bay from the Gulf is via the Galveston hex. Na-val Transport between Galveston, Houston, and Liberty must be by River Transport.
Hampton (1349): Due to the very close physical presence of Fort Mon-roe to the Virginia Peninsula, for naval purposes treat the east side of the Hampton hex as a north to south Navigable River between that hex and Fort Monroe rather than as a Coastal Hex. In both directions, movement along it is considered to be down river.
Harper’s Ferry (1545): This is a Confederate Resource Hex and a River Crossing Town.
Hatteras Inlet: The only way into or out of Pamlico Sound is via the Hatteras Inlet Island Box.
Marion (Saltville-2435): A tempting target for the Union but be warned that any Union SPs that reach these hexes will probably be without an LOC and will suffer Supply Attrition.
Muscle Shoals (3220): This stretch of the Tennessee River is not naviga-ble—treat it as a Minor River.
New Madrid (2515) and Arkansas Post (3409): These are unique hexes—a Nav-igable River runs through the middle of the hex. For land movement and land combat the river is ignored. This was done to represent it as an important crossing site. Here are some points about these hexes:
• NewMadridisconsideredintheWesternTheater.• ThereisnomovementcosttocrosstheNavigableRiver.• AConfederateEntrenchmentinNewMadriddoesnotblockUnionNaval
Control on the Mississippi River.• Confederate landunitscouldenterandpass throughthehex if itwas
occupied by only a Union Naval Unit.
New Orleans (4814): Note that Naval Movement and an Amphibious Assault are not allowed into or through Lake Pontchartrain.
Norfolk (2449): Union control of Fort Monroe blocks Norfolk as a Block-ade Runner port. Confederate Naval Units in Norfolk can sail up the James River or can Run the Guns past Fort Monroe to enter the Chesapeake Bay.
Proctorville (4915): Due to the shallow water in this area, this is not an Ocean Port and Union Oceangoing NSPs are not allowed there.
Sabine City (4903): Ocean Transport must stop at Sabine City. From there River Transport may carry SPs further up river.
Savannah (4137): Fort Pulaski guards Savannah and the Savannah River. Automatic Reaction is allowed between Savannah and the Coastal Fort. Ocean Transport must stop at Savannah, from there River Transport can take SPs further up the river.
Simmesport (4509): This town is the key to the Red River. If this town is in Confederate control then Union Naval Control is blocked from going up the Red River and down the Atchafalaya River.
Texas Off-Map BPs: These are Primary Supply Sources for the Confederate player if they have an LOC to another Resource Hex.
Tuscumbia (3219): The Port of Florence (3120) is linked to the rail net at Tuscumbia. This allows the Confederate player to use the Tennessee River as a Supply Line if clear of Union Naval Control. Likewise, the Union player can use it to link the River Supply Line into the rail line at Tuscumbia as long as he controls both Florence and Tuscumbia.
Vicksburg (4011): See Map Notes.
Washington DC (1647): A River Port so no Oceangoing NSPs allowed. Protected by the Potomac River from the south so only 1 Confederate SP may attack from that direction. If the Confederates build a Fort in Alexandria they cancel the Union Fort’s river control and so can attack Washington with 3 SPs from that direction.
Wilmington (3345): Fort Fisher guards Wilmington. Automatic Interception and Avoid Battle is allowed between the Port and Coastal Fort.
39
© 2015 GMT Games, LLC—revised Mar. 2016
THE U.S. CIVIL WAR
HINTS ON PLAYUnionThis is a war of attrition. You have to reduce the Confederate re-inforcement rate down to 9 or 10 SPs per turn as soon as possible. Do this by capturing the Blockade Runner Ports, Nashville, and Memphis and all the low-hanging fruit. Don’t expect to get far into the South until the attrition has weakened him and you have better Generals. The best thing you can do in 1862 is keep him out of the Border States and avoid losing the game from Confederate VPs.
WEST VIRGINIA: Capture the 3 Confederate Resource hexes in West Virginia as soon as possible.
MISCELLANEOUS: Look to invade Florida or Texas, take New Orleans or the Fort St. Philip and Jackson. If playing with the Salt rules, go for the Salt—it really is worthwhile.
BE CAREFUL: Don’t weaken your forces near Washington DC too much by sending too many SPs away on coastal operations or you will invite Lee to invade the North. Build Washington up to an F3 Fort as soon as possible and garrison it with 4 to 7 SPs at all times.
ConfederateBuild Forts on the Mississippi! When playing the 1862 scenario, the Confederate player should be aware that once the Fort at Co-lumbusfalls,theentireMississippiopensuptotheUnionfleet.HisRivergoing NSPs can sail everywhere destroying all the Ironclads under construction. Therefore, the Confederate player should build a back-up Fort at Memphis or Vicksburg, or both.
KENTUCKY: You might as well invade Kentucky on Turn 3 since it becomes Union on Turn 4. Columbus and Bowling Green give you 4 easy BPs.
The fastest way to win the game is to invade the North, but it is also the fastest way to lose the game. If Lee goes north, be sure you have an F2 or F3 Fort in Richmond and 4 or more SPs. It can be crippling if the Union burns down Richmond with one or two Arsenals in it.
BE CAREFUL: New Orleans is vulnerable by a land attack from Proctorville, and Mobile is vulnerable via Pascagoula. Also, lump the Arsenals you build into one hex in each state and then build a Fort in that hex to protect them from Union raids.
DESIGN NOTESDuring the 1980’s Eric Lee Smith’s The Civil War was my favorite game. That distinction was replaced around the year 2000 by Mark Herman’s For the People. With the exception of some old Avalon Hill games, those two games I’ve played more than any others. So when I started this project three or so years ago I started by using theelementsIlikedinthosetwogamesandaddingmymodifica-tions. I am grateful to those two gentlemen for providing a great foundation to build from.
Focus: This game focuses on maneuver and strategy and covers very little of the politics and social issues. I built it as a desk-top military exercise—youareprovidedwithamapoftheconflictareaandachallengetofindthebestwaytoputdownorsavetherebellion.
Navigable Rivers: With the exception of the Ohio and Mississippi the navigable rivers on the map were not navigable all year round. I considered rules to account for this but it seemed too much. Also, aflat-bottomsteamboatcouldgomuchfurtherupriverthenwhatis
shown on the map. I had to make a judgment call on where to end the navigation, and so usually ended it at an important river port.
GeneralsRatings: No General received any negative ratings because once you do that, a player looks for a way to get rid of him. Every General has some value. At this scale, the Generals are also representing the quality of the troops they are leading.
Set Arrival and Departure: This will probably be the most contro-versial part of the game. This was done so players would waste no time and energy protecting their good generals and looking for ways to get them promoted. Having lost Grant and Sherman to leader ca-sualty rules in other games, and remembering how odd that felt and how much it affected the outcome of the game, I left it out. I want players to concentrate on strategy and not worry about their generals.
Special ActionsThis rule is a close copy of the rule found in Rick Young’s Europe Engulfed. It is a wonderful mechanism to make some actions rare and gives the player the ability to decide when and where to concen-trate his limited resources. I initially called them “Planning Disk” because I envisioned them as a way to show a campaign that was well planned and supported by assets. Something like Farragut’s attack on the forts at the mouth of the Mississippi River.
The Movement SystemTerrain cost: My goal here was to keep it as simple as possible, so all hexes cost 1 MP except Marsh.
The Dice Differential: The idea for this came directly from Eric’s The Civil War which,Ibelieve,wasthefirstgametousethatmech-anism. I think it is a great way to determine Initiative and generate variable Action Points which for some reason was never used much in other games. I’ve gladly brought it back and think it is superior to the card-driven mechanism popular today.
Regroup: This is a new concept where a general calls in forces near him. I’ve never liked the idea of a general having to march 60 miles to pick up somebody, then have to march back 60 miles to start his campaign.
Crossing Navigable Rivers: This rule became complicated but it was important to show that a Union controlled navigable river was a huge barrier to Confederate forces. I couldn’t make them impossible to cross since there were a number of times Confeder-ate cavalry forces crossed them during the war. If the Confederate player wants to cross the Ohio River with an army he is up against a hugechallenge.HewilleitherhavetorunshipspasttheUnionfleet(very unlikely) or build a Fort on the river. However, building a Fort requires Full Supply and being in Full Supply in northern Kentucky seems unlikely. One method is to use multiple Action Points to cross his SPs one at a time, but that is a very costly maneuver.
Strategic Road Movement: This was a rule I wanted from the very beginning. Off-rail Strategic Movement in some strategic-level Civil War games is too generous. Limiting off-rail Strategic Movement to only 1 SP per theater gave the game a nice feel and made the railroads all the more important.
Railroad Control: This came about as a method to cut down on the number of Control markers necessary—I did not want a Control marker in every railroad hex. So I made sure there was a town or city in every 2nd or 3rd hex and ruled that those hexes were the only ones where a control marker was necessary.
THE U.S. CIVIL WAR40
© 2015 GMT Games, LLC—revised Mar. 2016
The Combat SystemThe goal here was to show the attritional nature of Civil War battles andmakeitdifficulttodestroyanarmy.Ialsowantedtoshowthata small force needed only one General while a large army needed three Generals. I did not want three Generals being able to add their Attack or Defense Ratings to a stack containing only 1 SP. The CRT wasoneofthefirstelementsdesignedforthegameanditkeptitsbasic shape throughout playtesting.
Demoralized: It may seem odd that the defender is not affected by the –2 DRM for being Demoralized, but this was done so there was not a cascading affect against the defender after he lost a battle. After Gettysburg and Sharpsburg Lee’s army was still very potent. Nonetheless, attacking a Demoralized army still has the potential of causing one additional step loss and so is often worthwhile.
Sieges: While thousands of books have been written on the American Civil War there apparently is no book studying and comparing the various sieges of the war. There were a fair number—Vicksburg, Chattanooga, Fort Donelson, and Port Hudson are the most famous. The sieges would last between 4 to 55 days (which is fairly quick if compared to sieges between rival races or religions). Vicksburg lasted 46 days, which is about three Action Phases. So, I built the Surrender Table so a “Vicksburg-type” siege would last about three Action Phases while an unimportant isolated hex or a Confederate Coastal Fort might Surrender after only 1 Action Phase.
Fortifications and DC: At the start of the Civil War the defenses of Washington DC consisted of only one old fort. By the end of the war it contained 68 forts, 93 separate batteries, and 20 miles of riflepits.AfterlearningthisIhadtohavemorethanonetypeoffortavailable to players. Once I started testing with the F2 and F3 level Forts I loved their effects, especially on Vicksburg—Union players began to siege the city instead of attacking it directly.
Supply RulesThe Supply Rules: This was not easy. I went through many ideas and they all crashed in testing. From the start, I wanted a supply system that would tie armies to the railroads, but still allow Van Dorn to make his raids into Missouri, Bragg to invade Kentucky, and Lee to venture into Maryland and give battle at full strength at Gettys-burg. So for Van Dorn and Lee’s sake I had to allow an army that was winning battles in the North to continue campaigning. It could be assumed that they could restock their ammo supplies from the baggage camps and supply depots of the defeated enemy. However, once that army lost or tied a battle, then supply becomes a problem.
Foraging markers: Early in testing we discovered that deep raids into the South were too effective. The solution was to make Out of Supply very painful and hence the Foraging markers and Supply Attrition rules came about. Sherman can make his March to the Sea but he’d better not do it in Winter and there better not be a strong Confederate army nearby.
Fortress Supply: This rule works nicely for the Vicksburg situation. I’m embarrassed to admit how long we playtested before the idea occurred to me.
Supply Attrition DRMs: Note that a single SP and a General with an Attack Rating of at least 1 is always safe from Supply Attrition during the Summer turns, as long as it stays in Clear hexes and avoids becoming Demoralized. A force that is out of supply in the Winter (+3) and Demoralized (+2) will fade away quickly.
Grant’s Mississippi Campaign: The game system also had to show why any player would attack Vicksburg the way Grant did. Why not just march down from Memphis and attack the city by land? And most players should do that if the Confederate player lets him, but a good CSA player will have cavalry ready to cut Grant’s supply line at every opportunity. If that happens, then Grant’s method starts to make sense.
Vicksburg and the Yazoo River: The Yazoo River does not run alongside the Vicksburg hex—this is intentional. I did that so a Fort at Vicksburg could not control the Yazoo River. Grant used the Yazoo River as his supply base for the siege after his end run around Vicksburg. Consider the hex above Vicksburg as the Chick-asaw Bluffs—the Confederate player should guard that hex with an Entrenched SP to scare away any Union invasion there.
The Naval RulesNaval Units: I initially designed the game with the Naval Units in-cluded in the basic game, but found most players were put off by the size of the rules. While I liked the idea of preserving the Confederate MississippifleetunderthegunsofastrongVicksburg,orbuildingup two or three Ironclads in Charleston or Wilmington, the idea of a simple naval system had a lot of merit. Most games will see the ConfederateMississippifleetcrippledin1862andthenavalruleshardlyusedby1863.Inowfindthebasicgamenavalrulesmorethan satisfactory and players should not attempt to use the advanced Naval Units until they’ve played the basic game a few times.
Why only 5 Oceangoing NSPs?MostoftheOceangoingfleetisinvolved in blockade duty or chasing down commerce raiders, which has been abstracted out of the game. Assume the 5 NSPs is what the Secretary of Navy (Gideon Welles) has allocated for army operations.
Brashear City: It was hard to determine how to handle this port. The approach to the port from the Gulf side was very shallow and accessible only by shallow craft coastal steamers and gunboats—oceangoing ships would never be able to use the port. At the be-ginningofthewartheConfederatesuseditforcoastaltrafficandblockade running but it was easily sealed off by a few blockading ships. The Union never landed at this location but I felt they could have. General Banks captured the port from the land side in 1862.
The Reinforcement SystemIf you strip everything away the essential facts are these: The Union gets 14 SPs per turn, the CSA gets a number dependent on his BPs. He starts with about 11 or 12 in 1861. The Union player really can’t get much traction until he can bring that down to 9 or 10. The Con-federate player will start hurting when it gets down to 8 or below. It is much easier for the Union player to deny the Confederate player reinforcements than to eliminate them in battle.
Automatic VictoryBecause of the VP Benchmarks the Union player is essentially los-ing 3 VPs per turn. This was done to show the political and public pressure on the Union player—Lincoln and the public need to see progress in this very costly war or war weariness will grow. This prevents the Union player from sitting still and building up his forc-es—he must act before he is ready. If no progress is being made in thefieldandtheConfederateArmyisconstantlyinvadingtheNorth,peace terms will become something the North will have to consider.
– Mark Simonitch
41
© 2015 GMT Games, LLC—revised Mar. 2016
THE U.S. CIVIL WAR
GMT Games, LLC P.O. Box 1308, Hanford, CA 93232-1308
www.GMTGames.com
Action Cycle . . . . . . . . . . . . . . . . . . . . . 4.1Action Phases . . . . . . . . . . . . . . . . . . . . 4.0Amphibious Assaults . . . . . . . . 20.5, 21.7Army Markers . . . . . . . . . . . . . . . . . . . 22.4Army Morale . . . . . . . . . . . . . . . . . . . . 22.5Arsenals . . . . . . . . . . . . . . . . . . . . . . . . 14.5Automatic Victory . . . . . . . . . . . . . . . . 19.3Avoid Battle . . . . . . . . . . . . . . . . . 9.3–9.4Battle Ratings . . . . . . . . . . . . . . . . . . . 11.3Benchmark Numbers . . . . . . . . . . . 19.3.3Blockade Running . . . . . . . . . . . . . . . . 14.4Border States . . . . . . . . . . . . . . . . . . . . 17.1Brownsville . . . . . . . . . . . . . . . . . . . 14.4.6Casualties . . . . . . . . . . . . . . . . . . . . 16.5.1Cautious Generals . . . . . . . . . . . . . . . . . 7.7Cavalry Generals . . . . . . . . . . . . . . . . . . 8.0Chesapeake Bay Holding Box . . . . 20.2.2Coastal Forts . . . . . . . . . . . . . . . . . . . . 10.3Coastal Hex . . . . . . . . . . . . . . . . . . . . 2.1.8Commanding General . . . . . . . . . . . . . . 7.3Command Limit . . . . . . . . . . . . . . . . . . 7.2Confederate VPs . . . . . . . . . . . . . . . 19.3.2Control . . . . . . . . . . . . . . . . . 6.0, 6.3, 19.1Control Markers . . . . . . . . . . . . . . . . . . 6.2Control of States . . . . . . . . . . . . 6.1, 19.1.2Cottonclads (Confederate) . . . . . . . . 21.11Demoralized . . . . . . . . . . . . . . . 12.2–12.4Demotions . . . . . . . . . . . . . . . . . . . . 16.3.2Dice Difference . . . . . . . . . . . 4.1.1 – 4.1.4Displaced Box . . . . . . . . . . . . . . . . . . . 14.6Displacement of Generals . . . . . . . . 11.2.4Entrenchments . . . . . . . . . . . . . . . . . . . 10.1Exiting the Map . . . . . . . . . . . . . . . . . 5.1.4First Player . . . . . . . . . . . . . . . . . . 4.1, 4.2Foraging markers . . . . . . . . . . . . . . . . 13.2Force . . . . . . . . . . . . . . . . . . . . . . . . . 2.2.2Fortifications . . . . . . . . . . . . . . . . . . . . 10.0Fortress Supply . . . . . . . . . . . . . . . . 13.3.3Forts . . . . . . . . . . . . . . . . . . . . . . . . . . 10.2Generals . . . . . . . . . . . . . . . . . . . 7.0, 16.0Gunboats (Union) . . . . . . . . . . . . . . . 21.11Heavy Losses . . . . . . . . . . . . . . . . . . . 12.3Inflation . . . . . . . . . . . . . . . . . . . . . . 14.4.5Interception . . . . . . . . . . . . . . . . . . 9.2, 9.4Ironclads (Confederate) . . . . . . . . 21.10.3Isolated Group . . . . . . . . . . . . . . . . . 13.6.2Isolation . . . . . . . . . . . . . . . . . . . . . . . . 13.6
Kentucky . . . . . . . . . . . . . . . . . . . . . 17.1.3Leader Management . . . . . . . . . . . . . . 16.0Leader Transfers . . . . . . . . . . . . . 7.8, 16.6Lines of Communications (LOC) . . . . 13.5Low on Coal . . . . . . . . . . . . . . . . . . 21.2.7Maneuver Reaction . . . . . . . . . . . . . . . 22.6Map Spaces . . . . . . . . . . . . . . . . . . . . 2.1.3Militia . . . . . . . . . . . . . . . . . . . . . . . . . 17.2Minor Rivers . . . . . . . . . . . . . . . . . . . 5.8.2Mississippi and Ohio Rivers . . . . . . . 2.1.7Mississippi River Control . . . . . . . . 19.3.1Mobile Bay . . . . . . . . . . . . . . . . . . . . 5.8.5Mountains . . . . . . . . . . . . . . . . . . . . . . . 5.6Movement . . . . . . . . . . . . . . . . . . . . . . . 5.0Movement After Battles . . . . . . . . . . . 5.11Movement Allowance . . . . . . . . . . . . . . 5.2Movement Cost . . . . . . . . . . . . . . . . . . . 5.3Moving SPs without a General . . . . . . 5.10Muscle Shoals . . . . . . . . . . . . . . . . . 20.1.3National Panic . . . . . . . . . . . . . . . . . 19.3.2Naval Naval Batteries . . . . . . . . . . . . . 21.10.4 Naval Battles . . . . . . . . . . . . . . . . . . 21.6 Naval Control . . . . . . . . . . . . . . . . . 20.1 Naval Leaders . . . . . . . . . . . . . . . 21.2.8 Naval Pool . . . . . . . . . . . . . . . . . . 21.9.2 Naval Reaction . . . . . . . . . . . . . . . . 21.4 Naval Repair . . . . . . . . . . . . . . . . . . 21.8 Naval Rules (Advanced) . . . . . . . . . 21.0 Naval Rules (Basic Game) . . . . . . . 20.0 Naval Special Actions . . . . . . . . . . 21.12 Naval Support . . . . . . . . . . . . . . . . . 21.3 Naval Transport . . . . . . . . . . . . . . . . 20.3 Naval Units . . . . . . . . . . . . . . . . . . . 21.2 Naval ZOI . . . . . . . . . . . . . . . . . . . . 21.4Navigable Rivers . . . . . . . . . . . . . . . . 5.8.3Navigable Rivers (attacking across) . . 11.5Non-playable Terrain . . . . . . . . . . . . . . 5.7Objective Hexes . . . . . . . . . . . . . . . . 2.1.4Phasing Player . . . . . . . . . . . . . . . . . . 4.1.5Picking Up and Dropping Off SPs . . . . 7.5Political Restrictions . . . . . . . . . . . . . . 22.1Port Protection . . . . . . . . . . . . . . . . 21.4.4Ports . . . . . . . . . . . . . . . . . . . . . . . . . . 20.2Price . . . . . . . . . . . . . . . . . . . . . . . . . . . 8.6Promotions . . . . . . . . . . . . . . . . . . . 16.3.1
INDEXRail Movement Bonus . . . . . . . . . . . 5.4.2Railroad Bridges . . . . . . . . . . . . . . . . 5.4.3Railroad Control . . . . . . . . . . . . . . . . . . 6.5Railroad Ferries . . . . . . . . . . . . . . . . . 5.4.4Railroads . . . . . . . . . . . . . . . . . . . . . . . . 5.4Railroads (New) . . . . . . . . . . . . . . . . 5.4.5Rally . . . . . . . . . . . . . . . . . . . . . 12.5, 19.2Rank . . . . . . . . . . . . . . . . . . . . . . . 7.2, 8.4Reaction Movement . . . . . . . . . . . . . . . 9.0Regroup Movement . . . . . . . . . . . . . . . 5.9Reinforcing a Hex Under Attack . . . . . 22.3Reinforcements (Confederate) . . . . . . 14.3Reinforcements (Union) . . . . . . . . . . . 14.2Resource Hexes . . . . . . . . 2.1.4, 6.4, 14.3.2 Retreats . . . . . . . . . . . . . . . . . . . . . . . . 11.6River Crossing Towns . . . . . . . 2.1.6, 5.8.4River Flotillas . . . . . . . . . . . . . . . . 21.10.5River Supply . . . . . . . . . . . . . . . . . . 13.3.4Rivers . . . . . . . . . . . . . . . . . . . . . . . . . . 5.8Roads (through Marsh) . . . . . . . . . . . . . 5.5Running the Guns . . . . . . . . . . . . . . . 21.13Salt Hexes . . . . . . . . . . . . . . . . . . . . . . 22.2Sequence of Play . . . . . . . . . . . . . . . . . . 3.0Sheridan . . . . . . . . . . . . . . . . . . . . . . . . 8.6Shipyards. . . . . . . . . . . . . . . . . . . . . . . 21.8Simmesport . . . . . . . . . . . . . . . . . . . . 5.8.5Special Actions . . . . . . . . . . . . . . 2.3, 18.0States . . . . . . . . . . . . . . . . . . . . . . . . . 2.1.2Strategic Movement . . . . . . . . . . . . . . 15.0Strength Points . . . . . . . . . . . . . . . . . 2.2.3Subordinates . . . . . . . . . . . . . . . . . . . 7.2.3Supply . . . . . . . . . . . . . . . . . . . . . . . . . 13.0Supply Attrition . . . . . . . . . . . . . . . . 13.2.2Supply Paths . . . . . . . . . . . . . . . . . . . . 13.4Supply Sources . . . . . . . . . . . . . . . . . . 13.3Surrender . . . . . . . . . . . . . . . . . 11.6.6, 13.6Texas Off-Map Resources . . . . . . . . . 2.1.5Theaters . . . . . . . . . . . . . . . . . . . . . . . 2.1.1Three- and Four-Star Generals . . . . . . . 7.4Training Actions . . . . . . . . . . . . . . . . . 17.3Tidal River Paths . . . . . . . . . . . . . . . . . 20.4Union Oceangoing Ironclad Strength . . 21.5Van Dorn . . . . . . . . . . . . . . . . . . . . . . . . 8.6War Industry . . . . . . . . . . . . . . . . . . . . 14.5West Virginia . . . . . . . . . . . . . . . . . . 17.1.2ZoneofInfluence . . . . . . . . . . . . . . . . . 9.1