Embed Size (px)
Citation preview

Troubles and Solutions Start Here - Word 2010 Options from Small City Law Firm Tech
PART 1 WORD 2010 OPTIONS - 4
Set Word Options 4 General Settings 5 Show Mini Toolbar on selection 6 Enable Live Preview 6 Colour Scheme 6 Screen Tips 7 User Name and Initials 8 Open e-mail attachments in Full Screen Reading view 8
PART 2 – DISPLAY AND PRINTING OPTIONS 9
Page Display Options 9 Show white space between pages in Print Layout view 9 Show highlighter marks 10 Show Tooltips on hover 11 Always show these formatting marks on the screen 12
Printing options 12 Print drawings 12 Print background colours and images 13 Print Document Properties 13 Print Hidden Text 13 Update Fields before printing 14 Update Linked Data before printing 14
PART 3 PROOFING 14
AutoCorrect Options 15 AutoCorrect Checklist: 15 Show AutoCorrect Options buttons 16 Correct Two Initial Capitals 16 Exceptions 16 Capitalize First Letter of Sentence 17 Capitalize First Letter of Table Cells 17 Capitalize Names of Days 17 Correct Accidental Use of Cap Locks Key 17 A final word about AutoCorrect Exceptions: 18 Replace text as you type 19
PART 4 SPELLING OPTIONS 19
Correcting Spelling in Microsoft Options Programs 20 Ignore words in UPPERCASE 20 Ignore words that contain numbers 20 Ignore Internet and file addresses 20

Flag repeated words 21 Enforce accented uppercase in French 21 Suggest from main dictionary only 22 Custom Dictionaries 22 French and Spanish Modes 22
Correcting Spelling and Grammar in Word 23 Check Spelling as you type 23 Use Contextual Spelling 23 Mark and check grammar errors 24 Show readability statistics 24 Writing Style 24 Exceptions 25
PART 5 – SAVE OPTIONS 25
Save Options 26 Save file in this format: 26
AutoRecovery 27 Save 27 Keep the Last Recovered File 27 AutoRecover file location 28 Default File Location 28
Offline Editing options 29
Preserve Fidelity 29
PART 7 EDITING OPTIONS 29
Advanced Options – Editing Options 29 Typing replaces selected text 30 Automatically select entire word 31 Text dragging and dropping 31 Use Ctrl Click to open a hyperlink 31 Drawing Canvas for AutoShapes 32 Use smart paragraph selection and smart cursoring 33 Insert Key for Overtype 34 Prompt to Update Style 35 Use Normal style for bulleted or numbered lists 35 Keep Track of Formatting 35 Updating Style to match selection 36 Enable click and type 37 Show AutoComplete suggestions 37
PART 9 ADVANCED OPTIONS CONTINUED 38
Continuing with Advanced Options 38 Image Size and Quality 38 Discard editing data 39 Do Not Compress Images in File 39 Set Default target output 39 Show Document Content 40

Show background colours 40 Show text wrapped within the document window 40 Show picture placeholders 40 Show drawings and text boxes on screen 41 Show text animation 41 Show bookmarks 41 Show text boundaries 42 Show crop marks 42 Show field codes instead of their values 43 Field shading 43 Use draft font in Draft and Outline views 44 Font Substitution 44
PART 11 ADVANCED PRINT OPTIONS 44
Advance Print Options 45 Use draft quality 45 Print in Background 45 Print pages in reverse order 45 Print XML tags 46 Print field codes 46 Allow field codes with tracked changes to update 46 Print on front/ back of sheet for duplexing 47 Scale content 47 Default tray 47 When printing this document 48
PART 12 ADVANCED SAVE OPTIONS 48
Advanced Save Options 48 Prompt before saving Normal 48 Always create a backup copy 50 Copy remotely stored files 50 Allow Background Saves 50 Preserve Fidelity 51
PART 13 ADVANCED GENERAL OPTIONS 51
Advanced General Options 51 Provide feedback with sound 51 Provide feedback with animation 52 Confirm file format 52 Update automatic links on open 53 Allow opening a doc in Draft view 53 Enable background repagination 53 Show add-in errors 53 Customer-submitted content 54 Mailing Address 54 File Locations 54 Web Options 55

4 | P a g e
Troubles and Solutions Start Here - Word 2010 Options from Small City Law Firm Tech
Part 1 Word 2010 Options -
Whenever the ever-friendly and helpful Barriston Tech Team sets up a new workstation with a Microsoft Word 2010 install, we like to tweak the myriad of Word Options the way we think works best for the user (We’re not always right about that – sometimes our tweaks lead not to help, but to hindrance, depending on how the user prefers to work). What we do notice is that few users seem to realize a) the presence of Word options and b) the profound effect that Option settings can have on how Word produces all your Word documents. So I thought it might be a good idea to go through Word 2010’s Options in a series of blog posts, because setting Options for the way you prefer to work is an often-overlooked Word issue, resulting in some unnecessary annoyances.
Set Word Options
Getting to Options is easy. Setting Option takes a bit more time, but it’s time well spent. To access Options:
1. Click the ‘File’ tab 2. Click ‘Options’

5 | P a g e
And then you’ll see the Word Options box, open at the General view:
General Settings
Before going through each of the General settings, you should take notice of these symbols: they’re kind of hard to see but, to the right of some of the settings, there’s a little blue ‘i’ inside a circle (for ‘information’). If you hover your mouse over it, you’ll see a pop-up providing additional information about the setting. If you’re unsure about a setting, the information in the pop-up may be helpful to read before you set to tinkering.

6 | P a g e
Show Mini Toolbar on selection
If this setting is check marked, you’ll see the mini toolbar pop up whenever you select text.
For more info on Word 2010’s mini toolbar, see prior post: Word 2010’s Mini Toolbar – Help or Hindrance?. If you don’t like the mini toolbar, uncheck this setting. (You can always change your mind and reset it later if you choose.)
Enable Live Preview
This option is one of my favourites and I think it should always be left on. With this option check marked, you can preview some formatting actions before you actually take them. I can’t seem to catch it on a screenshot, but to experiment, select some text in your document, then head on up with your mouse to the Style section of the Home Ribbon and hover (without clicking) over a few Styles – you’ll see the results of each Style (had you selected them by clicking) before committing yourself. Take your mouse out of the Style area and watch your selected text settle back down to its original formatting, without ever clicking a thing. Love this option!
Colour Scheme
7 | P a g e
I believe the default is Blue. I have a yen for Silver, so that’s how I’ve set mine. Try each one out and determine what’s easiest on your eyes. As with the rest of the options, you can always change later if the feeling strikes.
Screen Tips
Next up are Screen Tips – you have 3 choices:
Here is result of choosing ‘Show feature description in Screen Tips’ (in each example below when the Show/Hide icon is selected). With this choice, you see a full, detailed explanation of the selected feature, including its shortcut key.
Here is the result for choice ‘Don’t show feature description in Screen Tips’. All you see is the name of the feature and its shortcut key:
Here is result for choice ‘Don’t show Screen Tips’ – nothing at all:

8 | P a g e
Even as an advanced Word user, I still prefer to be spoon-fed the feature description, but your mileage may vary!
User Name and Initials
There isn’t a lot of room for imagination here – this one is pretty straight forward – ensure your name and initials are properly set out:
Word uses your Name in document properties, such as author:
And your initials in Comments and Revisions:
So make sure your name and initials are set up properly! You wouldn’t want someone else to take credit for all your hard work.
Open e-mail attachments in Full Screen Reading view

9 | P a g e
This is the final option in General Settings. You can see from the below that I have unchecked this option. I despise Full Screen Reading view. According to Microsoft “Full Screen Reading view is optimized for reading a document on the computer screen. In Full Screen Reading view, you also have the option of seeing the document as it would appear on a printed page.” I say big deal – so what. Print Layout is good enough for me when opening email attachments and is a close enough approximation of what the document will look like, plus I get *all* the document editing options. But if you want to give it a try, go ahead and check the box and save your options. Then head off to your email program and find an email with a .doc attachment and double-click to open. That way, you’ll be able to decide for yourself if you can tolerate Full Screen Reading view for email attachments. If you decide you don’t like it, head back to Word Options and turn that option back off again.
So there’s your Word 2010 Options warm-up. We’ll dig a little deeper into Options as the days go by.
PART 2 – DISPLAY AND PRINTING OPTIONS
I can’t describe it better than Microsoft does: These settings affect how your document is displayed on your monitor and what it looks like when it is printed. Important options, but also very straightforward.
Page Display Options
Show white space between pages in Print Layout view

10 | P a g e
You definitely want this one check marked ‘ON’, especially if you work in Print Layout (as most people do) with a lot of headers and footers (and many letter templates have their business graphics in the headers and footers)
With ‘Show white spaces’ active, you can see the margin area of the document – look to the far right of the screenshot below, at the top of the left, vertical ruler and you can see a narrow margin. On the document itself, you can see the white space on the page that is in the margin area:
With ‘Show white spaces’ inactive (checkmark removed), you cannot see but a sliver of the margin at the top of the ruler and all white space in that area is now hidden from view:
I don’t see any good reason to work with it off, and *many* good reasons to work with it on. If you double-click in the wrong place (top of the page) in your document, you can turn it on/off without making a trip to the Options. I wrote about that here: The Strange Case of the Disappearing Header, with a how-to on how to get your headers in the margin area back into view.
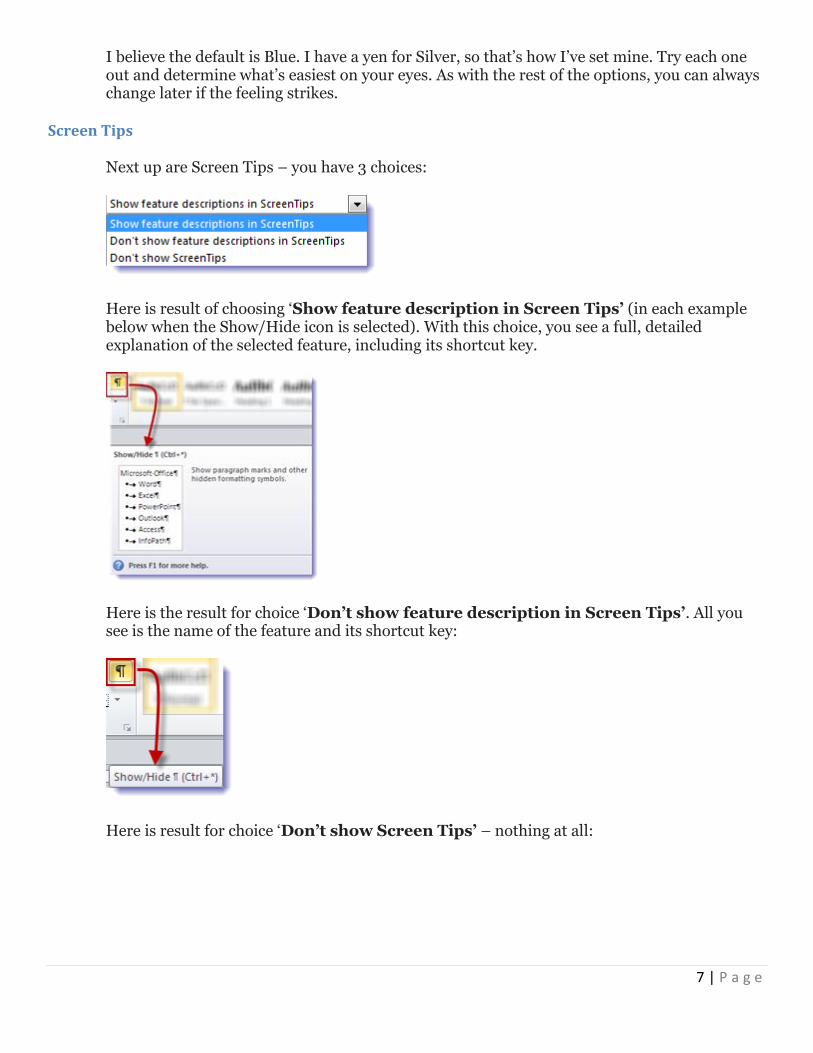
Show highlighter marks
If you’re working with Word’s highlighter, you’ll want to pay attention to this setting. With it check marked ‘On’, you’ll see your chosen highlighting colour in your display, *and* if you printer to a colour printer (if you print to a B&W printer, the highlighted area will show as light grey over the selected text).
11 | P a g e
With this option turned ‘off’ (unchecked), no amount of highlighting is going to be visible (it’s not that it’s not there, it’s just not visible), when you view or print your document.
So, the moral of this story is: If you have highlighted your document for onscreen viewing, but don’t want to see those highlighter marks on the printed version, dig into Options and turn ‘Show highlighter marks’ off before hitting that Print button. And then, if you’re wondering where your highlighting went to, turn it back on for viewing.
Show Tooltips on hover
This is on by default and I like to leave it on. I’m not sure of every tooltip covered by this option, but I leave it on for this reason mainly: when the option is ‘on’ and you hover over a hyperlink in your document, you’ll see a pop-up showing you the web address of the hyperlink (or the location of the file, if it’s a link). With the option ‘off’, you can’t easily view this information.

12 | P a g e
Whether this option is on or off has no effect on the Screen Tips described in the General Options in Part 1
Always show these formatting marks on the screen
I have a definite opinion about this and it’s not terribly popular – I wrote about it here: The Horror of bad formatting in Word (or: Why to keep your Non-Printing Symbols turned ON) and recommend that rather than me regurgitating that blog post, you click on over and read it for an in-depth explanation of why you want ‘Show all formatting mark’ clicked ‘on’ and then use your ‘Show / Hide’ button to toggle them as desired. Trust me on this if you spend a lot of time formatting documents.
Printing options
Print drawings
This setting can affect more than just drawings created in Word, and it’s on by default, so it’s best to leave it that way. That way you won’t have to think about whether any graphics, no matter how created and how formatted, will print.
13 | P a g e
Print background colours and images
Another setting to leave defaulted ‘on’. With this ‘on’, if you have background colours and images in your documents, they’ll print, if it’s off, they won’t. You will likely rarely have these colours and images, but if you do, well there they on the paper when you hit that print button. No harm in leaving this option ‘on’.
Print Document Properties
If you turn this option ‘on’ (it’s off by default), you’ll print an additional last page to your document with the below information. That’s fine if you want it, but as an active default, it would seem to be a waste of paper. Most of this information (not the directory and file paths) can be seen in the Info view of the File Tab. Leave this option off and turn it on only when you want to print that information.
Print Hidden Text
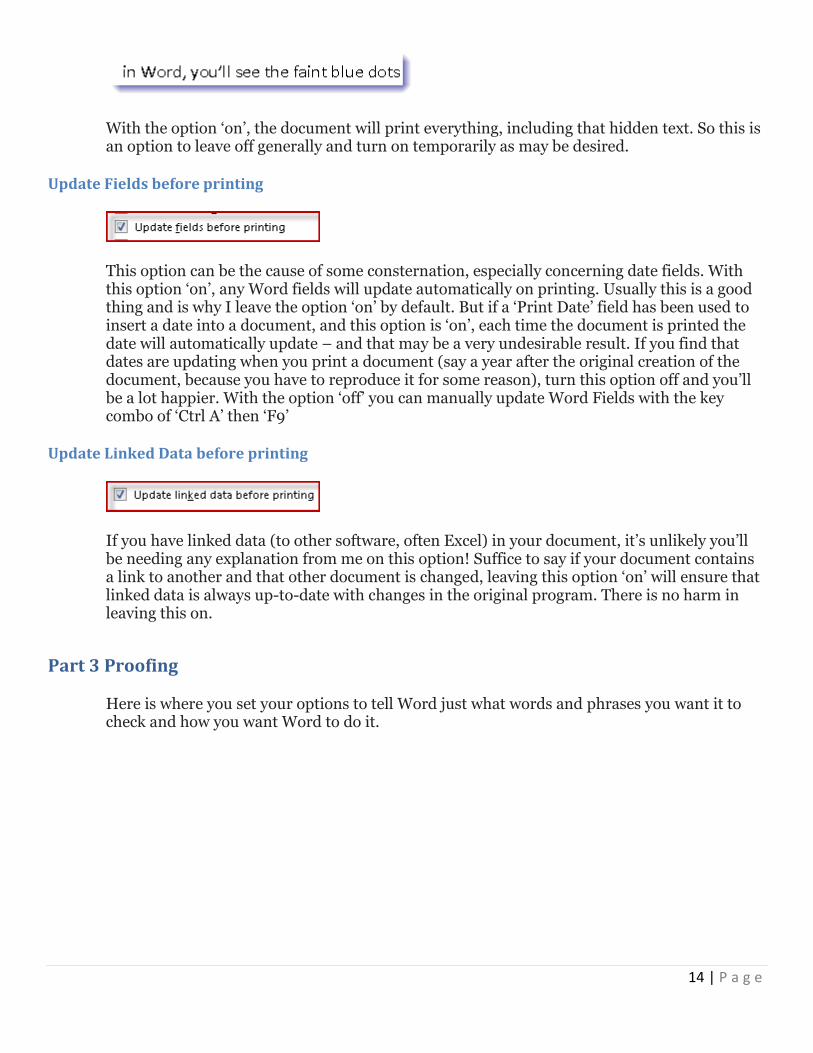
If you format text as hidden in Word, you’ll see the faint blue dots underlining the hiddent text like this – that’s your visual indication that this text is hidden:
Usually you’ve hidden the text for a reason (I often do it when creating a template that has some user instructions that I want visible as they are working). With this option off (as it is by default), the document will print nicely, without those instructions, as you can see below – the hidden ‘If you format text as hidden’ did not print, but the ‘in Word’ did.
14 | P a g e
With the option ‘on’, the document will print everything, including that hidden text. So this is an option to leave off generally and turn on temporarily as may be desired.
Update Fields before printing
This option can be the cause of some consternation, especially concerning date fields. With this option ‘on’, any Word fields will update automatically on printing. Usually this is a good thing and is why I leave the option ‘on’ by default. But if a ‘Print Date’ field has been used to insert a date into a document, and this option is ‘on’, each time the document is printed the date will automatically update – and that may be a very undesirable result. If you find that dates are updating when you print a document (say a year after the original creation of the document, because you have to reproduce it for some reason), turn this option off and you’ll be a lot happier. With the option ‘off’ you can manually update Word Fields with the key combo of ‘Ctrl A’ then ‘F9’
Update Linked Data before printing
If you have linked data (to other software, often Excel) in your document, it’s unlikely you’ll be needing any explanation from me on this option! Suffice to say if your document contains a link to another and that other document is changed, leaving this option ‘on’ will ensure that linked data is always up-to-date with changes in the original program. There is no harm in leaving this on.
Part 3 Proofing
Here is where you set your options to tell Word just what words and phrases you want it to check and how you want Word to do it.

15 | P a g e
AutoCorrect Options
And here is where you tell Word what to do with your typos (correct them automatically of course!).
Before you start, you may want to take a look at these posts that touch on AutoCorrect to beef up your AutoCorrect skills before you beef up your AutoCorrect Options:
(if it looks like a I write about AutoCorrect a lot – well I do. I love this feature – not just for autocorrecting my many typos, but for a type of shorthand too).
AutoCorrect Checklist:
My advice is to leave them all ‘on’:
16 | P a g e
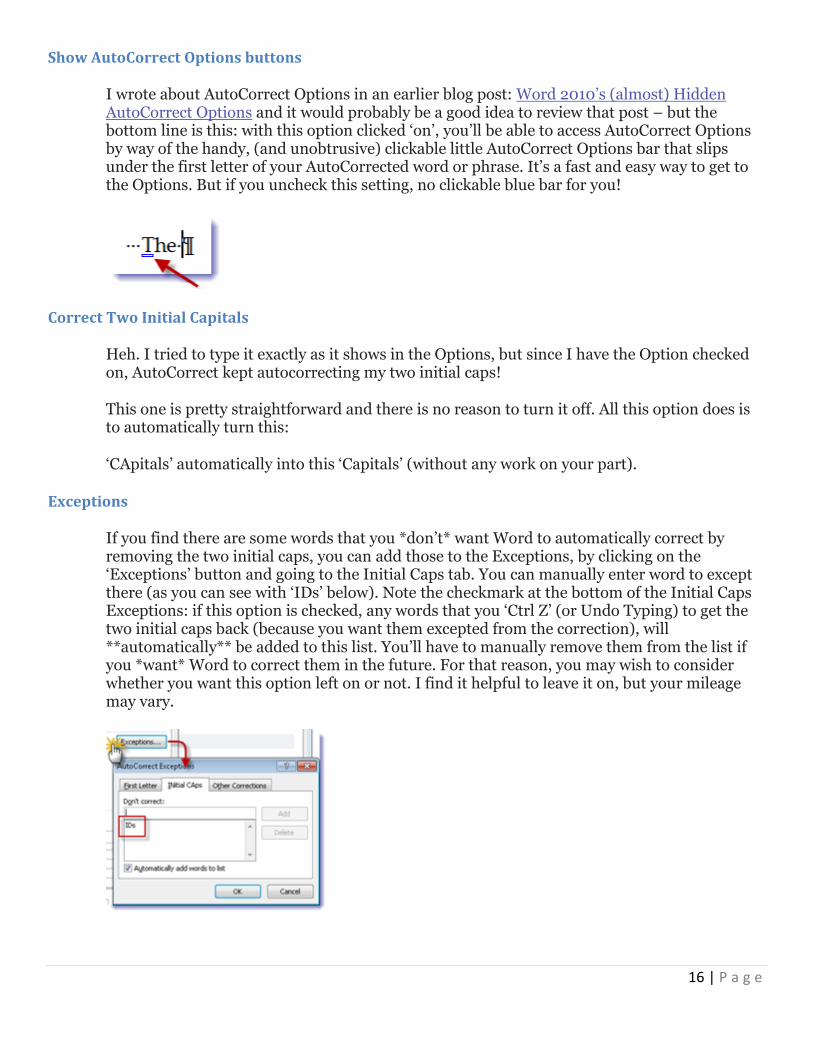
Show AutoCorrect Options buttons
I wrote about AutoCorrect Options in an earlier blog post: Word 2010’s (almost) Hidden AutoCorrect Options and it would probably be a good idea to review that post – but the bottom line is this: with this option clicked ‘on’, you’ll be able to access AutoCorrect Options by way of the handy, (and unobtrusive) clickable little AutoCorrect Options bar that slips under the first letter of your AutoCorrected word or phrase. It’s a fast and easy way to get to the Options. But if you uncheck this setting, no clickable blue bar for you!
Correct Two Initial Capitals
Heh. I tried to type it exactly as it shows in the Options, but since I have the Option checked on, AutoCorrect kept autocorrecting my two initial caps!
This one is pretty straightforward and there is no reason to turn it off. All this option does is to automatically turn this:
‘CApitals’ automatically into this ‘Capitals’ (without any work on your part).
Exceptions
If you find there are some words that you *don’t* want Word to automatically correct by removing the two initial caps, you can add those to the Exceptions, by clicking on the ‘Exceptions’ button and going to the Initial Caps tab. You can manually enter word to except there (as you can see with ‘IDs’ below). Note the checkmark at the bottom of the Initial Caps Exceptions: if this option is checked, any words that you ‘Ctrl Z’ (or Undo Typing) to get the two initial caps back (because you want them excepted from the correction), will **automatically** be added to this list. You’ll have to manually remove them from the list if you *want* Word to correct them in the future. For that reason, you may wish to consider whether you want this option left on or not. I find it helpful to leave it on, but your mileage may vary.
17 | P a g e
Capitalize First Letter of Sentence
This is self-explanatory. I leave it on, but, to be honest, I still do this manually. The habit is so ingrained, going all the way back to high school, that I can’t break myself of it. Just as I can’t break myself of adding 2 spaces after an end-of-sentence period, when I know that only 1 is required (and is more acceptable).
This option can be annoying from time to time and if you manually capitalize the first letter of a sentence, you may want to turn this option off, for this reason: Word doesn’t know when a period is used for the end of a sentence and when it’s not. Like with short forms of words that end with a ‘period’ – the following word will automatically be capitalized and that may not be the behaviour you want. Example of this behaviour:
‘Weds. night’ is automatically corrected to ‘Weds. Night’, even if you don’t want it – due to the ‘period’ following the word ‘Weds.’
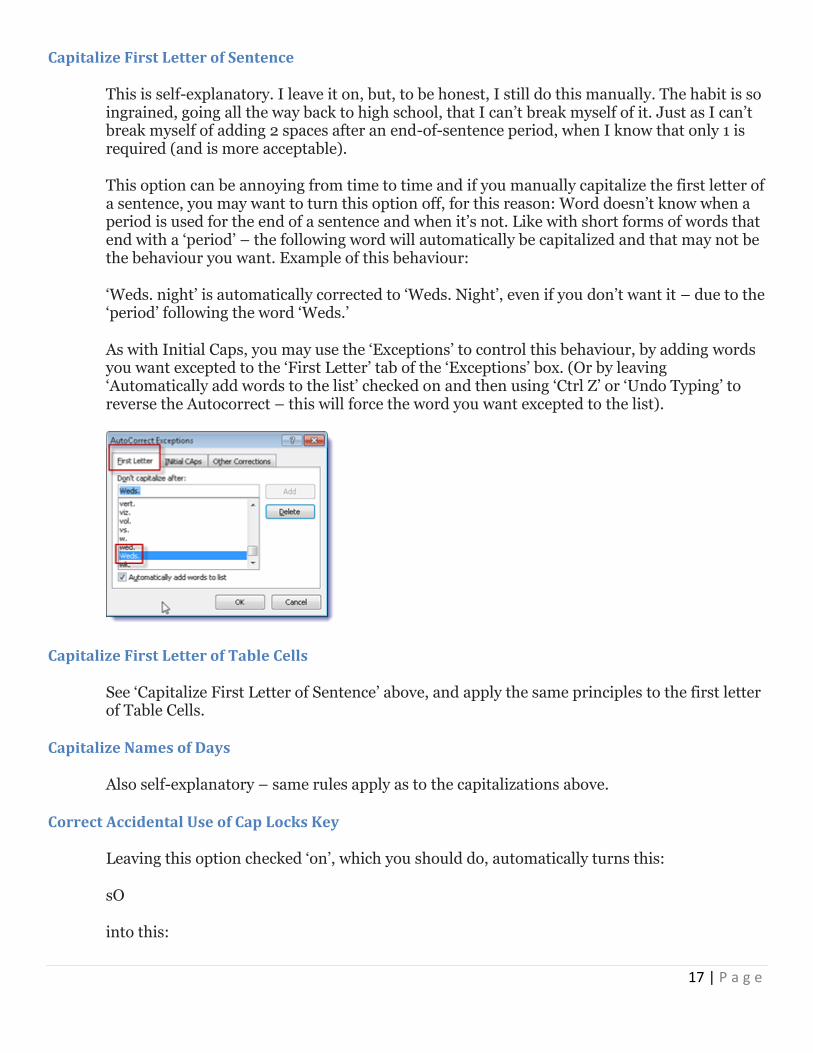
As with Initial Caps, you may use the ‘Exceptions’ to control this behaviour, by adding words you want excepted to the ‘First Letter’ tab of the ‘Exceptions’ box. (Or by leaving ‘Automatically add words to the list’ checked on and then using ‘Ctrl Z’ or ‘Undo Typing’ to reverse the Autocorrect – this will force the word you want excepted to the list).
Capitalize First Letter of Table Cells
See ‘Capitalize First Letter of Sentence’ above, and apply the same principles to the first letter of Table Cells.
Capitalize Names of Days
Also self-explanatory – same rules apply as to the capitalizations above.
Correct Accidental Use of Cap Locks Key
Leaving this option checked ‘on’, which you should do, automatically turns this:
sO
into this:
18 | P a g e
So
This is for those times when you inadvertently turn on your Caps Lock, but still use the ‘Shift’ key to try to capitalize a Word (which results in just the opposite of the effect you were going for…). Word nicely puts the capitalization in order for you. I can’t think of a reason to ever turn this option off. Frankly, I can’t think why it’s even an option!
A final word about AutoCorrect Exceptions:
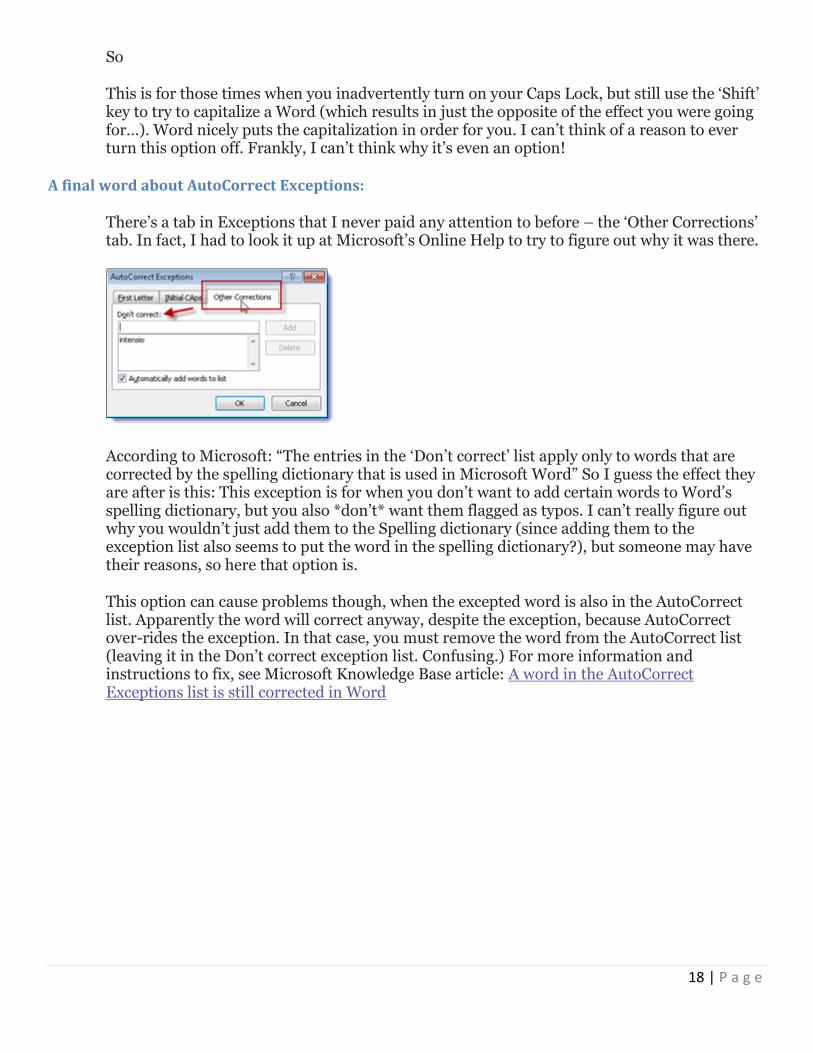
There’s a tab in Exceptions that I never paid any attention to before – the ‘Other Corrections’ tab. In fact, I had to look it up at Microsoft’s Online Help to try to figure out why it was there.
According to Microsoft: “The entries in the ‘Don’t correct’ list apply only to words that are corrected by the spelling dictionary that is used in Microsoft Word” So I guess the effect they are after is this: This exception is for when you don’t want to add certain words to Word’s spelling dictionary, but you also *don’t* want them flagged as typos. I can’t really figure out why you wouldn’t just add them to the Spelling dictionary (since adding them to the exception list also seems to put the word in the spelling dictionary?), but someone may have their reasons, so here that option is.
This option can cause problems though, when the excepted word is also in the AutoCorrect list. Apparently the word will correct anyway, despite the exception, because AutoCorrect over-rides the exception. In that case, you must remove the word from the AutoCorrect list (leaving it in the Don’t correct exception list. Confusing.) For more information and instructions to fix, see Microsoft Knowledge Base article: A word in the AutoCorrect Exceptions list is still corrected in Word
19 | P a g e
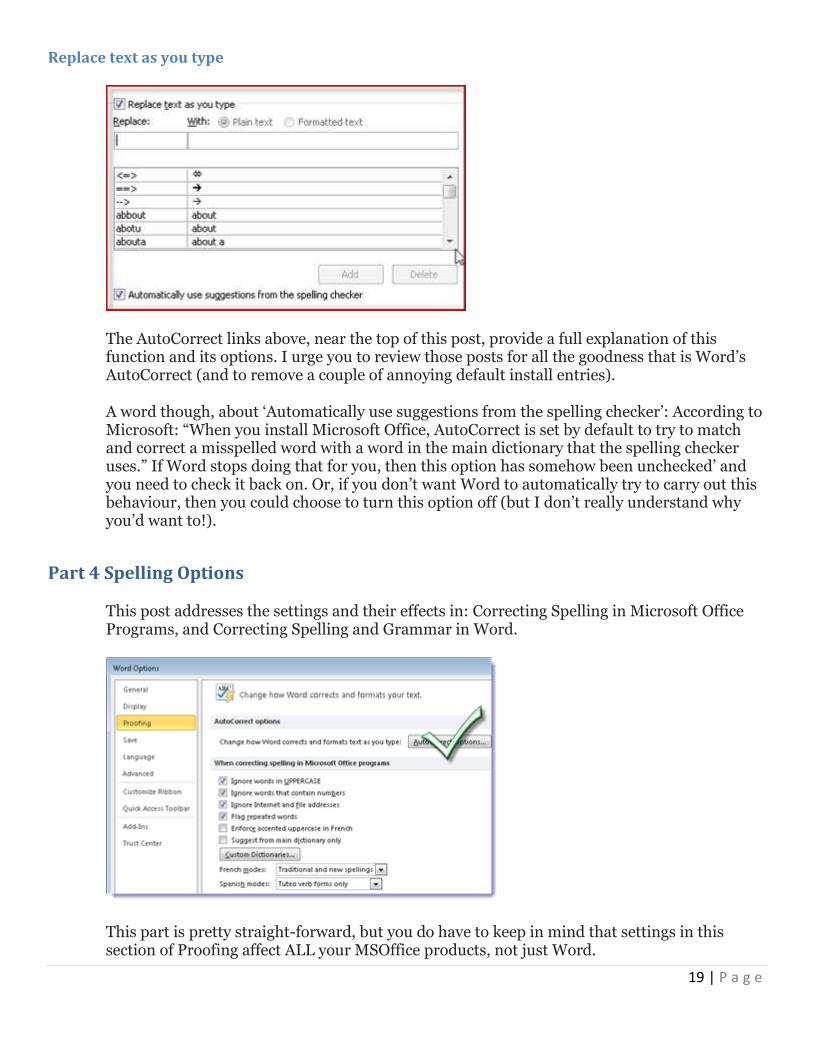
Replace text as you type
The AutoCorrect links above, near the top of this post, provide a full explanation of this function and its options. I urge you to review those posts for all the goodness that is Word’s AutoCorrect (and to remove a couple of annoying default install entries).
A word though, about ‘Automatically use suggestions from the spelling checker’: According to Microsoft: “When you install Microsoft Office, AutoCorrect is set by default to try to match and correct a misspelled word with a word in the main dictionary that the spelling checker uses.” If Word stops doing that for you, then this option has somehow been unchecked’ and you need to check it back on. Or, if you don’t want Word to automatically try to carry out this behaviour, then you could choose to turn this option off (but I don’t really understand why you’d want to!).
Part 4 Spelling Options
This post addresses the settings and their effects in: Correcting Spelling in Microsoft Office Programs, and Correcting Spelling and Grammar in Word.
This part is pretty straight-forward, but you do have to keep in mind that settings in this section of Proofing affect ALL your MSOffice products, not just Word.

20 | P a g e
Correcting Spelling in Microsoft Options Programs
Ignore words in UPPERCASE
This option is checked ‘on’ by default. The consequences are exactly what you would expect: Word’s (and other Office programs) spell checker will ignore any words you type fully in UPPERCASE – they will never display as requiring correction, even if you spell them incorrectly. With the setting checked ‘off’, ‘UPPERCASE’ spelled incorrectly looks like this:
with the traditional indication of a misspelling – the red squiggly underline. This one’s up to you – I’ve checked mine ‘off’. I make enough typos, and spell so few words only in uppercase that I prefer Word to tell me when I’ve typo’d.
Ignore words that contain numbers
If you’re Canadian and you type a lot of postal codes, you’ve already ensured that this is checked on! This setting left ‘off’ drives us crazy, because with ignore turned ‘off’, postal codes are all flagged as misspelled:
If you don’t have postal codes that are a mixture of letters and numbers, your mileage may vary on this one. If you find that you do a lot of typing that includes letters/numbers together, you’ll want to ensure those combos are ignored, unless you don’t mind doing a lot of spell checking…
Ignore Internet and file addresses
If you type a lot of URLs and file paths in your documents, here’s one setting you don’t want to set improperly. Ensure that the setting is checked to ‘ignore’, otherwise, your document will flag every URL and file path as a misspelling ending up in spell check. Very annoying.

21 | P a g e
Flag repeated words
There is absolutely no reason to turn this flag off. It would be a rare situation where you would *want* the same word twice, side by side, in a sentence. But it’s not so rare to mistakenly type the same word twice. With this setting checked ‘on’, the double word will flag as a typo and a right click on the second word (or a full spell check) will give you a quick ability to delete the repeated word:
Enforce accented uppercase in French
I only type in English, so I’ve not paid attention to this setting before and had to look it up at Microsoft’s site. According to Microsoft this option, if checked on, will:
Alert you to French words that contain uppercase letters that are missing an accent mark.
When you are using the French (Canadian) dialect, by default this option is always turned on, because the dictionary for this language includes the accented uppercase form of words in this language. This means that the option is selected by default whenever you do the following:
Use French (Canadian) as your Primary editing language. For more information, see Set the language options for Office.
Check the spelling of text that is in the French (Canadian) dialect.
So, if you’re working with French Canadian text, you’ll want this option checked ‘on’, otherwise it’s safe to leave ‘off’.

22 | P a g e
Suggest from main dictionary only
This is definitely an option to leave unchecked. If you check this option, Word will *only* use its main default install dictionary to make spelling correction settings. It will ignore any words you’ve added to your custom dictionary.
Custom Dictionaries
It’s good to familiarize yourself with the Custom Dictionary (it’s highly unlikely that you have more than one). Go ahead and click on it to open, and there you’ll see the ‘Edit Word List’ button. Here is where you can easily view the words you’ve added to your Custom Dictionary through Spell Check ‘Add to Dictionary’, and here is where you can remove any words added in error. (Note: you can also get there through Spell Check ‘Options’.)
French and Spanish Modes
I leave these at default because, honestly, ! have no idea what they mean!
23 | P a g e
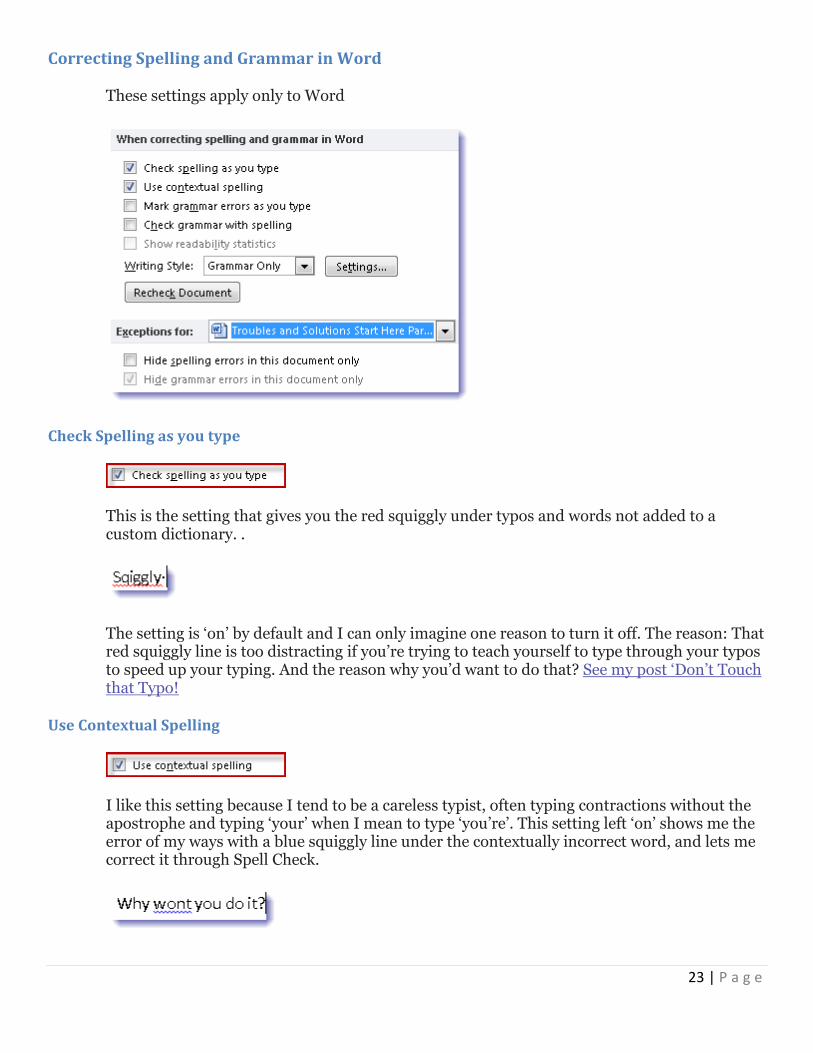
Correcting Spelling and Grammar in Word
These settings apply only to Word
Check Spelling as you type
This is the setting that gives you the red squiggly under typos and words not added to a custom dictionary. .
The setting is ‘on’ by default and I can only imagine one reason to turn it off. The reason: That red squiggly line is too distracting if you’re trying to teach yourself to type through your typos to speed up your typing. And the reason why you’d want to do that? See my post ‘Don’t Touch that Typo!
Use Contextual Spelling
I like this setting because I tend to be a careless typist, often typing contractions without the apostrophe and typing ‘your’ when I mean to type ‘you’re’. This setting left ‘on’ shows me the error of my ways with a blue squiggly line under the contextually incorrect word, and lets me correct it through Spell Check.

24 | P a g e
Mark and check grammar errors
Well, what Word thinks are grammar errors, anyway…. I don’t always agree, so I work with this option checked ‘off’. When checked ‘on’, Word will flag sentence fragments (like the fragment above, that I wrote deliberately) and other grammar errors with a green squiggly underline.
If you want to check grammar, but don’t want a document full of green squigglies, you can leave the ‘as you type’ option unchecked, and check the ‘check grammar with spelling’ and grammar errors will be pulled into your document Spell Check.
Show readability statistics
This option is also turned off by default. If you check it ‘on’, you see Readability Statistics box after you complete a full speck check on your document.
Writing Style
25 | P a g e
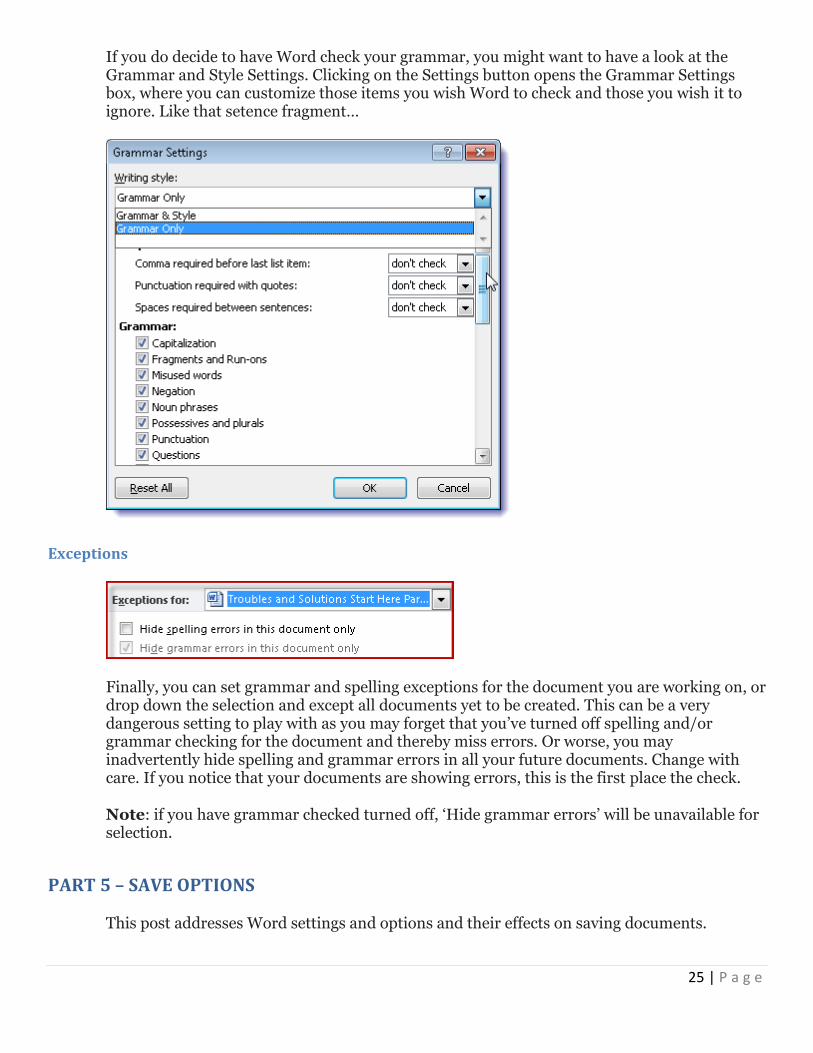
If you do decide to have Word check your grammar, you might want to have a look at the Grammar and Style Settings. Clicking on the Settings button opens the Grammar Settings box, where you can customize those items you wish Word to check and those you wish it to ignore. Like that setence fragment…
Exceptions
Finally, you can set grammar and spelling exceptions for the document you are working on, or drop down the selection and except all documents yet to be created. This can be a very dangerous setting to play with as you may forget that you’ve turned off spelling and/or grammar checking for the document and thereby miss errors. Or worse, you may inadvertently hide spelling and grammar errors in all your future documents. Change with care. If you notice that your documents are showing errors, this is the first place the check.
Note: if you have grammar checked turned off, ‘Hide grammar errors’ will be unavailable for selection.
PART 5 – SAVE OPTIONS
This post addresses Word settings and options and their effects on saving documents.
26 | P a g e
Save Options
I’ve spent some time out of province doing the ‘mom’ thing by helping my son set up his new digs, in his new city, where he’s now residing due to his new job. While I was helping my son set up his place I couldn’t help but think a bit about this series (because I’m hopeless that way…). As I was helping him to set up everything ‘just so’, so that his daily home life would hum along as smoothly as possible, I thought about how important the right settings are, both in life and in Word. It sounds silly to make the comparison, but it’s an apt one – very much like having the right tool for the job makes the job a whole lot easier. If the basic settings are messed up – if you don’t have a broom to sweep the floor, or a towel to dry off, or a pot to boil eggs in – daily life becomes infinitely more difficult to navigate. If you don’t have your Word options and settings set ‘just so’ (for the way you like to work), your daily Word life will become infinitely more difficult and frustrating. Taking the time to purchase the right equipment and set it up properly is another example of short term pain being worth the long term gain. With that said, let’s figure out Word’s ‘Save’ settings.
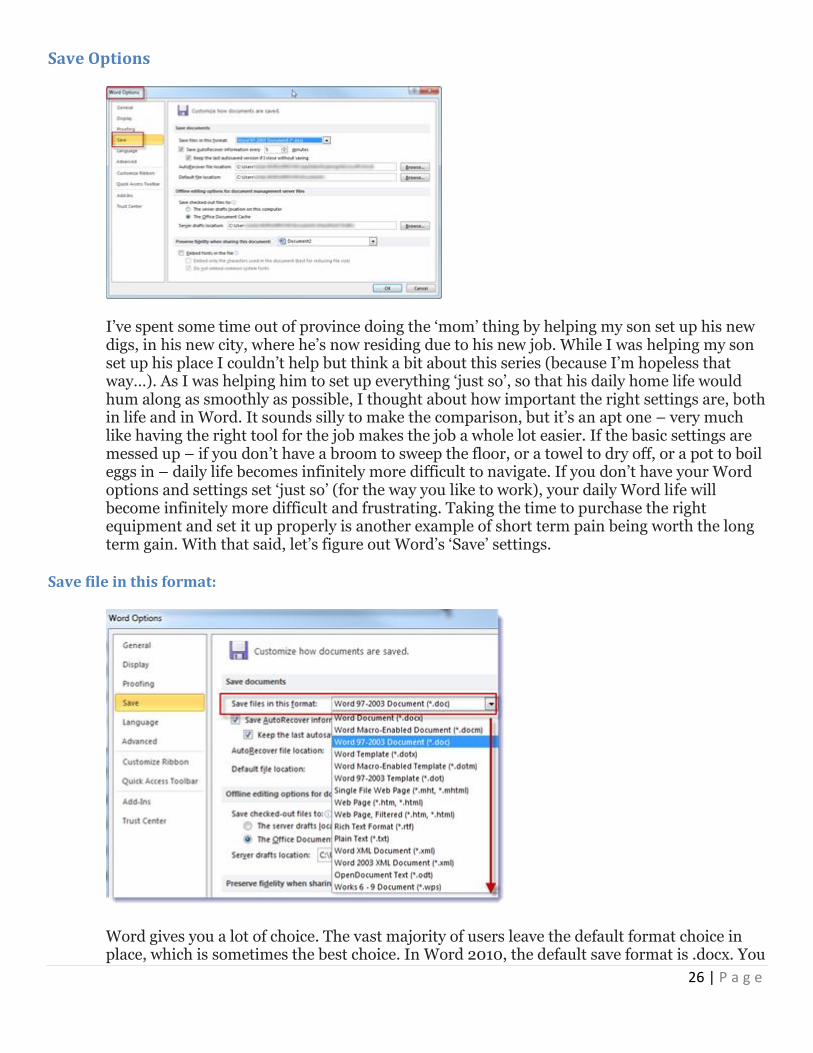
Save file in this format:
Word gives you a lot of choice. The vast majority of users leave the default format choice in place, which is sometimes the best choice. In Word 2010, the default save format is .docx. You

27 | P a g e
can see from the above screenshot that I have *not* left the default format in place for saving – I have reverted to .doc as my default format. The .doc format is compatible with Word 2003 and earlier versions, but can also be read by Word 2007 and 2010. Because some of the people at Barriston and many people outside the office still have Word 2003, I find this default to be the most convenient (that way I don’t have to deal with calls about ‘why won’t this open’ and ‘what’s the compatibility pack’. Whatever default is in place in these settings can still be overwritten at the actual save of any particular document. So when I want a .docx version of a document, I just do a ‘Save As’ and choose that format.
AutoRecovery
Save
Set this to a number as small as your computer can handle.
If this setting is checked ‘on’, and it should be, every time you save your Word document, Word starts an invisible timer to background save your file every ‘x’ minutes (x=the number you set in this option). Word autosaves to the location specified in the options. Then, if (when!) Word crashes, and your document along with it, the next time you open Word, you’ll see a reference to your document in the Document Recovery pane that Word will present, giving you an option to open and properly save it. The bottom line here: the lower the number, the less work you’ll lose on a crash, but the harder it is on older computers.
Keep the Last Recovered File
You definitely want to ensure that this option is checked ‘on’! I don’t know how many panicked calls I’ve received over the years after someone has closed without saving their document. In the past, I’ve been the bearer of mostly bad news, but with this option, you get to recover unsaved, closed documents to the point of last autorecovery through the ‘Recovery Unsaved Documents’ command at the bottom right of the Recent files window.

28 | P a g e
You may also access Autorecovered files and file versions through ‘File’ ‘Info’ ‘Manage Version, just keep in mind that each time you hit the ‘Save’ button, Word wipes out any previous autorecovered versions of the file and starts the timer over again.
AutoRecover file location
Word sets the autorecover file path by default and I don’t see any reason to change the location.
Default File Location
Word would like to control the location of the default folder where you save your files. If you’d like to take control and point the default to another location, go ahead and browse to the location (either locally or on your network), where you’d like Word to default for all saves.

29 | P a g e
This is the default location only – you will always be free to save your files to any local or network location that you have access to.
Offline Editing options
You only need to be concerned about these locations if you have a SharePoint server or other DMS software. If you do, well, I’m envious and we’ll just leave it at that.
Preserve Fidelity
More settings you may safely ignore. These settings are only crucial when using unusual document fonts and the precise appearance of the document needs to be preserved when transmitted to a third party. It’s highly unlikely however that a law office will be dealing with such documents.
Part 7 Editing Options
Advanced Options – Editing Options
There are a number of sections under Advanced Options, so I’m just going to bite them off in small chunks, starting with editing options
30 | P a g e
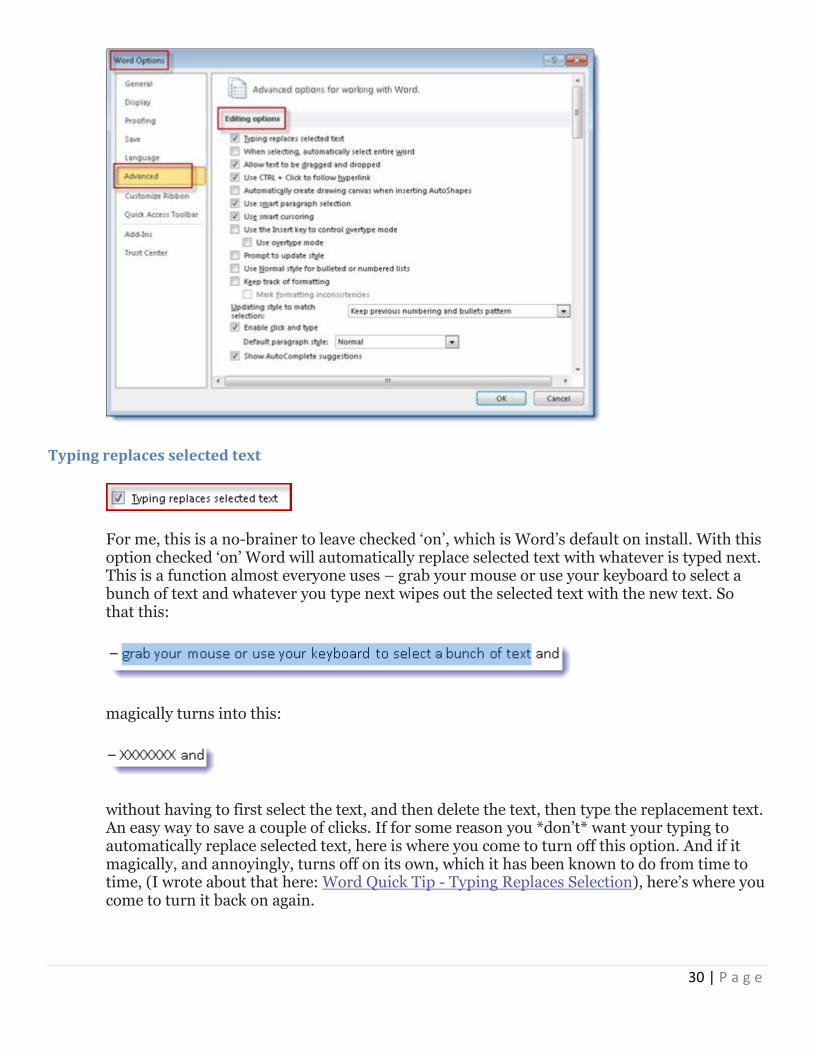
Typing replaces selected text
For me, this is a no-brainer to leave checked ‘on’, which is Word’s default on install. With this option checked ‘on’ Word will automatically replace selected text with whatever is typed next. This is a function almost everyone uses – grab your mouse or use your keyboard to select a bunch of text and whatever you type next wipes out the selected text with the new text. So that this:
magically turns into this:
without having to first select the text, and then delete the text, then type the replacement text. An easy way to save a couple of clicks. If for some reason you *don’t* want your typing to automatically replace selected text, here is where you come to turn off this option. And if it magically, and annoyingly, turns off on its own, which it has been known to do from time to time, (I wrote about that here: Word Quick Tip - Typing Replaces Selection), here’s where you come to turn it back on again.

31 | P a g e
Automatically select entire word
I find this setting annoying when it’s turned on, so I leave it off. With it on, Word will, when selecting text, work to grab all of the word being selected and its trailing space, whether you want it to or not. So, say if you start selecting in the middle of a word, and pull the selection to the next word, Word will jump the selection backwards to the beginning of the first partial word selected, and then jump forward a word at a time as you continue to select. You can backtrack your selection and then move forward slowly to select letter by letter, if you don’t want the whole word, or select with your keyboard cursor keys.
Since double-clicking a word gets the entire word selected, I prefer to use that approach to select an entire word, then drag my mouse for selection and choose for myself what portions of a word I select and what I don’t, rather than let Word choose for me.
Text dragging and dropping
If you find yourself inadvertently dragging and dropping text (moving it from one location to another in your document), due to some awkward mousing, you might want to consider turning this feature ‘off’. It’s on by default, and with it on, Word will allow you to select a chunk of text, then click in the selected area and drag all the selected text to a different location in your document. This is just too convenient, compared to select, then ‘Ctrl V’ to copy and cut, then navigate to the desired location for the text, then ‘Ctrl V’ to paste. Sometimes the mouse really is better, and this is one of those times.
If you suddenly lose the ability to drag and drop selected text, here’s where you come to restore that ability.
Use Ctrl Click to open a hyperlink
It’s a bit inconvenient, because an extra action is required, but I leave this option ‘on’ for a tiny bit of added security. With this option ‘on’, you must hold down the ‘Ctrl’ key on the keyboard when clicking on any kind of hyperlink (including a website address), before Word will let you navigate to that location. This extra step makes me *think* before I click, and that’s generally a good thing.
With this option ‘on’, hovering your mouse over a hyperlink will cause a pop-up to appear (assuming you have pop-ups visible) and at the bottom you’ll see the message to ‘Ctrl + Click’

32 | P a g e
When you hold down ‘Ctrl’, you’ll see the I-bar (as shown above) change to a hand, like this:
And clicking will then take you to the link.
If you want to click without ‘Ctrl’, turn this option off.
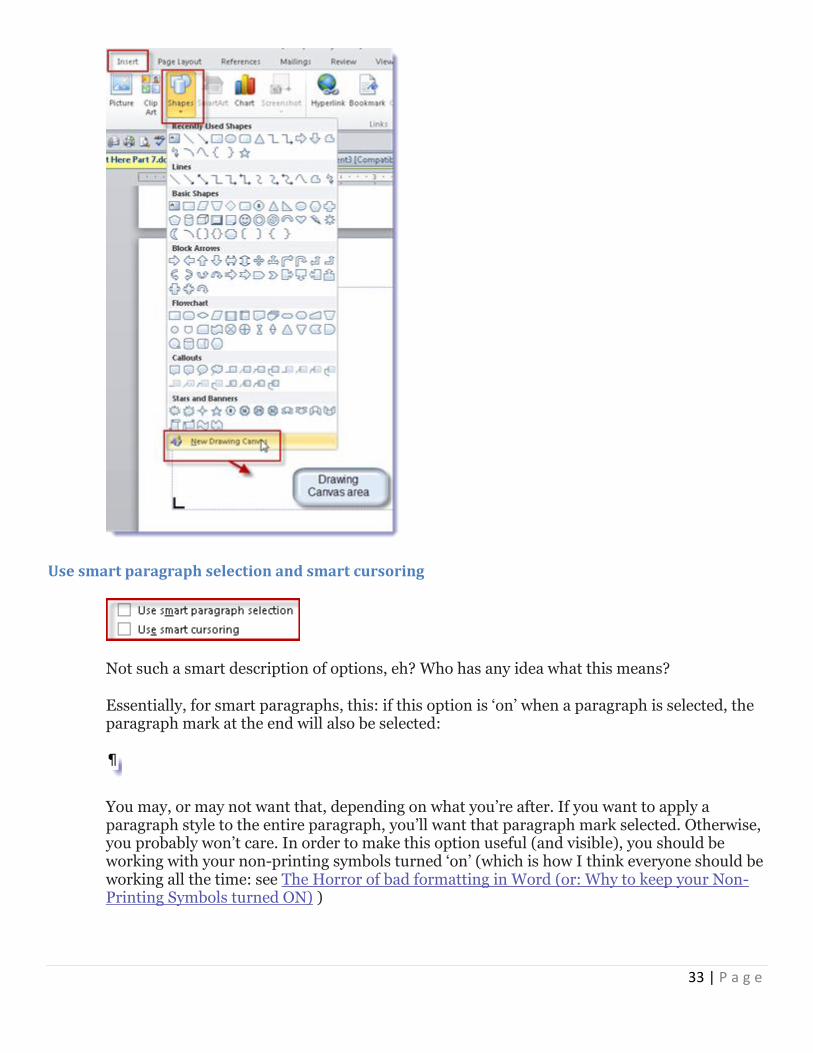
Drawing Canvas for AutoShapes
Not a lot of AutoShape insertion in a law office, so I’ve never paid any attention to this option. Had to look it up! This option, if ‘on’, automatically creates a drawing canvas when you insert Autoshapes in your document. Apparently this lets you easily arrange multiple shapes on the canvas that Word creates.
Given the workflow of a legal file, I don’t see the point in having this option ‘on’ for all Word documents. On the rare occasion that you might need to insert a drawing canvas in your document, you can do it ‘one-off’
33 | P a g e
Use smart paragraph selection and smart cursoring
Not such a smart description of options, eh? Who has any idea what this means?
Essentially, for smart paragraphs, this: if this option is ‘on’ when a paragraph is selected, the paragraph mark at the end will also be selected:
You may, or may not want that, depending on what you’re after. If you want to apply a paragraph style to the entire paragraph, you’ll want that paragraph mark selected. Otherwise, you probably won’t care. In order to make this option useful (and visible), you should be working with your non-printing symbols turned ‘on’ (which is how I think everyone should be working all the time: see The Horror of bad formatting in Word (or: Why to keep your Non-Printing Symbols turned ON) )

34 | P a g e
Smart cursoring just seems to be a waste of an option. For the life of me I cannot figure out what it does. On or off, seems to make no difference. If anyone has an explanation and a reason for it to be ‘on’, I’m all ears.
Insert Key for Overtype
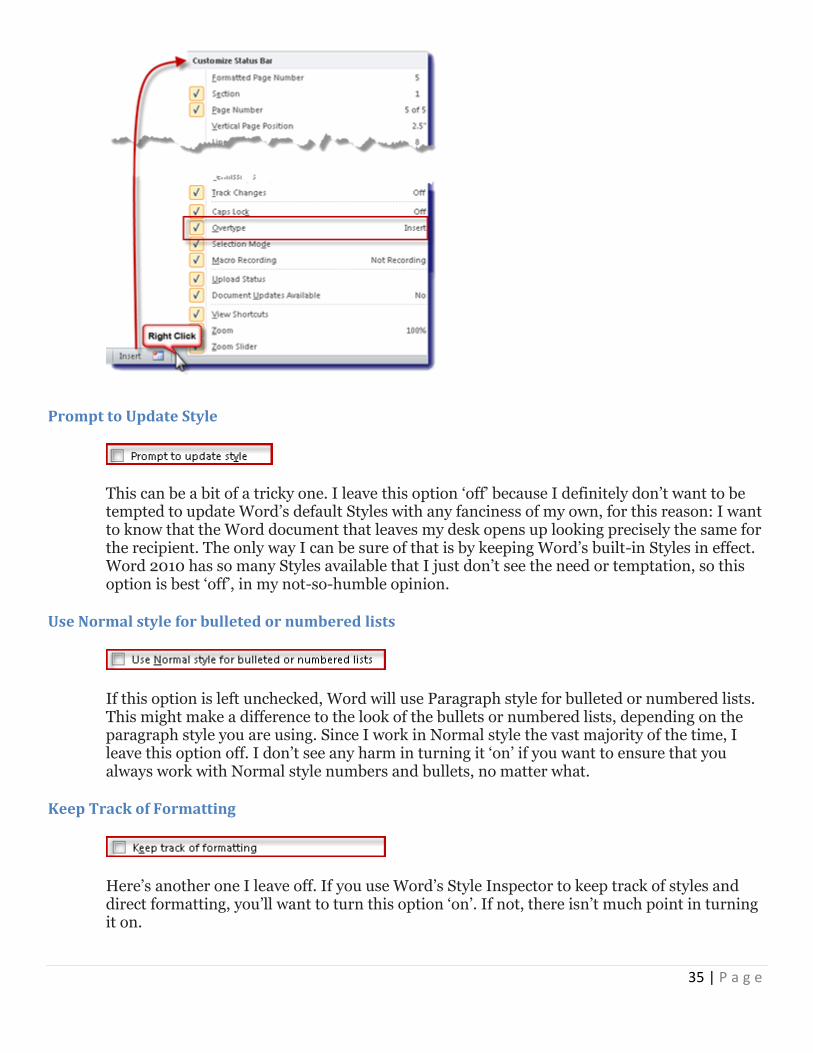
I HATE this option and never would turn it on. With it on, the Insert key on the keyboard will toggle to ‘overtype’ mode on and off. I despise overtype mode (overtype occurs when you place your cursor at a specific location in your document and what you type, rather than inserting new text at that point, types over the existing, following text. It’s extremely annoying when that happens. Leaving this option unchecked ensures that overtype is much less likely to happen by accident. For the odd time that I actually *want* to overtype (which is pretty rare, as I prefer the ‘typing replaces selection’ approach’) I use Word’s status bar to change to overtype mode, by clicking on ‘Insert:
To toggle to ‘Overtype’:
To make that option visible on your Word Status bar, if it’s not already visible, right-click on your Status Bar (at the bottom of the Word window) to bring up the ‘Customize Status Bar’ box and checkmark ‘Overtype’. For more on Status Bar goodness, see: Learning to Love Word’s Overlooked Status Bar and What it can do for you
35 | P a g e
Prompt to Update Style
This can be a bit of a tricky one. I leave this option ‘off’ because I definitely don’t want to be tempted to update Word’s default Styles with any fanciness of my own, for this reason: I want to know that the Word document that leaves my desk opens up looking precisely the same for the recipient. The only way I can be sure of that is by keeping Word’s built-in Styles in effect. Word 2010 has so many Styles available that I just don’t see the need or temptation, so this option is best ‘off’, in my not-so-humble opinion.
Use Normal style for bulleted or numbered lists
If this option is left unchecked, Word will use Paragraph style for bulleted or numbered lists. This might make a difference to the look of the bullets or numbered lists, depending on the paragraph style you are using. Since I work in Normal style the vast majority of the time, I leave this option off. I don’t see any harm in turning it ‘on’ if you want to ensure that you always work with Normal style numbers and bullets, no matter what.
Keep Track of Formatting
Here’s another one I leave off. If you use Word’s Style Inspector to keep track of styles and direct formatting, you’ll want to turn this option ‘on’. If not, there isn’t much point in turning it on.
36 | P a g e
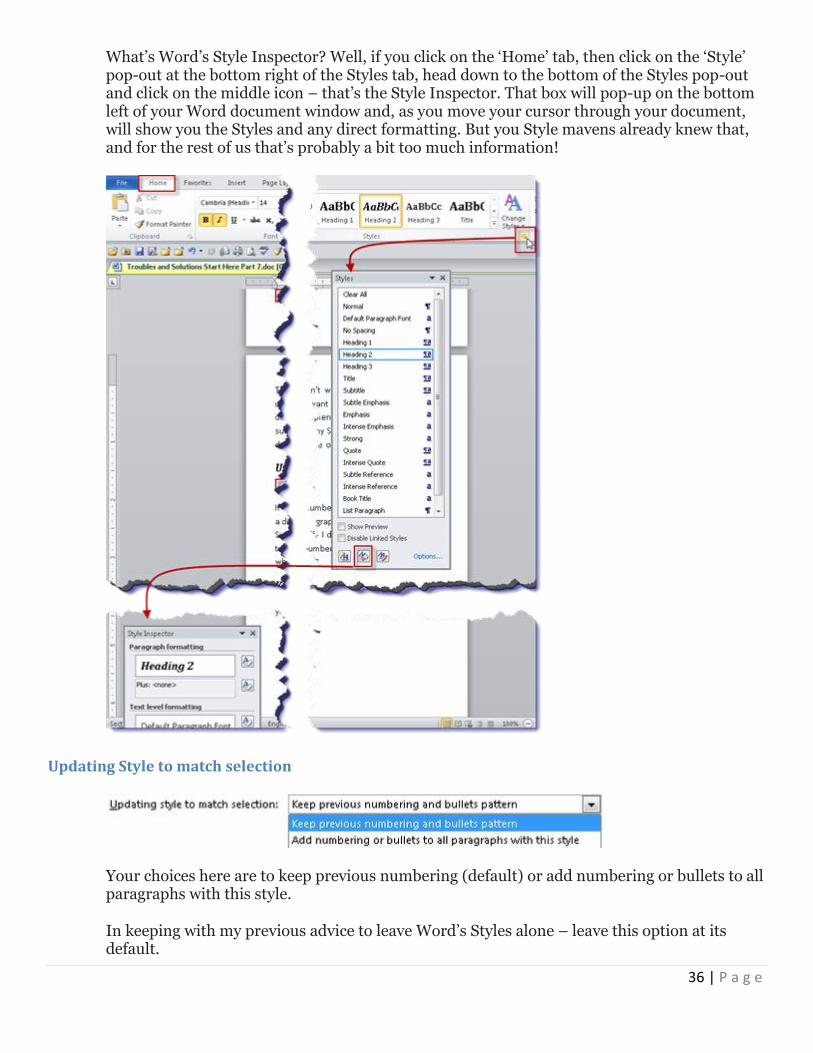
What’s Word’s Style Inspector? Well, if you click on the ‘Home’ tab, then click on the ‘Style’ pop-out at the bottom right of the Styles tab, head down to the bottom of the Styles pop-out and click on the middle icon – that’s the Style Inspector. That box will pop-up on the bottom left of your Word document window and, as you move your cursor through your document, will show you the Styles and any direct formatting. But you Style mavens already knew that, and for the rest of us that’s probably a bit too much information!
Updating Style to match selection
Your choices here are to keep previous numbering (default) or add numbering or bullets to all paragraphs with this style.
In keeping with my previous advice to leave Word’s Styles alone – leave this option at its default.

37 | P a g e
Enable click and type
This is a kinda cool option that I don’t pay nearly enough attention to: it allows you to double-click anywhere in a blank portion of your document to create an insertion point. You really have to try it out to get the effect, and in order to try it out, you need to have this option turned ‘on’. Go ahead and open up a new, blank document and double-click in the middle of the document – you’ll see the cursor moves to that point, even though you haven’t done anything but double-click. Make sure your non-printing symbols are turned on and you’ll see exactly what Word has done – in the screenshot below, I’ve double-clicked in the middle of a blank page and Word places my cursor there (using automatically inserted paragraph returns) and has centred the text:
If I click again (change my mind), the insertion point goes back to where it should be, at the top of the document, and the paragraph marks disappear). Watch the insertion point as you move your cursor around the blank area of the document and you’ll see the paragraph alignment indication change as you move from left to centre to right. Very neat option especially suited to Title Page creation. For more info, see this from Microsoft: About Click and Type
Show AutoComplete suggestions

38 | P a g e
If you’ve read this blog for any length of time, you know I’m a huge fan of Word’s AutoText. I couldn’t work without this option left ‘on’. I want to see those suggestions and I want to use ‘em whenever I can to increase the speed and accuracy of my typing. With this option turned ‘on’, when I start typing the first few letters of an AutoText entry, Word will prompt me with a screen tip to press ‘Enter’ to insert the full entry.
If I don’t want the AutoText entry, I just keep typing whatever it is I wanted and the screen tip will gracefully fade away. What’s not to like about that?
Well that was a bit of a marathon! But editing options are crucially important to the ease with which you create your documents – make sure you set them for the way you best work!
Part 9 Advanced Options Continued
Continuing with Advanced Options
Image Size and Quality
39 | P a g e
The easiest thing to say about this is nothing at all (well, maybe just a little bit). In a law office, it’s highly unlikely that these settings will ever be relevant to you.
That said, here’s a bit of info: This option allows you to set the settings for just the open document(s) or for all documents by making the appropriate choice.
Discard editing data
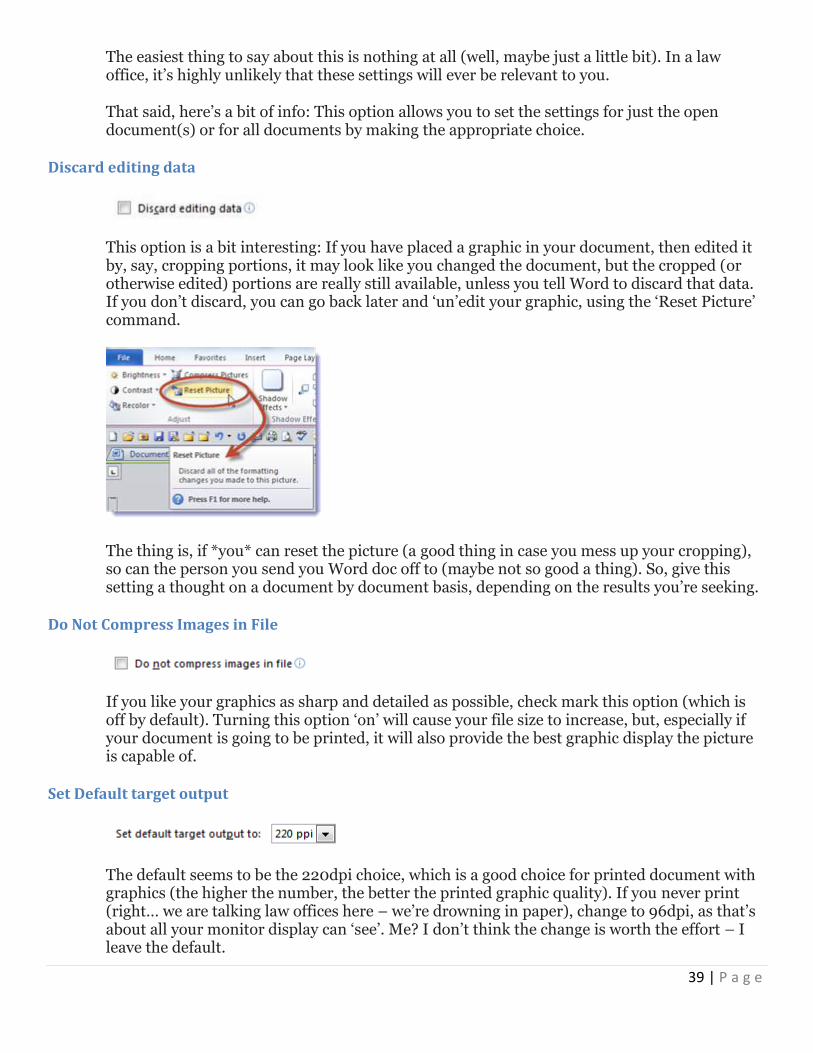
This option is a bit interesting: If you have placed a graphic in your document, then edited it by, say, cropping portions, it may look like you changed the document, but the cropped (or otherwise edited) portions are really still available, unless you tell Word to discard that data. If you don’t discard, you can go back later and ‘un’edit your graphic, using the ‘Reset Picture’ command.
The thing is, if *you* can reset the picture (a good thing in case you mess up your cropping), so can the person you send you Word doc off to (maybe not so good a thing). So, give this setting a thought on a document by document basis, depending on the results you’re seeking.
Do Not Compress Images in File
If you like your graphics as sharp and detailed as possible, check mark this option (which is off by default). Turning this option ‘on’ will cause your file size to increase, but, especially if your document is going to be printed, it will also provide the best graphic display the picture is capable of.
Set Default target output
The default seems to be the 220dpi choice, which is a good choice for printed document with graphics (the higher the number, the better the printed graphic quality). If you never print (right… we are talking law offices here – we’re drowning in paper), change to 96dpi, as that’s about all your monitor display can ‘see’. Me? I don’t think the change is worth the effort – I leave the default.

40 | P a g e
Show Document Content
These options determine how a number of Word features display onscreen. If you’re not seeing something in your document that you think should be displaying, you’ll want to check these settings.
Show background colours
If your document has any background images or colour (unlikely) and you want them to display, check this setting ‘on’. For example, if you’ve chosen a Page Colour for your document, but you’re not seeing it display on screen, it’s because this setting is off.
Show text wrapped within the document window
Applies only to ‘Draft’ view. The default setting for this option is ‘off’ and I can’t really see any reason to turn it on. However, if you are working in Draft view (rare) and you zoom your document so that the zoom level causes the horizontal scroll bar to appear at the bottom of your document, and the text to move off the screen, this setting, if on, will force the text to wrap so that you don’t need to use the horizontal scroll bar. Whoa – I think that set a record for a run-one sentence…
Show picture placeholders
If you don’t want to see the graphics in your document, but I can’t imagine why you wouldn’t, you’ll want to turn this option ‘on’. If you do, graphics will appear thusly:

41 | P a g e
If your picture disappears into a boxed empty space, now you know why. The theory is that documents will open more quickly and use less memory, but today’s computers are so powerful that there seems to be no real-world benefit to turning this option on. Note that even if you decide to turn it on, graphics will still display normally.
Show drawings and text boxes on screen
I do use text boxes from time to time in my work and I like to see their exact location when I use them, so I always ensure this option is ‘on’, so it displays properly. I really can’t imagine working with it off.
Show text animation
Friends don’t let friends use animated text. You don’t need this setting on.
Show bookmarks
With this option ‘off’ an inserted bookmark looks like this: bookmark
(i.e.: doesn’t look like anything but the typed word)

42 | P a g e
With this option ‘off’ an inserted bookmark looks like this: (letting you easily see the location of a Word bookmark.
So, if you work with bookmarks in your documents, turn this option ‘on’. And if you don’t know what Word bookmarks are, well, if you hang around this blog long enough, I’ll eventually get to them!
Show text boundaries
Sometimes I wonder if Microsoft just adds options for giggles, but invariably someone will come along and let me know why a certain option that seems useless to me is important to them. I’m still waiting on this one…
Normally this option is ‘off’. With it off, you only ‘see’ your margins (text boundaries) as the blank areas at the document top, bottom, left and right, where test won’t normally place itself. For me, that’s more than enough boundary info – for Microsoft, apparently not.
If you turn this option ‘on’, you’ll see this:
I just do not find those boundary lines helpful. Note: don’t worry about them printing, if you do decide to use them, because they won’t.
Show crop marks
If you turn ‘em on, you’ll see these:

43 | P a g e
Like text boundaries, I don’t see the point. If I’m going to increase the visual noise in my documents, I want to see a benefit for doing so. I’m just not seeing it. Also, like text boundaries, if you do decide you want to see crop marks, you don’t have to worry about them printing – they won’t.
Show field codes instead of their values
If you know what fields codes are and how to use them, you don’t need my assistance here! If you do, you’re probably using the keyboard shortcut [Alt F9] to switch them between results and values, as it’s much more flexible
I inserted this day, using a field code for the day, rather than typing – the result looks like this:
If I display the code instead of the result it looks like this:
which would send most people running off screaming. But stay tuned because this unfriendly looking thing can be very helpful in automating your documents. And this blog will be going there soon.
In any case, if you find yourself in a document with this unfriendly looking code, the easiest way out is to do this:
1. Ctrl + A to select the entire document 2. Alt + F9 to switch from code to results.
Then you can start breathing again…
Field shading
This setting goes hand in hand with the setting above. If you are using fields, it is often helpful to have them ‘shaded’ automatically by Word, so you know you’re looking at field results, and not at plain ol’ text. You have 3 choices and I would advise never to select ‘Never’, but to, instead, choose between ‘Always’ and ‘When selected’. With either selection, you will either **always** know when the text is actually a field result, or if you select the text and it turns ‘grey’, you’ll again know it’s a field result and no plain text:
44 | P a g e
Use draft font in Draft and Outline views
I never work in Draft view, except for the odd occasion when I need to confirm document Section Breaks, so I never pay attention to this setting. If you do work in Draft view, and you don’t like to see the various fonts and font sizing in your document (although I can’t imagine when that would be helpful), you can tell Word to always display your chosen font and font size when working in Draft or Outline by turning on this option and setting the font name and size.
Font Substitution
If you’re working on a document that someone else prepared, on a different computer, you may (remotely) find this button helpful. If you click on it when your document is open and get this response:
you’ll know that you’re viewing the document exactly as it was prepared. If the document does contain fonts that are not present on your computer, you’ll be presented with a Font Substitution box, where you can, if you wish, convert the missing fonts to something similar already existing on your workstation.
Part 11 Advanced Print Options
We consume a lot of trees in the legal profession – we print *a lot* of documents. Even offices that have moved to a paperless (meaning less paper, not no paper), still consume reams and reams of paper. Our processes may be efficiently paperless, but it’s not the same for most of the people we deal with. Keeping that in mind, you can see how important it is to print with minimal fuss and muss. Your printer will cause you enough grief all on its own, without adding to your frustration with improperly set Word Print Options. So here we go – you want to get these right for the way *you* work:

45 | P a g e
Advance Print Options
Use draft quality
If your printer has a ‘draft’ mode (‘draft’ is a mode of printing that is lighter and theoretically uses less ‘ink’) available (not all do) then choosing this option will ensure that draft quality printing is the default. I find this option to be more trouble than it’s worth and never set it on. I’ve never been convinced of any actual savings because I always forget it’s on and then end up re-printing a good copy – wasting more time and ‘ink’.
Print in Background
This setting used to matter more when Windows was less nimble and computers were less powerful. Now, it doesn’t matter so much whether this option is ‘on’ or ‘off’. At least at my computer, there’s no longer much of a difference no matter the setting. However, if you would like to ensure that you can continue working in Word without hesitation after sending a print job, go ahead and turn this one ‘on’.
Print pages in reverse order
You’ll know if you need to turn this option ‘on’ – if you find your documents printing back to front! There apparently are some printers (although I’ve never run across one) that print this way. If you are always reordering your print job after the printer spits it out, go ahead and turn this one on permanently. You’ll be much happier! (Or turn it off if you find it on and don’t want it!)

46 | P a g e
Print XML tags
Safely ignored
Print field codes
I can’t imagine a reason to have this option on by default, although if you’re working with field codes while setting up a document, you might want it on temporarily. If this setting is turned on inadvertently, and you have a field code in your document you’ll end up with something that looks like this:
(field code for a date)
instead of this:
(result of the date field code)
So, if your document looks like it has some gibberish in it that you don’t recognize, you’ll want to head off to this setting and made sure to uncheck it to get things looking right again.
Allow field codes with tracked changes to update
This is a new setting in Word 2010. With track changes on, and this setting on, you are ensured that most version of the field result (like the date above) will be used when the document is printed. This can be confusing if your view is of an earlier version, and you don’t see the update until you print. Keeping this setting turned ‘off’ ensure that what you see if what you get. As a precaution, when I’m working with fields and want to ensure that I can see the most up-to-date results *before* I hit the print button, I always perform a ‘Ctrl A’ (to select the whole document), then F9 (update fields).
47 | P a g e
Print on front/ back of sheet for duplexing
If your printer does not duplex print automatically (printing on the front and back of a page) then you can simulate by printing the job twice – print all odd pages on one side of the paper, then flip the printed pages and send them through the printer again to print all even pages on the other side. This can be really tricky – to get all the pages oriented the right way for the 2nd trip through. I invariably muck it up. These settings may help when trying to print a manual duplex – but take my advice – practice with a very small job first. When you get it right, make a little sticky note and stick it to the side of your printer.
Scale content
Turn this option ‘on’ and you won’t have to think about whether the document you received is set for A4 (European) or 8.5 X11 (U.S.) – it’ll print just fine.
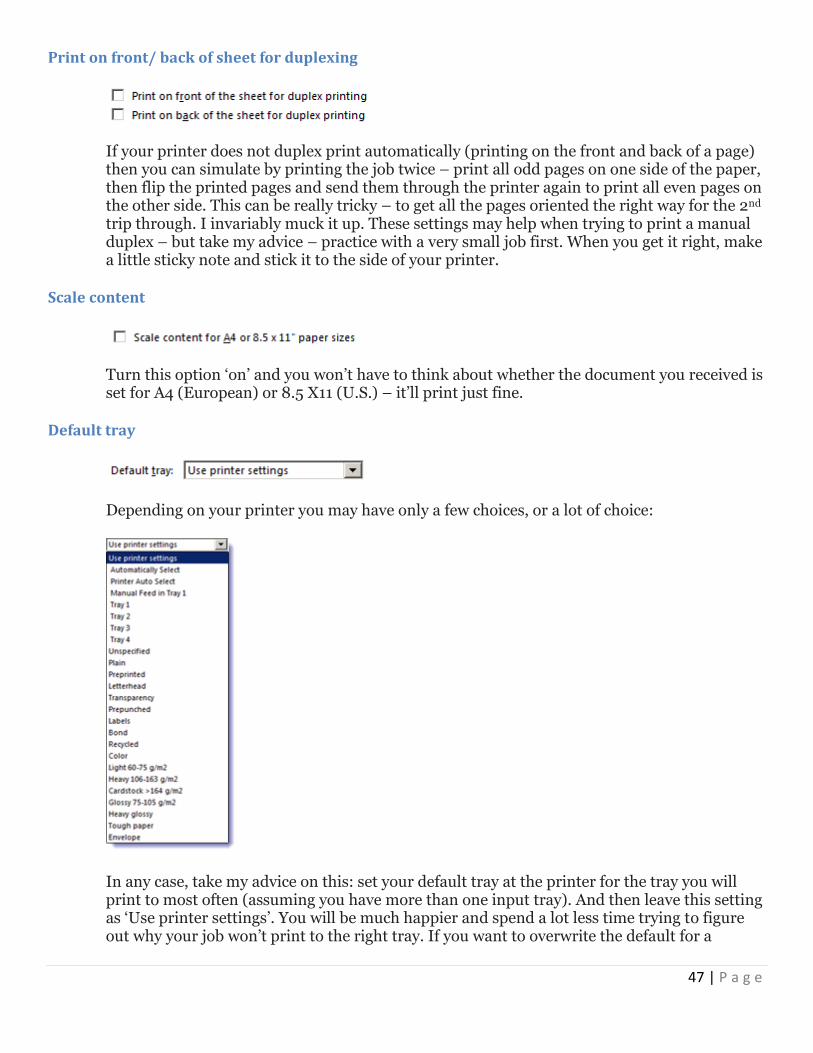
Default tray
Depending on your printer you may have only a few choices, or a lot of choice:
In any case, take my advice on this: set your default tray at the printer for the tray you will print to most often (assuming you have more than one input tray). And then leave this setting as ‘Use printer settings’. You will be much happier and spend a lot less time trying to figure out why your job won’t print to the right tray. If you want to overwrite the default for a

48 | P a g e
particular document (say, a template), change the Page Source in Page Layout, otherwise, choose a different tray one-off as you wish.
When printing this document
These are both safely ignored – either one off for the particular document, or in general. These are off by default and are best left that way.
Part 12 Advanced Save Options
If you remember, way back in Part 5 of this series, we already talked about Save options, so why are we doing it again? Because Microsoft has seen fit to split Save Options into two parts: The main Save Options already covered, and some additional Save options under Advanced Options. Why split them apart? I have no idea, although I assume it made sense to someone, somewhere along the way…
Advanced Save Options
Prompt before saving Normal
Clicking on the ‘info’ button provides a very straight-forward answer to the effect of turning on this option.
49 | P a g e
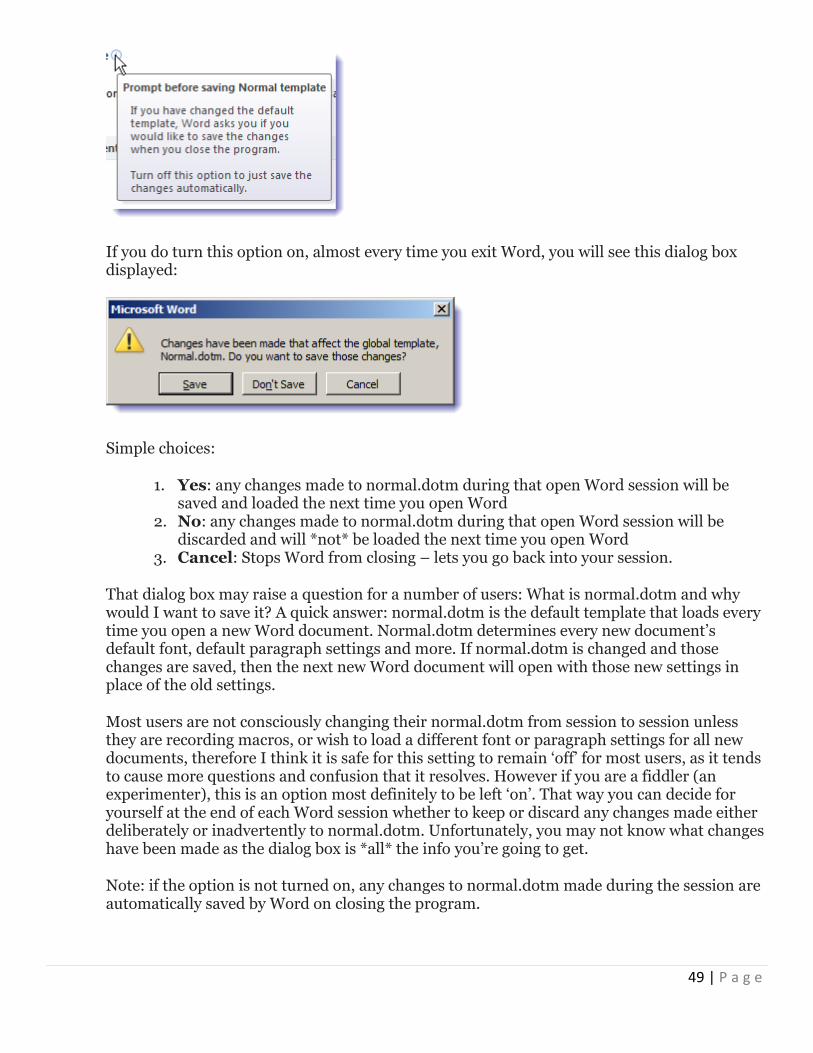
If you do turn this option on, almost every time you exit Word, you will see this dialog box displayed:
Simple choices:
1. Yes: any changes made to normal.dotm during that open Word session will be saved and loaded the next time you open Word
2. No: any changes made to normal.dotm during that open Word session will be discarded and will *not* be loaded the next time you open Word
3. Cancel: Stops Word from closing – lets you go back into your session.
That dialog box may raise a question for a number of users: What is normal.dotm and why would I want to save it? A quick answer: normal.dotm is the default template that loads every time you open a new Word document. Normal.dotm determines every new document’s default font, default paragraph settings and more. If normal.dotm is changed and those changes are saved, then the next new Word document will open with those new settings in place of the old settings.
Most users are not consciously changing their normal.dotm from session to session unless they are recording macros, or wish to load a different font or paragraph settings for all new documents, therefore I think it is safe for this setting to remain ‘off’ for most users, as it tends to cause more questions and confusion that it resolves. However if you are a fiddler (an experimenter), this is an option most definitely to be left ‘on’. That way you can decide for yourself at the end of each Word session whether to keep or discard any changes made either deliberately or inadvertently to normal.dotm. Unfortunately, you may not know what changes have been made as the dialog box is *all* the info you’re going to get.
Note: if the option is not turned on, any changes to normal.dotm made during the session are automatically saved by Word on closing the program.

50 | P a g e
A word of advice to everyone: normal.dotm is a file you definitely want to back up – maybe multiple times! It not only has a tendency to corrupt, but you may save a new version that you later decide you don’t want. If you back normal.dotm up from time to time by making a copy and storing it in a safe place, you’ll be glad you did. Windows 7 users should be able to find the file here (where the blurred area is your user name):
Or just do a Windows Explorer search for ‘normal.dotm’ on your local drive and that should do the trick to locate. (Word 2003 users, the file you’re looking for is normal.dot – no ‘m’ at the end)
Always create a backup copy
Wow, this one brings back memories. In the ‘early days’, Tech always turned this option ‘on’ when setting up a new workstation. This made our lives easier in the days when restoring from backup was more cumbersome and network snapshots weren’t available. With this option turned ‘on’, each time a user saves a Word doc, the prior version is automatically saved in the same folder with a .wbk extension (the latest version gets the .doc extension), allowing the user to freely return to the earlier saved version. There were users who were very happy with this! To be honest though, it did confuse other users, who sometimes opened the .wbk version of the file and went to work on it before realizing that all their prior edits were no longer there (because, of course, the changes were in the .doc file)! And, for those users who were conscientious about regularly saving their documents as they were working, the version they wanted to go back to was often long gone – overwritten by later .wbk versions of the file.
In addition to some confusion, this option also caused Word files on the network to multiply like bunnies – for every new file opened and saved a second file (the .wbk file) would magically appear. Folders stuffed with Word files became doubly stuffed…
So, we turned this option off office-wide some time ago. Your mileage may vary.
Copy remotely stored files
This is supposed to speed up performance if you’re working with network or remote files. I haven’t found much of a difference with this option ‘on’ or ‘off’. You might want to experiment to see if it makes a difference for you.
Allow Background Saves
51 | P a g e
We turn this setting ‘on’ by default for all users when setting up a new computer. It allows open documents to be saved in the background, allowing you to continue to work while the saving is going on. With fast workstations and stable networks and power supplies, it’s a safe option to check ‘on’.
Preserve Fidelity
Even though this isn’t really part of the Advanced Save Options, I’m throwing it in here anyway, as it is next on the list, and does touch on ‘save’ aspects. This is a weirdly named option and I don’t see any reason for its two choices to be ‘on’ by default for all documents, especially in a law office where it is unlikely that documents with form and/or linguistic data are being routinely created. If, for any reason, you are working with a particular document containing these features, you can come to this option and turn it on just for that document.
Part 13 Advanced General Options
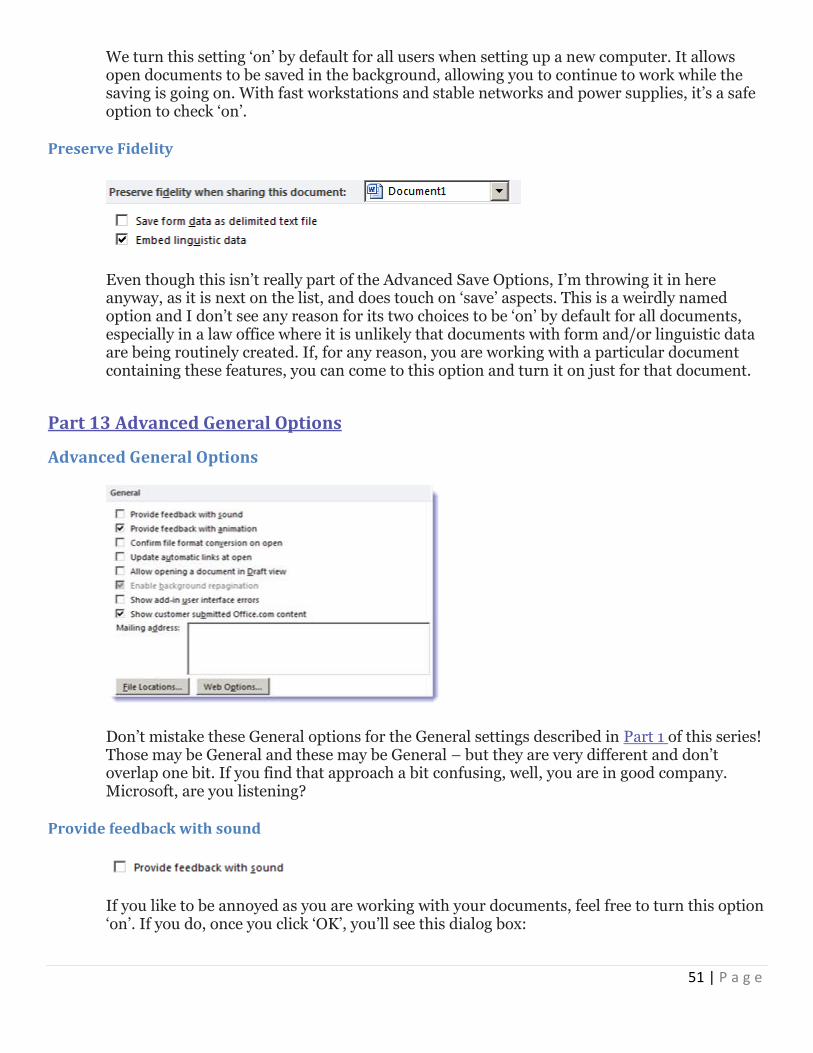
Advanced General Options
Don’t mistake these General options for the General settings described in Part 1 of this series! Those may be General and these may be General – but they are very different and don’t overlap one bit. If you find that approach a bit confusing, well, you are in good company. Microsoft, are you listening?
Provide feedback with sound
If you like to be annoyed as you are working with your documents, feel free to turn this option ‘on’. If you do, once you click ‘OK’, you’ll see this dialog box:

52 | P a g e
Go ahead and install by clicking ‘yes’ (if you dare).
I guarantee it won’t be long before you choose to turn it back off. Or your coworkers will choose for you…
Provide feedback with animation
On or off – I can’t make out any difference. If anyone knows what this option actually affects, please drop your explanation in the comments!
Confirm file format
If you leave this option unchecked (off), Word will decide which of its converters to use when opening a file other than a .doc file. If you have a specific file converter you’d like Word to use when opening non-.doc files in Word (HTML or RTF or other Word compatible files), then checking this option ‘on’ will ensure that you get to use the converter you want when opening such files.
Please be aware that this option only works on files that Word understands. Checking it ‘on’ will not allow you to do such things as open a .pdf file within Word, because Word can’t do that. The list of files that Word can open is visible through the ‘File’ ‘Open’ dialog box:
Note: if you leave this option unchecked and you see the File Conversion box anyway when opening a file Word recognizes, including .doc files, then you know your file is corrupt: (I’ve used a .pdf to trigger the box) and you have some work to do…

53 | P a g e
Update automatic links on open
If you use any links in your documents and you want them to auto-update, turn this option ‘on’. I don’t see how leaving it on can hurt.
Allow opening a doc in Draft view
If you like to work and save your documents in Draft view, and you want them to open that way when you work on them, go ahead and enable this option. Documents will only open in Draft view, using this option, if they were saved and closed while in Draft view.
Enable background repagination
You’ll note that my screenshot of this option shows as ‘greyed-out’. That’s because I work in Print Layout view and when working in that view this setting is mandatory – background pagination happens whether you like it or not. (I do) If you work in Draft view and want background pagination to work, you’ll need to turn this option ‘on’. If it slows down your computer (unlikely, but possible) you can just turn it back off.
Show add-in errors

54 | P a g e
If you use a lot of Word Add-ins (I do) and you find Word is crashing (I don’t), then you may want to check this option ‘on’ to diagnose which add-in is causing you grief.
Customer-submitted content
I like what other people have to say when I’m searching through for assistance with Word. I often find it more helpful than Microsoft’s Help. So this option stays ‘on’.
Mailing Address
Most people type their office address here for placement by Word on the return address area of envelopes. I use document generation software to create letters and envelopes, so I’ve left mine blank. If you use envelopes with a pre-addressed return, you may want to leave this area blank also. However, if you wish, you can fill it out, then, when using the Envelopes and Labels dialog, just click the ‘omit’ area, so you don’t end up with your return address printing on top of your envelope’s pre-printed return address!
File Locations
Word, when installed, will decide for you where it wants to save your files, or look for files. You don’t have to accept these defaults. If you find that you are always browsing to a different location for certain types of files, you can set the default location to a place that works for you for:
1. Documents

55 | P a g e
2. User Templates 3. Workgroup Templates 4. AutoRecover files 5. Tools 6. Startup
Just click the ‘File Location’ button, then select the File Type that you want to change. Next, click ‘Modify’ and in the Modify Location box, browse and select the default location that works best for you. Click ‘OK’ to select.
Realistically, the only location you are likely to change is the Documents location and it’s best to set it where your documents are most often located, included mapped network drives.
Web Options
If you’re creating Web pages using Word, you’ll want to pay attention to these options. But if you’re creating Web pages using Word, you have my sympathies and not my help, so all I’m going to say is this: Click Web Options and muck around in the corresponding dialog box:

56 | P a g e
But I’m really going to help you by advising this: Please, for the sake of all that’s good on the inter-tubes, use something else to create your web pages…