Embed Size (px)
Citation preview
www.UltimateNightVision.com ver 41914
UNV - MDVR
Operation Manual
2
Content Page Number
Hardware Orientation 3
Camera Interface Orientation 4
Guide to Use with Thermal/Digital Devices 5-6
Accessories 7
Remote Control 7
Using the Trigger Switch 8
Basic Operation and Recording 9
How to capture video and audio 10
Playing Back Files 11
Specifications 16
3
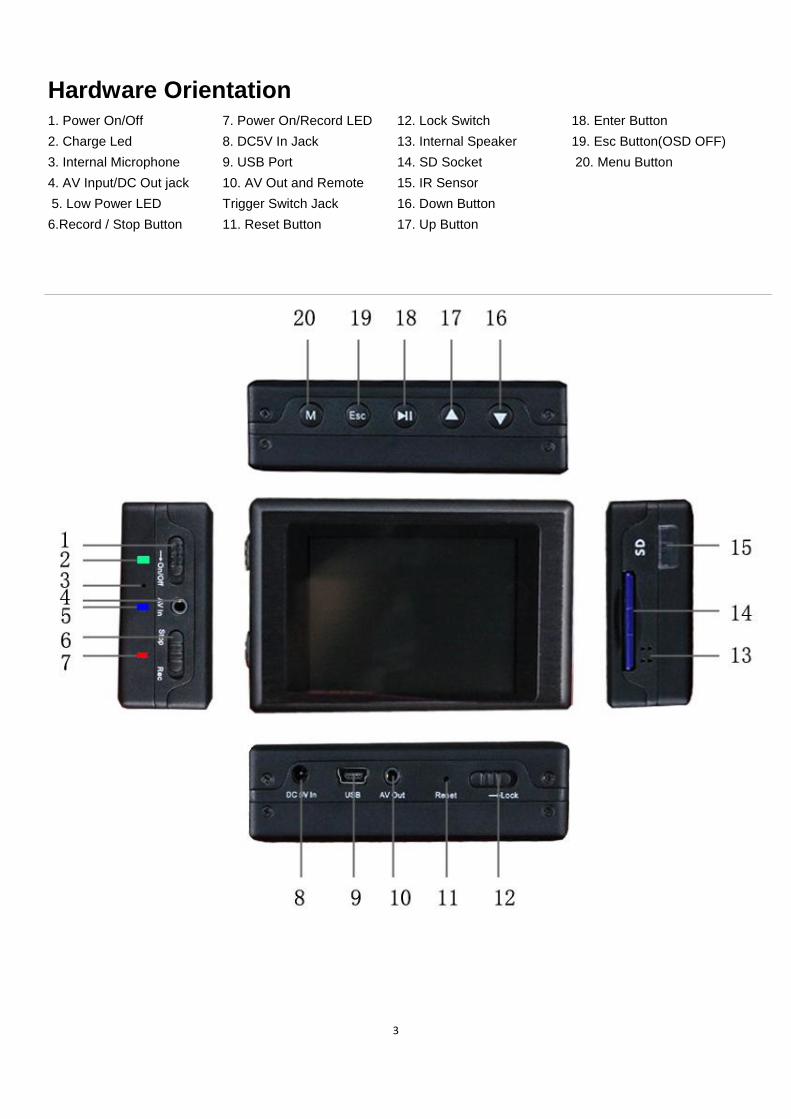
Hardware Orientation 1. Power On/Off
2. Charge Led
3. Internal Microphone
4. AV Input/DC Out jack
5. Low Power LED
6.Record / Stop Button
7. Power On/Record LED
8. DC5V In Jack
9. USB Port
10. AV Out and Remote
Trigger Switch Jack
11. Reset Button
12. Lock Switch
13. Internal Speaker
14. SD Socket
15. IR Sensor
16. Down Button
17. Up Button
18. Enter Button
19. Esc Button(OSD OFF)
20. Menu Button
4
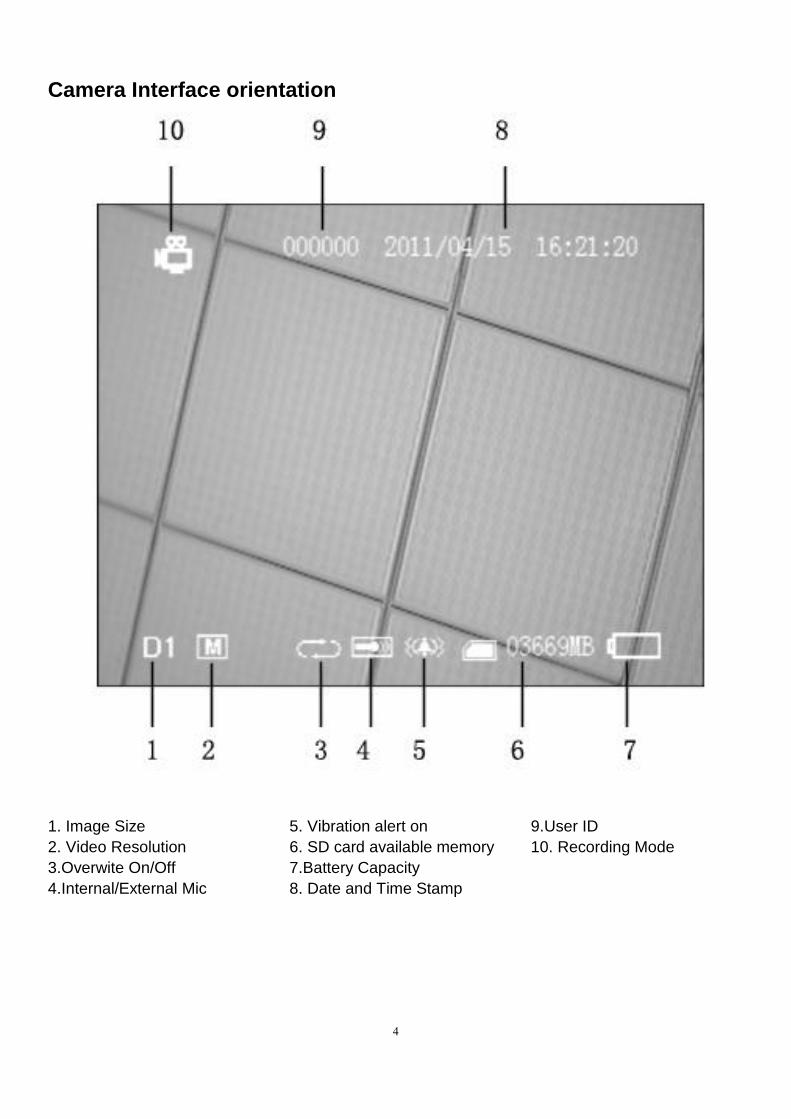
Camera Interface orientation
1. Image Size
2. Video Resolution
3.Overwite On/Off
4.Internal/External Mic
5. Vibration alert on
6. SD card available memory
7.Battery Capacity
8. Date and Time Stamp
9.User ID
10. Recording Mode
- 5 -
An Overview to using your MDVR with Thermal/Digital Night Vision Devices
Navigating the MDVR Menu
Power the MDVR on holding the On/Off switch to on/off for 2 seconds. The MDVR has an easy to
use main menu structure consisting of three submenus including Recorder Setting, System
Setting, and Even Playback. To navigate these menus use the four buttons located on the bottom
of the MDVR. The M/Menu Button will bring up the main menu. The Play/Pause/Enter Button will
enter a sub menu when selected. The Up Button and Down Button are used to scroll through
menus, turn the audio volume up and down, and fast forward and rewind when viewing a recorded
video in the Event Playback menu. The Escape Button will exit or back out of a menu.
Format your SD card(not included)
To ensure proper video recording, you must format your SD card(not included) in the MDVR.
Failure to format the SD card will cause dropped frames, missing audio, video, and corrupt files.
The default password to format your SD card is 000000.
You can find the format function here:
Main Menu > System Setting > Format
Set the MDVR to Video Recording Mode
The MDVR has video, audio, and image capture modes. To use the MDVR with a thermal or
digital scope you will need to set the MDVR to video mode.
You can find the video mode setting here:
Main Menu > Recorder Setting > Mode > Video
Select the Internal Microphone and Microphone Volume
To capture audio while using a thermal or digital scope, select the internal microphone setting.
You will also need to select the correct microphone volume level to capture a quality audio
recording and avoid audio distortion. The optimum microphone volume setting for night hunting is
5.
You can find the microphone settings here:
Main Menu > Recorder Setting > Microphone Select > Internal Mic
You can find the microphone volume settings here:
Main Menu > Recorder Setting > Audio Record Volume
Turn off the button beep tone
The MDVR has a built in beep tone function that emits a beep tone when any button is pushed.
While this can be useful in some situations, you will want to turn the beep tone off for night hunting
scenarios.
You can find the beep tone setting here:
Main Menu > System Setting > Beep
Select a time stamp setting
The MDVR has a built in time stamp function that will record the date and time in the upper right
hand of any captured video when enabled.
You can find the time stamp settings here:
Main Menu > Recorder Setting > Time Stamp

- 6 -
Enable the vibration alert function
The MDVR has a built in vibration alert function to alert you when a video signal is not present.
This is especially useful in the field when night hunting to ensure that you are getting a good video
signal from your thermal or digital device. The vibe alert function will help to alert you when any
setting may be incorrect on your thermal or digital scope, or if a video cable is accidentally
unplugged or damaged.
You can find the vibration alert setting here:
Main Menu > System Setting > Vide Alert
Select Video Resolution
The MDVR has three built in resolution options to choose from including NTSC 720x480, PAL
720x576, and VGA 640x480. The majority of currently available thermal and digital scopes output
an NTSC or PAL signal. You should try all three resolution settings to find the setting that best
captures your scope’s video output.
You can find the video resolution settings here:
Main Menu > Recorder Setting > Resolution
Select Video Quality
The MDVR has three video quality settings. Low: 2.5mbps, Medium 3.5mpbs, and High: 8mbps.
Chose high resolution for the best video quality.
You can find the video quality setting here:
Main Menu > Recorder Setting > Video Quality
Select Frame Rate
The MDVR has a 15 fps and a 30fps setting. Choose the 30fps frame rate for the best video
quality.
You can find the frame rate setting here:
Main Menu > Recorder Setting > Frame Rate
Use the trigger switch or record on start-up function to capture video
There are 3 ways to record with the MDVR.
1) Set the Record/Stop button to stop. Power the MDVR on, then set the Record/Stop button
to record. To stop the recording set the Record/Stop button to stop.
2) Set the Record/Stop button to record, then power the MDVR on. When you power the
MDVR on with the Record/Stop button set to record, the MDVR will automatically begin
recording. To stop the recording set the Record/Stop button to stop.
3) Plug the remote recording trigger switch into the AV Out port. When
the MDVR is off, activating the remote trigger switch (flipped to the I position on the trigger
switch) will turn the MDVR on and send into recording mode immediately. Deactivating the
remote recording trigger switch (flipped away from the I position) will stop recording and
power off the MDVR. NOTE: Do not plug the remote recording trigger switch into the AV out
port while the MDVR is on. Do not pug the remote recording trigger switch into the AV out
while the switch is set to the I position. See pg 8 for full instructions.
- 7 -
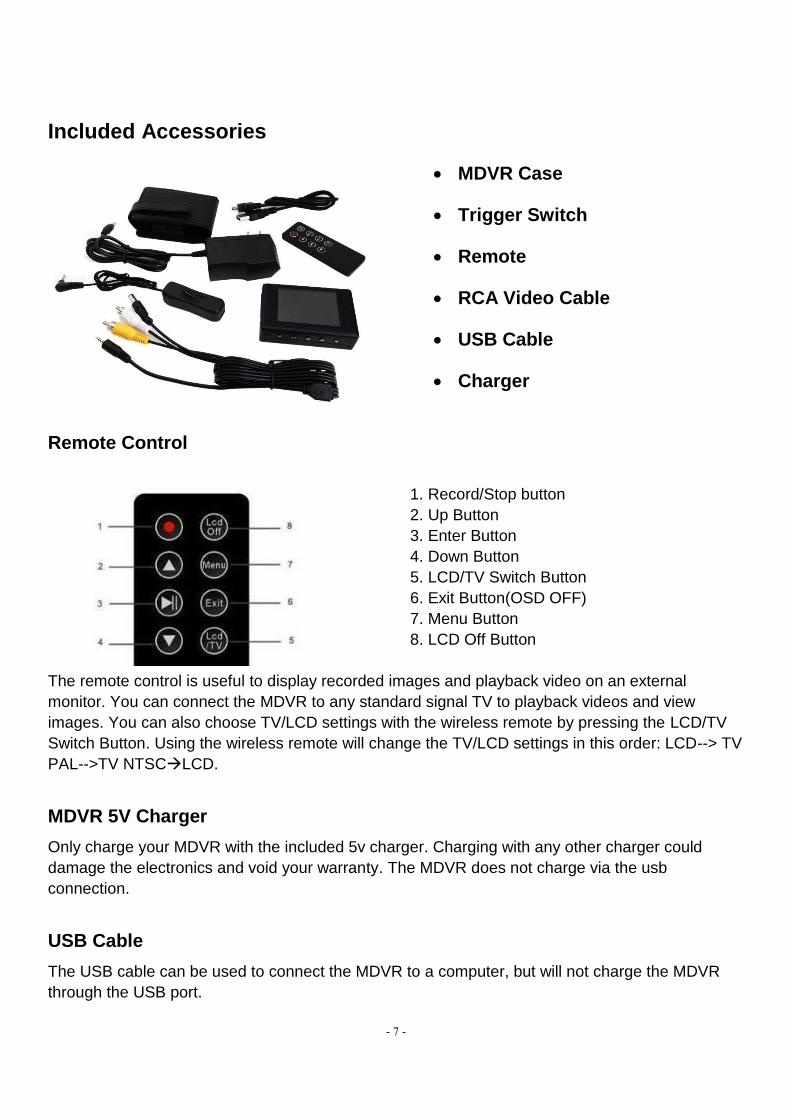
Included Accessories
MDVR Case
Trigger Switch
Remote
RCA Video Cable
USB Cable
Charger
Remote Control
1. Record/Stop button
2. Up Button
3. Enter Button
4. Down Button
5. LCD/TV Switch Button
6. Exit Button(OSD OFF)
7. Menu Button
8. LCD Off Button
The remote control is useful to display recorded images and playback video on an external
monitor. You can connect the MDVR to any standard signal TV to playback videos and view
images. You can also choose TV/LCD settings with the wireless remote by pressing the LCD/TV
Switch Button. Using the wireless remote will change the TV/LCD settings in this order: LCD--> TV
PAL-->TV NTSCLCD.
MDVR 5V Charger
Only charge your MDVR with the included 5v charger. Charging with any other charger could
damage the electronics and void your warranty. The MDVR does not charge via the usb
connection.
USB Cable
The USB cable can be used to connect the MDVR to a computer, but will not charge the MDVR
through the USB port.
- 8 -
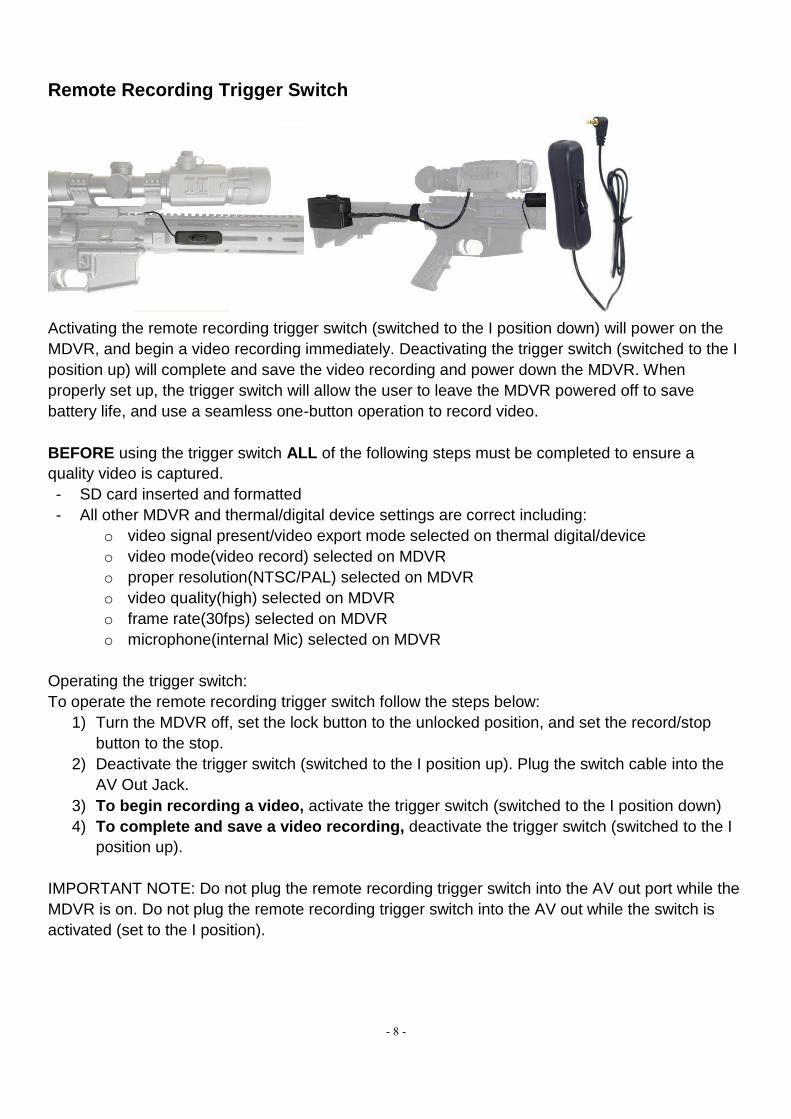
Remote Recording Trigger Switch
Activating the remote recording trigger switch (switched to the I position down) will power on the
MDVR, and begin a video recording immediately. Deactivating the trigger switch (switched to the I
position up) will complete and save the video recording and power down the MDVR. When
properly set up, the trigger switch will allow the user to leave the MDVR powered off to save
battery life, and use a seamless one-button operation to record video.
BEFORE using the trigger switch ALL of the following steps must be completed to ensure a
quality video is captured.
- SD card inserted and formatted
- All other MDVR and thermal/digital device settings are correct including:
o video signal present/video export mode selected on thermal digital/device
o video mode(video record) selected on MDVR
o proper resolution(NTSC/PAL) selected on MDVR
o video quality(high) selected on MDVR
o frame rate(30fps) selected on MDVR
o microphone(internal Mic) selected on MDVR
Operating the trigger switch:
To operate the remote recording trigger switch follow the steps below:
1) Turn the MDVR off, set the lock button to the unlocked position, and set the record/stop
button to the stop.
2) Deactivate the trigger switch (switched to the I position up). Plug the switch cable into the
AV Out Jack.
3) To begin recording a video, activate the trigger switch (switched to the I position down)
4) To complete and save a video recording, deactivate the trigger switch (switched to the I
position up).
IMPORTANT NOTE: Do not plug the remote recording trigger switch into the AV out port while the
MDVR is on. Do not plug the remote recording trigger switch into the AV out while the switch is
activated (set to the I position).
9
Basic Operation IMPORTANT NOTE: Format your SD card in system settings before recording any video or audio
files to ensure proper recording. Failure to format SD card can result in file corruption Default
password is 000000.
How to turn the MDVR on and off:
ON - To turn the MDVR on, hold the Power On/Off to On/Off for 2 seconds or
until the RED power led light appears.
OFF - To turn the MDVR off, hold the Power On/Off to On/Off for 2 seconds or
until the RED power led light disappears.
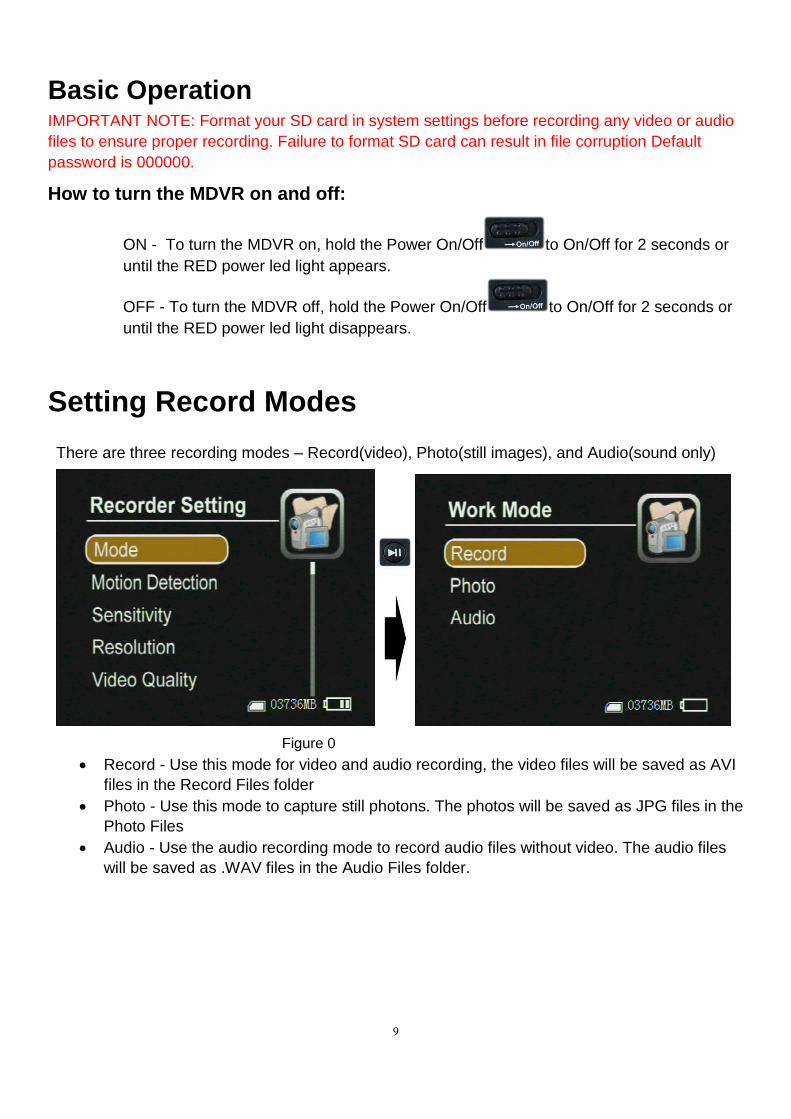
Setting Record Modes
There are three recording modes – Record(video), Photo(still images), and Audio(sound only)
Figure 0
Record - Use this mode for video and audio recording, the video files will be saved as AVI
files in the Record Files folder
Photo - Use this mode to capture still photons. The photos will be saved as JPG files in the
Photo Files
Audio - Use the audio recording mode to record audio files without video. The audio files
will be saved as .WAV files in the Audio Files folder.

10
How to capture video and audio
Recording when the MDVR is powered on
When powered on, push the Record / Stop switch to Rec to start a recording. The red power led
and the red dot icon on the left upper corner of the LCD screen will flash until the Record/Stop
switch is pushed to Stop.
Recording when the MDVR is powered off
If the Record / Stop switch is set on Rec before the MDVR is powered on, the MDVR will begin
recording immediately when powered on if the SD card is available. To stop the recording set the
record/stop button to stop.
Using the Remote Recording Trigger Switch
Activating the remote recording trigger switch (switched to the I position down) will power on the
MDVR, and begin a video recording immediately. Deactivating the trigger switch (switched to the I
position up) will complete and save the video recording and power down the MDVR. When
properly set up, the trigger switch will allow the user to leave the MDVR powered off to save
battery life, and use a seamless one-button operation to record video.
BEFORE using the trigger switch ALL of the following steps must be completed to ensure a
quality video is captured.
- SD card inserted and formatted
- All other MDVR and thermal/digital device settings are correct including:
o video signal present/video export mode selected on thermal digital/device
o video mode(video record) selected on MDVR
o proper resolution(NTSC/PAL) selected on MDVR
o video quality(high) selected on MDVR
o frame rate(30fps) selected on MDVR
o microphone(internal Mic) selected on MDVR
Operating the trigger switch:
To operate the remote recording trigger switch follow the steps below:
5) Turn the MDVR off, set the lock button to the unlocked position, and set the record/stop
button to the stop.
6) Deactivate the trigger switch (switched to the I position up). Plug the switch cable into the
AV Out Jack.
7) To begin recording a video, activate the trigger switch (switched to the I position down)
8) To complete and save a video recording, deactivate the trigger switch (switched to the I
position up).
IMPORTANT NOTE: Do not plug the remote recording trigger switch into the AV out port while the
MDVR is on. Do not plug the remote recording trigger switch into the AV out while the switch is
activated (set to the I position).
11
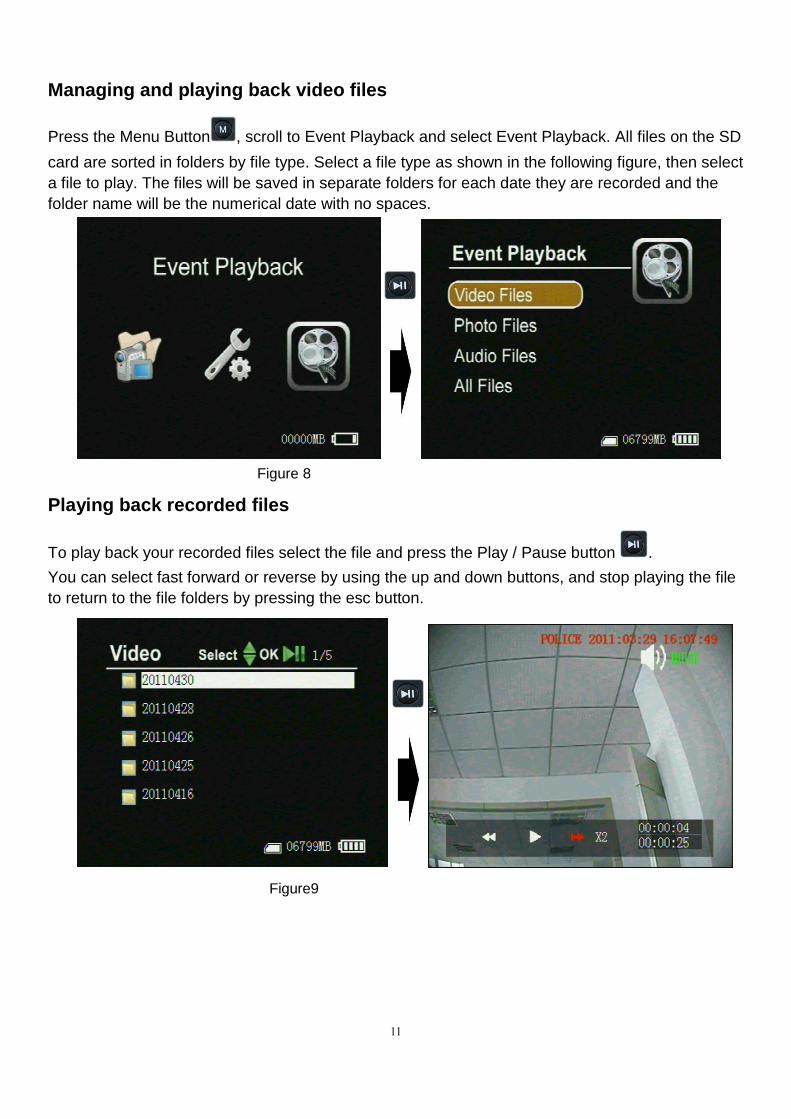
Managing and playing back video files
Press the Menu Button , scroll to Event Playback and select Event Playback. All files on the SD
card are sorted in folders by file type. Select a file type as shown in the following figure, then select
a file to play. The files will be saved in separate folders for each date they are recorded and the
folder name will be the numerical date with no spaces.
Figure 8
Playing back recorded files
To play back your recorded files select the file and press the Play / Pause button .
You can select fast forward or reverse by using the up and down buttons, and stop playing the file
to return to the file folders by pressing the esc button.
Figure9
12
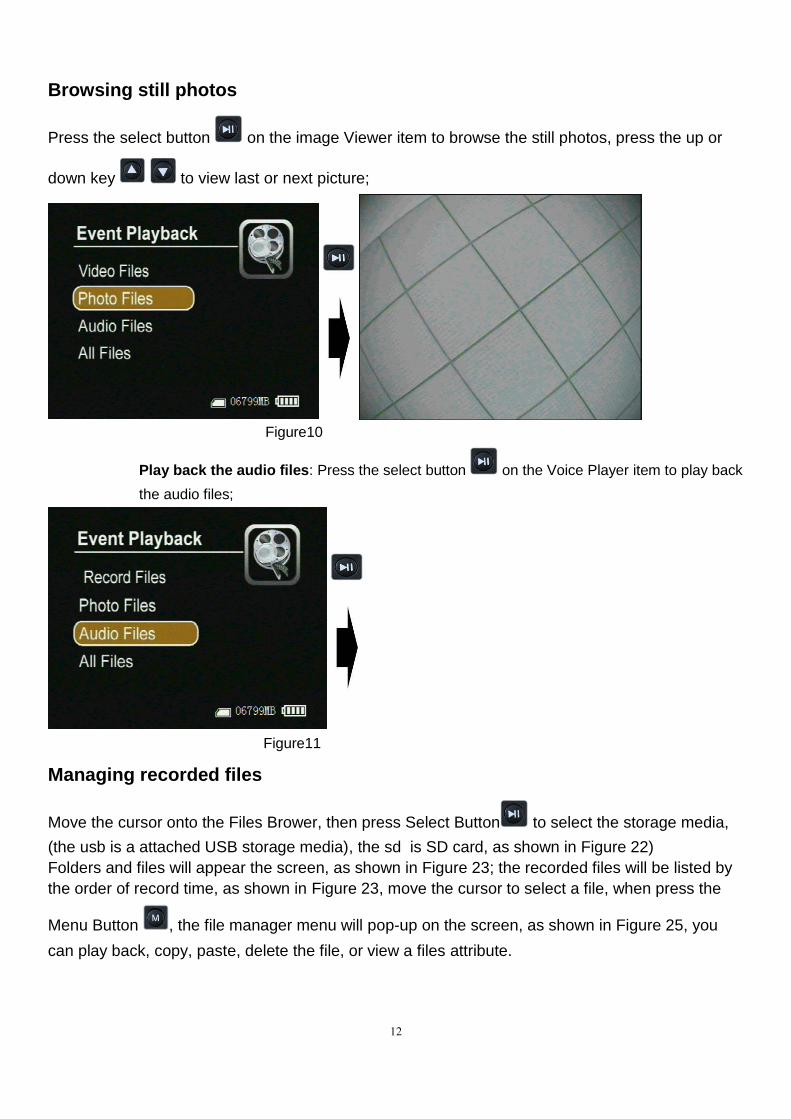
Browsing still photos
Press the select button on the image Viewer item to browse the still photos, press the up or
down key to view last or next picture;
Figure10
Play back the audio files: Press the select button on the Voice Player item to play back
the audio files;
Figure11
Managing recorded files
Move the cursor onto the Files Brower, then press Select Button to select the storage media,
(the usb is a attached USB storage media), the sd is SD card, as shown in Figure 22) Folders and files will appear the screen, as shown in Figure 23; the recorded files will be listed by
the order of record time, as shown in Figure 23, move the cursor to select a file, when press the
Menu Button , the file manager menu will pop-up on the screen, as shown in Figure 25, you
can play back, copy, paste, delete the file, or view a files attribute.
13
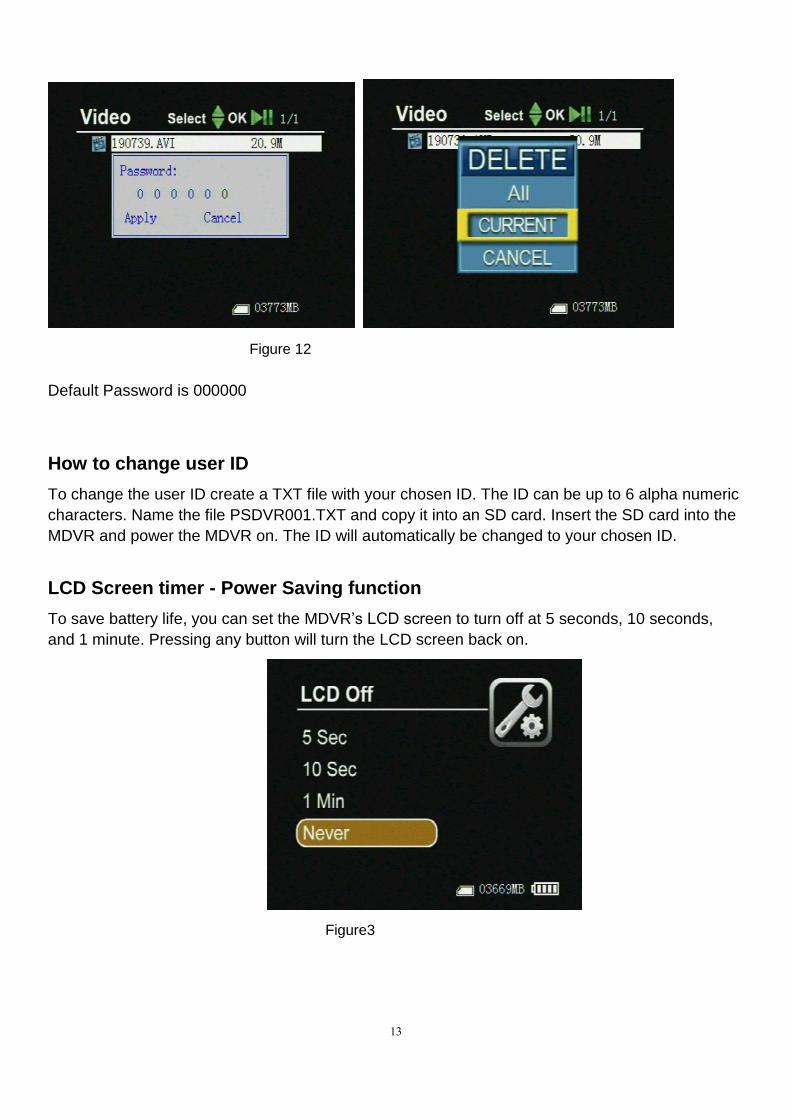
Figure 12
Default Password is 000000
How to change user ID
To change the user ID create a TXT file with your chosen ID. The ID can be up to 6 alpha numeric
characters. Name the file PSDVR001.TXT and copy it into an SD card. Insert the SD card into the
MDVR and power the MDVR on. The ID will automatically be changed to your chosen ID.
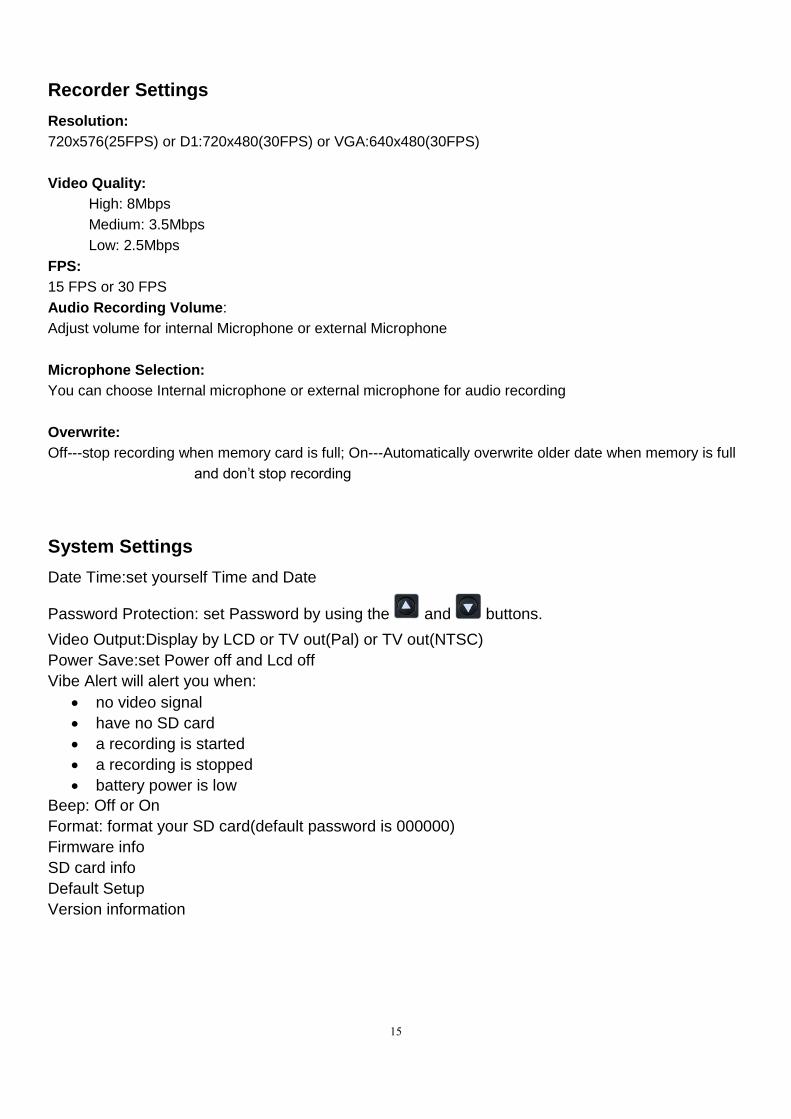
LCD Screen timer - Power Saving function
To save battery life, you can set the MDVR’s LCD screen to turn off at 5 seconds, 10 seconds,
and 1 minute. Pressing any button will turn the LCD screen back on.
Figure3

14
Motion Detection
The motion detection setting is used with an external video camera not included with the MDVR.
When using motion detection recording, the MDVR will be triggered to record when only the video
image is changed in the motion detection area.
Figure6
Figure 7
15
Recorder Settings
Resolution:
720x576(25FPS) or D1:720x480(30FPS) or VGA:640x480(30FPS)
Video Quality:
High: 8Mbps
Medium: 3.5Mbps
Low: 2.5Mbps
FPS:
15 FPS or 30 FPS
Audio Recording Volume:
Adjust volume for internal Microphone or external Microphone
Microphone Selection:
You can choose Internal microphone or external microphone for audio recording
Overwrite:
Off---stop recording when memory card is full; On---Automatically overwrite older date when memory is full
and don’t stop recording
System Settings
Date Time:set yourself Time and Date
Password Protection: set Password by using the and buttons.
Video Output:Display by LCD or TV out(Pal) or TV out(NTSC)
Power Save:set Power off and Lcd off
Vibe Alert will alert you when:
no video signal
have no SD card
a recording is started
a recording is stopped
battery power is low
Beep: Off or On
Format: format your SD card(default password is 000000)
Firmware info
SD card info
Default Setup
Version information
16
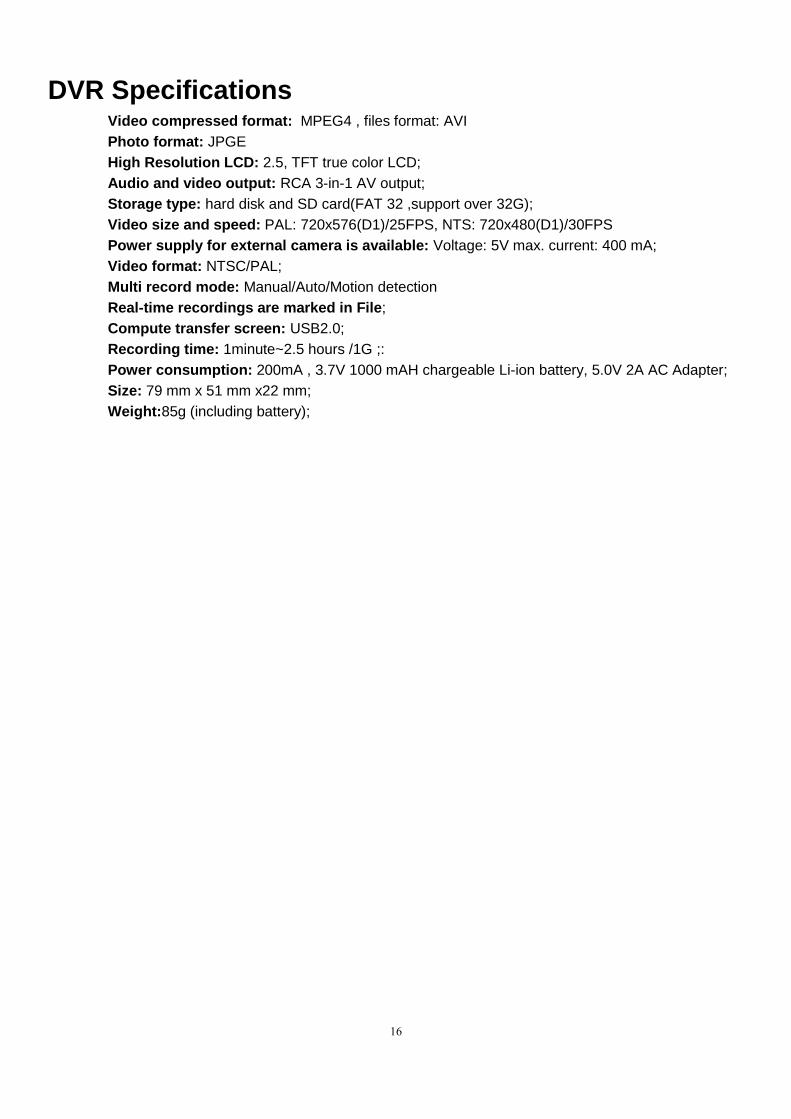
DVR Specifications
Video compressed format: MPEG4 , files format: AVI
Photo format: JPGE
High Resolution LCD: 2.5, TFT true color LCD;
Audio and video output: RCA 3-in-1 AV output;
Storage type: hard disk and SD card(FAT 32 ,support over 32G);
Video size and speed: PAL: 720x576(D1)/25FPS, NTS: 720x480(D1)/30FPS
Power supply for external camera is available: Voltage: 5V max. current: 400 mA;
Video format: NTSC/PAL;
Multi record mode: Manual/Auto/Motion detection
Real-time recordings are marked in File;
Compute transfer screen: USB2.0;
Recording time: 1minute~2.5 hours /1G ;:
Power consumption: 200mA , 3.7V 1000 mAH chargeable Li-ion battery, 5.0V 2A AC Adapter;
Size: 79 mm x 51 mm x22 mm;
Weight:85g (including battery);