Embed Size (px)
Citation preview
Owner’s Manual
Software-Version 2.0.0

DynaSample Ingo Scherzinger Pforzheimer Str. 87 D-75242 Neuhausen GERMANY Phone +49 (700) DYNASAMPLE Email [email protected] Internet https://.dynasample.com
Owner’s Manual Version 2.0 Rev.0 (last update October 2018)
Owner’s Manual
XpressO

Table of Contents I.) License Agreement & Warranty p. 1
1) Rights of Use 2) Safety Instructions 3) Warranty II.) Design and Architecture of the XpressO p. 3
1) General Information about Sound Production 2) Setting up the Cable Connections 3) General Operating Instructions 4) Bank (Factory / User) 5) Preset 6) Store Preset 7) User Interface III.) Inputs and Outputs p. 7
1) Front 2) Remote Control Unit 3) Rear IV.) Factory / User Preset Banks p. 8
1) Select Bank 2) Renaming of User Banks 3) Copy and Restore User Banks 4) Copy User Banks to an external USB Drive V.) Play p. 9
1) General 2) Parameter VI.) Edit p. 11
1) General 2) Parameter 3) Store 4) Discard Changes VII.) Store p. 23 VIII.) Global Settings p. 24
1) General 2) Enter Global Settings Mode 3) Parameter IX.) Demo p. 31 X.) Utility p. 32 XI.) Special Features p. 36
Pitchbend Program and Bank Change for the Akai EWI-USB XII.) Trouble-Shooting p. 37 XIII.) MIDI - Implementation p. 38 XIV.) Index of Sounds – Factory Banks p. 39
- 1 -
I.) License Agreement & Warranty Congratulations on purchasing our MIDI / USB sound module XpressO ! We hope you will have much musical enjoyment with this excellent product from DynaSample!
In order to avoid problems or inconveniences that could affect your artistic and musical creativity we kindly ask you to carefully read the following license agreement and safety instructions.
By using the instrument you explicitly accept these terms. In case you do not agree with the following terms please do not play the instrument and contact DynaSample immediately. 1) Rights of Use:
The user has the right to use the instrument for private or commercial purposes and perform in public or publish the results of these performances in any way without restrictions.
The license of the sound library is connected to the hardware unit and not to the user. I.e. the user has the right to sell the instrument and the license will stay valid for the instrument with the next owner. Once the license fee for the library has been paid in full it will stay permanently on the instrument. In case of a defect of the hardware the license can be transferred to another unit if the defective unit is returned to DynaSample.
The user does not have the right to copy single notes or instruments as samples either by recording audio or copying sound files from the memory for the use with other software or hardware instruments unless authorized by DynaSample. Violations will be prosecuted by law.
Parts of the software are subject to the GNU GPL license. Please contact DynaSample for further information or get information on the internet about the license of PureData and Truecrypt.
If the user has a time limited license agreement the license will expire after the time specified and he will have to make a payment - as specified at the time of purchase - to renew the license until he has acquired a permanent license. The conditions are subject to change and are valid as of the time of purchase throughout the full time needed to acquire the full license.
Any attempt to manipulate the license will make the license void for this licensing period and the license for this time period will have to be purchased anew. The last specified licence payment will make the license permanent.
2) Safety Instructions:
Only use the included AC adapter. Other power supplies might cause problems or damage the unit.
Do not attempt to use the unit at temperatures lower than 0°C (32°F) or higher than 40°C (105°F) to avoid damage from moisture or overheating.
Protect the unit thoroughly against liquids, humidity or condensation that might occur when experiencing large temperature changes.
The vents on top and on the side of the housing need to be uncovered at all times. Covering them can lead to overheating and will void the warranty. Always place the unit in a dry place with sufficient air for cooling and avoid placing it directly in the sun. Do not place it next to heating appliances or similar.
Do never open the unit. Opening can impact the functionality and lead to damages. There is also a risk of injuries by touching any of the electrical parts.
Do never manipulate the AC adapter in any way. There is a serious risk of an electrical shock!
Transport the unit carefully and only in its original case to avoid damage.
To avoid damaging the amplifiers and speakers as well as injuring your ears turn on the XpressO first. Then switch on your amplification system and slowly raise the volume without sudden volume jumps that could hurt your or other people’s ears.
When finished turn off the amplifier first and then the XpressO.
Self-inflicted errors caused by disregarding the above mentioned safety instructions can lead to the loss of the warranty. Breaking the warranty seal will void the warranty in any case.
The use of this unit is at your own risk!
All service needs to be handled by DynaSample or an authorized service center. 3) Limited Warranty:
DynaSample grants a 2 year warranty from the date of purchase for all parts and the software / library as long as the defect has not been caused by improper handling, mechanical damage or intentionally. For verification of the warranty it is necessary to present either the original sales invoice or having the unit registered with the serial number plus name and full address. A damaged or broken warranty seal will render the warranty void.
- 2 -
Copyright © 2018 DynaSample - All rights reserved.
Product features, specifications and availability are subject to change without notice.
FCC Compliance Statement (U.S.A.): . . .
European Compliance Statement: CE mark for European Harmonized Standards: . . .
This symbol indicates that in EU countries, this product must be collected separately from other household waste, as defined in each region. Products bearing this symbol must not be discarded together with household waste.
Dieses Symbol bedeutet, dass dieses Produkt in EU-Ländern getrennt vom Hausmüll gesammelt werden muss gemäß den regionalen Bestimmungen. Mit diesem Symbol gekennzeichnete Produkte dürfen nicht zusammen mit dem Hausmüll entsorgt werden. Akai Professional, EWI-USB, EWI4000s, Yamaha WX5, WX7, WX11, Softwind Synthophone and Casio DH-100 or other trademarks contained herein are the property of their respective owners.
Special thanks to „Cembalobau Merzdorf“ for their kind support!

- 3 -
II.) Design and Architecture of the XpressO 1) General Information about Sound Production - Features Two Voice Sample Engine & Virtual Analogue Synthesi zer
The XpressO can play Samples and the integrated analogue synthesizer at the same time. MIDI plus USB-MIDI Inputs
allow a flexible setup with several MIDI controllers. TDB (True Dynamic Behavior)
True Dynamic Behavior describes the technique that the XpressO uses to emulate the behavior of real instruments. The XpressO uses manipulations that are very similar to the way the air column inside a tube of a real instrument is vibrating. This approach guaranties a vivid dynamic and natural sound spectrum. However – as opposed to physical modelling – samples are used as a sound base. This is why the instrument is not only behaving very “realistic” – it also sounds very “realistic”.
Voice Control
Voice Control allows extremely intuitive dynamic control by using a microphone.
The most natural way to achieve musical phrasings is the human voice. The XpressO captures these phrasings with a microphone and translates the information internally to MIDI data to control dynamics and sound. The captured data can control the internal sounds and also outputs CC messages for use with a sequencer as well.
A „Pitch to MIDI“ converter allows directly singing into an internal synthesizers. By using a neck contact microphone it is even possible to use acoustic instruments like a trumpet or a saxophone to operate the internal Voice Synthesizer or – with certain restrictions – sampled instruments.
Dynamic Vibrato
Many wind players create vibrato by changes of the air stream. This technique is usually called “diaphragm” or “throat” vibrato. The XpressO recognizes this type of vibrato and creates a musical sounding vibrato that does not cause any intonation artifacts.
Keysplit
The keysplit function allows keysplits and dual layers even if your MIDI controller does not provide such features.
Chord-Mapper
The XpressO’s Chord-Mapper offers the unique possibility to execute polyphonic playing on a monophonic instrument like a MIDI windcontroller. To achieve this task chords with individual voices can be assigned to each single note. Depending on the mode you are using chords can be assigned over the full range or repeat every octave or they could use just one single chord that will be shifted parallel through the entire range.
Karaoke Audio Playback Engine
For each preset an audio file can be assigned that will start automatically after a certain amount of notes being played. This way there is no need for an external unit to provide backing tracks. No extra action – other than selecting the preset - is required to start the backing tracks.
- 4 -
Optimized for MIDI Wind Controllers
The XpressO is suited very well for the use with MIDI wind controllers. All necessary settings can be set automatically for each MIDI input and special preset banks have been optimized for the use with these instruments.
Akai EWI-USB Editor / Pitchbend Program Change
The XpressO can edit all parameters of the AKAI EWI-USB. Even though the EWI-USB has no program change buttons it is possible to receive MIDI program changes with the XpressO from the EWI-USB.
Complete MIDI Controller Redirecting
Unfortunately not all keyboards or windcontroller can send any CC message that is needed at the moment. This is why the XpressO offers the ability to globally redirect any incoming CC message, aftertouch or pitchbend into another CC message. In addition to this it is possible to define and store up to six individual remappings including range mapping per preset.
10 User Preset Banks
To store edited presets there are 10 [User ] banks available each containing 128 presets. These banks can be archived via USB and / or exchanged with other users.
- 5 -
2) Setting up the Cable Connections - Connect the MIDI out of your keyboard or other MIDI controller with the MIDI in jack on the left side
of the XpressO . Alternatively you can also connect a USB keyboard or an Akai EWI-USB to one of the front USB connectors. The USB keyboard needs to work with standard USB MIDI drivers. Otherwise it is not possible for the XpressO to recognize this unit.
- Connect the Audio out jack with a proper cable using 1/4 inch unbalanced phone plugs to your amplifier or mixing desk. The nominal level is -10 dB. Alternatively you could use a suited RCA cable to connect the digital SPDIF output to a corresponding SPDIF input of your amplification system.
!!! Attention (!): The SPDIF output will have to be activated in [Utility] beforehand!
- You can alternatively connect a pair of headphones to the 1/4 inch stereo jack at the front panel of the unit.
- Connect the included AC adapter with the jack on the rear side of the XpressO. Then connect the AC adapter to the wall socket and turn the unit on by moving the power switch on the right side of the unit to the upper position. The display will show a startup message.
- The XpressO is now loading the software and the samples. This can take some time. When loading has finished the display will say „READY“ and change to the main display page showing the preset names and numbers as well as some additional information.
- To switch the unit off move the power switch to the bottom position It is recommended to always disconnect the AC adapter from the wall outlet if the unit is not in use. 3) General Operating Instructions On the XpressO there a four function keys or soft keys as well as two data entry wheels on the left and
the right side.
The four function keys are assigned as preset memory buttons while on the main display page. When in any of the edit modes these buttons serve to jump directly to the corresponding functions shown in the display. When pressed once more the value of most parameters can be toggled between the current value and the default value. Furthermore - in [Edit ] mode by pressing and holding - these buttons can be used to copy single parameters to a range of other presets within a preset bank or to restore the respective parameters from the original factory presets.
☺ Hint: By pressing one of the function keys while still on the title of the menu you can jump quickly to the parameters without having to wait any longer.
With the wheel on the left hand side of the remote control unit you can move to the left [◄] or right [►] to select different menu options. By pressing and turning you can move up [▲] or down [▼] and change the current value. You can also change values up [▲] or down [▼] with the right wheel which is the normal procedure.
The left wheel also has the function of the [ESCAPE]. Pressing and holding for more than 2 seconds triggers a RESET. This will cut off stuck notes and take you back to the main display page. It also resets some internal parameters that might be causing some unexpected behaviours.
The right wheel has the function of the [OK] or ENTER. Like this the current action gets either confirmed or aborted.
On the main display page pressing the left wheel while turning up [▲] or down [▼] will select „external“ MIDI program changes internally. The preset name will be flashing and does not get selected until confirmation with [OK]. [Escape ] will cancel the operation. The external MIDI program number can be seen on line 4 of the display on the left side.
The control dial on the right side will select the internal preset (without simulating an external MIDI program change). Pressing the dial shortly will assign this preset to the current external MIDI program number if a Preset Map has been activated in the [Global ] menu.
4) Bank (Factory / User)
The XpressO ships with several [Factory ] banks and 10 [User ] banks (0-9) containing 128 presets (or patches) each. The [Factory ] banks cannot be overwritten. However, the [User ] banks can freely be changed in any way desired.
For each MIDI channel an individual Preset Bank can be assigned. Banks can be selected from MIDI with CC 0 (bank select).

- 6 -
A value of 0-9 has to be sent for the [User ] banks. The [Factory ] banks are starting at 64 – going up. 5) Preset
Each of the 128 available presets per bank can play a sample and / or a virtual analogue layer. On top of it you can assign an external preset from another MIDI sound module and – if desired – mix to the internal sound generator by connecting it to the line input of the XpressO.
To each preset you can assign a sound file (.wav, .aif, .mp3) and a Chord-Mapper preset.
Within each preset you can reassign a number of MIDI CCs for assigning the same controls of your instrument to different functions of the XpressO.
You will find more information about this in chapter VI.) Edit Mode . 6) Store Preset
Edited presets can be stored to [User ] banks while in [Edit ] mode by pressing [OK]. You can select a new preset number to store to - if needed - and confirm. The changed preset can then be recalled at any later time by selected the previously stored preset. To copy a preset to a new location from the main page move to the right until [Store ] appears. Confirm with [OK] and proceed as explained above to crate a copy of the current preset on another location.
Edited presets can be renamed as explained in chapter VI.) Edit Mode .
Storing to the [Factory ] banks is not possible. 7) User Interface
The user interface consists out of
a) the Main page - this is where you select presets and see the most important information b) the Play pages - here you can assign sound files (.wav, .aif, .mp3) to the presets c) the Edit pages where sounds are edited and stored d) the Global pages where general settings for the entire instrument are made e) the Utility pages - where you can find additional tweaks and information about the XpressO
There are also functions for selecting Preset Banks , copying Preset Banks as well as the Demo page to hear some audio examples.
You can reach these pages by moving the left wheel clockwise [►] or counter clockwise [◄]. Functions are activated with [OK] by shortly pressing [OK]. Pressing and holding the right wheel for longer that one second will send [ESCAPE] which will always take you back to the main page.
8) Alternative User Interfaces
There is also a possibility to use the “Key Remote” (see [Global ] Key Remote) or a number pad of a USB QWERTY keyboard to get around the user interface. Note that the number pad has to be connected before starting up.
- 7 -
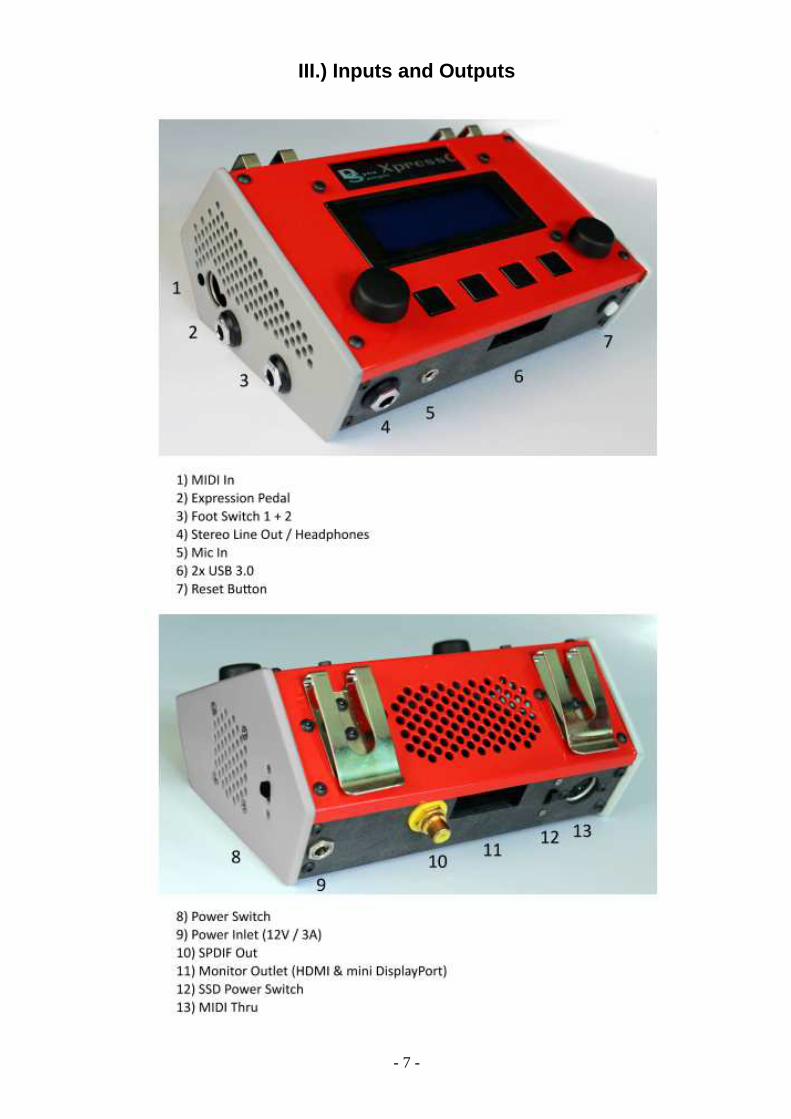
III.) Inputs and Outputs
- 8 -
IV.) Factory / User Preset Banks 1) Select Bank Move to the left three times to go to the bank select page [BnkNo ]. Press [OK]. Select the MIDI channel
on the left part of the display and assign a preset bank to that channel on the right side with [▲] or [▼]. It is also possible to change all MIDI channels at once.
Move the cursor to the left [◄] or press one of the two function keys on the left side to select another MIDI channel and continue with other channels if desired.
Leave the bank select page with [OK] or [Escape ].
☺ Hint: Shortcut is button 1 and 2. Escape by pression onto the dial. 2) Renaming of User Banks By moving to the right while on the bank select page you can reach another page that allows you to
rename this User Bank. Use the left wheel to navigate and the wheel on the right hand to change characters.
[OK] takes you back to the bank select page. [Escape ] brings you back to the main page. All edits will be stored in any case.
3) Copy and Restore User Banks [User ] banks can be copied to other locations or be “reset” from the factory banks at any time.
- First select the target bank that you want to copy to or restore. - Move to the left four times until you reach Bank Copy [BkCp ] and press [OK]. - You will see a selection whether to make an internal reset or copy / restore to or from USB. - Choose internal Reset. - You will be warned that the current bank will be overwritten followed by: „ Press [OK] to continue“. - Confirm with [OK]. - Use [▲] or [▼] to select the source bank to copy from. - follow the directions on the displays or abort with [Escape ].
☺ Hint: It’s a good idea to make a safety copy of your own edited bank onto another bank! 4) Copy User Banks to an external USB Drive
This provides the possibility to store a complete preset bank onto an external USB drive. You can select both the source and target bank to copy from or to.
- connect a USB drive to one of the available USB ports. - Make sure that a [User ] bank is active. - Move to the left until you reach Bank-Copy [BkCp ]. Press [OK]. - You will see a selection whether to make an internal reset or copy / restore to or from USB. - Choose “Backup to USB”. - follow the onscreen instructions or abort with [Escape ].
With the same method you can restore previously save preset banks to the XpressO when selecting “Copy from USB”.
☺ IMPORTANT: - The USB drive has to be formatted with FAT32.
- These files can be copied to almost any computer for backup or email transfer.
- 9 -
V.) Play 1) General
The XpressO offers the possibility of automatic sound file playback by assigning an audio file to a preset on channel one. The backing track can be started automatically with the first note played after preset selection or any later note that has been assigned accordingly.
Start / Stop can also be received from MIDI realtime commands [250] and [252]. It can be selected as well from MIDI CC 120 that might have been assigned beforehand to a footswitch.
If a sound file is assigned to a preset and activated the name of it will be shown in the third line of the display together with the abbreviation of it’s status.
You can reach the settings by moving to the right until [Play ] appears and press [OK] to activate Playback Edit Mode.
!!! IMPORTANT (!): Playback can be stopped anytime with [Escape] ! 2) Parameter
Karaoke Playback Selection - Select Sound File
Select a sound file with the dial to assign it to the current preset.
!!! Attention (!): Please reselect the sound file before editing and check the status or else there could be errors.
Volume
Sets the volume gain in dB.
This parameter will be stored with the sound file and be recalled when the file is used elsewhere. Status
Decides whether the assigned sound file is active or not.
- disabled no sound file is played – the currently selected sound file will be reset - no autoplay the sound file gets started only with MIDI start / stop commands - autoplay plays the sound file when the note number that is set up in [Start ] is reached
- PgUp-Stop plays the sound file then executes a program up command and stops - PgUp-Cont plays the sound file then executes a program up command and continues to play
the assigned sound file for this preset if activated Start
Sets the note count to start playback of the assigned sound file if set to “autoplay”. Backing Tracks – internal or USB
It is possible to select whether the backing tracks are coming from the internal flash drive or from an external USB drive that can be connected to any available USB port.
After connecting an external drive you need to reselect “USB backing tracks”
NO backing tracks - turns the function completely off. INTernal backing tracks - uses the soundfiles stored inside the internal flash memory. USB backing tracks - plays the backing tracks that are stored on an external USB drive. Karaoke EQ Settings
A two band equalizer for treble and bass can be activated to optimize the frequency response.
This parameter will be stored with the sound file and be recalled when the file is used elsewhere.
- 10 -
Copy Files from USB to the XpressO
With this function you can copy audio files of the formats MP3, WAV or AIF from an external USB drive into the XpressO’s internal memory.
The files need to be located in the following folder:
xpression/karaoke/soundfiles/
The folder „xpression“ needs to be on the top level of the USB drive and not inside another folder. !!! IMPORTANT (!):
- Only MP3s with the format MP3 Layer III will work. - NO blank spaces or special characters like Umlaut are allowed in the name. Please replace all spaces with underscores “ _ “ before transfering. - Similar names have to have a difference within the first 12 characters.
Follow the onscreen instructions! Sound file Player Output
Selects the stereo output for the sound files.
!!! Attention (!): If the digital SPDIF-Out is activated all analogue stereo outputs carry the same signal.
- 11 -
VI.) Edit Mode
1) General
Even though all presets are set up carefully to sound and behave as close as possible to the original instruments there might still arise the need to occasionally adjust the instruments according to your own taste, the musical requirements or your own individual playing style.
This can be done in [Edit ] mode. This mode can be entered by moving to the right [►] twice. Press [OK] to activate it.
Navigation is done with the left wheel [◄] (left) and [►] (right) so all sub menus can be accessed. The function keys underneath the display allow activating the parameters directly.
The right wheel [▲] (up) or [▼] (down) changes the values.
Pressing a function key twice toggles between the current value and the default value.
Holding a function key for several seconds recalls a copy function that allows duplicating the current parameter and its current value to a range of other presets within this user bank. This also allows resetting the current parameter to the factory default value. During the upcoming dialog you can specify whether you want to copy or restore and set the starting and ending preset to where you want to copy / restore this parameter.
Edited presets can be stored to any user banks by pressing [OK] while in [Edit ] mode. This way you can come up with several variations of the same sound that can be stored to individual preset locations.
You can leave [Edit ] mode by pressing [OK] if you want to save your edits or by pressing [Escape ] if you want to abort without saving the changed preset.
The XpressO uses virtual controller numbers from 128 to 134 internally for aftertouch (128), Pitchbend
(129), microphone dynamic (130), normal internal dynamic (132), breath vibrato (133), bite or aftertouch vibrato (134) and individual pitchbend up / down (135 / 136).
2) Parameter Select Edit Channel
selects the channel to be edited.
While on the main page the Edit Channel can be selected by pressing the dial on the right and holding it. Keep holding and select the desired channel.
Modwheel (CC1) Assignment
This assigns the function of the incoming MIDI controller 1 (CC1).
The range can be limited or expanded with “minimum” and “maximum”. The range can even be expanded to twice the range that MIDI allows. In most cases this doesn’t make any sense, though. Watch out for unexpected behavior when going over „127“.
When the modwheel is moved the XpressO will show the incoming value on the right side of the display.
The bottom line will show a description of the assigned MIDI controller. A * means that the XpressO is able to use this CC number.
The internal controller CC134 is used for direct vibrato with bite / lip control or aftertouch. Aftertouch Assignment
assigns the function of incoming aftertouch including range. Alternative Dynamic Controller
overwrites the standard dynamic controller that is assigned fort his MIDI input. Controller Reassign – Copy or Replace
Decide here if you want the original CC message to be replaced or copied after transforming. MIDI Controller A – D Redirection
Here you can remap four midi controllers (before modulation and aftertouch assignment)
- 12 -
Source – sets the source controller. Destination – sets the destination controller. Minimum – sets the minimal value of the destination controller. Maximum - sets the maximal value of the destination controller. Sustain Pedal Assignment
Here you can assign a function to the sustain pedal (incoming MIDI CC64).
- Sustain corresponds to the normal hold pedal of a piano. The value is irrelevant.
- Portament o switches the portamento function on for as long as the pedal is pressed. A value between 0 – 127 sets the relative duration of the glissando between the notes. “0” is off - “127” equals the full value that is set up for the portamento time.
- Mono Retrigger repeats (only in monophonic mode) the same pitch even when playing different midi notes. Use it to repeat notes quickly or to simulate alternative fingerings on a wind instrument. The value is irrelevant.
- Mono-Poly switches the monophonic mode to polyphonic as long as sustain is pressed.
- Mono-Poly+Sustain allows polyphonic playing with sustain in a monophonic preset. Vibrato (LFO )Settings
Amount – sets the stored LFO vibrato intensity. Speed – is responsible for the speed of the vibrato. Delay – makes the vibrato fade in within a certain amount of time. Maximum – sets the maximal intensity of the vibrato. Dynamic -> LFO Vibrato Amount and Vibrato -> Pitch
Lowers the LFO vibrato intensity at lower levels.
The value for Vibrato -> Pitch limits pitch modulation altogether. This is valid for both LFO and Bite/Aftertouch vibrato.
Dynamic Vibrato Settings (Breath and Bite / Lip-Vib rato)
With the Dynamic Vibrato you can be create vibrato by variations of the incoming dynamic controller. For wind instruments this is usually referred to throat or diaphragm vibrato. These are the available parameters:
Maximum – sets the maximal intensity. Gain – boosts low values (similar to a compressor with auto gain). Overtones – sets the influence of vibrato to the sound (only for dynamics – not lip/bite). Volume Compensation – compensates the volume when using dynamics/breath to achieve
more pitch and sound variations in relation to the level changes.
If Dynamic Vibrato is generally not used at all you could set this value to „0“ to save computation time.
Dynamic / Breath vibrato uses the internal CC133. Bite vibrato CC134. Direct Vibrato Source
This parameter configures the direct vibrato source to be used. Choices are dynamics / breath or the internal MIDI controller 134 (bite / lip or aftertouch) or both. Using both might lead to undesired results in some cases.
Dynamic -> Sound Range
Minimal Dynamic
- 13 -
This limits the dynamic sound response on the bottom without affecting the volume range. The default value is 0. Increasing this value will result in changing the sound and attack behavior
to correspond to a sound that is played at a higher volume.
The sound and feeling will become „harder“.
Maximal Dynamic This limits the dynamic sound response on the top without affecting the volume range. The default value is 127. Decreasing this value will result in changing the sound and attack
behavior to correspond to a sound that is played at a lower volume.
The sound and feeling will become „softer“. Mono - Poly Settings
polyphonic – allows polyphonic playing. monophonic + polyphonic – allows monophonic legato playing while allowing polyphonic
playing if several notes are pressed at the same time.
monophonic – is optimized for monophonic playing and allows the best legato playing as well as many special pitch “tricks” as shown in the Pitchbend tutorial.
☺ Hint: Pressing the sustain pedal (MIDI CC 64) allows polyphonic playing even if a monophonic mode is activated.
Sample Filter Mix and Filter Resonance
Here you can adjust the mixing proportion between the filtered and unfiltered sound.
Minimal Dynamic Filter Mix This sets the ratio between the filtered and unfiltered portion of the sound at minimal dynamic.
“0” means 100% filtered sound while “127” is completely unfiltered.
Maximal Dynamic Filter Mix This sets the ratio between the filtered and unfiltered portion of the sound at maximal dynamic.
Minimal Dynamic Filter Q This parameter sets the amount of filter resonance at minimal dynamic.
Maximal Dynamic Filter Q This sets the filter resonance at maximal dynamic. Sample Filter Range Dynamic / Envelope Settings
Offset – sets the lowest filter frequency. Dynamic – controls the impact of the dynamic controller to the filter frequency. Envelope – regulates the range of the envelope to be applied to the filter frequency. Retrigger – affects the envelope retriggering behavior when playing legato. Sample Filter Envelope
This controls a standard synthesizer envelope for the filter cutoff of the sample engine. (The analogue synthesizer uses his own filter envelope)
Attack – time to reach the peak level of the envelope Decay – time to reach the sustain level Sustain – level to hold the note until the note off is received Release – time after the note off for the envelope to drop back to the initial level Dynamic -> Volume Range
This can compensate the dynamic curve from -12 dB to +12 dB in case it has changed by editing certain sound parameters.
Brass Overtones
This adds overtones while playing forte (mainly for brass).
Overtone-Level – sets the volume. Overtone-Tune – sets the frequency response. Pitchbend to Volume & Overtones
Sets the influence of the pitchbend to volume and additional overtones.
- 14 -
- uVol - sets the volume change for pitchbend up - dVol - sets the volume change for pitchbend down - uOvt - sets the overtones gain on pitchbend up - dOvt - sets the overtones gain on pitchbend down Overdrive Settings
This is an overdive / distortion module.
- mix - blends between the clean and distorted sound. - drive - sets the drive of the distortion. - LpF - this regulates the frequency of the lowpass filter of the distorded signal. - treble - adds higher frequencies abve the lopass cutoff frequency. Partial A + B Volume
With these parameters the levels of two individual overtones can be adjusted.
Partial A/B Number – selects the partial number of the overtone series. Partial A/B Level – sets the volume of this overtone. Doubling
This allows doubling of the instrument without the need of a second voice by introducing a small delay and pitch modulation while setting the pan position to hard left / right.
Doubling – activates the function. Minimum – sets the minimal delay in milliseconds. Range – defines the time window in which a random delay will take place. Volume Settings
The volume controller (MIDI CC7) stores the basic level of the instrument. How much attenuation CC7 actually provides be set up in [Global ] „Control 7 volume range
minimum“.
Volume-Trim can attenuate or amplify the volume of the preset from -48 to +12 dB. This is independent of the CC7 setting.
☺ Hint: Use this to correct levels after editing or to set an instrument to solo or background level. You might want to copy the preset to two different locations for the latter.
Velocity Limit
Sets a velocity limit for the minimum and maximum velocity.
- vMin - sets the lowest possible velocity. Values are scaled between vMin and vMax. - vMax - sets the highest possible velocity. Values are scaled between vMin and vMax. - LegDamping - lowers the velocity on legato playing (mainly for guitars). Dynamic Range & dynamic Attack Time
Dynamic Range – sets the impact of the dynamic controller to volume between 0 and 100%. Dynamic Attack – extends the attack time of the volume envelope at minimal level in ms. Sample Starting Point
Gives you the option of cutting off the attack and starting the sample at the loop starting point. Sample Volume Envelope ADSR
- 15 -
This takes care of the automatic level changes over time. Especially attack and release time with a standard synthesizer ADSR envelope for the samples.
(The analogue synthesizer uses its own volume envelope.)
Attack – attack time from 0 to the maximal level of the envelope in milliseconds Decay – decay time in milliseconds until the sustain level is reached Sustain – level that is being sustained until the note is released Release – time of the fade out back to 0 after the note has been released Legato Note Transitions
This sets the alternative attack and release times for legato transitions when the preset is set to a monophonic mode.
Legato-Attack – legato attack time in milliseconds Legato Overlap Time – overlap time of the last note Legato Pitch Time – portamento time for legato transitions Legato Sample Start – starting point of new notes when played legato Legato Portamento Time Key Follow
- BpLO - legato portamento time breakpoint lo - sets the lower key limit. - mult - sets the multiplication factor of the lowest note (BpLO) of the portamento time. - BpHi - legato portamento time breakpoint high - sets the upper key limit. - Mult - sets the multiplication factor of the highest note (BpHI) of the portamento time. Extra Attack Threshold
Here you can set the breakpoint between the low and high “extra attack envelope”. Extra Attack Envelope
Allows setting an auxiliary envelope for the attacks sparately for lower and higher dynamics.
- vlHi - xtra attack level (upper dynamic range) - tmHi - xtra attack time (upper dynamic) - vlLo - xtra attack level (lower dynamic) - tmLo - xtra attack time (lower dynamic) MIDI Octave Shift
Sets the default octave offset from -3 to +3.
This parameter can be changed in realtime with CC88 (octave minus), CC89 (octave normal) and CC90 (octave plus).
Mix Parameter Settings
Volume – sets the volume of the sample sound. Panning – sets the stereo panning. Transpose – transposes the instrument. Variation – uses a sample offset which is not having an effect on all sounds. Key Range
You can limit the note window. This is useful for creating keysplits.
Lo – sets the lower key limit. Hi – sets the upper key limit. TEST: shows the currently played note number for reference only. Pitchbend Range Settings
- 16 -
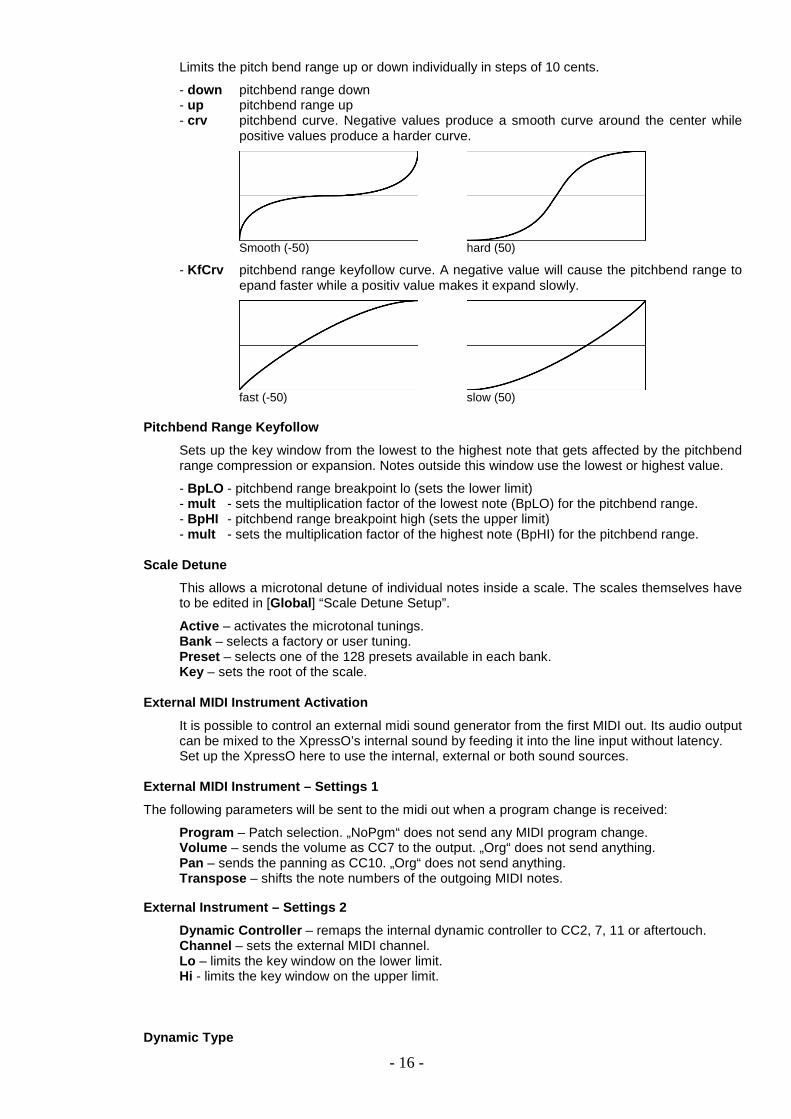
Limits the pitch bend range up or down individually in steps of 10 cents.
- down pitchbend range down - up pitchbend range up - crv pitchbend curve. Negative values produce a smooth curve around the center while
positive values produce a harder curve.
Smooth (-50) hard (50)
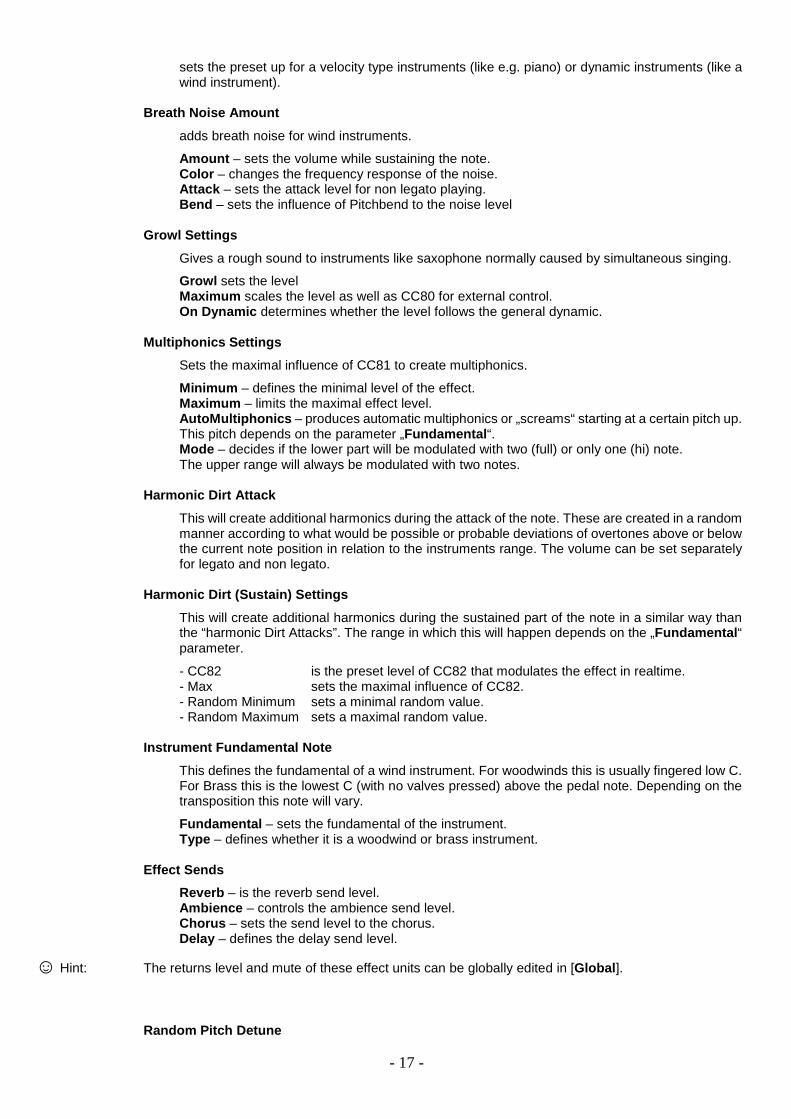
- KfCrv pitchbend range keyfollow curve. A negative value will cause the pitchbend range to epand faster while a positiv value makes it expand slowly.
fast (-50) slow (50) Pitchbend Range Keyfollow
Sets up the key window from the lowest to the highest note that gets affected by the pitchbend range compression or expansion. Notes outside this window use the lowest or highest value.
- BpLO - pitchbend range breakpoint lo (sets the lower limit) - mult - sets the multiplication factor of the lowest note (BpLO) for the pitchbend range. - BpHI - pitchbend range breakpoint high (sets the upper limit) - mult - sets the multiplication factor of the highest note (BpHI) for the pitchbend range. Scale Detune
This allows a microtonal detune of individual notes inside a scale. The scales themselves have to be edited in [Global ] “Scale Detune Setup”.
Active – activates the microtonal tunings. Bank – selects a factory or user tuning. Preset – selects one of the 128 presets available in each bank. Key – sets the root of the scale. External MIDI Instrument Activation
It is possible to control an external midi sound generator from the first MIDI out. Its audio output can be mixed to the XpressO’s internal sound by feeding it into the line input without latency.
Set up the XpressO here to use the internal, external or both sound sources. External MIDI Instrument – Settings 1
The following parameters will be sent to the midi out when a program change is received:
Program – Patch selection. „NoPgm“ does not send any MIDI program change. Volume – sends the volume as CC7 to the output. „Org“ does not send anything. Pan – sends the panning as CC10. „Org“ does not send anything. Transpose – shifts the note numbers of the outgoing MIDI notes. External Instrument – Settings 2
Dynamic Controller – remaps the internal dynamic controller to CC2, 7, 11 or aftertouch. Channel – sets the external MIDI channel. Lo – limits the key window on the lower limit. Hi - limits the key window on the upper limit. Dynamic Type
- 17 -
sets the preset up for a velocity type instruments (like e.g. piano) or dynamic instruments (like a wind instrument).
Breath Noise Amount
adds breath noise for wind instruments.
Amount – sets the volume while sustaining the note. Color – changes the frequency response of the noise. Attack – sets the attack level for non legato playing. Bend – sets the influence of Pitchbend to the noise level Growl Settings
Gives a rough sound to instruments like saxophone normally caused by simultaneous singing.
Growl sets the level Maximum scales the level as well as CC80 for external control. On Dynamic determines whether the level follows the general dynamic. Multiphonics Settings
Sets the maximal influence of CC81 to create multiphonics.
Minimum – defines the minimal level of the effect. Maximum – limits the maximal effect level. AutoMultiphonics – produces automatic multiphonics or „screams“ starting at a certain pitch up.
This pitch depends on the parameter „Fundamental “. Mode – decides if the lower part will be modulated with two (full) or only one (hi) note. The upper range will always be modulated with two notes. Harmonic Dirt Attack
This will create additional harmonics during the attack of the note. These are created in a random manner according to what would be possible or probable deviations of overtones above or below the current note position in relation to the instruments range. The volume can be set separately for legato and non legato.
Harmonic Dirt (Sustain) Settings
This will create additional harmonics during the sustained part of the note in a similar way than the “harmonic Dirt Attacks”. The range in which this will happen depends on the „Fundamental “ parameter.
- CC82 is the preset level of CC82 that modulates the effect in realtime. - Max sets the maximal influence of CC82. - Random Minimum sets a minimal random value. - Random Maximum sets a maximal random value. Instrument Fundamental Note
This defines the fundamental of a wind instrument. For woodwinds this is usually fingered low C. For Brass this is the lowest C (with no valves pressed) above the pedal note. Depending on the transposition this note will vary.
Fundamental – sets the fundamental of the instrument. Type – defines whether it is a woodwind or brass instrument. Effect Sends
Reverb – is the reverb send level. Ambience – controls the ambience send level. Chorus – sets the send level to the chorus. Delay – defines the delay send level.
☺ Hint: The returns level and mute of these effect units can be globally edited in [Global]. Random Pitch Detune
- 18 -
Random Detune causes slight variations in pitch that will let the instrument sound more naturally.
Attack – defines the maximal drift at the beginning of the note. Fast – sets very fast pitch changes. Slow – causes slow pitch variations. Autotranspose Interval
At this place you can define an interval that is used for transposing the instrument if the function „Autotranspose“ in the [Global ] menu is activated. This can be useful if reading original music of changing transposing / non transposing instruments without having to touch any other transposition setting.
Portamento Time
By sending the MIDI controller number 5 it is possible to achieve a Portamento or glissando effect between two notes. The shown value stands for the time in milliseconds. The addition “no Attack” cuts off the attack portion of the sample.
With increasing values of CC5 you can continuously increase the portamento duration from „0“ to the assigned maximal time.
When Pitchbend is outside the center position Portamento will be activated automatically.
☺ Hint: In [Global] you can define the width of this Pitchbend center. Voice Synthesizer
The Voice Synthesizer can recognize pitch information from a connected microphone and translate it to internal MIDI information. This in return can trigger an internal monophonic synthesizer. Polyphonic audio signals cannot be analyzed.
Samples can be triggered as well but are – due to latency – limited in use.
Active – enables pitch recognition from the microphone and assigns it to the synth ort he current sample preset. Preset – selects a synthesizer preset. Octave – determines the octave range. Volume – sets the level of the synth.
Switch MIDI channels with CC66
CC66 can be used to switch between MIDI channel 1 and either Ch02 or Ch09 in various ways with or without holding the other channel’s note(s). Switch all notes off by pressing CC66 twice.
- not active - switch to channel 2 - switch to channel 9 - switch to channel 2 and hold channel 1 - This allows building chords on
channel 1 and switch to channel 2 - switch to channel 9 and hold channel 1 - This allows building chords on
channel 1 and switch to channel 9 - switch to channel 9 and hold Chord-Mapper down - This allows building multitimbral
chords with the Chord-Mapper moving down channel by channel
- switch to channel 9 and hold Chord-Mapper up3 - This allows building multitimbral 3 voice chords with the Chord-Mapper moving up channel by channel
- switch to channel 9 and hold Chord-Mapper up4 - This allows building multitimbral 4 voice chords with the Chord-Mapper moving up channel by channel
- switch to channel 9 and hold Chord-Mapper up5 - This allows building multitimbral 5 voice chords with the Chord-Mapper moving up channel by channel
- switch to channel 9 and hold Chord-Mapper up6 - This allows building multitimbral 6 voice chords with the Chord-Mapper moving up channel by channel
4 Band Equalizer
This allows changing the volume of four predefined EQ bands in Steps of 1 dB.
- 19 -
Keysplit Activation
This creates monophonic or polyphonic keysplits or layers with two instruments. This function is available on channel 1 and 9 only. The second patch is located one channel above the first one. Respectively channel 2 or 10.
Split – activates this function. Bank – sets the preset bank of the second instrument. Only the current user bank ort he factory banks are available. Other user banks cannot be used to avoid errors when banks are moved. Preset – selects the sound of the second instrument. EDIT – gives access to more parameters as described below. Softkey 4 and [OK] to enter.
Keysplit A - Settings
A-Lo – sets the lower key limit for the first sound. A-Hi – sets the upper key limit for the first sound. Transpose – shifts the note numbers the first sound up or down.
Variation – recalls a sample variation. This can be useful to avoid phasing when doubling the same sound.
Keysplit B - Settings
This contains the same parameters as Keysplit A for the second (+1) midi channel. Keysplit Volume and Panning
Volume A / Volume B – sets the volume for both instruments. Pan A / Pan / B – sets the stereo position for both sounds. Keysplit Detune and Pitchbend
Detune A / Detune B – sets a detune for both sounds. Pitchbend A / Pitchbend / B – multiplies the originally programmed pitchbend range. Keysplit Controller Handling
Here you can specify which incoming CC messages will be forwarded to the second channel.
Do not copy any CC – does not forward any controllers. Copy selected CC -> B – copies only selected controllers. Redirect all CC -> B – sends all controllers to the second channel and not to the first one. Clone all CC -> A+B – copies all CC messages to both channels. Keysplit Controller A – C Redirection
Source – sets a controller number to be forwarded. Destination – sets the destination controller number fort his message on the second channel. Clone Channel – allows the controller to be used only on the second or on both channels. Chord-Mapper Main Settings
This menu item activates the Chord-Mapper which allows polyphonic multitimbral playing with a monophonic MIDI instrument input.
With the Chord-Mapper it is possible to assign up to 6 notes on separate MIDI channels for each incoming note. These channels are located from the third to the eighth channel above the original input channel. This means channel 3-8 when using channel 1. Possible input channels are 1 and 9. This means Chord-Mapper triggers chords stored on the preset of channel 1 and sends them to channel 3-8. The original note on channel 1 does not sound.
The „external“ mode can forward up to six incoming notes on channel 1 to six different MIDI channels as long as they are played at the same time (within 30 ms).
☺ Hint: With the Synthophone you can send harmonies like this on a single channel to save MIDI bandwidth. Active – selects the available modes:
Full uses one of the internal 1280 full key range maps.
- 20 -
External splits incoming chords on channel 1 to different MIDI channels. Single uses only the chord stored at note 60 (middle C) and transposes it parallel. By
using offset you can use a different source note chord. Octave repeats the chord recorded to note 60-71 in all octaves. Rotate rotates between 2 to 12 different chords stored from note 60 (middle C) up. Rotate Random rotates randomly between the same 2 to 12 different chords as above.
Bank - selects the [User ] bank where the Chord-Mapper preset is located. Preset – selects a preset. Press [OK] to actually load this preset. Reset / Store / Edit – choose one of these functions and execute with [OK].
Reset erases all programmed notes (without storing the changed preset) Store saves the active preset in the current state to disk. It is possible to select another
destination preset before without pressing [OK]. You will be asked to enter a new name. Confirm with [OK].
Edit takes you to further options of Chord-Mapper.
Proceed as follows to enter a new map or to edit an existing one:
- Select the mode plus the preset number and bank. - If desired reset the map to erase all existing notes. - Make sure that voices have been activated beforehand. (the easiest way for doing this is to start out with an already existing Multi Preset)
- Press a connected sustain switch (remote unit or MIDI) 3x quickly or press onto the dial on the right hand of the remote.
Now you will be asked to set the base note.
For “internal” this can be any note of the piano range between MIDI note 24 and 108. For “single” or “octave” you need to choose middle C (MIDI note 60).
The base note is the note that will hold and trigger the first chord that is recorded. All following chords will automatically get assigned to the next chromatic note up. This way you can recall the recorded chords one after each other by playing a chromatic scale up from the base note.
Now play the first chord by arpeggiating downwards to set the correct voice order and hold the notes if you are using a keyboard. When using a monophonic instrument you can press the sustain pedal until the chord is completed.
By releasing all notes or the sustain pedal the chord is stored to the base note. You will now be asked to enter the next chord. On the lower line of the display you can always see the target / trigger note to where the current chord will be stored.
When done entering all chords this way press sustain 3x quickly or press onto the dial of the remote. Note entry is finished and you will see “done” for a short moment.
In case that you have made a mistake you can stop and restart from there by entering
this note as the new base note. This way you can also replace single chords if you have changed your mind about the voicings.
Chord-Mapper does not erase any chord that you don’t overwrite explicitly. Once you have exited record mode you can listen to your arrangement immediately by
playing a chromatic scale from the base note up.
Please notice that the voices that are used have to be activated beforehand in order to hear anything.
If you are happy with your arrangement you can store the edited preset onto any preset number and (user) bank.
Please read the section “Store” above about this.
Rests can be entered with a „rest note“ which is defined in [Global ] / Chord-Mapper Pause . These rest notes can be used to enter e.g. only a trombone note in a section with trumpet, tenor
sax and trombone. In this case you would play a rest note for the first two instruments (trp & ten sax) while holding sustain and then – without releasing sustain – play the trombone note.
With this method you can build complicated polyphonic arrangements.
Chord-Mapper Mix and Transpose Settings
Volume – sets the volume for all voices
- 21 -
Panning – sets the stereo pan position of the voices. There are optimized presets for different numbers of instruments in several variations like narrow (N) and wide (W). The variations 1 or two define whether the upper voices are in the center or more on the outside on the stereo panning
Offset – moves the base note from where the chords will be played Transpose – transposes the chords to different keys Chord-Mapper Vibrato and Random Settings
Since individual instruments usually play their own vibrato it is strongly recommended to use LFO vibrato with modulation (CC1).
Vibrato – LFO vibrato amount. „Org“ uses the value stored in the preset Random Pitch – random detune to achieve a better „live“ feeling Random Timing – adds random timing to the middle voices Chord-Mapper Sound Editor 1
Voice – select voice number Bank – preset bank of the selected voice Preset – preset of the selected voice Active – turns the voice on/off or sets it to SOLO Chord-Mapper Sound-Editor 2
Voice – select voice number Volume – volume of the selected voice
Variation – sample variation of the voice. This eliminates phasing problems when playing in unison with the same preset.
Active – turns the voice on/off or sets it to SOLO Chord-Mapper Sound-Editor 3
Voice – select voice number Pitchbend Down – Pitchbend DOWN range of the voice Pitchbend Up – Pitchbend UP range of the voice Active – turns the voice on/off or sets it to SOLO Chord-Mapper Sound-Editor 4
Voice – select voice number Octave – chooses a octave transposition for the voice Active – turns the voice on/off or sets it to SOLO Virtual Analogue Synthesizer Activation & Mix
The XpressO contains a complete virtual analogue synthesizer with two oscillators. This synth can be used simultaneously with the sample sounds.
!!! Attention (!): This is very demanding on the machine. In case of such dual sounds it is strongly recommended to reduce polyphony to six voices as described below.
Select – samples or analogue synth or both. Analogue Volume – volume of the analogue synth. Sample Volume – volume of the sample engine. Edit – takes you to further parameters after pressing [OK]. Preset Voice Limit
You can set a voice limit per preset to prevent overloading of the unit. The voice limit will be valid for the 8 channel voice block that you are playing and overwrite the global limit that is set up in [Utility ].
Guitar Mode
This is still under development. Edit Preset Name
Let’s you change the name of the preset.
- 22 -
Navigate with left [◄] and right [►]. Change the name with up [▲] or down [▼] or with the dial. 4) Store Edited Presets
Edited presets can be stored to [User ] banks (while in [Edit ] mode) by pressing [OK]. Storing to [Factory ] banks is not possible.
The display will show “store preset?” Confirm with [OK]. Then you have the option to select a new preset number and bank with up [▲] or down [▼] or by using
the control dial. Confirm twice with [OK]. The Preset is stored now!
With [Escape ] you can abort the operation at any time.
☺ Hint: To reset a preset to the original state select the preset from the [Factory] bank. Then use [Store] to copy it back to the desired [User] bank. You can copy an entire preset bank by using [Bank Copy] as described in chapter V.) 3.
5) Discard Changes of Edited Presets
If you are not happy with the edits that you made you can discard them by pressing [Escape ]. All changes will be lost.
- 23 -
VII.) Store Use store to copy an existing preset to another location. Copy Presets
By moving three times to the right you will reach the menu entry [Store ]. Press [OK] to copy the current preset to another location.
The display will show “store preset?” Confirm with [OK]. Then you have the option to select a new preset number and bank with up [▲] or down [▼] or by using
the control dial. Confirm twice with [OK]. The Preset is stored now!
With [Escape ] you can abort the operation at any time.
☺ Hint: You can copy an entire preset bank by using [Bank Copy] as described in chapter V.) 3.

- 24 -
VIII.) Global Settings 1) General
These are settings that affect the entire instrument and not the individual presets. 2) Enter Global Settings Mode
To change the [Global ] settings move from the main page to the right until you reach [Global ] and press [OK].
You can leave [Global ] mode with [OK] or [Escape ].
Other than in preset [Edit ] mode all changes will be stored no matter if you leave this mode with [OK] or [Escape ]. In certain cases you can leave this mode only with [Escape ]. This is when [OK] is needed for parameter confirmation.
3) Parameter
Program Number Mapping
With these maps you can assign incoming MIDI program changes to the internal preset numbers. There are nine program maps available in total. Channel – selects the channel to assign the program map to. Program-Map – selects the map to be assigned to this channel. [Edit ] + [OK] – takes you to the editor to manually change assignments.
Editor: On the left side of the display you set the incoming MIDI program number. This can also be set by an incoming MIDI program change. On the right side you can select the target preset with up [▲] or down [▼] or by using the control dial. Confirm with [OK]. Without pressing [OK] the assignment will not be stored. The assignments can also be done on the main display page:
Choose a MIDI program number by sending an external program change or by selecting it with the left wheel while pressing and then pressing [OK]. The MIDI program number will be shown on the bottom left.
Now select a preset with the control dial on the right and press the dial. The preset is now assigned to the last selected MIDI program number.
☺ Hint: Make sure a program map is activated! Copy Program Map
Select the source and the destination program map and confirm twice with [OK]. Program Change Delay Time
This sets a delay time in milliseconds for an incoming MIDI program change to make sure that the bank change can be processed before the program change.
☺ Hint: A higher value than “0” is only needed when sending bank changes (CC0) before a program change!
- 25 -
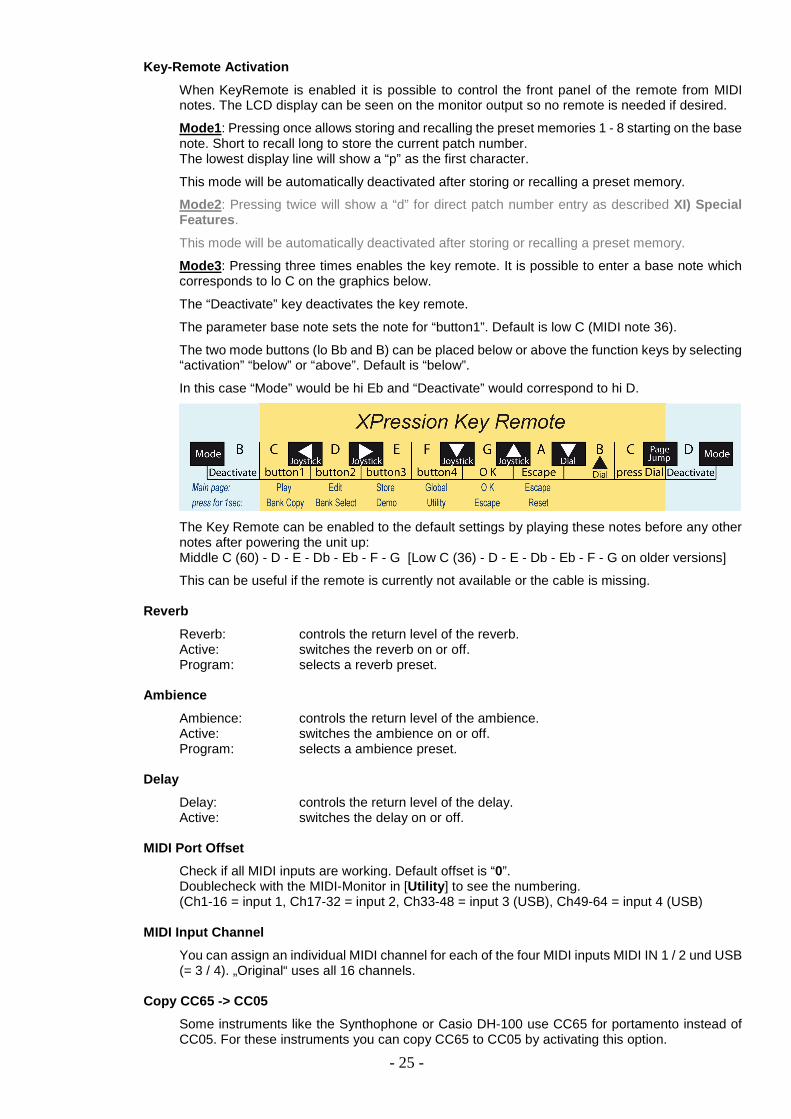
Key-Remote Activation
When KeyRemote is enabled it is possible to control the front panel of the remote from MIDI notes. The LCD display can be seen on the monitor output so no remote is needed if desired.
Mode1 : Pressing once allows storing and recalling the preset memories 1 - 8 starting on the base note. Short to recall long to store the current patch number.
The lowest display line will show a “p” as the first character.
This mode will be automatically deactivated after storing or recalling a preset memory.
Mode2 : Pressing twice will show a “d” for direct patch number entry as described XI) Special Features .
This mode will be automatically deactivated after storing or recalling a preset memory.
Mode3 : Pressing three times enables the key remote. It is possible to enter a base note which corresponds to lo C on the graphics below.
The “Deactivate” key deactivates the key remote.
The parameter base note sets the note for “button1”. Default is low C (MIDI note 36).
The two mode buttons (lo Bb and B) can be placed below or above the function keys by selecting “activation” “below” or “above”. Default is “below”.
In this case “Mode” would be hi Eb and “Deactivate” would correspond to hi D.
The Key Remote can be enabled to the default settings by playing these notes before any other notes after powering the unit up:
Middle C (60) - D - E - Db - Eb - F - G [Low C (36) - D - E - Db - Eb - F - G on older versions]
This can be useful if the remote is currently not available or the cable is missing. Reverb
Reverb: controls the return level of the reverb. Active: switches the reverb on or off. Program: selects a reverb preset. Ambience
Ambience: controls the return level of the ambience. Active: switches the ambience on or off. Program: selects a ambience preset. Delay
Delay: controls the return level of the delay. Active: switches the delay on or off. MIDI Port Offset
Check if all MIDI inputs are working. Default offset is “0”. Doublecheck with the MIDI-Monitor in [Utility ] to see the numbering. (Ch1-16 = input 1, Ch17-32 = input 2, Ch33-48 = input 3 (USB), Ch49-64 = input 4 (USB) MIDI Input Channel
You can assign an individual MIDI channel for each of the four MIDI inputs MIDI IN 1 / 2 und USB (= 3 / 4). „Original“ uses all 16 channels.
Copy CC65 -> CC05
Some instruments like the Synthophone or Casio DH-100 use CC65 for portamento instead of CC05. For these instruments you can copy CC65 to CC05 by activating this option.
- 26 -
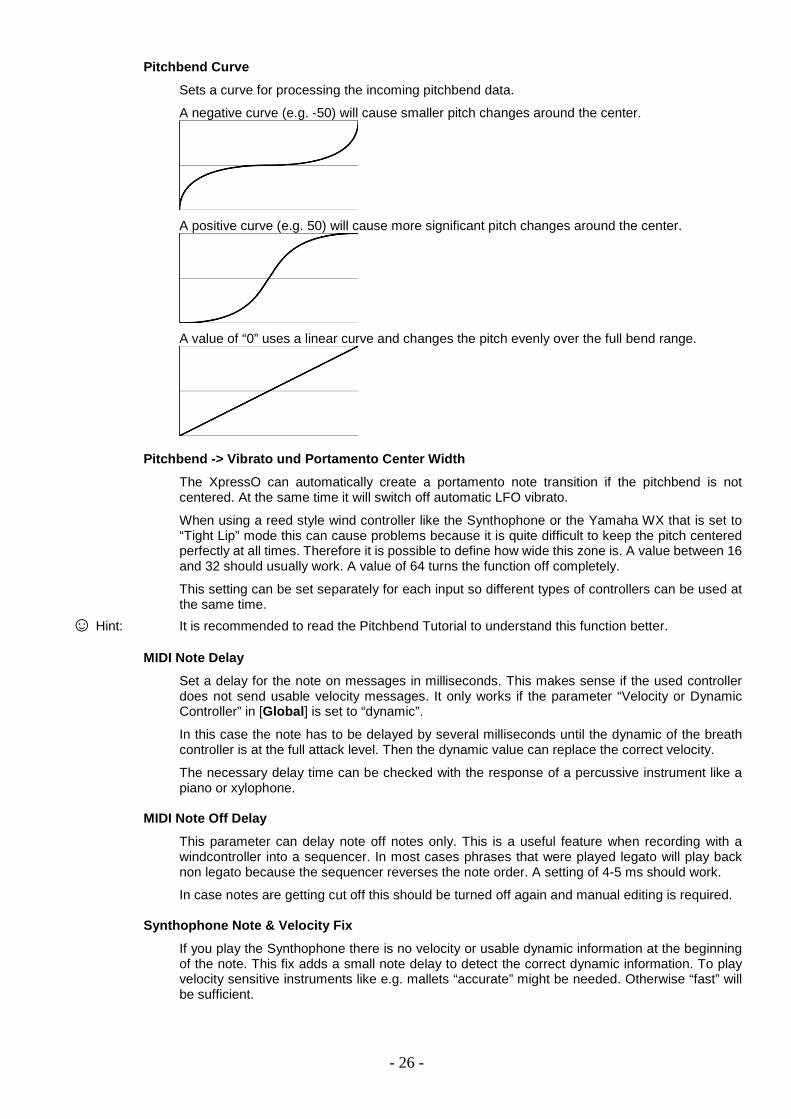
Pitchbend Curve
Sets a curve for processing the incoming pitchbend data.
A negative curve (e.g. -50) will cause smaller pitch changes around the center.
A positive curve (e.g. 50) will cause more significant pitch changes around the center.
A value of “0” uses a linear curve and changes the pitch evenly over the full bend range.
Pitchbend -> Vibrato und Portamento Center Width
The XpressO can automatically create a portamento note transition if the pitchbend is not centered. At the same time it will switch off automatic LFO vibrato.
When using a reed style wind controller like the Synthophone or the Yamaha WX that is set to “Tight Lip” mode this can cause problems because it is quite difficult to keep the pitch centered perfectly at all times. Therefore it is possible to define how wide this zone is. A value between 16 and 32 should usually work. A value of 64 turns the function off completely.
This setting can be set separately for each input so different types of controllers can be used at the same time.
☺ Hint: It is recommended to read the Pitchbend Tutorial to understand this function better. MIDI Note Delay
Set a delay for the note on messages in milliseconds. This makes sense if the used controller does not send usable velocity messages. It only works if the parameter “Velocity or Dynamic Controller” in [Global ] is set to “dynamic”.
In this case the note has to be delayed by several milliseconds until the dynamic of the breath controller is at the full attack level. Then the dynamic value can replace the correct velocity.
The necessary delay time can be checked with the response of a percussive instrument like a piano or xylophone.
MIDI Note Off Delay
This parameter can delay note off notes only. This is a useful feature when recording with a windcontroller into a sequencer. In most cases phrases that were played legato will play back non legato because the sequencer reverses the note order. A setting of 4-5 ms should work.
In case notes are getting cut off this should be turned off again and manual editing is required. Synthophone Note & Velocity Fix
If you play the Synthophone there is no velocity or usable dynamic information at the beginning of the note. This fix adds a small note delay to detect the correct dynamic information. To play velocity sensitive instruments like e.g. mallets “accurate” might be needed. Otherwise “fast” will be sufficient.

- 27 -
Percussive - Velocity or Dynamic Controller
uses the current dynamic level as velocity. For instruments that don’t send usable velocity (like the Synthophone) this method can be used to achieve valuable velocity information. However, this works only in conjunction with “note delay”.
MIDI Controller 4 (Pitchbend Down) reverse
reverses the values of an incoming MIDI CC4. This is useful if pitchbend down is controlled by an EWI with this MIDI controller. With a foot pedal you should leave it at the off position.
Edit Channel Selection on Main Page
When enabled you can select the current MIDI channel with the dial while pressing and holding it. This works only on the main display page.
MIDI Thru - Activation
Choose whether both MIDI inputs will always be sent to MIDI Out 1 (always on) or if the MIDI out is controlled by the parameters set up in the presets (use program settings) or if MIDI Thru is generally turned off (off).
„All Notes Off“ - Filter
Can be set up to ignore the MIDI „all notes off“ message, use it on individual channels or on all channels.
Retrigger Mode
This determines whether the note will keep playing or get cut off when the dynamics reaches a value of „0“. It can also retrigger the note when using a keyboard with a eXpressO pedal or breath controller.
- no retrigger normal mode – sustains the note without re-attacking. - turn note off only not used. - full retrigger keyboard breath controller mode – turns the note off and retriggers it
when the dynamic reaches a value higher than „0“. MIDI-Input Transpose
Here you can transpose the incoming MIDI notes before any processing takes place. Transpose Settings
Transpose
sets the global note transposition in semitones.
CC74 can also be used to set the current transposition. Connect a footswitch to send CC74. Press the footswitch and play the note you want to transpose to relative to middle C (MIDI note 60). Release the footswitch and the transposition is set. Repeat the procedure and set it to middle C to turn transposition off again. You can see the transposition interval in the display.
You can now press button 2 and 3 simultaneously to jump directly to the Transposition Settings. Set the transposition with the dial and press onto the dial to return to the main page.
Auto-Transpose
Auto Transpose causes transposing instruments like trumpet or saxophone to play in their original transposition (e.g. Bb or Eb).
☺ Hint: This might be useful if you are playing with original transposed sheet music. The transposition of the instruments can be adjusted in the preset editor.

- 28 -
Chord-Mapper Key Offset
allows chord-maps that repeat in octaves to be played in other keys.
This sets offset and transposition globally at the same time. If the original map was recorded in the key of e.g. C a value of -2 will allow you to play it in the key of Bb.
This parameter can be set in realtime with CC 73. Press and hold a pedal assigned to CC 73 and play a note relative to middle C (MIDI note 60) to set the offset. The lower line of the display will show the interval. Release the pedal – set!
This key offset may cause unexpected behaviour if it is used with any other Chord-Mapper modes. Make sure it is set to “0” when using full or single mode.
Chord-Mapper Rest Note
Select a note number that can be used as a „rest“ while recording into the Chord-Mapper. This note plays normally any other time. Scale Detune Setup (Micro Tuning)
It is possible to tune the notes of a scale differently than the standard well tempered scale. This might be useful to play “old” music or ethnic music that does not use the standard western equal temperament.
All tunings are relative to the key of C. Preset - sets up one of the 128 User presets to store your own tunings. Note - selects the note number that is to be retuned in semitones up relative to C. Tune - changes the tuning of the selected note in steps of one cent.
Store - stores the currently selected scale with all edits. Scale Detune – Force Always
Always uses the last selected active microtuning preset until a new one is active. Program Change / Bank Change Activation Mode (for u se with the Akai EWI-USB)
If you are using an instrument that is not capable of sending MIDI program changes (like e.g. the Akai EWI-USB) you can use a “trick” to send such program changes anyway. Please read section XI.) Special Features for a description on how to execute this function.
This option can be activated here. Program Change Channel
Here you can enable sending program changes to all 16 channels. This is very useful for controllers that use more than one single MIDI channel like the Xharp. Dynamic Controller Input 1 - 4 Selection
Dynamic-Controller
This sets the MIDI controller CC message to be used for the dynamics. Possible is: 2=Breath Controller, 7=Main Volume, 11=EXpressO, Aftertouch and Microphone.
Curve - changes from a linear to a logarithmical curve. 25 - 30 is recommended in most cases.
Curve Type - sets a single curve or a double curve that is centered in the middle and mirrored on both ends.
single-negative single-positive dual-negative dual-positive
Dynamic Auto-Scale Activation
This function checks for the lowest and highest dynamic input and scales it to the full volume range of 0-127. This can be helpful for controllers that do not send the full dynamic range.
It can be set up separately for MIDI input 1 and input two.
- 29 -
Velocity Curve
Curve - changes from a linear to a logarithmical curve
Curve Type - sets a single curve or a double curve that is centered in the middle and mirrored on both ends.
Velocity Compression / Expansion
This lets you correct the velocity range of a connected keyboard to expand or compress its dynamic. This can be set up separately for all 16 MIDI channels.
Noise Attack – Level & Source (Breath Attacks)
With this setting you can globally adjust the level of the noise (breath) attacks in percent without having to edit them in the individual presets. The default value is 100%.
Ctl 7 Volume Minimum
This limits the effect that the MIDI volume controller 7 has to the range that is desired. Set it e.g. to 12 dB to fade between background level and solo level.
☺ Hint: With the function „ignore stored volume“ the MIDI volume that was saved in the preset can be ignored so the current level of the pedal won’t jump upon preset selections.
Ignore Stored Volume (MIDI-Controller 7)
Here you can set up whether the MIDI main volume (CC7) will be recalled from the value that was saved with the preset. This prevents the current position of a connected foot pedal to be overwritten by the preset settings.
!!! Attention (!): A wrong setting can cause volume problems if a connected foot pedal gets disconnected.
Ignore Stored LFO Vibrato (MIDI-Controller 1)
With this parameter you can globally ignore the value that is stored for LFO modulation (CC1). Reverse Sustain Pedal
This reverses the function of a connected sustain pedal (CC64) with a wrong polarity. Eliminate Short Notes on Sustain
On wind controllers there is a good chance that some unwanted short notes are being held whith the sustain pedal while builing a chord. This function eliminates those “wrong” notes.
Set the minimum time for the wanted notes in milliseconds here. MIDI Chanel Stereo Output Assignment
assigns the stereo output for each MIDI channel.
!!! Attention (!):If the digital SPDIF output is activated in [Utility] only one stereo bus is available. All output busses will be mixed down to the first stereo output in this case.
Language
sets the language to English or German. Menu Title Time
This parameter affects how long the title of the edit screen will be seen before it jumps to the parameter display.
- 30 -
Display 1 st Line Content
On this page you determine what the first display line is showing. By default this is the preset of the edit channel but it can also be set up to show the presets of a fixed cannel number.
Display 2 nd Line Content
On this page you determine whether the second display line is showing the current preset bank number, the current preset of the Edit channel or any other MIDI channel or the pitchbend of the edit channel.
Display 3 rd Line Content
- “normal” shows the information about the current preset backing track - “show dynamic” shows the current dynamics that you are playing (default) - “show backing track” lets you select any backing track anytime from the main page without
the need of having it programmed to the current preset beforehand. Guitar Mode active
This sets up a special guitar mode that is currently still under development. Expert Mode
This enables „expert mode“ which gives access to an extended set of options and parameters.
Machine Master Volume
Master Volume – sets the over all volume of the unit in steps of 1 dB. Master Mute – mutes the entire instrument.
☺ Hint: This page can be reached directly from the main page by pressing button 1 + 4 below the display simultaneously. You can escape from this page also by simply pressing onto the dial on the right side of the remote unit. This will unmute the unit again.
Out1 Mono-Stereo Settings
This sets the first stereo output to stereo or mono if you do not have a stereo amplification system. All other outputs remain stereo.
☺ Hint: This can be used for mono monitoring while going stereo to a mixer or recording system as long as the outputs are set up to use only one stereo out in [Utility] “SPDIF Output On-Off”.
- 31 -
IX.) Demo Move twice to the left [◄] until DEMO appears and press [OK]. The demo songs will be played one after the other.
You can navigate right [►] and left [◄] to forward or rewind to the next or last song.
[OK] or [Escape ] stops the demo and takes you back to normal Play Mode.

- 32 -
X.) Utility Utility contains a number of useful help functions and information tools. Enter Utility: To enter [Utility ] move the cursor from the main page to the left once until [Utility ]
appears and press [OK].
Exit Utility: Use [Escape ] (= press and hold [OK] for 1 second). Choose MIDI Controller
With this option you can carry out automatic setup of all global parameters for your MIDI controller. If you desire to make further adjustments or look at the parameters in detail you should activate Expert Mode in the [Global ] menu. Most of the settings are valid per MIDI input. However, some might overwrite settings of other inputs.
Mastertune
This sets the master tuning of the entire instrument in Hertz. Save & Load <- -> USB All Global Settings
This lets you save and restore the entire folder with all [Global ] and [Utility ] settings to a USB drive. Follow the instructions on the display.
These files can be archived on a computer. It is possible to erase certain files from the folder for restoring only selected settings.
“Default” will restore all settings to factory default values. Reselect your MIDI controller after resetting. Internal Backup – All Settings and Maps
Choose whether you want to make a backup or if you want to restore the current settings one of 5 user backup folders. Select the backup or restore number and press [OK]. Confirm with [OK] and all settings will be backed up or restored from any of the used folders.
As an option you can restore optimized default settings for the EWI, WX, Synthophone or MIDI guitar located in the backups 6-9.
Internal Backup of All Preset and Chord-Mapper Bank s
Choose whether you want to make a backup or if you want to restore all user preset banks and maps to one of 5 user backup folders. Select the backup or restore number and press [OK]. Confirm with [OK] and all preset banks and maps will be backed up or restored from any of the used folders.
As an option you can restore factory banks located in the backups 6 to the user banks. WARNING: All user banks will be overwritten by doin g so! Number of Voices
This sets the number of available voices for the first and second group of 8 MIDI channels. Be careful as it is possible to set up more voices than XpressO can handle without overloading its engine. Playing more than 8 voices will lead to problems. This setting should be set to the lowest count possible when playing with two controllers simultaneously. In certain cases – like when using the Chord-Mapper – it might be necessary to reduce the voice count within the presets to achieve a clean sound.
Latency Settings
Here you can set the latency that XpressO needs to play it’s voices without any artifacts. It is strongly recommended to leave this setting at the recommended default setting of 6 milliseconds.
Line Input Level
XpressO provides a line input with standard RCA connectors that can be used as an alternative mic input. It can also serve to send audio data to the first stereo output without adding any additional latency e.g. to mix a second synth to the internal sound of XpressO. When this line input is not used it is recommended to turn the volume to „0“ to avoid unnecessary noise at the output. The line input does not appear at the digital SPDIF output.
Search for HID Instrument

- 33 -
This is experimental – don’t use it!
Remote Pedal 1 / 2 Settings
There a two stereo ¼ inch jacks at the remote unit for connecting foot pedals as well as another one for 2 footswitches and a connector for a breakout cable to connect 4 more footswitches. Take a look at chapter III.) Inputs & Outputs .
You can set up a MIDI channel and the controller number. The number in front of the MIDI channel refers to the MIDI input that the pedal is assigned to. In most cases the input assignment has no effect.
Pedal 1 Auto-Calibration
Leave it always on “auto”. This is for testing only! Foot Pedal Curve
This sets up the response of the foot pedals.
Curve - describes the logarithmical dynamic curve of the pedals
Curve Type - sets a single curve or a double curve that is centered in the middle and mirrored on both ends.
Footswitch 1 – 6 Settings
manages the MIDI channel and CC assignments of the six footswitches as well as the value range. Transmit EWI-USB SysEx at Start Up & EWI-USB Reset
- no action sends no data to the EWI-USB at start up of XpressO - send SysEx sends the currently stored parameters to the EWI-USB at start up
OK -> Reset initializes the EWI-USB either to the Akai factory settings or to the optimized settings for use with XpressO on pressing [OK].
EWI-USB Finger, Breath, Bite & Delay EWI-USB Channel, Transpose & Pitchbend EWI-USB Velocity, Breath2 & Bite2 EWI-USB Gain Settings
All of these parameters are responsible for the settings of the Akai EWI-USB windcontroller. Please check the relevant manual of the EWI-USB about the functions of these parameters.
Microphone Settings
- Lo Gain is the low threshold for the microphone to send data - Hi Gain is the maximal value that is required for full level - Curve describes the logarithmical dynamic curve of the mic signal - Level shows the current value from 0 – 127 Microphone MIDI Channel
Sets the MIDI channel on which dynamic data of the microphone is being sent. Microphone MIDI Output
Here you can determine whether the control values of the microphone will be sent to one of the two MIDI outputs.
Microphone or Line Input (for Voice Control)
This lets you choose the input which is used for Voice Control dynamics. The options are Microphone or Line In. For the microphone there are 3 gain levels available.
SPDIF Output On / Off
- 34 -
The digital SPDIF output needs to be activated to send audio signals. The SPDIF is activated only one stereo bus can be used instead of three. Only the first stereo bus is active but the other buses will be mixed together with the first one and distributed to all physical outs.
You can also select the number of available stereo buses here. If only one analogue stereo out is needed it is recommended to set it to SPDIF Off – 2 channels.
Global MIDI Controller Remapping
All incoming MIDI controllers, aftertouch and pitchbend can be mapped globally to other messages. In this place you can define whether you want to use one map for all channels or if you would like to remap data separately for all individual MIDI channels.
Global remapping is placed before the remapping that is available in the preset editor. Set MIDI Control Remap
Here you can globally remap MIDI controller messages to other CC numbers.
- channel selects the MIDI channel (or all channels)to be edited - active switches the remapping on or off - source selects the source CC number - destination selects the destination CC number Copy Global Controller Map
Global controller maps can be copied between channels. By copying “reset” the map can be reset to the default values.
Press [OK] to execute.
CME WIDI-XU channel
Here you can select a channel for a CME WIDI-XU wireless MIDI receiver. EXPERIMENTAL!
MIDI - Monitor
Here you can monitor incoming MIDI data and foot pedals / footswitches.
This might be helpful to check the MIDI channel of your instrument. You can also see whether MIDI data is coming in at all or which Continuous Controller messages are received.
Use the dial to filter only certain data types like notes or CC messages. Number of incoming MIDI Controller per Second
This shows the number of incoming MIDI Continuous Controller messages (including pitchbend) per second. Use this to check if your MIDI bus might be overloaded.
Authorization File – Save / Load
XpressO needs to be authorized to the hardware that you are using. After upgrading the operating system or restoring from a drive image that was not saved from the internal flash drive it is necessary to restore the authorisation file.
Here you can select whether you want to save or restore the authorisation for your unit. Press [OK] and follow the instructions on the display.
It is recommended to save the authorization file immediately and copy it to a safe place. Complete Internal Drive Backup to USB (bootable)
It is possible to make a backup copy of the internal 16 GB flash drive that contains the operating system, the software and samples as well as all data that was stored by the user.
This might be useful if the internal drive is not functioning anymore due to e.g. a power failure during updating. In this case you can start from the external drive and restore the internal drive.
Make sure you have a rather fast external USB 2.0 flash drive with a capacity of 16 GB at hand. Do not
use a drive with a reading speed of less than 15 MB/s. The drive will be erased! It should not be used for anything else after the backup.
- 35 -
The backup cannot be interrupted and takes up to one hour on a fast drive (possibly a lot longer with a slow drive!). Make sure you have enough time available before starting! Do not power the unit off during backup or restoring in any case!
Connect the drive to any of the USB ports on the front or rear side. Do not connect any other USB
devices during backup or restore.
Press [OK] and follow the instructions on the display. When the backup is done you will see a “finished” message on the display. Turn the unit off to test starting up from the backup.
When starting from the external drive you need to turn off the power supply of the internal drive by
moving the switch on the rear side of the unit to the lower position. The switch is located next to the power inlet of XpressO.
Start up from the external drive. Everything should work normally - only the start up time will be slower. If everything is working turn off the unit and remove the external drive. Put the switch back to the upper
position. Start up again from the internal flash drive. To restore the internal drive boot the system from the external drive (with the internal flash power supply
turned off). Now set the flash power switch to the upper position to turn it on and repeat the same procedure as before when backing up to the external drive. The words “internal” and “external” will be reversed when restoring.
When done turn off the unit and remove the external drive. Restart from the internal drive. You can make as many backup copies as you like. You can operate XpressO from the external drive
the same way as if it was started from its internal flash memory.
It is strongly recommended to create a backup immed iately and keep it in a safe place. Serial Number & Software Version
Here you can check the serial number and the current software version. Please provide these two numbers to DynaSample when experiencing technical problems. Software Update
BEFORE UPDATING CREATE A RELIABLE SYSTEM DRIVE BACKUP AS DESCRIBED ABOVE ! UPDATING WITHOUT BACKUP IS AT YOUR OWN RISK ! This can update the software of XpressO. Please follow the onscreen directions.
Do not plug in the USB drive until asked to do so. XpressO automatically restarts in update mode and will ask you to connect the drive.
Please read the ReadMe file which is included in the update for exact directions.
!!! Do not turn off the unit in any case or unplug the power cord during the update procedure. This could permanently damage the internal flash drive!
Service – not permitted!
This page is only to be used by DynaSample or authorized technicians.
- 36 -
XI.) Special Features Pitchbend Program Change with the Akai EWI-USB:
With the Akai EWI-USB it is normally not possible to send MIDI program changes. However, a special method by using a pitchbend / note combination makes this possible anyway with XpressO:
- Make sure you are on the main display mode and not in any edit mode. - Do NOT blow into the breath controller respectively leave the eXpressO pedal at minimal position. - Move the pitchbend to the highest position. - Now move very fast from the maximal to the minimal pitchbend position and stay there. - The display will ask you to enter a program number now.
The notes C - A of any octave correspond to the digits 0 – 9. To enter program number 019 you need to play the notes C, C# and A while holding pitchbend in the same position. The numbers 20 - 99 can be entered with two digits all others need three digits.
The notes A# and B have a special function of „Program Down“ and „Program Up“.
After entering all digits the program change will be executed and pitchbend can be returned to the normal position.
To abort simply set pitchbend back to the center position.
The same technique can be applied both on an EWI or a keyboard. Make sure that the dynamic controller is always at “0” while entering the program change
Bank Change with the Akai EWI-USB:
Bank changes can be accomplished in almost the same way:
- Proceed in exactly the same way but move the pitchbend from the lowest to the highest position. - You will be asked to change the preset bank now. - Notice that the notes C - A have no function here. Use only B und A# for plus / minus.
After entering the new bank number pitchbend must be returned to the normal position.
To abort simply set pitchbend back to the center position.

- 37 -
XII.) Trouble-Shooting - The unit does not start up
- When turning XpressO on you should see a startup message and after about 30 seconds the display should show the version number and then say “loading samples”. If the latter is not the case the power supply of the internal flash drive on the rear might be turned off.
Please check the switch next to the DC power inlet and make sure it is in the upper position. - No sound!
- Are all cables connected correctly?
- Is the power LED lit up and does the display on the remote control unit show any messages?
- Is the amp powered up?
- Is the Master Volume set to 0dB?
- Is XpressO still loading the operating system or sound library?
- Play the demos to test the audio connections!
- Use the [Utility ] MIDI Monitor to check if any MIDI signals are coming in.
- Is the dynamic controller at XpressO the same as the keyboard / windcontroller is sending?
- Send a MIDI program change to select another preset! Does the display reflect the program change? If NOT, check the MIDI cables and MIDI channels!
- Is the function “Ignore Stored Volume (MIDI-Controller 7)” in the Global menu activated? Then turn it off, change the preset and try again. - I cannot play polyphonic on the keyboard
- The Preset is monophonic! Set in [Edit ] the Mode to „polyphonic“ or „monophonic + polyphonic“.
Alternatively for many presets you can press the sustain pedal (this function needs to be activated for the preset, though!).
- Dynamics do not control volume or only volume wit hout changes in timbre
- Make sure to set up the correct MIDI controller in the [Global ] menu „Dynamic Controller In“ for the MIDI Input that you are using. All four MIDI Inputs can have an individual dynamic controller assignment.
- The Akai EWI-USB is not staring up correctly (the green LED is not lit up)
The EWI-USB can cause problems when starting up. In such a case try this:
- Unplug the USB cable and reconnect it to XpressO during the startup screen.
- Alternatively you could try to connect the EWI-USB via a powered USB hub. In some cases this improves the communication.
- The Instrument plays in different keys
- Deactivate „Auto Transpose“ in the [Global ] Transpose Settings. - Check the transposition in the [Global ] Transpose Settings. - The instrument keeps playing wrong notes all of t he time
- You should definitely practice more!

- 38 -
XIII.) MIDI Implementation
Function Receive Remarks ______________________________________________________________________________________
channel 1 - 16
mode 3 multimode
note numbers 21 – 108
velocity yes
channel aftertouch yes assignable
poly aftertouch no
pitchbend yes control change yes
00 bank select (MSB) 01 modulation (assignable) 02 breath control 03 pitchbend up 04 pitchbend down (foot control) 05 portamento time 06 data entry 07 main volume / dynamic 08 balance 09 dimension2 10 pan 11 eXpressO 32 bank select (LSB) [send only] 39 volume (from VST instrument) 63 edit page jump 64 sustain, mono & portamento switch, retrigger 65 portamento switch (optional) 66 sostenuto 71 chord-mapper volume voice 2-6 72 chord-mapper voice count 73 set chord-mapper key offset 74 set transposition 75 minimum dynamic range 76 maximum dynamic range 77 maximum vibrato 78 vibrato speed 79 vibrato delay 80 growl 81 multiphonics 82 harmonic dirt 84 transpose 1 semitone down 85 transpose 1 semitone up 86 program down 87 program up 88 – 90 octave (minus, center, plus) 91 reverb send 92 room send 93 chorus send 94 delay send 95 96 data increment 97 data decrement 98 NRPN LSB 99 NRPN MSB 102 - 109 preset memory 1 – 8 110 - 119 front panel keys 121 start / stop 123 all notes off program change 1 – 128
system exclusive no
system common no
system realtime yes start / stop
active sense yes
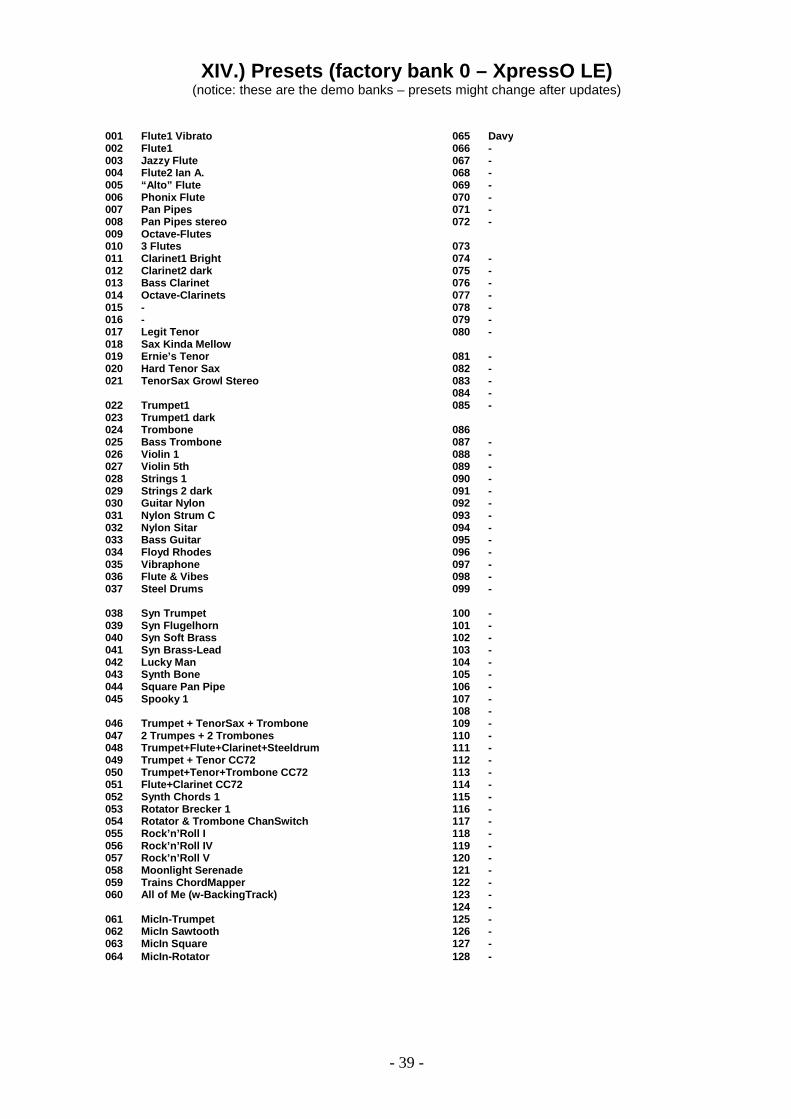
- 39 -
001 Flute1 Vibrato 002 Flute1 003 Jazzy Flute 004 Flute2 Ian A. 005 “Alto” Flute 006 Phonix Flute 007 Pan Pipes 008 Pan Pipes stereo 009 Octave-Flutes 010 3 Flutes 011 Clarinet1 Bright 012 Clarinet2 dark 013 Bass Clarinet 014 Octave-Clarinets 015 - 016 - 017 Legit Tenor 018 Sax Kinda Mellow 019 Ernie’s Tenor 020 Hard Tenor Sax 021 TenorSax Growl Stereo 022 Trumpet1 023 Trumpet1 dark 024 Trombone 025 Bass Trombone 026 Violin 1 027 Violin 5th 028 Strings 1 029 Strings 2 dark 030 Guitar Nylon 031 Nylon Strum C 032 Nylon Sitar 033 Bass Guitar 034 Floyd Rhodes 035 Vibraphone 036 Flute & Vibes 037 Steel Drums 038 Syn Trumpet 039 Syn Flugelhorn 040 Syn Soft Brass 041 Syn Brass-Lead 042 Lucky Man 043 Synth Bone 044 Square Pan Pipe 045 Spooky 1 046 Trumpet + TenorSax + Trombone 047 2 Trumpes + 2 Trombones 048 Trumpet+Flute+Clarinet+Steeldrum 049 Trumpet + Tenor CC72 050 Trumpet+Tenor+Trombone CC72 051 Flute+Clarinet CC72 052 Synth Chords 1 053 Rotator Brecker 1 054 Rotator & Trombone ChanSwitch 055 Rock’n’Roll I 056 Rock’n’Roll IV 057 Rock’n’Roll V 058 Moonlight Serenade 059 Trains ChordMapper 060 All of Me (w-BackingTrack) 061 MicIn-Trumpet 062 MicIn Sawtooth 063 MicIn Square 064 MicIn-Rotator
065 Davy 066 - 067 - 068 - 069 - 070 - 071 - 072 - 073 074 - 075 - 076 - 077 - 078 - 079 - 080 - 081 - 082 - 083 - 084 - 085 - 086 087 - 088 - 089 - 090 - 091 - 092 - 093 - 094 - 095 - 096 - 097 - 098 - 099 - 100 - 101 - 102 - 103 - 104 - 105 - 106 - 107 - 108 - 109 - 110 - 111 - 112 - 113 - 114 - 115 - 116 - 117 - 118 - 119 - 120 - 121 - 122 - 123 - 124 - 125 - 126 - 127 - 128 -
XIV.) Presets (factory bank 0 – XpressO LE) (notice: these are the demo banks – presets might change after updates)

- 40 -
001 Flute1 Vibrato 002 Flute1 003 Flute2 004 Flute2 Ian A. 005 Piccolo Flute 006 Pan Pipes 007 Phonix Flute 008 Oboe1 009 English Horn 010 Clarinet1 Bright 011 Bass Clarinet 012 Bassoon Bright 013 Soprano Sax Clean 014 Alto Sax Clean 015 Alto Sanborn 016 Alto Desmond 017 Sax Kinda Mellow 018 Ernie’s Tenor 019 Tenor Sax Growl 020 Dexter 021 Baritone Sax dirty 022 Trumpet1 023 Trumpet1 dark 024 Trumpet1 Mute 025 Trumpet2 Mute 026 Trumpet2 AutoWah 027 Breathy Flugel 028 2 Flugelhorns 029 Trombone 030 Trombone Mute1 031 Trombone Mute2 032 Tenor Horn 033 Tuba 034 French Horn1 035 French Horn1 x2 036 French Horn1 Mute 037 French Horn1 Mute x2 038 Woodwind Quintet 039 3 Flutes 040 Saxophone Quartet 041 Saxophone Section (Big Band) 042 2 Trumpets + 2 Trombones 043 Brass Quintet 2 044 French Horn + Trombone 045 Trumpet + Ten Sax + Trombone 046 Tower of Power 047 Flute + Clarinet + TrbM + BsClar 048 Syn Trumpet 049 Syn Flugelhorn 050 Syn Brass-Lead 051 Syn Soft Brass 052 Syn Horn 053 Synth Bone 054 Square Pan Pipe 055 Arp Harp 056 Synth Bass 1 057 Synth Bass 2 058 Bass Guitar 059 Fretless Bass 060 Double Bass 061 Strings 1 062 Strings 2 063 Violin 1 064 Cello
065 Synth Chords 1 066 Synth Chords 2 067 Synth Chords 3 068 Synth Chords external 1 069 Synth Chords external 2 070 Synth Chords external 3 071 Brass Chords external 072 Sax Section external 073 Moonlight Serenade 074 In The Mood 075 Sail Along part 1 076 Sail Along part 2 077 Rock’n’Roll I 078 Rock’n’Roll IV 079 Rock’n’Roll V 080 All Night long - Brass 081 Flute Badinerie (w- BackingTrack) 082 Flute1 Mozart (w- BackingTrack) 083 Oboe1 Vivaldi (w- BackingTrack) 084 Bassoon Vivaldi (w- BackingTrack) 085 Trumpet Haydn (w- BackingTrack) 086 All of Me (w- BackingTrack) 087 Peter Gunn (w- BackingTrack) 088 Take Five (w- BackingTrack) 089 In a Sentimental Mood (w- BackingTrack) 090 Trb - Night and Day (w- BackingTrack) 091 BigBand One4RS (w- BackingTrack) 092 BigBand Trombone Section 093 Bari Sax Dirty (w- BackingTrack) 094 Trumpet+Alto CC72 095 Trumpet+AltoSax+Trombone CC72 096 Alto Sax – Mic-Growl 097 12-String Strum (in C) 098 Tootsy 099 BluesHarp 100 A Horse With No Name – 12Str. 101 Guitar Nylon 102 Guitar Steel 103 12 String Guitar 104 Mandolin 105 Grand Piano 106 Bright Piano 107 E-Piano 1 108 E-Piano 2 109 Harpsichord 110 Clavinet 111 Celesta 112 Glockenspiel 113 Vibraphone 114 Marimba 115 Xylophone 116 Tubular Bells 117 Steel Drum 118 Jazz Organ 119 Pipe Organ 1 120 Pipe Organ 2 121 Harp 122 Timpani 123 Gong 124 MicIn-Rotator 125 Trains ChordMapper 126 Rotator&Trombone ChanSwitch 127 Hold&Alto ChanSwitch 128 Microphone -> MIDI OUT 1
XIV.) Presets (factory bank 1) (notice: these are the demo banks – presets might change after updates)

- 41 -
001 Flute1 Vibrato 002 Flute1 003 Flute2 004 Flute2 Ian A 005 Piccolo - Flute 006 Jazzy Flute 007 Pan Pipes 008 Pan Pipes stereo 009 Alto Flute 010 - 011 - 012 - 013 - 014 - 015 - 016 Phonix Flute 017 Oboe1 018 Oboe1 dark 019 Oboe2 020 - 021 English Horn 022 - 023 Clarinet1 bright 024 Clarinet1 clean 025 Clarinet2 bright 026 Clarinet2 dark 027 - 028 - 029 Bass Clarinet 030 - 031 Bassoon bright 032 Bassoon dark 033 - 034 - 035 - 036 - 037 - 038 - 039 - 040 - 041 Soprano Sax clean 042 Soprano Sax dirty 043 Groove-Soprano 044 - 045 Alto Sax clean 046 Alto Sax Sanborn 047 Alto Sax Desmond 048 - 049 Alto Glazunov 050 - 051 Sax Kinda Mellow 052 Sax Kinda Mellow dirty 053 TenSax1 ‘RoundMidnight (BiteVib) 054 Hard Tenor Sax 055 Tenor Sax Growl 056 Ernie’s Tenor 057 Dexter 058 It Getz Airy 059 - 060 Legit Tenor 061 Baritone Sax 062 Baritone Sax dirty 063 - 064 BassBeast - Bari
065 Trumpet 1 066 Trumpet 1 dark 067 Trumpet 2 068 Trumpet 2 dark 069 Trumpet 1 mute 070 Trumpet 2 mute 071 Trp2 Mute AutoWah 072 - 073 - 074 - 075 - 076 Piccolo Trumpet 077 Flugelhorn 078 Breathy Flugel 079 2 Flugelhorns 080 - 081 Trombone 082 Trombone Mute1 083 Trombone Mute2 084 Bass Trombone 085 Tenor Horn 086 - 087 Tuba 088 - 089 French Horn1 090 French Horn1 x2 091 French Horn2 092 French Horn2 x2 093 French Horn1 Mute 094 French Horn1 Mute x2 095 French Horn2 Mute 096 French Horn2 Mute x2 097 - 098 Tootsy 099 BluesHarp 100 - 101 Woodwind Quintet 102 4 Flutes 103 Flute + Oboe + Bassoon 104 2 Oboes + English Horn 105 2 Clarinets + Bass Clarinet 106 Bass Clarinet + Bassoon 107 - 108 - 109 Saxophone Quartet 110 Saxophone Section (Big Band) 111 Clarinet + Saxophone Section 112 2 Trumpets + 2 Trombones 113 Brass Quintet 1 114 Brass Quintet 2 115 French Horn + Trombone 116 Brass 1 117 Flugelhorn + Tenor Horn 118 Tenor Horn + Tuba 119 Trumpet + Ten Sax + Trombone 120 Trumpet + Ten Sax + Trombone 121 Trumpet + 3 Saxes + Trombone 1 122 Tower of Power 123 Flute + Trp Mute + 2 Saxes + Trb 124 Flute + Clarinet + Trb + BsClar 125 TrpMute+EnglHorn+TrbMute+Bassoon 126 - 127 - 128 Microphone -> MIDI OUT 1
Presets (factory bank 2 and 3)
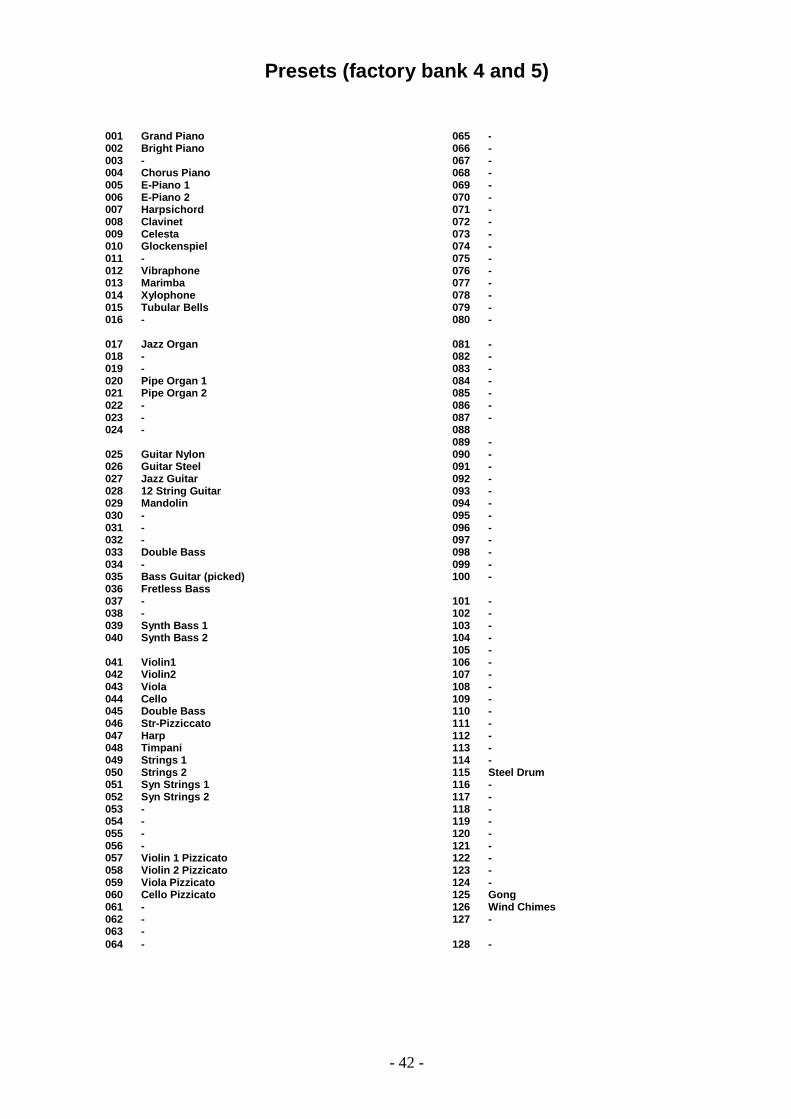
- 42 -
001 Grand Piano 002 Bright Piano 003 - 004 Chorus Piano 005 E-Piano 1 006 E-Piano 2 007 Harpsichord 008 Clavinet 009 Celesta 010 Glockenspiel 011 - 012 Vibraphone 013 Marimba 014 Xylophone 015 Tubular Bells 016 - 017 Jazz Organ 018 - 019 - 020 Pipe Organ 1 021 Pipe Organ 2 022 - 023 - 024 - 025 Guitar Nylon 026 Guitar Steel 027 Jazz Guitar 028 12 String Guitar 029 Mandolin 030 - 031 - 032 - 033 Double Bass 034 - 035 Bass Guitar (picked) 036 Fretless Bass 037 - 038 - 039 Synth Bass 1 040 Synth Bass 2 041 Violin1 042 Violin2 043 Viola 044 Cello 045 Double Bass 046 Str-Pizziccato 047 Harp 048 Timpani 049 Strings 1 050 Strings 2 051 Syn Strings 1 052 Syn Strings 2 053 - 054 - 055 - 056 - 057 Violin 1 Pizzicato 058 Violin 2 Pizzicato 059 Viola Pizzicato 060 Cello Pizzicato 061 - 062 - 063 - 064 -
065 - 066 - 067 - 068 - 069 - 070 - 071 - 072 - 073 - 074 - 075 - 076 - 077 - 078 - 079 - 080 - 081 - 082 - 083 - 084 - 085 - 086 - 087 - 088 089 - 090 - 091 - 092 - 093 - 094 - 095 - 096 - 097 - 098 - 099 - 100 - 101 - 102 - 103 - 104 - 105 - 106 - 107 - 108 - 109 - 110 - 111 - 112 - 113 - 114 - 115 Steel Drum 116 - 117 - 118 - 119 - 120 - 121 - 122 - 123 - 124 - 125 Gong 126 Wind Chimes 127 - 128 -
Presets (factory bank 4 and 5)

- 43 -
001 Syn Trumpet 002 Syn Flugelhorn 003 Syn Brass Lead 004 Syn Soft Brass 005 Syn Horn 006 Synth Bone 007 Square Pan Pipe 008 Arp Harp 009 Spooky 1 010 Spooky 2 011 Flooty Synth 012 Popcorn Pizza 013 Analog Guitar 014 Synth Sitar (use sustain) 015 Sentimental 016 Lucky Man 017 Syn-Strings 1 018 - 019 - 020 - 021 Syn Soft Brass 022 Soft Brass Pad 023 - 024 - 025 - 026 - 027 - 028 - 029 - 030 - 031 - 032 - 033 Synth Bass 1 034 Synth Bass 2 035 - 036 - 037 - 038 - 039 - 040 - 041 - 042 - 043 - 044 - 045 - 046 - 047 - 048 - 049 - 050 - 051 - 052 - 053 - 054 - 055 - 056 - 057 - 058 - 059 - 060 - 061 - 062 - 063 - 064 -
065 Synth Bass 1 066 Synth Bass 2 067 - 068 - 069 - 070 - 071 - 072 - 073 - 074 - 075 - 076 - 077 - 078 - 079 - 080 - 081 - 082 - 083 - 084 - 085 - 086 - 087 - 088 089 - 090 - 091 - 092 - 093 - 094 - 095 - 096 - 097 - 098 - 099 - 100 - 101 - 102 - 103 - 104 - 105 - 106 - 107 - 108 - 109 - 110 - 111 - 112 - 113 - 114 - 115 - 116 - 117 - 118 - 119 - 120 - 121 - 122 - 123 - 124 - 125 - 126 - 127 - 128 -
Presets (factory bank 6 and 7)