��113012-2-EB �2001 Kohler Co.
�
WELLWORTH PRESSURE LITE
VITREOUS CHINASIPHON JET TOILET
K-4413
BEFORE YOU BEGININSTALLER HAZARD NOTIFICATION
WARNING: Risk of injury or water damage.Contents of vessel under pressure can causesevere injury. Do not open or service before readinginstallation instructions or service instructions. Turnoff water supply and flush unit to release pressurebefore attempting any service.
CAUTION: Risk of product damage. Do not useany oils or lubricants on the Pressure Lite� system.
CAUTION: Risk of product damage. The fittingsin this toilet require no adjustment (except forpossible gap clearance adjustment and winterizing,refer to Page 6). The fittings in this toilet are preset.Any adjustment or modifications of the product arenot normal usage and void the warranty.
WARNING: Risk of injury or product damage.Handle vitreous china products very carefully.Vitreous china can break and chip if youover-tighten bolts and nuts.
NOTICE: For service and warranty on the SloanFlushmate vessel and related components, see the SloanFlushmate Owner’s Service Manual (included). Followall local plumbing codes.
PRODUCT PROPERTIES� Pressure Lite System.� Water surface to rim is 6-7/8” (17.5cm).� 2-1/4” (5.7cm) passageway.� For roughing-in and overall dimensions, see
diagram on Page 3.� Fixture dimensions are nominal and conform to
tolerances by ANSI/ASME Standards (A112.19.2).
NOTICE: Due to the pressure within the vessel, the flushnoise level may be higher than that of a gravity flush toilet.
PRODUCT REQUIREMENTS� The supply stop should be 8” (20.3cm) above the
floor line, and 7” (17.8cm) to the left of the closetflange centerline.
� Since all toilets do not have the same supplyrough-in, you may have to change the location ofthe supply stop to install this toilet.
� Closet flange must be 12” (30.5cm) on-center fromwall.
� Seat post holes are on 5-1/2” (14cm) centers.� For most satisfactory operation, the toilet requires
20 p.s.i. (1.3Kg/cm�) static pressure minimum atthe supply stop. The pressure is not to exceed 80p.s.i. (5.5Kg/cm�) maximum static pressure.
ORDERING INFORMATIONToilet K-3458. . . . . . . . . . . . . . . . . . . . . . . . . . . . . . . . . . . . . When specified:
3/8” supply K-7637. . . . . . . . . . . . . . . . . . . . . . . . . . . . Floor bolts 21401. . . . . . . . . . . . . . . . . . . . . . . . . . . . . .
NOTE: For service parts ordering information, see thelabel on the underside of the tank cover.
NOTICE: For service and warranty on the SloanFlushmate vessel and related components, see the SloanFlushmate Owner’s Service Manual (included).
MATERIALS REQUIRED� Supply stop (3/8” recommended)� Toilet seat� Closet flange� Toilet gasket (wax seal)� Toilet T-bolts 1/4” (6mm) or 5/16” (8mm) diameter
(2 required)� Toilet supply tubing
TOOLS REQUIRED� 10” adjustable wrench� Tubing cutter� Hacksaw� Level� Putty knife� Metal file� Tape measure� Screwdriver
NOTE: Site preparation may require additional tools.
2113012-2-EB Kohler Co., Kohler, WI U.S.A.
SITE PREPARATION
REMOVE EXISTING TOILETNOTICE: Carefully inspect new fixture for any signof damage before removing existing toilet. If anydamage to vitreous china or Pressure Lite systemcomponents are discovered, stop installation and callplace of purchase for assistance.
Inspect the complete toilet to ensure that the:
� Components are attached securely.� Trip lever and plunger arm move freely.� Vessel is securely mounted.� Vitreous china is undamaged.
Turn off the water supply.
Flush the toilet, and sponge out all remaining water fromthe tank and bowl.
Disconnect the supply stop, and remove the old tank andbowl.
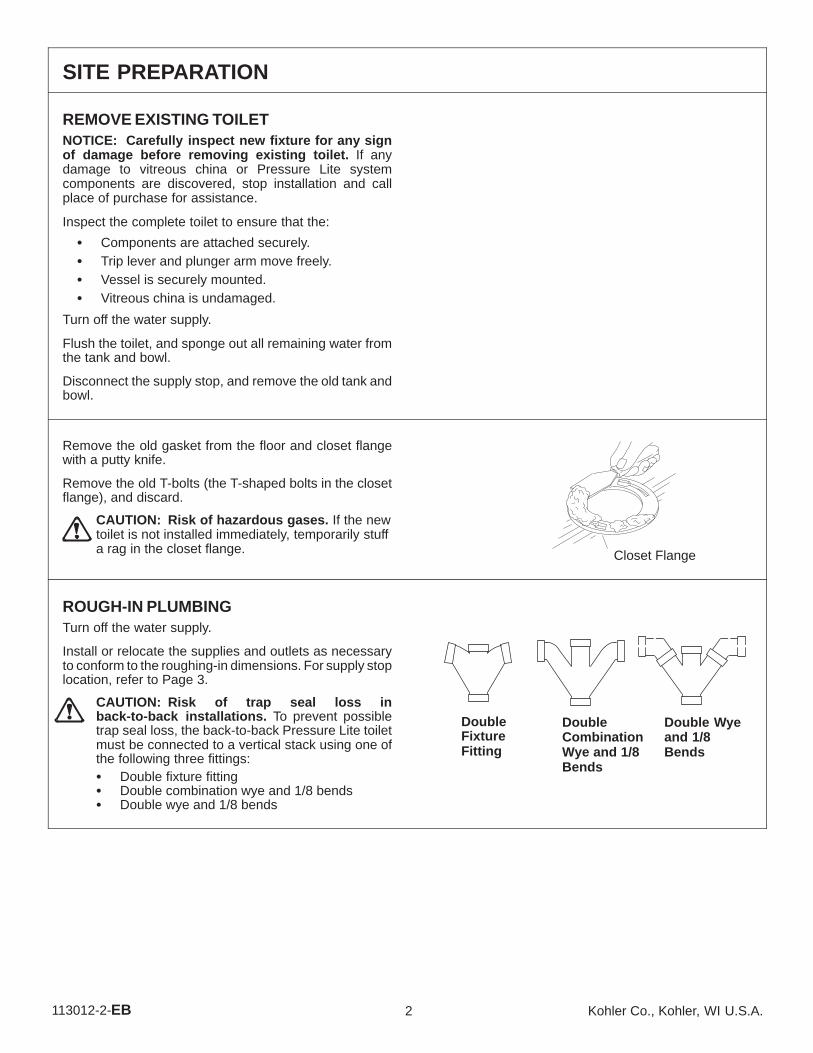
Remove the old gasket from the floor and closet flangewith a putty knife.
Remove the old T-bolts (the T-shaped bolts in the closetflange), and discard.
CAUTION: Risk of hazardous gases. If the newtoilet is not installed immediately, temporarily stuffa rag in the closet flange. Closet Flange
ROUGH-IN PLUMBINGTurn off the water supply.
Install or relocate the supplies and outlets as necessaryto conform to the roughing-in dimensions. For supply stoplocation, refer to Page 3.
CAUTION: Risk of trap seal loss inback-to-back installations. To prevent possibletrap seal loss, the back-to-back Pressure Lite toiletmust be connected to a vertical stack using one ofthe following three fittings:� Double fixture fitting� Double combination wye and 1/8 bends� Double wye and 1/8 bends
DoubleFixtureFitting
DoubleCombinationWye and 1/8Bends
Double Wyeand 1/8Bends
3Kohler Co., Kohler, WI U.S.A. 113012-2-EB
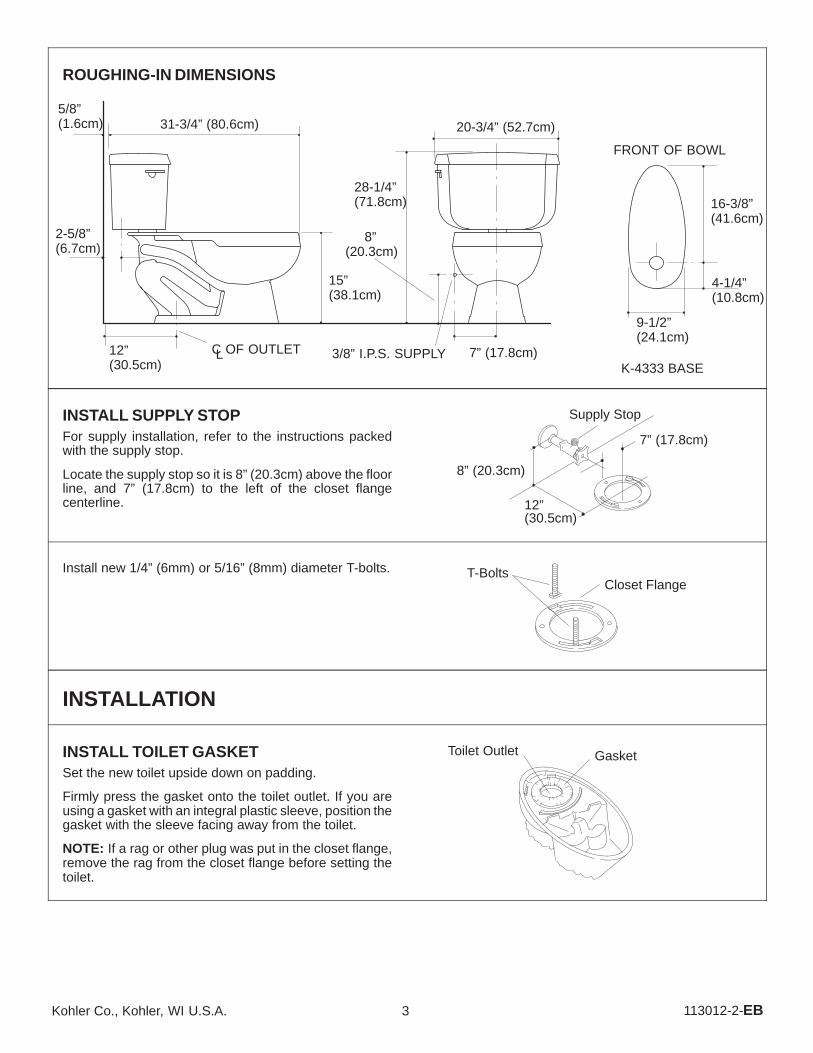
ROUGHING-IN DIMENSIONS
31-3/4” (80.6cm) 20-3/4” (52.7cm)5/8”(1.6cm)
12”(30.5cm)
28-1/4”(71.8cm)
8”(20.3cm)
15”(38.1cm)
7” (17.8cm)C OF OUTLETL 3/8” I.P.S. SUPPLY
2-5/8”(6.7cm)
16-3/8”(41.6cm)
4-1/4”(10.8cm)
9-1/2”(24.1cm)
K-4333 BASE
FRONT OF BOWL
INSTALL SUPPLY STOPFor supply installation, refer to the instructions packedwith the supply stop.
Locate the supply stop so it is 8” (20.3cm) above the floorline, and 7” (17.8cm) to the left of the closet flangecenterline.
Supply Stop
8” (20.3cm)
7” (17.8cm)
12”(30.5cm)
Install new 1/4” (6mm) or 5/16” (8mm) diameter T-bolts. T-BoltsCloset Flange
INSTALLATION
INSTALL TOILET GASKETSet the new toilet upside down on padding.
Firmly press the gasket onto the toilet outlet. If you areusing a gasket with an integral plastic sleeve, position thegasket with the sleeve facing away from the toilet.
NOTE: If a rag or other plug was put in the closet flange,remove the rag from the closet flange before setting thetoilet.
Toilet Outlet Gasket
4113012-2-EB Kohler Co., Kohler, WI U.S.A.
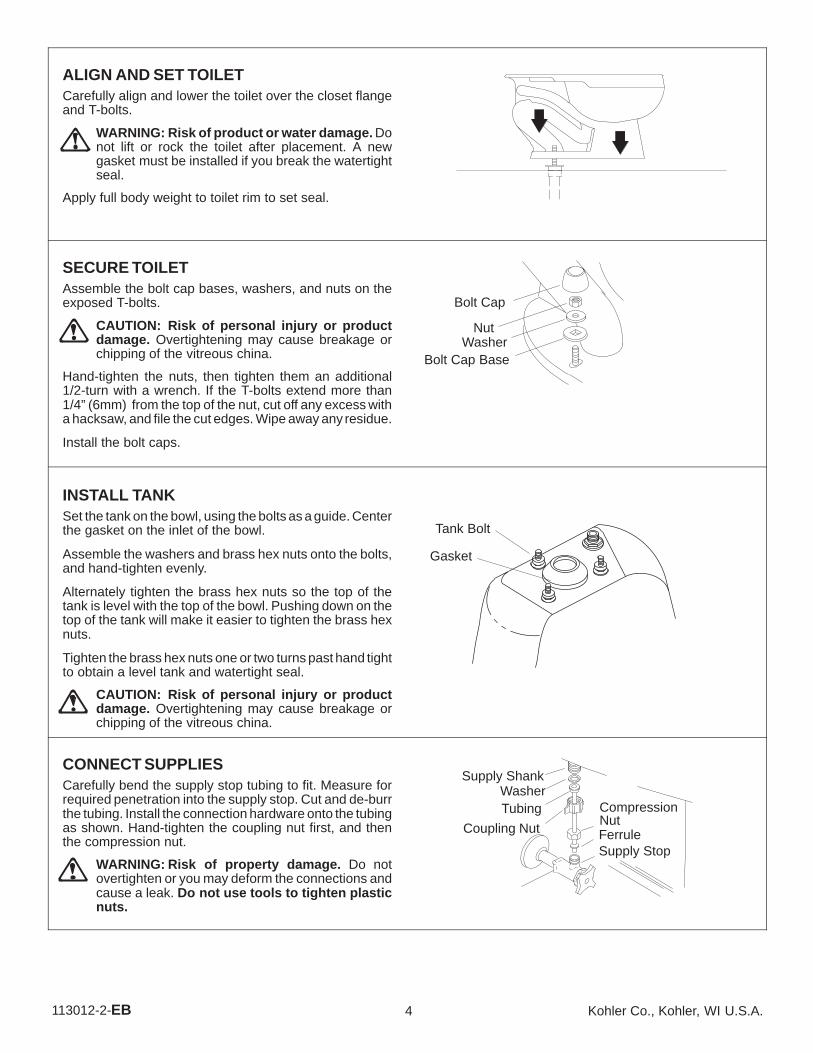
ALIGN AND SET TOILETCarefully align and lower the toilet over the closet flangeand T-bolts.
WARNING: Risk of product or water damage. Donot lift or rock the toilet after placement. A newgasket must be installed if you break the watertightseal.
Apply full body weight to toilet rim to set seal.
SECURE TOILETAssemble the bolt cap bases, washers, and nuts on theexposed T-bolts.
CAUTION: Risk of personal injury or productdamage. Overtightening may cause breakage orchipping of the vitreous china.
Hand-tighten the nuts, then tighten them an additional1/2-turn with a wrench. If the T-bolts extend more than1/4” (6mm) from the top of the nut, cut off any excess witha hacksaw, and file the cut edges. Wipe away any residue.
Install the bolt caps.
Bolt Cap
NutWasher
Bolt Cap Base
INSTALL TANKSet the tank on the bowl, using the bolts as a guide. Centerthe gasket on the inlet of the bowl.
Assemble the washers and brass hex nuts onto the bolts,and hand-tighten evenly.
Alternately tighten the brass hex nuts so the top of thetank is level with the top of the bowl. Pushing down on thetop of the tank will make it easier to tighten the brass hexnuts.
Tighten the brass hex nuts one or two turns past hand tightto obtain a level tank and watertight seal.
CAUTION: Risk of personal injury or productdamage. Overtightening may cause breakage orchipping of the vitreous china.
Tank Bolt
Gasket
CONNECT SUPPLIESCarefully bend the supply stop tubing to fit. Measure forrequired penetration into the supply stop. Cut and de-burrthe tubing. Install the connection hardware onto the tubingas shown. Hand-tighten the coupling nut first, and thenthe compression nut.
WARNING: Risk of property damage. Do notovertighten or you may deform the connections andcause a leak. Do not use tools to tighten plasticnuts.
Supply StopFerrule
CompressionNut
Coupling Nut
TubingWasher
Supply Shank
5Kohler Co., Kohler, WI U.S.A. 113012-2-EB
PRESSURE LITE SYSTEM
WARNING: Risk of personal injury or waterdamage. Contents of the vessel are underpressure, and can cause severe injury. Do not openor service before reading installation instructions orservice instructions. Turn off the water supply, andflush the unit to release pressure before attemptingany service.
CAUTION: Risk of product damage. Do not useany oils or lubricants on the Pressure Lite system.
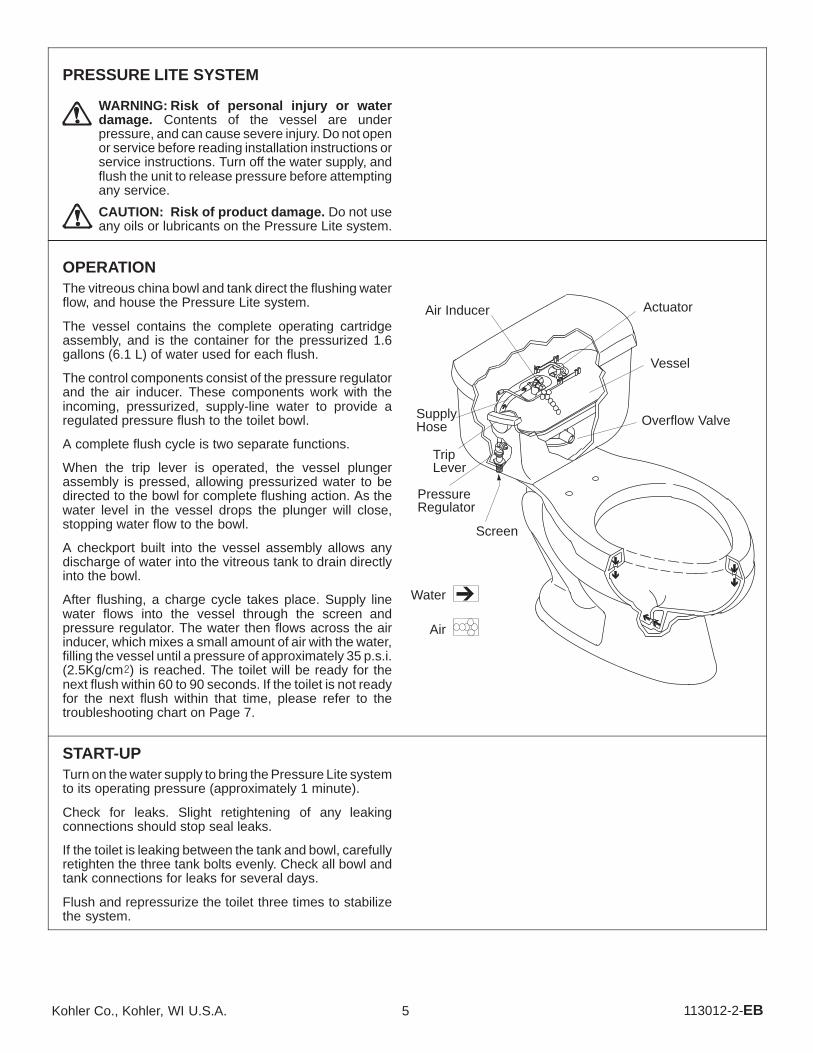
OPERATIONThe vitreous china bowl and tank direct the flushing waterflow, and house the Pressure Lite system.
The vessel contains the complete operating cartridgeassembly, and is the container for the pressurized 1.6gallons (6.1 L) of water used for each flush.
The control components consist of the pressure regulatorand the air inducer. These components work with theincoming, pressurized, supply-line water to provide aregulated pressure flush to the toilet bowl.
A complete flush cycle is two separate functions.
When the trip lever is operated, the vessel plungerassembly is pressed, allowing pressurized water to bedirected to the bowl for complete flushing action. As thewater level in the vessel drops the plunger will close,stopping water flow to the bowl.
A checkport built into the vessel assembly allows anydischarge of water into the vitreous tank to drain directlyinto the bowl.
After flushing, a charge cycle takes place. Supply linewater flows into the vessel through the screen andpressure regulator. The water then flows across the airinducer, which mixes a small amount of air with the water,filling the vessel until a pressure of approximately 35 p.s.i.(2.5Kg/cm�) is reached. The toilet will be ready for thenext flush within 60 to 90 seconds. If the toilet is not readyfor the next flush within that time, please refer to thetroubleshooting chart on Page 7.
PressureRegulator
Air Inducer Actuator
Vessel
Water
Air
TripLever
Overflow Valve
Screen
SupplyHose
START-UPTurn on the water supply to bring the Pressure Lite systemto its operating pressure (approximately 1 minute).
Check for leaks. Slight retightening of any leakingconnections should stop seal leaks.
If the toilet is leaking between the tank and bowl, carefullyretighten the three tank bolts evenly. Check all bowl andtank connections for leaks for several days.
Flush and repressurize the toilet three times to stabilizethe system.
6113012-2-EB Kohler Co., Kohler, WI U.S.A.
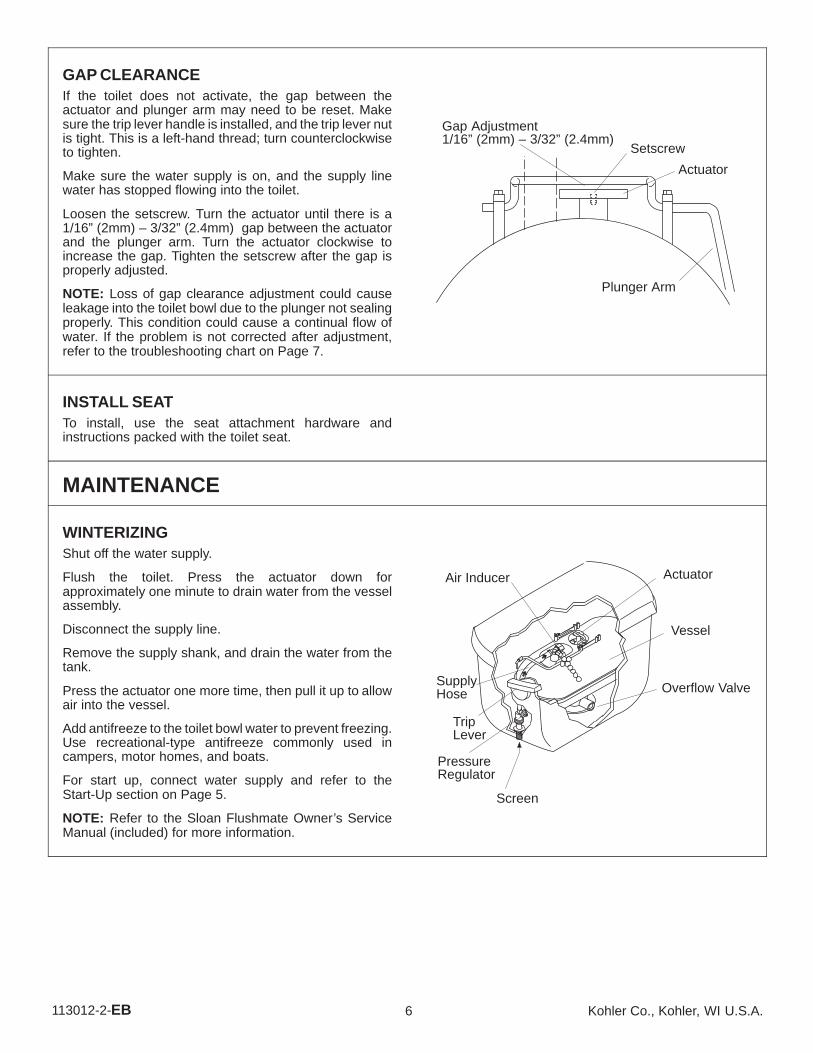
GAP CLEARANCEIf the toilet does not activate, the gap between theactuator and plunger arm may need to be reset. Makesure the trip lever handle is installed, and the trip lever nutis tight. This is a left-hand thread; turn counterclockwiseto tighten.
Make sure the water supply is on, and the supply linewater has stopped flowing into the toilet.
Loosen the setscrew. Turn the actuator until there is a1/16” (2mm) – 3/32” (2.4mm) gap between the actuatorand the plunger arm. Turn the actuator clockwise toincrease the gap. Tighten the setscrew after the gap isproperly adjusted.
NOTE: Loss of gap clearance adjustment could causeleakage into the toilet bowl due to the plunger not sealingproperly. This condition could cause a continual flow ofwater. If the problem is not corrected after adjustment,refer to the troubleshooting chart on Page 7.
Actuator
Gap Adjustment1/16” (2mm) – 3/32” (2.4mm)
Plunger Arm
Setscrew
INSTALL SEATTo install, use the seat attachment hardware andinstructions packed with the toilet seat.
MAINTENANCE
WINTERIZINGShut off the water supply.
Flush the toilet. Press the actuator down forapproximately one minute to drain water from the vesselassembly.
Disconnect the supply line.
Remove the supply shank, and drain the water from thetank.
Press the actuator one more time, then pull it up to allowair into the vessel.
Add antifreeze to the toilet bowl water to prevent freezing.Use recreational-type antifreeze commonly used incampers, motor homes, and boats.
For start up, connect water supply and refer to theStart-Up section on Page 5.
NOTE: Refer to the Sloan Flushmate Owner’s ServiceManual (included) for more information.
PressureRegulator
Air Inducer Actuator
Vessel
TripLever
Overflow Valve
Screen
SupplyHose
7Kohler Co., Kohler, WI U.S.A. 113012-2-EB
TROUBLESHOOTINGThe troubleshooting guide below is meant for general aid only. All fittings in this toilet except for the plunger nut are presetby the manufacturer to prevent adjustment. Any attempt to adjust the fittings (except for gap clearance and winterizing)may damage the toilet. Such adjustments for modifications of this product are not normal usage and will void the warranty.For proper trip lever adjustment procedures, refer to Gap Clearance on Page 6 in these instructions. Any problems,technical questions, or warranty issues involving the vessel or its related components should be directed to1-800-533-3450. Any other problems not covered in this chart should be referred to your installer/dealer.
SYMPTOM POSSIBLE CAUSE CORRECTIVE ACTION
1. No flush. A. Supply stop is closed. A. Fully open supply stop.
B. Trip lever is loose. B. Tighten nut (turn counterclockwiseto tighten).
C. Trip lever does not actuate plunger. C. Adjust linkage or actuator gap (referto Page 6).
D. Obstruction within water inletcomponents.
D. Replace inlet components. (Phone1-800-533-3450 for assistance.)
E. Screen is clogged. E. Clean the screen. (Phone1-800-533-3450 for assistance.)Replace the screen if necessary.
2. Poor flush. A. Bowl rim holes are clogged. A. Clean under bowl rim.
B. Trapway or drain line is clogged. B. Plunge bowl, auger trap, augerdrain to clear blockage.
C. System is not pressure charged. C. Adjust plunger adjuster for properactuation arm gap (refer to Page6).
D. Supply stop is not opened. D. Fully open supply stop.
E. Drain line vent is clogged. E. Refer to installer/dealer forassistance.
F. Screen is clogged. F. Clean the screen with a medium tohard bristle brush. Replace thescreen if necessary. (Phone1-800-533-3450 for assistance.)
3. Bowl watercontinues to flow ortank fill water will not
A. Plunger is not seating properly. A. Adjust gap between actuator andplunger arm (refer to Page 6).
tank fill water will notshut off. B. Plunger arm is binding. B. Repair or replace plunger arm
(refer to installer/dealer forassistance).
C. Pressure regulator is not working. C. Replace the lower supply group.(Phone 1-800-533-3450 forassistance.)
8113012-2-EB Kohler Co., Kohler, WI U.S.A.
IMPORTANT CONSUMER INFORMATION
CONSUMER RESPONSIBILITIESIf you live in a hard water area, you should make certainthat the holes in the rim are kept clean for proper bowlflushing. Toilet bowl cleaners should be used at least oncea week. Use a long-handled brush to clean the rim holesand to clean as far into the trap as possible to preventmineral deposits from forming.
Cleaning of the Pressure Lite tank system is notnecessary. If cleaning is desired, use mild soap and water.
Most toilet bowl cleansers are not harmful to the vitreouschina surface of the toilet bowl. Please follow the bowlcleanser manufacturer’s instructions carefully.
Do not use abrasive cleaners or solvents.
REQUESTING SERVICE LIMITED ONE-YEAR WARRANTYPlease take a moment to familiarize yourself with theKohler Warranty, its benefits, and limitations. Kohler Co.and its distributors support you with one of the largestService Networks of its type. Here’s what you need to doif you require service:
FIRST: Contact the dealer or contractor who sold andinstalled the product. They should be able tosolve any problems you may have.
SECOND: If your dealer or contractor cannot solve theproblem, they will contact or supply you withthe name of the local Kohler Distributor andthe:
Kohler plumbing fixtures and fittings are warranted free ofmanufacturing defects.
Kohler Co. will, at its election repair, replace, or makeappropriate adjustment where Kohler Co. inspectiondiscloses any such defects occurring in normal usagewithin one year after installation. Kohler Co. is notresponsible for installation or removal costs.
To obtain warranty service, contact Kohler Co. eitherthrough your Dealer or Plumbing Contractor or by writingKohler Co., Attn: Customer Service Department, 444Highland Drive, Kohler, WI 53044 U.S.A., or by calling1-800-4-KOHLER from within the U.S.A.
KOHLER TECHNICAL SPECIALISTImplied warranties, including that of merchantability
fit f ti l lTHIRD: If you are unable to obtain warranty servicethrough either your contractor or Kohler Co.distributor, please write us directly at KohlerCo., Attn: Customer Service Department, 444Highland Drive, Kohler, WI 53044 U.S.A.Any problems, technical questions, orwarranty issues involving the SloanFlushmate vessel or its related componentsshould be directed to Sloan at1-800-533-3450.
FOURTH: Include all pertinent information regardingyour claim, including a complete description ofthe product, model numbers, colors, finishes,and the date the product was installed.Include a description of the problem, and aphotocopy of your invoice for the productsinvolved. Also give us the name of thecontractor and distributor.
p , g yor fitness for a particular purpose, are expresslylimited in duration to the duration of this warranty.Kohler Co. disclaims any liability for special,incidental, or consequential damages.
Some states do not allow limitations on how long animplied warranty lasts or the exclusion or limitation ofspecial, incidental, or consequential damages, so theselimitation and exclusion may not apply to you. Thiswarranty gives you specific legal rights. You may alsohave rights which vary from state to state.
This limited warranty provides specific legal rights as theyapply within the U.S.A., and other rights may be available,but may vary from country to country.
This is our exclusive written warranty.
KOHLER CO,. KOHLER, WISCONSIN, 53044
���������EB
Recommended