Embed Size (px)
Citation preview

Component List
■ Standard
■ Optional Extras
ITEM MODEL QTY
Carrying Case 3910-01 1
Lithium-ion Battery 3910-12 1
Battery Charger 3910-10 1
6531-2G VHT Probe with 2m Cable 6531-2G-P 1
Pressure Sensor with Connection Cable 3910-11 1
Contact Output Cable 3900-03 1
■ Consumables
ITEM MODEL QTY
Zero Filter (w/t joint and tube (70cm)) 3910-04 1
Printer Paper for 3910/3905 3910-05 5
Standard Inlet 3910-06 1
Isokinetic Suction Probe 3905-07 1
For more information on consumables, please contact your distributor or your KANOMAX service center.
ITEM MODEL QTY
Main Unit 3905 1
Power Cord - 1
Standard Inlet 3910-06 1
Isokinetic Suction Probe 3905-07 1
Zero Filter 3910-04 2
Tygon Tube (2M) - 1
Printer Paper for 3910/3905 3910-05 2
Measurement Software - 1
Operation Manual - 1
Test sheet/Certificate Calibration Traceability Certificate
- 1
AC adapter(15V 4A) 3910-08 1
USB flash drive – 16GB - 1
Lithium-ion Battery 3910-12 1

Important Safety Information i
Laser Classification
This instrument is classified as a Class 1 Laser Product in accordance with the following standards:
● EN60825-1: 2007
● I EC60825-1: 2007
* Class 1 Laser:
Lasers that are considered to be safe under reasonably foreseeable conditions of operation,
including the use of optical instruments for intrabeam viewing.
Laser Safety Instruction
Danger - This instrument employs a laser inside the unit as the light source of the sensor.
Never open/close the case of the unit or disassemble the optical sensor inside the
unit.
Caution - Use of controls, adjustments or performance of procedures other than those
specified herein may result in hazardous radiation exposure.
Wave Length 775-800nm
Maximum Output 80mW
CLASS 1 LASER PRODUCT EN60825-1 : 2007

Important Safety Information ii
Important Safety Information In this manual, warning types and classifications are defined as follows.
[Classification]
WARNING: To Prevent Serious Injury or Death
Indicates a potentially hazardous situation which, if not avoided, may result in
serious injury or death.
CAUTION: To Prevent Damage to the Product
Indicates a potentially hazardous situation which, if not avoided, may result in
damage to the product that may void the product warranty.
[Description of Symbols]
△ Indicates the condition (including danger) that requires caution. The subject of each
caution is illustrated inside the triangle (e.g., the symbol shown to the left is high
temperature caution).
Indicates prohibition. Do not take the prohibited action shown inside or near this symbol.
(e.g., The symbol shown to the left prohibits disassembly.)
● Indicates a mandatory action. A specific action is described near the symbol.
WARNING
¤ Do not disassemble, modify or repair the instrument. …… A 3B laser diode is used as the optical source inside the instrument. Therefore, never
attempt to disassemble the instrument as it is extremely dangerous Also, disassembling the unit may result in short circuit or malfunction.
¤ Use the instrument properly by carefully following this operation manual. …… Misuse of the instrument may result in electric shock, fire, damage to the instrument, etc.
¤ If any abnormal noise, unusual odor or smoke is emitted, or any liquid enters into
the instrument, turn the power off immediately, remove the battery and
disconnect the power cable. …… It may result in electric shock, fire, or damage to the instrument.
Contact your distributor or your KANOMAX service center for repair.
Handle Properly
Do not
modify/disassemble

Important Safety Information iii
WARNING
¤ Do not use this instrument in an ambient temperature of 35 °C or greater.
…… The performance may deteriorate significantly. Also, dielectric degradation may occur, which may result in short circuit or fire.
¤ Unplug the power cord when the instrument is not in use. …… Failure to observe the above may result in electric shock, fire or damage to internal
circuitry.
¤ Install the instrument where you can pull the power cord out anytime.
¤ When using the power cord, ensure there is no dust on the power plug. The AC
outlet used must be within the specified power requirement of 100 ~ 240V. …… Failure to observe the above may result in fire.
¤ When using a power cord or an AC adapter, make sure to use the one provided
with this instrument. …… Other commercially available cords may have different voltage specifications and
polarity, which could result in short circuit, fire or damage to the instrument.
¤ When charging the batteries by the instrument, do not insert or pull the batteries
out. …… Failure to observe this may result in damage to battery or internal circuitry.
CAUTION ¤ Remove battery when the instrument will not be used for an extended period of
time.
Also, do not leave a discharged battery inside the instrument.
…… Failure to observe the above may result in battery leakage and damage to the instrument.
¤ Do not perform measurements in environments exceeding or falling below the
specified temperature and RH levels of the instrument.
The instrument should not be exposed to direct sunlight for prolonged periods.
…… The instrument may not function properly outside the specified environment. (10~35°C, 20~85%RH, with no condensation)
¤ Do not wipe the instrument with volatile solvents.
…… The body may be deformed or deteriorated. Use a soft dry cloth to remove stains. If stains persist, soak the cloth in a neutral detergent or water and wipe the instrument with the cloth. Never use volatile solvents such as thinner or benzene.
¤ Do not subject the instrument to strong shock. Do not place heavy objects on the
instrument or sensor.
…… Failure to observe the above may cause damage to the instrument.
¤ Do not move the main unit or the probe from a cold place to a warm place
quickly. It will cause condensation.
…… Even when used in an environment within the specified operating temperature and
humidity, a sudden temperature change may cause condensation. Condensation
generated on the sensor may cause inaccurate measurements. Condensation on metal parts may cause rusting and lead to a malfunction.
Prohibition
Prohibition
Prohibition
Handle Properly
Prohibition
Prohibited
Installation

Important Safety Information iv
¤ Do not touch the instrument when it is electrically charged. …… Failure to observe the above may affect the measurement value and cause damage to
the instrument circuitry.
¤ Do not let the instrument suck in highly concentrated particles that exceed the
specification level. …… Failure to observe the above may contaminate the instrument. As
a result the instrument may fail to obtain zero count.
In order to check the performance under highly concentrated environments, make sure to attach the filter to the inlet.
If you accidentally let the instrument suck in highly concentrated
particles, attach the filter to the inlet and brush inside the instrument while the pump is running.
¤ Do not dispose of the instrument as household waste. …… Please note that the disposal of the instrument and the batteries should be in line with
your local or national legislation. For details, please contact your local distributor.
Handle Properly
Prohibition

Table of Contents
1. Part Names and Functions ...................................................................... 1
1.1 General Outline ............................................................................................................ 1
1.2 Airborne Particle Counter ......................................................................................... 1
2. Getting Started ............................................................................................... 3
2.1 Power Supply ................................................................................................................ 3
2.2 Zero Check .................................................................................................................... 4
2.3 Isokinetic Suction Probe ........................................................................................... 4
2.4 Consumables ................................................................................................................ 5
2.4.1 Printer Paper Replacement .............................................................................................. 5
2.4.2 Zero Filter Replacement ................................................................................................... 5
2.4.3 Isokinetic Suction Probe Replacement ........................................................................ 6
2.5 User Authentication .................................................................................................... 6
3. Display Description and Operation Procedure ............................ 7
3.1 Boot Screen ................................................................................................................... 7
3.2 Log-In [A log-in is a necessary when the User Authentication
function is activated] ......................................................................................................... 8
3.2.1 Log-In Screen ....................................................................................................................... 8
3.2.2 User .......................................................................................................................................... 8
3.2.3 Authentication Screen ....................................................................................................... 9
3.2.4 Operation Log ....................................................................................................................... 9
3.3 Main Screen................................................................................................................. 10
3.3.1 Main Screen ......................................................................................................................... 10
3.3.2 Screen Change – Main Screen ..................................................................................... 16
3.4 MONITOR ...................................................................................................................... 18
3.5 MODE ............................................................................................................................. 19
3.5.1 SINGLE .................................................................................................................................. 19
3.5.2 CONTINUOUS ...................................................................................................................... 22
3.5.3 INTERVAL ............................................................................................................................. 23
3.5.4 STATS .................................................................................................................................... 25
3.5.5 STANDARD ........................................................................................................................... 27
3.5.6 PRESET .................................................................................................................................. 31
3.5.7 REMOTE ................................................................................................................................. 31
3.6 START ............................................................................................................................ 32
3.6.1 SINGLE, CONTINUOUS, INTERVAL ............................................................................. 32
3.6.2 STATS .................................................................................................................................... 34
3.6.3 STANDARD ........................................................................................................................... 41
3.6.4 Interlocking Operations .................................................................................................. 48
3.6.5 Saving Data ......................................................................................................................... 51
3.6.6 In Case a Measurement is Interrupted ..................................................................... 52
3.7 FILE ................................................................................................................................ 54
3.8 MENU ............................................................................................................................. 57
3.8.1 Measuring ............................................................................................................................. 57
3.8.2 Setting ................................................................................................................................... 64
3.8.3 Other ...................................................................................................................................... 67

3.8.4 LOG OUT ............................................................................................................................... 73
3.8.5 EXIT ........................................................................................................................................ 73
4. PC Applications ............................................................................................. 74
4.1 User Management .................................................................................................. 74
4.2 Remote Console ...................................................................................................... 74
4.3 Create Schedule ...................................................................................................... 74
4.4 Remote Measurement .......................................................................................... 75
5. Connecting Option Sensors .................................................................. 76
6. Printing Examples ...................................................................................... 77
6.1 Printing Example for Each Measurement Mode ............................................ 77
6.1.1 SINGLE .................................................................................................................................. 77
6.1.2 CONTINUOUS ...................................................................................................................... 78
6.1.3 INTERVAL ............................................................................................................................. 79
6.1.4 STATS .................................................................................................................................... 80
6.1.5 STANDARD(for the measurement standards ISO14644-1:2015) .................. 81
6.1.6 STANDARD(for the measurement standards other than ISO14644-1:2015)
............................................................................................................................................................. 82
7. Battery Charge.............................................................................................. 83
7.1 Charging Battery ....................................................................................................... 83
8. Main Specifications .................................................................................... 84
9. Troubleshooting ........................................................................................... 85
10. Warranty and After-sales Service .................................................. 87

1. Part Names and Functions 1
1. Part Names and Functions
1.1 General Outline
This Airborne Particle Counter is a light scattering laser particle counter using semiconductor
laser radiation as a light source. This counter is used to detect ultrafine airborne particles in a
cleanroom or other environment equivalent to a cleanroom. Mainly this counter is used as a
monitoring measurement equipment to monitor the cleanliness in a cleanroom.
By using option sensors, air velocity, temperature, humidity and differential pressure can be
measured simultaneously.
Each measurement value is displayed on the LCD screen and can be stored in the internal
memory of the instrument and be printed out by the internal printer. As for the power supply,
either an AC adapter (100-240V) or batteries can be used.
1.2 Airborne Particle Counter
Power Switch
--- When the main power switch located on
the rear of the unit is ON, you can turn
the power on or off by using this button.
Inlet
--- Particles enter the unit from here.
Attach the provided standard inlet. To
use the provided isokinetic suction
probe, attach the Tygon tube to the end
of the inlet.
Printer
--- For printing measurement data. Set the printer roll-paper here.
Paper Cover Open Switch
--- Slide this switch to open the cover when
changing the printer roll-paper.
To change printer paper refer to 2.4.1
Printer Paper Replacement.
LCD Touch Panel
--- This touch panel allows you to setup and control all instrument functions.
SUPPLY LED
POWER LED:
--- Indicates
ON/OFF of the unit.
FRONT

1. Part Names and Functions 2
Battery Compartment
--- Insert rechargeable battery here.
Refer to 2.1 Power Supply for how to install the battery.
BACK
Sampling Air Exhaust Port
--- Filtered sample air is exhausted at this
port.
Do not block the port as it may result in damage to the instrument.
DC-IN
---This is an inlet to supply AC power to the
instrument. Connect the provided AC adapter here.
Optional Sensor Connecting Terminal
--- Terminals where optional sensors can be
connected. Refer to 5. Connecting
Option Sensors for details.
ETHERNET Connector
---To be used when controlling the
instrument by the software. For details,
refer to the operation manual for the
software.
MEMORY CARD Insertion Slot
(Service only.)
Upper: SERVICE PORT1 Connector
(Service only.)
Middle: SERVICE PORT2 Connector
(Service only.)
Lower: USB Connector
--- Insert a USB flash drive to store
measurement data.
To be used to transfer measurement data
and other files to be processed on PCs.

2. Getting Started 3
2. Getting Started
2.1 Power Supply
Supply power to the main unit.
There are two ways to supply power; using the AC adapter or a battery.
-- AC Adapter --
Plug the AC adapter into the connecting port.
AC100V~240V power supply shall be used.
Output voltage ……. DC 15V
Polarity of output voltage …
-- Battery --
Charge the battery by installing it in the instrument and then connecting the
provided AC adapter.
Refer to 7.Battery for charging the battery.
You can also charge the battery with the optional charger.
Open the battery compartment cover on the rear of the instrument.
Loosen the screw on the cover to open it.
Connect the battery to the connecter inside the compartment.
Insert the battery as shown to the right picture (the connecter end should go
to the rear of the compartment).
Put the cover back and tighten the screw to fix the cover.
When you plug in the AC adapter, the SUPPLY LED will light up red. When
the batteries are being charged, the red LED will blink.
After pressing the POWER switch on the front of the instrument, you will
hear a beep and the POWER LED will light up. If the power is supplied by
the AC line, the SUPPLY LED will be red and if supplied by battery, the
LED will be yellow.
Several seconds later, the main screen appears automatically. Refer to
3. Display Description and Operation Procedure for the details
about the operation screen.

2. Getting Started 3
2.2 Zero Check If the internal optical system is dirty, you may not be able to perform an accurate
measurement.
To confirm the cleanliness of the internal optical system, perform a Zero Check
before measuring.
Remove the rubber cap that is mounted on the inlet on the upper
side of the main unit.
Next, attach the zero filter to the inlet using the supplied Tygon
tube.
The length of the tube is not critical. However, make sure that the
tube is not bent. (Approx. 60cm)
Follow the above procedure in order to prevent particles
from entering the instrument.
Perform a measurement for one minute and then conduct a
Zero Check.
(Refer to 3.4 Monitor for the operation procedure.)
Perform a Zero Check at least once a day.
It is recommended a Zero Check be done before and after each measurement.
If the count value is not zero, keep the zero filter attached to the inlet and tap [MONITOR] until the
count reads zero.
2.3 Isokinetic Suction Probe Use the Isokinetic Suction Probe to ensure the sampling air
velocity is equivalent to the operating environment air velocity.
This allows you to perform a measurement without significantly
disturbing the normal air flow.
Attach the Isokinetic Suction Probe to the standard inlet by
using the provided Tygon tube.
When using the Tygon tube, cut the tube to the most
suitable length for your measurement requirements.
(We recommend the Tygon tube not be extended more than 1.5 meters)

2. Getting Started 3
2.4 Consumables
2.4.1 Printer Paper Replacement
When the provided printer paper runs out, please purchase new printer paper (dust free paper),
Model 3910-05.
Installing printer paper
1. Press the Paper Cover Open Button to open the paper cover.
2. Place the paper as shown in the picture below.
3. Pull the top of the paper so that a slight portion is sticking out of the printer when the cover is
closed.
1. 3.
2.
2.4.2 Zero Filter Replacement
If the performance of the provided zero filter is deteriorated, please purchase a new Zero Filter.
To replace a Zero Filter, refer to

2. Getting Started 5
2.2 Zero Check.
2.4.3 Isokinetic Suction Probe Replacement
If the provided Isokinetic Suction Probe is damaged or lost or any air leak is detected, please
purchase a new Isokinetic Suction Probe, Model 3910-07.
To replace an Isokinetic Suction Probe, please refer to 2.3 Isokinetic Suction Probe.
2.5 User Authentication
This instrument allows you to configure an authentication using a user ID and a password for
security purposes.
When the User Authentication function is activated, the user authentication is required for logging
in at start-up and for changing settings. This function also allows for limiting possible activities for
each user.
There are some operating procedures that are only effective or necessary when the User
Authentication function is enabled, which are marked in this manual.
Setting a user authentication can be done from the Security Setting display.
Please refer to 3.8.3 Other – Security Setting.

3. Display Description and Operation Procedure 7
A
f
e
w
s
e
c
o
n
d
s
a
f
t
e
r
t
h
e
i
n
s
t
r
u
m
e
n
t
i
s
t
u
r
n
e
d
o
3. Display Description and Operation Procedure
3.1 Boot Screen
A few seconds after the instrument is
turned ON, the screen shown to the
left will be displayed.
Please wait for a few moments, while
the system is initialized.

3. Display Description and Operation Procedure 8
3.2 Log-In [A log-in is a necessary when the User Authentication function is activated]
3.2.1 Log-In Screen
After the system is initialized, the
Log-in screen shown to the left will be
displayed.
Type your user ID and password in the
field and tap [OK] button.
Press [Shut Down] button to turn off
the instrument.
[CAPS] button: To type upper case letters
[SWITCH] button: Jump to next field
[CLR] button: Clear input
[BS] button: Back space, delete the preceding character
ATTENTION!
If a user fails to enter a correct password 10 times, that user ID will become temporarily invalid; the
user ID cannot be used to login for 24 hours.
*A built-in user [administrator] is set in this instrument.
On the first log-in, [administrator] shall be displayed as a user ID. The initial password of the [administrator] is "1234".
For security reasons, please change the password as soon as possible.
If multiple users are registered, the field of user ID on the log-in screen will be blank; type your user ID from the keyboard
screen.
3.2.2 User
When the User Authentication function is activated, measurement data and operation details are
recorded in this instrument together with the logged-in user's ID. It is also possible to limit the
range of functions to be performed by each user.
Settings of User information are conducted on the User Setting display (Refer to 3.8.3 Other - User
Management).
User information consists of User name, User ID, Password, and Qualification.
User name: a user name with up to 40 characters
User ID: a user ID with up to 16 characters.
Password: The instrument recognizes users with the combination of user ID and
Password. Passwords need to be 4 to 16 alphanumeric characters.
Passwords expire every 180 days, after which the user ID will be invalid until
a new password is set.
Qualification: When the User Authentication function is activated, restrictions on certain
functions/operations can be set for each user by the administrator.

3. Display Description and Operation Procedure 9
Authorization to use specific functions will be assigned to each user by the
administrator.
For example, if a user has no authorization for the [Copy File] operation,
he/she can view the contents of data files on the [FILE] screen, but cannot
copy data files to USB flash drive.
If the current logged in user does not have the authorization to carry out a
certain operation, the button for that operation is deactivated. Even if a user
has the authorization, the user will need to enter his/her user name and
password every time before initiating an action that requires the
authorization.
The administrator can reset passwords for any users in case of a lost or forgotten password (Refer
to 3.8.3. Other - User Management).
If the administrator forgets his/her password when the User Authentication function is activated,
nobody can operate the instrument. Therefore, registering multiple administrator users on the
instrument is strongly recommended.
3.2.3 Authentication Screen
Certain operations and settings require
user authentication.
In the Authentication screen, the
current logged in user ID is displayed.
Enter the password to authenticate.
ATTENTION!
If a user fails to entry his/her password 10 times, the user ID will become temporarily invalid; the
user ID cannot be used for 24 hours.
3.2.4 Operation Log
When the User Authentication function is activated, the instrument saves a history of operations,
error messages, and alarms in the log file.
The operation log stores the time, User ID, operation detail, result, and parameter of the
occurrence. (Please refer 3.8.3 Other for details on the operation log.)
A user can review logs on the [Log Maintenance] screen. (To review logs, the user needs to have
the authorization to review logs).
3. Display Description and Operation Procedure 10
3.3 Main Screen
3.3.1 Main Screen
After the instrument is booted up and a
user has logged in, the main screen shown
to the left will be displayed.
.
All operations can be started from this screen.
The measurement parameters are displayed on the Measurement Condition / Ambient Data
display area (2).
When an option sensor is attached, you can tap the [SWITCH] button to show the ambient
data.
Tap the title to switch between data, graph and map.
When a chart is displayed, you can change the particle chart to the ambient chart by tapping the
[SWITCH] button.
(2)
(1)
(3)
(4)
(5)
[DATA]
[GRAPH] [MAP]
Ambient data

3. Display Description and Operation Procedure 11
(1) Data Display: Displays numeric value, chart and map.
(2) Measurement
Condition/
Ambient Data:
Displays measurement mode, measurement setting and measurement
status/
Displays the current status when option sensors are connected.
(3) Status Display: Displays the status of power source, pump, LD error, over count.
(4) START: Starts measuring in the configured mode. This button becomes [STOP]
button after sampling starts. Tap [STOP] button to stop sampling.
MONITOR: Performs a measurement and displays a measurement value. This mode
does not save measurement results. The measurement display value is
updated every second.
MODE: Selects measurement mode. Select either “SINGLE”, “CONTINUOUS”,
“INTERVAL”, “STATS”, “STANDARD” or “REMOTE” mode. Configures
advanced settings in items such as INTERVAL, SAMPLE T. and CYCLES
can be set in each mode. In “PRESET” loads stored measurement setting
file.
FILE: Loads, prints and deletes stored measurement data.
MENU:
Configures chart settings, alarm settings and system settings.
(5) Operating Status
Display:
Displays operating status. The remaining time is counted during a wait
time; the measurement time and interval time are counted during a
measurement.
Pause:
Waiting:
Measuring:
Preparing:
Suspended:
Not in operation
Waiting for the next measurement
In the process of measurement
Preparing to start a measurement
In a temporary state of suspension
Tap [START] to restart the measurement.
When the User Authentication function is activated, a user needs to have the authorization for [Change
Measurement Mode] to select a measurement mode and to conduct measurement setting. In addition,
User Authentication is required.
To change settings from the [MENU], the user needs to have the authorization for [Access Control
Panel]. In addition, User Authentication is required.
<Icons in the Status Display>
Indicates if the instrument is powered by the AC power cord or a battery. If it’s
battery-powered, the remaining battery level is also shown.
Indicates a pump error status. If the pump is operating abnormally, this icon will be
shown.
Indicates an LD error status. If the LD is operating abnormally, this icon will be
shown.
Indicates if the measurement count per second exceeds the maximum measurable
concentration.
Indicates if an instrument Alarm error is occurring. Tap this icon to cancel the Alarm
sound.

3. Display Description and Operation Procedure 12
/
Switches between Total display and Single display.
is displayed when Total display is selected. is displayed when Single
display is selected.
The range of indicated data is as follows:
The numeric value will be indicated in black when Total display is set and in gray
when Single display is set.
Channel Total Display Single Display
0.3um X ≧ 0.3um 0.3um ≦ X < 0.5um
0.5um X ≧ 0.5um 0.5um ≦ X <1.0um
1.0um X ≧ 1.0um 1.0um ≦ X <3.0um
3.0um X ≧ 3.0um 3.0um ≦ X <5.0um
5.0um X ≧ 5.0um 5.0um ≦ X <10.0um
10.0um X ≧ 10.0um X ≧ 10.0um
* X: detected particle count

3. Display Description and Operation Procedure 13
<Chart Operations>
: Switches the display between the particle chart and the OP sensor chart on the GRAPH
screen.
: Scrolls the chart to the left (half of the display can be scrolled at a time).
: Scrolls the chart to the right (half of the display can be scrolled at a time).

3. Display Description and Operation Procedure 14
:Sets the range of the Y axis.
Particle Graph (Example) :
Select either LOG or LINEAR for the Y axis. Select the maximum scale value from four options.
For setting the four maximum values for each option, please refer to 3.8.1 MEASURING –
CHART SETTING.
In the display shown above, LOG is selected for the scale of the Y axis and the maximum scale
value of the Y axis is set to 10 to the sixth.
Option Sensor Graph (Example):
Select one of the three combinations of minimum and maximum scale values of the Y axis for
each sensor. For setting the combination of minimum and maximum values for each option,
please refer to 3.8.1 MEASURING – CHART SETTING.

3. Display Description and Operation Procedure 15
: Sets the range of the X axis.
10 Sets the maximum scale value of the X axis to 10.
20 Sets the maximum scale value of the X axis to 20.
50 Sets the maximum scale value of the X axis to 50.
100 Sets the maximum scale value of the X axis to 100.
150 Sets the maximum scale value of the X axis to 150.
300 Sets the maximum scale value of the X axis to 300.
ALL Displays all data.
3. Display Description and Operation Procedure 16
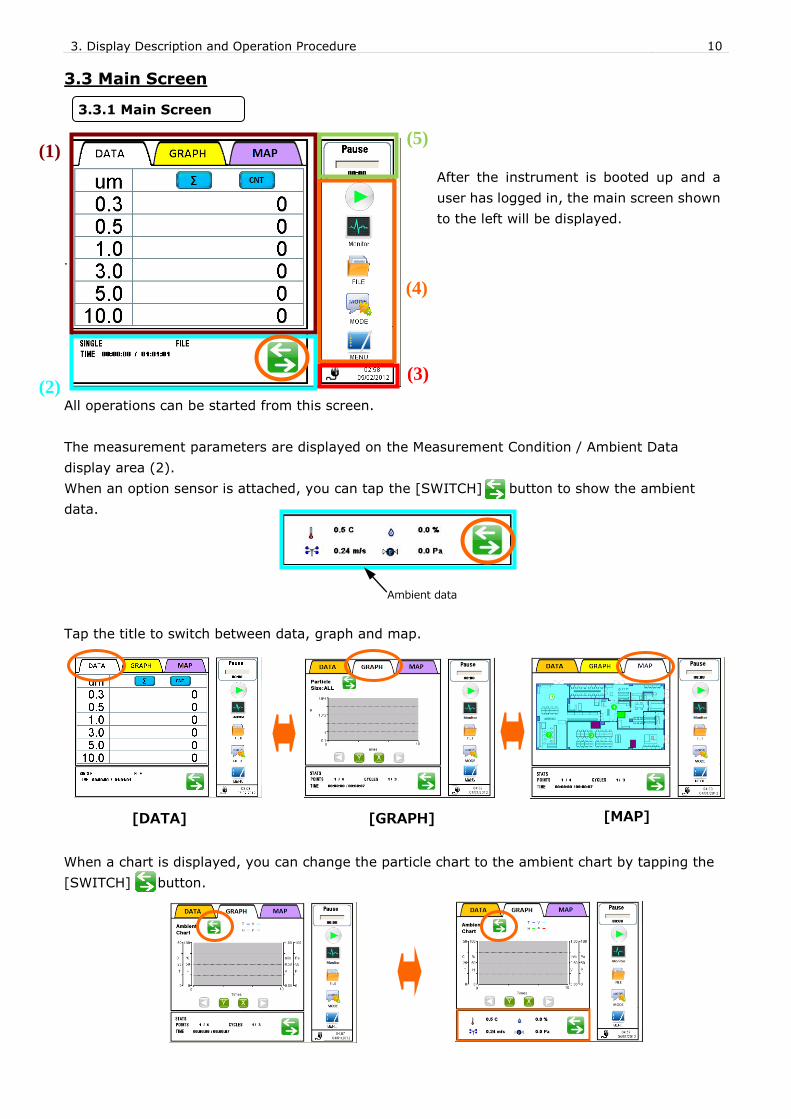
3.3.2 Screen Change – Main Screen
MONITOR
MODE
RETURN
MONITOR
START
STOP
MENU
EXIT
FILE
CLOSE

3. Display Description and Operation Procedure 17
<Measurement Procedures>
To select the measurement mode or conduct measurement settings when the User Authentication
function is activated, a user needs to have the authorization for Change Measurement Mode.
In addition, User Authentication is required.
MODE Screen
1. Tap [MODE] on the
Main Screen.
2. Configure the measurement conditions on
the MODE screen.
Select a desired measurement mode from
the MODE screen and tap [RETURN].
3. Tap [START] on the Main
Screen.
Main Screen Main Screen

3. Display Description and Operation Procedure 18
3.4 MONITOR
Tap [MONITOR] on the main screen to start
monitoring. Sampling for a measurement
will start in 10 seconds after the pump starts
operating.
* Note that the instrument is capable of
180 hours of continuous operation.
While measuring, tap [MONITOR (STOP)]
again. A dialog will be displayed asking you
if you want to stop monitoring. Tap [Yes] to
stop monitoring.
Note that you cannot save measurement
data or display the chart when you are
monitoring in this mode.

3. Display Description and Operation Procedure 19
3.5 MODE
Tap [MODE] to display the mode selection window.
*A User needs to have the
authorization (Change Measurement
Mode) to change measurement mode.
In the Mode setting screen you can
configure measurement settings in each
mode.
Select a mode from below and tap it;
“SINGLE”,“CONTINUOUS”,“INTERVAL”,
“STATS”,“STANDARD”,”PRESET”,
“REMOTE”.
You can set items such as INTERVAL,
SAMPLE T., CYCLES, MANUAL STOP, AUTO
SAVE, AUTO PRINT and START DELAY.
Please note that the setting items vary
depending on the measurement mode.
3.5.1 SINGLE
[Measurement Flow]
Perform a measurement once within the pre-set time frame.
Example: If the setting is as follows:
INTERVAL: N/A
SAMPLE T.: 00:00:15
CYCLES: N/A
A 15 second sampling is performed.
* Delay Time: Set Delay Time in START DELAY screen (Refer to 3.8.1 Measuring).
Sampling Time
(15sec)
Start Measurement
Finish
Measurement
Wait Time
Pump ON
Delay Time
10 sec
Wait Time
*Note that the instrument is capable of 180 hours
of continuous operation in every measurement
mode.

3. Display Description and Operation Procedure 20
[Delay Time]
You can set Delay Time in the START DELAY screen. Please refer to 3.8.1 Measuring for details.
Below is a breakdown of the Wait Time.
Did you set Delay Time?
Counting down Delay time
Display "Waiting"
Is Pump working?
Pump is turned onDisplay
"Preparing"
Measurementstarts
10 sec to go?
Display "Measuring"
Is Pump working?
Pump is turned on&
Wait for 10 sec
Display "Preparing"
Wait for 10 sec
YES
NO
YES
NO NO
YES
NO
YES

3. Display Description and Operation Procedure 21
[Measurement Settings]
Tap [SINGLE] to open the [MEASURE SETTING] dialogue box.
[SAMPLE T.] (Sampling Time)
Tap the entry field (a) to display a numeric
keypad.
Enter “hours”, “minutes” and “seconds” on the
numeric keypad and tap [OK] (b).
Check “AUTO SAVE” to store the data
automatically.
Check “AUTO PRINT” to print the data
automatically.
Check “START DELAY” to use a delay time
prior to a measurement.
Check “Set time” to set the time when you want to start a
measurement.
Tap [OK] (c) to save and activate the settings
(User Authentication required).
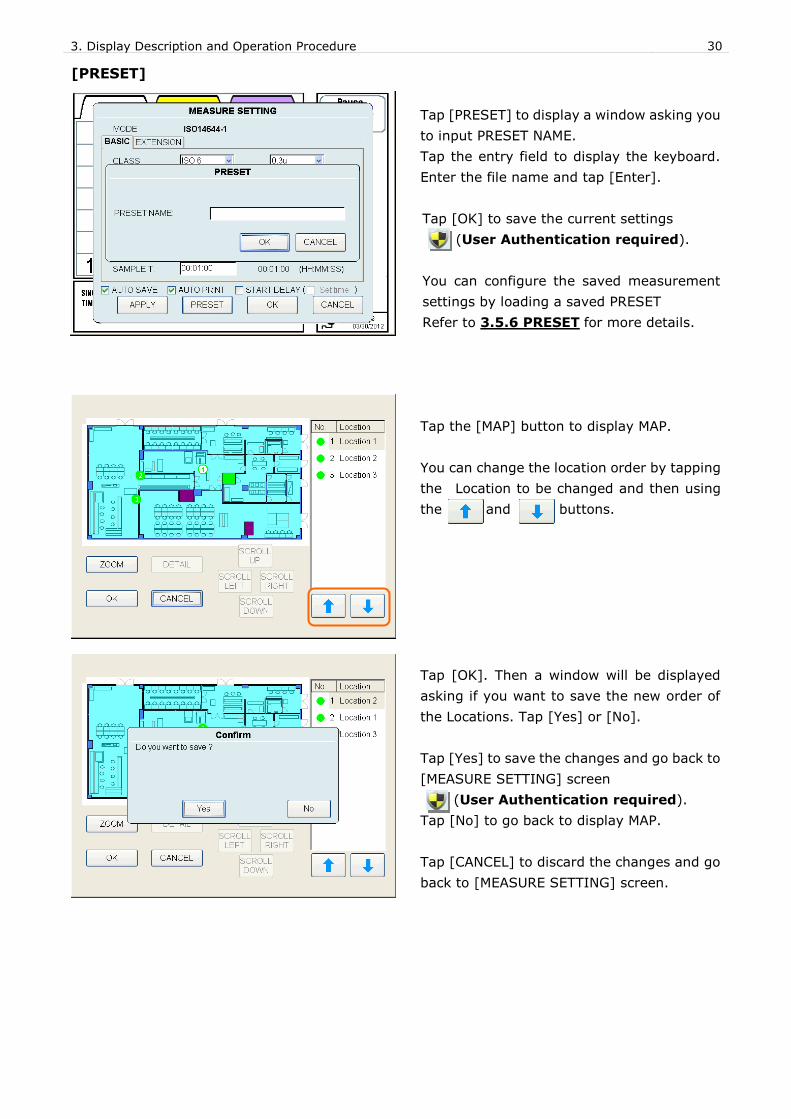
[PRESET]
Tap [PRESET] (d) on [MEASURE SETTING] dialog box to display a window asking you to input
PRESET NAME.
Tap the entry field (e) to display the keyboard. Enter the file name and tap [Enter] (f).
Tap [OK] to save the current settings (User Authentication required).
* In the future you can automatically load the configuration saved here as a PRESET. Refer to 3.5.6
PRESET.
(b)
(a)
(c)
(d)
(e)
(f)

3. Display Description and Operation Procedure 22
3.5.2 CONTINUOUS
[Measurement Flow]
Start/Stop measuring manually.
Example: If the setting is as follows:
INTERVAL : N/A
SAMPLE T. : N/A
CYCLES : N/A
A continuous measurement is performed until you manually stop it.
[Measurement Settings]
Check “AUTO SAVE” to store the data
automatically.
Check “AUTO PRINT” to print the data
automatically.
Check “START DELAY” to use a delay time
prior to a measurement.
Check “Set time” to set the time when you
want to start a measurement.
Tap [OK] to save and activate the current
settings (User Authentication
required).
[PRESET]
Tap [PRESET] to display a window asking you
to input “PRESET NAME”.
Tap the entry field to display the keyboard.
Enter the file name and tap [Enter].
Tap [OK] to save the current settings
(User Authentication required).
* In the future you can load the configuration
saved here as a PRESET. Refer to 3.5.6
PRESET.
Sampling Time
Start Measurement
Finish Measurement
Wait Time
STOP
<Input PRESET NAME>

3. Display Description and Operation Procedure 23
3.5.3 INTERVAL
[Measurement Flow]
Configure INTERVAL, SAMPLE T and CYCLES, and repeat measuring.
Example: If the setting is as follows:
INTERVAL: 00:01:00
SAMPLE T.: 00:00:15
CYCLES: 20
A total of 20 measurements are performed at one minute intervals.
Note: Sampling time is 15 seconds and standby time is 45 seconds.
Measurement Flow
If the time period between two samplings is 10 seconds or longer, the pump will be turned OFF after
a sampling is finished. Then the pump will be turned ON again 10 seconds before the next sampling
starts.
[Measurement Settings]
You can set INTERVAL, SAMPLE T., CYCLES and
MANUAL STOP.
To set INTERVAL and SAMPLE T, tap the entry
field to display a numeric keypad. Enter “hours”,
“minutes” and “seconds”, and tap [OK].
Tap the entry field for CYCLES to display a
numeric keypad. Tap the value you want to
enter and tap [Enter].
Check “MANUAL STOP” to continue measuring until you manually stop it regardless of the CYCLES
setting.
Check “AUTO SAVE” to store the data automatically.
Check “AUTO PRINT” to print the data automatically.
Check “START DELAY” to use a delay time prior to a measurement.
Check “Set time” to set the time when you want to start a measurement.
Tap [OK] to save and activate the settings (User Authentication required).
Interval
(1 min)
Sampling Time (15sec)
The 1st Measurement The 2nd Measurement The 20th Measurement
Total Time: 19min 15sec
Start Measurement
Finish Measurement
Wait Time
Interval
(1 min)
Sampling Time (15sec)
Sampling Time (15sec)

3. Display Description and Operation Procedure 24
[PRESET]
Tap [PRESET] to display a window asking you to
input “PRESET NAME”.
Tap the entry field to display the keyboard.
Enter the file name and tap [Enter].
Tap [OK] to save the current settings
(User Authentication required).
* In the future you can automatically load the
configuration saved here as a PRESET. Refer
to 3.5.6 PRESET.
<Input PRESET NAME>

3. Display Description and Operation Procedure 25
3.5.4 STATS
[Measurement Flow]
Configure SAMPLE T., CYCLES and SAMPLE POINT, and repeat measuring.
In STATS mode, INTERVAL and SAMPLE T. are configured with the same value. Measurements are
repeated according to the CYCLES settings in each SAMPLE POINT.
[Measurement Settings]
If there are any MAP files saved or any MAP is
saved on the USB flash drive, they are displayed in
the dropdown list of SCHEDULE. When measuring
by using a MAP file, select a FILE from the list.
Tap the entry field for “SAMPLE T”. to display a
numeric keypad. Enter the values for hours,
minutes and seconds on the numeric keypad and
tap [OK].
Tap the entry field of “CYCLES” to display a
numeric keypad. Enter a value and tap [ENTER].
Once a MAP file is loaded, you cannot change the
settings for SAMPLE POINT. (The configured
number of measurement points in the MAP file
will be applied.)
When a MAP file is not loaded, tap an entry field of
“SAMPLE POINT” to display a numeric keypad.
Enter a value and tap [ENTER].
[PRESET]
Tap “PRESET” to display a window asking you to
input “PRESET NAME”.
Tap the entry field to display the keypad. Enter
the file name and tap [Enter].
Tap [OK] to save the current settings
(User Authentication required).
* In the future you can automatically load the
configuration saved here as a PRESET. Refer to
3.5.6 PRESET.
Check “AUTO SAVE” to store the data
automatically.
Check “AUTO PRINT” to print the data
automatically.
Check “START DELAY” to use a delay time
prior to a measurement.
Check “Set time” to set the time when you
want to start a measurement.
Tap [OK] to save and activate the settings
(User Authentication required).
<MEASURE SETTING>
<Input PRESET NAME>

3. Display Description and Operation Procedure 26
When a MAP file is specified in [SCHEDULE]
on the [MEASURE SETTING] screen, tap
[MAP] to display a MAP.
You can change the location order.
Tap the Location to be changed.
Use the and buttons to change
the order.
Tap [OK]. Then a window will be displayed
asking if you want to save the new order of the
Location.
Tap [Yes] or [No] (User Authentication
required).
Tap [Yes] to set the changes and go back to
[MEASURE SETTING] screen.
Tap [No] to go back to MAP screen.
Tap [CANCEL] to discard the changes and go
back to [MEASURE SETTING] screen.

3. Display Description and Operation Procedure 27
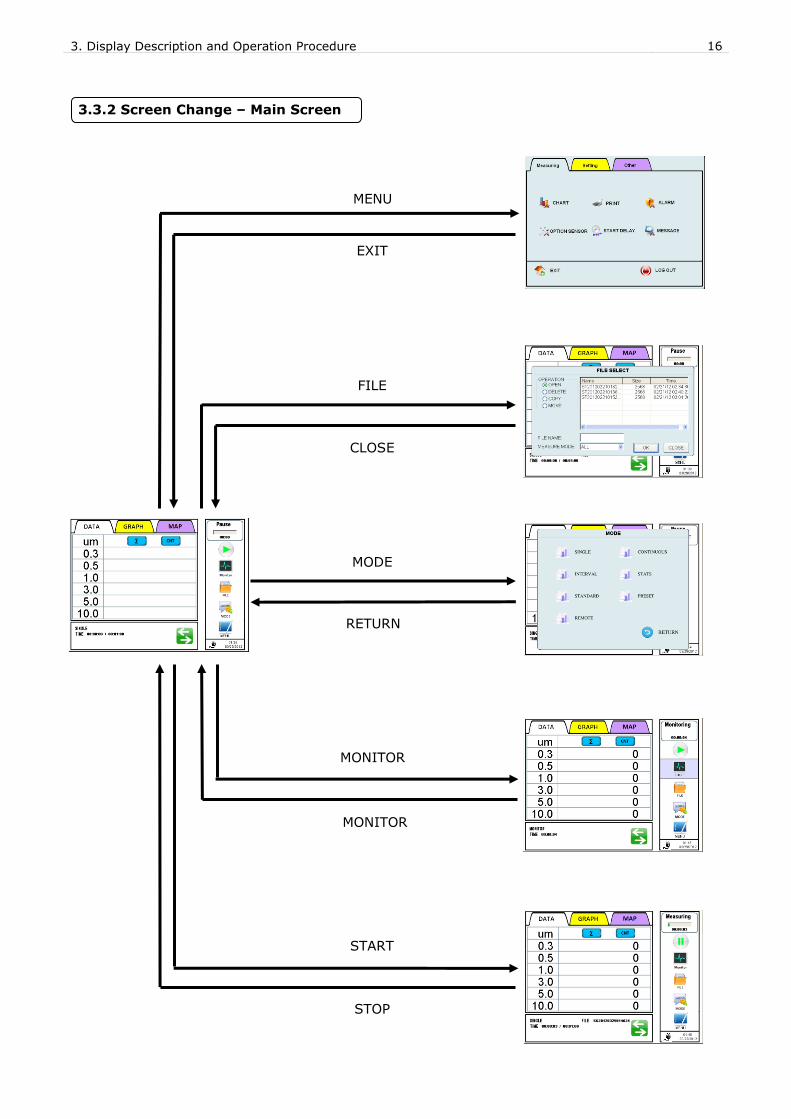
3.5.5 STANDARD
[Measurement Flow]
You can perform a measurement which complies with 7 measurement standards as follows:
- ISO14644-1:2015 (International Standard) Refer to ISO14644-1. 2015
- ISO14644-1:1999 (International Standard) Refer to ISO14644-1. 1999
- ISO 14644-1 SEQUENTIAL SAMPLING (International Standard) Refer to ISO14644-1. 2015
- FEDERAL STANDARD (m) (The US Standard) Refer to FEDERAL STANDARD 209E.
- FEDERAL STANDARD (ft) (The US Standard)
- BRITISH STANDARD (British Standard) Refer to BS-5295.
- EU GMP (European Standard) Refer to EU GMP.
- GB/T 16292-1996 (Chinese Standard) Refer to GB/T 16292-1996.
Tap [STANDARD] to open the SELECT
STANDARD window to select a
measurement standard to be applied in
the STANDARD mode.
Select and set one of the above
measurement standards.
Tap [OK] to display the
MEASURE SETTING screen to
configure measurement
settings.
Tap [CANCEL] to go back to
[MODE] screen.
【ISO14644-1 1999】
[Measurement Settings]
The setting items for CLASS and items in the
EXTENSION tab varies depending on the
STANDARD settings you configured.
In the BASIC tab;
Configure the settings of CLASS, SCHEDULE,
ROOM, LOCATION, CYCLES,SAMPLE T and
PARTICLE SIZE.
.
3. Display Description and Operation Procedure 28
CLASS:
Set the cleanliness level of the cleanroom to be measured. By configuring
this setting, the appropriate particle size for the configured CLASS can be
selected.
SCHEDULE: You can load a MAP file. If you select the file, the MAP function will be
activated and the MAP will be displayed.
ROOM: Input the size of the room to be measured.
LOCATION: Input the number of measurement points.
CYCLES: Input the measurement cycles.
SAMPLE T.: Input the sampling time.
PARTICLE SIZE: Select one particle size which will be judged in EVALUATION DATA.
【ISO14644-1 2015】
[Measurement Settings]
(for the measurement standard
ISO14644-1:2015 + CLASS ISO1, ISO2,
ISO3, ISO4, or ISO9)
The setting items for CLASS and items in the
EXTENSION tab varies depending on the
STANDARD settings you configured.
In the BASIC tab;
Configure the settings of CLASS, SCHEDULE,
ROOM, LOCATION, CYCLES and SAMPLE T
PARTICLE SIZE.
CLASS:
Set the cleanliness level of the cleanroom to be measured. After configuring
this setting, the appropriate particle size for the configured CLASS can be
selected.
Select the particle size(s) to be printed out. The setting here has
precedence over the print setting on page 54.
SCHEDULE: You can load a MAP file. If you select the file, the MAP function will be
activated and the MAP will be displayed.
ROOM: Input the size of the room to be measured.
LOCATION: Input the number of measurement points.
CYCLES: Input the measurement cycles.
SAMPLE T.: Input the sampling time.
PARTICLE SIZE: Select one or multi particle size which will be judged in EVALUATION DATA.
You can set [SAMPLE T.], [CYCLES], and [SAMPLE POINT] to repeat measurements.
INTERVAL and SAMPLE T. are configured with the same value. Measurements are repeated
according to the CYCLES setting in each SAMPLE POINT.
After the all the measurements are finished, the results are evaluated according to the selected
standard.

3. Display Description and Operation Procedure 29
The numeric value shown next to the each entry field is the recommended value based on CLASS;
ROOM and AIR DIRECTION (in EXTENTION tab). Tap [SET] to use the recommended value.
In the EXTENTION tab, configure the following;
- ROOM STATUS
- AIR DIRECTION (only for Federal Standard)
- COMMENT
- ID
- COMPANY
[AIR DIRECTION]
- Select unidirectional when wind direction is
constant.
- Select nonunidirectional when wind direction
is not constant.
(※Only FEDERAL STANDARD (m)、FEDERAL STANDARD
(ft)、GB/T 16292-1996 mode are settable)
[ROOM STATUS]
Select either as-built, as-rest or operational.
- Select as-built when the cleanroom is setting up.
- Select as-rest when the cleanroom function is off.
- Select operational when the cleanroom function is
on.
[COMMENT]
Tap the entry field to display a keypad. Enter
comment and tap [Enter].
[ID]
Tap the entry field to display a keypad. Enter ID and
tap [Enter].
[COMPANY]
Tap the entry field to display a keypad. Enter
company name and tap [Enter].
Tap [APPLY] to save the new settings.
(User Authentication required).
Tap [OK] to save the new settings and return to
MODE screen.
(User Authentication required).
Tap [CANCEL] to discard the changes and close the
window.
Check “AUTO SAVE” to store the data automatically.
Check “AUTO PRINT” to print the data automatically.
Check “START DELAY” to use a delay time prior to a
measurement.
Check “Set time” to set the time when you want to start
a measurement.
3. Display Description and Operation Procedure 30
[PRESET]
Tap [PRESET] to display a window asking you
to input PRESET NAME.
Tap the entry field to display the keyboard.
Enter the file name and tap [Enter].
Tap [OK] to save the current settings
(User Authentication required).
You can configure the saved measurement
settings by loading a saved PRESET
Refer to 3.5.6 PRESET for more details.
Tap the [MAP] button to display MAP.
You can change the location order by tapping
the Location to be changed and then using
the and buttons.
Tap [OK]. Then a window will be displayed
asking if you want to save the new order of
the Locations. Tap [Yes] or [No].
Tap [Yes] to save the changes and go back to
[MEASURE SETTING] screen
(User Authentication required).
Tap [No] to go back to display MAP.
Tap [CANCEL] to discard the changes and go
back to [MEASURE SETTING] screen.

3. Display Description and Operation Procedure 31
3.5.6 PRESET
Select [PRESET] on the mode screen to
display [CALL PRESET] screen.
The settings in the selected PRESET file will
be reflected in the MODE and Measurement
Settings.
*A User needs to have the
authorization (Delete Files) to delete
[PRESET] files.
The first two letters of the file name indicates
the mode type.
SG: SINGLE MEASUREMENT
CO: CONTINUOUS MEASUREMENT
IN: INTERVAL MEASUREMENT
ST: STATS MEASUREMENT
IS: STANDARD MEASUREMENT
Select the item that you want to load or delete.
Tap [OK] to load the selected PRESET settings
into MODE and MEASURE SETTING
(User Authentication required).
Tap [DELETE] to delete the selected PRESET
setting (User Authentication required).
3.5.7 REMOTE
Tap [REMOTE] on the [MODE] screen to change to
[REMOTE MODE].
Change to [REMOTE MODE] when performing a measurement from a PC connected via Ethernet
using the remote sampling software.
Tap [RETURN] to stop the [REMOTE MODE] and return to [MODE] screen.

3. Display Description and Operation Procedure 32
3.6 START
3.6.1 SINGLE, CONTINUOUS, INTERVAL
Tap [START] on the main screen to start
a measurement in accordance with the
settings configured in 3.5 MODE .
If “START DELAY” is NOT checked in
[MODE] setting:
Upon tapping [START] , the pump will
begin running. After the pump has run for
10 seconds to stabilize the flow rate, the
measurement will begin.
If only “START DELAY” is checked in
[MODE] setting:
Upon tapping [START] , the count of
the Delay Time begins. During the last 10
seconds of that Delay Time the pump will
run to stabilize, after which the
measurement will begin.
If “START DELAY” and “Set time”
are checked in [MODE] setting:
Upon tapping [START] , “Input START
TIME” dialog box will be displayed. Enter
the time when you want to start
measuring and tap [OK]. During the last
10 seconds of the [Time left] time the
pump will run to stabilize, after which the
measurement will begin.
Tap [CANCEL] to stop measuring and go
back to the menu screen.
If you fail to press [OK] after entering
“START TIME”, and the entered START
TIME arrives, the instrument will increase
the start time in 10 minute intervals until
you press [OK].
Tap the [STOP] button to stop a
measurement.
<Input START TIME dialog box>

3. Display Description and Operation Procedure 33
Display screen example in each Measurement MODE.
<SINGLE MODE>
<CONTINUOUS MODE>
*Tap [STOP] to stop a measurement in CONTINUOUS mode.
<INTERVAL MODE>
* After a measurement in INTERVAL mode is finished, the measurement results will be displayed.
After measurement is finished
To display the chart tap button while measuring.

3. Display Description and Operation Procedure 34
3.6.2 STATS
- When not using a MAP file
Tap [START] on the main screen to
display [CONFIRM] screen.
A measurement will start based on the
setting configured in 3.5 MODE .
Tap [START] to start a measurement.
If "START DELAY" is NOT checked in
[MODE] setting:
Upon tapping [START], the pump will
begin running. After the pump has run for
10 seconds to stabilize the flow rate, the
measurement will begin
If only "START DELAY" is checked in
[MODE] setting:
Upon tapping [START], the count of the
Delay Time begins. During the last 10
seconds of that Delay Time the pump will
run to stabilize, after which the
measurement will begin.
If "START DELAY" and "Set time"
are checked in [MODE] setting:
Upon tapping [START], [Input START
TIME] dialog box will be displayed. Enter
the time when you want to start
measuring and tap [OK]. During the last
10 seconds of the [Time left] time the
pump will run to stabilize, after which the
measurement will begin.
Tap [CANCEL] to stop measuring and go
back to the menu screen.
If you fail to press [OK] after entering
"START TIME", and the entered START
TIME arrives, the instrument will increase
the start time in 10 minute intervals until
<Input START TIME dialog box>
3. Display Description and Operation Procedure 35
you press [OK].
Tap [STOP] to stop a measurement.
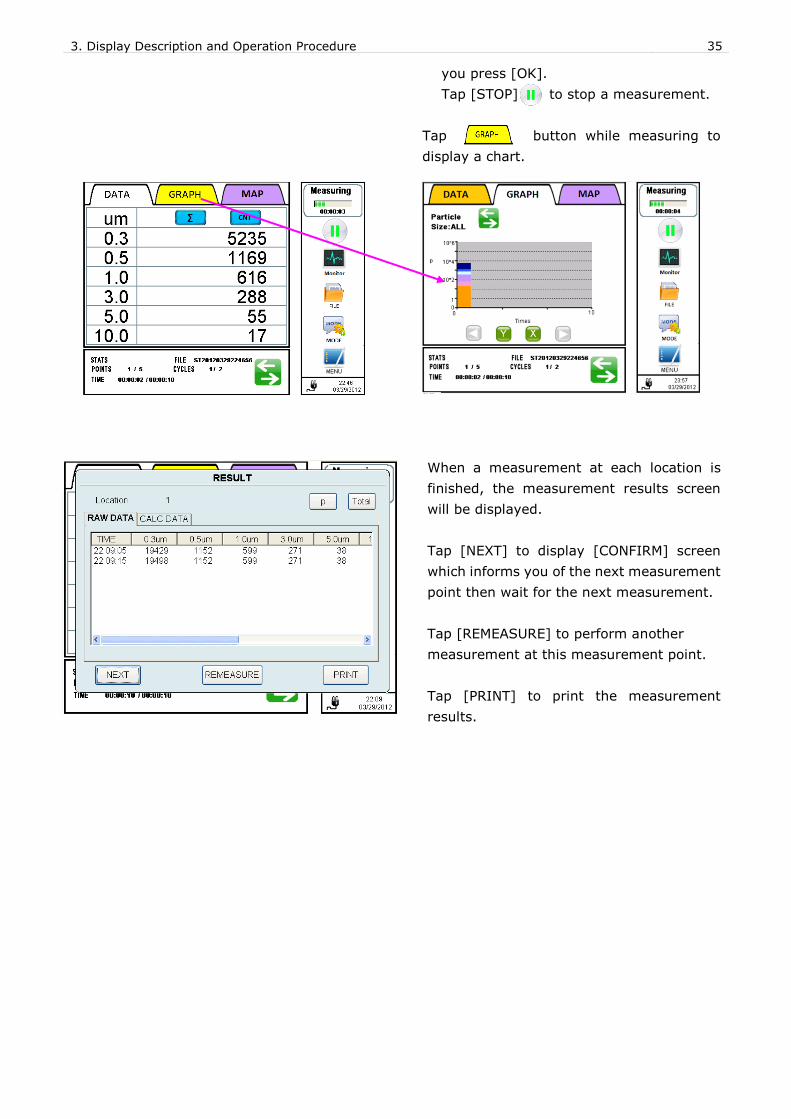
Tap button while measuring to
display a chart.
When a measurement at each location is
finished, the measurement results screen
will be displayed.
Tap [NEXT] to display [CONFIRM] screen
which informs you of the next measurement
point then wait for the next measurement.
Tap [REMEASURE] to perform another
measurement at this measurement point.
Tap [PRINT] to print the measurement
results.
IMAGE will be changed.

3. Display Description and Operation Procedure 36
When all the measurements are finished,
the final measurement results screen will be
displayed.
You can view the results of a certain
LOCATION by selecting a Location from the
dropdown list of [Location].
Tap [CLOSE] to end the measurement.
Tap [REMEASURE] to perform a
measurement again at the last point. Tap
[PRINT] to print measurement results of the
last measurement point.
Every time you tap this button, the
particle unit changes in the order of:
p p/cf p/m³.
Use this button to select either
Total display or Single display.
(Only applicable for RAW DATA)

3. Display Description and Operation Procedure 37
- When using a MAP file
In STATS mode, a MAP will be displayed upon
tapping [START] .
The map is displayed by data transfer from a
PC or using MAP file in a USB flash drive.
(If a MAP is set from a USB flash drive, insert
the USB flash drive and tap [START] to start a
measurement.
If the USB flash drive storing a MAP is not
inserted, a measurement cannot be started.)
A measurement will start based on the
settings configured in 3.5 MODE .
Select a Location and tap [START] to start a
measurement.
Tap [STOP] to stop a measurement.
Tap [ZOOM] to enlarge a MAP.
(Press [NORMAL] to return to viewing the
entire MAP when a map is enlarged.)
Select a Location and tap [DETAIL] to view
the image of the selected Location.
(You need to register the image for the
[DETAIL] view when creating a Schedule
using the provided PC application.)
When a MAP is enlarged, [SCROLL UP],
[SCROLL DOWN], [SCROLL LEFT] and
[SCROLL RIGHT] buttons are activated,
which enables you to move the MAP from the
left to right and up to down.
The color of a location changes from green to
red once a measurement is done.
3. Display Description and Operation Procedure 38
Select a Location and tap [DETAIL] to view
the image of the selected Location. (The
image of the Location needs to be registered
when creating a Schedule using the provided
PC application.)
Tap [START] on the MAP to start a
measurement.
If "START DELAY" is NOT checked in
[MODE] setting:
Upon tapping [START], the pump will
begin running. After the pump has run for
10 seconds to stabilize the flow rate, the
measurement will begin.
If only "START DELAY" is checked in
[MODE] setting:
Upon tapping [START], the count of the
Delay Time begins. During the last 10
seconds of that Delay Time the pump will
run to stabilize, after which the
measurement will begin.
If "START DELAY" and "SET time"
are checked in [MODE] setting:
Upon tapping [START], [Input START
TIME] dialog box will be displayed. Enter
the time when you want to start
measuring and tap [OK]. During the last
10 seconds of the [Time left] time the
pump will run to stabilize, after which the
measurement will begin.
Tap [CANCEL] to stop measuring and go
back to the main screen.
If you fail to press [OK] after entering
"START TIME", and the entered START
TIME arrives, the instrument will increase
the start time in 10 minute intervals until
you press [OK].

3. Display Description and Operation Procedure 39
Tap button while measuring to
display a chart.
Tap [STOP] to stop a measurement.
When a measurement at each location is finished, the measurement results screen will be
displayed.
Tap [NEXT] to display the MAP again.
Then the instrument waits for the next
measurement point to be selected.
Tap [REMEASURE] to perform a
re-measurement at the current location.
Tap [PRINT] to print the measurement
results.
The color of a location changes from green to
red once a measurement is done.
<Screen while measuring>

3. Display Description and Operation Procedure 40
When all the measurements are finished, the final measurement results screen will be
displayed.
You can view the results of a certain
LOCATION POINT by selecting Location from
the dropdown list of [LOCATION].
Tap [CLOSE] to end the measurement.
Tap [REMEASURE] to perform a
measurement again at the last point.
Tap [PRINT] to print measurement results of
the last measurement point.
Every time you tap this button,
the particle unit changes in the
order of:
p -> p/cf -> p/m³.
Use this button to select either
Total display or Single display.
(Only applicable for RAW DATA)

3. Display Description and Operation Procedure 41
3.6.3 STANDARD
- When not using a MAP file
Tap [START] to display [CONFIRM]
screen.
A measurement will start based on the
settings configured in 3.5 MODE.
Tap [START] to start a measurement.
If "START DELAY" is NOT checked in
[MODE] setting:
Upon tapping [START], the pump will
begin running. After the pump has run for
10 seconds to stabilize the flow rate, the
measurement will begin.
If only "START DELAY" is checked in
[MODE] setting:
Upon tapping [START], the count of the
Delay Time begins. During the last 10
seconds of that Delay Time the pump will
run to stabilize, after which the
measurement will begin.
If "START DELAY" and "Set time"
are checked in [MODE] setting:
Upon tapping [START], “Input START
TIME” dialog box will be displayed. Enter
the time when you want to start
measuring and tap [OK]. During the last
10 seconds of the [Time left] time the
pump will run to stabilize, after which the
measurement will begin.
Tap [CANCEL] to stop measuring and go
back to the menu screen.
If you fail to tap [OK] after entering
"START TIME", and the entered START
TIME arrives, the instrument will increase
the start time in 10 minute intervals until
you press [OK].
<Input START TIME dialog box>
<CONFIRM window>

3. Display Description and Operation Procedure 42
When a measurement at each location is finished, the measurement results screen will be
displayed.
Tap [NEXT] to display a [CONFIRM] window
informing you of the next measurement point,
and wait for the next measurement.
Tap [REMEASURE] to perform a
re-measurement.
Tap [STOP] to stop a measurement.
Tap [PRINT] to print a measurement result.
Tap [START] on the [CONFIRM] screen to
start a measurement.
Tap [STOP] to stop a measurement.
Tap button while measuring to display
a chart.
Tap [STOP] to stop a measurement.
<CONFIRM window>
<Screen while measuring>

3. Display Description and Operation Procedure 43
When all the measurements are finished, the final measurement results screen will be
displayed.
You can view the result of a certain
LOCATION POINT by selecting Location from
the dropdown list.
Tap [EVAL] to display CLEAN ROOM
EVALUATION window.
Tap [REMEASURE] to perform a
re-measurement.
Tap [PRINT] to print a measurement result.
Tap [PRINT] to print a measurement result.
By selecting particle size you can change the
particle size of the data to be evaluated.
However, the status indicated by
RESULT is determined based on the particle
size selected in [MODE] settings.
Tap [CLOSE] to close the window.
<Measurement RESULT>
<CLEAN ROOM EVALUATION>

3. Display Description and Operation Procedure 44
- When using a MAP file
In STANDARD measurement tap [START]
to display a MAP.
The map is displayed by data transfer from a
PC or using MAP file in a USB flash drive.
(If a MAP is set from a USB flash drive, insert
the USB flash drive and tap [START] to start a
measurement.
If the USB flash drive storing a MAP is not
inserted, a measurement cannot be started.)
A measurement will start based on the
settings configured in 3.5 MODE .
Select a Location and tap [START] to start a
measurement.
Tap [STOP] to stop a measurement.
Tap [ZOOM] to enlarge a MAP.
(Press [NORMAL] to return to viewing the
entire MAP when a map is enlarged.)
When a MAP is enlarged, [SCROLL UP],
[SCROLL DOWN], [SCROLL LEFT] and
[SCROLL RIGHT] buttons are activated,
which enables you to move the MAP from the
left to right and up to down.

3. Display Description and Operation Procedure 45
Select a Location and tap [DETAIL] to view
the image of the selected Location. (The
image of the Location needs to be registered
when creating a Schedule using the provided
PC application.)
Tap [START] to start a measurement.
If "START DELAY" is NOT checked in
[MODE] setting:
Upon tapping [START], the pump will begin
running. After the pump has run for 10
seconds to stabilize the flow rate, the
measurement will begin.
If only "START DELAY" is checked in
[MODE] setting:
Upon tapping [START], the count of the
Delay Time begins. During the last 10
seconds of that Delay Time the pump will run
to stabilize, after which the measurement
will begin.
If "START DELAY" and "Set time" are
checked in [MODE] setting:
Upon tapping [START], [Input START TIME]
dialog box will be displayed. Enter the time
when you want to start measuring and tap
[OK]. During the last 10 seconds of the
[Time left] time the pump will run to
stabilize, after which the measurement will
begin.
Tap [CANCEL] to stop measuring and go
back to the main screen.
If you fail to press [OK] after entering
"START TIME", and the entered START TIME
arrives, the instrument will increase the
start time in 10 minute intervals until you
press [OK].
<Input START TIME dialog box>

3. Display Description and Operation Procedure 46
Tap button while measuring to
display a chart.
When a measurement at each location is
finished, the measurement results screen
will be displayed.
In [RAW DATA] tab, measurement data
will be displayed.
In [CALC DATA] tab, data of minimum
(MIN), maximum (MAX) and average
(AVE) measurements will be displayed.
Tap [NEXT] to display the MAP again and
wait for the next point to be selected.
Tap [REMEASURE] to perform a
re-measurement.
Tap [STOP] to stop a measurement.
Tap [PRINT] to print measurement
results.
The color of a location changes from green
to red once a measurement is done.
<Screen while measuring>

3. Display Description and Operation Procedure 47
When all the measurements are finished,
the final measurement results screen will
be displayed.
You can view the result of a certain
LOCATION POINT by selecting Location
from the dropdown list.
Tap [EVAL] to display [CLEAN ROOM
EVALUATION] screen.
Tap [REMEASURE] to perform a
re-measurement at the current location.
Tap [PRINT] to print a measurement
result.
By selecting particle size you can change
the particle size of the data to be
evaluated. However, the status indicated
by RESULT is determined based on the
particle size selected in the [MODE]
setting.
Tap [Close] to close the window.
<CLEAN ROOM EVALUATION>

3. Display Description and Operation Procedure 48
3.6.4 Interlocking Operations
Tap a particle size on the screen to display
the data for the particular particle size.
Tap to return to displaying data for all 6
particle sizes.
<SINGLE and CONTINUOUS mode>
Tap to switch to displaying a
chart while measuring.
A particle-size-based histogram will be
displayed in SINGLE and CONTINUOUS
modes.
Tap again to return to displaying
data for all 6 particle sizes.
Every time you tap the particle
unit, it changes in the order of: CNT /cf /m3.

3. Display Description and Operation Procedure 49
<INTERVAL, STATS and STANDARD modes>
A time series chart will be displayed in
INTERVAL, STATS and STANDARD
modes.
Tap to switch to the Single display.
Tap to return to the Total display.
For details on Total display and Single display,
please refer to P10 Icons in the Status
Display.

3. Display Description and Operation Procedure 50
Status of Measurement RESULT display
There are six indications for STATUS;
“OK”, “F”, “L”, “O”, “V” and “B”.
Each means;
OK: No error
F: FLOW error
L: LD error
O: OPTION SENSOR error
V: OVER error
(The count per second exceeds
the maximum detectable
concentration)
B: BATTERY error
Message when printing
While data is being printed, the message
shown to the left will be displayed.
If you tap [STOP], you can cancel the
printing. However, the data already
transmitted to the printer will be printed.
3. Display Description and Operation Procedure 51
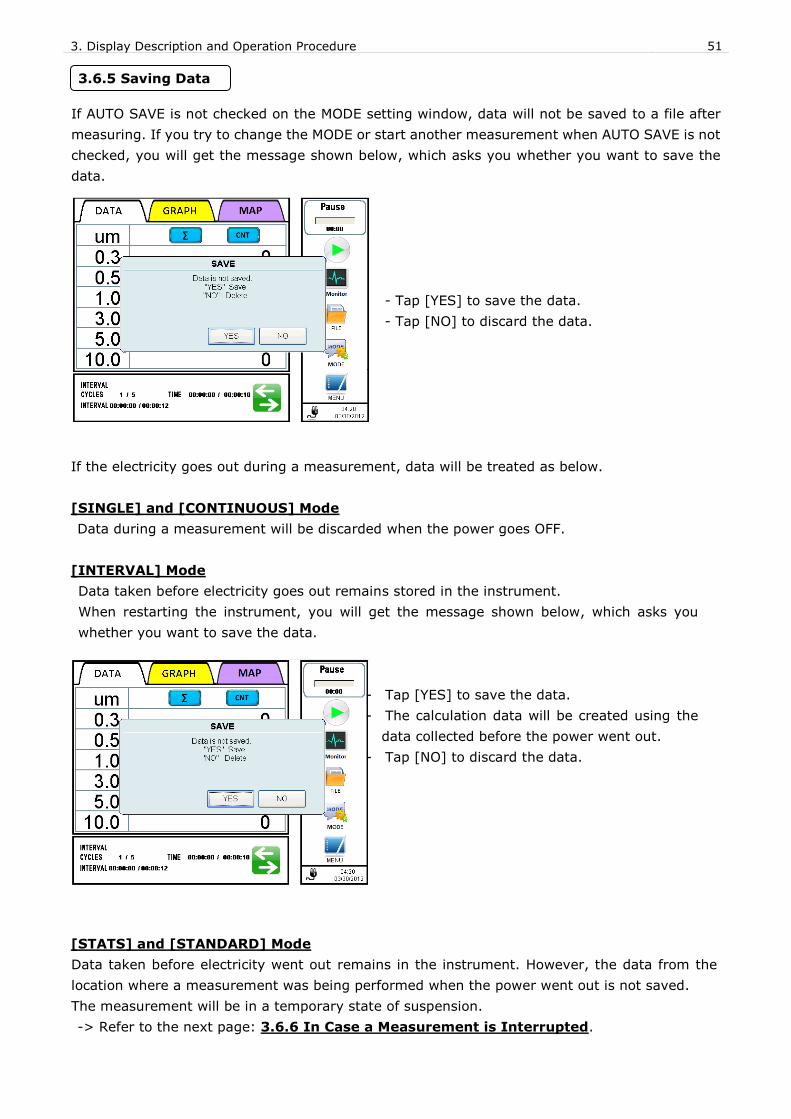
3.6.5 Saving Data
If AUTO SAVE is not checked on the MODE setting window, data will not be saved to a file after
measuring. If you try to change the MODE or start another measurement when AUTO SAVE is not
checked, you will get the message shown below, which asks you whether you want to save the
data.
- Tap [YES] to save the data.
- Tap [NO] to discard the data.
If the electricity goes out during a measurement, data will be treated as below.
[SINGLE] and [CONTINUOUS] Mode
Data during a measurement will be discarded when the power goes OFF.
[INTERVAL] Mode
Data taken before electricity goes out remains stored in the instrument.
When restarting the instrument, you will get the message shown below, which asks you
whether you want to save the data.
- Tap [YES] to save the data.
- The calculation data will be created using the
data collected before the power went out.
- Tap [NO] to discard the data.
[STATS] and [STANDARD] Mode
Data taken before electricity went out remains in the instrument. However, the data from the
location where a measurement was being performed when the power went out is not saved.
The measurement will be in a temporary state of suspension.
-> Refer to the next page: 3.6.6 In Case a Measurement is Interrupted.

3. Display Description and Operation Procedure 52
3.6.6 In Case a Measurement is Interrupted
If you stop a measurement in STATS or STANDARD mode before all measurements complete, and
there is more than one location where a determined set of measurements is finished, the
instrument will be in a temporary state of suspension. In this case, the Operating Status Display
indicates "Suspended".
The instrument will remain in a temporary state of suspension until a measurement restarts or
completes. During this period you cannot change the measurement mode or MODE settings.
[STATS]
If you start a measurement when the instrument is in a temporary state of suspension, the
message below will be displayed, asking you if you want to restart a measurement or not.
Tap [YES] to resume measuring from the next
LOCATION.
If you tap [NO], you will get a message asking if you
want to save the data or not.
Tap [CANCEL] to go back to the main screen.
If you tap [NO] on the window above, a
confirmation window will be displayed
asking if you want to save the data or not.
Tap [YES] to save the data.
Tap [NO] to discard the data.
If you try to switch the mode, the message below will be displayed, indicating that the instrument
is in a temporary state of suspension.
Tap [OK].
You cannot change the mode when a measurement is
in a temporary state of suspension.

3. Display Description and Operation Procedure 53
[STANDARD]
If you start a measurement when the instrument is in a temporary state of suspension, the
message below will be displayed, asking you if you want to restart a measurement or not.
Tap [YES] to resume measuring from the next
LOCATION.
Tap [NO] to display CLEAN ROOM EVALUATION. Then
the measurement will be completed.
Tap [PRINT] to print out the result.
Tap [CANCEL] to close the CLEAN ROOM
EVALUATION window.
If you try to switch the mode, the message below will be displayed, indicating that the instrument
is in a temporary state of suspension.
Tap [OK].
You cannot change the mode when a measurement is
in a temporary state of suspension.

3. Display Description and Operation Procedure 54
3.7 FILE Select [FILE] on the main screen. Then a screen
shown to the left will be displayed. You can display,
print, delete, copy and move data here.
The file name consists of an abbreviation of the
Measurement mode + Date + Time.
The measurement mode abbreviations are:
(a) To display names of every saved file,
check [OPEN]. (When this screen is open,
[OPEN] is selected by default.)
(b) Use [MEASURE MODE] to narrow down the files
to be displayed.
(c) Tap the file name that you want to display, then
the file name will be displayed in the box for
[FILE NAME]. Then tap [OK] to open the data
display screen as shown below.
Tap [CALC DATA] tab to display CALC result.
Tap [SETTING] tab to display the setting information.
(e) To delete the displayed file, tap [DELETE]. A dialog will be
displayed asking you if you want to delete it or not. Tap
[YES] to delete the file displayed.
(To delete files, a user needs to have
authorization to Delete Files, and User
Authentication is required)
(f) Tap [PRINT] to print the data.
(g) Tap [CLOSE] to close a window.
(h) In STATS mode and STANDARD mode, you can change the
data to be displayed by selecting LOCATION.
Data Display
(a)
(b)
(c)
SG: SINGLE FS: FEDERAL STANDARD CO: CONTINUOUS BS: BRITISH STANDARD IN: INTERVAL EC: EU GMP ST: STATS GB: GB/T IS: ISO
<CALC TAB DATA>
(e) (f) (g)
(h)
<SETTING TAB>
(e) (f) (g)
(h)
<RAW DATA TAB>
(h)
(e) (f) (g)

3. Display Description and Operation Procedure 55
(a) Select the [COPY] button to copy file and insert USB
flash drive to store the selected file(s). A check box
will be displayed at the beginning of each file name so
that you can check the file(s) that you want to copy.
(b) Use [MEASURE MODE] to narrow down the files to be
copied.
(c) Select the file(s) to copy and tap [OK] to save.
(User Authentication required)
*A User needs the authorization (Copy Files) to copy files.
Copied files are encrypted, and can be converted to text files with the provided user
management software.
(a) Select the [DELETE] button to delete files.
A check box will be displayed at the beginning of
each file name so that you can check the file(s) that
you want to delete.
(b) Use [MEASURE MODE] to narrow down the files to be
deleted.
(c) Select the file(s) that you want to delete and tap [OK]
to delete them.
(User Authentication required)
*For data protection purpose, files can be deleted only after they have been copied.
*A User needs the authorization (Delete Files) to delete files.
(c)
(c)
(a)
(a)
(b)
(b)
Copy Files
Delete Files

3. Display Description and Operation Procedure 56
(a) Select the [MOVE] button to move files from internal
data storage. Insert USB flash drive to store the
selected file(s). Select the dates of files to be moved.
A check box will be displayed at the beginning of each
file name so that you can check the file(s) that you
want to move.
(b) Use [MEASURE MODE] to narrow down the files to be
moved.
(c) Select the file(s) to be moved and tap [OK] to move
them.
(User Authentication required)
*After files are moved to the USB flash drive, they are deleted from
the internal data storage.
*A user needs authorization to both Copy Files and Delete Files to move files.
Move Files
(a)
(b)
(c)

3. Display Description and Operation Procedure 57
3.8 MENU
Select [MENU] on the main screen to display
the window.
*A user needs to have the
authorization (Access Control Panel)
to change the settings on the menu.
3.8.1 Measuring
In the Measuring window you can configure
the following settings;
- CHART
- ALARM
- OPTION SENSOR
- START DELAY
- MESSAGE
-

3. Display Description and Operation Procedure 58
· CHART SETTING
Configure the axis of the chart and range
settings.
For X Axis select either “10”, “20”, “50”,
“100”, “150” or “300”.
For Y Axis in PARTICLE tab select either
[LOG] or [LINEAR].
Select 1, 2, 3 or 4 to determine which of the
Y AXIS MAX values will be displayed on the
chart.
You can set 4 different max values each for
[LOG] and [LINEAR].
When you configure the chart settings as shown above, the chart will be as shown below.
X Axis:
MAX value set in the PARTICLE tab in the CHART SETTING
window is applied to the chart.
Tap the MAX value to change it.
(It changes in the order of “10”, “20”, “50”, “100”, “150”,
and “300”.)
Y Axis:
MAX value set in the
PARTICLE tab in the CHART
SETTING window is applied
to the chart.
Tap the MAX value to
change it.
(It changes in the order of
MAX settings 1, 2, 3, and 4.)
Y-axis in LINEAR scale
X-axis
Y-axis in LOG scale

3. Display Description and Operation Procedure 59
In the OPTION tab, configure the [MIN] and
[MAX] settings for each sensor.
For each sensor you can set three different
values.
Tap [APPLY] to save the values that are
currently displayed in the tab ( User
Authentication required). The window
remains open.
Tap [OK] to save the values and close the
window ( User Authentication
required).
Tap [CANCEL] to discard any changes you
have made to the values and close the
window. The previous values will be applied.
Select 1, 2 or 3 to determine which of the 3
value settings will be displayed on the chart.
When you configure the chart settings as shown above, the chart will be as shown below.
The MAX value set in the OPTION tab in
the CHART SETTING window is applied to
the chart.
Tap MAX value to change it.
(It changes in the order of “10”, “20”,
“50”, “100”, “150”, and “300”.)
The MAX and MIN values set for each
sensor in the OPTION tab in the CHART
SETTING window is applied in the chart.
Tap MAX or MIN value to change it.
(It changes in the order of MIN & MAX
settings 1, 2, and 3.)
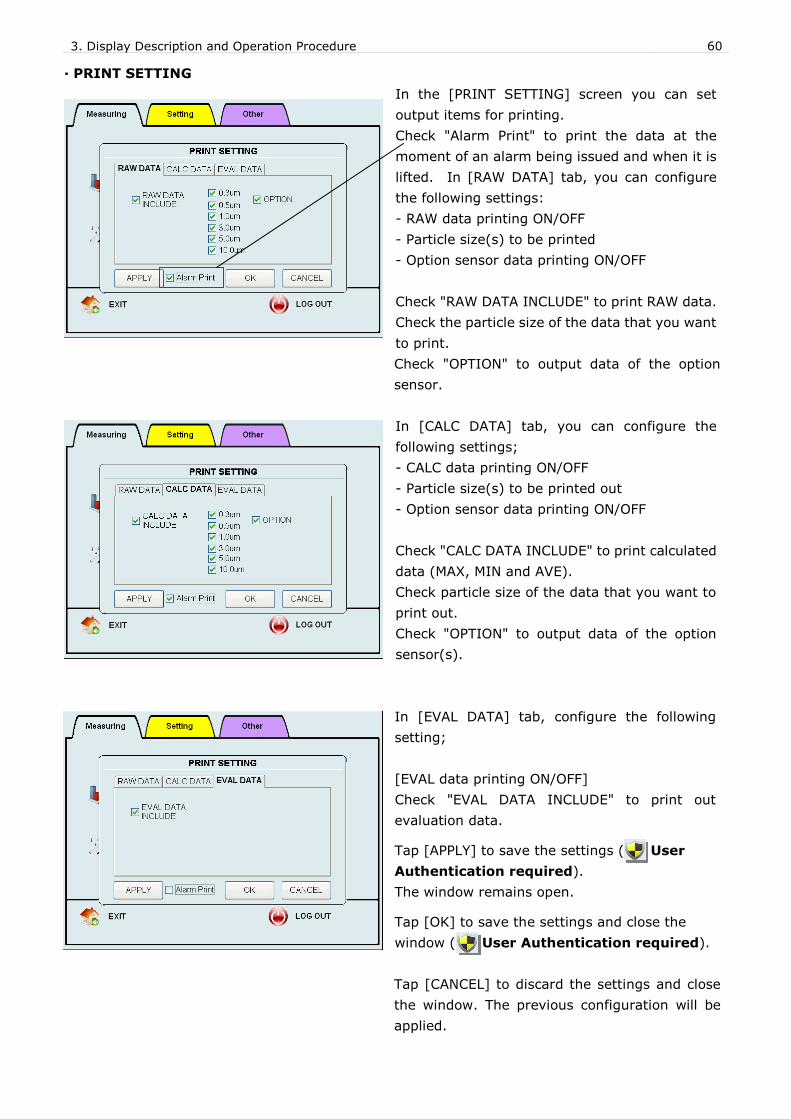
3. Display Description and Operation Procedure 60
· PRINT SETTING
In the [PRINT SETTING] screen you can set
output items for printing.
Check "Alarm Print" to print the data at the
moment of an alarm being issued and when it is
lifted. In [RAW DATA] tab, you can configure
the following settings:
- RAW data printing ON/OFF
- Particle size(s) to be printed
- Option sensor data printing ON/OFF
Check "RAW DATA INCLUDE" to print RAW data.
Check the particle size of the data that you want
to print.
Check "OPTION" to output data of the option
sensor.
In [CALC DATA] tab, you can configure the
following settings;
- CALC data printing ON/OFF
- Particle size(s) to be printed out
- Option sensor data printing ON/OFF
Check "CALC DATA INCLUDE" to print calculated
data (MAX, MIN and AVE).
Check particle size of the data that you want to
print out.
Check "OPTION" to output data of the option
sensor(s).
In [EVAL DATA] tab, configure the following
setting;
[EVAL data printing ON/OFF]
Check "EVAL DATA INCLUDE" to print out
evaluation data.
Tap [APPLY] to save the settings ( User
Authentication required).
The window remains open.
Tap [OK] to save the settings and close the
window ( User Authentication required).
Tap [CANCEL] to discard the settings and close
the window. The previous configuration will be
applied.

3. Display Description and Operation Procedure 61
· ALARM SETTING
In ALARM SETTING you can set thresholds for
the particle alarm and option sensor alarm.
In the PARTICLE tab, configure the unit and
threshold for each particle.
Check the particle size that you want to alarm
by external contact output and audible
alarm*.
(* Note that audible alarm will be activated
only when “Alarm Sound” is checked.)
Also enter the threshold that you want to
trigger the alarm.
To enter the threshold, tap the entry field to
display a numeric keypad. Enter a value and
tap [Enter].
In the OPTION tab, you can set an alarm
threshold for TEMPERATURE, HUMIDITY,
VELOCITY and DIFFERENTIAL PRESSURE.
Tap the entry field to display a numeric keypad.
Enter a value and tap [Enter].
To activate the audible alarm check “Alarm
Sound”.
Tap [APPLY] to save the settings ( User
Authentication required).
The window remains open.
Tap [OK] to save the settings and close the
window. ( User Authentication
required).
Tap [CANCEL] to discard the settings and close
the window. The previous configuration will be
applied.

3. Display Description and Operation Procedure 62
· OPTION SENSOR SETTING
In the OPTION SENSOR SETTING screen you
can confirm if the option sensor is connected
or not, and whether or not to use the sensor.
You can also set the unit and MIN/MAX
measuring range for each sensor. MIN/MAX
value should be the spec range for each
sensor.
A sensor will be displayed in blue if it is
connected or in gray if it is not.
To use an option sensor, check USE/NO USE
box.
Tap [OK] to save the settings and close the
window ( User Authentication
required).
Tap [CANCEL] to discard entries and close
the window.
UNIT:
Set the unit for TEMPERATURE and VELOCITY.
For TEMPERATURE, select °C or °F
For VELOCITY, select m/sec or FPM.
MIN/MAX:
Set the measurable range of the sensor according to the specifications of each option sensor.
Tap an entry field to display a numeric keyboard. Enter a value and tap [Enter].
INSTANT/ AVERAGE:
Select INSTANT or AVERAGE for measurement display format.
CHECK button:
Tap [CHECK] to confirm if the option sensor(s) are connected or not.

3. Display Description and Operation Procedure 63
· START DELAY
In the START DELAY window set a
measurement delay time.
Tap the entry field to display a keyboard.
Enter “hours”, “minutes” and “seconds” then
tap [OK] to activate the settings
( User Authentication required).
· MESSAGE SETTING
In the MESSAGE SETTING window, you can
choose whether or not to display messages
for "PREPARATION" and "DELAY".
Tap [OK] in order to activate the settings
( User Authentication required).
- PREPARATION:
displays a message after the pump is
ON before sampling starts.
- DELAY:
displays a message before sampling
starts when START DELAY function is
ON.

3. Display Description and Operation Procedure 64
3.8.2 Setting
In the Setting window you can configure the
following;
- DATE/TIME
- LCD
- SOUND
- COMMUNICATION
- REGION
· DATE/TIME
In the DATE/TIME settings:
To adjust DATE, tap [▼] to display a calendar
and set the date.
To change the TIME, tap “hours”, “minutes”
and “seconds” then use the [▲/▼] buttons
to adjust the selected number.
Tap [OK] to activate the settings
( User Authentication required).
· LCD
In the LCD settings, configure the Power
saver time-out and Brightness setting. Also
the LCD displays the power state of the unit
(battery level, power source (AC/battery),
battery charging, etc.)
For the Power saver time-out setting, select
one among 1min, 2min, 5min, 10min, 15min,
& 30min.
To configure the brightness setting, move the
slider to the desired setting.
Tap [OK] to save the settings
( User Authentication required).

3. Display Description and Operation Procedure 65
· SOUND
In the SOUND settings, you can configure the
sound volume and sound type.
Default Sound:
Set the sound for erroneous operation. When this item is unchecked, this sound function will be
off.
Tap Sound:
Set the tap sound on the screen. When this item is unchecked, there will be no tap sound.
Alarm Sound:
Set the sound for the Alarm. When this item is unchecked, there will be no alarm sound.
Tap [OK] to save the settings and close the window ( User Authentication required).
Tap [CANCEL] to discard the configured settings (Previous settings will be applied).
· COMMUNICATION
In [COMMUNICATION SETTING], configure the
settings for Ethernet connection. This settings
need to be configured when connecting the
instrument to a PC using remote console or remote
mode.
For the HOST NAME, enter a name to identify the
instrument when it is connected to a network or
workgroup by Ethernet. (Be sure not to use the
same name as other PCs or devices on the network
or workgroup.)
For IP ADDRESS, check AUTO to acquire an IP ADDRESS automatically. If AUTO is unchecked,
enter IP Address, NET MASK and DEFAULT Gateway.
Tap [OK] to save the settings and to close the window ( User Authentication required).
Tap [CANCEL] to discard the configured settings (Previous settings will be applied).
You can use any Windows standard WAV format file for the
sound functions.
Create a folder named “Sound” on the USB flash drive.
Then copy the WAV file(s) in the folder. You will be able to
select the file from the list as long as the USB flash drive
is installed (* is added to all of the WAV file names on the
USB flash drive).
Selected WAV files are transferred to internal data
storage. Therefore, after selecting the files and choosing
[OK], you can remove the USB flash drive.

3. Display Description and Operation Procedure 66
· REGION
In [REGIONAL SETTING], you can set the
date display format to be used when saving
files.
Tap [OK] to save the settings and close the
window. ( User Authentication
required)
Tap [CANCEL] to discard the current
settings.

3. Display Description and Operation Procedure 67
3.8.3 Other
In [Other] window you can configure the
following settings;
- USER ADMIN
(to open User Information screen)
- LOGS
- ABOUT (for version information)
- REMOTE MODE
- SECURITY (for security settings)
· User Setting
[User Setting] is displayed only when the User Authentication function is activated.
[User Setting] screen shows up by choosing
[USER ADMIN] menu on the control panel.
Registering a user, modifying user
information, deleting an account,
importing/exporting user information,
printing user information, and changing a
user password can be done from the [User
Setting] window.
*Registering, modifying, and
deleting User information have to be
done by an Administrator user.
*A user needs to have the
authorization (Copy Files) to import
and export User information.
User Setting window shows registered users.
Select one of the registered users displayed on the screen and tap [DELETE] to delete the selected
user ( User Authentication required).
Select one of the registered users displayed on the screen and tap [PRINT] to print out the selected
user information.
Tap [REGISTER] to register a new user ( User Authentication required).
Select one of registered users and tap [MODIFY] to edit the selected user information ( User
Authentication required).
Tap [EXPORT] to copy the selected user information into storage ( User Authentication
required, insert USB flash drive ). Exported user information can be modified by PC software.
Tap [IMPORT] to import user information from the USB flash drive ( User Authentication
required).
Tap [PASSWORD] to change the selected user’s password.
Tap [RETURN] to go back to the control panel.

3. Display Description and Operation Procedure 68
(a)
(c)
(d)
(e)
(f)
(b)
(g)
(h)
(i) (j) (k)
User Information Window (Configured only by an Administrator User)
Select [REGISTER] or [MODIFY] in the [User
Setting] screen to display [User Information]
window.
In [User Information] window you can add users
and edit user information.
[Information] tab contains user information
[Qualification] tab is for setting user
authorizations.
(a) User Number: automatically assigned
(b) User Name: up to 40 characters
(c) User ID: up to 16 characters. Duplicate IDs
are not allowed
(d) Password: 4 to 16 characters
(e) Password Reenter: confirmation of
password
(f) Company / Division: up to 99 characters
(g) Memo: up to 99 characters
(h) Qualification:
Check the items to set user authorizations.
Administrators automatically have the
authorization to perform all tasks.
Items (i), (j), and (k) show the information of the current user.
(i) Password expiration:
Shows the expiration date of the password. Passwords expire every 180 days.
The default Administrator password needs to be changed within 60 days.
(j) Registration date:
Shows the registration date and the User ID which registered the information
(k) Last modified date:
Shows the latest modified date and the User ID which modified the information
Tap [OK] to register the information and go back to [User Setting] window.
Tap [CANCEL] to cancel the registration and go back to [User Setting] window.

3. Display Description and Operation Procedure 69
(a)
(b)
(c)
Qualification
Qualification Definition
Administrator An administrator automatically has the authorization to perform all
tasks. [Manage Users] are only assigned to the administrator.
Manage Users Allows a user to add, edit, delete and activate/deactivate users.
Access Control Panel Allows a user to change settings in the control panel.
Change Measurement Mode Allows a user to change the measurement mode.
Copy Files Allows a user to copy data, such as measurement data, log data
And user information. Data can be copied via network.
Delete Files Allows a user to delete data, such as measurement data and user
preset.
View Logs Allows a user to review the log data.
Input Password
Select [PASSWORD] in [User Setting]
window to open [INPUT PASSWORD]
window.
Edit password from [INPUT PASSWORD]
window.
The keyboard shows up when a user taps
entry fields.
(a) OLD Password: type in the current
password.
(b) NEW Password: type in the new
password.
(c) Reenter NEW Password:
confirm the new password
Tap [OK] to renew your password and go
back to [User Setting] window.
Tap [CANCEL] to cancel the process and go
back to [User Setting] window.

3. Display Description and Operation Procedure 70
· Log Maintenance
The [Log Maintenance] screen shows up when you select “LOGS” on the control panel.
Users can review and print-out the log files, such as the operation log, alarm log, and error log.
*A User needs the authorization (View Logs) to view logs.
*A User needs the authorization (Copy Files) to copy files.
(a) Log List
Shows following information; Date/Time, User ID, Operation (requests and results), and
Parameters
(b) User ID
Select user ID to review the user’s logs.
User ID is displayed only when the User Authentication function is activated.
(c) Operations / Alarm / Error
Select the type of log from the following:
Operations: show operation logs.
Operations are displayed only when the User Authentication function is activated.
Alarm:shows alarm logs.
Error:shows error logs.
(d) Date
Select start date and end date for logs
Tap [Update] to refresh the log list, which is based on the criteria you select in (b), (c) and (d).
Tap [Print] to print out the current information from the log list.
Tap [Copy] to copy the selected log files to the USB flash drive..
( User Authentication required).
Tap [Close] to go back to the control panel.
(a)
(b)
(c)
(d)

3. Display Description and Operation Procedure 71
· ABOUT
Tap [ABOUT] to view the firmware version
of the instrument and the remaining
capacity of the internal data storage.
· REMOTE MODE SETTING
In the REMOTE MODE SETTING, check
"START IN REMOTE MODE" to activate
remote mode automatically when the
instrument is turned ON.
Enter remote address in the entry field for
ID.
Tap [OK] to save the settings and close the
window.
Tap [CANCEL] to discard changes.
· SECURITY SETTING
In the SECURITY SETTING, the User
Authentication function can be activated
and deactivated.
Check [ENABLE USER
AUTHENTICATION] to enable the User
Authentication function.
Tap [OK] to save the settings and close
the window ( User Authentication
required).
Tap [CANCEL] to discard the settings.

3. Display Description and Operation Procedure 72
When activating the User Authentication function
Login from the [Log-In] screen.
For more information on Log-In, please refer to 3.2 Log-In.
When deactivating the User Authentication function
User Authentication is required. A user without administrator authorization is not
allowed to deactivate the User Administration function.
Log-In Screen

3. Display Description and Operation Procedure 73
3.8.4 LOG OUT
When User Authentication is deactivated
Tap [LOG OUT] to display a dialogue asking if you want to shut down.
Tap [YES] to turn the instrument OFF 5 seconds later.
When User Authentication is activated
Tap [LOG OUT] to return to the [LOG IN]
screen.
At this screen, you can switch the users and
also can shut-down the instrument.
When the [OK] button is tapped after a
user ID and password are inputted, you
return to [MENU] screen.
Tap [SHUTDOWN]. A window will be
displayed asking “Do you want to shut
down the power?”
5 seconds after tapping [YES], the
instrument will shut down.
*Make sure to turn the power off at the [LOG IN] screen. If the power is not turned off
from the [LOG IN] screen, settings or data loss, as well as hardware errors may occur.
3.8.5 EXIT
Go back to the main screen。

4. PC Applications 74
4. PC Applications
The provided PC applications allow you to process measurement data and to operate the instrument
from a Windows computer via network.
This section describes important settings when using the PC applications.
For details of each application, refer to the operation manual “AIRBORNE PARTICLE COUNTER
SOFTWARE”.
4.1 User Management
You can transfer files from the instrument and edit them on PCs. In addition to the management of
data and log files, you can also edit user information files.
Data and log files may be converted into text files, so that they can be used with other applications.
・ To transfer files via network, connect the instrument to the network and enter the
appropriate settings in the COMMUNICATION SETTING screen.
・ To access the instrument from a PC, enter the HOST NAME specified in the
COMMUNICATION SETTING.
・ When the User Authentication function is activated, user authentication is required in order
to connect to the instrument via PC. Enter your user ID and Password as registered in the
instrument.
・ To transfer data to a PC using the USB flash drive, select “COPY” in the [FILE SELECT]
window to transfer data files, and “COPY” in the [LOG MANAGEMENT] window to transfer
log files. Select “EXPORT” in the [USER MANAGEMENT] window to transfer user
information files. A User needs the authorization (Copy Files) to copy files.
・ To update the user information file on the instrument, in the [USER MANAGEMENT] window,
import the user information file edited on a PC.
4.2 Remote Console
The program allows remote operation of the instrument from a PC via network.
・ Connect the instrument to the network and enter the appropriate settings in the
COMMUNICATION SETTING screen.
・ To access the instrument from a PC, enter the HOST NAME specified in the
COMMUNICATION SETTING.
・ When the User Authentication function is activated, user authentication is required in order
to connect to the instrument via PC. Enter your User ID and Password as registered in the
instrument. The user Authentication is required for remote control.
4.3 Create Schedule
You can create schedules to be used for STATS mode and STANDARD mode, and upload them to the
instrument.

4. PC Applications 75
・ Connect the instrument to the network and enter the appropriate settings in the
COMMUNICATION SETTING screen.
・ To access the instrument form a PC, enter the HOST NAME specified in the
COMMUNICATION SETTING.
・ When the User Authentication function is activated, user authentication is required in order
to connect to the instrument. Enter your User ID and Password as registered in the
instrument. A user needs the authorization (Copy Files) to copy files.
4.4 Remote Measurement
You can read data stored in the instrument directly from PCs connected via network to take
measurements.
・ You need to connect the instrument to the network and make appropriate settings in the
COMMUNICATION SETTING.
・ Before taking remote measurements, “START IN REMOTE MODE” needs to be checked in
the [REMOTE MODE SETTING] window, which can be displayed from the CONTROL PANEL
screen of the instrument.
(Please refer to 3.6.7 REMOTE MODE.)
・ Enter the HOST NAME specified in the COMMUNICATION SETTING for the destination.

5. Connecting Option Sensors 76
5. Connecting Option Sensors
Two types of sensors plus an alarm function are available as optional extras for this instrument.
By connecting the sensors or an alarm to three different connectors on the rear of the unit, you can
perform two different kinds of measurement and one contact output for the alarm simultaneously.
*The alarm output is a single set of contacts that
activates upon any sensor threshold being
exceeded. It can be used to activate an alarm
light, etc.
*When connecting the pressure transmitter, cable
MODEL 3900-02 is required separately. Please
check with your sales representative.
Temperature, Humidity, Velocity Probe - Model 6531
Temp. Range -20 to 70 °C
Temp. Accuracy ±0.5 °C
Humidity Range 2 to 98 %RH
Humidity
Accuracy
±2 %RH (when in the range of
2-80%RH, other ±3 % )
Velocity Range 0.01 to 30 m/s
Velocity Accuracy
±2% of reading or ±0.015m/s, whichever is greater
Dimension Φ10 to 16 x212 mm Length of the probe cable: 2m
Pressure Transmitter - Model C264 0-100Pa
Pressure Range 0 ~ 100 Pa
Pressure Accuracy
±1 %F.S.
Guaranteed
Temp 5 to 65 °C
Output 4 to 20 mA
Contact Output Cable - Model 3910-03
When the alarm function is ON and the threshold
is exceeded, the alarm will be turned ON.
Spec Photocoupler Maximum rating: 60V/400 mA Red: + / Black: -

6. Printing Examples 77
6. Printing Examples
6.1 Printing Example for Each Measurement Mode
6.1.1 SINGLE
[SG20101201120000] Instrument ID = Model 3910 Ser.No. = 654321 Calibrated on 11/22/2010 Measured by kanomax Measured on 12/01/2010 Sample Time = 00:01:00 Cycles = 1 Printed by kanomax
Particle [p][DIFF] TIME 12:00:00
0.3um 8000 0.5um 5000 1.0um 3000
3.0um 1000 5.0um 500 10.0um 100
T[C] : 25.2 H[%] : 68.5 V[m/s]: 0.1 P[Pa] : 15

6. Printing Examples 78
6.1.2 CONTINUOUS
[CO20101201120000] Instrument ID = Model 3910 Ser.No. = 654321 Calibrated on 11/22/2010 Measured by kanomax Measured on 12/01/2010 Sample Time = 00:01:00 Cycles = 1 Printed by kanomax
Particle [p][DIFF] TIME 12:00:00
0.3um 8000 0.5um 5000 1.0um 3000
3.0um 1000 5.0um 500 10.0um 100
T[C] : 25.2 H[%] : 68.5 V[m/s]: 0.1 P[Pa] : 15

6. Printing Examples 79
6.1.3 INTERVAL
[IN20101201120000] Instrument ID = Model 3910 Ser. No. = 654321 Calibrated on 11/22/2010 Measured by kanomax Measured on 12/01/2010 Sample Time = 00:00:06 Cycles = 10 Printed by kanomax Start at 12/01/2010 12:00:00 Sample Time = 00:00:06 Repeats = 10 Particles [p] 0.3um Min= 15623 Max= 16136 Ave= 15848.3 0.5um Min= 389 Max= 521 Ave= 441.9 1.0um Min= 57 Max= 103 Ave= 90.9 3.0um Min= 3 Max= 12 Ave= 7.4 5.0um Min= 0 Max= 4 Ave= 1.4 10.0um Min= 0 Max= 2 Ave= 0.2 Temperature [C] Min= 24.8 Max= 25.3 Ave= 25.2 Humidity [%] Min= 64.3 Max= 68.2 Ave= 65.4 Velocity [m/s] Min= 0.1 Max= 0.3 Ave= 0.2 Pressure [Pa] Min= 13 Max= 21 Ave= 15
Particles [p][DIFF]
TIME 12:00:00 0.3um 15942 0.5um 389 1.0um 92 3.0um 6 5.0um 2 10.0um 0
------------------- TIME 12:01:00
0.3um 15623 0.5um 439 1.0um 102 3.0um 5 5.0um 0 10.0um 0
------------------- … … ------------------- TIME 12:09:00
0.3um 15759 0.5um 521 1.0um 103 3.0um 10 5.0um 2 10.0um 2
TIME 12:00:00 T[C] : 24.8 H[%] : 64.3 V[m/s]: 0.2 P[Pa] : 13 ------------------- TIME 12:01:00 T[C] : 24.8 H[%] : 64.3 V[m/s]: 0.2 P[Pa] : 13 ------------------- … … ------------------- TIME 12:09:00 T[C] : 25.1 H[%] : 68.1 V[m/s]: 0.3 P[Pa] : 20
Stat. data
Raw data
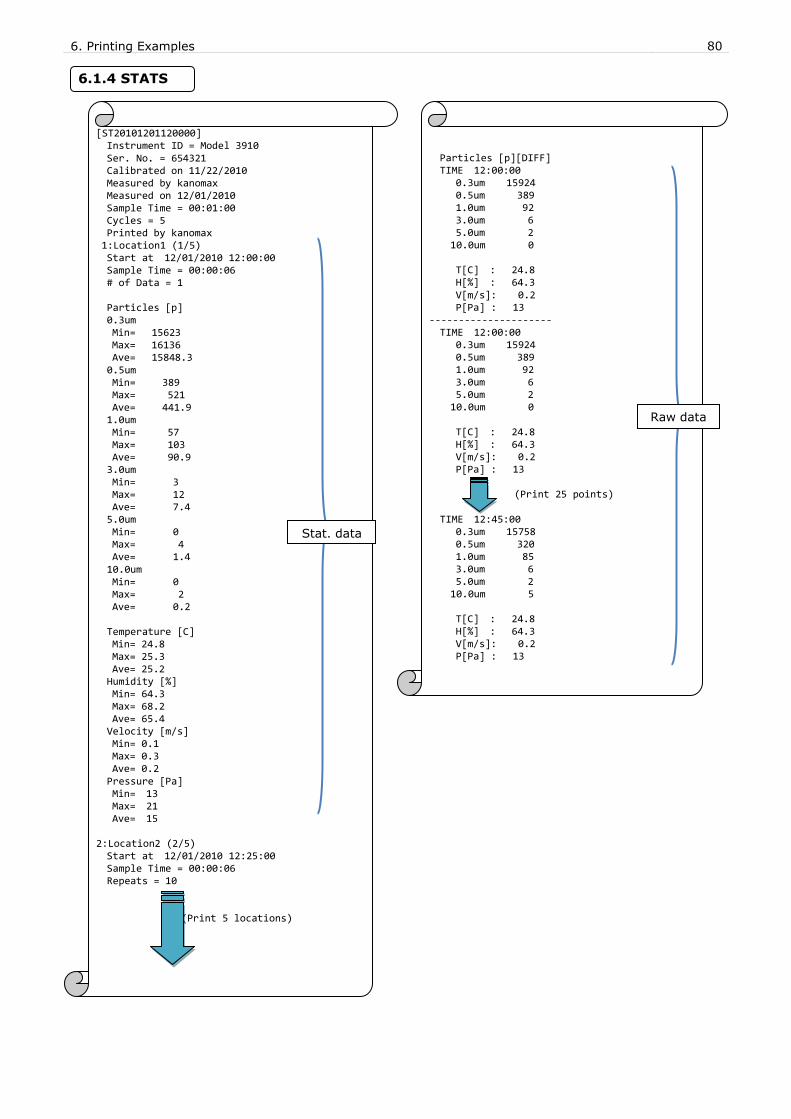
6. Printing Examples 80
6.1.4 STATS
[ST20101201120000] Instrument ID = Model 3910 Ser. No. = 654321 Calibrated on 11/22/2010 Measured by kanomax Measured on 12/01/2010 Sample Time = 00:01:00 Cycles = 5 Printed by kanomax
1:Location1 (1/5) Start at 12/01/2010 12:00:00 Sample Time = 00:00:06 # of Data = 1 Particles [p] 0.3um Min= 15623 Max= 16136 Ave= 15848.3 0.5um Min= 389 Max= 521 Ave= 441.9 1.0um Min= 57 Max= 103 Ave= 90.9 3.0um Min= 3 Max= 12 Ave= 7.4 5.0um Min= 0 Max= 4 Ave= 1.4 10.0um Min= 0 Max= 2 Ave= 0.2 Temperature [C] Min= 24.8 Max= 25.3 Ave= 25.2 Humidity [%] Min= 64.3 Max= 68.2 Ave= 65.4 Velocity [m/s] Min= 0.1 Max= 0.3 Ave= 0.2 Pressure [Pa] Min= 13 Max= 21 Ave= 15
2:Location2 (2/5) Start at 12/01/2010 12:25:00 Sample Time = 00:00:06 Repeats = 10
(Print 5 locations)
Particles [p][DIFF] TIME 12:00:00
0.3um 15924 0.5um 389 1.0um 92 3.0um 6 5.0um 2 10.0um 0 T[C] : 24.8 H[%] : 64.3 V[m/s]: 0.2 P[Pa] : 13
--------------------- TIME 12:00:00
0.3um 15924 0.5um 389 1.0um 92 3.0um 6 5.0um 2 10.0um 0 T[C] : 24.8 H[%] : 64.3 V[m/s]: 0.2 P[Pa] : 13
(Print 25 points) TIME 12:45:00
0.3um 15758 0.5um 320 1.0um 85 3.0um 6 5.0um 2 10.0um 5 T[C] : 24.8 H[%] : 64.3 V[m/s]: 0.2 P[Pa] : 13
Stat. data
Raw data

6. Printing Examples 81
6.1.5 STANDARD(for the measurement standards ISO14644-1:2015)
Company = KANOMAX [IS20101201120000] Instrument ID = Model 3910 Ser. No. = 654321 Calibrated on 11/22/2010 Measured by kanomax Measured on 12/01/2010 Start at 12:00:00 End at 12:45:00 Sample Time = 00:01:00 Cycles = 5 Printed by kanomax Class = ISO 6 Sizes = 0.3um
1:Location1 2887279 p/m3 NG 2:Location2 2848409 p/m3 NG 3:Location3 2793992 p/m3 NG 4:Location4 2904593 p/m3 NG 5:Location5 2840989 p/m3 NG Limit : 102000 p/m3 Result 0.5u: NG Result 5.0u: NG Limit : 3520 p/m3 (0.5um) Limit : 29 p/m3 (5.0um) Result 0.5u(GMP):NG Result 5.0u(GMP):NG 1:Location1 (1/5) Start at 12/01/2010 12:00:00 Sample Time = 00:00:06 Cycles = 10 Particles [p] 0.5um Min= 389 Max= 521 Ave= 441.9 5.0um Min= 0 Max= 4 Ave= 1.4 All Locations=1-5 Particles [p] 0.5um Min= 389 Max= 521 Ave= 441.9 5.0um Min= 0 Max= 4 Ave= 1.4 Temperature [C] Min= 24.8 Max= 25.3 Ave= 25.2 Humidity [%] Min= 64.3 Max= 68.2 Ave= 65.4 Velocity [m/s] Min= 0.1 Max= 0.3 Ave= 0.2 Pressure [Pa] Min= 13 Max= 21 Ave= 15
2:Location2 (2/5) Start at 12/01/2010 12:25:00 Sample Time = 00:00:06 Repeats = 10
(Print 5 locations) Particles [p][DIFF] [CUMUL] TIME 12:00:00
0.3um 15924 15535 0.5um 389 297 1.0um 92 86 3.0um 6 4 5.0um 2 2 10.0um 0 0
----------------------- TIME 12:01:00
0.3um 15623 15184 0.5um 439 336 1.0um 103 98 3.0um 5 5 5.0um 0 0 10.0um 0 0
----------------------- (Print 25 points) ----------------------- TIME 12:45:00
0.3um 15623 15164 0.5um 459 336 1.0um 123 113 3.0um 10 8 5.0um 2 0 10.0um 2 2
----------------------- TIME 12:00:00 T[C] : 24.8 H[%] : 64.3 V[m/s]: 0.2 P[Pa] : 13
----------------------- TIME 12:01:00 T[C] : 24.5 H[%] : 64.0 V[m/s]: 0.2 P[Pa] : 13
----------------------- (Print 25 points) ----------------------- TIME 12:45:00 T[C] : 25.1 H[%] : 68.1 V[m/s]: 0.3 P[Pa] : 20
Operated by Checked by
Eval. data
Raw data
Stat. data

6. Printing Examples 82
6.1.6 STANDARD(for the measurement standards other than ISO14644-1:2015)
Company = KANOMAX [IS20101201120000] Instrument ID = Model 3910 Ser. No. = 654321 Calibrated on 11/22/2010 Measured by kanomax Measured on 12/01/2010 Sample Time = 00:01:00 Cycles = 5 Printed by kanomax Class = ISO 6 Sizes = 0.3um
1:Location1 2887279 p/m3 NG 2:Location2 2848409 p/m3 NG 3:Location3 2793992 p/m3 NG 4:Location4 2904593 p/m3 NG 5:Location5 2840989 p/m3 NG ALL : 2855053 p/m3 SE : 19317 p/m3 UCL : 2896198 p/m3 Limit : 102000 p/m3 Result : NG 1:Location1 (1/5) Start at 12/01/2010 12:00:00 Sample Time = 00:00:06 Repeats = 10 Particles [p] 0.3um Min= 15623 Max= 16136 Ave= 15848.3 0.5um Min= 389 Max= 521 Ave= 441.9 1.0um Min= 57 Max= 103 Ave= 90.9 3.0um Min= 3 Max= 12 Ave= 7.4 5.0um Min= 0 Max= 4 Ave= 1.4 10.0um Min= 0 Max= 2 Ave= 0.2 Temperature [C] Min= 24.8 Max= 25.3 Ave= 25.2 Humidity [%] Min= 64.3 Max= 68.2 Ave= 65.4 Velocity [m/s] Min= 0.1 Max= 0.3 Ave= 0.2 Pressure [Pa] Min= 13 Max= 21 Ave= 15
2:Location2 (2/5) Start at 12/01/2010 12:25:00 Sample Time = 00:00:06 Cycles = 10
(Print 5 locations) Particles [p][DIFF] TIME 12:00:00
0.3um 15924 0.5um 389 1.0um 92 3.0um 6 5.0um 2 10.0um 0
----------------------- TIME 12:01:00
0.3um 15623 0.5um 439 1.0um 103 3.0um 5 5.0um 0 10.0um 0
----------------------- (Print 25 points) ----------------------- TIME 12:45:00
0.3um 15623 0.5um 459 1.0um 123 3.0um 10 5.0um 2 10.0um 2
----------------------- TIME 12:00:00 T[C] : 24.8 H[%] : 64.3 V[m/s]: 0.2 P[Pa] : 13
----------------------- TIME 12:01:00 T[C] : 24.5 H[%] : 64.0 V[m/s]: 0.2 P[Pa] : 13
----------------------- (Print 25 points) ----------------------- TIME 12:45:00 T[C] : 25.1 H[%] : 68.1 V[m/s]: 0.3 P[Pa] : 20
Eval. data
Raw data
Stat. data

7. Battery Charge 83
7. Battery Charge
7.1 Charging Battery
When the AC adapter is connected, you can charge the battery (one or two) when it is installed in
the instrument.
When the battery is fully charged, the SUPPLY LED turns red.
When the battery is charging, the SUPPLY LED will blink.
Note: if the battery is charging now, you should not pull the battery out or insert another
battery.
It may damage the battery or the instrument.
If you must exchange the battery when the
power is on and the battery is charging, you can
follow this instruction:
First, tap the Power Icon (a) on the main
screen.
Tap [Enable Pull] (b), and then you can pull the
batteries out or insert them.
When you are finished, you must tap [RETURN]
(c) to finish it.
You may also charge the battery with the provided charger instead of using
the instrument and AC adapter:
Open the battery compartment cover on the rear of the instrument by hand.
Connect the battery to the provided charger to recharge the battery. It takes
about 4 hours to charge one battery fully.
After the battery is charged, install it into the instrument (Refer to 2.1 Power Supply
for installing the battery).
(a)
(b) (c)

8. Main Specifications 84
8. Main Specifications
Product Name Airborne Particle Counter
Model Model 3910
Optical Source Laser Diode (two-year warranty)
Particle Size Distribution 0.3 / 0.5 / 1.0 / 3.0 / 5.0 / 10.0 μm (6 Channels)
Rated Flow 28.3L/min.
Counting Efficiency 50±20% (Compliant with ISO 21501-4)
Spurious Count 0.2 counts/cf or less (Compliant with ISO 21501-4)
Max Detectable
Concentration 500,000 counts/cf (=17,667.8 counts/L)
Sampling Time 6sec ~ 23hours 59min 59sec (Configurable)
Interval Time 6sec ~ 23hours 59min 59sec (Configurable)
Delay Time 11sec ~ 1hour (=3,600sec) (Configurable)
Repeat Times 1 ~ 9,999 times (Continuous) (Configurable)
Location Number Configurable in the range of 0~999 (Schedule can also be configured.)
Alarm Setting 1 ~ 9,999,999 count (= count/cf, count/m³) (Unit is Configurable)
Measurement Mode SINGLE Mode, CONTINUOUS Mode, INTERVAL Mode, STATS Mode,
STANDARD Mode
Display Color LCD Dot Matrix
Data Storage Capacity
80MB (Internal data storage) 1 unit of data = Approx.100 bytes (For example, Repeat measurement × 1,000 times → 100 bytes × 1,000 times = 100k bytes)
Up to 10,000 files can be stored.
Printer Built-in (Compatible with Dust-free Paper)
Interface Ethernet , USB-Host
Power Supply - AC adapter (100 to 240V) - Rechargeable Lithium-ion battery (2 battery slots, Provides 5+ hours of continuous usage from 2 fully charged batteries, User replaceable)
Operating Environment
This model can be used in the environment described below: - Temperature 10 ~ 35 °C / Humidity 20 ~ 85 %RH (Non condensing) - This instrument is for indoor use only - This instrument cannot be used if the altitude is higher than 2,000 m. - Overvoltage Category II
- Pollution Degree: Class 2
Storing Environment Temperature -20~50 °C / Humidity 0~85%RH (Non condensing)
Dimension W 200 × D 205 × H 200 mm (Excluding Handle)
Weight Approx. 5.5kg with 2 batteries
Standard Accessories
Manual(All, Quick-start guide), test-report, Zero filter, Li-ion battery×1, Printer Paper×2, AC adaptor, Tygon tube×2m, Isokinetic
probe, Software,USB flash drive
Optional Extras
Carry case, Battery charger, Li-ion battery, Option Sensors (6531
Probe, Pressure-sensor, Alarm-output), Tripod, Filter Scan Probe, Opration Manual (Dust Free Paper), IQ/OQ Sheet (Dust Free Paper)
*For specifications for the Option Sensors, please refer to 5. Connecting Option Sensors.

9. Troubleshooting 85
9. Troubleshooting
Symptom Possible Cause Maintenance
Cannot obtain Zero Count
(When using a filter)
1) The inside of the optical system may
be dirty.
Attach the zero filter and perform purging for a
prolonged time.
After performing a measurement in a highly
concentrated environment, attach the zero filter and
perform purging.
2) The filter’s air tightness may be
deteriorated.
Replace your zero filter.
3) Leaks may be occurring inside the
instrument.
Return the instrument to your distributor or to your
KANOMAX service center for repair.
Count value is too high
(Higher than the expected)
1) The particle concentration at the
measurement site may be high. -
2) The inside of the optical system may
be dirty.
Attach a zero filter and perform purging for a
prolonged time.
After performing a measurement in the highly
concentrated environment, attach the zero filter and
perform purging.
3) The instrument may be being used
outside the operating environment
defined in the specifications.
(Measurement Environment Temperature
/ Humidity / Concentration etc.)
Use the instrument under the environmental
conditions set in the specifications.
If you have checked the above 1), 2)
and 3), and the instrument readings
are still too high, the instrument may
require calibration or repair.
Contact your distributor or your KANOMAX service
center for repair or calibration.
Count value is too low
(Lower than the expected)
1) The particle count at the measurement site may be low. -
2) The pump vacuum is low. Pay attention to the pump performance.
Check if an error status is displayed on the screen.
3) The instrument may be being used
outside the operating environment
defined in the specifications.
(Measurement Environment Temperature
/ Humidity / Concentration etc.)
Use the instrument under the environmental
conditions set in the specifications.
4) If you have checked the above 1), 2)
and 3), and the instrument readings
are still too low, the instrument may
require calibration or repair.
Contact your distributor or your KANOMAX service
center for repair or calibration.
The output of the option
sensors is not displayed.
1) The sensor may not be connected
properly.
Check the option sensor connection.
Touch panel becomes
unresponsive
1) The touch panel may be damaged. Return the instrument to your distributor or to your
KANOMAX service center for repair.
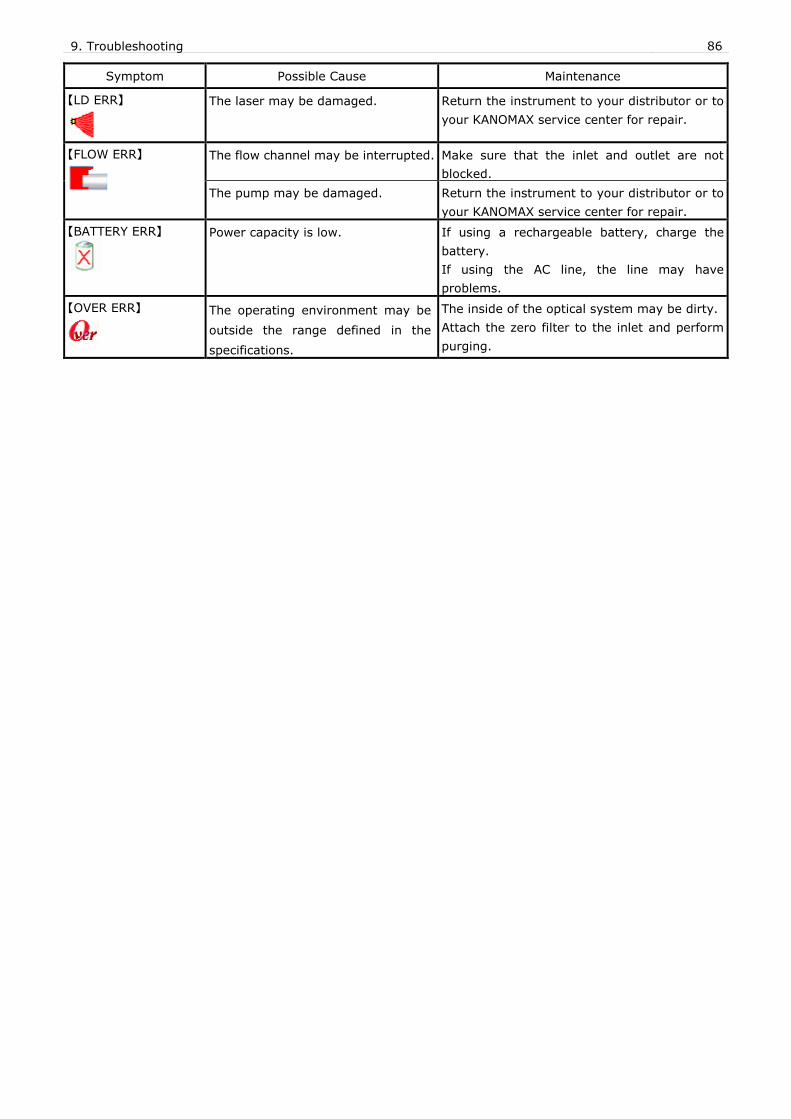
9. Troubleshooting 86
Symptom Possible Cause Maintenance
【LD ERR】
The laser may be damaged. Return the instrument to your distributor or to
your KANOMAX service center for repair.
【FLOW ERR】
The flow channel may be interrupted. Make sure that the inlet and outlet are not
blocked.
The pump may be damaged. Return the instrument to your distributor or to
your KANOMAX service center for repair.
【BATTERY ERR】
Power capacity is low. If using a rechargeable battery, charge the
battery.
If using the AC line, the line may have
problems.
【OVER ERR】
The operating environment may be
outside the range defined in the
specifications.
The inside of the optical system may be dirty.
Attach the zero filter to the inlet and perform
purging.

10. Warranty and After-sales Service 87
10. Warranty and After-sales Service
KANOMAX Limited Warranty
The limited warranty set below is given by KANOMAX with respect to the KANOMAX brand Airborne
Particle Counter, its attachment parts including Probe and other accessories (hereafter referred to
as “PRODUCT”) that you have purchased. PRODUCT you have purchased shall be the only one that
the limited warranty stated herein applies to.
Your PRODUCT, when delivered to you in new condition in its original container, is warranted against
defects in materials or workmanship as follows: for a period of two (2) years from the date of
original purchase, defective parts or a defective PRODUCT returned to your sales representative, as
applicable, and proven to be defective upon inspection, will be exchanged for a new or comparable
rebuilt parts, or a refurbished PRODUCT as determined by your sales representative. Warranty for
such replacements shall not extend the original warranty period of the defective PRODUCT.
This limited warranty covers all defects encountered in normal use of the PRODUCT, and does not
apply to the following cases:
(1) Use of parts or supplies other than the PRODUCT sold by your sales representative, which cause
damage to the PRODUCT or cause abnormally frequent service calls or service problems.
(2) If any PRODUCT has its serial number or date altered or removed.
(3) Loss of damage to the PRODUCT due to abuse, mishandling, improper packaging by the owner,
alteration, accident, electrical current fluctuations, failure to follow operating, maintenance or
environmental instructions prescribed in the PRODUCT's instruction manual provided by
KANOMAX, or service performed by a party other than KANOMAX.
NO IMPLIED WARRANTY, INCLUDING ANY IMPLIED WARRANTY OF MERCHANTABILITY OR FITNESS FOR A
PARTICULAR PURPOSE, APPLIES TO THE PRODUCT AFTER THE APPLICABLE PERIOD OF THE EXPRESS LIMITED
WARRANTY STATED ABOVE, AND NO OTHER EXPRESS WARRANTY OR GUARANTY, EXCEPT AS MENTIONED
ABOVE, GIVEN BY ANY PERSON OR ENTITY WITH RESPECT TO THE PRODUCT SHALL BIND KANOMAX. KANOMAX
SHALL NOT BE LIABLE FOR LOSS OF STORAGE CHARGES, LOSS OR CORRUPTION OF DATA, OR ANY OTHER
SPECIAL, INCIDENTAL OR CONSEQUENTIAL DAMAGES CAUSED BY THE USE OR MISUSE OF, OR INABILITY TO
USE, THE PRODUCT, REGARDLESS OF THE LEGAL THEORY ON WHICH THE CLAIM IS BASED, AND EVEN IF
KANOMAX HAS BEEN ADVISED OF THE POSSIBILITY OF SUCH DAMAGES. IN NO EVENT SHALL RECOVERY OF
ANY KIND AGAINST KANOMAX BE GREATER IN AMOUNT THAN THE PURCHASE PRICE OF THE PRODUCT SOLD
BY KANOMAX AND CAUSING THE ALLEGED DAMAGE. WITHOUT LIMITING THE FOREGOING, THE OWNER
ASSUMES ALL RISK AND LIABILITY FOR LOSS, DAMAGE OF, OR INJURY TO THE OWNER AND THE OWNER'S
PROPERTY AND TO OTHERS AND THEIR PROPERTY ARISING OUT OF USE OR MISUSE OF, OR INABILITY TO USE,
THE PRODUCT NOT CAUSED DIRECTLY BY THE NEGLIGENCE OF KANOMAX. THIS LIMITED WARRANTY SHALL
NOT EXTEND TO ANYONE OTHER THAN THE ORIGINAL PURCHASER OF THE PRODUCT, OR THE PERSON FOR
WHOM IT WAS PURCHASED AS A GIFT, AND STATES THE PURCHASER'S EXCLUSIVE REMEDY.

10. Warranty and After-sales Service 88
After-sales Service
If the PRODUCT is malfunctioning, please see “Troubleshooting” page 81 to find possible causes
first.
Repair parts are retained for a minimum period of five (5) years after production cessation of the
PRODUCT. This storage period of repair parts is considered as the period during which KANOMAX
can provide repair service.
For more information, please contact your sales representative. When you call, please have the
following information at hand:
(1) PRODUCT name;
(2) Model number;
(3) Serial number;
(4) Probe number;
(5) Description of Symptom, and;
(6) Date of purchase

89
USA & Europe
KANOMAX USA, INC.
PO Box 372, 219 US Hwy. 206, Andover, NJ 07821 U.S.A.
TEL: 1-800-247-8887 / 1-973-786-6386 FAX: 1-973-786-7586
URL: http://www.kanomax-usa.com/
E-Mail: [email protected]
Japan & Asia
KANOMAX JAPAN INC.
2-1 Shimizu Suita City, Osaka 565-0805, Japan
TEL: 81-6-6877-0183 FAX: 81-6-6877-5570
URL: http://www.kanomax.co.jp/
E-Mail: [email protected]
China
Shenyang Kano Scientific Instrument Co., Ltd
#1315, 56-39 YELLOW RIVER NORTH STREET,
HUANGGU DISTRICT SHENYANG,
Shenyang City, Liaoning, 110035, PRC
TEL: :+86-24-23846440 FAX: 86-24-89730177
URL: http://www.kanomax.com.cn/
E-Mail: [email protected]
Copyright © Kanomax Japan Inc. All rights reserved. 2017
No copying, distribution, publication, modification, or incorporation of this
document, in whole or part, is permitted for commercial purposes without the
express written permission of Kanomax.
The contents of this document may be changed without prior notice.
02002/17.05