Embed Size (px)
Citation preview
1
RCS13101E
Read these instructions before using your new product for the first time.Es importante leer este manual antes de usar por vez primera su equipo.
user manualmanual de usuario
EN
ES
Scan for more user manual details or visit www.RCAtablets.comEscanear para más detalles del manual de usuarios o vistita www.RCAtablets.com
2
* SEE REAR OF UNIT FOR GRAPHIC SYMBOLS *The lightning flash with an arrowhead symbol, within the equilateral triangle, is intended to alert the user to the presence of uninsulated "dangerous voltage" within the product's enclosure that may be of sufficient magnitude to cause an electric shock.The exclamation point within the equilateral triangle is intended to alert the user to the presence of important operating and maintenance (servicing) instructions in this owner's manual.
Safety Instructions
WARNINGS:
Rules. These limits are designed to provide reasonable protection against harmful interference in a residential installation. This equipment generates, uses and can radiate radio frequency energy and, if not installed and used in accordance with the instructions,
there is no guarantee that interference will not occur in a particular installation. If this equipment does cause harmful interference to radio or television reception, which can be determined by turning the equipment off and on, the user is encouraged to try to correct the interference by one or more of the following measures:– Reorient or relocate the receiving antenna.– Increase the separation between the equipment and receiver.– Connect the equipment into an outlet on a circuit different from
that to which the receiver is connected.
WARNING: Changes or modifications to this unit not expressly approved by the party responsible for compliance could void the user’s authority to operate the equipment.
Service InformationThis product should be serviced only by those specially trained in
service, refer to the warranty included in this guide.
This product contains a low power laser device.
Warnings:
remain readily operable during intended used. In order to disconnect the apparatus from the mains completely, the AC power plug should be disconnected from the mains socket outlet completely.
be easily accessed during intended use.
sufficient ventilations.
openings with items such as newspaper, table-cloths, curtains, etc.
on the apparatus.
As the laser beam used in this compact disc player could be harmful to the eyes, do not attempt to disassemble the casing. Refer servicing to qualified personnel only.
so, the laser beam interlock may be defeated allowing the laser to remain on when the lid is opened.
power supply and have the unit checked by qualified personnel before any further operation.
high level inputs are recorded with high fidelity, and the noise level
the disc with no audio signals or very low level inputs. If you do so, the speakers may be damaged when the peak level of the sound is
lens. If you do so, the lens may be damaged and the unit will not operate correctly.
- Excessive dust.
in a cloth, blanket, etc. If you do so, the temperature inside and outside the unit may rise considerably, resulting in malfunctioning of the unit.
placed in a very damp room, the moisture may condense on the lens inside the unit. Should this occur, the unit will not operate. In this case, remove the disc and leave the unit in a warm place for several hours until the moisture evaporates.
Additional safety information
apparatus.
that may prevent air flow through vent openings.
product.
contain customer serviceable components.
harmful interference, and (2) this device must accept any interference received, including interference that may cause undesired operation.
only identical replacement parts.
RCS13101E
Equipment tested forcompliance as acomplete unit
3
System connections
Remote Control
When the battery becomes weak, the operating distance of the remote control will be greatly reduced and you will need to replace the battery.
Note: If the remote control is not going to be used for a long time, remove the battery.
WARNING:
sunshine, fire or the like.
CAUTION:
with the same or equivalent type.
unit.
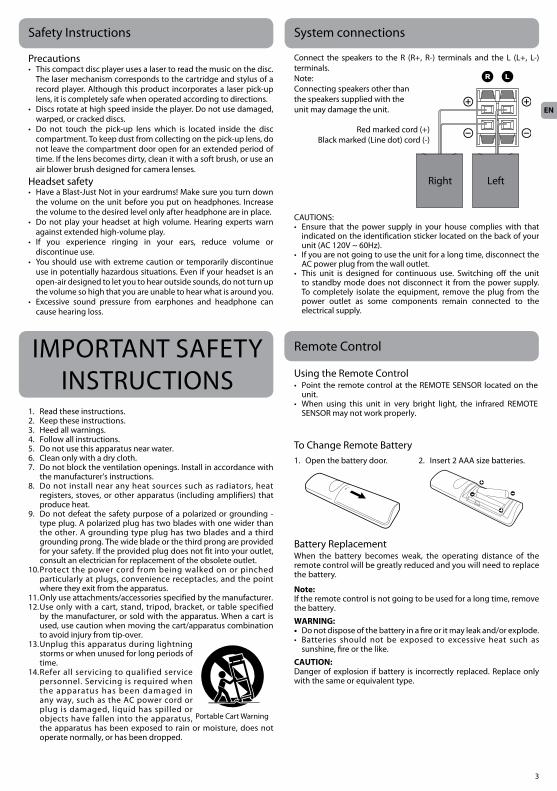
2. Insert 2 AAA size batteries.
1. Read these instructions.
6. Clean only with a dry cloth.
the manufacturer's instructions.
registers, stoves, or other apparatus (including amplifiers) that produce heat.
type plug. A polarized plug has two blades with one wider than the other. A grounding type plug has two blades and a third grounding prong. The wide blade or the third prong are provided for your safety. If the provided plug does not fit into your outlet, consult an electrician for replacement of the obsolete outlet.
particularly at plugs, convenience receptacles, and the point where they exit from the apparatus.
by the manufacturer, or sold with the apparatus. When a cart is used, use caution when moving the cart/apparatus combination
storms or when unused for long periods of time.
personnel. Servicing is required when the apparatus has been damaged in any way, such as the AC power cord or plug is damaged, liquid has spilled or
the apparatus has been exposed to rain or moisture, does not operate normally, or has been dropped.
The laser mechanism corresponds to the cartridge and stylus of a record player. Although this product incorporates a laser pick-up lens, it is completely safe when operated according to directions.
warped, or cracked discs.
compartment. To keep dust from collecting on the pick-up lens, do not leave the compartment door open for an extended period of time. If the lens becomes dirty, clean it with a soft brush, or use an air blower brush designed for camera lenses.
the volume on the unit before you put on headphones. Increase the volume to the desired level only after headphone are in place.
against extended high-volume play.
discontinue use.
use in potentially hazardous situations. Even if your headset is an open-air designed to let you to hear outside sounds, do not turn up the volume so high that you are unable to hear what is around you.
cause hearing loss.
Safety Instructions
terminals.Note:Connecting speakers other thanthe speakers supplied with the unit may damage the unit.
indicated on the identification sticker located on the back of your
AC power plug from the wall outlet.
to standby mode does not disconnect it from the power supply. To completely isolate the equipment, remove the plug from the power outlet as some components remain connected to the electrical supply.
Right Left
Red marked cord (+)
EN
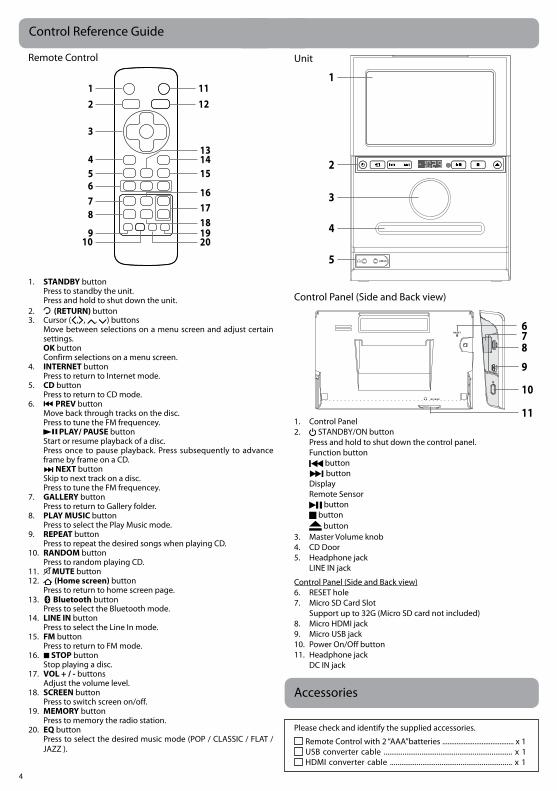
1. STANDBY button
2. (RETURN) button3. Cursor ( , , , ) buttons
settings. OK button Confirm selections on a menu screen.
INTERNET button
CD button
6. PREV button
PLAY/ PAUSE button Start or resume playback of a disc.
NEXT button Skip to next track on a disc.
7. GALLERY button
8. PLAY MUSIC button
REPEAT button
10. RANDOM button
11. MUTE button 12. (Home screen) button
13. Bluetooth button
LINE IN button
FM button
16. STOP button Stop playing a disc.17. VOL + / - buttons
18. SCREEN button
MEMORY button
20. EQ button
Control Reference Guide
Remote Control
12
3
45678
1112
1415
16
18
13
17
2019
109
2.
button button
Remote Sensor button button button
6. RESET hole
1
2
3
4
5
Remote Control with 2 “AAA”batteries ........................................ x 1
Accessories
11
6
89
7
10
When using the unit for the first time, you will be required to setup the following: 1. Select the language, then tap Start.
name to see more details or connect to it, and enter a password if necessary.
When prompted, sign in using the email address and password for your Google Account. If you don’t have one yet, go ahead and create one.
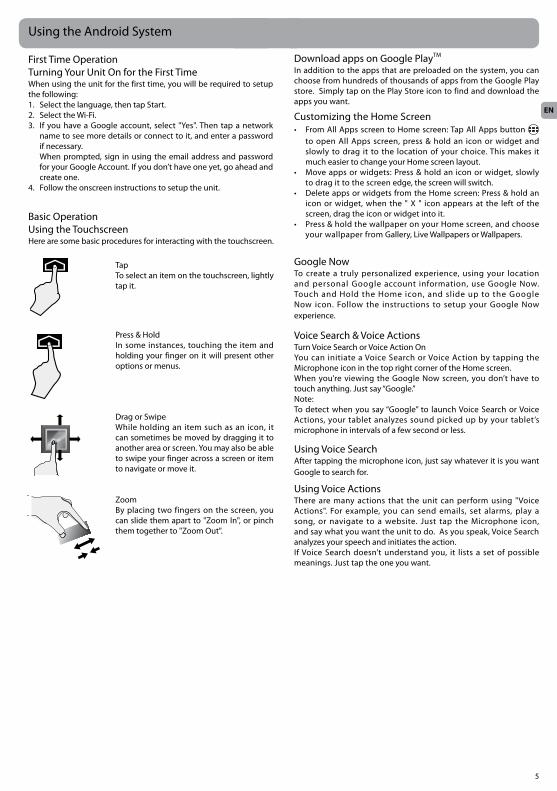
Tap To select an item on the touchscreen, lightly tap it.
In some instances, touching the item and holding your finger on it will present other options or menus.
While holding an item such as an icon, it can sometimes be moved by dragging it to
to swipe your finger across a screen or item to navigate or move it.
In addition to the apps that are preloaded on the system, you can
apps you want.
slowly to drag it to the location of your choice. This makes it
to drag it to the screen edge, the screen will switch.
screen, drag the icon or widget into it.
Google NowTo create a truly personalized experience, using your location and personal Google account information, use Google Now.
experience.
When you’re viewing the Google Now screen, you don’t have to
Note:
Actions, your tablet analyzes sound picked up by your tablet’s microphone in intervals of a few second or less.
Google to search for.
analyzes your speech and initiates the action.
EN
6
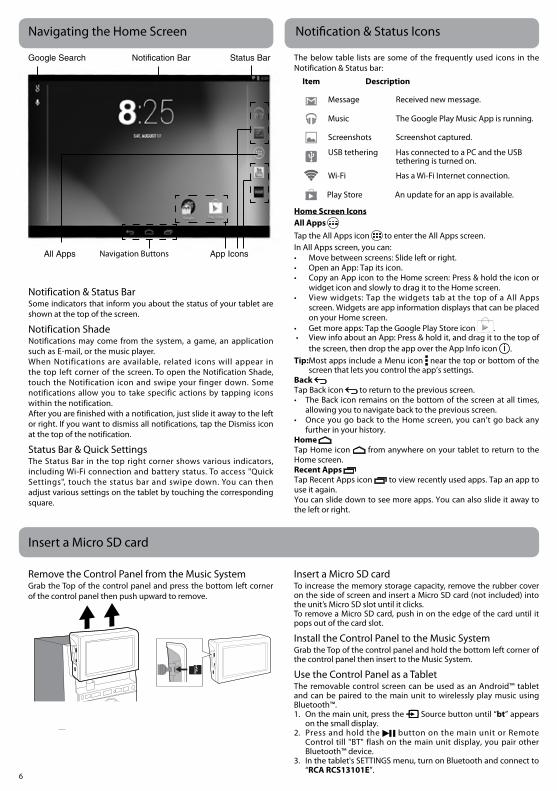
Some indicators that inform you about the status of your tablet are shown at the top of the screen.
Notification ShadeNotifications may come from the system, a game, an application such as E-mail, or the music player.When Notifications are available, related icons will appear in the top left corner of the screen. To open the Notification Shade, touch the Notification icon and swipe your finger down. Some notifications allow you to take specific actions by tapping icons within the notification.
at the top of the notification.
square.
App Icons
Status BarGoogle Search Notification Bar
All Apps
The below table lists are some of the frequently used icons in the
Item Description
Screenshots Screenshot captured.
tethering is turned on.
Home Screen IconsAll Apps Tap the All Apps icon to enter the All Apps screen. In All Apps screen, you can:
screen. Widgets are app information displays that can be placed
.
the screen, then drop the app over the App Info icon i .Tip: near the top or bottom of the
screen that lets you control the app’s settings.Back
to return to the previous screen.
allowing you to navigate back to the previous screen.
further in your history.Home
from anywhere on your tablet to return to the
Recent Apps Tap Recent Apps icon to view recently used apps. Tap an app to use it again.
the left or right.
To increase the memory storage capacity, remove the rubber cover
pops out of the card slot.
Grab the Top of the control panel and hold the bottom left corner of
The removable control screen can be used as an Android™ tablet and can be paired to the main unit to wirelessly play music using
Source button until “bt” appears on the small display.
button on the main unit or Remote
3. In the tablet's “RCA RCS13101E”.
Grab the Top of the control panel and press the bottom left corner of the control panel then push upward to remove.
7
Connections
Micro-USB
pictures and other files in both directions.Notes:
Settings > DEVICE > Storage, and tap Menu icon at the upper right corner. Then tap USB computer connection to enter to setup.
Micro SDRemove the rubber cover on the side of screen and insert the micro
Settings > DEVICE > Storage
card will pop out and can be removed.Notes:
Micro-HDMI
video.Notes:
Settings > HDMI > to modify each setting.
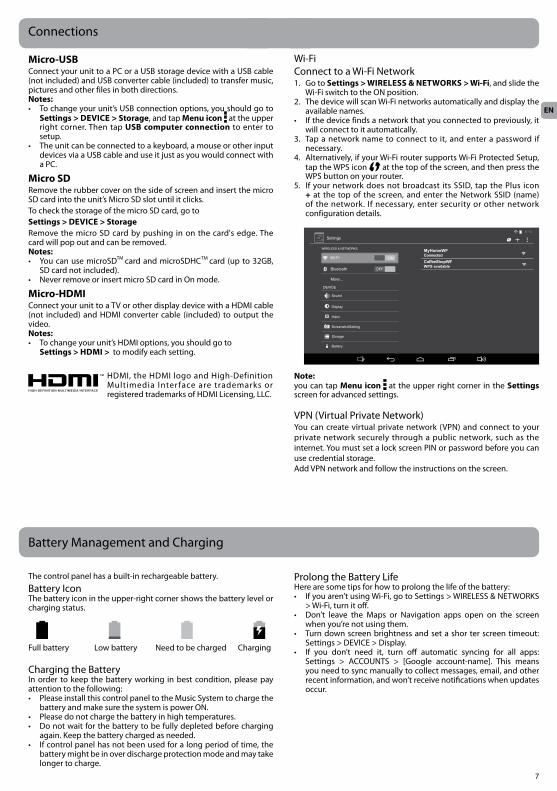
1. Go to Settings > WIRELESS & NETWORKS > Wi-Fi, and slide the
available names.
will connect to it automatically.3. Tap a network name to connect to it, and enter a password if
necessary.
at the top of the screen, and then press the
+of the network. If necessary, enter security or other network configuration details.
private network securely through a public network, such as the
use credential storage.
Note: you can tap Menu icon at the upper right corner in the Settings screen for advanced settings.
when you’re not using them.
you need to sync manually to collect messages, email, and other recent information, and won’t receive notifications when updates occur.
The control panel has a built-in rechargeable battery.
The battery icon in the upper-right corner shows the battery level or charging status.
In order to keep the battery working in best condition, please pay attention to the following:
battery might be in over discharge protection mode and may take longer to charge.
Need to be charged Charging
Settings
WIRELESS & NETWORKS
Wi-Fi
Bluetooth
More...
DEVICE
ScreenshotSetting
Storage
Battery
Hdmi
Sound
Display
6:14
ON
OFF
CoffeeShopWFWPS available
MyHomeWFConnected
EN
8
When headphones are connected, the speakers are automatically muted.Warning: Excessive sound pressure from earphones and headphones can cause hearing loss.
button to turn the unit on.
or button to tune in to a station.
Searching for a Station Automatically or button until the tuner starts searching
for a station, then release. After tuning in a station, the search stops.
you to tune in to a station directly.1. Tune in to a desired station.
MEMORY button. The preset number will blink and the “PXX” indicator will be shown on the display.
or button to select the preset number.MEMORY button again to store it in memory.
PLAY/PAUSE button on the unit or press or button on the remote control to select a preset number.
place it in the position that sounds best.
This system supports a variety of equalizers and sound effects.EQ button to select a desired music
mode. Each time the EQ button is pressed, the music mode will be changed to the next one as follows:
POP / CLASSIC / FLAT / JAZZ
L-in ” is shown on the display.
button to turn on the unit.
with the label side up and then press the button again to close
button. button again.
button.
Skipping to Another Track or button according to the desired
direction. button to skip to the start of the current track or skip
button to skip to the beginning of the next track.
or button pressed during playback, according to the desired direction, and release at the desired point.
Settings
WIRELESS & NETWORKS
Wi-Fi
Bluetooth
More...
DEVICE
ScreenshotSetting
Storage
Battery
SEARCH FOR DEVICES
Hdmi
Sound
Display
6:14
ONRCA RCS13101E
RCS13101TNot visible to other Bluetooth device
AVAILABLE DEVICESON
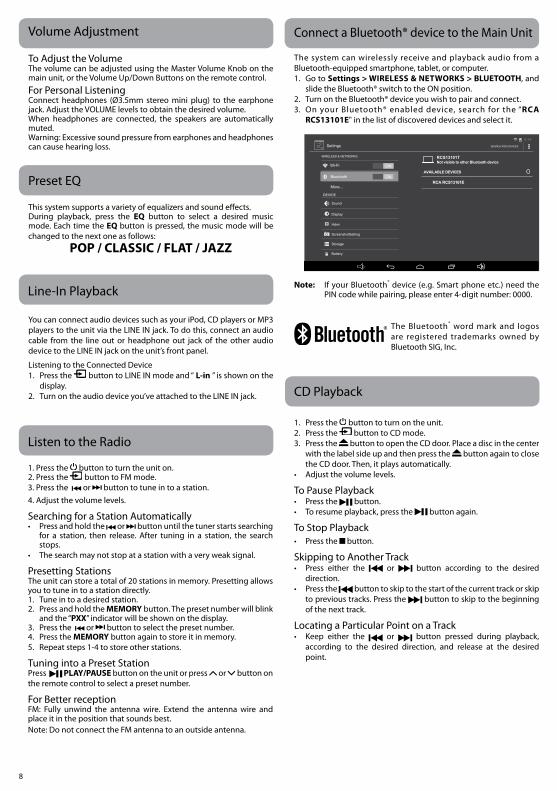
The system can wirelessly receive and playback audio from a
1. Go to Settings > WIRELESS & NETWORKS > BLUETOOTH, and
RCA RCS13101E" in the list of discovered devices and select it.
Note: device (e.g. Smart phone etc.) need the
word mark and logos are registered trademarks owned by

Repeat the current trackREPEAT button until “ rP1 ” blinks on the display. The
current track will be played repeatedly.
REPEAT button until “ rPA ” stops blinking and remains on. All tracks will be played repeatedly.
REPEAT button to cancel the playing until “ OFF ” appears.
RANDOM button on the remote control and “ rdn ” will be shown on the display. All tracks will be played randomly. After all tracks have played, the unit will stop automatically.
RANDOM button on the remote control again during RANDOM playback to return to normal playback and “ OFF ” will be shown on the display.
Troubleshooting Guide
No power.
power.The remote control does not function.
unit.
transformers).
Severe hum or noise is heard.
moistened with alcohol.
Control panel displays network or service error message.
Touch screen response is slow or incorrect.If the tablet’s touch screen response is incorrect, please try the following:
film may prevent the device recognition input.
touch screen.
bugs.
Control panel is frozen or a serious error appears.
the app program or reset the control panel.
power button for 8 seconds to reset the tablet.
back of the control panel.
Control panel gets warm.
is normal and will not affect the life or performance of the unit.
A defective or soiled disc inserted into the unit can cause sound to drop out during playback.
excessive heat.
from the center outward with a cleaning cloth.
octagonal, etc.). They may cause malfunctions.
before cleaning the unit.
dirty, wipe clean with a cloth that has been dipped in a weak soap-and-water solution and wrung out thoroughly, then wipe with a dry cloth.
Important Note
compartment.
EN
10
AVC MULTIMEDIA (“AVC”) makes the following limited warranty. This limited warranty extend to the original consumer purchaser and is limited to non-commercial use of the product.One Year Parts & Labor WarrantyAVCyear from the date of their original retail purchase. If the unit fails to conform to this warranty, we will service the product using new or refurbished parts and products, at AVC’s sole discretion.
AVC will provide, when needed, service labor to repair a manufacturing defect at Customer Support Center at
1-877-252-6873 or 1-855-475-9646, during the hours listed in the box below. The determination of service will be made by AVC Customer Support. PLEASE DO NOT RETURN YOUR UNIT TO AVC WITHOUT PRIOR AUTHORIZATION. New or remanufactured replacements for defective parts or products will be used for repairs by AVC at its designated Service Center for one year from the effective warranty date. Such replacement parts or products are warranted for an additional one year from the date of repair or replacement. The Customer will be required to ship the unit to the Service Center indicated at the time Customer Support is contacted to make the necessary repairs. The customer is responsible for all transportation charges to the service facility.Packaging and Shipping InstructionWhen you send the product to the AVC service facility you must use the original carton box and packing material or an equivalent as designated by AVC.Your Responsibility
(3) Warranties extend only to defects in material or workmanship, and do not extend to any product or parts which have been lost or discarded, or damage to product or parts caused by misuse, accident, improper operation or maintenance, or use in violation of instructions provided with the product, or to product which has been altered or modified without authorization of AVC, or to products or parts thereof which have had the serial number removed or changed.
Out of Warranty
In the event your product requires repair after the limited warranty period has expired, please contact our Customer Support Center at 1-877-252-6873 or 1-855-475-9646 or www.RCAtablets.com Hours: Monday–Thursday: 9am–7pm, Friday: 9am–5pm, Saturday: 9am–NOON Eastern time.Important: Center.
All warranties implied by state law, including the implied warranties of merchantability and fitness for a particular purpose, are expressly limited to the duration of the limited warranties set forth above. With the exception of any warranties implied by state law as hereby limited, the foregoing warranty is exclusive and in lieu of all other warranties, guarantees, agreements and similar obligations of manufacturer or seller with respect to the repair or replacement of any parts. In no event shall AVC be liable for consequential or incidental damages.No person, agent, distributor, dealer or company is authorized to change, modify or extend the terms of these warranties in any manner whatsoever. The time within action must be commenced to enforce any obligation of AVC arising under the warranty or under any statute, or
to implied warranties arising under state law.This warranty gives you specific legal rights and you may also have other rights, which may vary, from state to state. Some states do not allow limitation on how long an implied warranty lasts, when an action may be brought, or the exclusion or limitation of incidental or consequential damages, so the above provisions may not apply to you.
www.RCAtablets.comImportant:
Type of set ...........................................................................................................................................................................................................
Serial no . . . . . . . . . . . . . . . . . . . . . . . . . . . . . . . . . . . . . . . . . . . . . . . . . . . . . . . . . . . . . . . . . . . . . . . . . . . . . . . . . . . . . . . . . . . . . . . . . . . . . . . . . . . . . . . . . . . . . . . . . . . . . . . . . . . . . . . . . . . . . . . . . . . . . . . . . . . . . . . . . . . . . . . . . . . . . . . . . . . . . . . . . . . . . . .
Invoice no ............................................................................................................................................................................................................
www.RCAtablets.com