Embed Size (px)
Citation preview

Animation Technical Report
Di Cao
David Fagan
Weston Wieser
Michael Shah

Overview of Topics
• path animation
• camera animation
• keys and the graph editor
• driven keys
• dynamics
• Expressions
• particle systems
• animating FK & IK linkages, skinning
• locators, deformers, manipulators
• Constraints

Path Animation
• There are many ways to animate an object in
Maya.
• One basic method is to use motion paths…

Path Animation
• To set up an motion path animation, you must first have your object that you wish to animate. Then create a curve using a curve tool like the EP Curve Tool:

Path Animation
• Now in order to attach the object to the curve you must select them both. First select the object you are to animate,
• Then, holding down the SHIFT key, select the curve you just created. With both your object and your curve selected in this manner, select Animate > Motion Paths > Attach to Motion Path:

Path Animation
• With your motion path animation set up, you will notice two numeric markers along your path (generally at the beginning and end). These makers indicate the position and time at which the object will move to those markers…

Path Animation

Path Animation
• Another way to implement a motion path animation is to use motion path keys. Like basic keyframes these indicate the position of an object at the current frame.
• To start, select your object and go to Animate > Motion Paths > Set Motion Path Key. This will set a marker at your current frame, which you can see hovering at the center of you object with the frame number displayed.

Path Animation
• Now, if you move your timeline to a different frame, move you object to a different location, and once again set a motion key, you will see that another marker is created for that specific position and time but that it is now connected to the previous marker by a line. This line is your motion path by which your object will animate.

Path Animation

Path Animation
• There is one other feature that is available for motion path animations called Flow Path Object, which deforms objects as they animate along paths, adding a sense of realism.
• This feature is added onto an already existing path animation, so once you have that set up, simply select your object, the go to Animate > Motion Paths > Flow Path Object.

Path Animation
• This adds a lattice around the object, which deforms the object as the curvature of the path changes.

Path Animation
• In all cases, Maya opens a tab in the attribute editor for your motion path (or flow feature) This is where you control the animation settings, like Up vectors, object orientation and a feature called Banking, which rotates the animated object towards the center of the curve as it moves.

Path Animation
• Animating a camera along a path is similar to animating an object along a path. You just apply the same methods with a camera object.
• To create a camera, go to Create > Cameras > Camera. This places a camera object onto your stage, which you can apply path animations to.

Path Animation

Path Animation
• With cameras, you often want to look at your scene through its perspective, especially if you camera is animated.
• To view through your camera, select it and go to Panels > Look Through Selected.
• To return to perspective view, select Panels > Perspective > persp.

keys and the graph editor
• Keys store an objects attributes at a given time in animation.
• This time is measured in frames.
• The graph editor allows us to edit these keys with precision.

Keys and the graph editor
• Keys are used in every major 3D software package to store information.
• Knowing how to use the graph editor will help you get more fine tuned animations.

keys and the graph editor
• By storing keys, many types of animations can be created.
-Examples include
– Full character animations
– Movement of objects or cameras
– Particle effects
– Any effect that needs to be shown over time

keys and the graph editor
• To get started with animation, setup the menus for animation.
• By Default, you will also see the timeline slider at the bottom of the Maya layout.

keys and the graph editor
• Many preferences can be set on the timeline, regarding how the animation is played back.

keys and the graph editor
• We can start by creating an object, and then setting it’s key for the first frame.

keys and the graph editor
• Select the next frame in the slider
• Then translate the object.
• Repeat process for any object attributes that need be changed over time.

keys and the graph editor
• You will see corresponding lines on the time slider to where you have placed keys.

keys and the graph editor
• From Graph editor we can edit the translation, rotation, and scale of an object over time.

keys and the graph editor
• We are given some options of how we want to adjust our objects motion.
• A simple way to edit to graph is by using the transformation tools.

keys and the graph editor
• Then we can select a property we'd like to edit, middle-click and drag the points on the graph.

keys and the graph editor
• Show keys and graph editor example 1

Driven Keys
• Driven keys help us use the technique of key frame animation.
• Driven Keys help save time by being able to adjust multiple parts of an object that have related movements or attributes.
Driven Keys
• Driven Keys are useful in many scenarios for when you want many vertices to move together rather than keyframing them.
– Examples:
• A fist closing and opening
• An eyelid closing and opening.
• Flexing a muscle
• Moving objects as other objects approach( example: a sliding door).

Driven Keys
• Create a basic scene, with two objects.

Driven Keys
• We’ll now begin to link two objects together so one is driven by the other.

Driven Keys
• Here we setup the door To be driven by the ball.

Driven Keys
• Next, we setup a driver.
• The door’s Y Translation will be driven by the balls translation on the Z-axis.

Driven Keys
By setting the key at multiple positions Maya will then interpolate the values based on the translation properties we have setup.

Driven Keys
• Now we can slide our ball on the Z-axis and the door will move appropriately.
• (Show Demo)

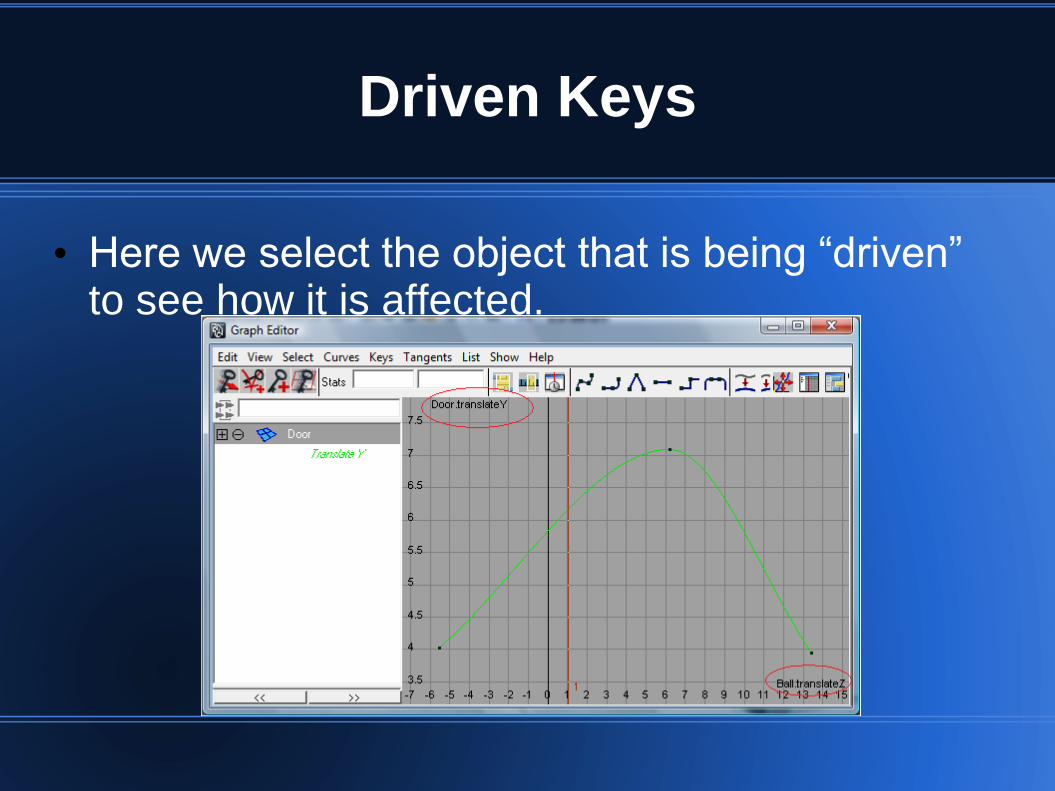
Driven Keys
• An important note, is that driven keys do not affect the time slider. You would still have to record key frames as done before.
• However, the graph editor is available to show our linked properties from the driven keys.
Driven Keys
• Here we select the object that is being “driven” to see how it is affected.

Driven Keys
• Youtube link to more complex examples.http://www.youtube.com/watch?v=v0XGrhKSkjI

Dynamics
“Dynamics is a branch of physics that describes how objects move using physical rules to simulate the natural forces that act upon them. Dynamic simulations are difficult to achieve with traditional keyframe animation techniques.”
– From Maya Documentation

Dynamics
• Dynamics are useful for
-Fluids,Fire, smoke, fireworks, or anything generally spontaneous in nature.
-Collisions between objects (Example: Dominos)
-Any simulation that needs gravity and the laws of physics

Dynamics
• Get started with dynamics by setting the menu to the appropriate set.

Dynamics
• In this first example, we’ll examine particles.
• Create a nurbs circle to emit particles from.

Dynamics
• After creating our object, we will select it and emit particles from it.

Dynamics
• Use the default settings for now.
• Other settings include
– Rate, speed, distance, direction, and more.

Dynamics
• Press play from the timeline slider, and the simulation will run.
• The simulation will continue for as many keyframes as we have.
• Show Dynamics Sample 1

Dynamics
• Dynamics as mentioned, are also useful for rigid body animations.
Definition: rigid body is a surface which has the attributes of an unyielding shape.
• Think objects that collide

Dynamics
• A simple dominos scene to show dynamics.
• Active Rigid Body
• Passive Rigid Body

Dynamics
Under Dynamics Tab, we will select fields and then add gravity to our ball. This make our object an active rigid body by default.

Dynamics
We will now make all of our dominos active rigid bodies as well, since their motion should continue after collisions.

Dynamics
• For our surface, we will make that a passive rigid body, because it just needs to stay static.
• Once this is done, we can run the simulation.

Dynamics
• To help simulate more realism, we can manipulate many properties.
• -I will change the mass of the dominos to 6.000, and lower the bounciness to 0
• - Go to Window and select Attribute editor to make the final changes.

Dynamics
• Show final dynamic simulation

Expressions
• Expressions animate any object attributes through the use of:
– mathematical equations
– conditional statements
– MEL commands
• Typically used for attributes that will change incrementally, randomly, or rhythmically over time

Expressions
• Advantages
– Does not require use of Set Driven Keys or animation curves
– Useful for linking attributes of different objects
• Disadvantages
– Cannot combine with other animation techniques for the same attribute

Creating an Expression
• Select the object
• Open the Expression Editor via Window > Animation Editors > Expression Editor
• Name your expression
• Enter expression in text area (could be multiple expressions)
• Hit Create

Useful Expressions
• Controlling multiple attributes
• Linking attributes between two objects
– Can be between non-expression animated and expression animated objects
Code used in example video:
Cube1.translateX = |Ball.translateX;
Cube1.translateY = |Ball.translateY + 2;
Cube1.translateZ = |Ball.translateZ;
Cube1.rotateZ = |Ball.translateZ*10;

Conditional Expressions
• Conditional Expressions use if-then-else statements to control the expression
Example:
Every 30th frame, translate ball 1 in the X direction from its current X position, 1 in the Z direction from its current Z position
For every other frame, translate ball 1 in the Y direction from its current Y position
if(frame % 30 == 0)
{
Ball.translateX += 1;Ball.translateZ += 1;
}
else
Ball.translateY += 1;

Expression Keywords
• The keyword time returns the current time dependent on your Frames per Second settings
• The keyword frame returns the current frame number

Possible Uses
• Rotation of the wheels on a car
• Flapping of wings
• Tracking camera to object or character

Particle Systems
• Particle systems use Maya’s Nucleus software
• Allow for several different approximated fluid systems such as liquid and smoke effects or even larger systems such as a box of candy

Candy Simulation (Creation)
• Start by dragging the upper left drop box to nDynamics
• Create an nParticle > Create nParticles > Balls

Candy Simulation (Creation)
• Select the Surface you wish to emit from
• Select nParticles > Create nParticles > Emit from Object > [_]
– Box icon brings up Emitter Options Window

Candy Simulation (Options)
• Options used in candy simulation with explanation
– Emitter Type determines way particles are emitted
• Surface distributes particles across the selected surface
– Speed determines speed at which particles are emitted
• Speed 5 gives an initial boost to show gravity has already affected the particles

Candy Simulation (Collision)
• Select the objects you wish to become passive collision objects
• Select nMesh > Create Passive Collider > [_]
• Select the Nucleus system used in your nParticle system in the Solver pull down menu
– Here named nucleus1

Candy Simulation (Particle Properties)
• In the Outliner (bar to the left), select your particle system
• Under the Attribute Editor go to the nParticleShape tab
– Here you can change the color, radius, collision properties, and many other attributes of your particles

Particle Expressions
• Expressions can be used for particles as well
• Can be used on the particles themselves, or their attributes
– Note: Internal ramp attribute controls must be deleted before Expressions can be used
Code used in video:
if(frame % 5 == 0)
CandyAttr.rgbPP = sphrand(1);

Manipulators
1. Basic Manipulators:
Move, Rotate, Scale , Universal manipulator(combined)
2. Hotkeys(w:move, e:rotate, r: scale, t:show manipulator)
Tricky part(highlight a channel in the channel box)
3. Other tools and objects can also have manipulators
(camera, partial curve(revolve), pole vector(ikRPsolver) and etc)
More Info: http://wiki.bk.tudelft.nl/toi-pedia/Cameras & Maya Help

Manipulators
4. Examples

FK & IK linkages
FK: Forward Kinematics(manually)
• Child joint position is computed/animated by rotation of it’s parent.
• Animated by setting keys for individual bone joint.
• Process-oriented. Example: arm movement driven by shoulder rotation, Muppet character animation and etc.
IK: Inverse Kinematics(dynamic)
• Parent joint position is computed/animated by position of child joint.
• Animated automatically. Joints between parent and child are automatically computed.
• Goal-oriented. Example: grabbing an object, pushing the wall, squatting down and etc.

FK and IK Blending Animation
• Select the IK handle of the Ik chain that you want to animate with FK. • In the IK Solver Attributes, drag the Ik Blend slider to 0.000(pure FK).• Select Animate > IK/FK Keys > Set IK/FK Key. All the joints in the IK chain
and the IK handle are keyed. • Deselect the IK handle. • Select a joint in the IK chain, drag the current time indicator along the Time
Slider and rotate the joint. • Set a key. • Repeat until you complete the FK portion of your animation. • Once you set the last FK key, deselect the current joint and select the IK
handle of your joint chain. • Make sure that the Ik Blend slider is still at 0.000 and select Animate > IK/FK
Keys > Set IK/FK Key. • Drag the current time indicator forward in time 1 frame. • Drag the Ik Blend slider to 1.000 and set a key. Since there is no period of
animation between the last pure FK key and the first pure IK key, the FK animation switches to IK instantly (without a blend).
• The animation mode is now set to pure IK.

Locators
• Implementation:
Constrains for the movement of the elbow and the knee
Creating a point in space for eyeballs to follow. Then you can animate the locator(s) to change where the eyeballs are looking.

Locators

Constraints
“With constraints, you can drive the position, orientation, and scale of constrained object with the transformation settings of target object. “

Constraints
• Point(translation channel)
• Orient(rotation channel)
• Parent(inherit transformation/orientation)
• Scale(scaling channel)
• Aim(rotation channel and aim vector)
• Geometry(follow the curve/surface)
• Normal(orientation aligned with normal vector)
• Tangent(orientation pointed to the direction)
• Pole Vector(pole vector)

Constraints
•Select constrained object and then shift select one or more target objects.•Select Constrain->Option

Skinning
• “Skinning is the process of binding a modeled surface to a skeleton. When a model is bound to a skeleton using skinning, it then follows or reacts to the transformations of the skeleton’s joints and bones.
• For example, if you bind a model’s arm to its underlying skeleton using skinning, rotating the elbow joints causes the skin at the elbow to crease and pucker. “

Deformers
• Blend shape
• Lattice
• Wrap
• Cluster
• Soft modification
• Nonlinear
• Sculpt deformer
• Jiggle deformer
• Wire
• Wrinkle

Blend shape
Implementation: facial animation

Blend Shape

Blend Shape

Cluster and Soft Modification
• Cluster(weight deformation): Cluster deformers let you control a set of an object’s points (CVs, vertices, or lattice points) with varying amounts of influence.
• Soft modification:

Cluster and Soft Modification

Wire and Wrinkle
• Wire: one or more NURBS curves is used to change the shape of objects
• Implementation: lip animation when talking, eyebrow animation
• Wrinkle: a cluster of wire deformers.
• Implementation: face wrinkle
http://www.tutorialhero.com/click-54824-facial_animation_with_wire_deformers.php

Wire and Wrinkle

Nonlinear and Sculpt
• Nonlinear (line)
• Sculpt: edit large chunks of geometry into vertices together.
• Implementation: bulge, stretch, simulation of muscle such as chin, brow, or cheek actions.

Lattice and Wrap
• Lattice(ffd, free form deformation) : fire flame
• Wrap: low resolution model to high resolution model
• Lattice only can be squares rather than some other shape

Jiggle
• Jiggle: points on a surface or curve are deformed to shake as they move, speed up, or slow down.”
• Implementation: soft and elastic material such as jelly cube, non-rigid deformation, muscle and etc

Sources
http://images.autodesk.com/adsk/files/gettingstartedmaya2010.pdf
http://download.autodesk.com/us/maya/2010help/
http://www.3dtutorialzone.com/tutorial?id=96