Embed Size (px)
Citation preview

Instruction Manual & Recipe Guide

2 ∙ table of contents
TABLE OF CONTENTS
table of contents ∙ 3
TABLE OF CONTENTS
Important Safeguards ...........................................................4-5
Parts & Features .....................................................................6-7
Using Your Electric Mandoline ............................................8-9
Assembling Blades and Inserts ............................................ 10
Blade Configuration Chart .................................................... 11
Maintenance ........................................................................... 12
Troubleshooting ..................................................................... 13
Recipes ...............................................................................14-21
Customer Support ................................................................. 22
Warranty .................................................................................. 23

important safeguards ∙ 54 ∙ important safeguards
IMPORTANT SAFEGUARDSIMPORTANT SAFEGUARDS
When using electrical appliances, basic safety precautions should be followed, including:
• Do not use any accessory attachments that are not recommended by the appliance manufacturer, as this may result in fire, electric shock, or personal injury.
• To prevent the risk of fire, electric shock, or personal injury, do not place the cord, plug, or unit near water or other liquids when the appliance is plugged in.
• This appliance is intended for household use only.
• Do not use the Electric Mandoline for more than 90 seconds at a time. Allow the motor to rest for at least 2 minutes between cycles.
• All components included with the Electric Mandoline are compatible with this product only. Do not use these parts on other similar products.
• Do not use the appliance if any of the parts are damaged.
• Do not operate any appliance with a damaged cord or plug.
• Do not use outdoors.• Do not leave the appliance
unattended when plugged in.• Do not use this appliance to
make crushed ice.• It is recommended that the
accessories are hand washed with the Brush for best results.
• WARNING: the Processing Base, Pusher, Container, Blades, and Inserts are top shelf dishwasher safe only if cleaned on the “light” setting.
• This appliance shall not be used by or near children. Keep the appliance and its cord out of reach of children.
• This appliance complies with applicable standards and regulations.
• The appliance must be used on a stable worktop, away from water splashes.
• Do not turn the appliance over.• Do not use outdoors.• Never push food with your
hands, always use the Pusher.• Do not let cord hang over edge
of table or counter.• The appliance must be
disconnected: -If you notice any anomalies during operation -Before maintenance or cleaning -After each use
• This appliance has a polarized plug (one blade is wider than the other). To reduce the risk of electric shock, this plug will fit in a polarized outlet only one way. If the plug does not completely fit in the outlet, reverse the plug. If it still does not fit, contact a qualified electrician. Do not attempt to modify the plug in any way.
• Read all instructions.• Remove all bags and packaging
from appliance before use.• Make sure the appliance is
thoroughly cleaned before using.• Do not shred, grate, or slice
raw/cooked meat. Do not use appliance with hard foods such as sugar, ice cubes, or coffee.
• Never use fingers, utensils, or other objects to remove food from Processing Chute while appliance is plugged in.
• If food must be removed from the Processing Base or chute, turn off and unplug Electric Mandoline before attempting to remove it.
• This appliance is not intended for use by persons (including children) with reduced physical, sensory, or mental capabilities, or lack of experience and knowledge unless they are provided with supervision and instruction concerning use of the appliance by a person responsible for their safety.
• Check that the Electric Mandoline is off and unplugged before and after each use.
• When using any extension cords, make sure the electrical rating of the wire is compatible with the Electric Mandoline.
• Avoid contact with moving parts. To reduce the risk of injury to persons and/or damage to the appliance, do not put your hands, hair, clothing, or other objects in the Processing Chute during use.
• Do not use hands or other objects to push food into Processing Chute. Only insert the Pusher into the Processing Chute.
• Only use Electric Mandoline on a stable surface.
• Do not place appliance on or near a hot gas burner, hot electric burner, or in a heated oven.
• Handle the Blades and Inserts carefully as the blades are sharp and can cause injury.
• Always make sure the voltage used is consistent with the nominal voltage of the Electric Mandoline.
• Always be sure to unplug the appliance from outlet prior to assembly, disassembly, cleaning, and storage.
• Unplug cord from outlet before changing or removing Blades and Inserts.
• If appliance malfunctions, discontinue use until problem is resolved.
PLEASE READ AND SAVE THIS INSTRUCTION AND CARE MANUAL
SAVE THESE INSTRUCTIONS
6 ∙ parts & features parts & features ∙ 7
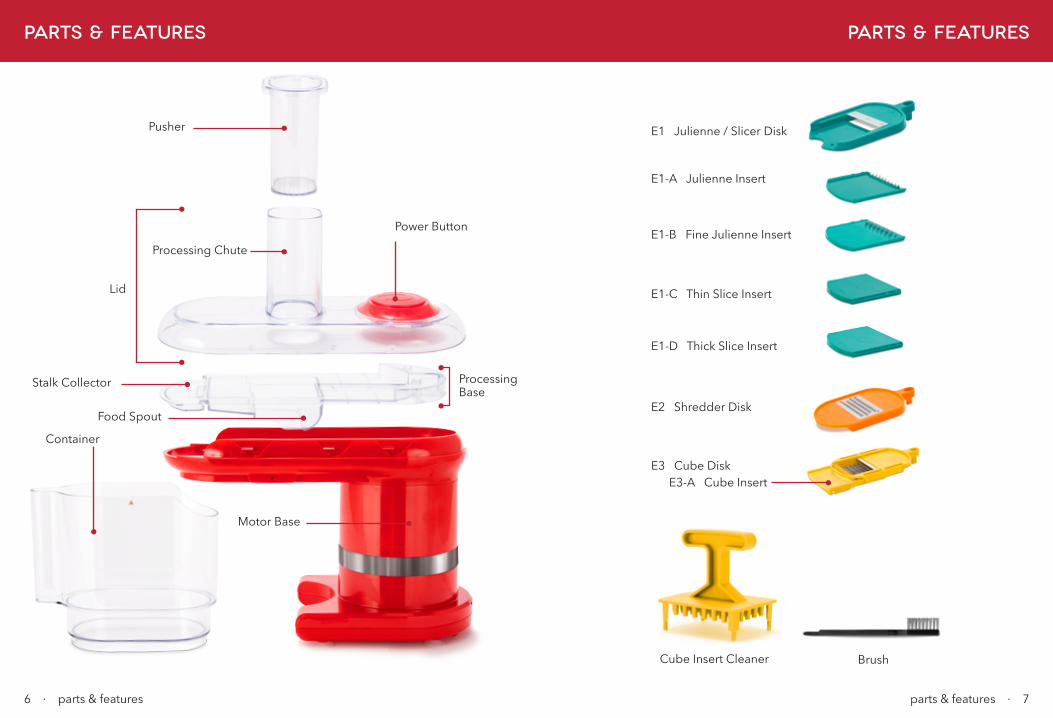
PARTS & FEATURESPARTS & FEATURES
Processing Chute
Power Button
Processing Base
Pusher
Lid
Food Spout
Motor Base
Stalk Collector
E1 Julienne / Slicer Disk
E3 Cube Disk E3-A Cube Insert
E2 Shredder Disk
E1-B Fine Julienne Insert
E1-A Julienne Insert
E1-C Thin Slice Insert
E1-D Thick Slice Insert
Cube Insert Cleaner Brush
Container

using your electric mandoline ∙ 9
USING YOUR ELECTRIC MANDOLINE
8 ∙ using your electric mandoline
USING YOUR ELECTRIC MANDOLINE
Clean the Electric Mandoline and all of its components prior to assembly and use. Remove any stickers and packaging before first-time use.
DO NOT use the appliance to shred tough or hard foods such as meat or ice cubes. You may need to cut larger foods into pieces so that they can fit inside the Processing Chute.
Set Motor Base on stable surface and place Processing Base on top.
Assemble Blade of choice (see Assembling Blades and Inserts on page 10 for instructions).
If using the Cube Disk, the Cube Insert must line up with rectangular slot over the Food Spout. The tab under the Blade should be inserted into the slot in the Motor Base.
Place Lid over Processing Base, matching up notches on Lid with the slots on the Motor Base. Once notches are aligned, push down and forward to lock the Lid into place.
Slide Container under the Motor Base, making sure to align the sides of the Container with slots under the Motor Base until the red arrow on the Container lines up with the red arrow on the underside of the Motor Base. If the Container is not inserted properly, the Electric Mandoline will not turn on.
Plug in Electric Mandoline. Place food in Processing Chute and use Pusher to press food into Chute. Hold down Power Button to begin slicing food. Release Power Button to stop.
1
2
2a
3
4
5
Set Blade on Processing Base, ensuring that the tab under the Blade is inserted into notch in the Motor Base.
blade configuration chart ∙ 1110 ∙ assembling blades and inserts
ASSEMBLING BLADES AND INSERTS BLADE CONFIGURATION CHART
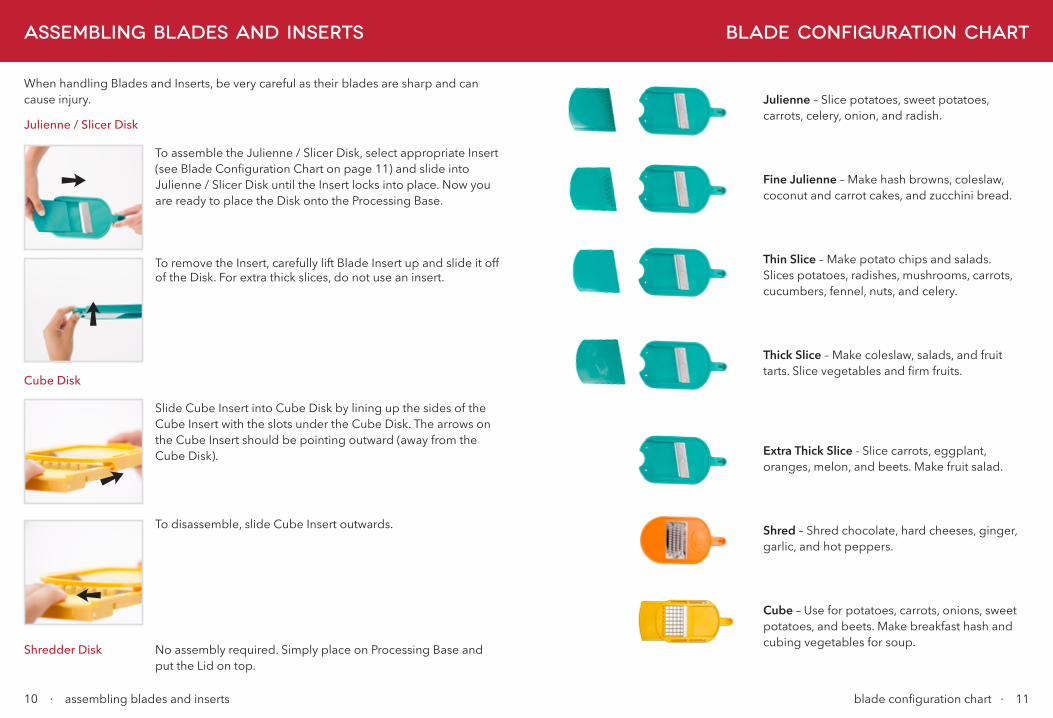
When handling Blades and Inserts, be very careful as their blades are sharp and can cause injury.
To assemble the Julienne / Slicer Disk, select appropriate Insert (see Blade Configuration Chart on page 11) and slide into Julienne / Slicer Disk until the Insert locks into place. Now you are ready to place the Disk onto the Processing Base.
To remove the Insert, carefully lift Blade Insert up and slide it off of the Disk. For extra thick slices, do not use an insert.
Julienne – Slice potatoes, sweet potatoes, carrots, celery, onion, and radish.
Fine Julienne – Make hash browns, coleslaw, coconut and carrot cakes, and zucchini bread.
Thin Slice – Make potato chips and salads. Slices potatoes, radishes, mushrooms, carrots, cucumbers, fennel, nuts, and celery.
Thick Slice – Make coleslaw, salads, and fruit tarts. Slice vegetables and firm fruits. Extra Thick Slice - Slice carrots, eggplant, oranges, melon, and beets. Make fruit salad.
Shred – Shred chocolate, hard cheeses, ginger, garlic, and hot peppers.
Cube – Use for potatoes, carrots, onions, sweet potatoes, and beets. Make breakfast hash and cubing vegetables for soup.No assembly required. Simply place on Processing Base and
put the Lid on top.
Slide Cube Insert into Cube Disk by lining up the sides of the Cube Insert with the slots under the Cube Disk. The arrows on the Cube Insert should be pointing outward (away from the Cube Disk).
To disassemble, slide Cube Insert outwards.
Julienne / Slicer Disk
Shredder Disk
Cube Disk

12 ∙ maintenance
MAINTENANCE
Thoroughly clean the Electric Mandoline and its components prior to first–time use. Always unplug the appliance before cleaning. Your Electric Mandoline and its Blades and Inserts must be properly cleaned after each use. It is recommended that the accessories are hand washed with the Brush for best results.
WARNING: DO NOT SUBMERGE MOTOR BASE IN WATER OR OTHER LIQUIDS. THE MOTOR BASE IS NOT DISHWASHER SAFE.
1. Always unplug the appliance before cleaning.
2. Do not submerge the Motor Base in water or other liquids. Instead, wipe down the Motor Base with a damp cloth and then wipe dry.
3. To avoid staining the Blades and Inserts, rub them with a cloth dipped in cooking oil prior to cleaning.
4. Clean the Lid and Container with warm water and mild soap.
5. The Processing Base, Pusher, Container, Blades, and Inserts should be washed with warm water and mild soap or they can be placed in the top rack of your dishwasher on the “LIGHT”, “ECO”, or “LESS DIRTY” functions. Be sure to handle the Blades and Inserts with care as their blades are sharp and can cause injury. If there is food left in the Cube Insert, use the Cube Insert Cleaner to push out food residue before cleaning.
6. Do not use corrosive or abrasive cleaning agents to clean the device or its accessories as this could damage the appliance.
7. Dry all parts thoroughly before storing. Store the Electric Mandoline in a dry place that is not accessible to children or animals. Always store Julienne and Fine Julienne Inserts with Covers to prevent injury when removing Inserts from storage.
troubleshooting ∙ 13
TROUBLESHOOTING
If your Electric Mandoline fails to function properly, first check whether you are able to correct the problem yourself using the checklist below.
If your problem is not resolved in the instructions listed, please contact StoreBound Customer Support at: 1-800-898-6970 from 7AM - 7PM PST, Monday - Friday, or by email at [email protected].
Do not attempt to repair the appliance yourself under any circumstances.
1. The Electric Mandoline will not turn on.
• Ensure that the power cord is plugged into the power outlet.
• Check to make sure the power outlet is operating correctly.
• Firmly press and hold down the Power Button located on the top of the Lid.
• Check to make sure Blades and Inserts have been inserted correctly.
• Make sure the Container is under the Motor Base. There is a small switch on the underside of the Motor Base that will be activated once the Container is in the correct position. If the switch is not activated, the Electric Mandoline will not turn on.
• Unplug the appliance, remove the Blades and Inserts and clean thoroughly. Reassemble your Electric Mandoline and try again.
• Determine if a power failure has occurred in your home, apartment, or building.
2. I can’t close the lid securely over the Motor Base.
• Check to make sure that the Blade (and Insert) is placed correctly on the Processing Base.
3. I can’t unlock the Lid from the Motor Base.
• Turn the appliance on for one second in order to move the Blade, then try to unlock the Lid again.
4. Food is stuck in the Blades and the Electric Mandoline will not start.
• Unplug the Electric Mandoline, disassemble the appliance, and clean all parts and accessories. Reassemble and plug back into outlet.

RECIPESdelicious & satisfying ideas for everyday meals
16 ∙ recipes recipes ∙ 17
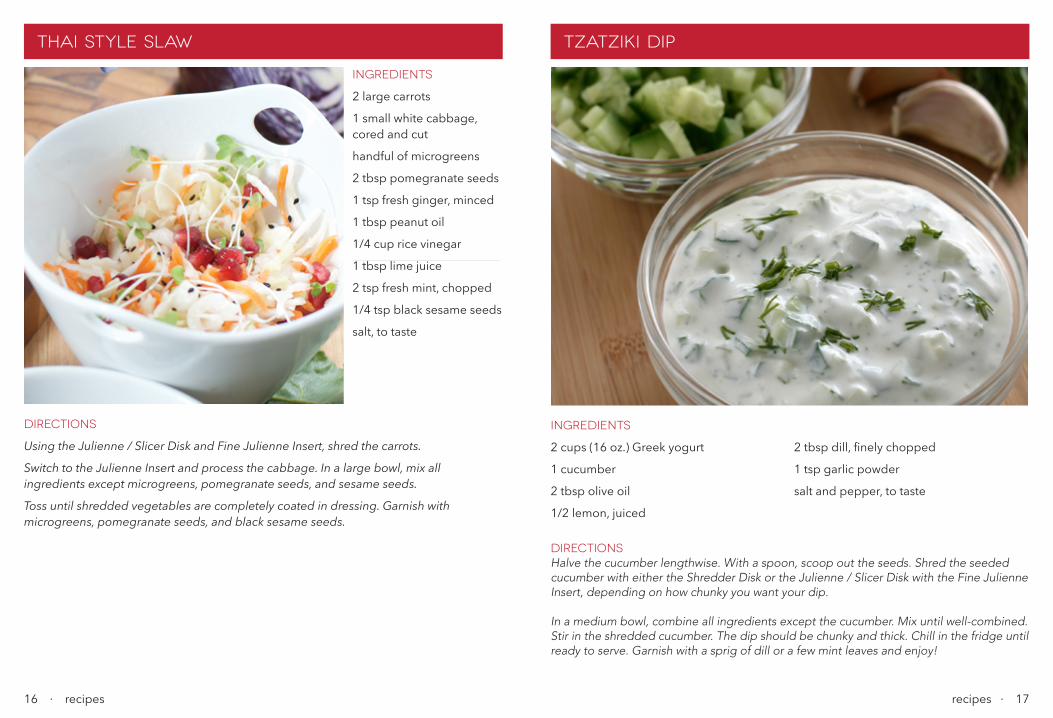
INGREDIENTS
2 large carrots
1 small white cabbage, cored and cut
handful of microgreens
2 tbsp pomegranate seeds
1 tsp fresh ginger, minced
1 tbsp peanut oil
1/4 cup rice vinegar
1 tbsp lime juice
2 tsp fresh mint, chopped
1/4 tsp black sesame seeds
salt, to taste
DIRECTIONS
Using the Julienne / Slicer Disk and Fine Julienne Insert, shred the carrots.
Switch to the Julienne Insert and process the cabbage. In a large bowl, mix all ingredients except microgreens, pomegranate seeds, and sesame seeds.
Toss until shredded vegetables are completely coated in dressing. Garnish with microgreens, pomegranate seeds, and black sesame seeds.
DIRECTIONSHalve the cucumber lengthwise. With a spoon, scoop out the seeds. Shred the seeded cucumber with either the Shredder Disk or the Julienne / Slicer Disk with the Fine Julienne Insert, depending on how chunky you want your dip.
In a medium bowl, combine all ingredients except the cucumber. Mix until well-combined. Stir in the shredded cucumber. The dip should be chunky and thick. Chill in the fridge until ready to serve. Garnish with a sprig of dill or a few mint leaves and enjoy!
INGREDIENTS
2 cups (16 oz.) Greek yogurt
1 cucumber
2 tbsp olive oil
1/2 lemon, juiced
2 tbsp dill, finely chopped
1 tsp garlic powder
salt and pepper, to taste
Thai Style Slaw Tzatziki Dip
18 ∙ recipes recipes ∙ 19
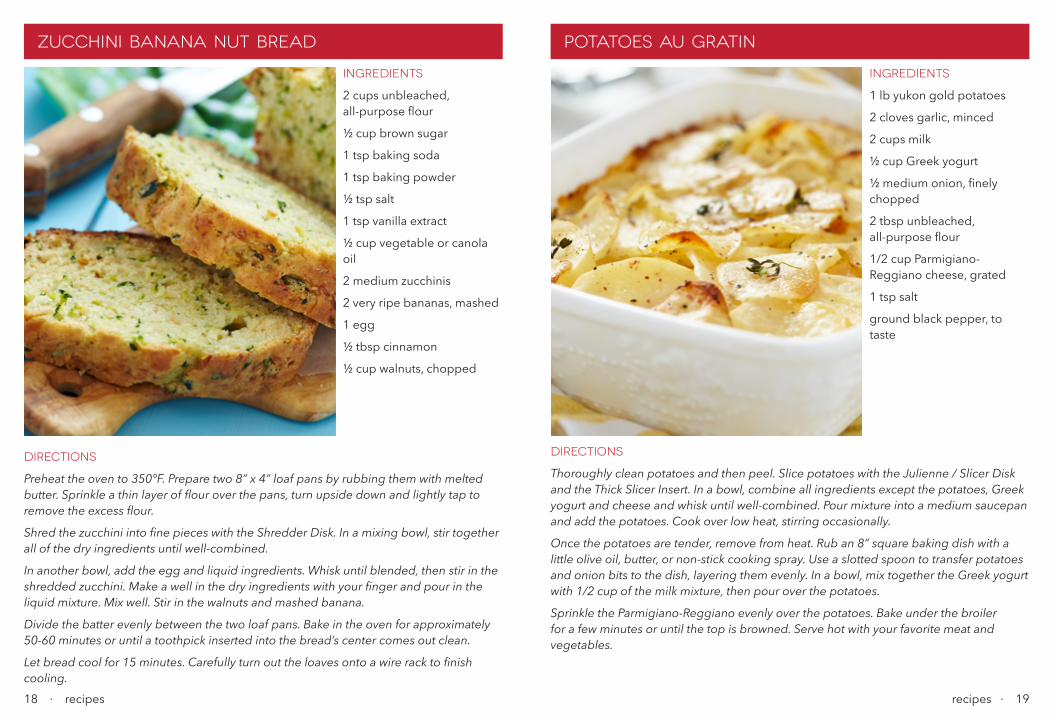
INGREDIENTS
2 cups unbleached, all-purpose flour
½ cup brown sugar
1 tsp baking soda
1 tsp baking powder
½ tsp salt
1 tsp vanilla extract
½ cup vegetable or canola oil
2 medium zucchinis
2 very ripe bananas, mashed
1 egg
½ tbsp cinnamon
½ cup walnuts, chopped
DIRECTIONS
Preheat the oven to 350°F. Prepare two 8” x 4” loaf pans by rubbing them with melted butter. Sprinkle a thin layer of flour over the pans, turn upside down and lightly tap to remove the excess flour.
Shred the zucchini into fine pieces with the Shredder Disk. In a mixing bowl, stir together all of the dry ingredients until well-combined.
In another bowl, add the egg and liquid ingredients. Whisk until blended, then stir in the shredded zucchini. Make a well in the dry ingredients with your finger and pour in the liquid mixture. Mix well. Stir in the walnuts and mashed banana.
Divide the batter evenly between the two loaf pans. Bake in the oven for approximately 50-60 minutes or until a toothpick inserted into the bread’s center comes out clean.
Let bread cool for 15 minutes. Carefully turn out the loaves onto a wire rack to finish cooling.
Zucchini Banana Nut Bread Potatoes Au Gratin
INGREDIENTS
1 lb yukon gold potatoes
2 cloves garlic, minced
2 cups milk
½ cup Greek yogurt
½ medium onion, finely chopped
2 tbsp unbleached, all-purpose flour
1/2 cup Parmigiano-Reggiano cheese, grated
1 tsp salt
ground black pepper, to taste
DIRECTIONS
Thoroughly clean potatoes and then peel. Slice potatoes with the Julienne / Slicer Disk and the Thick Slicer Insert. In a bowl, combine all ingredients except the potatoes, Greek yogurt and cheese and whisk until well-combined. Pour mixture into a medium saucepan and add the potatoes. Cook over low heat, stirring occasionally.
Once the potatoes are tender, remove from heat. Rub an 8” square baking dish with a little olive oil, butter, or non-stick cooking spray. Use a slotted spoon to transfer potatoes and onion bits to the dish, layering them evenly. In a bowl, mix together the Greek yogurt with 1/2 cup of the milk mixture, then pour over the potatoes.
Sprinkle the Parmigiano-Reggiano evenly over the potatoes. Bake under the broiler for a few minutes or until the top is browned. Serve hot with your favorite meat and vegetables.

20 ∙ recipes recipes ∙ 21
DIRECTIONS
Preheat oven to 350°F and thoroughly grease a 9” x 13” pan. Shred the carrots with the Shredder Disk. In a large bowl, mix together the oil, sugars, eggs, spices, vinegar, orange rind, and baking soda & powder. Add both types of flour and whisk until well-combined.
Finally, mix in the carrots and raisins. The batter will be thick. Pour into the prepared pan and bake for 50-60 minutes or until a toothpick inserted into the cake’s center comes out clean.
Allow the cake to cool for about 30 minutes. While the cake sits, combine the Greek yogurt, powdered sugar, and vanilla extract in a mixing bowl and whisk well. If the frosting is too thin, you can add more powdered sugar to thicken it. Place cake on a cake plate and frost. If you do not want to use frosting, you can dust the cake with a little powdered sugar.
Carrot Cake with Greek Yogurt Frosting Sweet Potato Chips
Slow Cooker Beef StewINGREDIENTS
1 cup whole wheat flour
1 ½ cups flour
½ tsp baking powder
1 tsp baking soda
2 tsp cinnamon
1 cup sugar
½ cup brown sugar
1 tbsp vinegar
grated rind of 1 orange
1 cup vegetable oil
4 eggs
6 medium, raw carrots
1 cup raisins
Greek Yogurt Frosting
1 cup (6 oz.) Greek yogurt
½ cup powdered sugar
1 tsp vanilla extract
DIRECTIONSPeel and slice sweet potatoes with the Julienne / Slicer Disk and the Thin Slicer Insert. Add coconut oil to a shallow pan and heat over medium high heat.
When the oil is hot (it should sizzle when you add a sweet potato slice), add sweet potatoes in small batches, trying not to overlap the chips. Let fry for 3-5 minutes, turning about halfway through. Use a slotted spoon to remove chips from oil and lay out on a paper towel to soak up any extra coconut oil. Sprinkle with salt and pepper and enjoy!
INGREDIENTS
2 sweet potatoes
1 cup coconut oil
salt and pepper, to taste
DIRECTIONS
Using your Electric Mandoline with the Cube Disk, cube onion, potatoes, carrots, and celery. Add meat to slow cooker. In a small bowl, mix together flour, salt, and pepper and then pour over meat, tossing to coat meat in flour mixture. Add remaining ingredients to slow cooker.
Cover and cook on low for 8-12 hours, stirring occasionally until beef is tender and easily pierced with a fork.
INGREDIENTS
2 lbs stew beef, cut into 1” cubes¼ cup floursalt and pepper, to taste4 cloves garlic, minced1 tbsp tomato paste1 bay leaf1 tsp smoked paprika
1 tsp Worcestershire sauce1 onion1 ½ cups beef broth3 potatoes4 carrots2 stalks celery

For more information, please visit bydash.comCustomer Support 1-800-898-6970