Embed Size (px)
Citation preview
1
SOME TECHNICAL NOTES ON PLATINUM/PALLADIUM PRINTING Updated 11/17/2016
I hope you find this helpful; it is the worksheet I use in my workshops and is updated all the time, in my darkroom as things change daily. I will try to update this every so often. Nothing here is gospel and may not work for you. It is only a guide as you follow the winding path of Platinum/Palladium Printing. Remember this works in MY darkroom and may not in yours! If anyone ever tells you there is only one way to do anything in this process or gives you an absolute, you know they are not someone to believe. There are no are absolutes within this process and no way is better than another. If it works for you it's right. It all depends on the infinite factors within your darkroom and your life. Try them all and find your path. Feel free to email questions!
WARNING REMEMBER ALL CHEMICALS ARE DANGEROUS! BE SURE TO READ ALL INFORMATION ON CHEMICALS AND FOLLOW MANUFACTURERS WARNING. BETTER TO BE OVERLY CAREFUL! PLEASE WEAR ALL RECOMMENDED PROTECTIVE, CLOTHING, GLOVES, AND RESPIRATORS READ ALL MSDS'S. ALWAYS CHECK WITH LOCAL ENVIRONMENTAL PEOPLE AS TO SPECIFIC REQUIREMENTS FOR YOUR AREA AS TO DISPOSAL STORAGE ETC.
ALSO I RECOMMEND AS MUST READ: The Book of Alternative Photographic Processes 3rd Edition By Christopher James
TABLE OF CONTENTS:
ANALOGUE ENLARGED NEGATIVES PAGE 2 RETOUCHING ANALOGUE NEGATIVES PAGE 3 PHOTOSHOP COLOR SETTINGS PAGE 4 SCANNING BLACK AND WHITE FILM FOR ENLARGED DIGITAL NEGATIVE PAGE 5 DIGITAL ENLARGED NEGATIVES PAGE 8 PAPERS PAGE 16 TRADITIONAL PT/PL FORMULA PAGE 17 MIXING FERRIC OXALATE AND PALLADIUM FROM POWDER PAGE 18 CONTRAST CONTROL PAGE 19 TWEEN 20/PHOTO FLO PAGE 20 COATING THE PAPER PAGE 21 DRYING PRIOR TO PRINTING PAGE 22 EXPOSURE INFORMATION PAGE 22 BRONZING PAGE 23 DEVELOPMENT PAGE 24 CLEARING BATHS PAGE 25 GOLD TONE PAGE 26 WASHING PAGE 26 FINAL DRYING PAGE 27 RETOUCHING PRINTS PAGE 28 SUPPLIERS PAGE 29 ENLARGED NEGATIVES: THEORY & PRACTICE John Rudiak, Taos, New Mexico, 1998 PAGE 38
2
ANALOGUE ENLARGED NEGATIVES (Wet darkroom) A great 8x10 enlarger is the Zone V 8x10 enlarger with the 8x10 "smoke" stack and 8x10 neg carrier Calumet used to sell them but alas no more. Try to find them used but to the best of my knowledge they are no longer made. Then get an Aristo 8x10 head T-12 head and their voltage regulator (head should not have transformer inside you want to wall mount transformer and voltage reg. to wall and run cables to head on enlarger (cables also from Aristo). Call Voltarc Inc. Rick Mehda 203-578-4600 I believe they still sell them. You will have to make the adaptor for the T-12 but it isn’t hard to make it fit enlarger. ALWAYS CHANGE ONLY ONE THING AT A TIME! REMEMBER ENLARGED NEGATIVE IS ONLY THE FIRST STEP IN MAKING THE PRINT. YOU MUST RE-EVALUATE ENLARGED NEGATIVE AFTER FIRST PRINT TESTS AND MAYBE RE-DO INTERNEG. I DON'T LIKE TO TAKE POSITIVE OUT OF ENLARGER UNTIL A GOOD PRINT IS MADE! I am now almost exclusively making my enlarged negatives from scanned filmed negatives. I am included this section for reference but so many of the suppliers are now gone and the prices of large film has become so expensive. I am working with Mark Nelson’s digital method and find it outstanding. See section on digital negatives for more information. INTER-POSITIVE: I am now working with digital output of negatives made from film originals. Wynit Inc. sometimes has large films 1-315- 437-1086 For making the inter positive I use (thanks to so very much help from John Rudiack. Ilford Commercial Ortho film to make a 4x5 or 8x10 positive 1-2 foot candles on easel exposure 1-3 seconds develop in Ilford iflfotech 1-32 4-10 mins 70' Also sometimes I use HC 110 dil. B 4-10 mins 70'
It seems best if your positive is somewhat flatter than you think the final should be and you want detail in highlights and shadows! It should look like a print that you would make if you where going to do a two step Kodak sepia toned print, a little dark a little flat. When making the positive I tend to do very little work as far as burning or dodging and work toward making an image that has a very full tonal range. If you do any burning or dodging at this stage it is just like when you make a print on photographic paper. Most, if not all of my “work” on the image us done when I go from the inter-positive to the enlarged negative.
John Rudiack and I have been working with "Pan Film ISO 125" from Photo Warehouse 800-922-5484 and we love it. Remember if it ain’t in the positive it can't be in the negative!
3
MAKING THE ANALOGUE NEGATIVE:
Your negative must be the same size as your print as this is a contact printing process. One thing to remember is that burning and dodging have the opposite effect. Burn to make negative denser, hence print lighter- dodge to make negative thinner, hence print darker! Here is where you really can build the “print” (negative) so that no contrast agents are necessary nor is any burning or dodging necessary when you make the final print.
On: Illford This is panchromatic film NO SAFELIGHT! At the present time I am using Kodak D-19 straight or 1 to 1 at 70' for 5 -10 mins. and for more contrast D-8 1-1 or straight for 6-10 mins at 70'. Also selenium toning in 1-4 for 10 mins does great things to highlights and again helps add contrast. Here is when you control contrast and all other aspects of the fine print.
Both John and I feel this is our film of choice and I recommend using if you’re just starting out. You can only get it through Photo Warehouse 800-922-5484. They carry it in 40 inch rolls and will cut it to any size you wish in any quantity.
Lots of people are using litho films and other strange concoctions that cost much less but I feel that the extra money you spend for a really super negative will more than pay for itself in print quality time in the darkroom and print sales, or at the very least personal satisfaction.
I feel it is very important to make your enlarged negative with enough contrast so you can print with none of the additives that are used to increase the contrast of the paper, be it in the emulsion or the developer. All the additives seem to degrade the image. More about this in the printing section. RETOUCHING ANALOGUE NEGATIVES
Retouching enlarged negatives gives you great possibilities for adding detail to shadow areas and enhancing highlight. I recommend playing with this a great deal. You can do some amazing things with a little practice. Just remember when working on the emulsion side to be very careful!
Use Kodak opaque on base side of negative for pin holes and bad scratches. Use charcoal pencil (medium) or regular #2 pencil to do fine retouching work such as adding to highlights. For minor retouching work- work on base side of film. For radical work- work on emulsion side but be careful. Great new tool for me is the KOH-I-NOOR pencil- with removable leads. Use your finger or a smug tool to smooth out your work. Also, powered graphite or powered charcoal works well in shadow areas or for other large areas. Use by putting on finger and rubbing into negative. To remove excess pencil or graphite and smooth out your work use your fingers or a smug tool. To add density to large areas try a broad magic marker only on the base side of the film. You must use a "Stanford" deluxe permanent marker. I like the brown color. This brand will come off with film cleaner others I've tested will not. Pencil can also be removed with film cleaner. I've used nail polish remover minus all the additives to clean negatives that nothing else will clean. It may ruin the neg but with careful work it is quite effective!
For removal of water marks and other defects try using selenium toner 1 to 29 for about 2 to 5 mins. then wash and dry neg. It can and will remove a lot of marks. Be sure to soak dry neg. in water for 5 mins before you put in toner!
4
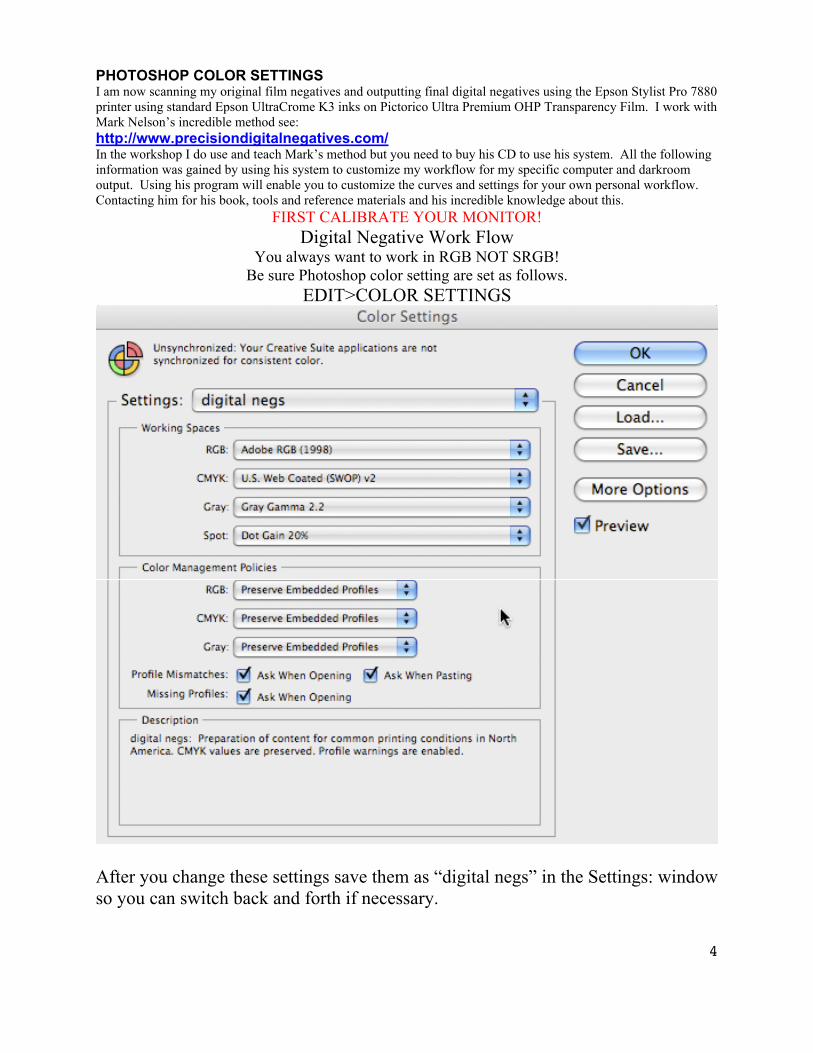
PHOTOSHOP COLOR SETTINGS I am now scanning my original film negatives and outputting final digital negatives using the Epson Stylist Pro 7880 printer using standard Epson UltraCrome K3 inks on Pictorico Ultra Premium OHP Transparency Film. I work with Mark Nelson’s incredible method see: http://www.precisiondigitalnegatives.com/ In the workshop I do use and teach Mark’s method but you need to buy his CD to use his system. All the following information was gained by using his system to customize my workflow for my specific computer and darkroom output. Using his program will enable you to customize the curves and settings for your own personal workflow. Contacting him for his book, tools and reference materials and his incredible knowledge about this.
FIRST CALIBRATE YOUR MONITOR! Digital Negative Work Flow
You always want to work in RGB NOT SRGB! Be sure Photoshop color setting are set as follows.
EDIT>COLOR SETTINGS
After you change these settings save them as “digital negs” in the Settings: window so you can switch back and forth if necessary.
5
SCANNING BLACK AND WHITE FILM FOR ENLARGED DIGITAL NEGATIVE
1) Scanning Black & White Film FIRST CREATE NEW FOLDER USING THE NAME OF THE PHOTOGRAPH YOU ARE WORKING ON. I work with a flat bed scanner and use Aztek smf 2001 Kami “scanner mounting fluid”
1. Clean glass on scanner 2. Clean negative 3. Pour a small amount of the mounting fluid on the bottom
glass. Use only enough to cover area of negative. I worry about fluid going under glass so don’t use too much but don’t skimp either. I have never had a problem with the fluid going under the glass and causing problems.
4. Place negative emulsion side up then pour some fluid on the negative and place a sheet of Aztek Scanner Overlay Graphic Arts Film on top of the negative and remove air bubbles by rubbing over top sheet with soft cloth. Keep pushing them around until they are not in the image area.
5. Close Scanner Top If your working with 35mm film this can be problematic because of the curve in the film there is not enough pressure to hold the negative flat. I have found that using a piece of glass about 4 inches square and 1/4 inch thick in place of the Overlay Film will hold the 35mm film flat. Do it exactly as above but use the glass in place of the overlay so there is fluid between top glass and neg. It is harder to get the bubbles out but with some effort you can do it.
Select IMPORT from the Photoshop FILE Menu (then select your scanning device) and scan neg. FILE>IMPORT
b) Set the following: (for Epson Perfection V750 Pro) i) Name: here you save the settings you use and can pull up your presets ii) Document Type Film with film area guide iii) Film Type: whatever it is iv) Image Type: 16-bit Grayscale (you will change to RGB later) v) Resolution 4800 (depending on the size of your negative and the size you
want final file to be)

6
vi) Document size is size of original thing you’re scanning. (if you leave this default and then when you use the area guides in preview it will set it automatically) You do not have to type anything here.
vii) Target size should be Original viii) There is a check box for Unsharp mask I usually have it checked and
set at medium. You should play with this and see what works for you. ix) Select PREVIEW x) Set scanning area guides if necessary xi) Hit Zoom xii) You can crop more here if you want xiii) NOTE IF SCANNING COLOR ORIGINALS BEST TO HAVE
SCANNER SET TO 16 BIT GRAYSCALE TO DO YOUR SCANNER ADJUSTMENTS THEN SWITCH TO 48 BIT COLOR TO SCAN IT.
xiv) Under Adjustments Adjust Input levels until ALL detail is present in negative and it looks a bit flat then close dialoged box. I almost always leave the output levels in their default settings unless I run into real problems. You are looking for scan that has all the information in the negative not something that looks like the way you want the final print to look.
xv) SCAN negative MAKE NEW FOLDER WI TH SAME NAME AS IMAGE and save file as “Name of Image_raw.tiff “ This file you will never mess with and should be saved to the folder you have already created with the same image name. FILE>SAVE AS

7
my settings for 4x5 P/N Polaroid Film

8
DIGITAL ENLARGED NEGATIVE Build your file structure so you can keep all this stuff organized: FIRST PICK YOUR IMAGE AND MAKE A FOLDER WITH THAT NAME AND PUT RAW FILE IN IT! ALL FILES WILL GO IN HERE FOR THAT IMAGE!
You have already created a new Folder in “My Working Images” folder” and named it the same as this picture will be. Save file with same name to the Folder with the same name “SAME NAME_RAW.TIFF You will never mess with this file.
9
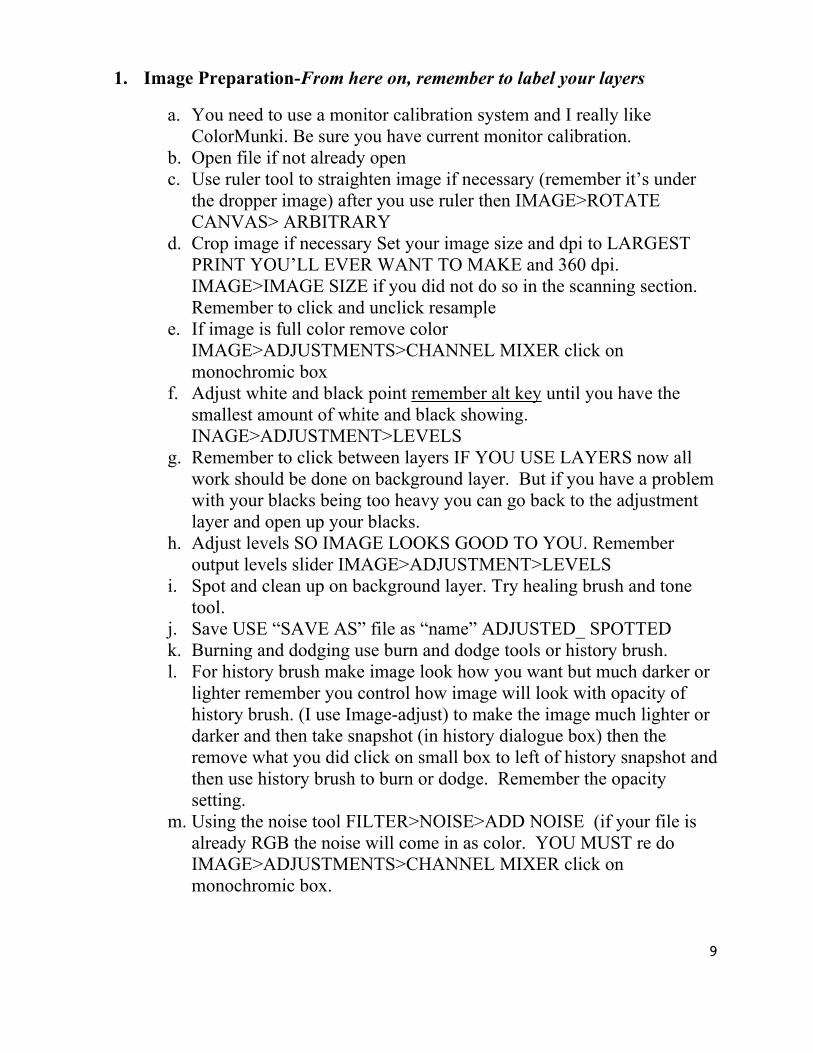
1. Image Preparation-From here on, remember to label your layers
a. You need to use a monitor calibration system and I really like ColorMunki. Be sure you have current monitor calibration.
b. Open file if not already open c. Use ruler tool to straighten image if necessary (remember it’s under
the dropper image) after you use ruler then IMAGE>ROTATE CANVAS> ARBITRARY
d. Crop image if necessary Set your image size and dpi to LARGEST PRINT YOU’LL EVER WANT TO MAKE and 360 dpi. IMAGE>IMAGE SIZE if you did not do so in the scanning section. Remember to click and unclick resample
e. If image is full color remove color IMAGE>ADJUSTMENTS>CHANNEL MIXER click on monochromic box
f. Adjust white and black point remember alt key until you have the smallest amount of white and black showing. INAGE>ADJUSTMENT>LEVELS
g. Remember to click between layers IF YOU USE LAYERS now all work should be done on background layer. But if you have a problem with your blacks being too heavy you can go back to the adjustment layer and open up your blacks.
h. Adjust levels SO IMAGE LOOKS GOOD TO YOU. Remember output levels slider IMAGE>ADJUSTMENT>LEVELS
i. Spot and clean up on background layer. Try healing brush and tone tool.
j. Save USE “SAVE AS” file as “name” ADJUSTED_ SPOTTED k. Burning and dodging use burn and dodge tools or history brush. l. For history brush make image look how you want but much darker or
lighter remember you control how image will look with opacity of history brush. (I use Image-adjust) to make the image much lighter or darker and then take snapshot (in history dialogue box) then the remove what you did click on small box to left of history snapshot and then use history brush to burn or dodge. Remember the opacity setting.
m. Using the noise tool FILTER>NOISE>ADD NOISE (if your file is already RGB the noise will come in as color. YOU MUST re do IMAGE>ADJUSTMENTS>CHANNEL MIXER click on monochromic box.

10
n. If necessary you can also sharpen image but be careful this can cause digital signatures. FILTERS>SHARPEN>UNSHARP MASK. I like the unsharp mask but there are many other ways to sharpen the image.
o. I like to use lightroom to do vignettes and various corrections. I am using lightroom more and more to control exposures etc..
2. Conversion to Negative
a. Open FINAL Image File if not already open b. Check Image Mode (RGB-16 Bit) change if necessary
IMAGE>MODE c. Flatten All Layers if necessary. LAYERS>FLATTEN d. Resize to Final Print Size for Negative you want to make (360 DPI)
IMAGE>IMAGE SIZE remember to click and unclick resample e. IMAGE>ADJUST>CHANNEL MIXER CLICK MONOCHROMIC
BOX f. INVERT Image (IMAGE>ADJUSTMENTS>INVERT) g. Rotate image if necessary IMAGE>ROTATE CANVAS h. CREATE Curve ADJUSTMENT Layer and Label It “contrast and the
# you will use. LAYERS>NEW ADJUSTMENT LAYER>CURVE
i. LOAD Process Adjustment Curve (Stupid Little Box) to left of okay button- of course you have no curves to load until you buy Mark’s program and do the work.
j. SAVE FILE as“name”ADJUSTED_SPOTTED_FINAL_NEGATIVE This should be the full name of the last file you were working. DO NOT FLATTEN FILE! IF YOU HAVE TO ADJUST CONTRAST YOU CAN REMOVE CONTRAST LAYER AND APPLY NEW ONE. IF YOU DECIDE TO DO ANY WORK ON THE IMAGE GO BACK TO THE FULL SIZE FINAL DO THE WORK THERE THEN RE- SIZE AND START OVER WITH b.
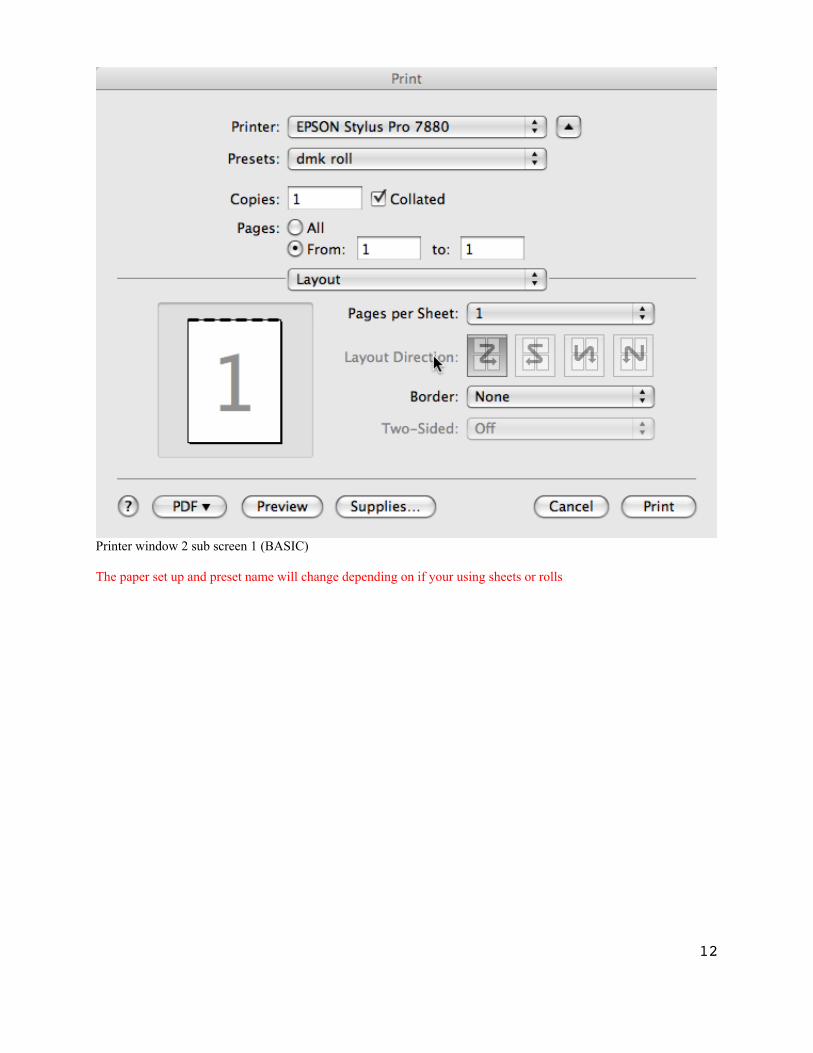
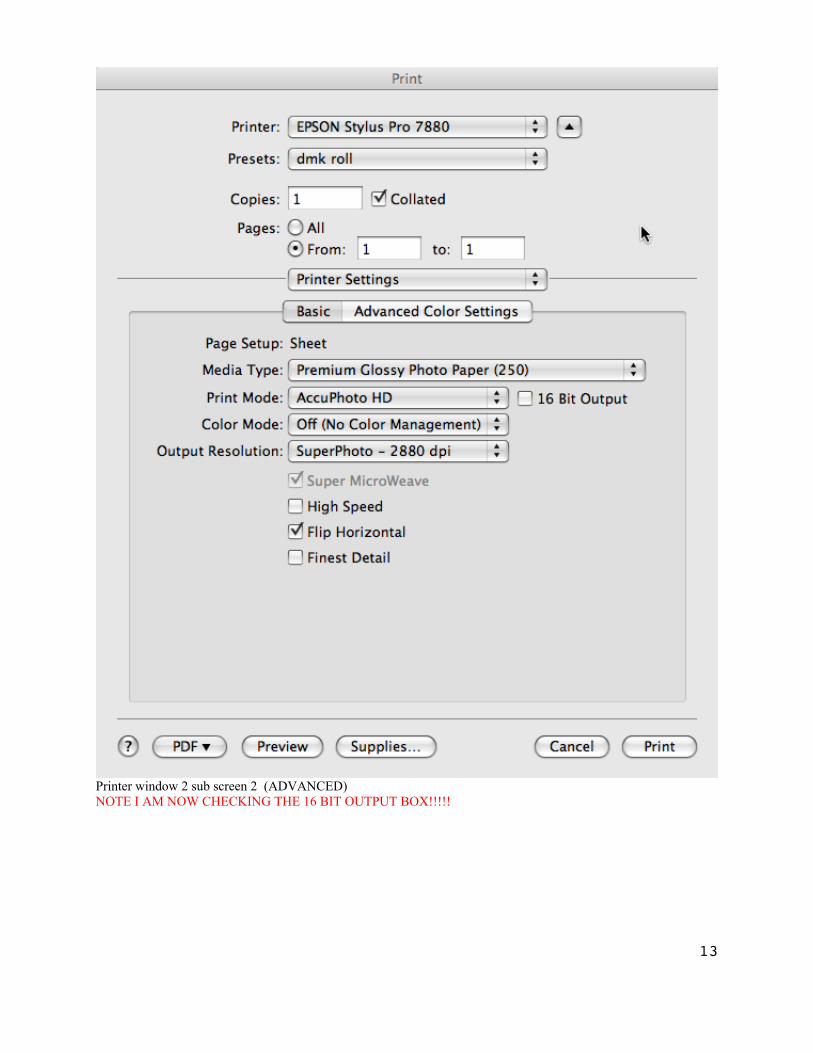
k. Print FILE>PRINT
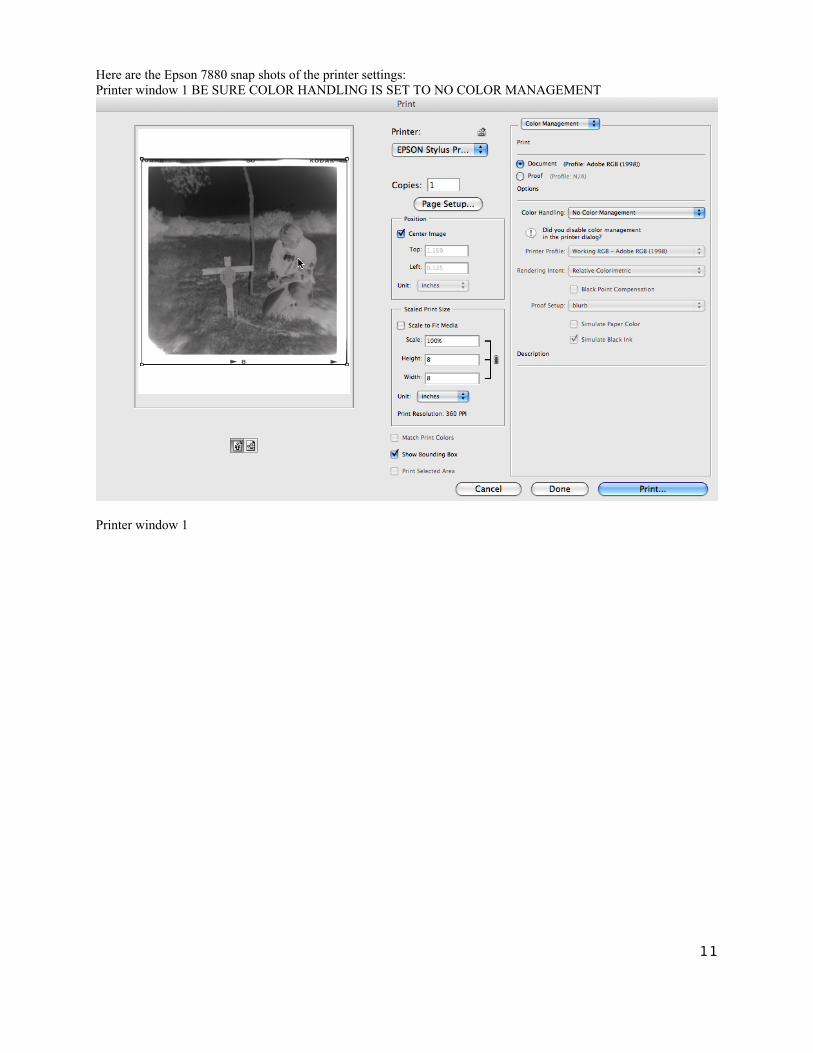
11
Here are the Epson 7880 snap shots of the printer settings: Printer window 1 BE SURE COLOR HANDLING IS SET TO NO COLOR MANAGEMENT
Printer window 1
12
Printer window 2 sub screen 1 (BASIC) The paper set up and preset name will change depending on if your using sheets or rolls
13
Printer window 2 sub screen 2 (ADVANCED) NOTE I AM NOW CHECKING THE 16 BIT OUTPUT BOX!!!!!

14
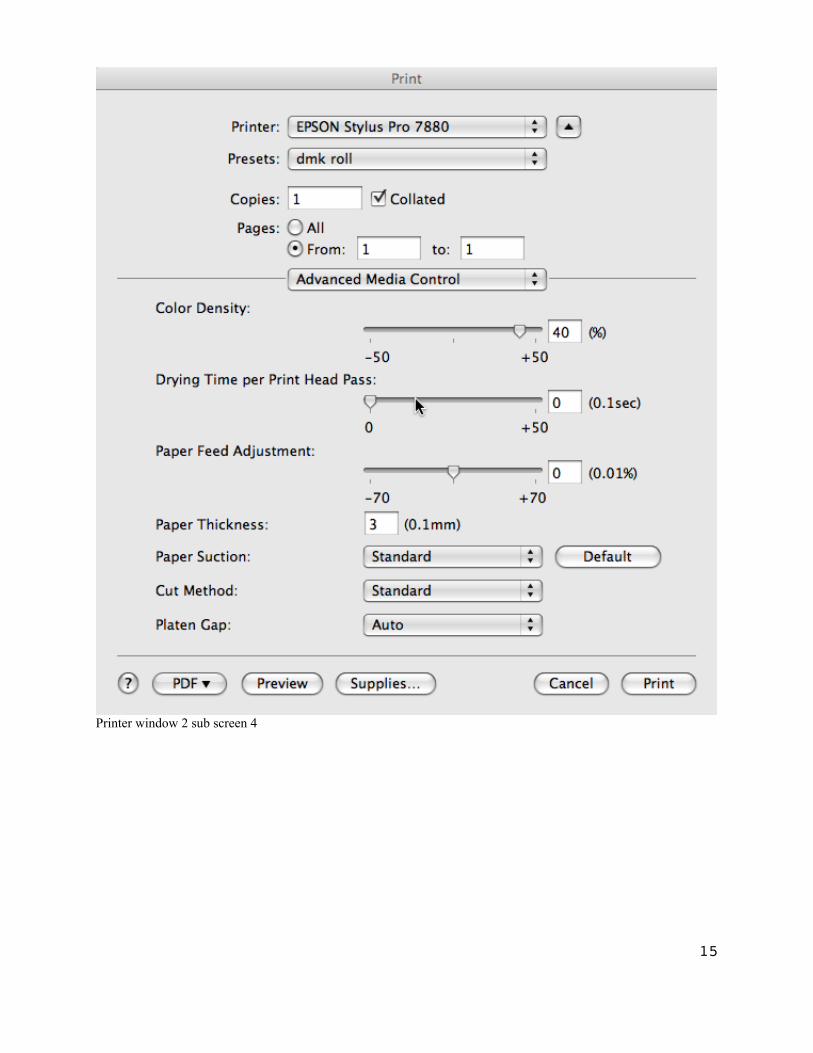
Printer window 2 sub screen 3
15
Printer window 2 sub screen 4
16
PAPERS This is where you'll learn just how good your Karma is. Perhaps one of the most important things is the surface we print on and guess what, it's one of the ones we have the least control over. You'll learn paper manufacturers don't like us. We do things to their papers that show every minor change they make, and I have yet to find any sympathy from them. Good luck! All papers will react differently, need different clearing baths, amounts of emulsion, exposure times etc. ALL PAPERS MUST BE CHECKED FOR "BLACK SPOTS" IMPERFECTIONS IN PAPER- INSPECT BY TRANSMITTED LIGHT. Try tearing the paper so they end up in shadow areas of print because they will show in the final print and etching them out is a pain- if possible at all. A beautiful print with a big black spot in an otherwise flawless skin can really make me cry. THIS IS A NEW REVERE THAT DOES NOT WORK LIKE THE OLD STOCK BUT I AM GETTING GOOD RESULTS USING 1ml of TWEEN 20 10% solution to 40 mls total emulsion Revere Platinum Paper Made by Legion Paper is now available in two weights. 1. 300 gsm sheets in 22x30 and 30x44
CLEARING BATH I AM USING I GAL H2O about 1/3 cup EDTA AND 3 OZS PREMA WASH. IT CLEARS EXTREMELY WELL!
It is a mould made, 100% cotton, neutral pH paper with NO buffering agents (calcium carbonate) and has 4 deckled edges with the REVERE watermark. Wonderful warm tones with hot potassium oxalate Remember do not cut paper with razor blade and metal ruler! Most printers rip their paper to size with a metal ruler. The razor blade and ruler will cause small specks of metal to cover your paper and cause tons of black spots. I use a Alvin Tempered Stainless steel Cutting Straight edge. Available at: http://www.opentip.com/product_info.php?products_id=881194 In my darkroom I heat everything in my microwave. This allows me to use plastic containers and keep things very constant without putting undue humidity into the air. I also use a triple beam scale but a good digital one should work as well for measuring chemicals.
For glossy finish: flatten paper in the dry mount press then apply wax and rub in until it is totally absorbed. For Matte Finish : After the paper is dry prior to putting it in the dry mount press apply the wax. Then I put it in the dry mount press at about 250 degrees for about 20 seconds. This allows the wax to sink into the paper and removes the shine from the wax as well as deepens the blacks. I am using Dorland’s Wax Medium. I just apply a good amount rub it until it in. It does not have to look shinny or totally smooth but you don’t want “globs” of it on the paper either. Just get some wax all over the paper.

17
ALL WATER USED TO MIX CHEMICALS AND DEVELOPER IS DISTILLED WATER. AFTER DEVELOPMENT I USE TAP WATER FOR CLEARING AND WASH. IF I HAVE
CLEARING PROBLEMS I MIGHT TRY USING DISTILLED WATER IN MY CLEARING BATH AS WELL.
TRADITIONAL PT/PL FORMULA
DATE FERRIC OXALATE BOTTLES AS YOU MIX THEM Total # of drops will increase as image size increases. Also number of drops for any given image size will vary due to paper thickness and absorbency of paper. I like to coat with a lot of emulsion- some people feel a thin coat is better...... My starting point: 8X10 = 30 DROPS 16X20 = 130 DROPS When mixing sensitizer, use these figures as a starting point- Multiply number of drops needed by the following: Sol 1 is Ferric Oxalate, the light sensitive stuff Sol 2 is ferric Oxalate and Potassium chloride the contrast control agent for the emulsion bad stuff- more later Sol 3 is the metal Palladium, Platinum or a mix of both. FOR VERY SOFT NEGATIVES (HARD PAPER GRADE 5? SOL 1: 0 SOL 2: 0.478 SOL 3: 0.521 FOR SOFT NEGATIVES (GRADE 4?) SOL 1: 0.174 SOL 2: 0.304 SOL 3: 0.521 FOR AVERAGE NEGATIVES (GRADE 3?) EXAMPLE FOR 30 DROPS: SOL 1: 0.304 0.304 X 30 = 9.12 DROPS SOL 2: 0.174 0.174 X 30 = 5.22 DROPS SOL 3: 0.521 0.521 X 30 = 16.63 DROPS FOR MODERATELY CONTRAST NEGATIVES (GRADE 2?) SOL 1: 0.391 SOL 2: 0.086 SOL 3: 0.521 FOR VERY CONTRASTY NEGATIVES (SOFT PAPER GRADE 1?) SOL 1: 0.478 SOL 2: 0 SOL 3: 0.521 Note: solution 2 is often labeled ferric oxalate #2 or ferric oxalate#2(pt). You use (pt) only with pure platinum. Platinum is more contrasty than palladium so the #2(pt) has less potassium chloride which makes it a less contrasty #2. Good idea to mix all chemicals 12 hrs. Before use. Be sure to wait until the Ferric oxalate solution is clear!
If there is a residue in the bottom of palladium solution #3, you can add small amount (a few grains) of normal table salt to the liquid to get everything back into solution. Or heat up chemicals slightly. If there is a residue in platinum heat bottle and shake do not add salt!
18
Remember that when you use palladium and platinum in combination the total # of drops changes as a sub-formula to the sol 1, sol 2, sol 3 formula IE: 10-0-10 (5pt.-5pl.) changes to 8-0-8 (4pt.-4pl.) for a 50% Platinum Palladium Print with no #2. MIXING FERRIC OXALATE AND PALLADIUM FROM POWDER Wear respirator! I think it is best to buy in powder and mix it yourself. FERRIC OXALATE (27 percent solution) 27 grams to 100 mls distilled water plus 2 grams oxalic acid heat water to about 200 degrees add ferric oxalate and oxalic acid mix well it will look like dark green murky pea soup when first mixed I like to mix the night before I print but you may use it as soon as cloudiness disappears, and it cools down-about 2 hour. If the ferric oxalate solution stays murky pea soupy you do not want to use it. Possible causes for this are improper mixing or the water you used was too cold. You can try reheating the solution but perhaps best to just mix new. STORE IN LIGHT PROOF BOTTLE PALLADIUM 100 mls distilled water 7 grams sodium chloride 10 grams palladium chloride heat water to quite hot 200 degrees or more add salt FIRST and stir well add palladium stir well and let it cool. Date ferric oxalate, as it does not have a long shelf life once in liquid form one to three months max! You may add a few drops of hydrogen peroxide in an emergency but best to throw out if unsure. It will keep longer in refrigerator. Perhaps 1 to 2 months longer. As it goes bad you will begin to notice fogging in your highlights and a loss of contrast. In powder form it lasts for years, or so I'm told. Palladium will last forever in power or in liquid. Ferric oxalate will last for years in powder form in dry tight cool environment. Photo Flo 200 With many papers I find that for every 16 mls of total solution adding 2 drops of Photo Flo 200 really give a good smooth coat and the paper only needs one coating. It also allows the emulsion to sink deeper into the paper and improves your blacks.
As to droppers- they make a tool called a pipette- device for measuring liquid. With a "pipette pump" attached you can measure out and dispense liquid so much faster and more accurately than with droppers. They are cheap and easy to use. Everyone who has tried them stops using droppers. With 2ml 1/10 ml gradation pipettes 1 drop = 1/10 ml. see suppliers list. For larger prints go to 5 ml pipettes and 5 ml pumps On some papers I have found that double coating dose help dmax and bronzing problems as well as often giving you a richer print. My method is to coat a single coat, let it dry fully- in my darkroom about 20 mins then apply the second coat. I use the same amount of solution for
19
both coats but if I am using TWEEN I reduce by 2 the amount of TWEEN in the second coat. During the summer months- higher humidity I use 10% more solution in the 2nd coat. Most negs will print fine with a single coat but double coating is something to keep in mind. Since switching to Revere Platinum I find I never need more than one coat of emulsion. CONTRAST CONTROL WORKING WITH DIGITAL ENLARGED NEGATIVE YOU SHOULD CONTROL CONTRAST ONLY IN THE NEGATIVE. YOU HAVE TOTAL CONTROL THERE AND ALL THE FOLLOWING DO SEEM TO DEGRADE THE IMAGE.! You should control your contrast in your original negative be it an in camera or enlarged negative!!! In camera using exposure and development compensation and when enlarging negatives using curves and levels if your working digital and use exposure and development if your working analogue. So using contrast controls when printing is a last ditch effort.
As I've said potassium chloride added to the ferric oxalate is the traditional method of contrast control. I find it adds a sort of lumpy grain to the image and also cools down the image. I NEVER use it! Some people also feel that adding platinum to the emulsion is a way to add contrast. I hate to disagree but even though Platinum is somewhat more contrasty than Palladium the main reason to vary the amount of Platinum to Palladium is for color issues not contrast control. Also I have found that “toning” my negative in selenium toner 1-4 for about 4 mins will increase contrast. This seems to add about one paper grade to the negative but it is not reversible so be sure you want it before you tone it. I have found the following to be quite effective when I can not get the necessary contrast from my negative: DICHROMATE METHOD OF CONTROLLING CONTRAST
This seems to be the best solution to controlling contrast in the printing if you just can't make your negative contrasty enough! I now make sure, when ever possible, that my negs have enough contrast so that I can use a #1 - #3 mixture always!!!
THIS WILL ALSO DEGRADE THE IMAGE TO SOME DEGREE. A 50% solution is made by adding 50 grams of sodium dichromate to 100 mls. of HOT distilled water. This is hard to get into solution and may requite re heating and lots of shaking but it will go into solution. SODIUM DICHROMATE FOR CONTRAST CONTROL Keep each contrast developer labeled in a separate bottle do not interchange YOU MUST USE POTASSIUM OXALATE DEVELOPER WITH THE DICHROMATE METHOD! YOU ALSO MUST USE GLOVES WHEN WORKING IN THIS DEVELOPER! CHECK OUT MSDS'S AND RELATED INFO BEFORE USING THIS OR ANY OTHER CHEMICALS! ALL PAPERS ARE COATED WITH NO SOLUTION #2!!! DROPS OF 50 % DICHROMATE TO 200 ML POT. OX DEVELOPER minor increase in contrast 1 add more contrast 2 even more 4 much more 8 major increase in contrast 16
Replenish developer with 200 ml of potassium Oxalate with the proper number of drops
of dichromate to 200 ml water.
20
To make a 50% solution of Sodium Dichromate add 50 grams of it to 100 mls of very hot water and shake, shake, shake it takes along time to go into solution and you may want to reheat it. It will last forever. You can change these formulas to fit your own contrast ranges but remember to keep each different mixture labeled and in it's own jug. Also this stuff is not good for you. Read MSDS!!!
TWEEN 20/PHOTO FLO Photo Flo 200 Is not working with the new Revere Platinum paper! But will work very well with other papers and is always work a try. TWEEN 20 "POLLY SORBATE 20" 10% solution
With the new Revere Platinum paper I have found the ONLY way to get very smooth clean coatings is to us 1ml of TWEEN 20 10% solution to 40 mls total emulsion.
I use TWEEN 20 in many dilutions from 50% down to 5% depending on what paper I am
using. The strength depends on what paper you are using. Some papers like TWEEN others hate it. With Archers Platine be carful with TWEEN most often TWEEN causes problems with this paper.
You should try using tween 20 at any dilution you want but I have found that at heavier concentrations you run into a problem with developer stain. This may be due to how hot my developer is. On some prints with very large black areas I do use it at 50% to help get very smooth deep blacks but I am very careful in putting the print in the developer. Also the developer seems to eat up the tween 20 so the staining problem tends to remain (with that developer) even after you go back to a weaker dilution in your emulsion mix. Tween 20 works much different than photo flo!
As far as I can tell tween 20 helps to keep the emulsion on the paper surface longer so you have more time to work with the coating. Photo flo helps the emulsion sink into the paper by helping to break through the sizing.
21
COATING THE PAPER 1. TESTING COATING AREA AND FERRIC OXALATE Whenever you set up a new coating area be sure to test for light fog! Coat (with fresh Ferric Oxalate) and dry a sheet of your normal paper. After you dry it put paper face up on coating area and cover part of the paper with a cup etc. and leave for 5 to 10 mins. Then develop, clear, wash and dry normally. If you see any image on paper after it is dry then you most likely have too bright a coating area. If the image goes to a grey tone you have a fogging problem caused by old ferric oxalate or too much light in coating area. If the image goes to yellow you have not cleared the paper fully. 2. FERRIC OXALATE, FOG AND CLEARING TEST Prepare paper to make print for your normal contrast. Do everything just like you would to make a print except don't expose paper! After paper has been dried, develop unexposed paper, clear wash and dry paper your normal way. If the paper looks grey where the emulsion was applied: 1. the light you use while coating is too bright or somehow you have fogged the paper. 2. the ferric oxalate is old. You can give it a little jazz by adding a few drops of hydrogen peroxide to ferric oxalate 2. But I'd throw it away! If the paper looks yellow where the emulsion was applied: 1. Your clearing bath method is not effective. This could be due to time in baths, weak or over used baths or the chemicals your using, etc. etc. Remember: Yellow stain= chemical stain or bad clearing Grey "stain"= fog density buildup NOW YOU ARE READY TO COAT THE PAPER Remember to use only tip of brush and be gentle do not overcoat! Write all information on print!
I coat in my darkroom with a dimmer switch and two lights above the coating surface. I turn the dimmer down until it is low level light but easy to see my paper and coating areas. So how do you get it onto the paper? Again there are as many ways to coat paper as there are people coating paper. I only use high quality brushes I have been using a 2 inch 6014S Sterling Studio Blender and Da Vinci Cosmotop Spin Flat Wash brush lately for prints up to 11x14 inch and it has metal so I watch it very carefully and in over a year I have not seen the residue from the metal drift down the brush far enough to effect the coating. For more “feathery” borders I use Yasutomo 4 3/4 INCH # BF300 for prints bigger than 8X10 and 2 2 INCH BRUSH BF 216 for smaller prints. Yasutomo no longer makes big brushes so I use Holbein brushes (see supplies below). I am also trying Da Vinci Cosmotop Spin Flat Wash brush in up to 4 inch for larger prints. I pour the emulsion on the paper top to bottom then spread it out left to right as I work I turn the paper and continue to brush left to right as the emulsion soaks in. I coat so heavy that sometimes I have to wipe off excess emulsion (from the brush) onto a paper towel. After I feel the paper is full coated I sometimes use a dry brush to help smooth out and remove any excess emulsion. This also adds to your brush strokes around the outer edge of the print. If you listen your paper will talk to you and tell you when your done coating it. Try not to brush too much or too hard. This will degrade the surface of the paper and hence your final image. If you think of the brush as a feather you are tickling someone with…
Many people are having great success with a tool called "The Puddle Pusher" a glass rod with a handle used for coating. Me, I can't make it work to save my life. Some use
22
combinations of both Puddle Pusher and a brush. Others use foam brushes, I believe they tear up the surface of the paper too much. DRYING PRIOR TO PRINTING
When using a hair dryer to dry your paper tiny particles of emulsion may be blown into the air. If breathed, they could be quite dangerous so wear a respirator. I am now drying my paper for 1/2 to 1 hour prior to printing. I want the paper to be dry but not bone dry. The time will vary depending on the humidity. I have found that as a hair dryer gets old it starts to shoot out little bits of metal and causes lots of black spot problems. Today if I use a
hair dryer I use it on the side of the paper that has no emulsion if I use one at all. In my darkroom a "hang dry" of about 20 mins works well. Today there is a great debate among printers as to humidity and the factors it plays in the image. Many people are having great success using humidity to control everything from contrast to color of the print. In my own personal opinion, and only perhaps because I have not played with it much I find the paper prints best when almost completely dry but with a very slight "dampness". I also like to use my paper within 12 hours of coating. After that I tend to throw the paper out. Other people like to coat and let the paper "age" for at least 24 hours before using. Remember what works for me may or may not work for you. Depending on where you live, time of year, humidity, weather and what you ate for dinner will all affect your working methods and results. I kid you not. EXPOSURE INFORMATION At one time I used an old style wood contact printing frame for paper size up to 11x14 and image size up to 8x10. For larger size you really need to be using a vacuum press to keep negative and paper in contact! Now I always use my vacuum press. Vacuum presses can be readily found as used items in the graphic arts/printing trade. As digital sweeps the printing industry vacuum presses are being scraped. I just picked up a 30 X 50 for around $250.00. I highly recommend using one for all sizes. The one disadvantage is that if you are using one of the processes that requite you to inspect the print during exposure there is no split back to allow you to look at the images during exposure. Me, I've never been able to tell much by looking at the print during exposure. If you want clean white boarders you need to mask the negative I use a graphic arts material called "orange vinyl mask " comes in 25x30 inch sheets also use silver metal tape. Made by Base Line Graphic Arts Products www. base-line.com. It is a “pre-press plastic. They do not sell direct but will give you a supplier near you. There are also as many light sources as there are printers. Remember we are working with UV waves! Very bad for eyes and skin so wear sunglasses and protective clothes and or keep light enclosed in unit. You can find commercially made ones ranging from a few hundred dollars into the thousands. I made my own which is composed of 16 uri 36 inch 85 watt bulbs with internal reflectors. It is powered by 4 electronic 66 ice cap ballasts the bulbs are about 1/8 inch apart. This unit is super bright and Fast! Info in suppliers’ section. The sun is also a viable light source. If combined with a Metrolux unit and a UV filter over the probe you can get very controllable results, but some very long exposure times. Some of the best pre-made light sources and vacuum presses are made by Edwards Engineered Products TALK TO JON 512-267-7274 Lago Vista, TX www.eepjon.com makers of light sources and various other interesting darkroom equipment.

23
The Metrolux II w/ probe measurers the quantity of light as apposed to the time/light relationship. This is so much better as what we are really interested in is the quantity of light. The Metrolux takes into account clouds passing over the sun as well as the bulb in you units getting old, voltage spikes etc. Good luck find one these days but it is worth he effort if you do. BRONZING I think one should do a sheet of test strips to determine what the maximum exposure for any given paper-emulsion-developer combination to determine if double coating is necessary and at what exposure time it would become necessary. BRONZING IS CAUSED BY TOO MUCH LIGHT HITTING TOO LITTLE EMULSION
possible remedies: 1. Less exposure 2. More metal in emulsion) ie: 50-0-50 could be 50-0-60 3. Double coat dry paper normally between coats! 4. Less contrasty emulsion
5.add some photoflo 1 drop or so of it (dilute 1 drop per 25 drops of distilled water) to emulsion to start increase # of total drops of emulsion as paper will become more absorbent with the photo flo
24
DEVELOPEMENT Again there are so many possibilities developers. For a very grainy, contrasty look try plain hot water! Your exposure times will greatly increase. One of the old stand bys' and the one I use is Potassium Oxalate in a saturated solution. Standard mixture for potassium oxalate is 1000 grams to 1 gallon distilled water. This will give you a saturated solution at room temp. If you heat the developer you will need more. Basically the hotter the developer the warmer the print. I use my developer around 150 degrees.
When using room temperature developers most people let the print remain in the developer up to 2 minutes. When using very hot developer, as I do I will develop for a full minute with constant agitation as I find it helps clearing. When using hot developer the print must go into the developer in one even movement. Any areas of the print that dose not get the developer evenly will not "catch up" and you will get uneven developer marks when the print is dry. Another pit fall of using hot developers- most printers feel that as developers age (get darker) they get better. Unless contaminated the developers are mostly good forever. But when used hot after they get to a certain darkness you start to get a lot of black developer stains no matter what you do. So if you’re going to work with very hot developer to get warm tones you have to watch for any staining on the paper if the developer gets very dark and replenish with fresh clean developer. Try aquarium heater to control temperature of chemicals. Perhaps a good “replenishment system” is to have a few gallons of pre mixed fresh developer in a separate jug and as the solution in your working developer runs out just add more liquid from the jug. Potassium Oxalate developer will cause any cuts to infected. So if you have cuts on your hands be sure to use plastic gloves. If the cuts get infected put Ichthammol Ointment 20% and cover with a band-aid. Will get better in a day or two.
TO GET:
WARMER COOLER USE ONLY PALLADIUM USE MORE PLATINUM
USE POTASSIUM OXALATE DEV. USE AMMONIUM CITRATE DEV. HEAT DEVELOPER USE DEV. COOLER
USE WARMER PAPER USE COLDER PAPER
FOR ADDED WARMTH WITH POTASSIUM OXALATE DEVELOPER: 280 GRAMS POTASSIUM OXALATE
20 GRAMS SODIUM PHOSPHATE DIBASIC 6 GRAMS OXALIC ACID
800 MLS DISTILLED WATER @140 DEGREES THEN DISTILLED WATER TO MAKE 1 LITER
I use the amount of platinum to palladium to control tones. There are some other slight side effects but the main reason to add or remove platinum from the emulsion is to cool down or warm up the print.
25
CLEARING BATHS I am now using PREMA WASH (3OZ. TO A GALLON OF H2O) AND ABOUT 1/3 CUP OF EDTA as a clearing agent with the Reeves paper. I find the paper is mostly clear by the time it leaves the hot developer and the edta /prema clears it very nicely in 2 - 5 minute baths. I check the paper by transmitted light looking at it from the base side of the paper. For any yellow orange staining. I also fine for stubborn clearing problems that a bath of 1 cup EDTA, 1 cup citric acid and 1 cup sodium bisulfate to a gallon of very warm water will get out many stubborn clearing problems. ALWAYS ADD ACID TO WATER ALL AT ABOUT 70- 80 DEGREES AGITATE OR YELLOW STAINS MAY APPEAR! Different papers will respond differently to different types. Throw out the baths as they turn yellow. Last bath should always be clear! Here are some I've tried and found to work well 1- Kodak hypo clear (Perma wash works just as well). Mix as per instructions for prints. Do 2 baths 8 mins each. It contains sodium sulfite as well as citric acid and edta. You can make a much cheaper version of this by adding 3-6 tablespoons Sodium sulfite and 3-6 tablespoons edta to 1 gallon of water. 2- hydrochloric acid (muriatic acid) 28% solution dilute 25-60 mls. to 1 gal water. Works very well, but is very toxic be careful!
I've been using muriatic acid (hydrochloric acid) 31.45 % (use about 25-60 mls per gallon water), from hardware store and it seems to be working fine. Much cheaper than stuff you get at the pharmacist use 3 baths 5 mins. per bath. Do not recommend very toxic! It will etch highlights after an hour or two. 3- citric acid for first 2 baths (diluted 4 to 6 tablespoons to 1-gallon tap water. Then use a 3rd bath sodium sulfite (4 teaspoons to 1 gal water) very effective.
26
GOLD TONE Gold tone can create interesting tones. In Palladium more reddish purple, in Platinum more blue purple. This method works quite well. It works quite well and does not stain The amounts are not critical and can be adjusted to suit individual needs. USE AT ROOM TEMP. Sol A: Sodium formate 2 gms. Water 500 mls.
Sol B: Gold chloride 5% 2 to 5 mls (to make 5% 1 gram gold chloride to 20mls distilled h2o) Clearing bath: HC110 25mls water 500 mls or Stock Dektol 100mls Water 400mls Make sure the print is fully cleared and washed. Add solution a to b. The clock has now started. Put in the print and observe toning. It will go faster under a bright light. Toning may take as long as 10 minutes. The toner is no good when the slight yellow color is gone-do not use it will stain! Quickly put the print in the clearing bath (either one). This will reduce out the remaining gold in the print. This step is necessary or the print will dry nicely and look like it was printed on a brown paper bag in the morning. The trick is to stop before you get to the point you'd like to get to with the toning. Even a slight toning will pop the d-max nicely, but it is very hard to observe this while it is happening. The more formate the faster the toning and the bigger the risk of staining. The amount of gold also controls the depth and amount of toning. FINAL WASHING
There is much said about the final wash. Depending on who you talk to 5 minutes to 1 hour. The bottom line is this has no gelatin, fix or other stuff that wants to hold onto the paper. I think 30 minutes is more than enough. I have designed my own washer. Most commercial tray washers shoot the water around too fast and it can hurt the paper surface. Remember the paper and emulsion are very delicate at this stage. Try putting a print in one of the archival free standing washers and you'll see why I don't do that. I have designed the following and it works very well.
27
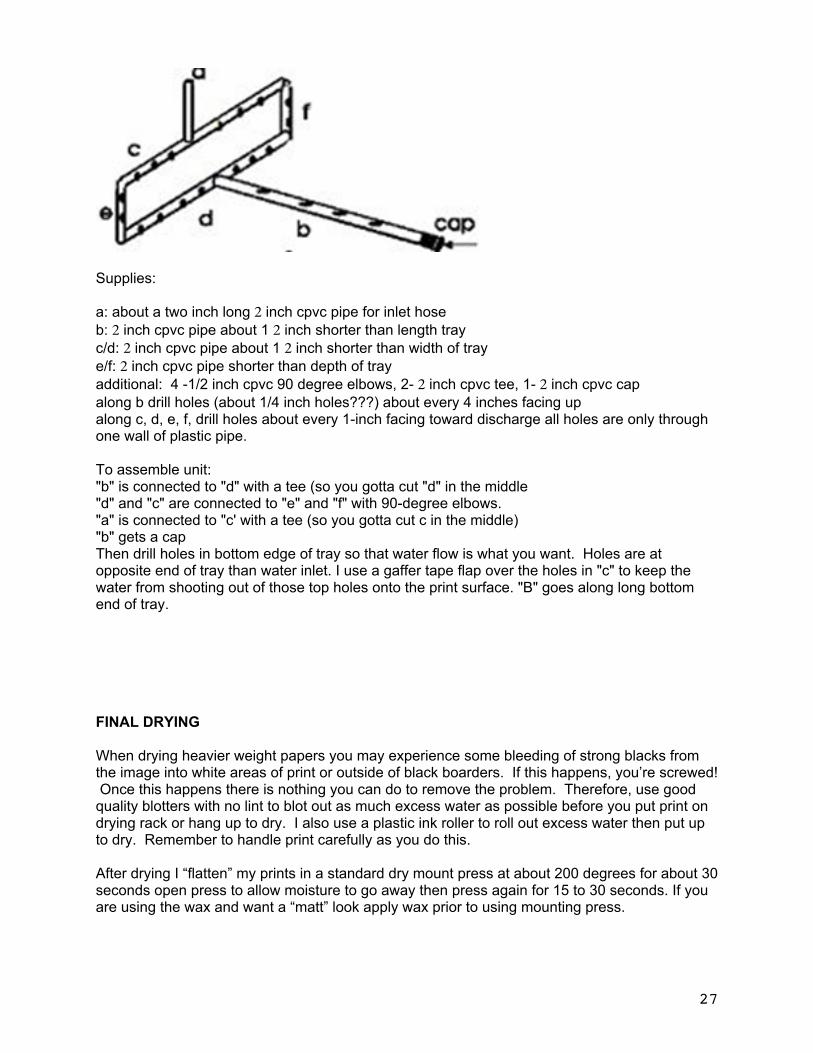
Supplies: a: about a two inch long 2 inch cpvc pipe for inlet hose b: 2 inch cpvc pipe about 1 2 inch shorter than length tray c/d: 2 inch cpvc pipe about 1 2 inch shorter than width of tray e/f: 2 inch cpvc pipe shorter than depth of tray additional: 4 -1/2 inch cpvc 90 degree elbows, 2- 2 inch cpvc tee, 1- 2 inch cpvc cap along b drill holes (about 1/4 inch holes???) about every 4 inches facing up along c, d, e, f, drill holes about every 1-inch facing toward discharge all holes are only through one wall of plastic pipe. To assemble unit: "b" is connected to "d" with a tee (so you gotta cut "d" in the middle "d" and "c" are connected to "e" and "f" with 90-degree elbows. "a" is connected to "c' with a tee (so you gotta cut c in the middle) "b" gets a cap Then drill holes in bottom edge of tray so that water flow is what you want. Holes are at opposite end of tray than water inlet. I use a gaffer tape flap over the holes in "c" to keep the water from shooting out of those top holes onto the print surface. "B" goes along long bottom end of tray. FINAL DRYING When drying heavier weight papers you may experience some bleeding of strong blacks from the image into white areas of print or outside of black boarders. If this happens, you’re screwed! Once this happens there is nothing you can do to remove the problem. Therefore, use good quality blotters with no lint to blot out as much excess water as possible before you put print on drying rack or hang up to dry. I also use a plastic ink roller to roll out excess water then put up to dry. Remember to handle print carefully as you do this. After drying I “flatten” my prints in a standard dry mount press at about 200 degrees for about 30 seconds open press to allow moisture to go away then press again for 15 to 30 seconds. If you are using the wax and want a “matt” look apply wax prior to using mounting press.
28
RETOUCHING PRINTS If you are using the wax method apply wax prior to retouching. Watercolors work best put in small bowls and let dry before use. Do not use spit or your tongue to wet brush. Use distilled water. Colors I like are Winsor & Newton lamp black- good black base, warm sepia and sepia extra by Holland works very well with palladium prints also good are Vandyke brown, burnt umber, raw umber, . If you over spot and make the area too dark try using a wet, very clean brush and using gentle brush strokes "wash" the area clean. Use an irregular pattern and let dry completely before re spotting!
If you find a paper you love but it is very hard to spot due to the spotting medium sinking in to quickly try soaking the print prior to spotting, in a solution of Liquitex diluted 1-6 for about 5 mins then re dry without blotting. It is best to hang it up and let it drip dry. Put the print in the diluted Liquitex when the print is dry.
For black spots on prints do not dig. Use a cross cut type action with pointed, very sharp! X-acto knife. Then rub gently with distilled water and clean brush. You may ruin the print but didn't the black spot already do this? It works great on some papers not on others.
With Revere Paper I am also finding to get really great blacks I have to rub wax on the paper. For glossy finish: flatten paper in the dry mount press then apply wax and rub in until it is totally absorbed. I apply the wax BEFORE I do my spotting. For Matte Finish : After it is dry and before I put it in the dry mount press at about 250 degrees for about 20 seconds. I apply the wax this allows the wax to sink into the paper and removes the shine from the wax as well as deepens the blacks. I am using Dorland’s Wax Medium. I just apply a good amount rub it until it in. It does not have to look shinny or totally smooth but you don’t want “globs” of it on the paper either. Just get some wax all over the paper.
29
SUPPLIERS Graphic Arts Supply www.graphicartssupply.com/shop2/index.php?main_page=index&cPath=5_1093_1089 suppliers of orange vinyl and other graphic arts supplies Aztek Suppliers of scanner material www.aztek.com/consumables.html Clear bags www.clearbags.com great site for all neg. envelopes etc. for prints use FLAP crystal clear bags http://www.clearbags.com/bags/clear-bags/flap-seal for negatives : use no flap bags http://www.clearbags.com/bags/clear-bags/no-flap MITSUBISHI IMAGING http://diamond-jet.com/index.aspx http://diamond-jet.com/ultrapremiumohptransparencyfilm.aspx suppliers of the ultra premium ohp transparency film Edwards Engineered Products 512-529-0538 Lago Vista, TX www.eepjon.com makers of light sources and various other interesting darkroom equipment. Aldrich Chemical Good suppliers of palladium but expensive unless you buy in bulk http://www.sigmaaldrich.com/catalog/search?interface=All&term=palladium%20chloride&N=0&focus=product&lang=en®ion=US Grainger Great suppliers for almost anything! https://www.grainger.com Specifically glass beakers Heavy Duty Beaker, Low Form, Glass, Capacity: 600mL, Graduation Subdivisions: 50 mL Ohaus triple beam scale www.affordablescales.com Ohaus® - TJ611 - Triple Beam Balance The Ohaus Triple Beam TJ611 Scale offers a 610 g capacity expandable up to 2,610 g with the Metric Weight Set. It also features notched and tiered beams for easy reading, magnetic dampening for quick results, and a zero adjust compensator to ensure correct zero.
30
Drafting Steals.com Great supplies for cutting boards, rulers, straight edges for tearing paper etc. http://www.draftingsteals.com/ Artcraft Chemical alternate photo chemicals www.artcraftchemicals.com/ 1-800 682-1730 speak to Mike upstate ny e-mail: [email protected] Bostick and Sullivan PO Box 1663 541 Center Drive Santa Fe, NM 87592 505-474-0890 877-817-4320 Simply the BEST Ferric Oxalate and other supplies related to Alternative Processes www.bostick-sullivan.com/ PHOTO WAREHOUSE 800-922-5484 General photo stuff and Pan Film ISO 125 SAMY'S CAMERA 800-321-4sam 213-983-2420 Los Angels Ca. For film and photography supplies B&H Photo for so many photographic things 420 Ninth Ave, New York, NY 10001 (212) 615-8820 http://www.bhphotovideo.com/ UNIQUE PHOTO 800-631-0300 Ask for Rich Kelly ext. 253 Ilford Commercial Ortho film Kodak Pro. Copy Film 4125 lots of other good photo items ARISTO GIRD LAMP PRODUCTS can now be got through: Voltarc Inc. Rick Mehda 203-578-4600 ARKIN MEDO NYC 718-445-4000 Good film/chemicals photo supplies FILM MART 800-522-2289 Good source for cheap film
31
Wynit Inc. has large Ilford film 5801 East Taft Road North Syracuse NJ 13212 1-315- 437-1086 www.wynit.com/ CHICAGO ALBUMEN WORKS 413-274-6901 Doug Munson. Agfa film Pop paper etc. off the wall alternate process stuff BEL-AIR PRODUCTS 201-694-0500 Pipette pumps PUMPS: https://www.belart.com/pipette-pump-pipettors.html do not sell pipettes various other chemicals and lab equipment Fisher Scientific for pipettes and other lab equiptment https://www.fishersci.com/shop/products/kimax-51-brand-reusable-serological-pipets-tooled-opening-7/1367435j?searchHijack=true&searchTerm=1367435J&searchType=RAPID VWR SCIENTIFIC REQUEST CATALOG! 800-932-5000 Great suppliers of chemicals and lab equipment you should see their catalog! pipettes kimax -51 10 mls 1/10 vwr cat # 89003-518 https://us.vwr.com/store/catalog/product.jsp?catalog_number=53280-029 pipett pumbs VWR® Fast-Release Pipette Pump™ II Pipetting Devices cat #53502-253 https://us.vwr.com/store/catalog/product.jsp?catalog_number=53502-251 J.T. BAKER 800-554 5343 Good supplier of bulk chemicals and lab equipment for bulk items Kirsten Sue for smaller amounts ext. 6976 Potassium oxalate Product # 3212-r 300 lbs. $5.99 per lb subject to change HEICO CHEMICAL COMPANY 1-800-344-3426 Delaware water gap pa. Good supplier of chemicals Taylor Box Co. 401-272-4990 John Romano www.taylorbox.com/

32
make great portfolio boxes som e stock and as custom as you can want ***YASUTOMO & CO. NO LONGER MAKE BIG BRUSHES I HAVE SWITCHED TO HOLBEIN BRUSHES 650-737-8888 490 eccles ave. S.F. California 94080 4 3/4 inch # BF300 bigger than 8x10 They say they will not sell direct but will with credit card if you have no local supplier who has items in stock. 2 1/2 inch brush by Yasutomo bf 216 www.yasutomo.com/ *****Black Horse Fine Art Supply 1197 Williston Road South Burlington, Vermont 05403 1-800-790-2552 Toll-FREE 1-802-860-4972 Holbein Brushes large prints 4 3/4 small prints 1 3/4inch http://www.black-horse.com/Products/Products.php?subcategoryID=80 For brushes Blue Rooster Art Supply Co. Da Vinci Cosmotop Spin Flat Wash Brushes https://www.blueroosterartsupplies.com/ DANIEL SMITH 800-426-6740 Seattle Washington Good paper/art supply www.danielsmith.com Orange Art 800-253-8975 very good suppliers of paper but only to commercial accounts. GREAT BASIN PHOTOGRAPHIC- DON 702-363-1900 FOR CONTACT FRAMES MAKE SOME SUPER ONES- BEST I'VE SEEN! HCR 33, Box 2 Las Vegas, Nv 89124 ULTRA-VIOLET RESOURCES INTERNATIONAL 800-247-3251 ask for marine div PO Box 770507 13000 Athens ave Cleveland Ohio 44107-0027 Ballast-
33
Top of line Electronic 66 ice cap $184.00 Handles 4 tubes Tubes are Uri 36 inch 85 or 95 watt 420 nanometers original designed for blue print industry Super actinic bulb 20.75 each part # fr30t12-03-vho Have internal reflector My light box has 16 3 ft. Bulbs and 4 ballasts The bulbs are as close together as possible-perhaps 1/8 inch apart makes changing them difficult. But then I have not replaced a blub in over 5 years and I print almost every day..... The coverage (exposure area is about 24x34 inches The bulbs are 2 1/4 inch above the print For 2 ft. Bulbs same ballast the bulb is: 2 ft. FR20T12 super actinic vho 20.00 75 watt Open tip Lots of cool stuff also Alvin Tempered Stainless steel Cutting Straight edge. : http://www.opentip.com/product_info.php?products_id=881194 Mark Nelson http://www.precisiondigitalnegatives.com/ very good digital Negative Book and system for you to use. Permission is given to download and use for your own personal use only for your personal reference. Copyright 1998-2013 David Michael Kennedy
34
ENLARGED NEGATIVES: THEORY & PRACTICE JOHN RUDIAK, TAOS, NEW MEXICO, 1988 The vast majority of antique and/or alternate photographic printing processes are contact printing processes, so the negative must be as large as the print we wish to make. The emulsions and sensitizers used are very slow compared to normal silver gelatin developing out printing papers and are also usually insensitive to visible light and must be exposed to sources rich in ultraviolet radiation, so conventional enlarging is impractical. The many alternative processes have different requirements for the negatives used and it is rare to have one negative work for a number of different printmaking processes so becoming a skilled negative maker is essential. The only evidence of your visual/emotional experience is the print you make validating this experience, so we owe it to ourselves to become the best printmakers that we can. Since the print qualities are dictated by the qualities of the negative, the importance of making the best negative possible cannot be overlooked. Although there are several methods for making enlarged negatives (direct duping film, re-photographing a print with a larger camera, reversal processing of negative film, etc.) the method which affords us the most control is to first make a film interpositive and then use that to generate the enlarged negative. This gives us two opportunities to choose film, adjust contrast and density, to dodge and burn and retouch while getting to the final negative, and sometimes once is just not enough. It can be argued that this method means we are working with a second generation copy with the attendant losses of information, but by generating either the positive or negative through contact the losses are significantly minimized. The equipment and laboratory used to generate enlarged negatives are the same as used for conventional silver printing but the degree of precision must be elevated, as the materials used are much more sensitive than store bought photo paper, so modifications will have to be made to the working environment. As a bonus, these changes will only improve the efficiency of the lab for all photo work. Because we will be using films, the darkroom becomes analogous to the inside of a camera with us walking around in it, and stray light that we wouldn't notice under bright safelights poses a very real threat for fogging. If the darkroom is light-tight enough to load fast film without fogging it we can turn our attention to the enlarger. Every enlarger I have seen leaks enough light to fog film and we need to plug up these leaks before exposing any film. Put a lens cap on the enlarging lens, put a negative carrier in, turn out the room lights and wait a few minutes for your eyes to adjust, and turn on the enlarger. All that light hitting the walls, ceiling, and you is non image-forming, fogging light and must be eliminated. Velcro and strips of
35
black cloth is very helpful here. Now that we have the enlarger plugged up, put a piece of white paper in the easel, take off the lens cap, and open the lens, darken the room and turn on the enlarger. The light illuminating the walls, ceiling and you is now caused by bounce from the easel and will fall back onto the film and fog it. Paint the walls and ceiling around the enlarger a very dark grey (black seems too depressing) and wear a black shirt when making negs. Some of the films you might use have no annihilation backing on them, so paint your easel flat black. Now we should have a darkroom. There are some other situations in our lab that need our attention to make the transition from silver printing to negative making. Consistency is essential if we want to reproduce results, or make changes to contrast and density in a predictable manner. A voltage stabilizer to control the current going to the timer and enlarger is well worth the investment. Even if your lab is on a single circuit from the fuse box so that the refrigerator in the next room kicking on during an exposure doesn’t affect the light output, there is enough normal line fluctuation from the electric company to noticeably change exposures. Electronic timers are much more consistent than their mechanical counterparts so there use is highly recommended. Sometimes it is desirable to make changes in exposure of fractions of a second, and this is not possible with a mechanical timer. A light integrator like the Metrolux, which controls exposure by measuring the total amount of light falling on the print represents the utmost in consistency. While on the subject of the enlarger, let’s turn our attention to the lens. The films we will be using are much faster than enlarging paper, so exposure times are naturally shorter, and the light intensity will have to be reduced. Simply stopping down the lens to 22 or smaller is not the answer. High quality enlarging lenses are sharper at wider apertures due to the effects of diffraction. You can check this by putting a negative in the enlarger and examining the grain with a high quality grain magnifier (focusing aid). Start with the lens wide open and notice how crisp the edges of the grain appear. Slowly stop down the lens and watch what happens to the crispness of the grain on or about f/11 you should begin to notice a loss of sharpness, which tells us not to stop down any more if maximum sharpness is desired. If you want to cut down the amount of light beyond this use a neutral density filter. Now that we have tightened up the exposing procedure, we should move on to processing our film. You can't do much worse than processing sheet film like you do paper, that is to say, in trays. Consistency is not possible. Film developers are not designed to live in trays and will oxidize in short order. Processing the first test strip in a tray weakens the solution to the extent that the next sheet processed will receive less development than the test. Using a processor like a Jobo is a wonderful luxury and has changed my life in the darkroom, but there is life before the Jobo. For many years I processed sheet film in color print processing drums which were rolled on a motor base. There are many of these devices in the used photo equipment market with drums that will handle film sizes up to 16X20 inches. Another
36
inexpensive alternative is the BTZS sheet film tubes sold by Darkroom Innovations. Before we leave our discussion of the working environment we need to address the subject of safelights. This is definitely a case where less is better. All the films used have recommended safelight requirements, either dark red or light red for orthochromatic (blue sensitive) films to none for panchromatic emulsions. No matter what the safelight, if films are exposed to these lights long enough they will fog. Another danger is the safelight causing a sub threshold exposure to the film. This is an exposure that is just barely insufficient to initiate development but still causes electrochemical changes to the emulsion relative to its ability to react with the developer. If this film is exposed and developed, areas which would normally remain clear will show some density. This will not show up with traditional fog tests. The best safelight for film is no safelight. With this in mind it is wise to take a look at the LED displays used on digital timers, especially since they are in close proximity to the enlarging easel. If the timer has a dimmer switch turn it down so that it is barely visible and aim it away from the easel. If no dimmer, several layers of lithographers tape (the clear red stuff) is good insurance. Now that we have the lab in shape for negative making let's take a look at the films with suitable characteristics for the job at hand, starting with making the interpositive. This film should be fine-grained, capable of lower than normal contrast, and have a long straight section on its HD curve with minimal toe and shoulder. The correct positive should look like a flat print when viewed on the light box, with no areas of clear film (some density in all non- specular highlights) and no shadow areas near the D-Max of the film. This places all the printable information from your original negative on the straight portion of the film curve insuring good tonal separation. One film with these characteristics is Ilford's Commercial Ortho Plus, a graphic arts film which I have been using successfully for the past five years. Another alternative would be T-max 100, which is not a graphic arts film but has characteristics which make it suitable for many aspects of photography including copying, masking, color separations, and normal picture taking. It is the closest thing available to an all purpose film and may cause the disappearance of a number of other Kodak film stocks. These films are readily available in sizes up to 8X10. Should larger size film be required, The film stock referred to as Fine Grained Positive (not the same as Kodak Fine Grain Positive) supplied by Photo Warehouse is available in sizes up to 20 inches and acts much like the Ilford Commercial Ortho. There are some situations where using a film positive the same size as the final negative is advantageous. If the original negative is smaller than 4X5 inches, generating the positive by contact (to avoid going through two enlargements with attendant loss of quality) to arrive at the final negative will result in grain from the positive influencing quality of the negative due to the degree of enlargement. To make an 8X10 or larger negative from a 35mm original, it is better to make an 8X10 or larger positive and contact to make the negative. An other situation would be if the original negative is larger than 8X10. All the above films respond favorably to processing in Kodak's HC110 or Ilford's Ifotech developers. And now to the final negative. This is the phase where most of the controls
37
such as contrast adjustment, dodging and burning and retouching are applied. One film ideally suited for this application is Kodak's Professional Copy Film, number 4125. It is specifically designed for generating copy negatives, having a uniquely shaped shoulder on its film curve which enhances highlight separation to counteract the highlight compaction usually occurring when making copies. It is also unique in that contrast is influenced not only by development time but exposure as well, increasing exposure resulting in increased contrast. It is retouchable on both sides, and is available in sizes up to 20X24. The disadvantages are that it is very expensive and supplies, especially in the larger sizes, are limited, as it seems that Kodak only makes this particular film once a year and supplies are exhausted before the next run. This is a great film and is highly recommended but at the time of this writing has been unavailable for two months. While I wholeheartedly recommend this film for enlarged negatives (I have been using it for 15 years) I believe its future as an available product is limited. As digitally produced negatives for reproduction occupy an ever increasing share of the market, the future of specialty films like Pro Copy is uncertain at best. An alternative must be found and camera oriented films promise the best availability. Fortunately some of the new generation films have very gentle shoulders and are adaptable for use in generating enlarged negatives. The aforementioned T-Max 100 would be a good choice but is unavailable in sizes larger than 8X10 except through special order (cost prohibitive). Photo Warehouse markets an ISO 125 Pan film for camera use which is available in sizes up to 20X24 which I have been using lately for enlarged negatives with great success. Selenium toning the final negative mimics the highlight characteristics of the Pro Copy and the film responds favorably to increased development which is necessary to achieve the higher than normal contrast required for most alt process negatives. Because we need to work from a positive that is lower in contrast than a normal negative designed for printing, and we need to generate a final negative that is higher in contrast than a normal printing negative, conventional film developers are often incapable of generating sufficient contrast before general fogging sets in, lowering contrast. The solution to this problem is to use developers capable of generating higher contrast negatives than normal film developers. For instance, if we develop a negative in HC-110 for ten minutes and it is not contrasty enough for its intended use, increasing the development time will likely result in chemical fog rather than increased contrast. The next developer to try is D-19, which is capable of generating a higher contrast negative than HC-110. If ten minutes in D-19 isn't contrasty enough, D-11 can make a contrastier negative than D-19. In the unlikely event that D-11 isn't contrasty enough, there is D-8, an extremely contrasty developer. With these four developers you should be able to handle any situation. These are all commercially available Kodak developers and the formulas are published so they can also be mixed from scratch. Once the final negative is generated there are other modifications that can be employed to get us closer to the perfect negative, which will affect local areas or the entire negative. Selenium toning the negative will result in a contrast increase, with more effect to the highlights. Selenium toner can be applied locally with a brush to increase density. Detail can be enhanced by retouching with a soft lead retouching pencil. The entire negative can be chromium intensified, or bleached and redeveloped in a pyro based developer. New coccine can be applied to lighten areas in the print. These controls will be discussed in more detail later.
38
Having discussed the theoretical considerations involved in producing an enlarged negative tailored to a particular printing process, let's proceed into the darkroom and make a 16X20 negative from a 4X5 original to be used for platinum printing. The negative, shot on 4X5 Tri-X on an overcast day was developed to print on grade two paper with a condenser enlarger. (Figure 1) This is large enough to make a contact generated positive. Adjust the enlarger so that 1-foot candle of light falls on the baseboard (this is equivalent to EV 1 at EI 50). Using a standard level of illumination for generating negatives simplifies procedures and makes comparisons meaningful. Make a test strip on Ilford Commercial Ortho Plus of 2 second intervals and process for 6 minutes in HC-110 dilution B at constant agitation. Choose the exposure which first shows density in all the highlight values, which in this case is six seconds. Also check the deepest shadows and notice that they are noticeably less than the film D-Max, indicating that the development time is acceptable. Now expose and process a sheet at six seconds and develop for six minutes (figure 2). Generating the positive is pretty straightforward and some exposure and contrast latitude is permissible so long as there is some density in the highlights and the shadows are less than D-Max. Put the positive in the enlarger and position the head to make a 16X20 enlargement. Take out the negative and adjust the illumination on the baseboard to 1 footcandle. In this instance we get 1 footcandle at f/22. A two stop neutral density filter is placed in the filter drawer so we can work at f/11, the smallest aperture on this lens before diffraction starts to degrade the image. Make a test strip on the negative film (in this case the Photo Warehouse ISO 125 Pan Film) in two second intervals and process in HC-110B for 7 minutes. Choose the exposure that just starts to show density in the shadow areas that you want to print black. This places the printable information above the toe of the film curve and will provide good shadow separation. In this case it is the 4 second exposure. Because this negative doesn't need any dodging or burning, we will use the four second exposure. If the negative needed this, we would increase the time to 16 seconds by putting another two stop ND filter in the filter drawer, giving us enough time for dodging and burning. Now we look at the highlights to check the negative's contrast. I like to make my platinum negatives so they have a density range of 1.9. If a densitometer is available this is easy to check. If you already have a negative that printed well in platinum, compare the test to that. If this is your first negative for platinum, make a print of the test adjusting the exposure so the shadows in the four second segment look right. Now check the highlights. If they are too dark, which they are in this case, more contrast is needed. The maximum amount of development available is different for each film/developer combination, but a safe assumption would be a 10 minute limit for full strength developers. Since this test negative was developed at 6 minutes and the print highlights are noticeably too dark, it is unlikely that a ten minute developing time would achieve sufficient density. Of course a densitometer would corroborate this, but lacking this piece of equipment means sneaking up to the proper printing contrast to make the right negative which will be used to compare to future negatives in respect to density and contrast. The next step up the contrast trail in respect to developers is D-19, which is only moderately contrastier than HC-110, and in this case it is unlikely that this developer will provide enough contrast. The next contrastier developer of this series is D-11. A strip of film is exposed at four seconds and processed for 7 2 minutes which looks very good. A test print of this strip shows that it is very close to the correct contrast for the platinum process but still a tiny bit flat. A 16X20 sheet of film is exposed at 4 seconds and processed for 8 2 minutes to raise the contrast slightly, and a test is made from a part of the negative containing highlight values. It looks very, very good at this point, but would be magnificent with a little more sparkle in the high values. While increasing the development time to 10 minutes would likely achieve the desired result, we can avoid using another large,
39
expensive piece of film by selenium toning the negative we have just made to achieve the half grade contrast boost in the high and middle tones. Use selenium toner 1:3 for ten minutes. The next step is to make a full size print to see if any post processing enhancements are needed. In this case none are required. Because the original subject was a low contrast scene and the print shows good shadow and highlight separation without blocking, all we have to do is sign it. Were it necessary, there are a number of methods available to locally control density. If you have slight shadow information that barely prints and you would like these areas to have more presence in the print, building up density on the emulsion side of the negative with a retouching pencil is very effective. This technique works on the near highlights and midtones also. If broad areas need to be lightened, a solution of new coccine (a red, water soluble dye) can be painted onto the negative. Start thin (a pinkish solution of the dye) and build up layers until the desired effect is obtained. Because new coccine is water-soluble and isn't fixed into the gelatin it is removable by washing. Another effective way to locally increase density in irregularly shaped areas of the print is to "spot" them with concentrated selenium toner (1:1). This is permanent and more effective in the denser negative areas. Of course wash the negative after this procedure. If negative density needs to be removed, the area can be gently rubbed with Kodak Abrasive Reducer, which seems to be a pumice based paste, to darken respective areas of the print. Should you have pinholes or dust holes in the negative, opaque them out so you can spot them later on the print. Now we should have as good a negative as we can make. It is well worth putting the effort into this stage of the printmaking process because the print you make can't be any better than the negative it came from, and the better the negative, the easier it is to print, and the less stressful the darkroom becomes. Printmaking should be a joy- not a struggle. Copyright (c) 1998 John Rudiak DAVID MICHAEL KENNEDY 2016