Embed Size (px)
Citation preview

1
THE 2013 ROSENTHAL PRIZE
for Innovation in Math Teaching
Engineering a Number Line
by Construction
Brent A. Ferguson The Lawrenceville School
Grade
6-10

2
Table of Contents Overview ................................................................................................................... 3 Prerequisite Knowledge ...................................................................................... 3 Lesson Outcomes .................................................................................................. 3 Standards: SMP ....................................................................................................... 3 Standards: CCSS .................................................................................................... 4 Feedback ................................................................................................................... 4 Lesson Plans: Overview ....................................................................................... 4 Lesson Plan: Detailed Plans ........................................................................... 5-7 Alternative Time Tables ...................................................................................... 7 Enrichment Extension Options ......................................................................... 8 Detailed Trisection Methods (also useful for multi-sections) ......................................................................... 9 Common Sources of Student Difficulty .................................................. 9-10 Follow-Up Questions for Educators ............................................................. 10 Accommodations ................................................................................................. 10 Worksheets ........................................................................................................ 11-21 An extension worksheet: “Generating irrationals with arcs” (by David Masunaga) ......................... 22-24
3
Overview In this 3-lesson unit (expandable to up to 5-6 lessons), students will develop a sense of the various types of real numbers and learn methods to locate them (including integers, non-integral rationals, and square-root irrationals) with precision on a number line by construction. They will be challenged to produce a number line with a personalized unit length that includes multiple number locations of each type – some proscribed by the instructor, others of their own choosing.
Prerequisite Knowledge
Students should be familiar with the use of a compass, but if this is their first time using one, this activity will help them develop skill with that tool. They should have some previous understanding of various types of numbers; this activity provides an opportunity for a more rigorous and enriched understanding of those number-types’ definitions and properties. Previous exposure to the Pythagorean theorem is helpful. Familiarity with the terms parallel, perpendicular, similar, and congruent will be relied upon for these lessons.
Lesson Outcomes
• Students can be expected to grow in their understanding of the sets of numbers and their properties, making use of an analogy (using pens and pencils, as in the lesson suggestion, or some other form) as needed, but in the end, knowing the classically-defined properties of these numbers.
• Students can be expected to engage with this activity robustly – both manually and verbally – using their hands to construct the lengths and using their voices (and words in writing) to describe their methods to their neighboring student and to the instructor.
• Students can be expected to note relationships in the sums and differences of square numbers as a vehicle for growing in understanding of square root irrational numbers.
• Students can be expected to make connections between various parts of mathematics whose interrelationships had previously not been seen.
• Students can be expected to develop an appreciation for their own skill in problem-solving as a result of wrestling with worthy tasks and successfully navigating the challenge with a product that at first might seem out of reach.
Standards for Mathematical Practice
MP1: Make sense of problems and persevere in solving them. MP2: Reason abstractly and quantitatively. MP3: Construct viable arguments and critique the reasoning of others. MP5: Use appropriate tools strategically. MP6: Attend to precision. MP7: Look for and make use of structure. MP8: Look for and express regularity in repeated reasoning.
4
Common Core State Standards
3-NF-A.1,2 Understand a fraction a/b as the quantity formed by a parts of size 1/b…Represent a fraction 1/b on a number line diagram by defining the interval from 0 to 1 as the whole and partitioning it into b equal parts… represent a fraction a/b on a number line diagram by marking off a lengths 1/b from 0. Recognize that the resulting interval has size a/b and that its endpoint locates the number a/b on the number line.
4-NF-B.3 Understand a fraction a/b with a>1 as a sum of fractions 1/b. 5-NF-B.3 Interpret a fraction as the division of the numerator by the denominator… 6-NS-5 Understand that positive and negative numbers are used together to describe quantities
having opposite directions or values. 6-NS-6 Understand a rational number as a point on the number line. 6-NS-7 Understanding ordering and absolute value of rational numbers. 6-NS-8 Include use of coordinates and absolute value to find distances between points. 7-NS-A Apply and extend previous understandings of operations with fractions…[including]
understanding that integers can be divided, provided that the divisor is not zero, and every quotient of integers (with non-zero divisor) is a rational number.
8-NS-A.2 Use rational approximations of irrational numbers to compare the size of irrational numbers, locate them approximately on a number line diagram, and estimate the value of expressions.
8-G-A Understand congruence and similarity… [including understanding] about the angles created when parallel lines are cut by a transversal.
8-G-B Understand and apply the Pythagorean theorem.
Feedback
Opportunities abound for students to receive feedback during this project. Simply seeing their number line emerge accurately (you can tell pretty easily when a given length is well off the mark) is the first piece of self-assessment. Students should be encouraged to share their work (including successes and frustrations or confusions) with their classmates near them, and support each other as teacher and learner alike. And the circulating teacher can listen in, make suggestions, and provide hints and direct instruction as discerned. In the completion of the number line project, students will find themselves proud of having grappled with a worthy challenge and, after inquiry and the application of effort, emerge as empowered math students, successfully meeting that challenge. If the instructor wishes to have students submit the projects as a graded item, I recommend having them produce a packet including a cover sheet, a final number line, and construction pages (at least one for each non-integral rational and one for each irrational). Each construction page should include a single constructed length, including the constructions marks that produced the desired length, along with a couple of sentences describing the process (the depth of these will vary with the ability and expectations of each class cohort). Providing students with a teacher-designed rubric will support student investment toward the specific stated goals of the instructor.
Lesson Plan – Broad Overview
LESSON #1 – Introduction to types of numbers Integers, rationals, and irrationals are necessary for the project, but it’s useful to introduce others as well (see detail) LESSON #2 – Construction of rationals First, determine a personalized one-unit ‘personal cubit’ length by choosing locations for 0 and 1. Then build up the integers. Most (the rest) of this lesson deals with non-integral rationals: dividing segments to divide integers (bisection, then multi-section). LESSON #3 – Construction of irrational square roots and building the number line Using perpendicular line construction, create right triangles for irrational number length constructions. Then, place various lengths on the number line; construct on separate sheets, then transfer onto a clean number line.

5
Lesson Plan – Specific Moves for Teaching & Learning
LESSON #1 (necessary background understandings) – Sets/types of numbers
Core take-away points: Ø Our sense of numbers all begins with zero, one, and the counting (natural) numbers. Our
ruler/number line can start anywhere we choose, and a unit can be whatever size we choose, even proceeding in either direction on the line!
Ø Integers are, in essence, the counting numbers, their opposites, and zero. Ø Rational numbers are numbers that can each be expressed as the ratio (fraction) of two
integers.
o Incidentally, that means that all integers are also rationals, since !"= 3,
%""= 0, and
'('= −1,
for example, are each a ratio of two integers. Ø Irrational numbers are those that cannot be written as a ratio of two integers.
o Of course, 𝜋, 𝜏, and e are ‘famous’ examples of irrationals, but this project will focus exclusively on ‘algebraic’ irrationals – in this case, square roots of non-square numbers.
A recommended interactive/hands-on method: Prepare a bag of pens and pencils, using a large variety of them with specific properties: I found this mix to work: permanent markers, ball-point pens of many colors, gel pens, sharpen-able pencils, including grey points and colored pencils, and mechanical pencils. Dump out the pens onto a table where all can see them, and/or hold them up one by one to describe the various properties/characteristics of the writing instruments. Ask the students to consider how they would separate them into categories by these properties, and then guide them in the sorting process as described below. Keep the analogy in mind as you do this and support a bridge of understanding as you discern it’s helpful to connect this new idea of number-types to something with which the students are quite familiar (pen/pencil-types): Numbers Writing Instruments Irrational numbers Pens of all kinds (unerasable; like irrationals being unable to be written as ratios…) Rational numbers Pencils of all kinds, including mechanical (ABLE to be erased/written as a ratio of
integers) Integers ‘Old school’ pencils, those that require sharpening (originals, vis-à-vis Kronecker) Natural numbers Graphite (not colored) sharpenable pencils Place all of the pens into your largest clear bag (the bag whose contents will represent the set of real instruments). Draw a large oval (or rectangle, etc. as preferred) on the board to represent the set of all of the instruments in the bag. Perhaps note that there are ‘invisible pens and pencils’ outside the bag. Divide the writing implements into two groups: pens and pencils, with the pens directly into the biggest (first) ‘everything’ bag and putting the pencils into a 2nd large bag, one that fits inside the first. At the same time, draw a new oval inside the first oval that represents the pencils as the erasable instruments. Continue in this way to then split up the pencils into two parts (sharpenable and not), leaving the non-sharpenables in their place and moving the sharpenables into a new smaller bag that fits into the ‘pencil bag.’ Always drawing at each step the corresponding oval into the emerging set diagram of pens and pencils. Lastly, take out all of the grey/graphite sharpenable pencils and place them in the smallest bag and draw its oval. Repeat the diagram on the board, but now indicating sets of numbers to complete the analogy. Draw a large oval or rectangle to represent the set of all real numbers. Draw the appropriate sets as partitions or subsets of that set, explaining the role of properties to determine the inclusion/exclusion of a particular number in a set, as appropriate. Assess student understanding by having them replace writing instruments in the plastic bags with numbers, written on small pieces of colored cardstock. I suggest that these be entirely student-generated, perhaps two or three for each student; they place them into the appropriate bags. Then, investigate as a class the numbers in each bag and discuss as needed/helpful.
6
LESSON #2 –Creating segments of various lengths: RATIONALS
Define a compass as a tool for measuring and copying distances (not just a tool to draw circles). This will help immensely if they see it as a “distance copier,” rather than as a “circle-drawer.” Artistic technique and craftsmanship makes a difference: Show the students that holding the compass at its two tips while one is drawing often results in changing the distance while arc-ing (yikes!). Better to hold the spike-end close to the end while positioning it, then to “lean and drag” the compass pencil while holding it near the hinge/joint, far away from the pencil-point. It will take a while for those unaccustomed students to develop comfort with the tool. This is as much art class (and engineering/craft technique) as math class! Also, when measuring a given distance from A (point) to B (pencil), it is helpful to let the pencil drag across B to confirm the correct length (after the hand is no longer holding it, but has been moved to the compass hinge/joint).
• Copying segments, and adding segment lengths – This can be connected to (or will lead up to) the Segment Addition Postulate. With this, students can build the whole numbers, and then integers, after placing 0 and 1 at their own selected locations (cf. Ruler Postulate) to create a length of ‘one personal cubit.’
• Copying a triangle – This construction plants the seed of the idea of SSS triangle congruence in students’ minds for a future Geometry class (or reinforces it for those already in such a class)
• Splitting a segment – bisection and multisection Bisection: Introduce the perpendicular bisector construction. This works best as a way to construct lengths of those rationals with 2, 4, 8, and other powers of 2 in the denominators, even though they, too, can be constructed using the multi-sectioning technique below. Multisection (introduced through trisection): This technique assumes the sense of the positive rational number a/b as “a divided by b,” which middle school students should have been introduced to. I used to use a side-splitter construction* for this; recently, one of my students showed me a nice parallelogram-style construction** that is more intuitive, in my opinion, and easier to manage. Just this spring, another student showed me an up-and-down triangles construction*** for multisectioning that leverages the proportionality of similar triangles. I now prefer this third method to the other two. (See notes for specific construction techniques.) Addition of unit fractions: Students’ sense of rational numbers will be enhanced by developing this second style of rational number construction, which employs the notion of the length a/b being equal to marking off a lengths, each of size 1/b. I recommend the up-and-down triangles method to create the unit fraction 1/b, using triangles with scale factor 1:(b-1). As often as possible, especially in this/these lessons which are intended to develop basic skills which students will use to build their number lines, pose open-ended questions to students. For instance, include those that nudge them toward a construction technique, hinting at it without explicitly walking them through the sequence of steps. The more they ‘construct’ their methods and personally own the process, the more enduring their learning will be. If you allocate extra days for this project, and incentivize the outcome sufficiently, students will both enjoy it more and build lasting understanding about fractions – understanding that was generated from manual activity and from personal intellectual interaction with the content and social interaction with each other.
LESSON #3 – Part one: constructing lengths that are IRRATIONALS At this point, students have all the basic skills necessary for the constructions; they will need to utilize the Pythagorean theorem and invest in thoughtful number play to create the appropriate lengths. Relying on the perpendicular bisection from last lesson, they create right triangles with two leg-lengths of specific (strategically chosen) values. The hypotenuse will thus have a length that is irrational. Next, pivot to subtracting squares: create right triangles with integral leg- and hypotenuse-lengths. Any radicand that is the sum or difference of two squares is therefore possible with these two methods. Teachers should use some discernment to assess student understanding and motivation. After allowing for some fiddling around (but before too much frustration sets in), see the attached supplemental activity (“Generating irrationals with arcs”) to inductively generate lengths for the square root of every counting number. This alternatively could be an activity that helps differentiate the learning for students who are advancing more speedily as the project progresses. Since this method is recursive, each new square root value relies on the previous one. However, given the always-nearby location of the roots of perfect squares, one need not (for example) generate all 50
7
previous values to construct 51; merely start from 49 (since it is easily constructed as 7) and develop the two that follow from there, or even use 2 with 7 as the legs of a right triangle. I suggest 2, 13, 41 and 7 – in that order – as lengths to include as the first irrationals; students can then choose their own radicands and grapple with the number relationships necessary to write the appropriate ‘Pythagorean equations’ involving sums of squares. Some examples here are provided to
support various options for teachers: 73= 13 + 6
3= 3
3+ 2 3 = 4 3 − 3 3. Challenge students
to use a construction that uses each of these three representations for 73 to construct a length of
7.
Part two: The Actual Construction of a Number Line Worksheets attached lead students through the construction process, supported by instructor interventions as necessary to clarify techniques or suggest hints for the numerical relationships for the irrationals. Using a straightedge, create a paper that will be your ‘final draft’ sheet – your personalized number line. Choose a location near one side as zero (0) and another location as one (1). This is one of your CUBIT lengths. All other numbers will need to comply with that unit length! Students measure that length and copy it successively to mark off, with precision, the locations of a few other integers, perhaps up to 4 or 5 in one direction and down to -2 or so in the other. For each length desired, use a separate sheet of blank paper for its construction. Begin by copying the original single-cubit length (from the final draft sheet) onto that paper. Proceed with the relevant construction, then measure and copy the constructed length onto the ‘final draft’ sheet. On the construction drafts, students should be encouraged to write a few sentences about the process by which they built that particular length. Again, the more chance they have to speak and to write about their process to another (whether in a pair or in front of the class, or in written form for assessment by the teacher), the better they will endeavor to understand the mathematics and craftsmanship behind the constructions. I suggest specifying a few pre-determined lengths1 and then allowing them to select lengths of their choosing – a few rationals (including at least one or two with denominators that are not powers of two) and a few irrational radicals.
Alternative Time Tables: Flexing the Plan I suggest in this lesson model three lessons (assumed to be approximately 45-50 minutes each). It is possible to introduce the number types more quickly and to get right to the construction work in day #1. Those with full hour classes might truncate and in this way use two class days instead of three. I recommend allowing for the opposite if time permits (5-6 days), giving two full class days for each of the above lessons #2 and #3. Additionally, this permits some flex for the differentiation of the learning; students at various paces will be able to complete varying numbers of constructions. Proficient students’ number lines will be denser with mapped points, while those needing more time will perhaps complete only the core proscribed constructions. This slower pace will also allow for a more in-depth consideration of the types of numbers, including the size/cardinality of the number sets, and a consideration of countability, if possible (see extension below). An additional consideration (as a way to engage advanced students) is a discussion of the commensurability of various numbers – this is an alternative, geometrically-oriented language about lengths to use with respect to rationality, which is typically strictly numerical.
1 I suggest the following basic lengths – integers: {-2, -1, 0, 1, 2, 3, 4, 5, 6, 7}, non-integral rationals: {− !
6 ,
"7 ,
'! ,
'3 ,
"7'
}, and irrationals: { 2, 13, 17, 21, 41 }

8
Enrichment Extension Options Inclusion of imaginary numbers and transcendental numbers, while beyond the scope of a typical 7th or 8th grade class, is possible to connect with the pen-and-pencil analogy, and will be a helpful planting of a seed for future growth of those ideas in years to come. A revised table looks like this: Numbers Writing Instruments Imaginary numbers Invisible pens (while ‘made-up,’ they’re still useful to draw pictures in one’s
mind!) Irrational numbers Pens of all kinds (unerasable; like irrationals being unable to be written as
ratios…) Transcendental numbers Highlighters or markers…not entirely like others, but still pens, rather than
pencils Rational numbers Pencils of all kinds (ABLE to be erased/written as a ratio of two integers) Integers ‘Old school’ pencils, those that require sharpening (originals, vis-à-vis
Kronecker) Natural numbers Graphite (not colored) sharpenable pencils Related, but non-necessary (and therefore optional) results to share in the first lesson include: The famous quote by Leopold Kronecker (1823-91) is fun to introduce and discuss with a willing cohort of students: “God created the integers; all else is the work of [humanity].” If time permits, I recommend a consideration of the other uses of the word ‘integer’ and its cognates – integral, integrity, integrated – to connect with ideas of consistency, shalom, wholeness, etc. This can be the starting point of other good interdisciplinary conversations involving the integrity of a community, or moral character, spirituality, or sociology and mathematics (without violating any rules about “no religion in schools”)… good linguistic analysis! We call the whole set of the counting numbers infinite in size…but ‘countable,’ (a.k.a. ‘denumerable’ or ‘countably infinite’). Therefore, since we can ‘line up’ (order) the integers 0, 1, −1, 2, −2, 3, −3, … , we call the size of that set, too, countably infinite. Further, the rational numbers can be ordered. Of historical significance is Georg Cantor (1845-1918), who used a grid to show all of the rationals and then used diagonal lines to systematically account for each of them as they were put in a particular order, so the rationals are therefore countable as well. While the algebraic irrationals can be so ordered, the transcendentals cannot2, and thus are called ‘uncountably infinite,’ which conveys that the size of the set of irrationals as a whole is, in a sense, larger than that of the rationals, even as we call both ‘infinite.’ Additionally, there are convenient, math-specific (perhaps esoteric) ways to denote these sets and their sizes with special symbols, which curious students (not only the advanced ones, but perhaps them more often than others) might find interesting: ℕ, ℤ, and ℚ for the respective sets and the wonderful ℵ= denoting the size ‘countably infinite,’ with a fun bit of word play: you can include ‘all of’ the rationals (or integers, or naturals) in the ‘aleph’ spaces for them. These understandings do not require any advanced background understanding, merely the time and commitment to embrace the task.
2 A different kind of ‘diagonalization’ argument is required for this, involving an indirect proof (by contradiction). Again, if time permits, this is a really beautiful logical piece of mathematics – both method and content – that unfortunately gets little play in a typical curricular sequence.
9
Detailed Trisection Methods You will find three multi-section methods (below, each is used to trisect a segment of length 5):
* SIDE-SPLITTER METHOD – To trisect a segment of length 5 (to construct a length of '! ), you could
use the following sequence: Copy a segment of length 5; call it AB. From A at any angle, extend a ray and measure off three [arbitrary but] equal lengths along that ray, ending at points C, D, and E, respectively. Now proceed to construct two lines through C and D, parallel to BE (one way to do this is by copying angle AEB to the vertices C and D). A reasonable example of this, but with some details omitted, is found at http://www.youtube.com/watch?v=2EGO6przl1k
** PARALLELOGRAM METHOD – To trisect a segment of length 5 (to construct a length of '! ), you
could use the following sequence: Copy a segment of length 5; call it AB. From A at any angle, extend a ray and measure off three [arbitrary but] equal lengths along that ray, ending at points C, D, and E, respectively. Copy triangle ABE and copy it to the congruent triangle BAF on the opposite side of AB. Measuring length AC and copying it twice along the new segment BF creates points G and H which trisect BF, just as C and D trisect AE. Drawing CH and DG will create the trisection points along AB, as needed.
*** UP-&-DOWN TRIANGLES METHOD – To trisect a segment of length 5 (to construct a length of '! ),
you could use the following sequence: Copy a segment of length 5; call it AB. Include on line AB room beyond A and B on the ends. Raise two perpendiculars to AB – one at A, the other at B. Along the first perpendicular (on one side of AB), mark an arbitrary length to point C. Along the other perpendicular, mark twice that length to point D. When you draw CD with the straightedge, it will create similar triangles with a scale factor of 1:2, and therefore intersect AB at a point that creates
sub-segments in the ratio of 1:2, effectively creating lengths of '! and
"%!
.
Common Sources of Student Difficulty Compass-quality issues: The ‘old-school’ metal compasses with ball-bearings are just not dependable. Those that end up sliding and not holding the measured lengths end up being the demise of good student effort. I’ve found it is worth getting a good class set of compasses that have steadily-holding hinges. Also of note on compasses: the larger, the better. This project benefits from having tools to hand that can make arcs for large measurements (even up to 8-10” radii, which can be accomplished by using a longer pencil, even if the spike side is fixed in length). A few that I’ve found effective are: The circle-master with a securing nut ($62 for a set of 30): http://www.amazon.com/ETA-hand2mind-Circle-Perfect-Compass/dp/B005HYOIUW/ref=pd_sim_sbs_ac_1 The less expensive safe-T compass ($37 for 30): http://www.hand2mind.com/item/safet-bullseye-compass-set-of-30/1324 The more classic-looking one ($1.75 each), but plastic that holds better than the metal ones: http://www.hand2mind.com/item/compass/5324 Scale up! The larger the cubit length, the more manageable the construction actions are, and the more accurate they will be as well. Use large compasses on 11x17” paper, with straightedges of at least 12” length. The trouble will be finding compasses large enough. Manual dexterity with the compass: It helps to give a few specific ‘lessons’ in how to use a compass effectively. I usually include a few intro lessons with practice in various tasks: ‘copy a segment,’ ‘copy an angle,’ ‘copy a triangle,’ and ‘construct some polygons’ (3-, 4-, 6, 8-gons are manageable) to develop some fluency with the basic compass manipulations before diving into the other skills for this project. Advanced students might find it fun to see a pentagon construction (they’re not hard to find online – here’s one: http://www.youtube.com/watch?v=-4i28mchejQ). Try to determine why it works (this is harder).
Developing, or following along with, the multisection technique: I’ve found that the parallelogram style seems easiest for them to understand, followed by the up-and-down similar triangles. The side-splitter theorem is trickier, though it appears to be the conventional technique used, from what I can
10
tell. For the latter, copying the angle to create a parallel line is often difficult in the small space on the paper, and many marks on a tiny part of the page tend to become confusing. Figuring out number combinations for the irrationals: Depending on which square root length they choose to construct, it can be quite a challenge to determine good choices for the legs (or one leg and a hypotenuse) that yield the desired result. I’ve found that showing 2, 13, 7, and 41 works well to introduce enough variety to get them started. For advanced students, ask them to find multiple ways to construct each of 5 and 21 as a challenge activity, or (as mentioned earlier) use the recursive technique to generate all square roots of the counting numbers. One high school student of mine actually developed a construction using the geometric mean relationship for the altitude to the hypotenuse of a triangle inscribed in a semi-circle. They will often surprise (and teach) you when you unleash them on these challenges!
Accommodations
Some students with difficulty in motor coordination will struggle with the use of a compass. Providing a few different kinds of compasses will help them find one that suits them better; the SAFE-T sliding-measure compass involves somewhat less hand balance management and perhaps better control as a result. Severe limitations can be mitigated by having some students work in assistive pairs, where the student with difficulty articulates instructions orally to the one with greater hand control and skill development. This aids the conceptual progress of the student required to speak more as (s)he gives language to thought and attends to the precision of expression in words.
Follow-Up Questions for Educators Who Use This Lesson Series
• How long does this unit actually take for your students, and at what grade level did you use it? Which lessons do you find yourself condensing, and which do you expand?
• What other pieces seem missing from the instructions, either mathematical theory or practical considerations for teaching and learning? (How can these materials be edited to be more helpful?)
• What interesting quotations have you overheard from your students that indicate the kind of engagement this lesson provides for them? Does it stir up new ideas for them? Confusion/distress? Excitement?
• What specific skills (or missing background understandings) seem to be the ‘bottlenecks’ for your students as you engage this project?
• How are their compass skills? Did the students notice that their care and precision in craftsmanship make a difference in the accuracy of their results? Did you notice any of them grow in their fine motor skill development? How did you support them in this particular aspect?
• Did they lean into the conversations with classmates about strategy or process in the construction techniques? Did you have any of them describe their work in pairs or in small clusters, or even in front of the whole class?
Worksheets
On the following pages, you will find printable templates for class use. It is perhaps just as useful to simply use blank paper for this project, but these can guide you and your students if you find them helpful. Some instructions are provided (construction marks will likely intersect the text; do encourage this). Teachers should provide encouragement, support, and additional prompts as needed for their various students, always endeavoring to allow them plenty of opportunity to grapple with the math and generate methods independently or with peer help.
11
Number Types
1. What types of numbers do you know about already? List them, along with their properties, below:
2. Draw a large oval labeled ‘writing instruments’ and complete the diagram as your teacher unpacks the pens and pencils. Label not only the names of the subsets, but also list the particular properties that create the boundaries for the types of sets.
3. Now draw another oval, this time labeled ‘real numbers.’ Draw and label each subset (again, with both names and properties) as you follow along in these notes. With a differently-colored pen, write-in three to five examples of each number-type in the various subsets.
4. This is a space to write a question that you have about one or more of these sets. Choose a good moment to consider asking this question, either of your teacher or, when appropriate, your neighboring classmate.
12
The Number Line – final draft sheet Integers: the creation of a cubit, and the repeated addition of 1
Where will you place 0? How about 1? Call the length between these points ONE CUBIT. This will be a personalized length for your entire number line project. Once you’ve made those choices, use a precise technique toconstruct the locations of the integers from -2 through 7. The following number sentences might help: 1 + 1 = 2 , 2 + 1 = 3 , 3 + 1 = 4 , … , 6 + 1 = 7. Measure the distance from -2 to 1 with your compass. Then place the spike at -1, and lean and drag the arc. Does it pass through where you expected it to? Repeat this process by placing the spike-end of the compass first at 0, then checking where it intersects the number line. After that, try the spike at 1, 2, 3, and 4. Use a similar method to check a length of 5 units in at least three different locations. How does this help you test your precision with compass constructions? First describe out loud to your neighboring classmate, then write down your response on this paper and exchange with another reader. Can you give them advice on how to express their good ideas even better?
13
Construction of 𝟓𝟐 of a cubit, by addition
Choose a location for zero, relatively near the middle of the page. Copy one cubit length from your original sheet.
Draw arcs of at least half of a cubit (a full cubit will do above and below the line, centered at 0. Do the same for arcs centered at 1. The arcs from 0 should intersect the arcs from 1.
Can you determine the next step to construct half of a cubit?
Now, measure and copy that length "3
repeatedly until
you have found the correct location for '3.
Measure this
'3 length and copy it onto your final
draft sheet. Does it look like it’s placed correctly? Reflect on your method – describe your construction for a reader. Consider which details to include, and which to leave out. Once you share this with a classmate, ask them what they would write differently. Additional suggestion: try performing the same second step (in bold) as above, but instead use a new length (2 cubits, or 3 cubits, or three-quarters of a cubit) for the four arcs (above and below from both endpoints). Do this at least 4-5 more times, each time keeping the same new length for the four arcs. What do you see?

14
Bisection: Construction of 𝟓𝟐 of a cubit, by division
Choose a location for zero, relatively near the middle of the page. Copy a 5-cubit length from your original sheet. Draw arcs of at least 3 cubits above and below the line, each centered at 0. Do the same for arcs centered at 5. The two sets of arcs should intersect. Can you determine the next step to construct
'3 cubits?
Measure this
'3 length and copy it onto your final
draft sheet. Does it look like it’s placed correctly? Reflect on your method – describe your construction for a reader. Which method seems more accurate? Which seems easier to manage? Again, share this with a classmate and ask them to comment.
15
Construction of 𝟓𝟐 of a cubit, by division…using congruent triangles
Choose a location for zero, relatively near the middle of the page. Then copy a 5-cubit length as before. Construct a line perpendicular to the given line, meeting that line at 0. Do the same at 5. Measure an arbitrary length along the perpendicular at 0 and mark it below the line. Measure the same length along the perpendicular at 5 and mark it above that line. Can you determine the next step to construct
'3 cubits?
Does this
'3 length measure the same as your others?
Reflect on the method – describe your construction for a reader. Why does this technique work? Did you find this method understandable?
16
Trisection: Dividing equally by design, but not into halves Construction of
𝟓𝟑 of a cubit
Choose a location for zero, relatively near the middle of the page. Then copy a 5-cubit length as before. Construct a line perpendicular to the given printed line, meeting the printed line at 0. Do the same at 5. Measure an arbitrary length along the perpendicular at 0 and mark it below the line there. Measure the same length along the perpendicular at 5 and mark it above that line. Placing the spike on that second mark, make another mark further on that line. Can you determine the last step to construct
'! cubits?
Once you do, copy it to your final draft sheet and label the location as '! .
Explain to the person next to you why this construction works.
How many marks would you make on each perpendicular if you intended to quintisect a segment (to construct the length
"')
for instance? Are you prepared to state that you could construct any rational number
AB ? Are there any a or b that you
think would be easier (or more difficult) to manage?
Reflect on this method – describe your construction technique and the math involved. Share this written response with your teacher. If you trisected a single unit to create a length of
"!-cubit, what would you then
do to generate '! ?

17
Irrational Numbers: 𝟐 Construction After locating zero, raise a perpendicular there. Then consider the simple number sentence: 1 + 1 = 2.
Can you see this means that 13+ 1
3= 2
3as well? How can this new equation
be used to construct a length that is 2 cubits long? Ask: “What would Pythagoras do?” About where on the number line should that be located, if constructed accurately? Guess a decimal value to the tenths’ place, and multiply it by hand to check it. If too low,
try one tenth higher (if too high, try one tenth lower), and check again. Can you determine a decimal value for 2 to the nearest hundredth, without using a calculator? How long do you think it would take, using this method, to get a
decimal value to the 8th decimal place? When you have constructed the 2 cubit length, copy it on your
final draft sheet. Describe your construction method for a reader:
18
Irrational Numbers: 𝟏𝟑 Construction As usual, locate a zero. Raise a perpendicular as with 2 . Consider the following list of the first square numbers: 1, 4, 9, 16, 25, 36, 49, 64, 81, 100, 121, 144, 169, 196, 225, 256, 289, 324, 361, 400, 441, 484,… . How can
you use numbers from this list with the method you just used for 2 , but to generate the number 13 ? Write a simple number sentence: ______________________________________ Write it in a form that shows the squares: ________________________________ Use that equation to construct a length of 13 cubits, then copy and label 13 on
your final draft sheet. Method – describe your construction for a reader:
19
Irrational Numbers: 𝟕 Construction
Locate zero and raise a perpendicular. Consider the following list of the first square numbers: 1, 4, 9, 16, 25, 36, 49, 64, 81, 100, 121, 144, 169, 196, 225, 256, 289, 324, 361, 400, 441, 484,… . How can
you use numbers from this list? Is there any addition sentence you can write that uses 7 with values from this list? Write a simple number sentence: ______________________________________ Write it in a form that shows the squares: ________________________________
Use that equation to construct a length of 7 cubits, then copy and label 7 on your final draft sheet. You may need to get creative with the construction technique; this one has a twist, as you might notice from the location of 7 in the equation…
Method – describe your construction: Now speak with your teacher about developing a plan to generate a construction for the square root of each whole number. There is a separate worksheet for this activity.

20
Irrational Number of your choosing: 𝒏 Construction (you pick n) Remarks/notes on this construction:
21
Other Construction(s) Remarks/notes on this construction:
22
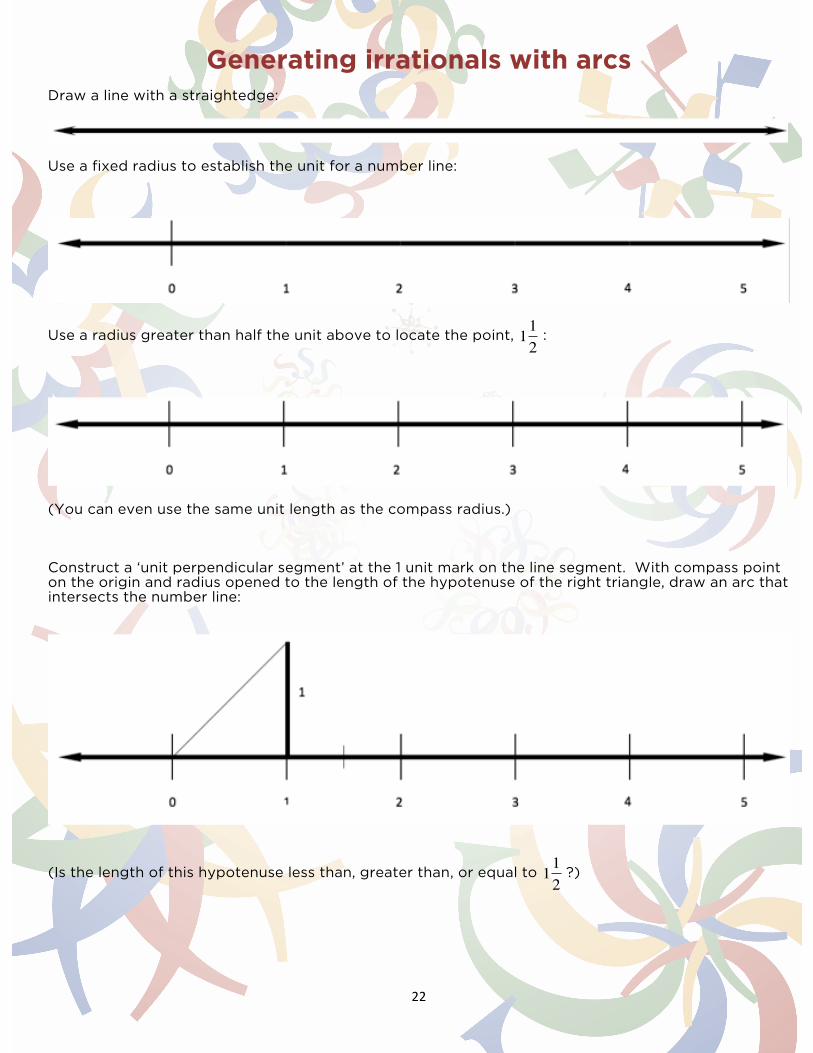
Generating irrationals with arcs Draw a line with a straightedge:
Use a fixed radius to establish the unit for a number line:
Use a radius greater than half the unit above to locate the point,
112
:
(You can even use the same unit length as the compass radius.) Construct a ‘unit perpendicular segment’ at the 1 unit mark on the line segment. With compass point on the origin and radius opened to the length of the hypotenuse of the right triangle, draw an arc that intersects the number line:
(Is the length of this hypotenuse less than, greater than, or equal to
112
?)
23
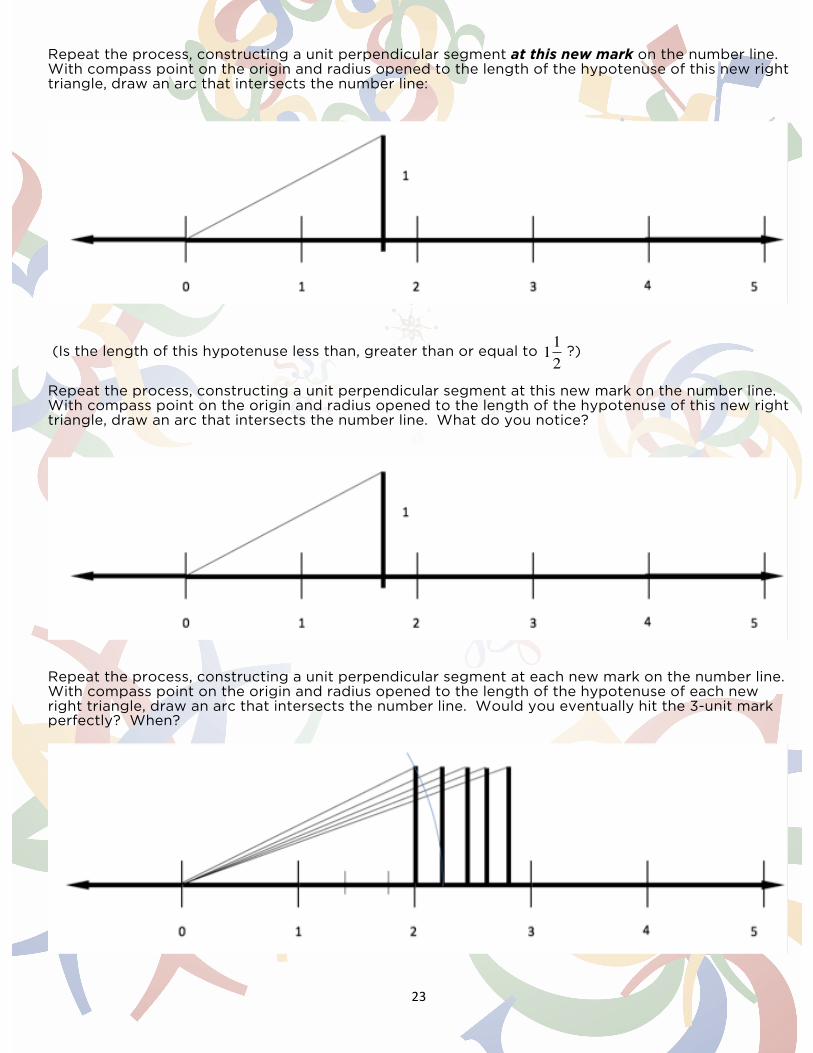
Repeat the process, constructing a unit perpendicular segment at this new mark on the number line. With compass point on the origin and radius opened to the length of the hypotenuse of this new right triangle, draw an arc that intersects the number line:
(Is the length of this hypotenuse less than, greater than or equal to
112
?)
Repeat the process, constructing a unit perpendicular segment at this new mark on the number line. With compass point on the origin and radius opened to the length of the hypotenuse of this new right triangle, draw an arc that intersects the number line. What do you notice?
Repeat the process, constructing a unit perpendicular segment at each new mark on the number line. With compass point on the origin and radius opened to the length of the hypotenuse of each new right triangle, draw an arc that intersects the number line. Would you eventually hit the 3-unit mark perfectly? When?
24
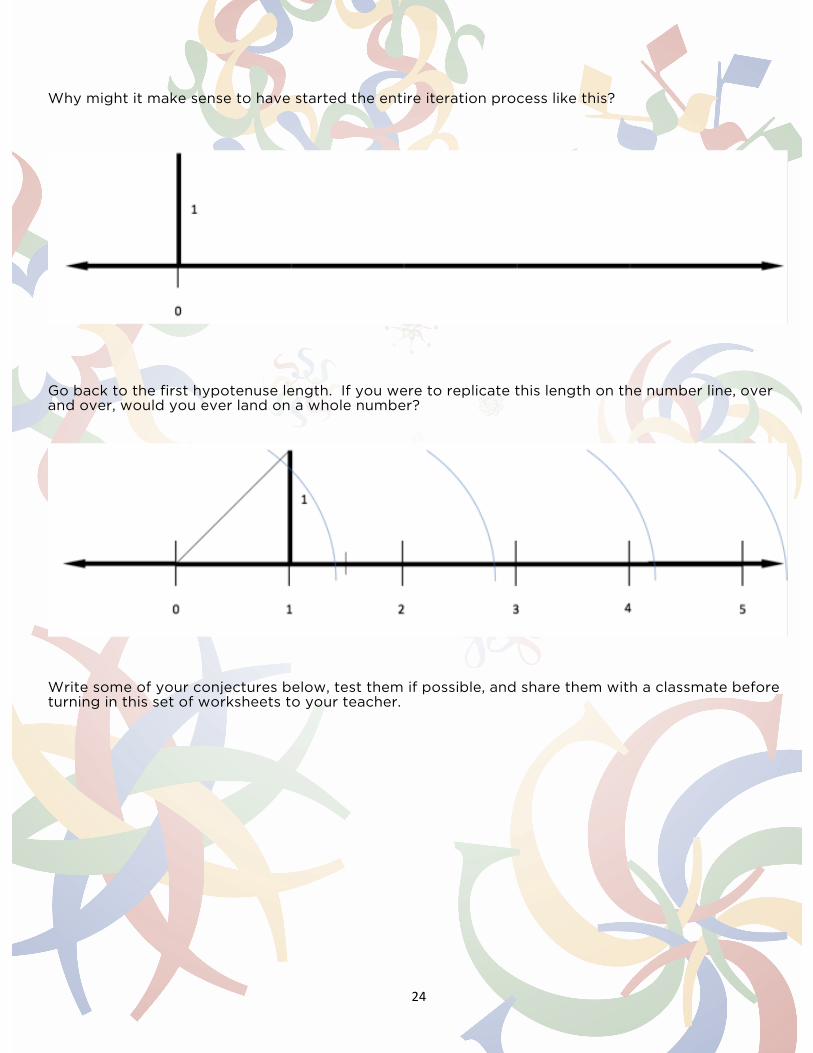
Why might it make sense to have started the entire iteration process like this?
Go back to the first hypotenuse length. If you were to replicate this length on the number line, over and over, would you ever land on a whole number?
Write some of your conjectures below, test them if possible, and share them with a classmate before turning in this set of worksheets to your teacher.

25
Generating irrationals with arcs – teacher notes Draw a line with a straightedge:
Use a fixed radius to establish the unit for a number line:
Use a radius greater than half the unit above to locate the point,
112
:
(You can even use the same unit.) Construct a unit perpendicular segment at the 1 unit mark on the line segment. With compass point on the origin and radius opened to the length of the hypotenuse of the right triangle, draw an arc that intersects the number line:
(Is the length of this hypotenuse less than, greater than, or equal to
112
?)
(less; it should be 2 , approx. 1.414)
26
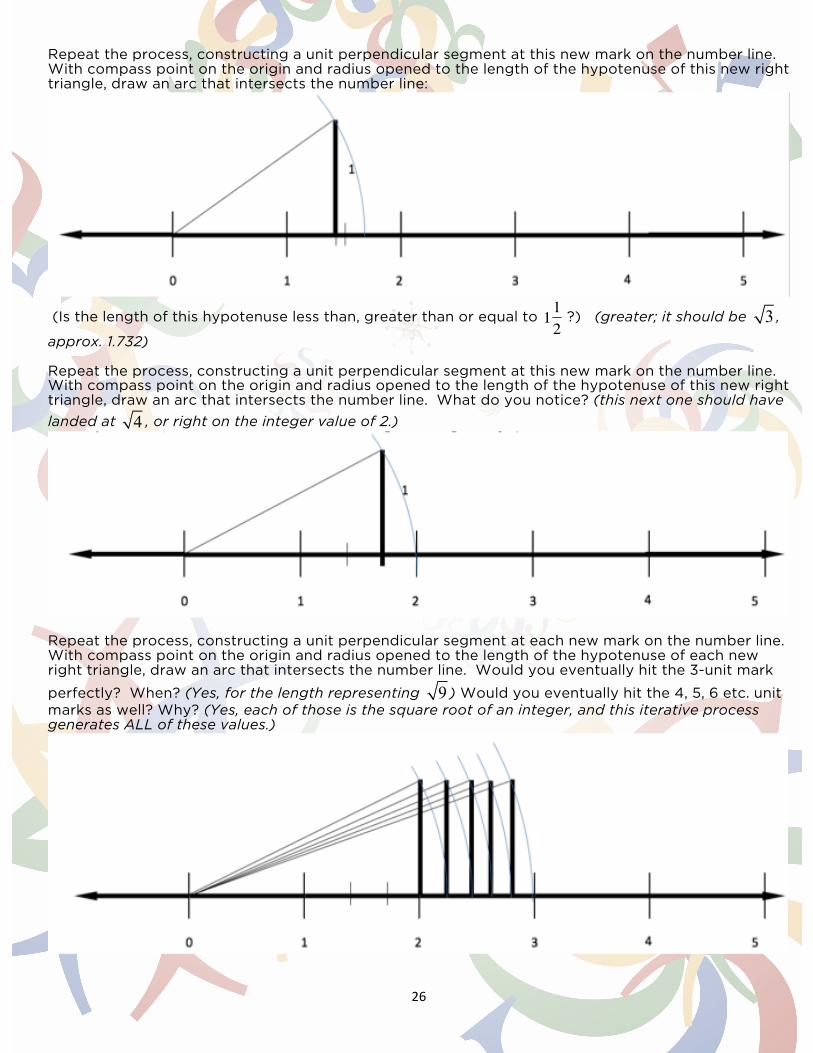
Repeat the process, constructing a unit perpendicular segment at this new mark on the number line. With compass point on the origin and radius opened to the length of the hypotenuse of this new right triangle, draw an arc that intersects the number line:
(Is the length of this hypotenuse less than, greater than or equal to
112
?) (greater; it should be 3 ,
approx. 1.732) Repeat the process, constructing a unit perpendicular segment at this new mark on the number line. With compass point on the origin and radius opened to the length of the hypotenuse of this new right triangle, draw an arc that intersects the number line. What do you notice? (this next one should have
landed at 4 , or right on the integer value of 2.)
Repeat the process, constructing a unit perpendicular segment at each new mark on the number line. With compass point on the origin and radius opened to the length of the hypotenuse of each new right triangle, draw an arc that intersects the number line. Would you eventually hit the 3-unit mark
perfectly? When? (Yes, for the length representing 9 ) Would you eventually hit the 4, 5, 6 etc. unit marks as well? Why? (Yes, each of those is the square root of an integer, and this iterative process generates ALL of these values.)
27
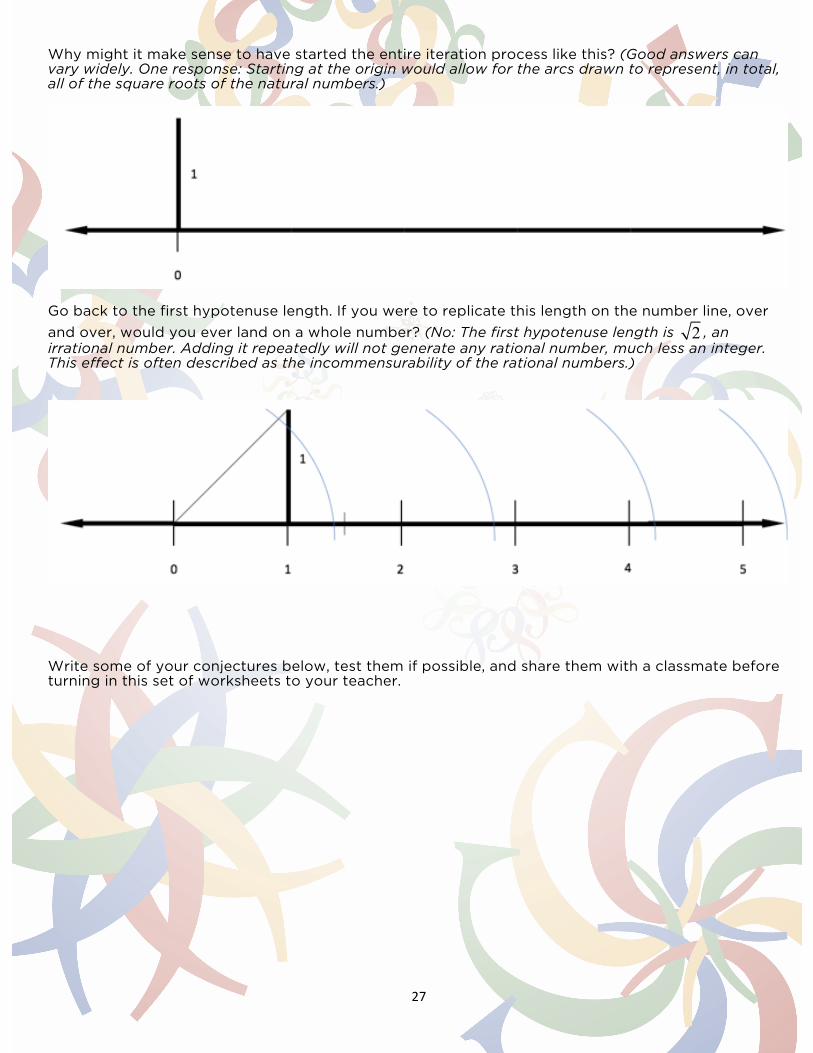
Why might it make sense to have started the entire iteration process like this? (Good answers can vary widely. One response: Starting at the origin would allow for the arcs drawn to represent, in total, all of the square roots of the natural numbers.)
Go back to the first hypotenuse length. If you were to replicate this length on the number line, over
and over, would you ever land on a whole number? (No: The first hypotenuse length is 2 , an irrational number. Adding it repeatedly will not generate any rational number, much less an integer. This effect is often described as the incommensurability of the rational numbers.)
Write some of your conjectures below, test them if possible, and share them with a classmate before turning in this set of worksheets to your teacher.