Embed Size (px)
Citation preview
Important • Please read the Precautions and this User’s Manual carefully to familiarize yourself with safe and effective usage.
• The software described in this document is provided based on the Software License Agreement, and can be used only when you agree with the contents of the agreement.
• This document exclusively describes the projected capacitive touch panel monitor.
• For information about how to connect the monitor, refer to the Setup Manual of your monitor.
• The latest software and User’s Manual are available for download from our web site: http://www.eizoglobal.com
User’ s Manual
Touch Panel Setting Tool

2 About This Document
1. EIZO Corporation shall retain the copyright to this document. Reprinting this document in part or in whole without prior permission from EIZO Corporation is strictly prohibited.
2. The contents of this document are subject to change without notice. 3. While we take great care in producing this document, if you find any errors or omissions, please
contact EIZO. 4. Notwithstanding the above, EIZO shall not assume any responsibility for damages, loss of profits,
and the like, resulting from the use of this document. Windows, .NET Framework are registered trademarks of Microsoft Corporation in the United States and other countries. DMT-DD is a registered trademark of DMC Co, Ltd. EIZO and the EIZO logo are registered trademarks of EIZO Corporation in Japan and other countries. Other company and product names are trademarks or registered trademarks of their respective companies.
About This DocumentThis document describes the procedures required to operate the EIZO projected capacitive touch panel monitor in Windows 10 / Windows 8.1 / Windows 7.
About DMT-DDDMT-DD is the software used to operate EIZO touch panel monitors in Windows 10 / Windows 8.1 / Windows 7.The available operating system varies depending on the model you are using. For details, refer to the User’s Manual of the model you are using.
3Contents
3-11. Tool Setting .................................................. 35 ● Resident Function ......................................... 35
Chapter 4 Troubleshooting .............................. 36Chapter 5 Reference Information ................... 38
5-1. Uninstalling the Touch Panel Driver ......... 38 ● USB Connection............................................ 38
● COM Port Connection ................................... 385-2. Uninstalling DMT-DD .................................. 40
ContentsAbout This Document ........................................... 2About DMT-DD ....................................................... 2Contents ................................................................. 3Chapter 1 Introduction ....................................... 4
1-1. Outline ............................................................ 4 ● Operating Conditions ...................................... 4
1-2. Precautions ................................................... 4
Chapter 2 Setup .................................................. 52-1. Setup Flow ..................................................... 52-2. Installing DMT-DD ......................................... 62-3. Installing the Touch Panel Driver ................ 8
● Installing the Touch Panel Driver (USB Connection) ..................................................... 9
● Installing the Touch Panel Driver (COM Port Connection) ............................................. 9
2-4. ConfiguringaTouchPanel .........................122-5. RegisteringaConfigurationFile ................142-6. Calibrating the Touch Panel Monitor .........172-7. Calibrating the Sensitivity of the Touch
Panel Monitor ...............................................18
Chapter 3 Touch Screen Properties ............... 193-1. Touch Panel Device List ............................. 203-2. Software Settings ........................................21
● Software Settings .......................................... 22
● Calibration ..................................................... 233-3. Touch Input Setting .................................... 25
● Touch Input .................................................... 25
● Touch Form ................................................... 26
● Lift-off Delay .................................................. 26
● Touch Enabled .............................................. 26
● Inversion ........................................................ 263-4. Touch Sound................................................ 27
● Play Type ....................................................... 27
● Sound Timing ................................................ 28
● Beep Setting .................................................. 28
● Name of the file to play ................................. 283-5. Right-click .................................................... 293-6. Hardware Setting ........................................ 303-7. Hardware Information .................................313-8. ConfigurationFile ....................................... 32
● Configuration File .......................................... 32
● Addition and Deletion of Configuration File .. 32
● Default Setting ............................................... 333-9. Touch Setting .............................................. 333-10. Mouse Setting ............................................. 34
4 Chapter 1 Introduction
Chapter 1 Introduction
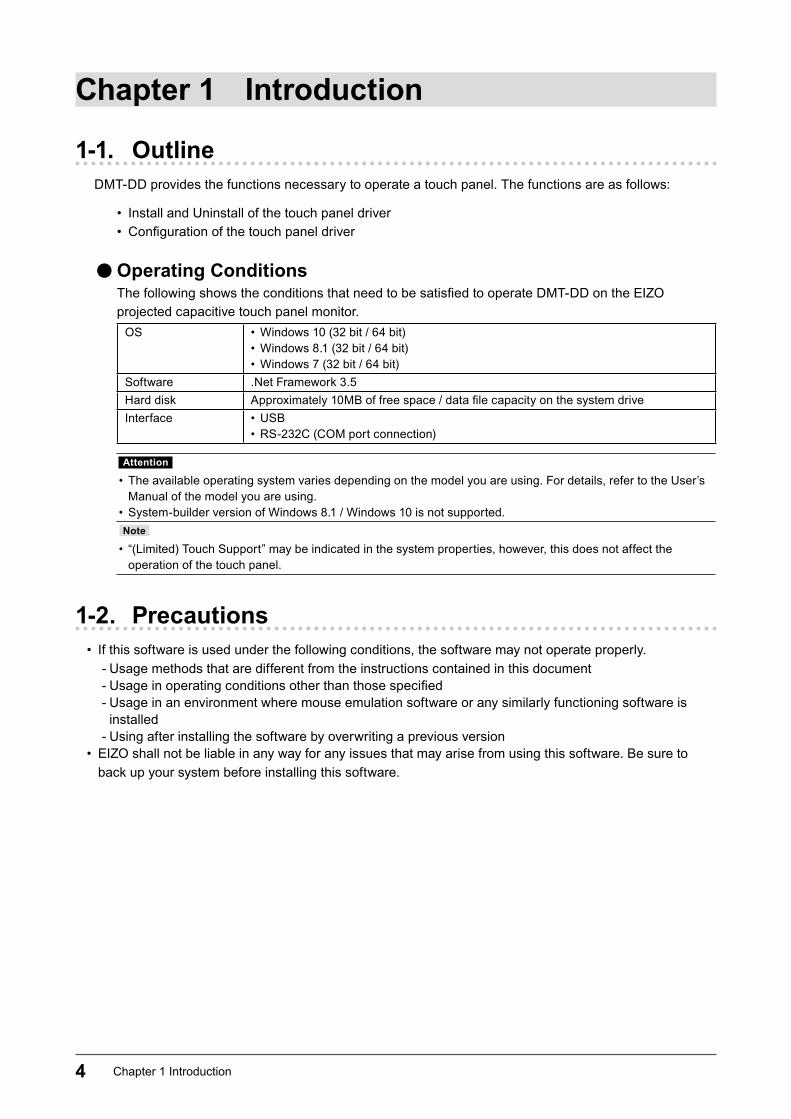
1-1. OutlineDMT-DD provides the functions necessary to operate a touch panel. The functions are as follows:
• Install and Uninstall of the touch panel driver • Configuration of the touch panel driver
●Operating ConditionsThe following shows the conditions that need to be satisfied to operate DMT-DD on the EIZO projected capacitive touch panel monitor.
OS • Windows 10 (32 bit / 64 bit) • Windows 8.1 (32 bit / 64 bit) • Windows 7 (32 bit / 64 bit)
Software .Net Framework 3.5Hard disk Approximately 10MB of free space / data file capacity on the system driveInterface • USB
• RS-232C (COM port connection)
Attention
• The available operating system varies depending on the model you are using. For details, refer to the User’s Manual of the model you are using.
• System-builder version of Windows 8.1 / Windows 10 is not supported.Note
• “(Limited) Touch Support” may be indicated in the system properties, however, this does not affect the operation of the touch panel.
1-2. Precautions • If this software is used under the following conditions, the software may not operate properly.
- Usage methods that are different from the instructions contained in this document - Usage in operating conditions other than those specified - Usage in an environment where mouse emulation software or any similarly functioning software is installed - Using after installing the software by overwriting a previous version
• EIZO shall not be liable in any way for any issues that may arise from using this software. Be sure to back up your system before installing this software.
5Chapter 2 Setup
Chapter 2 Setup
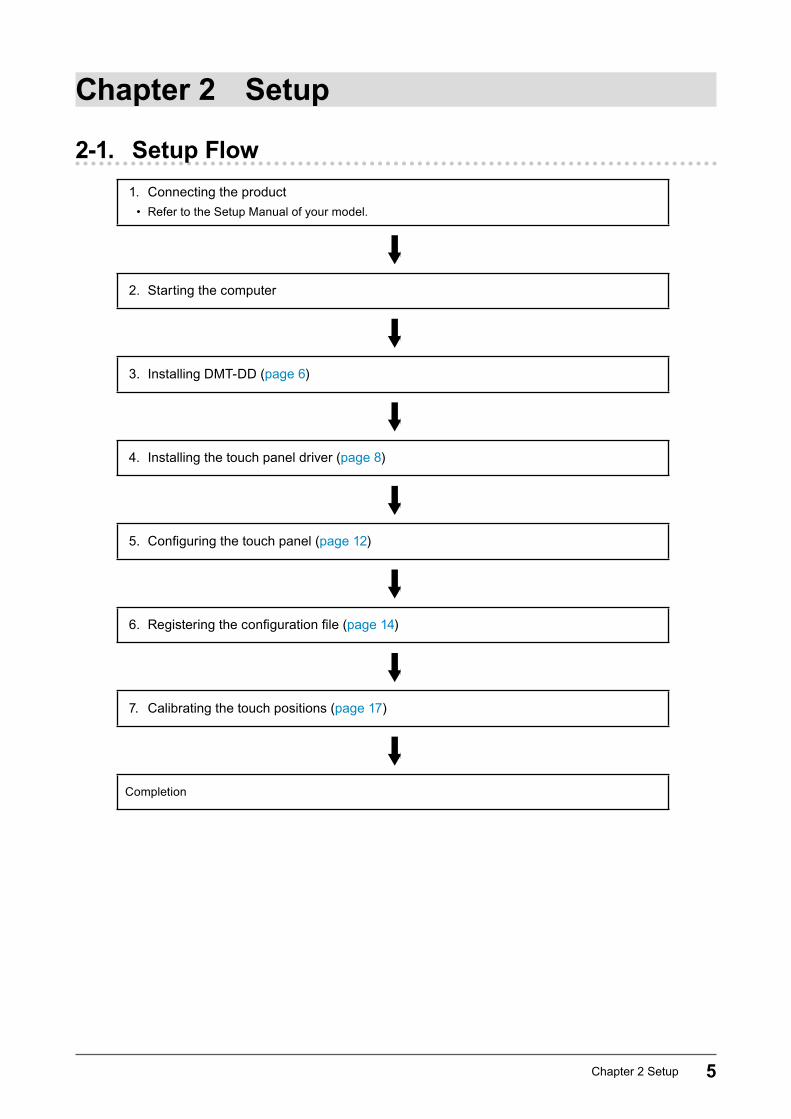
2-1. Setup Flow1. Connecting the product
• Refer to the Setup Manual of your model.
2. Starting the computer
3. Installing DMT-DD (page 6)
4. Installing the touch panel driver (page 8)
5. Configuring the touch panel (page 12)
6. Registering the configuration file (page 14)
7. Calibrating the touch positions (page 17)
Completion
6 Chapter 2 Setup
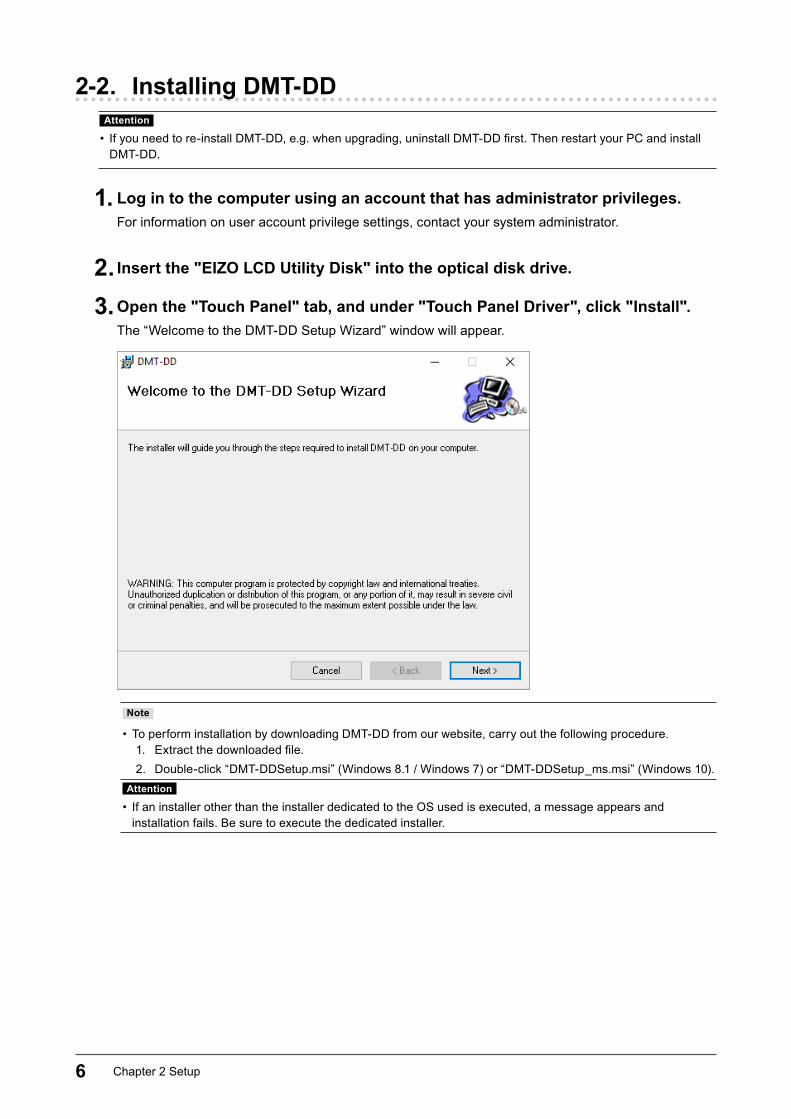
2-2. Installing DMT-DDAttention
• If you need to re-install DMT-DD, e.g. when upgrading, uninstall DMT-DD first. Then restart your PC and install DMT-DD.
1. Log in to the computer using an account that has administrator privileges.For information on user account privilege settings, contact your system administrator.
2. Insert the "EIZO LCD Utility Disk" into the optical disk drive.
3. Open the "Touch Panel" tab, and under "Touch Panel Driver", click "Install".The “Welcome to the DMT-DD Setup Wizard” window will appear.
Note
• To perform installation by downloading DMT-DD from our website, carry out the following procedure.1. Extract the downloaded file.2. Double-click “DMT-DDSetup.msi” (Windows 8.1 / Windows 7) or “DMT-DDSetup_ms.msi” (Windows 10).
Attention
• If an installer other than the installer dedicated to the OS used is executed, a message appears and installation fails. Be sure to execute the dedicated installer.
7Chapter 2 Setup
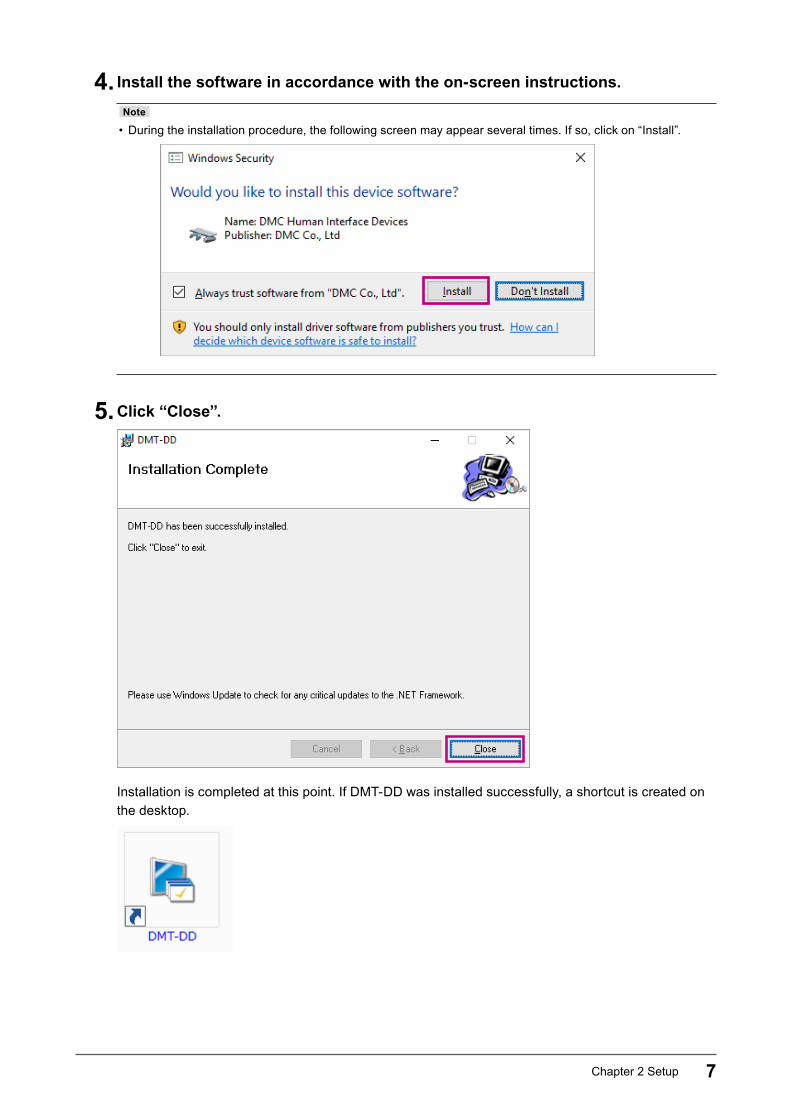
4. Install the software in accordance with the on-screen instructions.
Note
• During the installation procedure, the following screen may appear several times. If so, click on “Install”.
5. Click “Close”.
Installation is completed at this point. If DMT-DD was installed successfully, a shortcut is created on the desktop.
8 Chapter 2 Setup
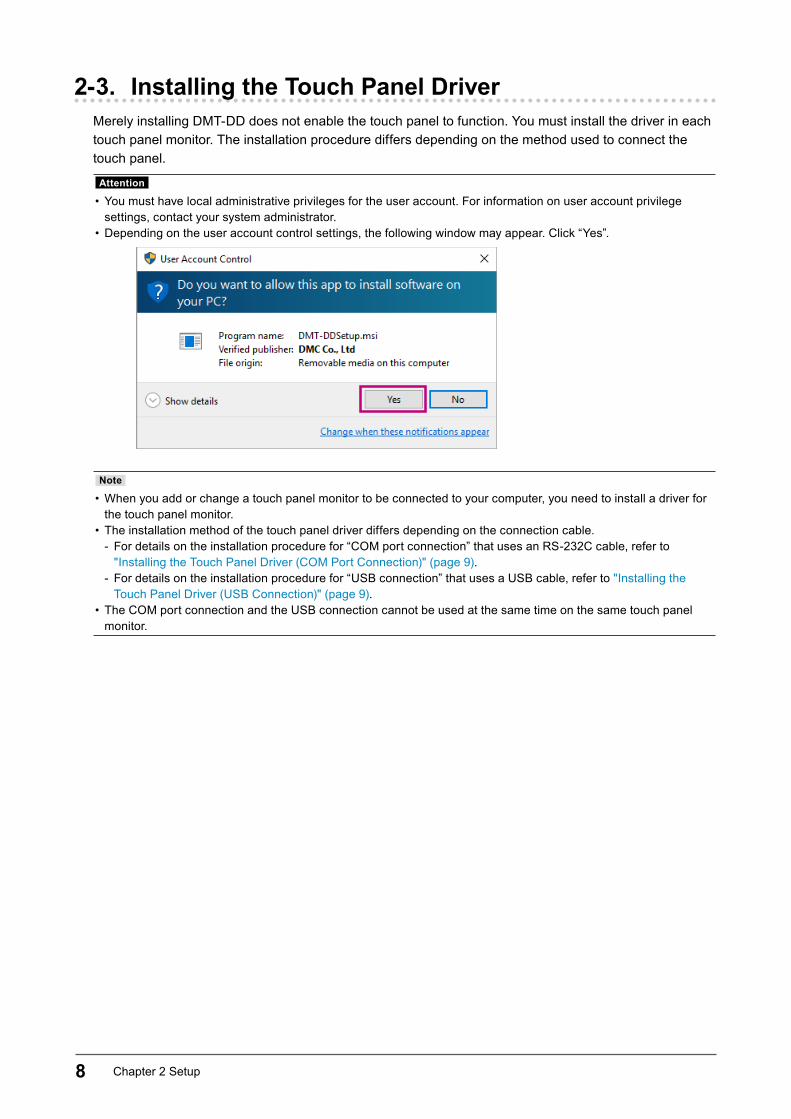
2-3. Installing the Touch Panel DriverMerely installing DMT-DD does not enable the touch panel to function. You must install the driver in each touch panel monitor. The installation procedure differs depending on the method used to connect the touch panel.
Attention
• You must have local administrative privileges for the user account. For information on user account privilege settings, contact your system administrator.
• Depending on the user account control settings, the following window may appear. Click “Yes”.
Note
• When you add or change a touch panel monitor to be connected to your computer, you need to install a driver for the touch panel monitor.
• The installation method of the touch panel driver differs depending on the connection cable. - For details on the installation procedure for “COM port connection” that uses an RS-232C cable, refer to "Installing the Touch Panel Driver (COM Port Connection)" (page 9).
- For details on the installation procedure for “USB connection” that uses a USB cable, refer to "Installing the Touch Panel Driver (USB Connection)" (page 9).
• The COM port connection and the USB connection cannot be used at the same time on the same touch panel monitor.
9Chapter 2 Setup
● Installing the Touch Panel Driver (USB Connection)The touch panel driver will be installed automatically when a USB cable is connected after DMT-DD is installed. If the USB cable is already connected before installing DMT-DD, disconnect and connect the USB cable again, or click “Install”.
Attention
• After the installation procedure is completed, you must reboot the computer.
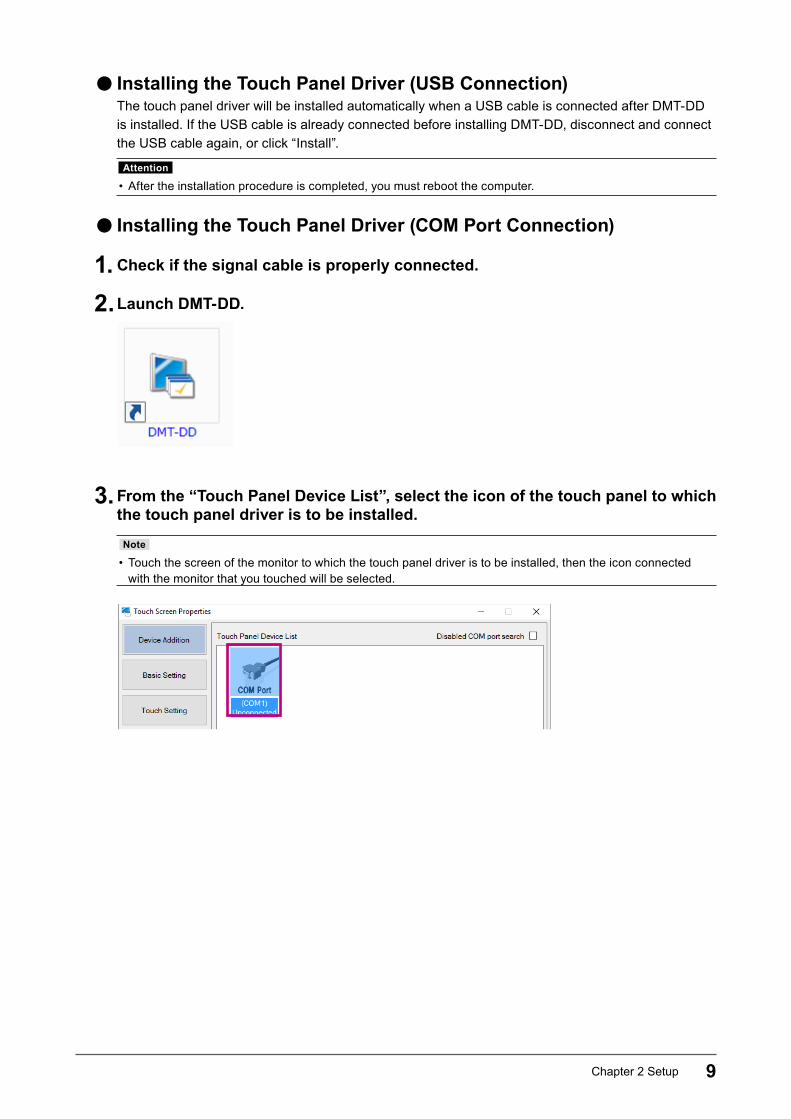
● Installing the Touch Panel Driver (COM Port Connection)
1. Check if the signal cable is properly connected.
2. Launch DMT-DD.
3. From the “Touch Panel Device List”, select the icon of the touch panel to which the touch panel driver is to be installed.
Note
• Touch the screen of the monitor to which the touch panel driver is to be installed, then the icon connected with the monitor that you touched will be selected.
10 Chapter 2 Setup
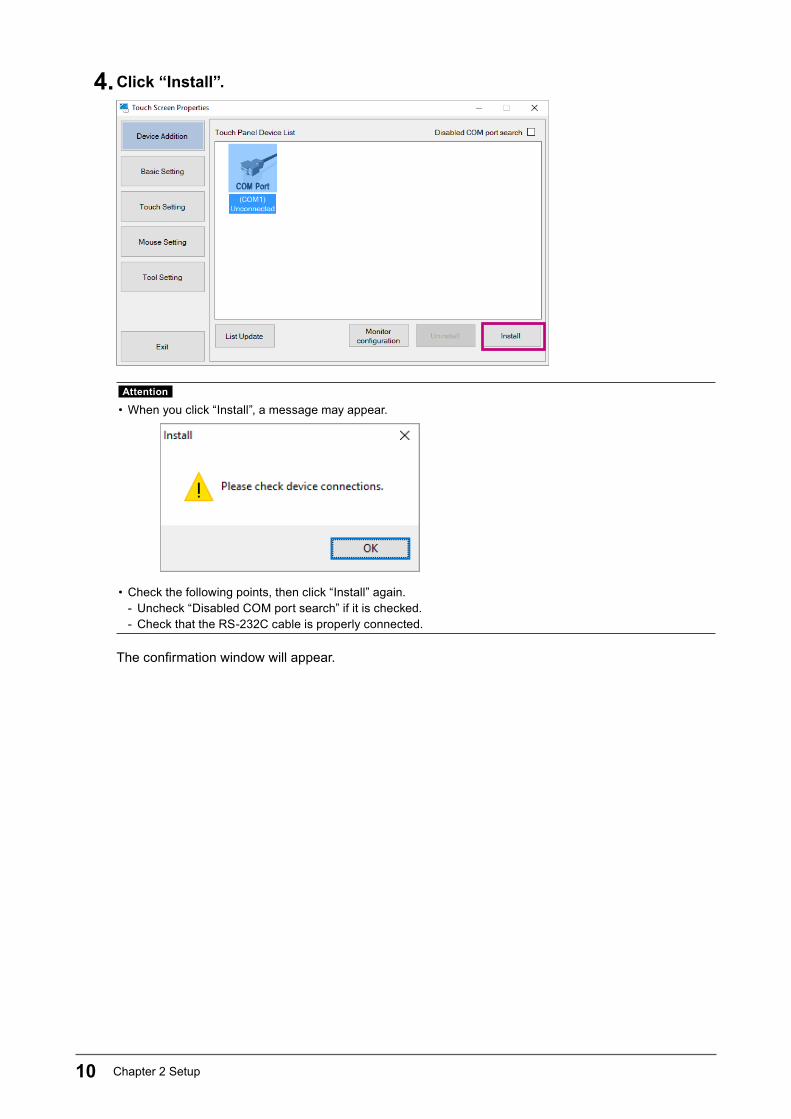
4. Click “Install”.
Attention
• When you click “Install”, a message may appear.
• Check the following points, then click “Install” again. - Uncheck “Disabled COM port search” if it is checked. - Check that the RS-232C cable is properly connected.
The confirmation window will appear.
11Chapter 2 Setup
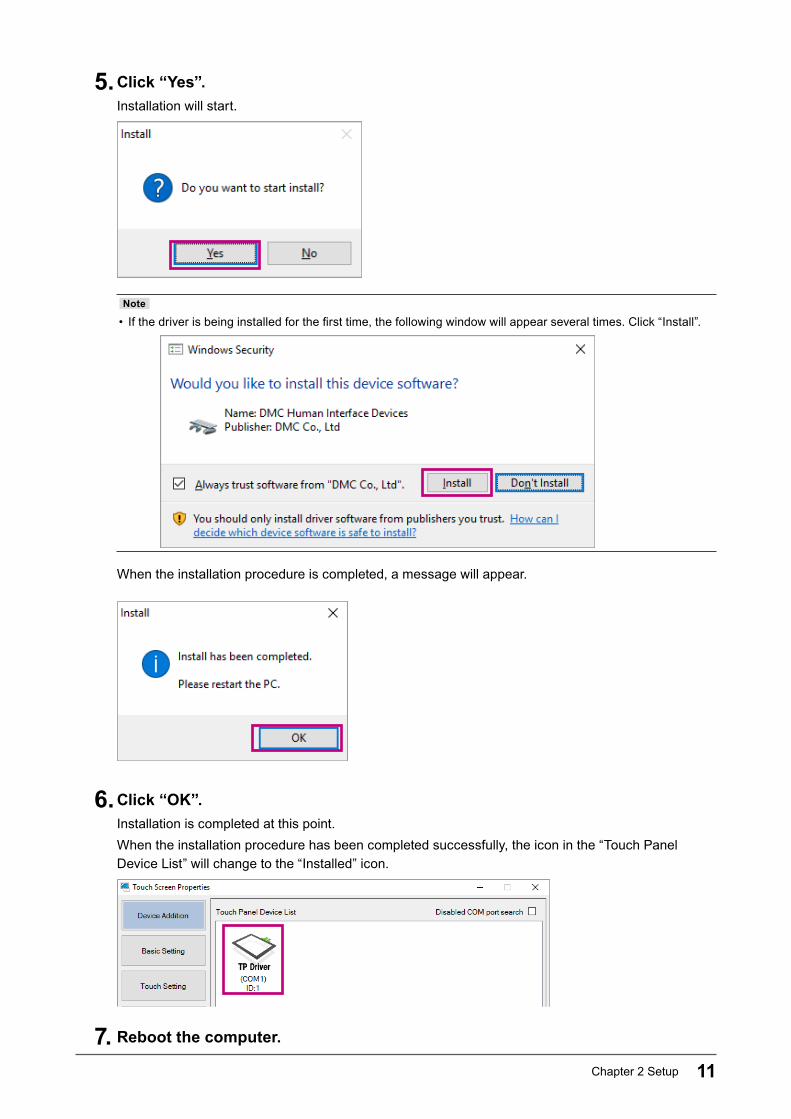
5. Click “Yes”.Installation will start.
Note
• If the driver is being installed for the first time, the following window will appear several times. Click “Install”.
When the installation procedure is completed, a message will appear.
6. Click “OK”.Installation is completed at this point.When the installation procedure has been completed successfully, the icon in the “Touch Panel Device List” will change to the “Installed” icon.
7. Reboot the computer.
12 Chapter 2 Setup
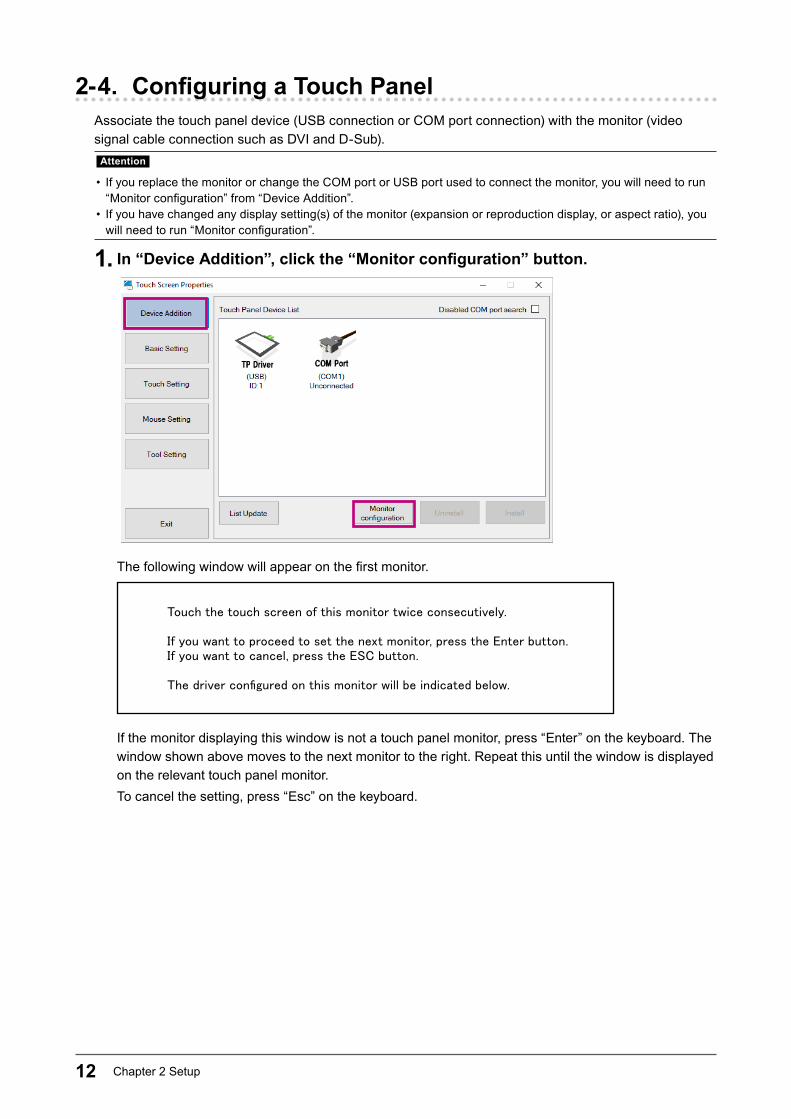
2-4. ConfiguringaTouchPanelAssociate the touch panel device (USB connection or COM port connection) with the monitor (video signal cable connection such as DVI and D-Sub).
Attention
• If you replace the monitor or change the COM port or USB port used to connect the monitor, you will need to run “Monitor configuration” from “Device Addition”.
• If you have changed any display setting(s) of the monitor (expansion or reproduction display, or aspect ratio), you will need to run “Monitor configuration”.
1. In“DeviceAddition”,clickthe“Monitorconfiguration”button.
The following window will appear on the first monitor.
Touch the touch screen of this monitor twice consecutively.
If you want to proceed to set the next monitor, press the Enter button.If you want to cancel, press the ESC button.
The driver configured on this monitor will be indicated below.
If the monitor displaying this window is not a touch panel monitor, press “Enter” on the keyboard. The window shown above moves to the next monitor to the right. Repeat this until the window is displayed on the relevant touch panel monitor.To cancel the setting, press “Esc” on the keyboard.
13Chapter 2 Setup
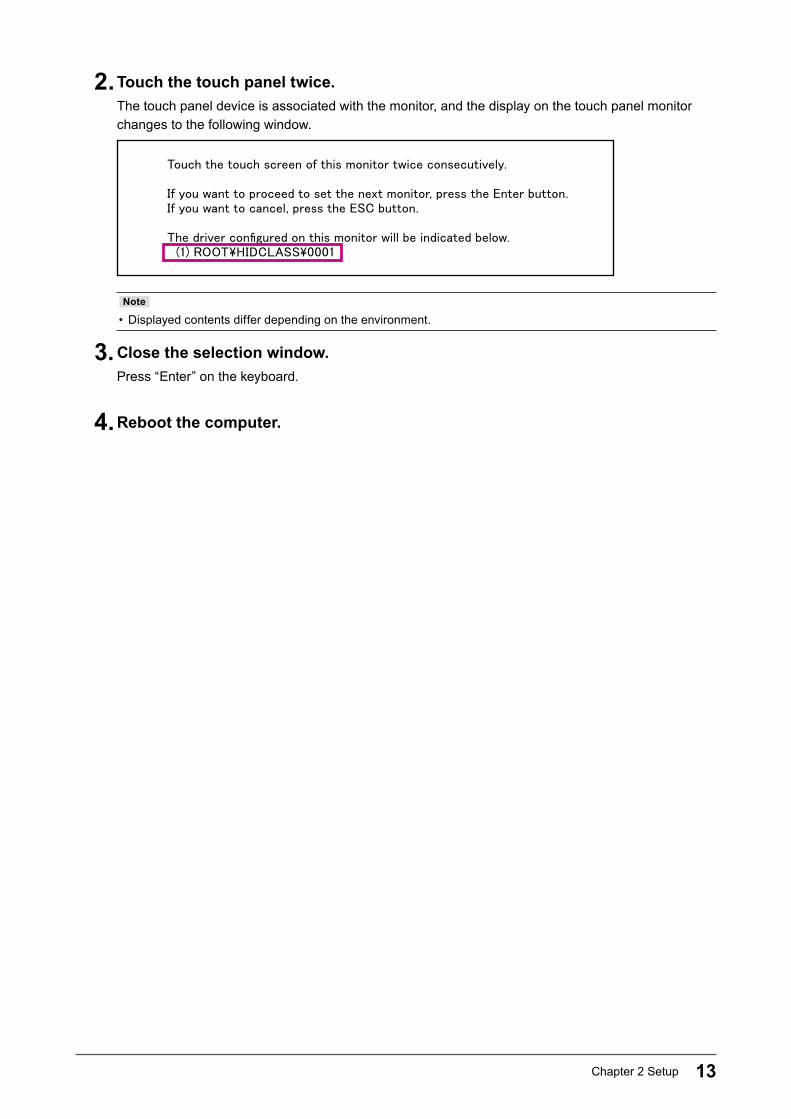
2. Touch the touch panel twice.The touch panel device is associated with the monitor, and the display on the touch panel monitor changes to the following window.
Touch the touch screen of this monitor twice consecutively.
If you want to proceed to set the next monitor, press the Enter button.If you want to cancel, press the ESC button.
The driver configured on this monitor will be indicated below. (1) ROOT\HIDCLASS\0001
Note
• Displayed contents differ depending on the environment.
3. Close the selection window.Press “Enter” on the keyboard.
4. Reboot the computer.
14 Chapter 2 Setup
2-5. RegisteringaConfigurationFileIf you register a configuration file, you can configure the operation mode of the touch panel.
Attention
• You must register a configuration file for each installed touch panel driver. • In the default setting, no configuration file is registered. When no configuration file is registered, the “Touch.mfd” file will be set.
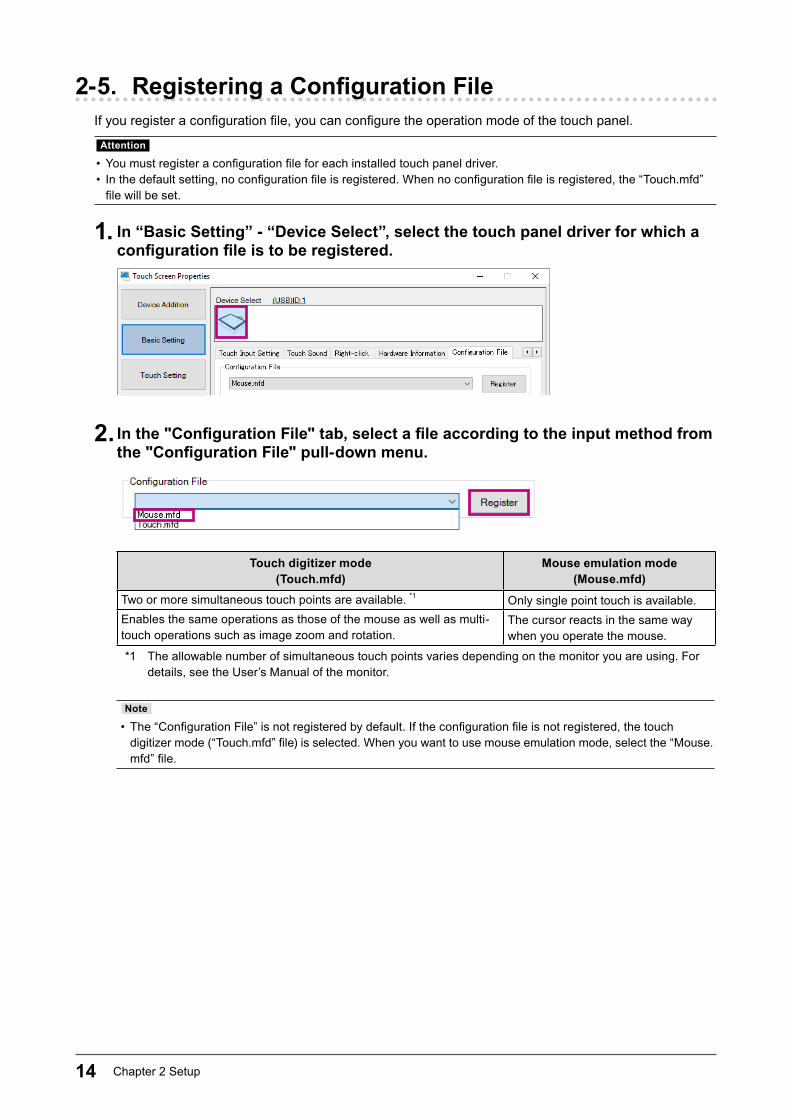
1. In “Basic Setting” - “Device Select”, select the touch panel driver for which a configurationfileistoberegistered.
2. Inthe"ConfigurationFile"tab,selectafileaccordingtotheinputmethodfromthe"ConfigurationFile"pull-downmenu.
Touch digitizer mode (Touch.mfd)
Mouse emulation mode (Mouse.mfd)
Two or more simultaneous touch points are available. *1 Only single point touch is available.Enables the same operations as those of the mouse as well as multi-touch operations such as image zoom and rotation.
The cursor reacts in the same way when you operate the mouse.
*1 The allowable number of simultaneous touch points varies depending on the monitor you are using. For details, see the User’s Manual of the monitor.
Note
• The “Configuration File” is not registered by default. If the configuration file is not registered, the touch digitizer mode (“Touch.mfd” file) is selected. When you want to use mouse emulation mode, select the “Mouse.mfd” file.
15Chapter 2 Setup
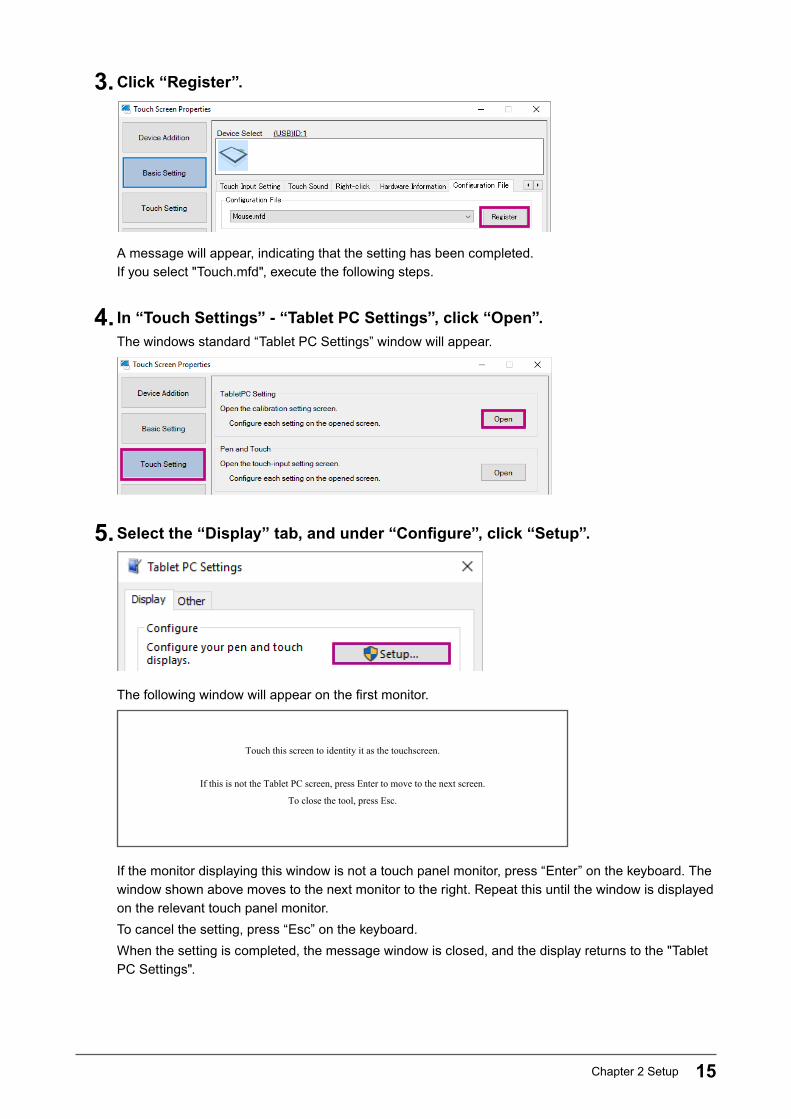
3. Click “Register”.
A message will appear, indicating that the setting has been completed.If you select "Touch.mfd", execute the following steps.
4. In “Touch Settings” - “Tablet PC Settings”, click “Open”.The windows standard “Tablet PC Settings” window will appear.
5. Selectthe“Display”tab,andunder“Configure”,click“Setup”.
The following window will appear on the first monitor.
Touch this screen to identity it as the touchscreen.
If this is not the Tablet PC screen, press Enter to move to the next screen.
To close the tool, press Esc.
If the monitor displaying this window is not a touch panel monitor, press “Enter” on the keyboard. The window shown above moves to the next monitor to the right. Repeat this until the window is displayed on the relevant touch panel monitor.To cancel the setting, press “Esc” on the keyboard.When the setting is completed, the message window is closed, and the display returns to the "Tablet PC Settings".
16 Chapter 2 Setup
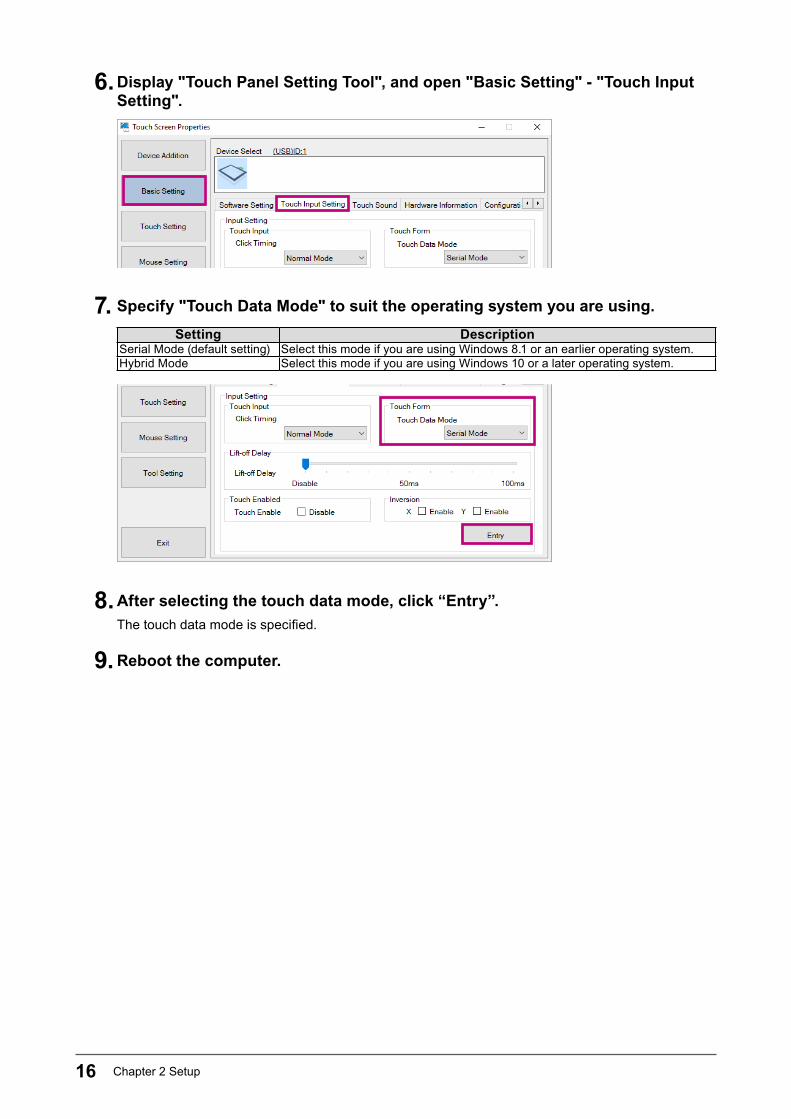
6. Display "Touch Panel Setting Tool", and open "Basic Setting" - "Touch Input Setting".
7. Specify "Touch Data Mode" to suit the operating system you are using.Setting Description
Serial Mode (default setting) Select this mode if you are using Windows 8.1 or an earlier operating system.Hybrid Mode Select this mode if you are using Windows 10 or a later operating system.
8. After selecting the touch data mode, click “Entry”.The touch data mode is specified.
9. Reboot the computer.
17Chapter 2 Setup
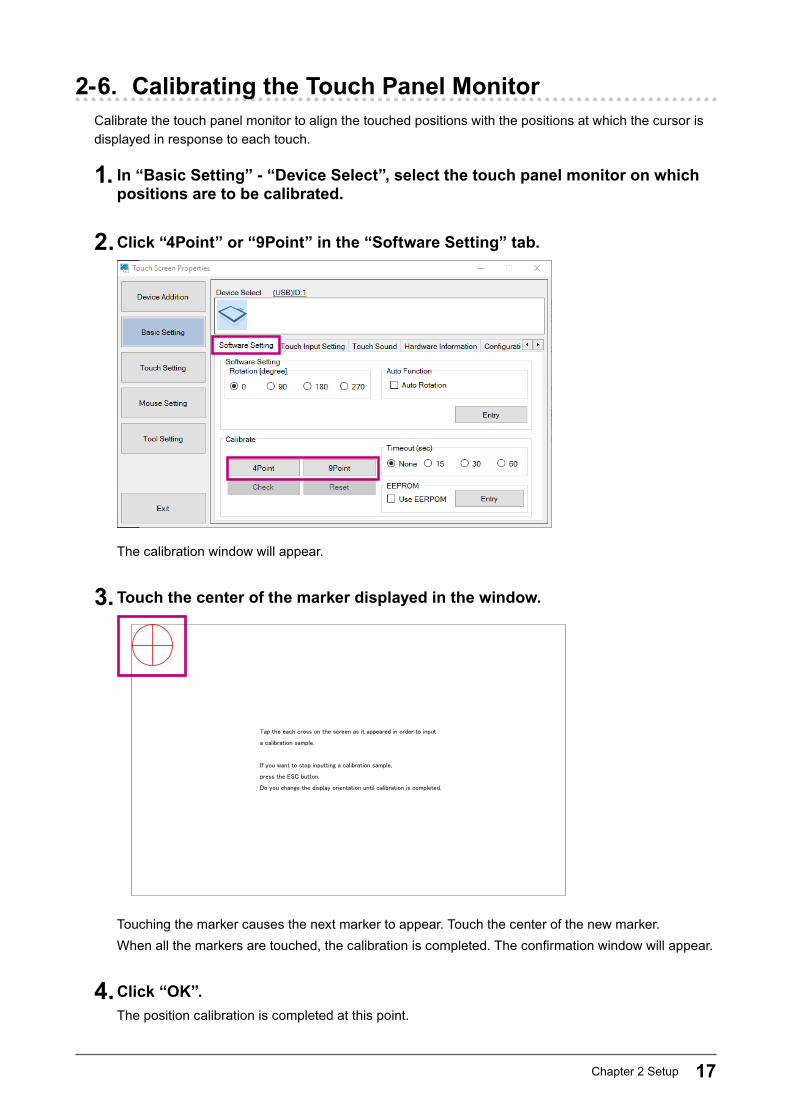
2-6. Calibrating the Touch Panel MonitorCalibrate the touch panel monitor to align the touched positions with the positions at which the cursor is displayed in response to each touch.
1. In “Basic Setting” - “Device Select”, select the touch panel monitor on which positions are to be calibrated.
2. Click “4Point” or “9Point” in the “Software Setting” tab.
The calibration window will appear.
3. Touch the center of the marker displayed in the window.
Tap the each cross on the screen as it appeared in order to input
a calibration sample.
If you want to stop inputting a calibration sample,
press the ESC button.
Do you change the display orientation until calibration is completed.
Touching the marker causes the next marker to appear. Touch the center of the new marker.When all the markers are touched, the calibration is completed. The confirmation window will appear.
4. Click “OK”.The position calibration is completed at this point.

18 Chapter 2 Setup
2-7. Calibrating the Sensitivity of the Touch Panel Monitor
Calibrate the sensitivity of the touch panel monitor.
1. In "Basic Setting" - "Device Select", select the touch panel monitor you want to calibrate the sensitivity for.
2. Click "Open" in the "Hardware Setting" tab.
The sensitivity calibration window will appear.
When the sensitivity calibration window is closed, calibration is completed.
19Chapter 3 Touch Screen Properties
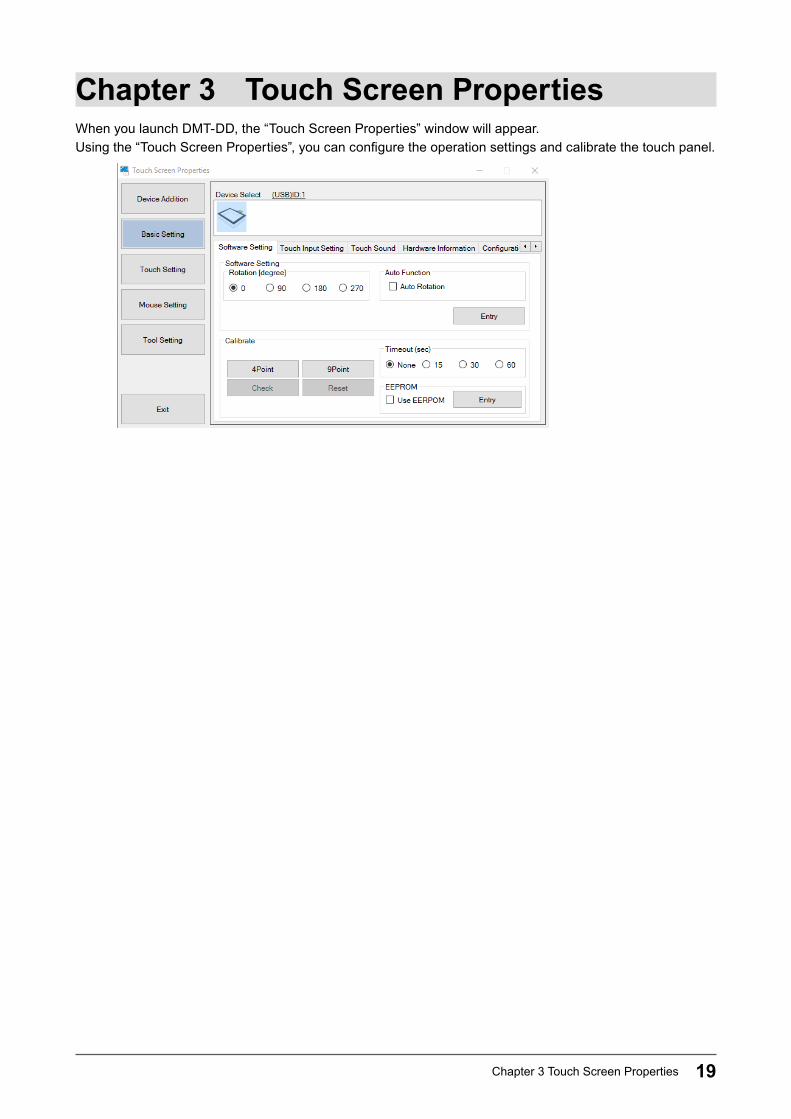
Chapter 3 Touch Screen PropertiesWhen you launch DMT-DD, the “Touch Screen Properties” window will appear.Using the “Touch Screen Properties”, you can configure the operation settings and calibrate the touch panel.
20 Chapter 3 Touch Screen Properties
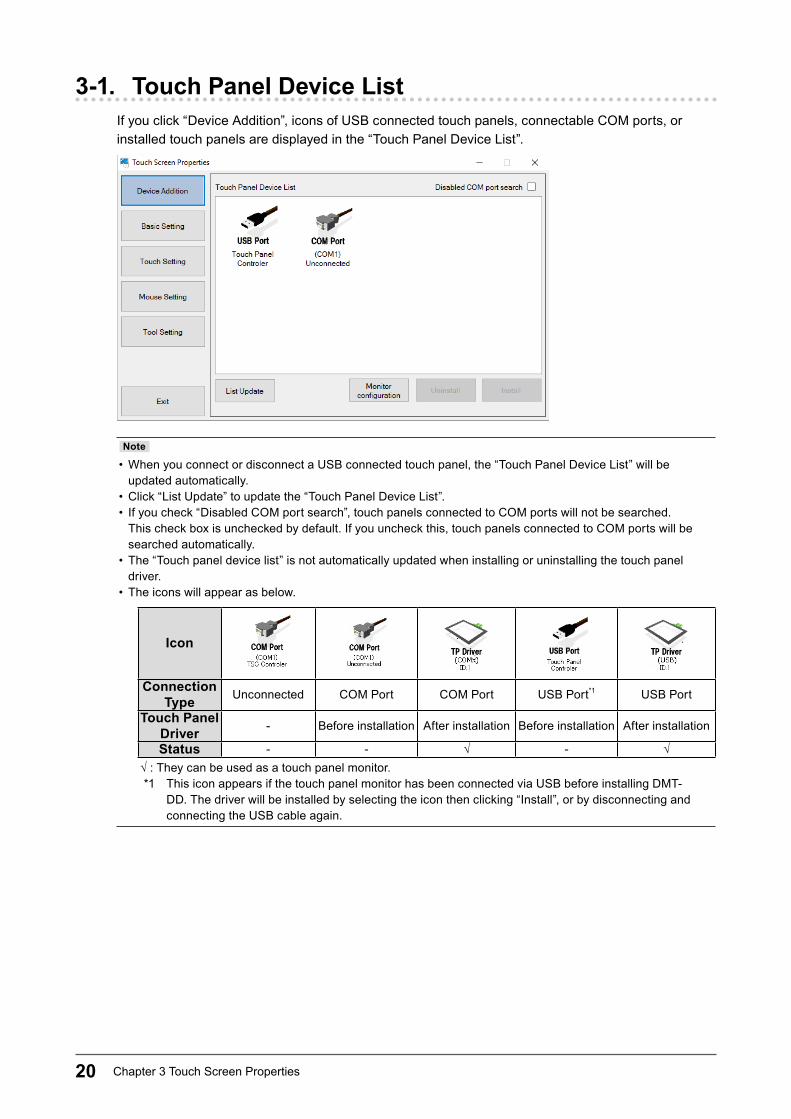
3-1. Touch Panel Device ListIf you click “Device Addition”, icons of USB connected touch panels, connectable COM ports, or installed touch panels are displayed in the “Touch Panel Device List”.
Note
• When you connect or disconnect a USB connected touch panel, the “Touch Panel Device List” will be updated automatically.
• Click “List Update” to update the “Touch Panel Device List”. • If you check “Disabled COM port search”, touch panels connected to COM ports will not be searched. This check box is unchecked by default. If you uncheck this, touch panels connected to COM ports will be searched automatically.
• The “Touch panel device list” is not automatically updated when installing or uninstalling the touch panel driver.
• The icons will appear as below.
Icon
Connection Type Unconnected COM Port COM Port USB Port*1 USB Port
Touch Panel Driver - Before installation After installation Before installation After installation
Status - - √ - √√ : They can be used as a touch panel monitor.*1 This icon appears if the touch panel monitor has been connected via USB before installing DMT-
DD. The driver will be installed by selecting the icon then clicking “Install”, or by disconnecting and connecting the USB cable again.
21Chapter 3 Touch Screen Properties
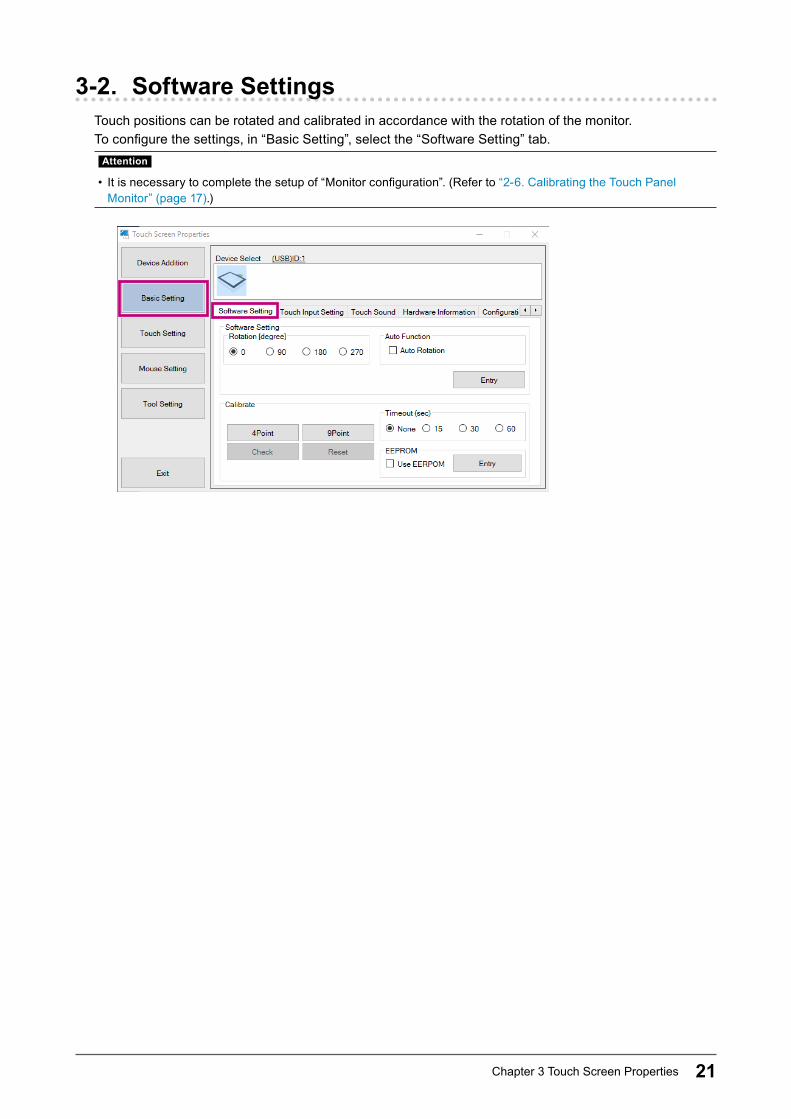
3-2. Software SettingsTouch positions can be rotated and calibrated in accordance with the rotation of the monitor.To configure the settings, in “Basic Setting”, select the “Software Setting” tab.
Attention
• It is necessary to complete the setup of “Monitor configuration”. (Refer to “2-6. Calibrating the Touch Panel Monitor” (page 17).)
22 Chapter 3 Touch Screen Properties
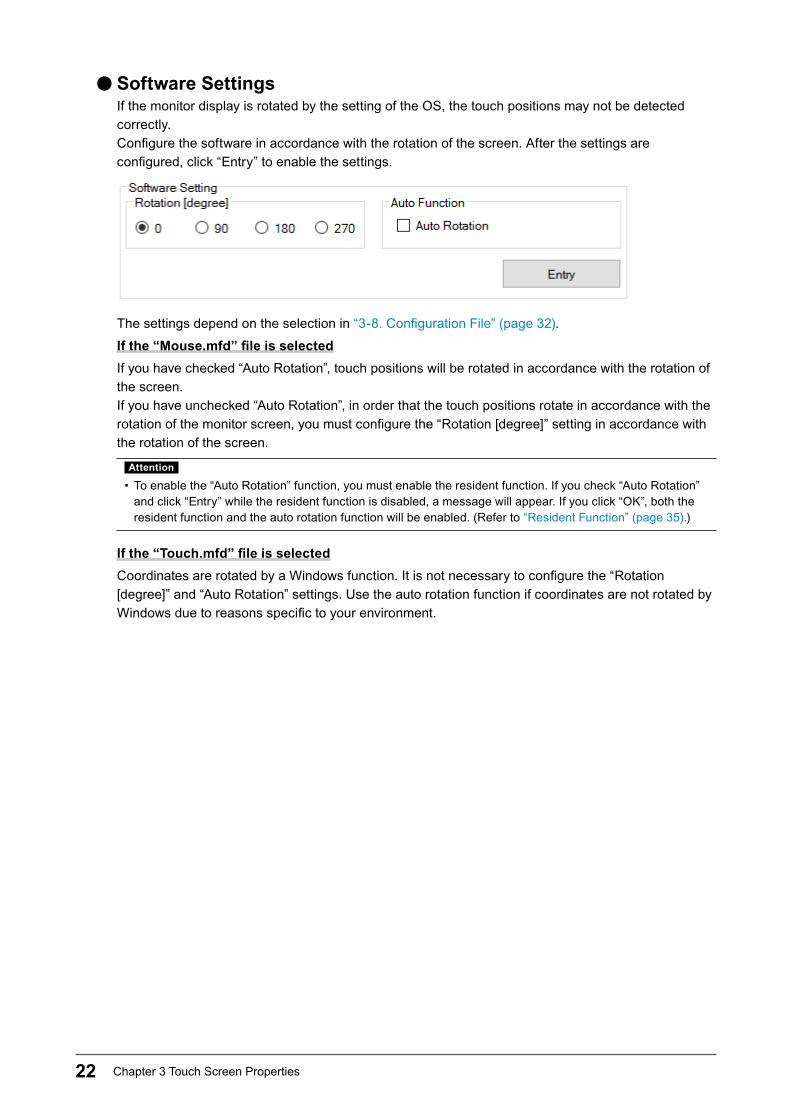
●Software SettingsIf the monitor display is rotated by the setting of the OS, the touch positions may not be detected correctly. Configure the software in accordance with the rotation of the screen. After the settings are configured, click “Entry” to enable the settings.
The settings depend on the selection in “3-8. Configuration File” (page 32).
Ifthe“Mouse.mfd”fileisselectedIf you have checked “Auto Rotation”, touch positions will be rotated in accordance with the rotation of the screen.If you have unchecked “Auto Rotation”, in order that the touch positions rotate in accordance with the rotation of the monitor screen, you must configure the “Rotation [degree]” setting in accordance with the rotation of the screen.
Attention
• To enable the “Auto Rotation” function, you must enable the resident function. If you check “Auto Rotation” and click “Entry” while the resident function is disabled, a message will appear. If you click “OK”, both the resident function and the auto rotation function will be enabled. (Refer to “Resident Function” (page 35).)
Ifthe“Touch.mfd”fileisselectedCoordinates are rotated by a Windows function. It is not necessary to configure the “Rotation [degree]” and “Auto Rotation” settings. Use the auto rotation function if coordinates are not rotated by Windows due to reasons specific to your environment.
23Chapter 3 Touch Screen Properties
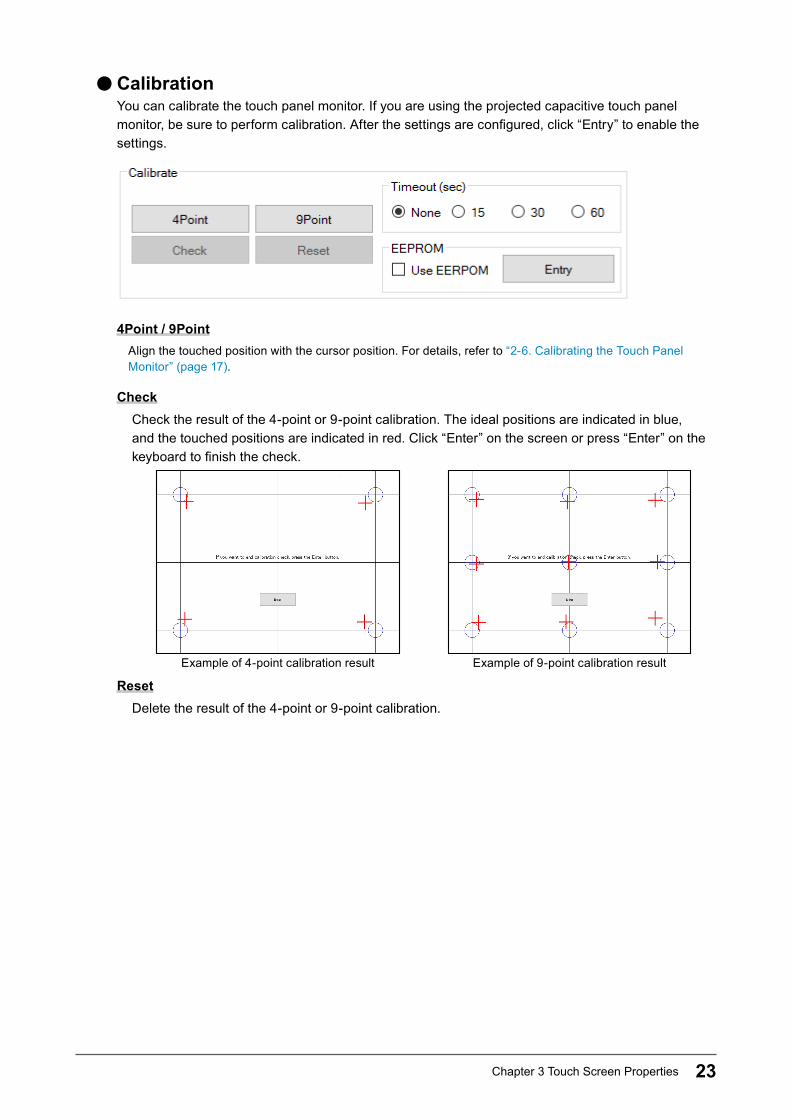
●CalibrationYou can calibrate the touch panel monitor. If you are using the projected capacitive touch panel monitor, be sure to perform calibration. After the settings are configured, click “Entry” to enable the settings.
4Point / 9PointAlign the touched position with the cursor position. For details, refer to “2-6. Calibrating the Touch Panel Monitor” (page 17).
CheckCheck the result of the 4-point or 9-point calibration. The ideal positions are indicated in blue, and the touched positions are indicated in red. Click “Enter” on the screen or press “Enter” on the keyboard to finish the check.
Example of 4-point calibration result Example of 9-point calibration result
ResetDelete the result of the 4-point or 9-point calibration.
24 Chapter 3 Touch Screen Properties
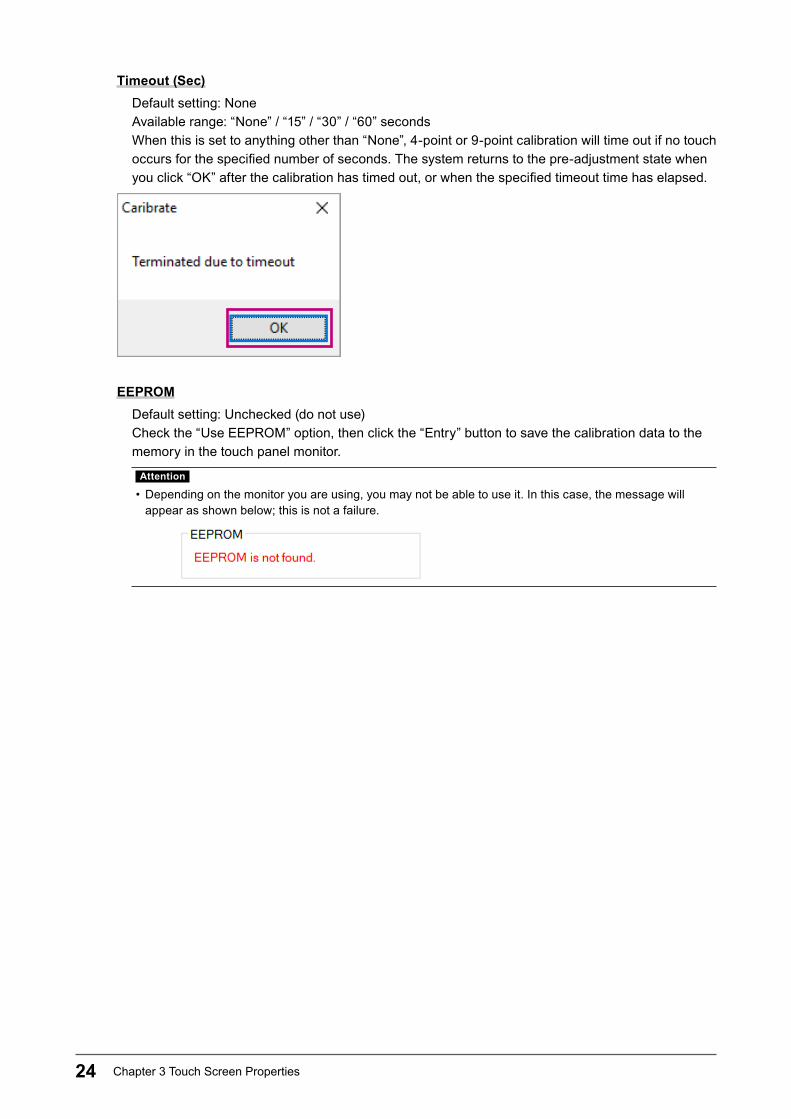
Timeout (Sec)Default setting: NoneAvailable range: “None” / “15” / “30” / “60” secondsWhen this is set to anything other than “None”, 4-point or 9-point calibration will time out if no touch occurs for the specified number of seconds. The system returns to the pre-adjustment state when you click “OK” after the calibration has timed out, or when the specified timeout time has elapsed.
EEPROMDefault setting: Unchecked (do not use)Check the “Use EEPROM” option, then click the “Entry” button to save the calibration data to the memory in the touch panel monitor.
Attention
• Depending on the monitor you are using, you may not be able to use it. In this case, the message will appear as shown below; this is not a failure.
25Chapter 3 Touch Screen Properties
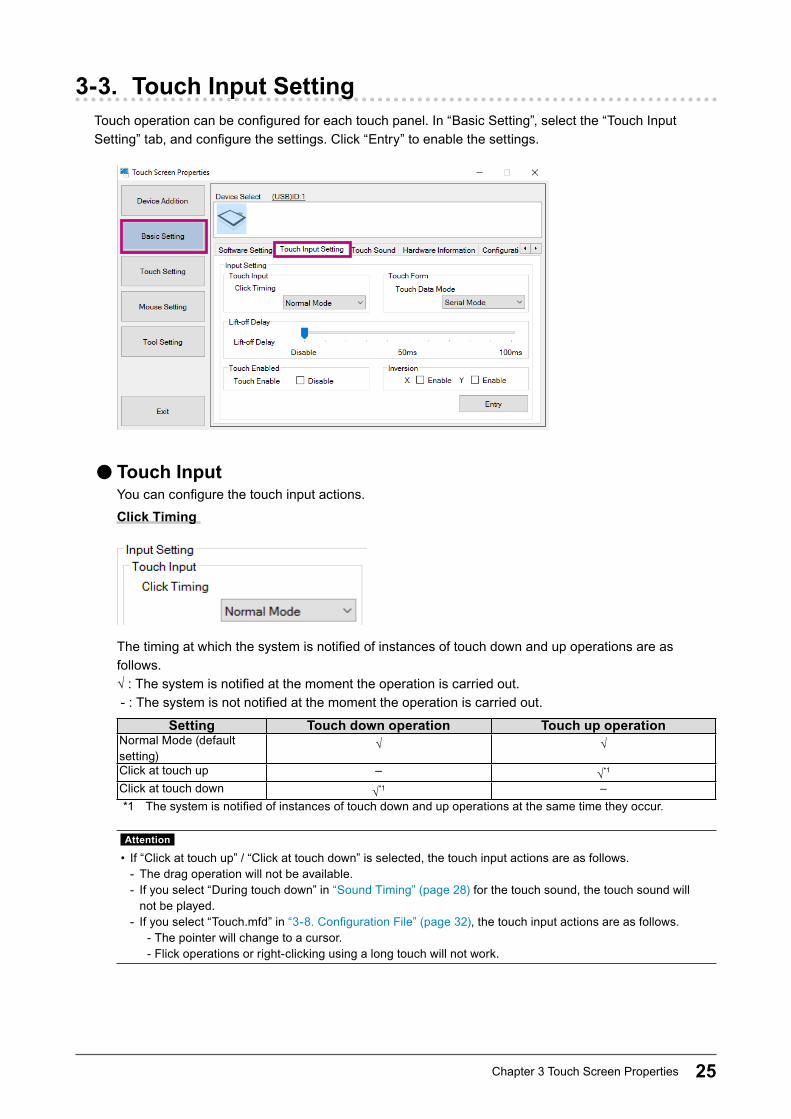
3-3. Touch Input SettingTouch operation can be configured for each touch panel. In “Basic Setting”, select the “Touch Input Setting” tab, and configure the settings. Click “Entry” to enable the settings.
●Touch InputYou can configure the touch input actions.
Click Timing
s
The timing at which the system is notified of instances of touch down and up operations are as follows. √ : The system is notified at the moment the operation is carried out. - : The system is not notified at the moment the operation is carried out.
Setting Touch down operation Touch up operationNormal Mode (default setting)
√ √
Click at touch up – √*1
Click at touch down √*1 –*1 The system is notified of instances of touch down and up operations at the same time they occur.
Attention
• If “Click at touch up” / “Click at touch down” is selected, the touch input actions are as follows. - The drag operation will not be available. - If you select “During touch down” in “Sound Timing” (page 28) for the touch sound, the touch sound will not be played.
- If you select “Touch.mfd” in “3-8. Configuration File” (page 32), the touch input actions are as follows. - The pointer will change to a cursor. - Flick operations or right-clicking using a long touch will not work.
26 Chapter 3 Touch Screen Properties
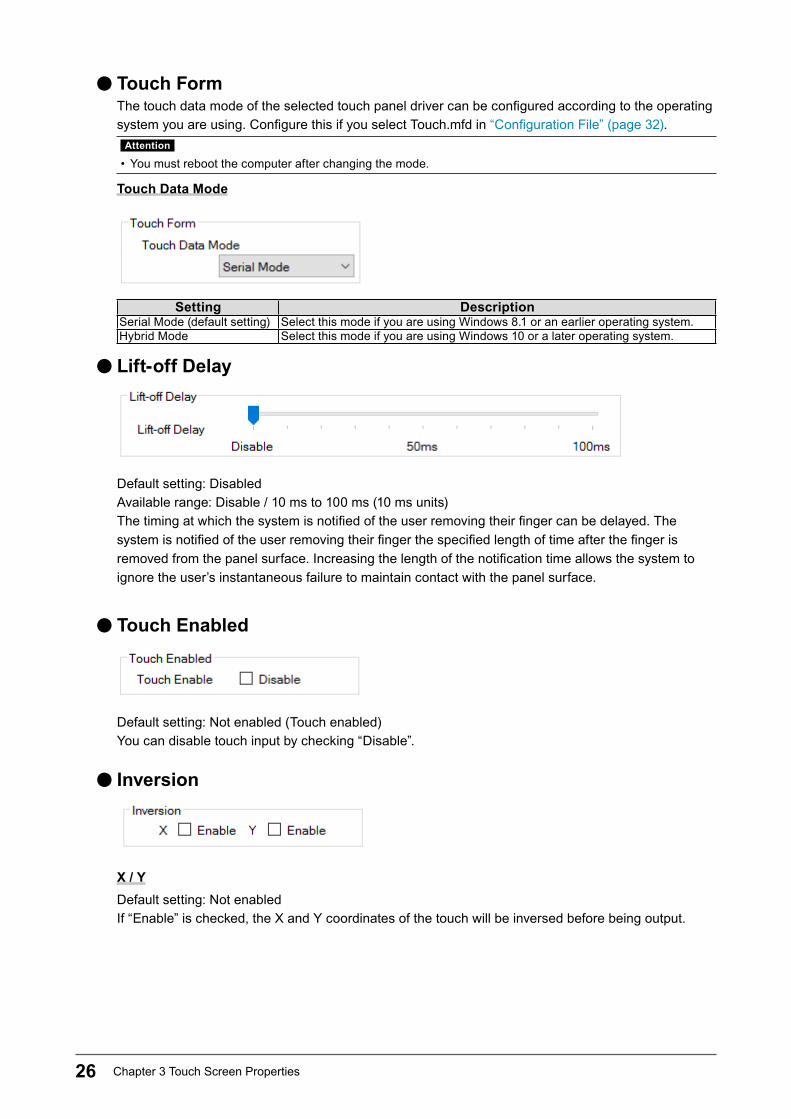
●Touch FormThe touch data mode of the selected touch panel driver can be configured according to the operating system you are using. Configure this if you select Touch.mfd in “Configuration File” (page 32).
Attention
• You must reboot the computer after changing the mode.
Touch Data Mode
Setting DescriptionSerial Mode (default setting) Select this mode if you are using Windows 8.1 or an earlier operating system.Hybrid Mode Select this mode if you are using Windows 10 or a later operating system.
●Lift-off Delay
Default setting: DisabledAvailable range: Disable / 10 ms to 100 ms (10 ms units)The timing at which the system is notified of the user removing their finger can be delayed. The system is notified of the user removing their finger the specified length of time after the finger is removed from the panel surface. Increasing the length of the notification time allows the system to ignore the user’s instantaneous failure to maintain contact with the panel surface.
●Touch Enabled
Default setting: Not enabled (Touch enabled)You can disable touch input by checking “Disable”.
● Inversion
X / YDefault setting: Not enabledIf “Enable” is checked, the X and Y coordinates of the touch will be inversed before being output.
27Chapter 3 Touch Screen Properties
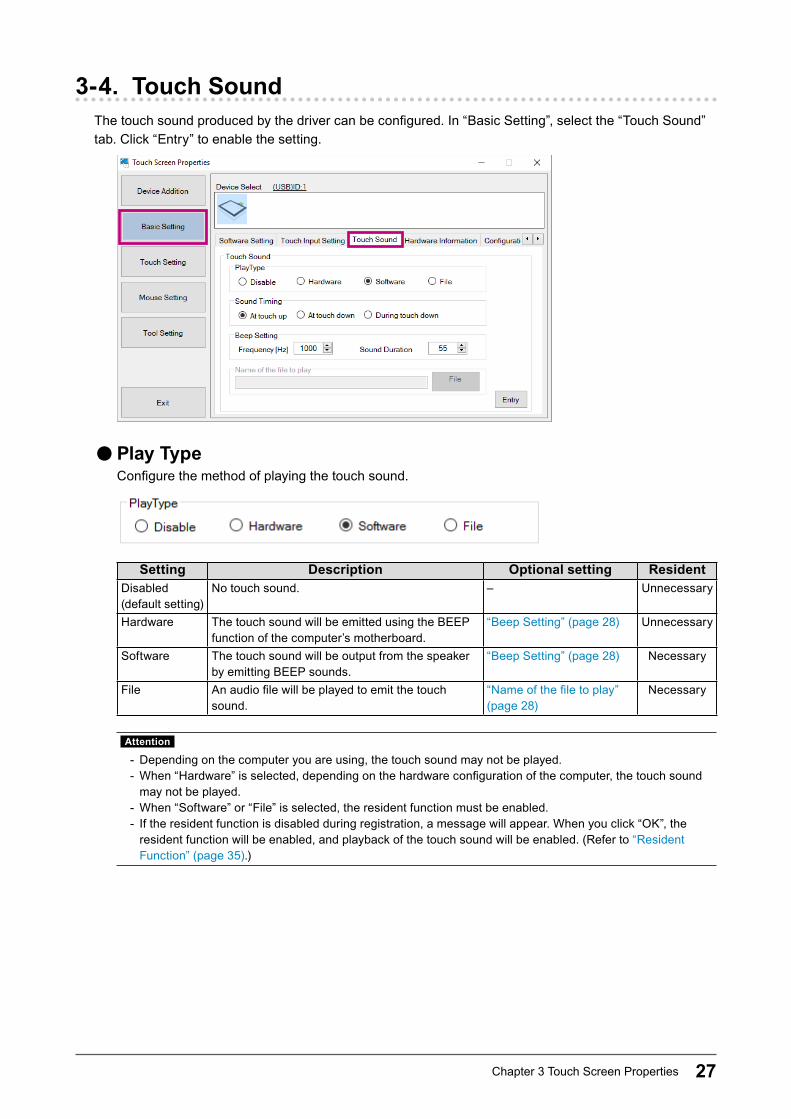
3-4. Touch SoundThe touch sound produced by the driver can be configured. In “Basic Setting”, select the “Touch Sound” tab. Click “Entry” to enable the setting.
●Play TypeConfigure the method of playing the touch sound.
Setting Description Optional setting ResidentDisabled (default setting)
No touch sound. – Unnecessary
Hardware The touch sound will be emitted using the BEEP function of the computer’s motherboard.
“Beep Setting” (page 28) Unnecessary
Software The touch sound will be output from the speaker by emitting BEEP sounds.
“Beep Setting” (page 28) Necessary
File An audio file will be played to emit the touch sound.
“Name of the file to play” (page 28)
Necessary
Attention
- Depending on the computer you are using, the touch sound may not be played. - When “Hardware” is selected, depending on the hardware configuration of the computer, the touch sound may not be played.
- When “Software” or “File” is selected, the resident function must be enabled. - If the resident function is disabled during registration, a message will appear. When you click “OK”, the resident function will be enabled, and playback of the touch sound will be enabled. (Refer to “Resident Function” (page 35).)
28 Chapter 3 Touch Screen Properties
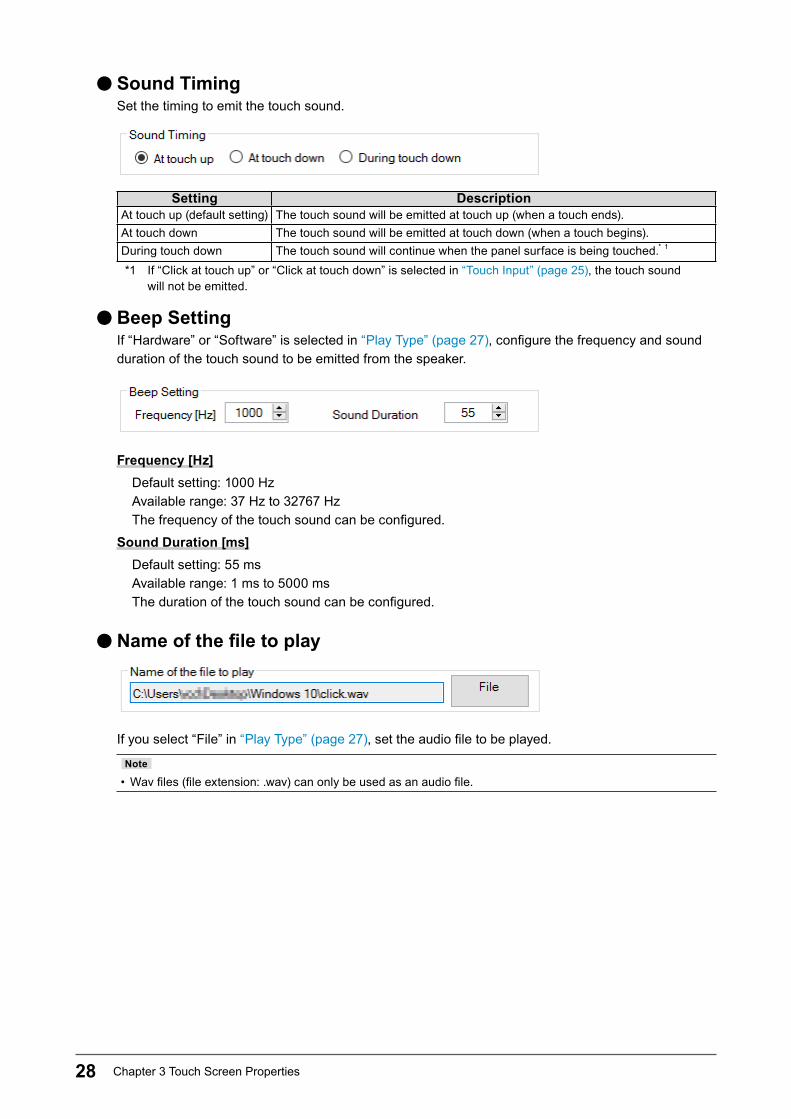
●Sound TimingSet the timing to emit the touch sound.
Setting DescriptionAt touch up (default setting) The touch sound will be emitted at touch up (when a touch ends).At touch down The touch sound will be emitted at touch down (when a touch begins).During touch down The touch sound will continue when the panel surface is being touched.* 1
*1 If “Click at touch up” or “Click at touch down” is selected in “Touch Input” (page 25), the touch sound will not be emitted.
●Beep SettingIf “Hardware” or “Software” is selected in “Play Type” (page 27), configure the frequency and sound duration of the touch sound to be emitted from the speaker.
Frequency [Hz]Default setting: 1000 Hz Available range: 37 Hz to 32767 HzThe frequency of the touch sound can be configured.
Sound Duration [ms]Default setting: 55 msAvailable range: 1 ms to 5000 msThe duration of the touch sound can be configured.
●Nameofthefiletoplay
If you select “File” in “Play Type” (page 27), set the audio file to be played.
Note
• Wav files (file extension: .wav) can only be used as an audio file.
29Chapter 3 Touch Screen Properties
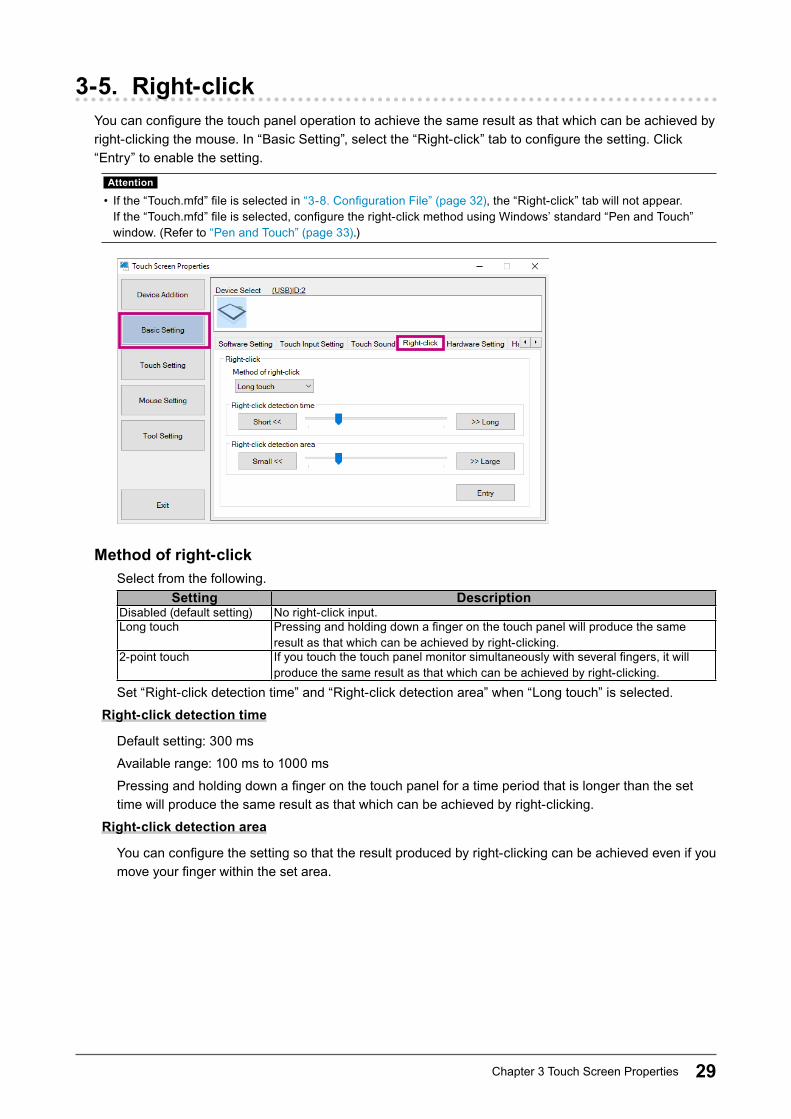
3-5. Right-clickYou can configure the touch panel operation to achieve the same result as that which can be achieved by right-clicking the mouse. In “Basic Setting”, select the “Right-click” tab to configure the setting. Click “Entry” to enable the setting.
Attention
• If the “Touch.mfd” file is selected in “3-8. Configuration File” (page 32), the “Right-click” tab will not appear. If the “Touch.mfd” file is selected, configure the right-click method using Windows’ standard “Pen and Touch” window. (Refer to “Pen and Touch” (page 33).)
Method of right-clickSelect from the following.
Setting DescriptionDisabled (default setting) No right-click input.Long touch Pressing and holding down a finger on the touch panel will produce the same
result as that which can be achieved by right-clicking.2-point touch If you touch the touch panel monitor simultaneously with several fingers, it will
produce the same result as that which can be achieved by right-clicking.
Set “Right-click detection time” and “Right-click detection area” when “Long touch” is selected.
Right-click detection time
Default setting: 300 ms
Available range: 100 ms to 1000 ms
Pressing and holding down a finger on the touch panel for a time period that is longer than the set time will produce the same result as that which can be achieved by right-clicking.
Right-click detection area
You can configure the setting so that the result produced by right-clicking can be achieved even if you move your finger within the set area.
30 Chapter 3 Touch Screen Properties
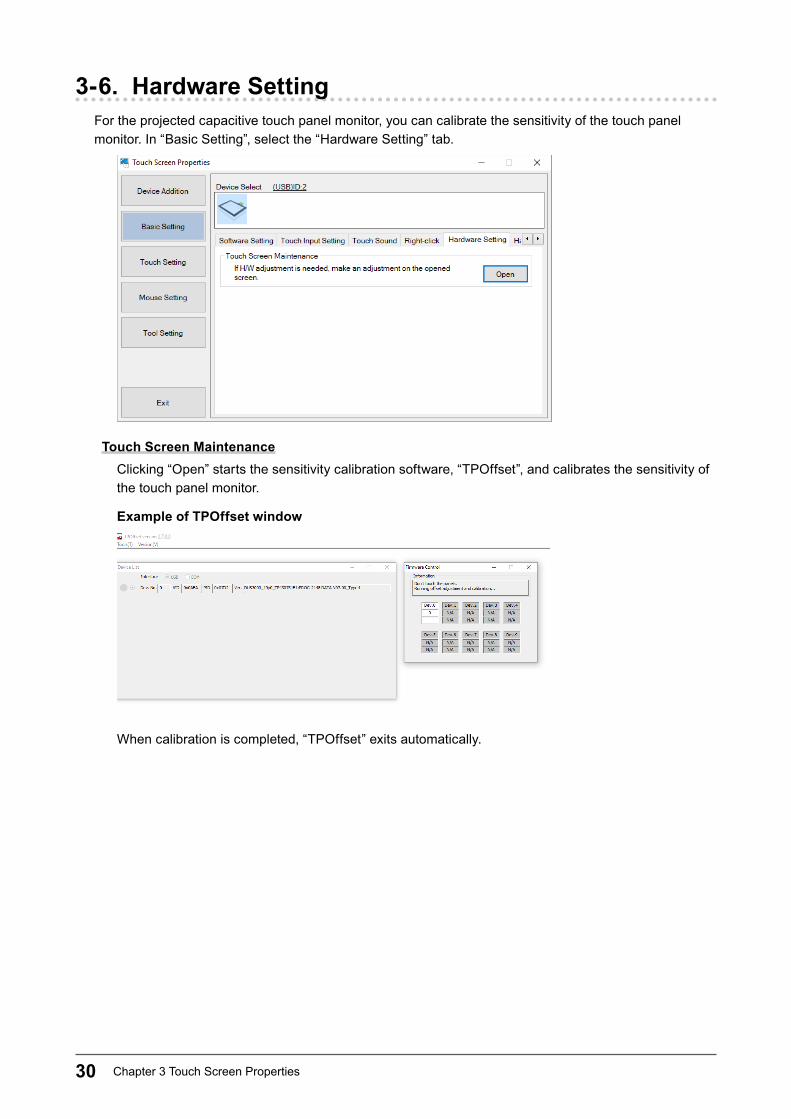
3-6. Hardware SettingFor the projected capacitive touch panel monitor, you can calibrate the sensitivity of the touch panel monitor. In “Basic Setting”, select the “Hardware Setting” tab.
Touch Screen MaintenanceClicking “Open” starts the sensitivity calibration software, “TPOffset”, and calibrates the sensitivity of the touch panel monitor.
Example of TPOffset window
When calibration is completed, “TPOffset” exits automatically.
31Chapter 3 Touch Screen Properties
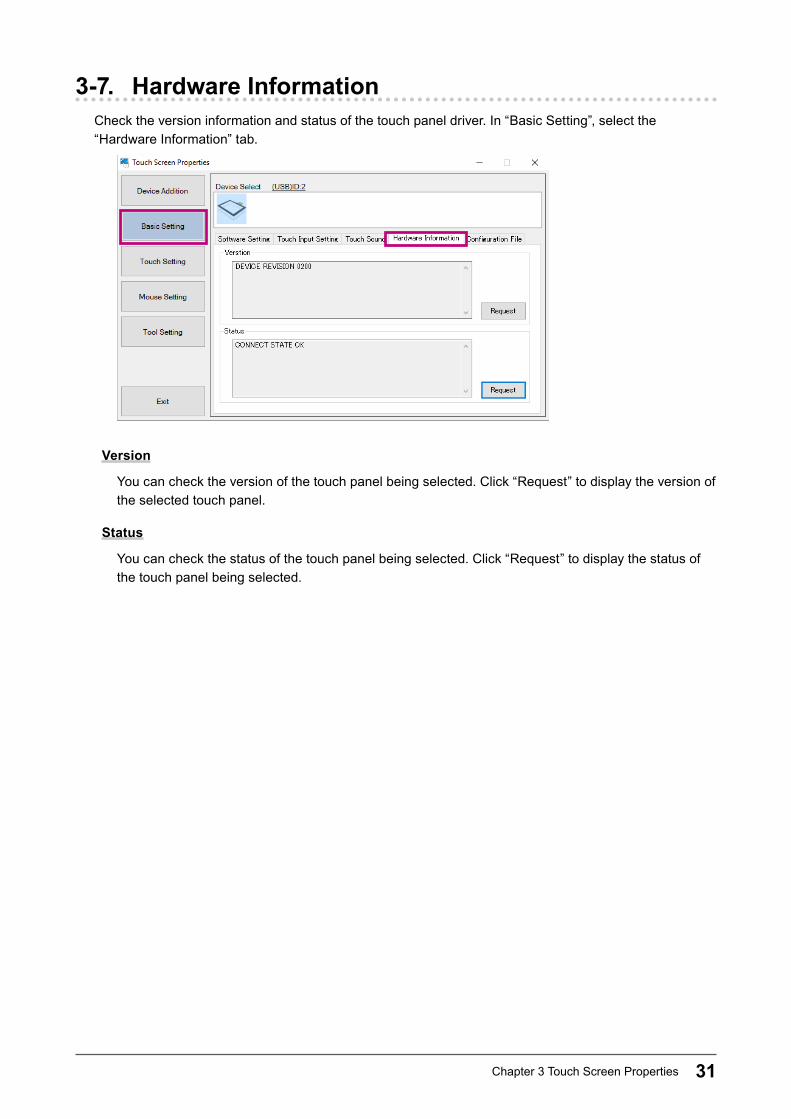
3-7. Hardware InformationCheck the version information and status of the touch panel driver. In “Basic Setting”, select the “Hardware Information” tab.
Version
You can check the version of the touch panel being selected. Click “Request” to display the version of the selected touch panel.
Status
You can check the status of the touch panel being selected. Click “Request” to display the status of the touch panel being selected.
32 Chapter 3 Touch Screen Properties
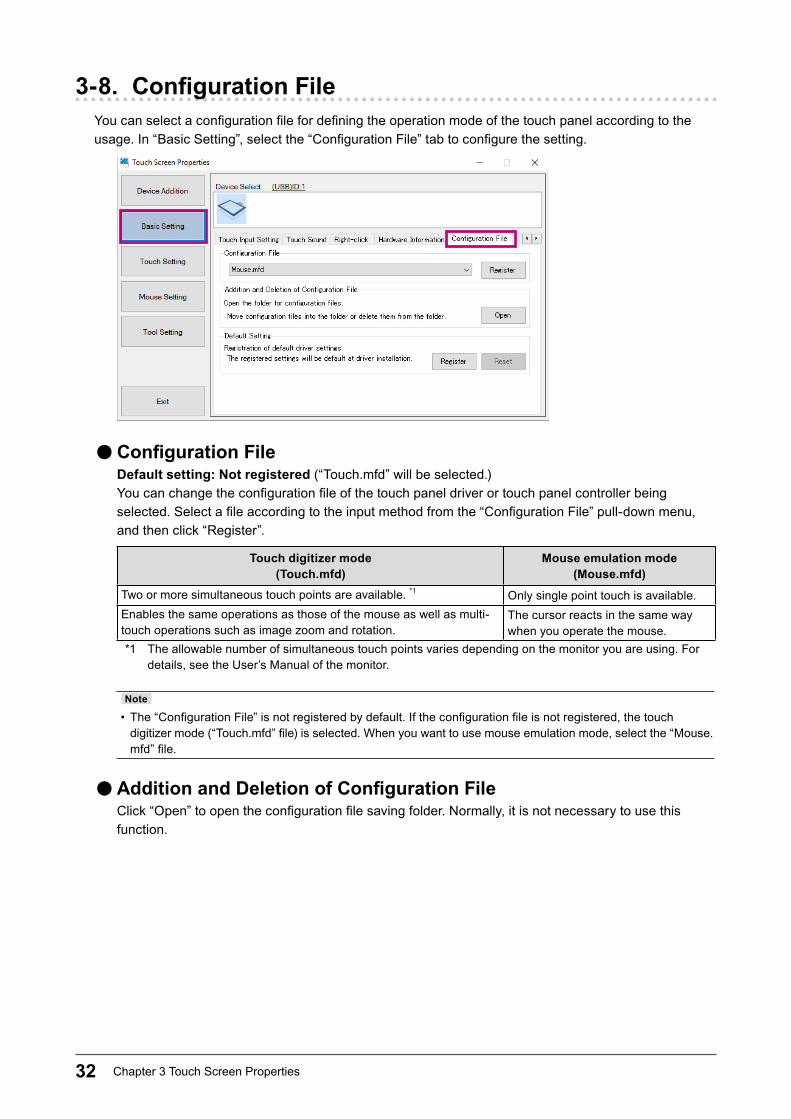
3-8. ConfigurationFileYou can select a configuration file for defining the operation mode of the touch panel according to the usage. In “Basic Setting”, select the “Configuration File” tab to configure the setting.
●ConfigurationFileDefault setting: Not registered (“Touch.mfd” will be selected.)You can change the configuration file of the touch panel driver or touch panel controller being selected. Select a file according to the input method from the “Configuration File” pull-down menu, and then click “Register”.
Touch digitizer mode (Touch.mfd)
Mouse emulation mode (Mouse.mfd)
Two or more simultaneous touch points are available. *1 Only single point touch is available.Enables the same operations as those of the mouse as well as multi-touch operations such as image zoom and rotation.
The cursor reacts in the same way when you operate the mouse.
*1 The allowable number of simultaneous touch points varies depending on the monitor you are using. For details, see the User’s Manual of the monitor.
Note
• The “Configuration File” is not registered by default. If the configuration file is not registered, the touch digitizer mode (“Touch.mfd” file) is selected. When you want to use mouse emulation mode, select the “Mouse.mfd” file.
●AdditionandDeletionofConfigurationFileClick “Open” to open the configuration file saving folder. Normally, it is not necessary to use this function.
33Chapter 3 Touch Screen Properties
●Default SettingThe settings of the selected touch panel can be registered as default settings to be used when a touch panel is newly connected on and after the next time. Configure the settings in “Software Setting” (page 21), “Touch Input Setting” (page 25), “Touch Sound” (page 27), “Right-click” (page 29) and “Configuration File”, and then click “Register”. The registered settings will be used as default settings when a touch panel driver is newly installed on and after the next time. If you wish to delete the registered settings, click “Reset”.
Attention
• Due to individual differences between touch panels, the settings configured as a result of “4Point” or “9Point” may differ between multiple touch panels. Perform calibration on each touch panel.
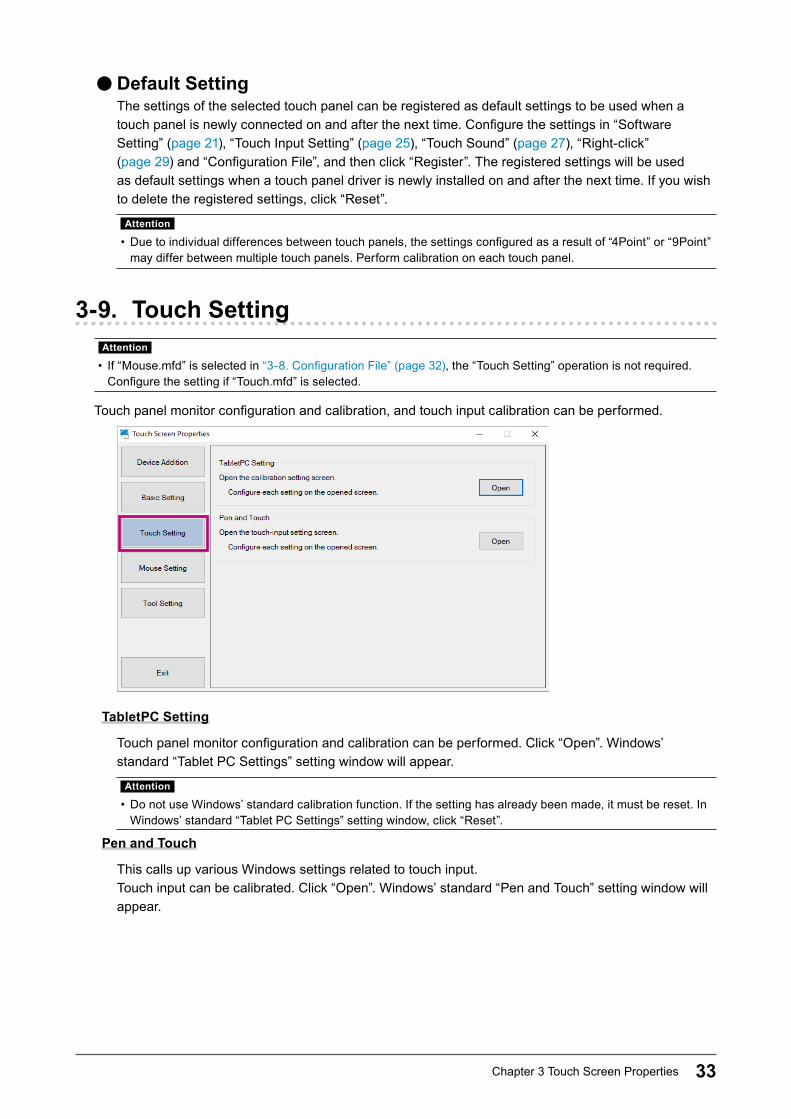
3-9. Touch SettingAttention
• If “Mouse.mfd” is selected in “3-8. Configuration File” (page 32), the “Touch Setting” operation is not required. Configure the setting if “Touch.mfd” is selected.
Touch panel monitor configuration and calibration, and touch input calibration can be performed.
TabletPC Setting
Touch panel monitor configuration and calibration can be performed. Click “Open”. Windows’ standard “Tablet PC Settings” setting window will appear.
Attention
• Do not use Windows’ standard calibration function. If the setting has already been made, it must be reset. In Windows’ standard “Tablet PC Settings” setting window, click “Reset”.
Pen and Touch
This calls up various Windows settings related to touch input.Touch input can be calibrated. Click “Open”. Windows’ standard “Pen and Touch” setting window will appear.
34 Chapter 3 Touch Screen Properties
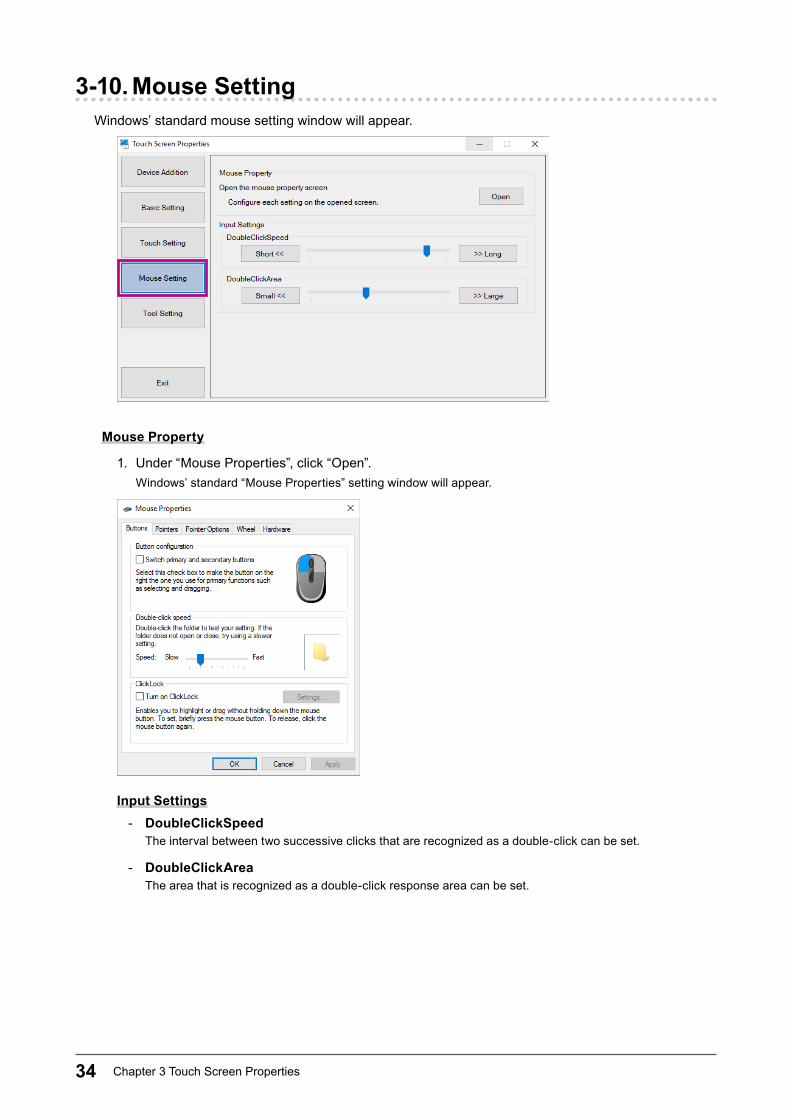
3-10. Mouse SettingWindows’ standard mouse setting window will appear.
Mouse Property
1. Under “Mouse Properties”, click “Open”.Windows’ standard “Mouse Properties” setting window will appear.
Input Settings - DoubleClickSpeed
The interval between two successive clicks that are recognized as a double-click can be set.
- DoubleClickAreaThe area that is recognized as a double-click response area can be set.
35Chapter 3 Touch Screen Properties
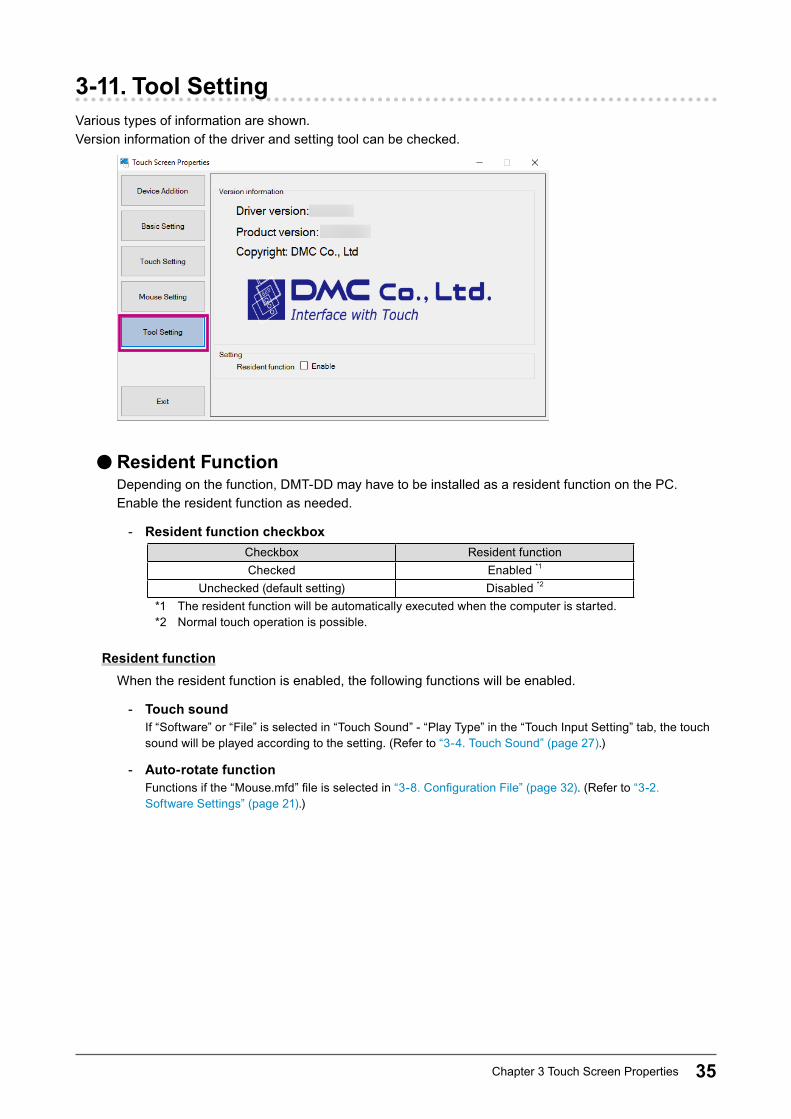
3-11. Tool SettingVarious types of information are shown.Version information of the driver and setting tool can be checked.
●Resident FunctionDepending on the function, DMT-DD may have to be installed as a resident function on the PC.Enable the resident function as needed.
- Resident function checkboxCheckbox Resident functionChecked Enabled *1
Unchecked (default setting) Disabled *2
*1 The resident function will be automatically executed when the computer is started.*2 Normal touch operation is possible.
Resident functionWhen the resident function is enabled, the following functions will be enabled.
- Touch sound If “Software” or “File” is selected in “Touch Sound” - “Play Type” in the “Touch Input Setting” tab, the touch sound will be played according to the setting. (Refer to “3-4. Touch Sound” (page 27).)
- Auto-rotate function Functions if the “Mouse.mfd” file is selected in “3-8. Configuration File” (page 32). (Refer to “3-2. Software Settings” (page 21).)
36 Chapter 4 Troubleshooting
Chapter 4 TroubleshootingSymptom Cause and countermeasure
1. The touch panel driver cannot be installed.
• Connect the touch panel to another COM port or USB port, and try to install the driver.
• Connect the monitor and the computer using the cable specified in the Setup Manual or User’s Manual of the monitor. Use of a conversion adapter may prevent the touch panel monitor from operating properly.
• When the touch panel is connected to a COM port, if “Disabled COM port search” in “Device Addition” is checked, the touch panel driver cannot be installed. Configure the settings in accordance with the following procedure. (Refer to “3-1. Touch Panel Device List” (page 20).)
1. Uncheck “Disabled COM port search”.2. Click “List Update”.3. Select the port from which you wish to install the driver, and click “Install”.
2. The mouse cursor does not appear.
• In “Basic Setting” - “Configuration File”, select “Mouse.mfd”, and click “Register”. (Refer to “3-8. Configuration File” (page 32).)
• Uninstall the touch panel driver, and then install it again. (Refer to “5-1. Uninstalling the Touch Panel Driver” (page 38) and “2-3. Installing the Touch Panel Driver” (page 8).)
3. The cursor position is displaced / the cursor jumps.
• In “Basic Setting” - “Calibration”, try to calibrate the position using “4Point” or “9Point”. (Refer to “2-6. Calibrating the Touch Panel Monitor” (page 17).)
• Turn the monitor off and on again.4. The touch operation
does not work. • Check that the communication cable (USB or RS-232C) is correctly connected. • Check that the touch panel driver is installed. (Refer to “2-3. Installing the Touch
Panel Driver” (page 8).) • The setting may have been changed by another user. Configure the settings again. • Display the “Touch Input Setting” tab from “Basic Setting”, uncheck “Disable”. (Refer
to “Touch Enabled” (page 26).) • Try to check whether touch operation is disabled for any touch panel monitor
function, referring to the touch panel monitor’s user’s manual. • Restart the setting tool of the touch panel driver, or reboot the computer.
5. Right-clicking does not work.
• Select “Basic Setting” - “Right-click”, and check the setting of “Method of right-click”. (Refer to “3-5. Right-click” (page 29).)
• If the “Right-click” tab is not displayed, select “Touch Setting” - “Pen and Touch”, click “Open” to display Windows’ standard “Pen and Touch” window, and configure the right-click settings. (Refer to “3-9. Touch Setting” (page 33).)
6. The touch sound is not emitted.
• In “Basic Setting”, configure the “Touch Sound” settings. (Refer to “3-4. Touch Sound” (page 27).)
• If “During touch down” is selected in “Basic Setting” - “Touch Sound” - “Sound Timing”, select “Normal Mode” in “Basic Setting” - “Touch Input”. (Refer to “Touch Input” (page 25).)
• If “Software” or “File” is selected in “Basic Setting” - “Touch Sound” - “Play Type”, check the following points.
- Connect the speaker. - Turn up the speaker volume. - In “Tool Setting” - “Resident function”, check “Enable”. (Refer to “Resident Function” (page 35).)
- If “File” is selected, check that the correct wav file is selected. • Depending on the hardware configuration of the computer, the touch sound may not
be output.7. The touch position is
displaced when the screen is rotated.
• In “Basic Setting” - “Software Setting”, check “Auto Rotation”, or configure “Rotation [degree]” according to the screen rotation. (Refer to “Software Settings” (page 22).)
• In “Tool Setting” - “Resident function”, check “Enable”. (Refer to “Resident Function” (page 35).)
37Chapter 4 Troubleshooting
Symptom Cause and countermeasure8. Dragging is
interrupted in the middle of the operation.
• The system may have recognized that your finger had been removed momentarily from the panel surface. Change the setting for “Lift-off Delay” (page 26) to anything other than “Disable”.
9. (Multiple monitor configuration)Whentouching the screen, the cursor appears on a different monitor.
• Refer to “2-4. Configuring a Touch Panel” (page 12) to associate the monitor with the touch panel.
• If you select “Touch.mfd” in “2-5. Registering a Configuration File” (page 14), you must associate the monitor with the touch panel in “Tablet PC Settings”. (Refer to “3-9. Touch Setting” (page 33).)
10. DMT-DD cannot be uninstalled.
• Under “Tool Setting”, uncheck “Enable” for “Resident Function”. (Refer to “Resident Function” (page 35).).
38 Chapter 5 Reference Information
Chapter 5 Reference Information
5-1. Uninstalling the Touch Panel Driver
●USB ConnectionThe touch panel driver for USB connection does not have to be uninstalled.
Note
• When you uninstall DMT-DD, the touch panel driver will be automatically uninstalled.
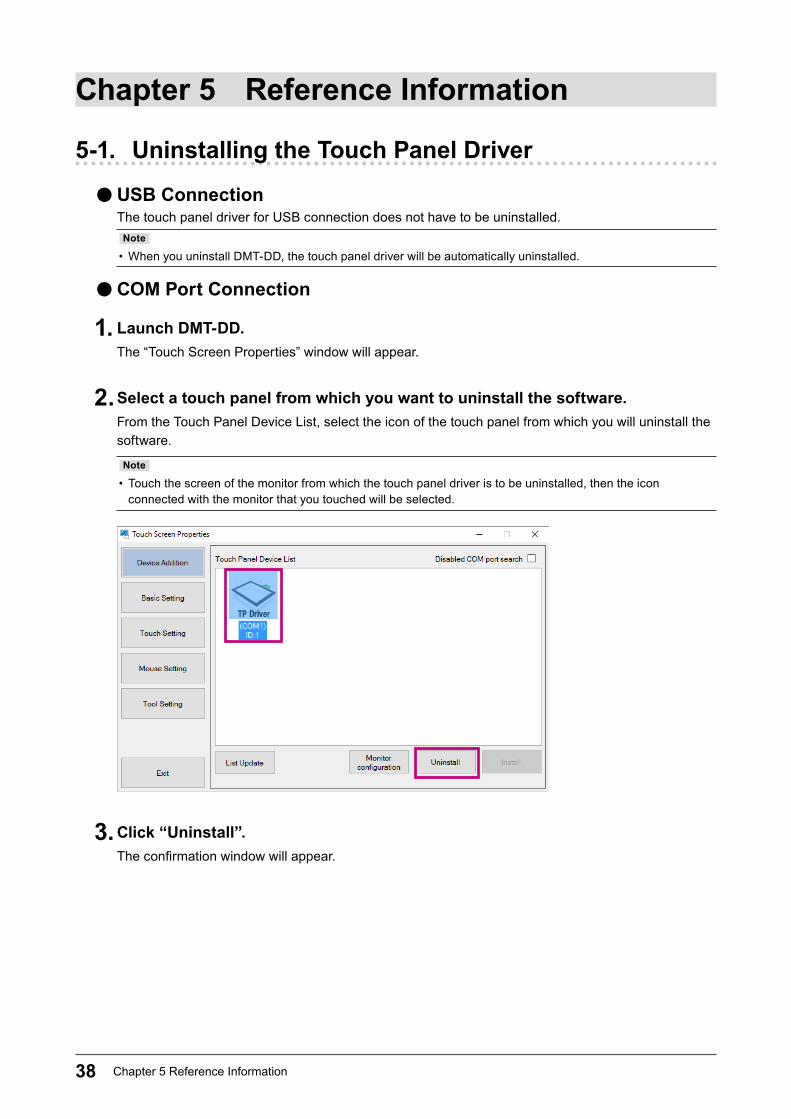
●COM Port Connection
1. Launch DMT-DD.The “Touch Screen Properties” window will appear.
2. Select a touch panel from which you want to uninstall the software.From the Touch Panel Device List, select the icon of the touch panel from which you will uninstall the software.
Note
• Touch the screen of the monitor from which the touch panel driver is to be uninstalled, then the icon connected with the monitor that you touched will be selected.
3. Click “Uninstall”.The confirmation window will appear.
39Chapter 5 Reference Information
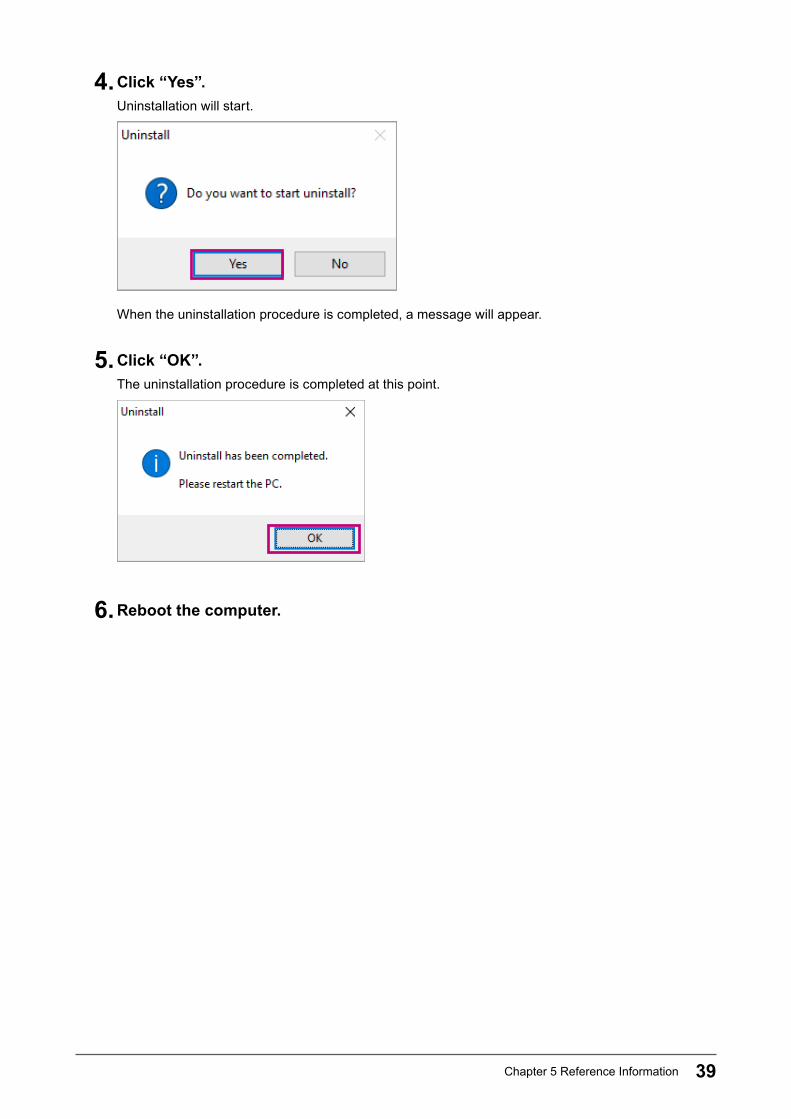
4. Click “Yes”.Uninstallation will start.
When the uninstallation procedure is completed, a message will appear.
5. Click “OK”.The uninstallation procedure is completed at this point.
6. Reboot the computer.
40 Chapter 5 Reference Information
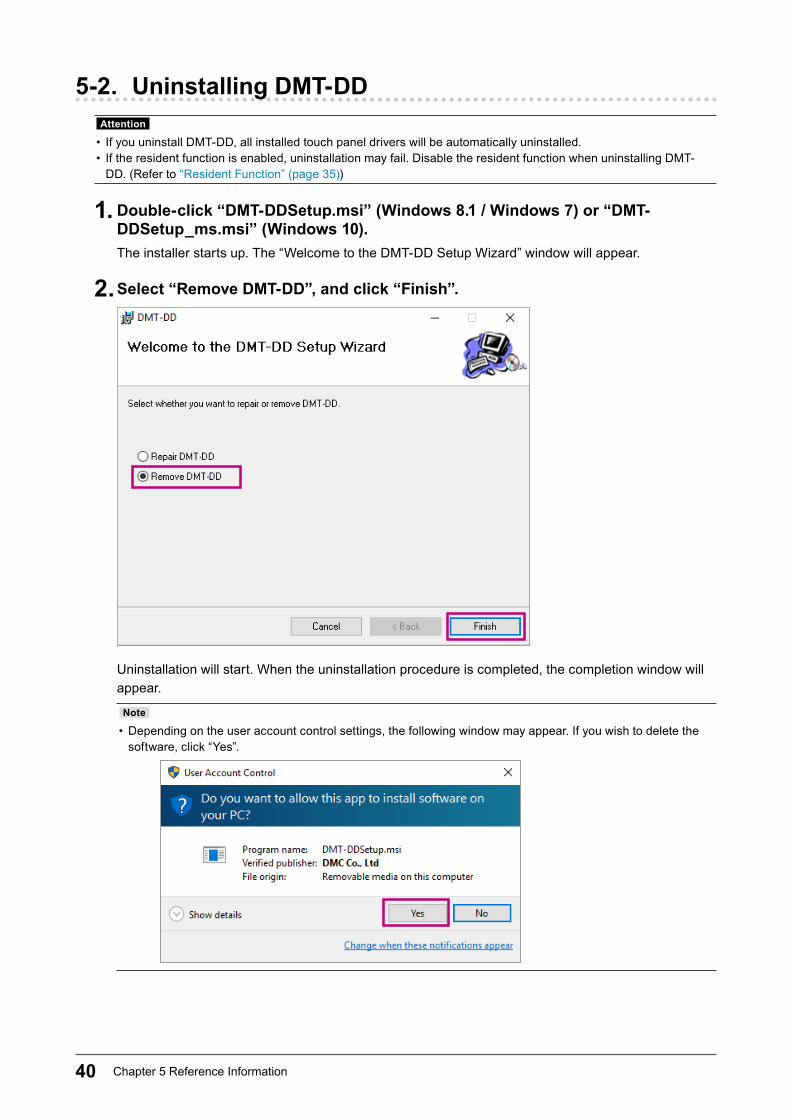
5-2. Uninstalling DMT-DDAttention
• If you uninstall DMT-DD, all installed touch panel drivers will be automatically uninstalled. • If the resident function is enabled, uninstallation may fail. Disable the resident function when uninstalling DMT-DD. (Refer to “Resident Function” (page 35))
1. Double-click“DMT-DDSetup.msi”(Windows8.1/Windows7)or“DMT-DDSetup_ms.msi”(Windows10).The installer starts up. The “Welcome to the DMT-DD Setup Wizard” window will appear.
2. Select “Remove DMT-DD”, and click “Finish”.
Uninstallation will start. When the uninstallation procedure is completed, the completion window will appear.
Note
• Depending on the user account control settings, the following window may appear. If you wish to delete the software, click “Yes”.
41Chapter 5 Reference Information
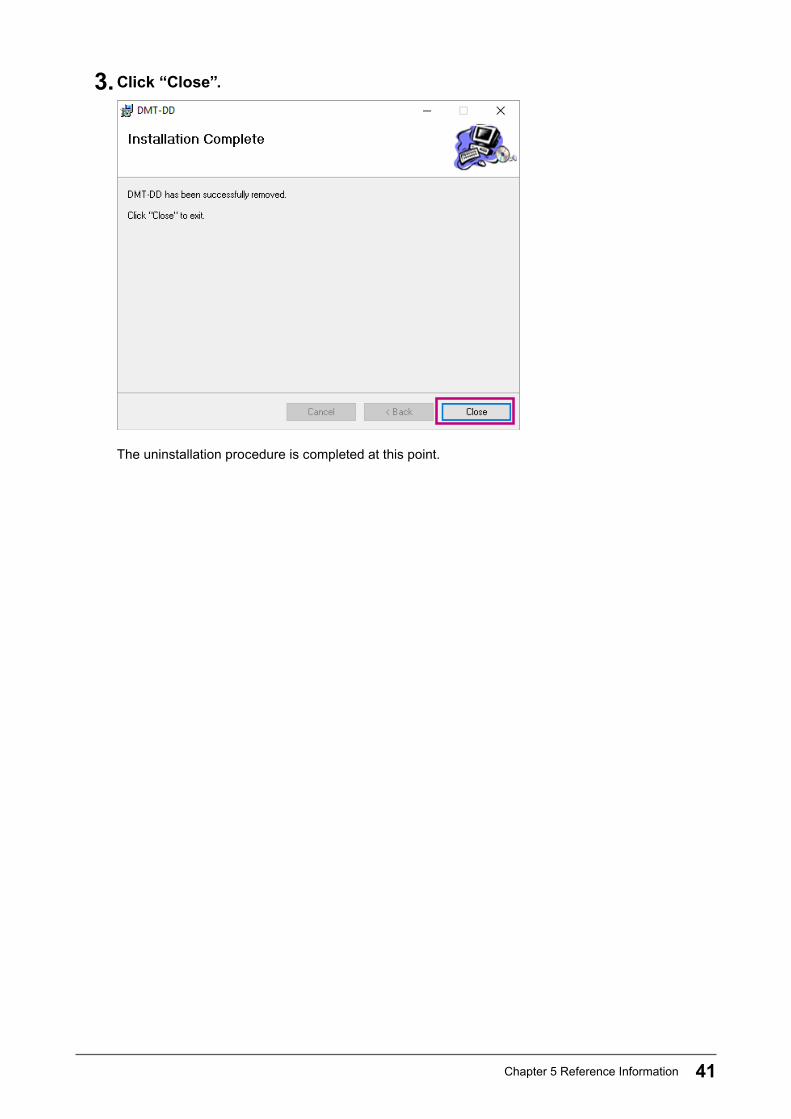
3. Click “Close”.
The uninstallation procedure is completed at this point.

Copyright © 2016-2018 EIZO Corporation. All rights reserved.
http://www.eizoglobal.com03V25879D1
UM-DMT-DD-C
4th Edition-February, 2018