Embed Size (px)
Citation preview

POWER TEACHER GRADEBOOK
Basic Training Manual
Revised August 23 2012

https://powerschool.shenandoah.k12.va.us/teachers
Everyone has the following initial set up:
Username: (first initial)(middle initial)(lastname)
Password: password set by each school’s assistant principal
This means that your gradebook can be accessed anywhere there is Internet access!!
Log in to your gradebook using the following:
Power School pulls the grades directly from PowerTeacher in “real time”.
Make sure your gradebook is accurate and up-to-date. Parents can access grades from PowerTeacher via the Parent Portal.

Note the Menu on the left of the screen. Daily Bulletin (not currently used) Staff Directory Meals (used by some schools; consult your assistant principal) Personalize Gradebook Reports Recommendations (not currently used)
Home Screen of PowerTeacher
Attendance from Seating Chart
Lunch count Student infoSeating ChartAttendance

Setting up Seating Charts – Seating Chart Design tab
Create and save different layouts.
Add a teacher desk, door, white board or
text to seating chart.
Add tables or student desks. Zoom in or out to
enlarge area.
Be sure to save!
If a student has a photo in PowerSchool,
then it will show up here.
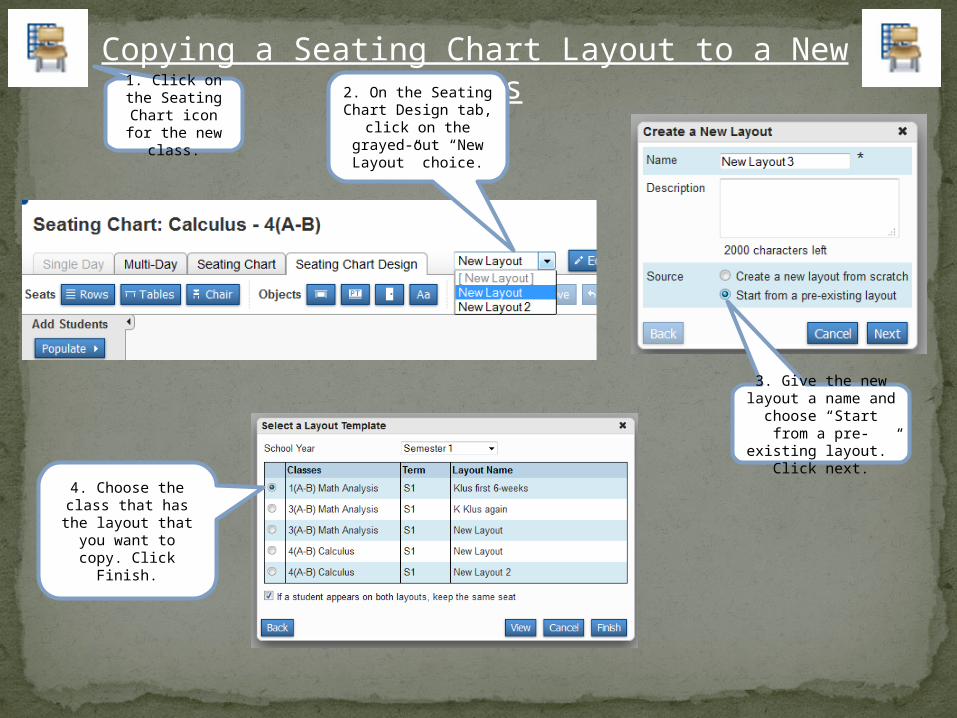
Copying a Seating Chart Layout to a New Class
4. Choose the class that has the layout that you want to
copy. Click Finish.
3. Give the new layout a name and choose “Start from
a pre-existing layout.” Click next.
1. Click on the Seating Chart icon for the new class.
2. On the Seating Chart Design tab,
click on the grayed-out “New Layout”
choice.

Student A
Student CStudent DStudent E
Student B
To Take Single Day Attendance:
Choose attendance code from the
dropdown above, then click in the box. Or simply
choose UA in the box for the
student. Then submit.
Click on the callout to enter a comment.
Medical, Guardian, Discipline and Other Alerts will display here. Alerts contain
CONFIDENTIAL INFORMATION. Never open an alert in front of students. Never leave this attendance screen open and
unattended.
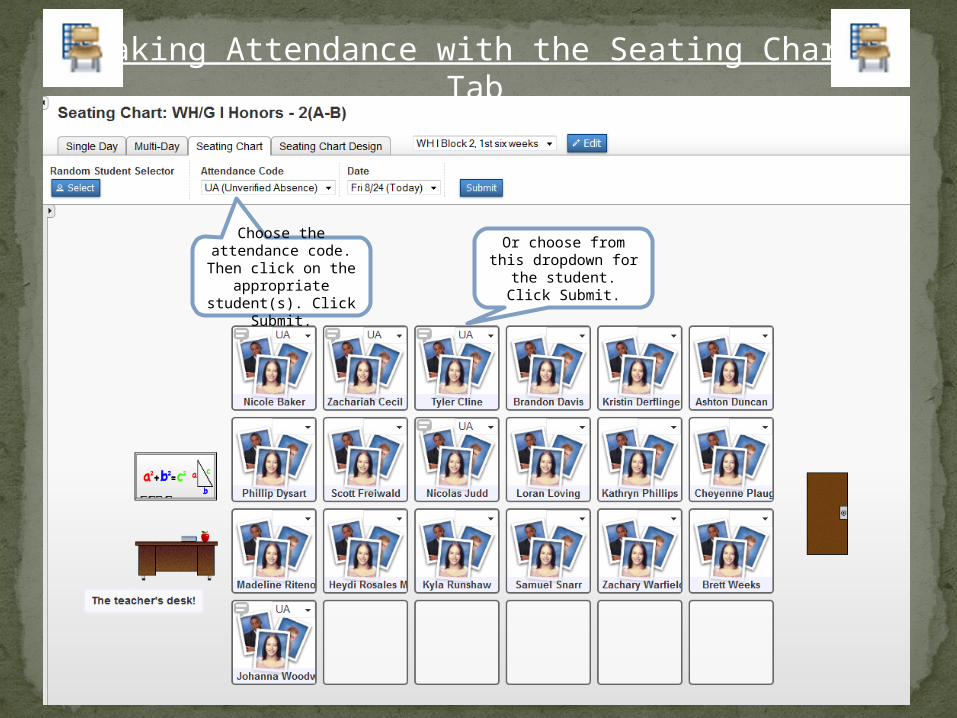
Taking Attendance with the Seating Chart Tab
Choose the attendance code. Then click on the
appropriate student(s). Click
Submit.
Or choose from this dropdown for the
student. Click Submit.

Taking Attendance on Multi-Day Screen
Choose attendance code from the
dropdown above, then click in the
box. Or simply type UA in the box. Then
submit.
Click Edit to change the range
of dates. The teacher is able to
see a week, a month, a six-weeks,
etc.
Above, Comments can be hidden or
displayed. Click on the callout to enter
a comment.
Students N
ames are H
ere!

Staff Directory
The staff directory contact information on staff in the building. Email addresses are linked for convenience.

Personalize
From this screen you can: (a) Change your password, (b) Select which student screen you want to see first when you click on the “book bag” icon [Meeting Attendance and Term Grades are most common], (c) Choose whether to show Section number on home page.
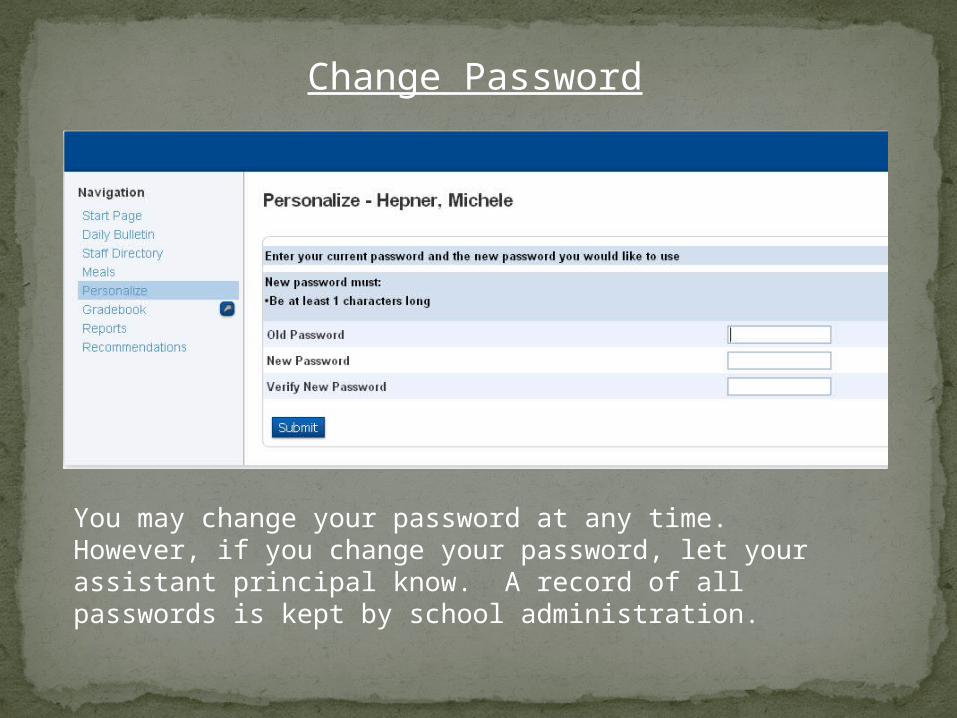
You may change your password at any time. However, if you change your password, let your assistant principal know. A record of all passwords is kept by school administration.
Change Password

Gradebook
Click here to “quick-launch” the gradebook.

Gradebook
The Gradebook link shows a list of new features of PowerTeacher 2.5, new for 2012-2013.

Opening Screen of Gradebook
• The gradebook will open in another window. The gradebook and PowerTeacher may be open simultaneously.
• If the gradebook expires, there will be a prompt to re-enter the password. Do not leave PowerTeacher nor your open gradebook unattended at any time!
Click here to switch to
PowerTeacher to take or
adjust attendance
quickly.
Notifications of student
birthdays, added or dropped
students, and administrative
logins. (Administrators have a “view-only” option of
reviewing teacher
gradebooks without using the teacher’s password.)
Use this dropdown to
determine that your year is
2012-13.

Determining Method of Grade Calculation
For each class you need to determine how you want to calculate grades for each marking period. This is done on the “Grade Setup” tab (1). Next, (2) Choose either “Total Points” or “Category Weights”.
If you choose “Category Weights” follow the instructions below.
2
1
• Click on CATEGORY WEIGHTS
• Click on ADD CATEGORY to put in all the categories and their weights.
• SAVE.
You must complete this process for EACH class and EACH marking period. However, there is a copy function.
3
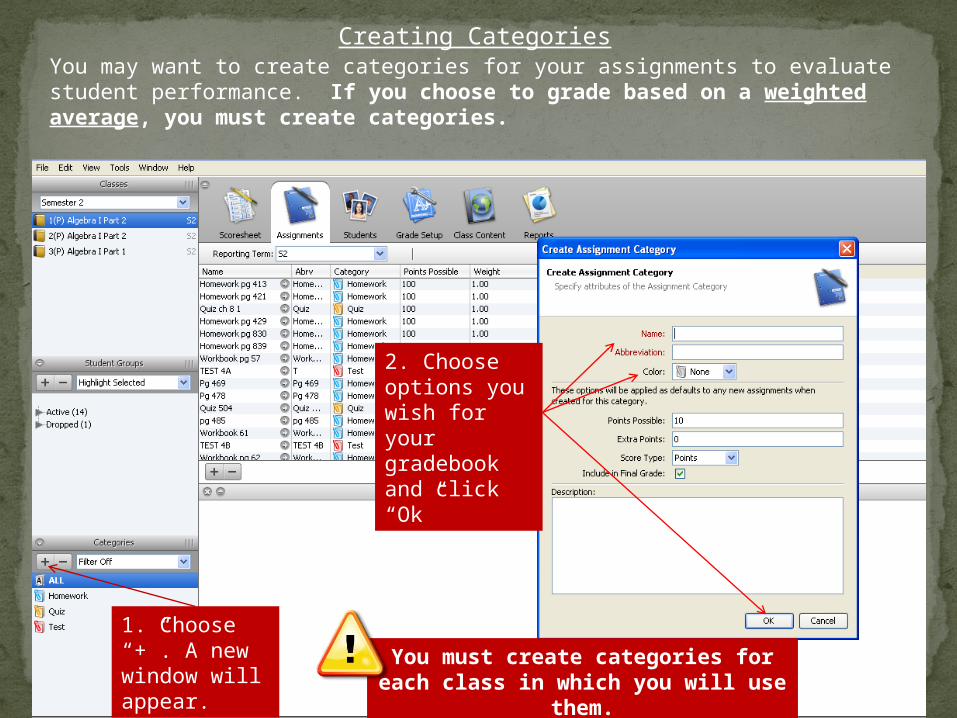
You may want to create categories for your assignments to evaluate student performance. If you choose to grade based on a weighted average, you must create categories.
Creating Categories
1. Choose “+”. A new window will appear.
2. Choose options you wish for your gradebook and click “Ok”
You must create categories for each class in which you will use them.

After setting up M1, click on the Copy link and check M2
and M3.
Copying Grade Setup for Each Marking Period

Confirm that you want to copy the grade setup of M1 to M2 and M3 of that same class.

Grade Calculation for S1This step is very important. If this is not done correctly, student’s final grades will not calculate properly. Earned credits and GPAs my be calculated incorrectly if this step is not done properly!
Grade calculations for S1 MUST be:• Term Weights• 33.3% for EACH
marking period

After M1, M2, M3 and S1 are set up for one of your blocks, right-click on S1 and choose Copy Grade Setup – Entire Class.
Copying the Grade Setup to all other Blocks

Check all the blocks that you want to have the same grade setup as the first one that you set up.
When you check an S2 class, you will get this mismatch error because the terms do not match. Confirm that you are aware of what you are attempting to do.

Carefully review this summary screen before clicking on Finish.

Creating a New Assignment
1. Click on the Scoresheet tab and then click on the + sign.
2. Complete the information regarding the assignment at the bottom. Be accurate. Remember, parents will be able to access student’s grade information.
1
Name of assignment
Choose category (if applicable)
Due date needs to be accurate. (Not the day you entered it)
If you want to link assignment to another file or webpage, you can do so with this button

Copying Assignments
You can copy assignments from one class to another, from current or previous grading periods, or from one semester to another.
1. Click TOOLS at the top of the screen.
2. Choose the assignment to copy. Click NEXT.
3. Select where you want to copy the assignment. Don’t forget to update the DUE DATE at the bottom.

Publishing AssignmentsParents and students will have access to grade information through the Parent Portal. Gradebooks should be updated weekly.
1. Click the “Publish” tab when entering an assignment.
2. Choose when you want to publish the assignment. The default is “Immediately.”
3. Make sure “Publish Scores” box is checked and Save.
1
2
3
4

Recording Scores in the Gradebook1. There are two ways to enter a score for an assignment in the gradebook.
A. After you have created the assignment, simply click in the box adjacent to the student name and type in the score. You can click enter or use the arrow keys to maneuver.
B. To mass fill scores you can Right Click in the column and use the FILL SCORES option as well.
2. Don’t forget to SAVE often.
A
B

Sample Gradebook with Grades Entered
Assignments are color-coded to colors chosen for categories (if applicable).

Score InspectorScore inspector allows you to manage assignments, add comments, or add denotations to the
grade such as “Late”, “Missing Assignment”, etc.
1. Click on TOOLS and drop down to “Score Inspector” OR Right click on assignment and select “Show Score Inspector.”

Score Inspector – Icons and their Meanings
Some icons can be added simply by right clicking on the assignment and choosing (Ex. “Late”; “Missing Assignment”)

Sample Scoresheet with Icons

PowerTeacher Optional Features

On the Student Info tab, you may enter preferred names and create other custom columns for non-graded items, such as textbook numbers. You may also change the order of the list of students using the “drag and drop” method in the My Order column.

Tools > Preferences > Student Tab: allows you to decide when you want to use preferred names and how you want to sort names. Check out other tabs to make your gradebook yours! (Preferred names are for your gradebook only; they do not span across all gradebooks for the student’s classes or the administrative side of PowerSchool.

Student Groups1. You can create groups of students that will allow you to work with sets of students. (Example:
cooperative groups, group projects, reading groups, etc.)
2. Click the STUDENTS tab, click the +sign in the Student Groups sections and choose ADD GROUP SET. Give the group a name and click NEXT.
3. Click on the names of the students you want in that group. Use CONTROL key to select multiple students. Drag students to the group name and all names will drop in.
4. Create assignment. Use drop down box in Student Groups to select FILTER SELECTED. Click on SCORESHEET and just those students will appear to enter grades.

Student Reports
There are a variety of student reports that can be accessed using PowerTeacher. Most of the reports you will use will be accessed from the gradebook and the “Reports” Tab (A). Report Cards can be generated from the PowerTeacher home screen (B).
A
B

Attendance Grid

Category Total Points

Final Grade Verification
You will use this report at the end of the six weeks to verify grades. Follow your assistant principal’s instructions regarding this report at the end of a marking period.

Individual Student Report1. To choose the student for whom you want the report, click ACTIVE under Student Groups for a list of
students.
2. To choose all students, select ENROLLED STUDENTS.
3. This will be your interim report (A).
A
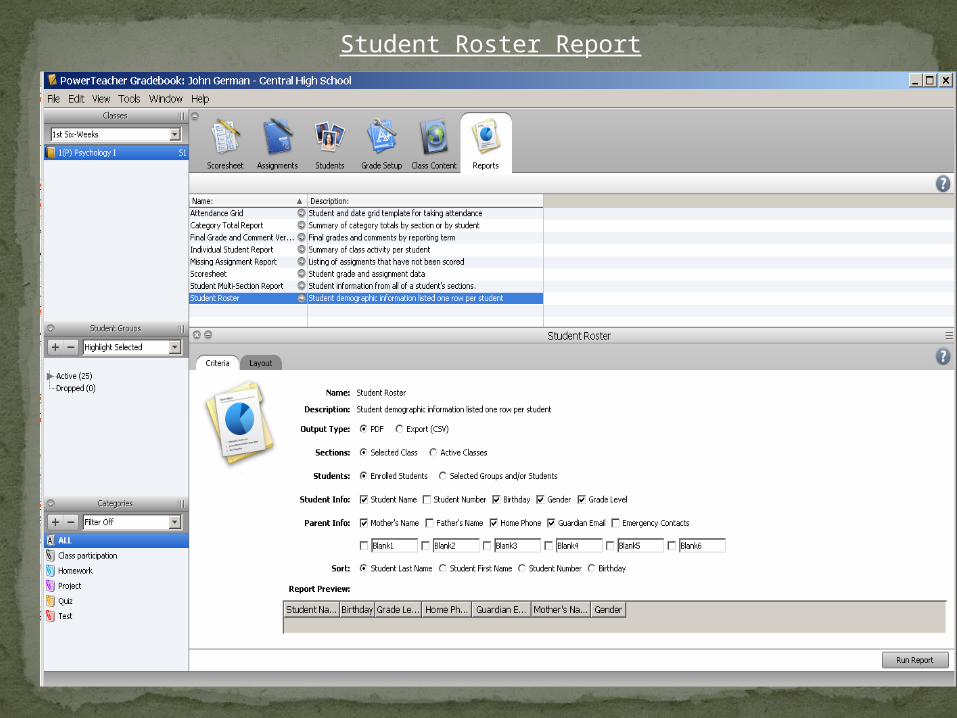
Student Roster Report

You can name these columns whatever you want!

Double-click on a student’s name and click on the Teacher Personal Note tab to enter a comment for the student (only viewable on this screen) and not available on any reports, but viewable when an administrator logs in. Information in a teacher gradebook is to be professional and appropriate.

Good Quick-Reference Guide!

Have a great 2012-2013 School Year!
Be a POWER TEACHER!
Questions?Ask your Assistant Principal!